As we’ve all been guilty, when you see demonstrations of technologies most of the time the data samples show single table solutions. When was the last time you’ve developed a single-table system? :-) Thought so.
In RIA Services demonstrations, most of them have been single-table samples as well. So how do you go about retrieving relational data (master/details type) with RIA Services? Here’s an option. I’m using VS2010, Silverlight 4 and the WCF RIA Services preview using the below sample. I’m also using the Chinook sample database which has become one of my favorite simpler relational data samples to use.
Creating your project and associated RIA Services
This is easy, create a new Silverlight project and make sure the ‘Enable .NET RIA Services’ link is checked (yes, we know it doesn’t say WCF in that dialog). My Silverlight application will be a simple button to retrieve artists then show their associated albums. Here’s my XAML to start:
1: <Grid x:Name="LayoutRoot" Background="White">
2: <StackPanel Width="400">
3: <Button Content="Get Artist Information" x:Name="GetArtistButton" Click="GetArtistButton_Click" />
4: <StackPanel Orientation="Horizontal">
5: <StackPanel x:Name="ArtistsContext">
6: <StackPanel Orientation="Horizontal">
7: <TextBlock Text="Artists: " />
8: <TextBlock Text="{Binding ElementName=ListOfArtists, Path=Items.Count}" />
9: </StackPanel>
10: <ListBox x:Name="ListOfArtists" Width="200" Height="300" DisplayMemberPath="Name" ItemsSource="{Binding}"/>
11: </StackPanel>
12: <StackPanel x:Name="AlbumsContext">
13: <StackPanel Orientation="Horizontal">
14: <TextBlock Text="Albums: " />
15: <TextBlock Text="{Binding ElementName=ListOfAlbums, Path=Items.Count}" />
16: </StackPanel>
17: <ListBox x:Name="ListOfAlbums" DisplayMemberPath="Title" ItemsSource="{Binding}" Width="200" Height="300"/>
18: </StackPanel>
19: </StackPanel>
20: </StackPanel>
21: </Grid>
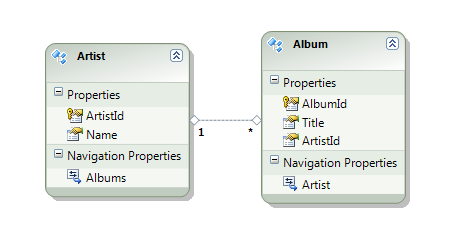
Now on the server side I need to create the associated models and domain services to be consumed. I’m creating my model using Entity Framework and it looks like this:

Now I need to create my Domain Service class for that model (remember to build the solution after you create your model so it will show up in the tools). When we create the Domain Service class be sure to enable the checkbox to generate associated classes for metadata. Once we finish we have some stub services created for us.
Using the Domain Service functions
We have GetArtists and GetAlbums functions we can work with. As an example we can wire up the button click to retrieve a list of artists using the default functions we got:
1: ChinookContext ctx = new ChinookContext();
2:
3: private void GetArtistButton_Click(object sender, RoutedEventArgs e)
4: {
5: ArtistsContext.DataContext = ctx.Artists;
6: ctx.Load(ctx.GetArtistsQuery());
7: }
But what about when a user clicks on an Artist, we want to show the albums for that artist and not the others. We need to modify our Domain Service to add a function:
1: public IQueryable<Album> GetAlbumsForArtist(int ArtistId)
2: {
3: return this.ObjectContext.Albums.Where(a => a.ArtistId == ArtistId);
4: }
Now we can use that function when a user clicks on an associated artist to populate the album information:
1: private void ListOfArtists_SelectionChanged(object sender, SelectionChangedEventArgs e)
2: {
3: ListBox theList = sender as ListBox;
4: Artist a = theList.SelectedItem as Artist;
5: ctx.Albums.Clear();
6: AlbumsContext.DataContext = ctx.Albums;
7: ctx.Load(ctx.GetAlbumsForArtistQuery(a.ArtistId));
8: }
Cool.
However, the second event handling for our master-details section for this particular data set seems unnecessary. After all, why not just include the children data with our initial request if we *know* that we’re doing an explicit master-details view (and our set is not that large relatively speaking).
Modify the metadata classes
Remember the generated metadata classes? Go back to it now. You’ll see a definition of the ArtistMetadata that includes this:
1: public EntityCollection<Album> Albums;
Notice it has an Albums collection property. Great, so we could just modify our XAML binding to use some element binding and get the Albums property of the SelectedItem right? Well, not yet. If we do that, we’ll have no data. Why is that? Because we haven’t told RIA Services to perform the necessary additional query to get the data. Simple add [Include] at the top of the Albums collection:
1: [Include]
2: public EntityCollection<Album> Albums;
And that’s what we need. Now we can add a function to our Domain Service class to get the additional data:
1: public IQueryable<Artist> GetArtistsWithAlbums()
2: {
3: return this.ObjectContext.Artists.Include("Albums");
4: }
Now we just need to do some clean up. We need to change our button click code to get the GetArtistsWithAlbums query now instead of the other one first.
Remove unnecessary code and use binding to help us
Now we can remove the SelectionChanged event handler for our Artists ListBox as well as add some binding commands to our XAML like this:
1: <Grid x:Name="LayoutRoot" Background="White">
2: <StackPanel Width="400">
3: <Button Content="Get Artist Information" x:Name="GetArtistButton" Click="GetArtistButton_Click" />
4: <StackPanel Orientation="Horizontal">
5: <StackPanel x:Name="ArtistsContext">
6: <StackPanel Orientation="Horizontal">
7: <TextBlock Text="Artists: " />
8: <TextBlock Text="{Binding ElementName=ListOfArtists, Path=Items.Count}" />
9: </StackPanel>
10: <ListBox x:Name="ListOfArtists" Width="200" Height="300" DisplayMemberPath="Name" ItemsSource="{Binding}"/>
11: </StackPanel>
12: <StackPanel x:Name="AlbumsContext" DataContext="{Binding ElementName=ListOfArtists, Path=SelectedItem}" >
13: <StackPanel Orientation="Horizontal">
14: <TextBlock Text="Albums: " />
15: <TextBlock Text="{Binding ElementName=ListOfAlbums, Path=Items.Count}" />
16: </StackPanel>
17: <ListBox x:Name="ListOfAlbums" DisplayMemberPath="Title" ItemsSource="{Binding Albums}" Width="200" Height="300"/>
18: </StackPanel>
19: </StackPanel>
20: </StackPanel>
21: </Grid>
Notice how the DataContext of my Albums ListBox is now set using element binding to the SelectedItem of the Artists ListBox. Then the ItemsSource of the ListBox for Albums has a {Binding Albums} command. This is because our Artists query now includes the associated Album data and we can just reference the property.
Use with caution
While this example shows how easy it can be to have included results in your Domain Service query result, be mindful of when you are using. For instance if you have a customer database of 1000 customers and you want all orders to be retrieved…it might not be wise to use this particular type of method.
This presents merely another choice for areas where you may want/need it (i.e., country/state/city) for your application.
You can download the sample solution for the above code snippets here: SilverlightApplication41.zip. Reminder that you will need to have the Chinook database installed already – it is NOT included with this sample download.
Hope this helps!


 本文介绍如何使用RIAServices进行关联数据(如主从表数据)的加载,并通过一个具体的示例展示了如何实现艺术家及其专辑信息的展示。文章详细说明了如何创建模型和服务类,以及如何修改元数据类来实现数据的一次性加载。


 5766
5766

 被折叠的 条评论
为什么被折叠?


