springboot 部署到linux 配置nginx

本文介绍了如何将SpringBoot应用打包成jar,并在Linux环境中使用shell脚本进行启动、停止和状态检查。同时,文章还讲解了在Linux上安装daemonize的必要性,以及如何通过Nginx配置反向代理,将应用服务暴露在8081端口对外提供访问。

首先我们要把spingboot 打包成jar 包

编写shell启动 命令,下载 是编写的一个通用的启动命令

jar_file=loveMM.jar  springboot的jar 
pid_file=loveMM.pid
log_file=loveMM.log   日志文件

pid_dir=/var/run/
pid_path="${pid_dir}$pid_file"

cd $(dirname "$0")

# wait_for_start(pid_file, timeout)
function wait_for_start(){
    pid_file=$1
    t=10
    if test $# -ge 2 && test $2 -gt 0
    then
        t=$2
    fi

    while test $t -ge 0
    do
        if test -s $pid_file
        then
            pid=`cat "$pid_file"`
            if kill -0 $pid 2>/dev/null
            then
                # success
                return 0
            fi
        fi
        (( t-- ))
        sleep 1
    done
    # fail
    return 1
}

function wait_for_stop(){
    pid=$1
    t=10
    if test $# -ge 2 && test $2 -gt 0
    then
        t=$2
    fi

    while test $t -ge 0
    do
        if kill -0 $pid 2>/dev/null
        then
            (( t-- ))
            sleep 1
        else
            # success
            return 0
        fi
    done
    # fail
    return 1
}

function start_jar(){
    java_path=`command -v java`
    if ! test -x "$java_path"; then
        echo "java not installed"
    elif ! command -v daemonize > /dev/null; then
        echo "daemonize not installed"
    elif test -s "$jar_file"; then
        echo "Starting $jar_file"
        daemonize -a -c "$(pwd)" -e "$log_file" -o "$log_file" -p "$pid_path" -l "$pid_path" "$java_path" -jar "$jar_file"
        if ! test $? -eq 0 ;then
            return 1
        fi
        wait_for_start "$pid_path" 10
        if test $? -eq 0 ;then
            echo "start $jar_file success"
            return 0
        fi
    fi
    echo "start $jar_file fail"
}

function stop_jar(){
    if test -s "$pid_path"
    then
        real_pid=`cat "$pid_path"`
        if (kill -0 $real_pid 2>/dev/null)
        then
            echo "Shutting down $jar_file"
            kill -s 15 $real_pid
            wait_for_stop $real_pid 10
            if test $? -ne 0; then
                echo "wait for $real_pid timeout, force kill"
                kill -9 $real_pid
            else
                echo "$jar_file is shutdown"
            fi
        else
            echo "$jar_file $real_pid is not runing"
            rm -f "$pid_path"
        fi
    else
        echo "$jar_file is not runing"
    fi
    ps -ef | grep $jar_file | grep -v grep | awk '{print $2}' | xargs kill -9 2>/dev/null
}

function status_jar(){
    if test -s "$pid_path"
    then
        real_pid=`cat "$pid_path"`
        if (kill -0 $real_pid 2>/dev/null)
        then
            echo "$jar_file is runing"
        else
            echo "$jar_file $real_pid is not runing"
        fi
    else
        echo "$jar_file is not runing"
    fi
}

case $1 in
    start)
        start_jar
        ;;
    stop)
        stop_jar
        ;;
    status)
        status_jar
        ;;
    restart)
        stop_jar
        start_jar
        ;;
    *)
        echo "unknow arg $1"
esac

 如果 遇到 "daemonize not installed" ,在linux 调用 

yum -y install daemonize 安装 

cd 到 jar  的根目录 ,执行启动命令

sh service.sh start   启动 ,stop 停止,

启动后开始配置nginx,我的jar 启动的是8081 端口,
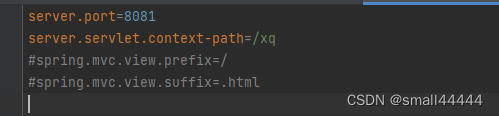
那么在nginx 里添加 路径 

通过代理,我们在浏览器就可以方法啦

http://ip/xeiyi  这样就可以了,记录一下


### Spring Boot 部署Linux 并通过 Nginx 配置 #### 一、系统环境准备 在 openEuler 或其他 Linux 系统中,需先完成基础环境搭建。以下是具体操作: 1. **安装 Nginx** 使用 `yum` 安装 Nginx: ```bash yum install nginx ``` 启动 Nginx 服务并设置开机自启: ```bash systemctl start nginx systemctl enable nginx ``` 2. **验证 Nginx 运行状态** 检查 Nginx 是否成功运行: ```bash systemctl status nginx ``` 如果显示绿色的 active (running),则表示 Nginx 已经正常启动[^1]。 --- #### 二、Spring Boot 应用程序部署Spring Boot 的 JAR 文件上传到服务器,并确保其能够独立运行。 1. **上传 JAR 文件** 将构建好的 Spring Boot 项目打包成 JAR 文件,使用工具(如 SCP 或 FTP)将其传输到目标目录 `/opt/springboot/` 下。 2. **运行 JAR 文件** 执行以下命令以后台方式运行应用: ```bash nohup java -jar your-spring-boot-app.jar > app.log & ``` 此处的日志文件 `app.log` 可用于记录输出日志以便调试[^4]。 3. **测试访问** 测试是否可以通过 IP 和端口访问该应用。例如,假设应用监听的是 8080 端口,则可通过浏览器输入地址 `http://<server-ip>:8080` 来确认服务可用性。 --- #### 三、Nginx 配置反向代理 为了使外部请求能通过域名或固定端口访问 Spring Boot 应用,需要配置 Nginx 实现反向代理功能。 1. **编辑 Nginx 配置文件** 修改默认站点配置文件路径通常位于 `/etc/nginx/conf.d/default.conf` 中,或者创建一个新的配置文件: ```nginx server { listen 80; server_name your-domain.com; location / { proxy_pass http://localhost:8080/; proxy_set_header Host $host; proxy_set_header X-Real-IP $remote_addr; proxy_set_header X-Forwarded-For $proxy_add_x_forwarded_for; proxy_set_header X-Forwarded-Proto $scheme; } } ``` 上述配置实现了对本地 Spring Boot 应用的转发支持,其中 `proxy_pass` 参数指向实际的应用端口。 2. **重新加载 Nginx 配置** 更新完成后,重载 Nginx 配置使其生效: ```bash nginx -s reload ``` --- #### 四、高级优化建议 对于生产环境中更复杂的场景,可以考虑以下改进措施: 1. **负载均衡** 若存在多个 Spring Boot 节点实例,可在 Nginx 中启用上游模块来分发流量。例如: ```nginx upstream backend { server localhost:8080; server another-server:9090; } server { listen 80; server_name load-balanced-site.com; location / { proxy_pass http://backend; } } ``` 这种方法适用于集群化部署的需求[^2]。 2. **SSL 支持** 添加 HTTPS 协议增强安全性。获取证书后,在 Nginx 配置中加入 SSL 设置: ```nginx server { listen 443 ssl; server_name secure-yourdomain.com; ssl_certificate /path/to/certificate.crt; ssl_certificate_key /path/to/private.key; location / { proxy_pass http://localhost:8080; } } ``` --- ### 总结 上述流程涵盖了从环境初始化到最终配置完毕的整体过程。通过合理利用 Nginx 提供的功能特性,不仅可以让 Spring Boot 更加高效稳定地对外提供服务,还能进一步提升用户体验和数据交互的安全保障。
评论
添加红包

请填写红包祝福语或标题

红包个数最小为10个

红包金额最低5元

当前余额3.43前往充值 >
需支付:10.00
成就一亿技术人!
领取后你会自动成为博主和红包主的粉丝 规则
hope_wisdom
发出的红包
实付
使用余额支付
点击重新获取
扫码支付
钱包余额 0

抵扣说明:

1.余额是钱包充值的虚拟货币,按照1:1的比例进行支付金额的抵扣。
2.余额无法直接购买下载,可以购买VIP、付费专栏及课程。

余额充值