


目录
1.前言
用原生的JS来处理界面的交互行为,开发效率是比较低的。而在现在的企业项目开发中,一般会借助于Vue这样的js框架来简化操作、提高开发效率。 那么我们今天呢,就来学习Vue这个框架。
2.什么是Vue?
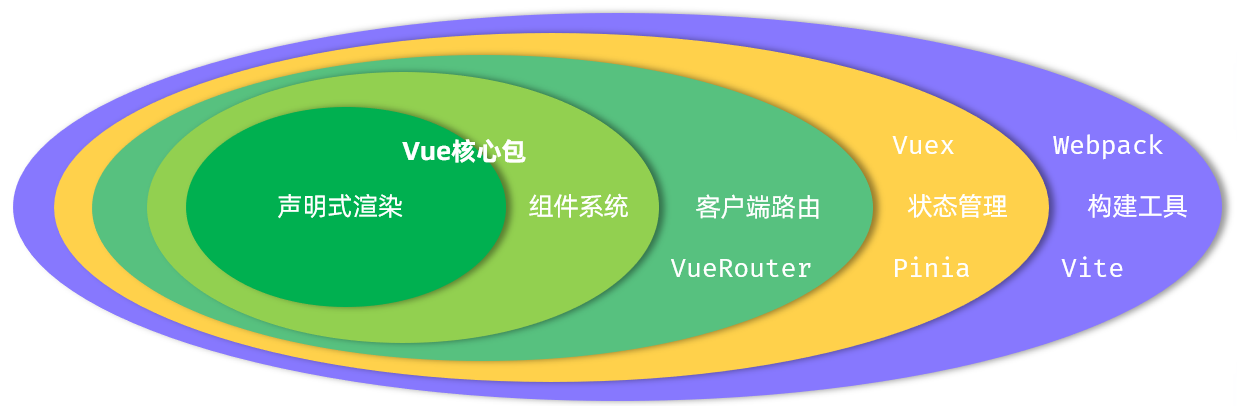
Vue(读音 /vjuː/, 类似于 view),是一款用于构建用户界面的渐进式的JavaScript框架(官方网站:Vue.js - 渐进式 JavaScript 框架 | Vue.js)。
3.Vue快速入门
-
需求
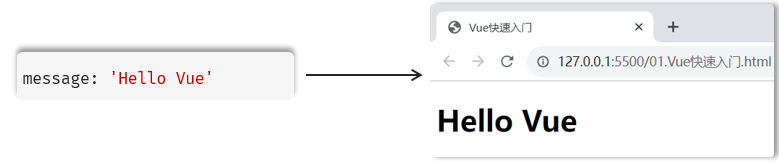
在入门程序中,最终我们需要将准备的数据 message 的值,基于Vue渲染展示在页面中,最终呈现的形式如下:
-
步骤
1). 准备工作:
准备一个html文件,并在其中引入Vue模块 (参考官方文档,复制过来即可)【注意:模块化的js,引入时,需要设置 type="module"】
创建Vue程序的应用实例,并绑定视图来控制视图的元素
准备元素(div),交给Vue控制
<!DOCTYPE html>
<html lang="en">

<head>
  <meta charset="UTF-8">
  <meta name="viewport" content="width=device-width, initial-scale=1.0">
  <title>Vue-快速入门</title>
</head>

<body>
  <div id="app">


  </div>

  <script type="module">
    // 1.引入Vue模块,在官网中查询语句
    import { createApp } from 'https://unpkg.com/vue@3/dist/vue.esm-browser.js'
    // 2.创建Vue实例,并绑定视图
    createApp({


    }).mount('#app')


  </script>
</body>

</html>
2). 数据驱动视图:
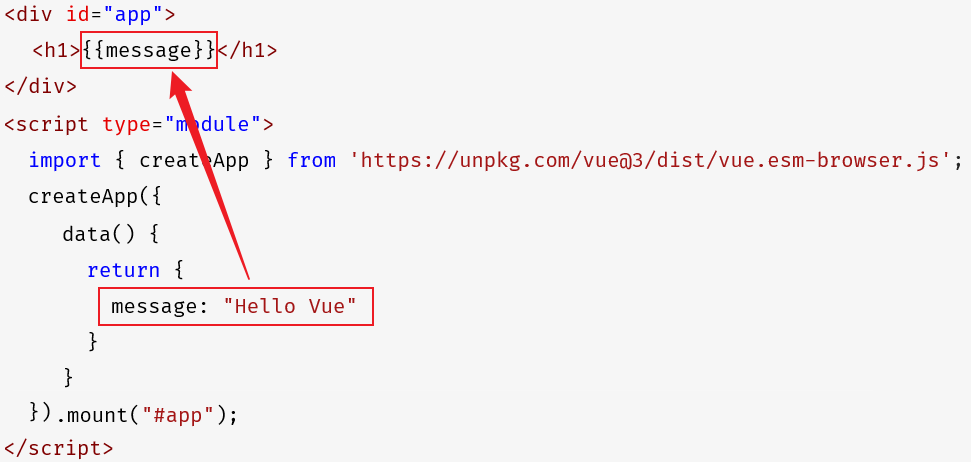
准备数据。 在创建Vue应用实例的时候,传入了一个js对象,在这个js对象中,我们要定义一个data方法,这个data方法的返回值就是Vue中的数据。
通过插值表达式渲染页面。 插值表达式的写法:{{...}}
3).实现
<!DOCTYPE html>
<html lang="en">

<head>
  <meta charset="UTF-8">
  <meta name="viewport" content="width=device-width, initial-scale=1.0">
  <title>Vue-快速入门</title>
</head>

<body>
  <!-- 3.准备视图元素 -->
  <div id="app">
    <!-- 5.通过插值表达式进行数据渲染 -->
    <h1>{{message}}</h1>
  </div>

  <script type="module">
    // 1.引入Vue模块
    import { createApp } from 'https://unpkg.com/vue@3/dist/vue.esm-browser.js'

    // 2.创建Vue实例,并绑定视图
    createApp({
      //4.定义数据模型
      data() {
        return {
          message: 'Hello Vue!'
        }
      }
    }).mount('#app')


  </script>
</body>

</html>
在上述入门程序编写时,需要注意这么几点:
Vue中定义数据,必须通过data方法来定义,data方法返回值是一个对象,在这个对象中定义数据。
插值表达式中编写的变量,一定是Vue中定义的数据,如果插值表达式中编写了一个变量,但是在Vue中未定义,将会报错 。
Vue应用实例接管的区域是 '#app',超出这个范围,就不受Vue控制了,所以vue的插值表达式,一定写在
<div id="app">...</div>的里面 。
4.Vue指令
指令:指的是HTML 标签上带有 v- 前缀的特殊属性,不同指令具有不同含义,可以实现不同的功能 。例如:v-if,v-for…
| 指令 | 作用 |
|---|---|
| v-for | 列表渲染,遍历容器的元素或者对象的属性 |
| v-bind | 为HTML标签绑定属性值,如设置 href , css样式等 |
| v-if/v-else-if/v-else | 条件性的渲染某元素,判定为true时渲染,否则不渲染 |
| v-show | 根据条件展示某元素,区别在于切换的是display属性的值 |
| v-model | 在表单元素上创建双向数据绑定 |
| v-on | 为HTML标签绑定事件 |
4.1 v-for
介绍
作用:列表渲染,遍历容器的元素或者对象的属性
语法:v-for = "(item,index) in items"
参数:
-
items 为要遍历的数组
-
item 为遍历出来的元素
-
index 为索引/下标,从0开始 ;可以省略,省略index语法:
v-for = "item in items"
演示:
<!DOCTYPE html>
<html lang="en">
<head>
<meta charset="UTF-8">
<meta name="viewport" content="width=device-width, initial-scale=1.0">
<title>v-for入门</title>
</head>
<body>
<div id="app">
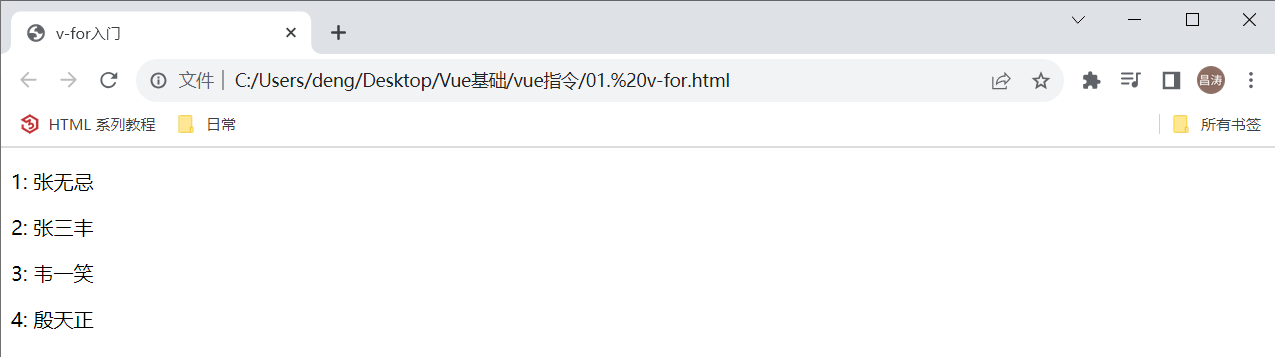
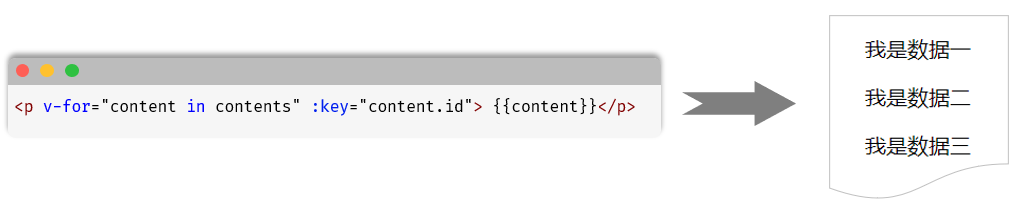
<p v-for="(name,index) in names">{{index + 1}}:{{name}}</p>
</div>
<script type="module">
import { createApp } from 'https://unpkg.com/vue@3/dist/vue.esm-browser.js'
createApp({
data(){
return {
names: ['张无忌', '张三丰', '韦一笑', '殷天正']
}
}
}).mount('#app')
</script>
</body>
</html>经过浏览器的解析渲染之后,展示出如下界面:
v-for的key
作用:给元素添加的唯一标识,便于vue进行列表项的正确排序复用
语法: v-for="(item,index) in items" :key="唯一值"
注意点:
-
key的值只能是 字符串 或 数字类型
-
key的值必须具有唯一性
-
推荐使用id作为key(唯一),不推荐使用index作为key(会变化,不对应)
提示:官方推荐在使用 v-for 时提供一个key属性,以遍可以追踪每个节点,提升渲染性能。
案例-列表渲染
<!DOCTYPE html>
<html lang="en">

<head>
  <meta charset="UTF-8">
  <meta http-equiv="X-UA-Compatible" content="IE=edge">
  <meta name="viewport" content="width=device-width, initial-scale=1.0">
  <title>Vue3-案例1</title>
  <style>
    table,th,td {
      border: 1px solid #000;
      border-collapse: collapse;
      line-height: 50px;
      text-align: center;
    }

    #center,table {
      width: 60%;
      margin: auto;
    }

    #center {
      margin-bottom: 20px;
    }

    img {
      width: 50px;
    }

    input,select {
      width: 17%;
      padding: 10px;
      margin-right: 30px;
      border: 1px solid #ccc;
      border-radius: 4px;
    }

    .btn {
      background-color: #ccc;
    }
  </style>
</head>

<body>
  <div id="app">
    <div id="center">
      姓名: <input type="text" name="name">
      性别:
      <select name="gender">
        <option value="1">男</option>
        <option value="2">女</option>
      </select>
      职位:
      <select name="job">
        <option value="1">讲师</option>
        <option value="2">班主任</option>
        <option value="3">其他</option>
      </select>

      <input class="btn" type="button" value="查询">
    </div>

    <table>
      <tr>
        <th>序号</th>
        <th>姓名</th>
        <th>头像</th>
        <th>性别</th>
        <th>职位</th>
        <th>入职时间</th>
        <th>更新时间</th>
      </tr>

      <!-- 基于 v-for 指令循环遍历用户数据列表 -->
      <tr v-for="(user,index) int userList" :key="user.id">
        <td>{{index + 1}}</td>
        <td>{{user.name}}</td>
        <td> <img src="{{user.image}}"> </td>
        <td>{{user.gender}}</td>
        <td>{{user.job}}</td>
        <td>{{user.entrydate}}</td>
        <td>{{user.updatetime}}</td>
      </tr>
    </table>
  </div>

  <script type="module">
    import { createApp } from 'https://unpkg.com/vue@3/dist/vue.esm-browser.js'

    createApp({
      data() {
        return {
          userList: [
            {
              "id": 1,
              "name": "谢逊",
              "image": "https://web-framework.oss-cn-hangzhou.aliyuncs.com/2023/1.jpg",
              "gender": 1,
              "job": 1,
              "entrydate": "2023-06-09",
              "updatetime": "2023-07-01 00:00:00"
            },
            {
              "id": 2,
              "name": "韦一笑",
              "image": "https://web-framework.oss-cn-hangzhou.aliyuncs.com/2023/2.jpg",
              "gender": 1,
              "job": 1,
              "entrydate": "2023-06-09",
              "updatetime": "2023-07-01 00:00:00"
            },
            {
              "id": 3,
              "name": "黛绮丝",
              "image": "https://web-framework.oss-cn-hangzhou.aliyuncs.com/2023/3.jpg",
              "gender": 2,
              "job": 2,
              "entrydate": "2023-06-09",
              "updatetime": "2023-07-01 00:00:00"
            },
            {
              "id": 4,
              "name": "殷天正",
              "image": "https://web-framework.oss-cn-hangzhou.aliyuncs.com/2023/4.jpg",
              "gender": 1,
              "job": 3,
              "entrydate": "2023-06-09",
              "updatetime": "2023-07-01 00:00:00"
            }
          ]
        }
      }
    }).mount("#app");
  </script>
</body>

</html>
浏览器打开此页面,最终浏览器中展示效果如下:
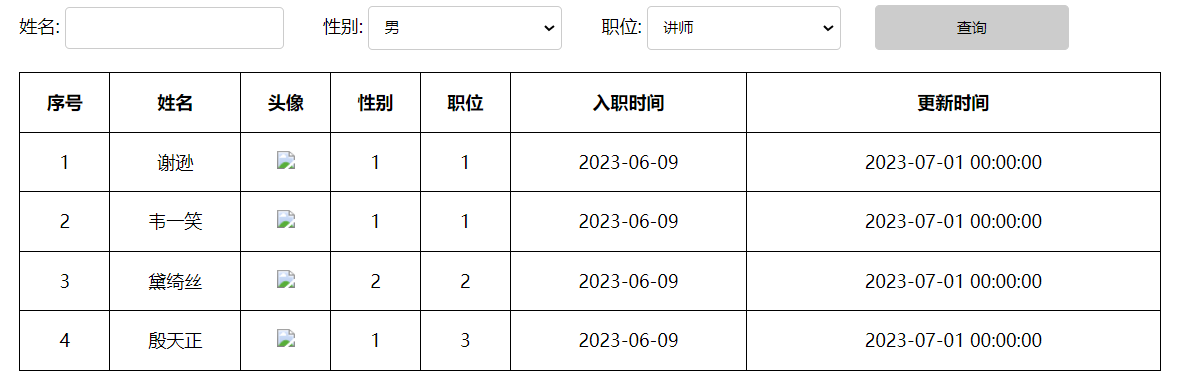
注意:插值表达式 {{...}} 只能用在标签内的文本区域,不能使用在标签的属性中,是无法解析的。所以上述的图片展示,是存在问题的(稍后解决)。引号里面不能用插值表达式
4.2 v-bind
介绍
作用:动态为HTML标签绑定属性值,如设置href,src,style样式等。
语法:v-bind:属性名="属性值"
简化::属性名="属性值"
注意:v-bind 所绑定的数据,必须在data中定义。
<!DOCTYPE html>
<html lang="en">
<head>
  <meta charset="UTF-8">
  <meta name="viewport" content="width=device-width, initial-scale=1.0">
  <title>v-bind入门</title>
</head>
<body>

  <div id="app">
    <a v-bind:href="url">链接1</a> <br><br>
    <a :href="url">链接2</a>
  </div>

  <script type="module">
    import { createApp } from 'https://unpkg.com/vue@3/dist/vue.esm-browser.js'
    createApp({
      data(){
        return {
          url: 'https://www.itcast.cn'
        }
      }
    }).mount('#app')
  </script>
</body>
</html>
案例
接下来,我们就可以通过 v-bind 指令,来动态为 <img src=""> 的src属性绑定值,从而动态展示出图片内容。
<!DOCTYPE html>
<html lang="en">

<head>
  <meta charset="UTF-8">
  <meta http-equiv="X-UA-Compatible" content="IE=edge">
  <meta name="viewport" content="width=device-width, initial-scale=1.0">
  <title>Vue3-案例1</title>
  <style>
    ...
  </style>
</head>

<body>
  <div id="app">
    <div id="center">
      姓名: <input type="text" name="name">
      性别:
      <select name="gender">
        <option value="1">男</option>
        <option value="2">女</option>
      </select>
      职位:
      <select name="job">
        <option value="1">讲师</option>
        <option value="2">班主任</option>
        <option value="3">其他</option>
      </select>

      <input class="btn" type="button" value="查询">
    </div>

    <table>
      <tr>
        <th>序号</th>
        <th>姓名</th>
        <th>头像</th>
        <th>性别</th>
        <th>职位</th>
        <th>入职时间</th>
        <th>更新时间</th>
      </tr>

      <tr v-for="(user, index) in userList" :key="user.id">
        <td>{{index + 1}}</td>
        <td>{{user.name}}</td>
        <!-- 基于v-bind指令绑定src属性, 动态展示图片, 该指令简写为 : -->
        <td> <img :src="user.image"> </td>
        <td>{{user.gender}}</td>
        <td>{{user.job}}</td>
        <td>{{user.entrydate}}</td>
        <td>{{user.updatetime}}</td>
      </tr>
    </table>
  </div>

  <script type="module">
    import { createApp } from 'https://unpkg.com/vue@3/dist/vue.esm-browser.js'

    createApp({
      data() {
        return {
          userList: [
           ...
          ]
        }
      },
    }).mount("#app");
  </script>
</body>

</html>
上述代码经过浏览器的解析之后,我们会看到图片就可以正常显示出来了。
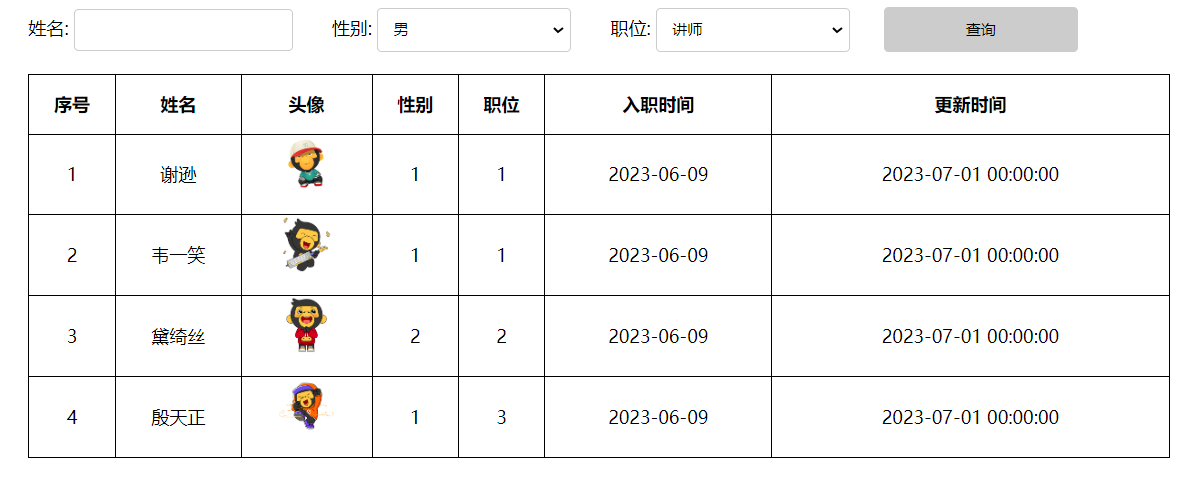
注意:表格的基本内容,以及图片信息已经展示出来了,但是我们看到性别显示的却是1、2,那最终要展示出来的得是 男、女。
4.3 v-if & v-show
介绍
作用:这两类指令,都是用来控制元素的显示与隐藏的
v-if:
-
语法:v-if="表达式",表达式值为 true,显示;false,隐藏
-
原理:基于条件判断,来控制创建或移除元素节点(条件渲染)
-
场景:要么显示,要么不显示,不频繁切换的场景
-
其它:可以配合 v-else-if / v-else 进行链式调用条件判断
v-show:
-
语法:v-show="表达式",表达式值为 true,显示;false,隐藏
-
原理:基于CSS样式display来控制显示与隐藏
-
场景:频繁切换显示隐藏的场景
注意:v-else-if必须出现在v-if之后,可以出现多个; v-else 必须出现在v-if/v-else-if之后 。
案例-性别职位展示
<!DOCTYPE html>
<html lang="en">

<head>
  <meta charset="UTF-8">
  <meta http-equiv="X-UA-Compatible" content="IE=edge">
  <meta name="viewport" content="width=device-width, initial-scale=1.0">
  <title>Vue3-案例1</title>
  <style>
   ...
  </style>
</head>

<body>
  <div id="app">
    <div id="center">
      姓名: <input type="text" name="name" >
      性别:
      <select name="gender">
        <option value="1">男</option>
        <option value="2">女</option>
      </select>
      职位:
      <select name="job">
        <option value="1">讲师</option>
        <option value="2">班主任</option>
        <option value="3">其他</option>
      </select>

      <input class="btn" type="button" value="查询" @click="search">
    </div>

    <table>
      <tr>
        <th>序号</th>
        <th>姓名</th>
        <th>头像</th>
        <th>性别</th>
        <th>职位</th>
        <th>入职时间</th>
        <th>更新时间</th>
      </tr>

      <tr v-for="(user, index) in userList" :key="user.id">
        <td>{{index + 1}}</td>
        <td>{{user.name}}</td>
        <td> <img :src="user.image"> </td>
        <td>
          <span v-if="user.gender == 1">男</span>
          <span v-else-if="user.gender == 2">女</span>
          <span v-else>妖</span>
        </td>
        <td>
          <!-- v-show -->
          //原来的样式:<td> {{user.job}} </td>
          <span v-show="user.job == 1">讲师</span>
          <span v-show="user.job == 2">班主任</span>
          <span v-show="user.job != 1 && user.job != 2">其他</span>
        </td>
        <td>{{user.entrydate}}</td>
        <td>{{user.updatetime}}</td>
      </tr>

    </table>
  </div>

  <script type="module">
    import { createApp } from 'https://unpkg.com/vue@3/dist/vue.esm-browser.js'

    createApp({
      data() {
        return {
          name: '',
          gender: '',
          job: '',
          userList: [
           ...
          ]
        }
      },
      methods: {
        search() {
          // 输出搜索框中的数据
          console.log(`姓名: ${this.name}, 性别:${this.gender}, 职位:${this.job}`);
        }
      }
    }).mount("#app");
  </script>
</body>

</html>
浏览器打开此页面后,经过浏览器的解析,数据可以正确的显示出来了。
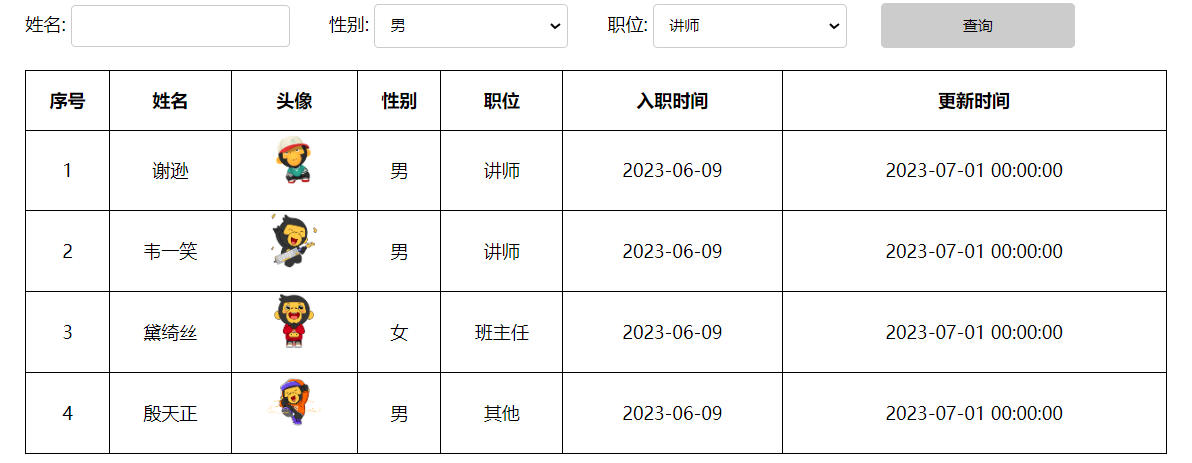
通过F12,打开浏览器的开发者工具,我们可以看到 v-if 控制元素的显示与隐藏时,如果条件不成立,压根就不会渲染对应的元素(创建或移除标签)。 而通过 v-show 控制元素的显示或隐藏,基于 CSS 样式display来控制显示与隐藏。
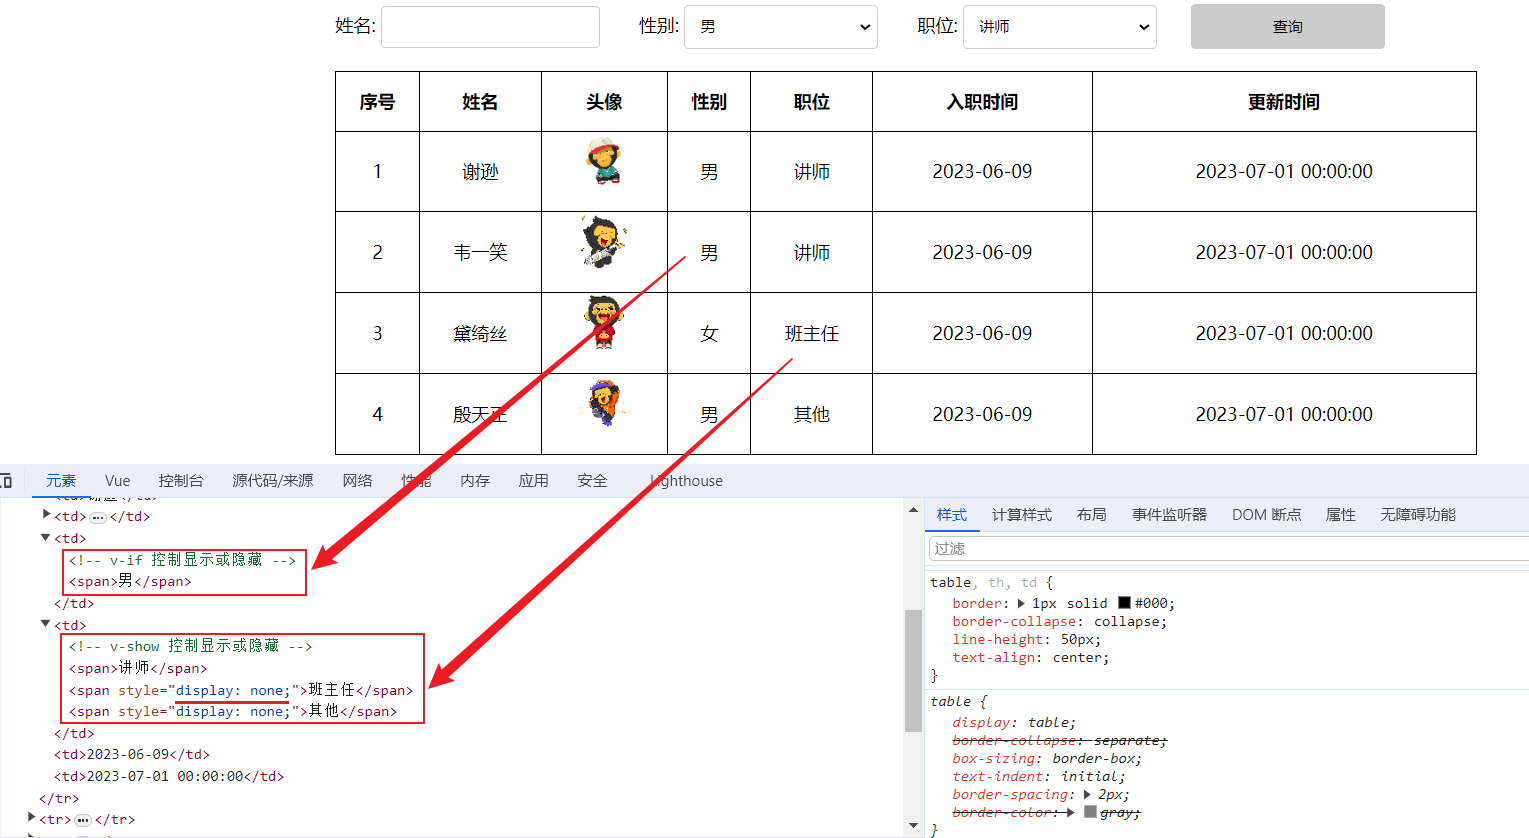
所以,对于
v-if适用于控制显示或隐藏不频繁的场景。 而v-show适用于显示与隐藏切换频繁的场景。
4.4 v-model
介绍
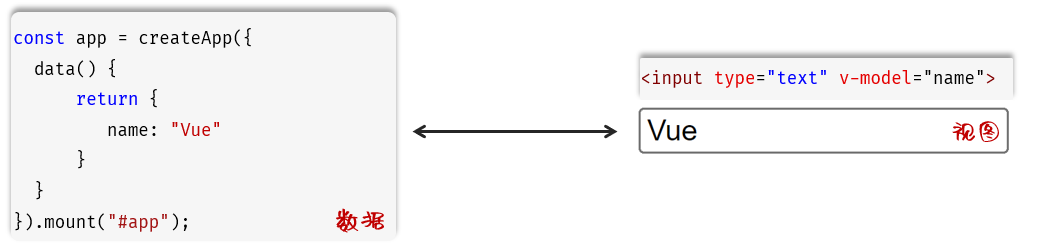
作用:在表单元素上使用,双向数据绑定。可以方便的 获取 或 设置 表单项数据
语法:v-model="变量名"
这里的双向数据绑定,是指 Vue中的数据变化,会影响视图中的数据展示。 视图中的输入的数据变化,也会影响Vue的数据模型 。
注意:v-model 中绑定的变量,必须在data中定义。
演示
<!DOCTYPE html>
<html lang="en">
<head>
  <meta charset="UTF-8">
  <meta name="viewport" content="width=device-width, initial-scale=1.0">
  <title>v-model入门</title>
</head>
<body>
  <div id="app">
    <input type="text" v-model="name"> <br>
    {{name}}
  </div>

  <script type="module">
    import { createApp } from 'https://unpkg.com/vue@3/dist/vue.esm-browser.js'
    createApp({
      data(){
        return {
          name: 'Vue'
        }
      }
    }).mount('#app')
  </script>
</body>
</html>
最终的效果如下: 视图中的数据变化,会影响Vue的数据模型。 Vue的属性模型变化,也会影响视图的展示 。
案例-获取搜索条件
接下来我们要来完成案例中,搜索栏中用户输入的表单数据,用户输入表单项数据后,要将数据展示出来 。
<!DOCTYPE html>
<html lang="en">

<head>
  <meta charset="UTF-8">
  <meta http-equiv="X-UA-Compatible" content="IE=edge">
  <meta name="viewport" content="width=device-width, initial-scale=1.0">
  <title>Vue3-案例1</title>
  <style>
   ...
  </style>
</head>

<body>
  <div id="app">
    <div id="center">
      <!-- 通过 v-model 绑定表单项数据,而这些变量,必须在data中定义 -->
      姓名: <input type="text" v-model="name">
      性别:
      <select v-model="gender">
        <option value="1">男</option>
        <option value="2">女</option>
      </select>
      职位:
      <select v-model="job">
        <option value="1">讲师</option>
        <option value="2">班主任</option>
        <option value="3">其他</option>
      </select>

      <input class="btn" type="button" value="查询">
    </div>
    {{name}} - {{gender}} - {{job}}
    <table>
      <tr>
        <th>序号</th>
        <th>姓名</th>
        <th>头像</th>
        <th>性别</th>
        <th>职位</th>
        <th>入职时间</th>
        <th>更新时间</th>
      </tr>

      <tr v-for="(user, index) in userList" :key="user.id">
        <td>{{index + 1}}</td>
        <td>{{user.name}}</td>
        <td> <img :src="user.image"> </td>
        <td>
          <span v-if="user.gender == 1">男</span>
          <span v-else-if="user.gender == 2">女</span>
          <span v-else>其他</span>
        </td>
        <td>
          <span v-if="user.job == 1">讲师</span>
          <span v-else-if="user.job == 2">班主任</span>
          <span v-else>其他</span>
        </td>
        <td>{{user.entrydate}}</td>
        <td>{{user.updatetime}}</td>
      </tr>
    </table>

  </div>

  <script type="module">
    import { createApp } from 'https://unpkg.com/vue@3/dist/vue.esm-browser.js'

    createApp({
      data() {
        return {
          //定义数据
          name: '',
          gender: '',
          job: '',

          userList: [
              ...
          ]
        }
      },
    }).mount("#app");
  </script>
</body>

</html>
最终在浏览器中执行,我们会看到,我们是可以实时获取到表单的数据的,因为已经将其绑定到了 name、gender、job 数据模型中 。
那现在我们已经可以正常的获取到表单的数据,正常的业务操作应该是点击 "查询" 之后,要执行查询操作。 那接下来,我们就先来为 "查询" 按钮绑定事件,点击查询按钮,获取到表单数据,并输出出来 。
4.5 v-on
介绍
作用:为html标签绑定事件(添加时间监听)
语法:
-
v-on:事件名="内联语句"<input type="button" value="点我一下试试" v-on:click="console.log('试试就试试');"> -
v-on:事件名="函数名"<input type="button" value="点我一下试试" v-on:click="handle">
这里的handle函数,就需要在Vue应用实例创建的时候创建出来,在methods定义。
-
简写为
@事件名="…"
演示
<!DOCTYPE html>
<html lang="en">
<head>
  <meta charset="UTF-8">
  <meta name="viewport" content="width=device-width, initial-scale=1.0">
  <title>v-on入门</title>
</head>
<body>

  <div id="app">
    <input type="button" value="点我一下试试" v-on:click="console.log('试试就试试1')">
    <input type="button" value="再点我一下试试" v-on:click="handle">
    <input type="button" value="再点我一下试试3" @click="handle">
  </div>

  <script type="module">
    import { createApp } from 'https://unpkg.com/vue@3/dist/vue.esm-browser.js'
    createApp({
      // 数据模型
      data(){
        return {
          name: 'Vue'
        }
      },
      // 定义函数
      methods: {
        handle(){
          console.log("试试就试试3");
        }
      },
    }).mount('#app')
  </script>
</body>
</html>
案例-事件绑定
<!DOCTYPE html>
<html lang="en">

<head>
  <meta charset="UTF-8">
  <meta http-equiv="X-UA-Compatible" content="IE=edge">
  <meta name="viewport" content="width=device-width, initial-scale=1.0">
  <title>Vue3-案例1</title>
  <style>
  ...
  </style>
</head>

<body>
  <div id="app">
    <div id="center">
      姓名: <input type="text" v-model="name">
      性别:
      <select v-model="gender">
        <option value="1">男</option>
        <option value="2">女</option>
      </select>
      职位:
      <select v-model="job">
        <option value="1">讲师</option>
        <option value="2">班主任</option>
        <option value="3">其他</option>
      </select>

      <!-- <input class="btn" type="button" value="查询" v-on:click="handle"> -->
      <input class="btn" type="button" value="查询" @click="handle">
    </div>

    <table>
      <tr>
        <th>序号</th>
        <th>姓名</th>
        <th>头像</th>
        <th>性别</th>
        <th>职位</th>
        <th>入职时间</th>
        <th>更新时间</th>
      </tr>

      <tr v-for="(user, index) in userList" :key="user.id">
        <td>{{index + 1}}</td>
        <td>{{user.name}}</td>
        <td> <img :src="user.image"> </td>
        <td>
          <span v-if="user.gender == 1">男</span>
          <span v-else-if="user.gender == 2">女</span>
          <span v-else>其他</span>
        </td>
        <td>
          <span v-if="user.job == 1">讲师</span>
          <span v-else-if="user.job == 2">班主任</span>
          <span v-else>其他</span>
        </td>
        <td>{{user.entrydate}}</td>
        <td>{{user.updatetime}}</td>
      </tr>
    </table>
  </div>

  <script type="module">
    import { createApp } from 'https://unpkg.com/vue@3/dist/vue.esm-browser.js'

    createApp({
      data() {
        return {
          name: '',
          gender: '',
          job: '',
          userList: [
            ...
          ]
        }
      },
      methods: {
       handle: function(){
         console.log(`查询啦, 查询条件: name=${this.name}, gender=${this.gender}, job=${this.job}`);
       }
      }
    }).mount("#app");
  </script>
</body>

</html>
最终在浏览器中执行,我们会看到,我们是可以实时获取到表单的数据的,因为已经将其绑定到了 name、gender、job 数据模型中 。
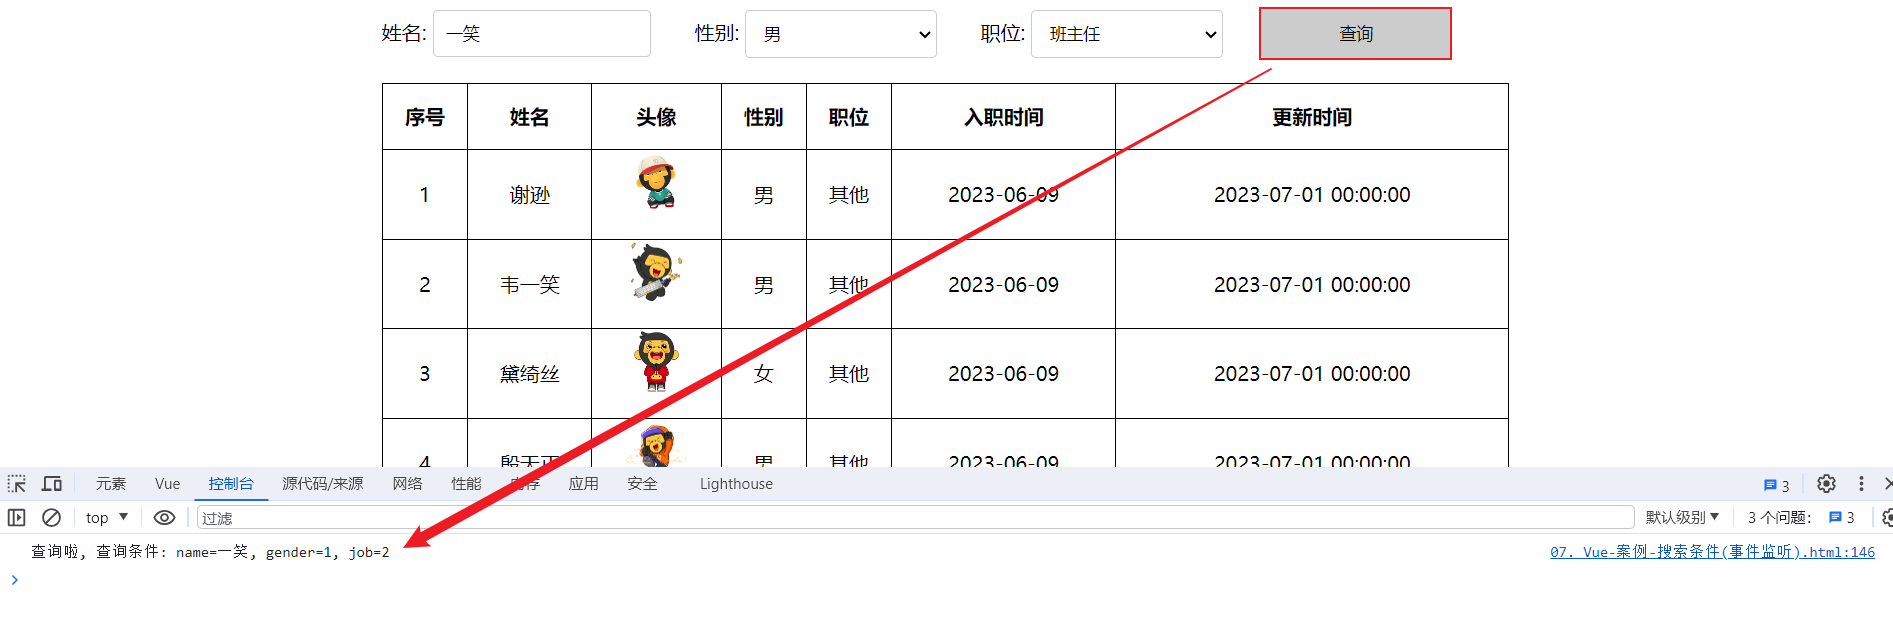
注意:在methods声明的方法中,如果想要获取Vue的数据,可以通过this关键字,获取到vue应用实例,从而获取到实例中的数据信息。


 2万+
2万+

 被折叠的 条评论
为什么被折叠?
被折叠的 条评论
为什么被折叠?
 到【灌水乐园】发言


