


使用time模块可以查看并处理时间和日期相关内容。
一、时间的表示格式
在Python中,表示时间的格式有4种较为常用,分别是浮点数格式、标准可读格式、格式化格式以及自定义格式。(名字是自己起的,非官方命名)
(1)浮点数格式
用一个float格式的浮点数表示时间,其具体含义表示为从世界标准纪元时间(1970年1月1日)起算至该时间节点的秒数。
(2)标准可读格式
形式为——“星期几 月份 日期 时:分:秒 年份”,便于人阅读。
(3)格式化格式(time.struct_time)
分别用多个参数来表示年份、月份以及时分秒等信息,便于计算机进行处理。
(4)自定义格式
根据自己的需求将时间日期信息整理为自定义格式的字符串。
# 浮点数格式
<class 'float'>
1667321639.1330378

# 标准可读格式
<class 'str'>
Wed Nov  2 00:53:59 2022

# 格式化格式
<class 'time.struct_time'>
time.struct_time(tm_year=2022, tm_mon=11, tm_mday=2, tm_hour=0, tm_min=53, tm_sec=59, tm_wday=2, tm_yday=306, tm_isdst=0)

# 自定义格式
<class 'str'>
2022年11月01日 11:59:59
不同的格式之间的转换关系如下图:
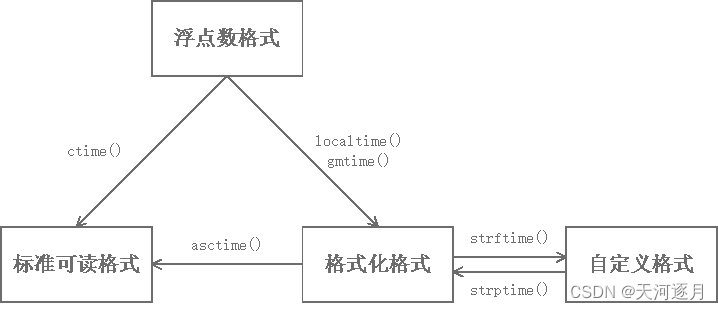
二、时间的读取与格式转换
1. 使用time.time()方法读取为浮点数格式
time.time()方法用于读取计算机内部时间,输出为浮点数格式。
import time

t1 = time.time()
print(t1)

Out:
1667322679.7262034
2. 使用time.localtime()和time.gmtime()方法读取为格式化格式
time.localtime()和time.gmtime()方法分别读取当地时间和世界时间,输出为格式化格式。
import time

t1 = time.localtime()  # 本地时间
t2 = time.gmtime()  # 世界时间
print(t1)
print(t2)

Out:
time.struct_time(tm_year=2022, tm_mon=11, tm_mday=2, tm_hour=1, tm_min=12, tm_sec=58, tm_wday=2, tm_yday=306, tm_isdst=0)
time.struct_time(tm_year=2022, tm_mon=11, tm_mday=1, tm_hour=17, tm_min=12, tm_sec=58, tm_wday=1, tm_yday=305, tm_isdst=0)
3. 使用time.ctime()和time.asctime()方法读取为标准可读格式
当time.ctime()和time.asctime()输入参数为空时,可以直接读取当前时间为标准可读格式。
import time

t1 = time.ctime()
t2 = time.asctime()
print(t1)
print(t2)

Out:
Wed Nov  2 01:10:01 2022
Wed Nov  2 01:10:01 2022
time.ctime()方法可将浮点数格式转换为标准可读格式。
time.asctime()方法可将格式化格式转换为标准可读格式。
import time

t1 = time.ctime(time.time())  # 将浮点数格式转换为标准可读格式
t2 = time.asctime(time.localtime())  # 将格式化格式转换为标准可读格式
print(t1)
print(t2)

Out:
Wed Nov  2 01:01:41 2022
Wed Nov  2 01:01:41 2022
4. 使用time.strftime()和time.strptime()完成与自定义格式的互转
time.strftime()可以将格式化格式转换为自定义格式。
import time

t1 = time.localtime()  # 格式化格式
s1 = time.strftime("%Y-%m-%d %H:%M:%S", t1)
print(s1)

Out:
2022-11-02 01:21:28  # 自定义格式
time.strptime()与time.strftime()相反,可以将自定义格式转换为格式化格式。
import time

s1 = "2022年11月01日 11:59:59"  # 自定义格式
t1 = time.strptime(s1, "%Y年%m月%d日 %H:%M:%S")
print(t1)

Out:
time.struct_time(tm_year=2022, tm_mon=11, tm_mday=1, tm_hour=11, tm_min=59, tm_sec=59, tm_wday=1, tm_yday=305, tm_isdst=-1)


 1427
1427

 被折叠的 条评论
为什么被折叠?
被折叠的 条评论
为什么被折叠?
 到【灌水乐园】发言


