


 本文介绍了如何在Vue项目中实现图片的放大镜效果,详细讲述了HTML、CSS和JavaScript的实现步骤,并提供了最终的实现效果展示及参考资料链接。
最近有项目需要用到对图片进行局部放大,类似淘宝商品页的放大镜效果,经过一番研究功能可用:
HTML部分
<template>
    <div>
        <div class="choose" ref="choose">
            <div class="content" ref="content" @mousemove="handleMove" @mouseout="handleOut">
                <img src="/static/bg.jpg" />
                <div class="shadow" ref="shadow"></div>
            </div>
            <ul id="listshow">
                <li class="selected">
                    <img src="/static/bg.jpg" alt="">
                </li>
            </ul>
        </div>
        <div class="larger" ref="larger">
            <img src="/static/bg.jpg" ref="big" />
        </div>
    </div>
</template>
CSS部分
<style scoped>
.choose {
    width: 400px;
    height: 600px;
    float: left;
    margin: 10px 0 0 10px;
}

.content {
    width: 400px;
    height: 400px;
    position: relative;
}

.content img {
    width: 400px;
    height: 400px;
}
#listshow {
    width: 400px;
    height: 100px;
    margin-top: 20px;
}

#listshow li {
    width: 98px;
    height: 100px;
    float: left;
    border: 1px solid #666;
}

#listshow li img {
    width: 98px;
    height: 100px;
}

#listshow .selected {
    border-color: brown;
}

.larger {
    width: 400px;
    height: 400px;
    position: absolute;
    top: 70px;
    left: 460px;
    float: left;
    overflow: hidden;
    display: none;
}

.larger img {
    width: 800px;
    height: 800px;
    position: absolute;
    left: 0;
    top: 0;
}

.shadow {
    width: 200px;
    height: 200px;
    background-color: rgba(145, 200, 200, 0.4);
    position: absolute;
    left: 0;
    top: 0;
    z-index: 10;
    display: none;
}
</style>
JavaScript部分
<script>
export default {
data() {
return {
};
},
methods: {
// 获取元素到文档区域的坐标
getPosition: function(element){
var dc = document,
rec = element.getBoundingClientRect(),
x = rec.left, // 获取元素相对浏览器视窗window的左、上坐标
y = rec.top;
// 与html或body元素的滚动距离相加就是元素相对于文档区域document的坐标位置
x += dc.documentElement.scrollLeft || dc.body.scrollLeft;
y += dc.documentElement.scrollTop || dc.body.scrollTop;
return {
left: x,
top: y
};
},
handleMove(evt) {
var larger = this.$refs.larger;
var shadow = this.$refs.shadow;
var big = this.$refs.big;
var pos = this.getPosition(this.$refs.choose);
var shadowRect = shadow.getBoundingClientRect();
var bigRect = big.getBoundingClientRect();
var contentRect = this.$refs.content.getBoundingClientRect();
var maxX = contentRect.width - shadowRect.width;
var maxY = contentRect.height - shadowRect.height;
var X = evt.pageX - pos.left - shadowRect.width / 2;
var Y = evt.pageY - pos.top - shadowRect.height / 2;
if (X <= 0) {
X = 0;
}
if (X >= maxX) {
X = maxX;
}
if (Y <= 0) {
Y = 0;
}
if (Y >= maxY) {
Y = maxY;
}
// 防止遮罩层粘滞,跟随鼠标一起滑出大图位置
var bigX = X * bigRect.width / contentRect.width;
var bigY = Y * bigRect.height / contentRect.height;
// bigX / bigW = X / contentW,主图和遮罩层之间存在两倍关系,放大图和原图之间也有两倍关系
shadow.style.left = X + "px";
shadow.style.top = Y + "px";
// console.log(X, Y, bigX, bigY);
big.style.left = -bigX + "px";
big.style.top = -bigY + "px";
larger.style.display = "block";
shadow.style.display = "block";
},
handleOut(evt) {
var larger = this.$refs.larger;
var shadow = this.$refs.shadow;
larger.style.display = "none";
shadow.style.top = "-1000px";
}
}
};
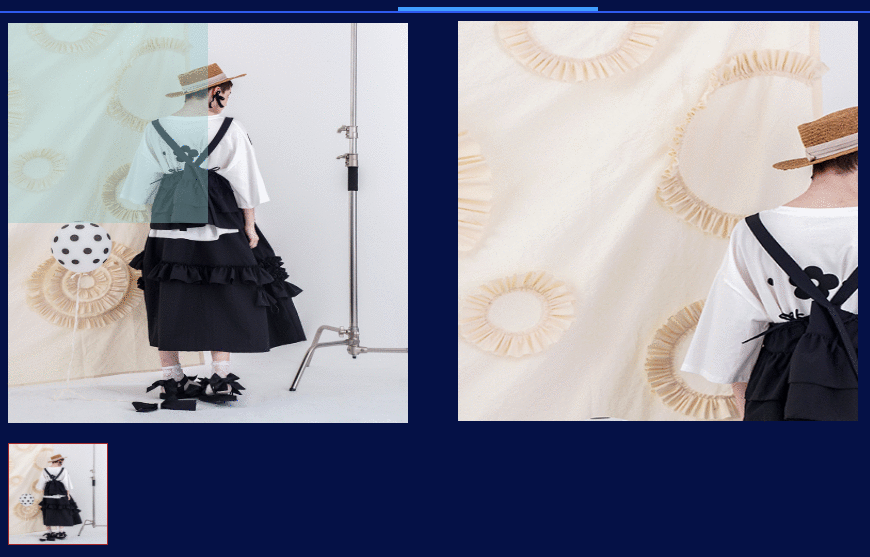
</script>最终效果图如下:
参考:
https://blog.youkuaiyun.com/jingtian678/article/details/98974783


 967
967

 被折叠的 条评论
为什么被折叠?
被折叠的 条评论
为什么被折叠?
 到【灌水乐园】发言


