


tips:本文使用的操作系统均为:国产kylin V10 sp3
操作如有不同,还麻烦自行修改~
[root@lb01 ~]# hostnamectl
   Static hostname: lb01
         Icon name: computer-vm
           Chassis: vm
        Machine ID: c0f0478cf6184056a381ffcfa393416d
           Boot ID: b59c4d6515d04c66a82ad2d30d71aaf0
    Virtualization: vmware
  Operating System: Kylin Linux Advanced Server V10 (Lance)
            Kernel: Linux 4.19.90-52.22.v2207.ky10.x86_64
      Architecture: x86-64
一、什么是nginx
Nginx(发音为 "Engine-X")是一个高性能的 web 服务器、反向代理服务器和负载均衡器。它最初是为了应对高流量的网站而设计的,特别适合处理大量并发连接。下面是简单易懂的介绍:
1. Web 服务器
Nginx 可以用作 web 服务器,也就是它负责接收用户的 HTTP 请求并返回网页内容。比如,当你在浏览器中输入网址(如 `www.example.com`)时,浏览器会发送 HTTP 请求给服务器,服务器通过 Nginx 返回网页。
例子:你访问一个网站,Nginx 就是帮你把网页和资源(HTML、CSS、JS、图片等)从服务器传递到你的浏览器。
2. 反向代理服务器
Nginx 也可以作为 反向代理服务器。反向代理的作用是接收客户端的请求,并将请求转发给后台的服务器处理。客户端(比如浏览器)并不直接与后台服务器交互,而是与 Nginx 交互,Nginx 会把请求转发给真实的服务器并把响应返回给客户端。
例子:假设你访问一个网站,它的实际内容来自多个后端服务(比如数据库查询、API 服务等)。Nginx 就会作为中介,把用户请求转发给相应的后台服务,确保用户请求能够得到快速、可靠的响应。
3. 负载均衡
当有多个服务器处理请求时,Nginx 可以作为 负载均衡器,智能地将请求分发给多个服务器,从而均衡各服务器的负载,提高系统的可用性和性能。
例子:如果你的应用有多个服务器,Nginx 可以根据一定的策略(如轮询、最少连接等)将用户请求均匀分配到这些服务器上,从而避免单个服务器负载过重。
4. 高并发处理
Nginx 特别擅长处理 高并发连接,因为它的设计非常轻量级,采用了异步、事件驱动的架构,使得它能够在同一时间处理大量的请求。和传统的 web 服务器(如 Apache)不同,Nginx 不会为每个请求创建一个新的进程,它的架构使得资源消耗更少,效率更高。
5. 其他功能
- 缓存:Nginx 可以缓存静态内容(如图片、视频等),提高响应速度。
- 安全:Nginx 可以配置 SSL(安全套接层)加密,提高数据传输的安全性。
- 反向代理和负载均衡:如前所述,Nginx 可以作为负载均衡器来分配流量,并实现流量的智能分发。
简单来说,Nginx 是一个 高效、轻量级、功能丰富 的服务器,它不仅能提供网页内容,还能转发请求、分发流量、提高网站的响应速度。无论是简单的网站,还是高流量的应用,Nginx 都能提供非常强大的支持。
二、安装nginx
# 第一种安装方式--->官网仓库安装
# 特点:版本新,配置易读
步骤1: 打开Nginx官网:
https://nginx.org/
步骤2: 找到我们对应的Linux版本进行仓库配置
[nginx-stable]
name=nginx stable repo
baseurl=http://nginx.org/packages/centos/$releasever/$basearch/
gpgcheck=1
enabled=1
gpgkey=https://nginx.org/keys/nginx_signing.key
module_hotfixes=true
步骤3:将官方的配置写入到我们的Linux源仓库中
[root@web01 ~]# cd /etc/yum.repos.d/
[root@web01 /etc/yum.repos.d]# touch nginx.repo
步骤4:安装nginx就创建一个nginx的目录,默认安装软件会先找nginx的repo里面
[root@web01 /etc/yum.repos.d]# vim nginx.repo
[nginx-stable]
name=nginx stable repo
baseurl=http://nginx.org/packages/centos/7/$basearch/
gpgcheck=0
enabled=1
gpgkey=https://nginx.org/keys/nginx_signing.key
module_hotfixes=true
步骤5:保存后安装即可
[root@web01 ~]# yum install -y nginx
查看版本[root@web01 ~]# nginx -v
nginx version: nginx/1.26.1
# 第二种安装方式--->默认仓库安装
# 特点:版本较低,配置跟官方不太统一
直接安装,不需要配置
[root@web01 ~]# yum install -y nginx
查看版本,版本低一点
[root@web01 ~]# nginx -v
nginx version: nginx/1.21.1
# 第三种安装方式--->编译安装
# 特点:可以自定义安装,比较灵活,但是难度较高
...
上文主要展示了nginx的三种安装方式,在本次实验,我们使用nginx的官方仓库安装。
安装了服务之后,我们先看一下nginx服务的主要配置文件,里面到底写了什么,读懂了配置文件,后续学习可以大大减少不少的问题。
### Nginx的默认配置文件
[root@web01 ~]# cat /etc/nginx/nginx.conf

user  nginx;             #运行nginx进程的用户,在安装nginx会默认创建
worker_processes  auto;  #nginx启动进程数量 以核心为准,假如机器是1核心,那么就只有一个子进程

error_log  /var/log/nginx/error.log notice;   #nginx的错误日志位置
pid        /var/run/nginx.pid;                #nginx的用户pid


events {
    worker_connections  1024;                 #nginx默认的最大进程连接数,我们可以修改大一点
}


http {
    include       /etc/nginx/mime.types;     #nginx支持的网站类型文件
    default_type  application/octet-stream;  #如果网站不支持的类型会变为下载到本地查看

    log_format  main  '$remote_addr - $remote_user [$time_local] "$request" '
                      '$status $body_bytes_sent "$http_referer" '
                      '"$http_user_agent" "$http_x_forwarded_for"';    #nginx日志格式

    access_log  /var/log/nginx/access.log  main;    #nginx启动服务的日志文件

    sendfile        on;    #文件传输
    #tcp_nopush     on;

    keepalive_timeout  65;  #长连接,如果65秒内没有操作会自动断开

    #gzip  on;      #资源是否压缩

    include /etc/nginx/conf.d/*.conf;  #包括字段,写入到/etc/nginx/conf.d/*.conf文件都默认加载到当前文件的server模块
}
也可以理解,写在/etc/nginx/conf.d/*.conf的conf文件写在/etc/nginx/nginx.conf也生效。

server区块,网站的配置。server区块是包含在http区块中。
## 在我们的nginx.conf中包含的配置文件,我们为了方便使用,一般网站的信息都会拆分到这里写。
[root@web01 conf.d]# cat default.conf
server {
	listen 80;		    # 监听的端口
	server_name www.oldboy.com; # 自己购买的域名 | hosts解析

	location / {		    # 路径匹配 www.oldboy.com/
	root /code;		        # 让用户去/code目录获取网站信息
	index index.html;	    # 默认给浏览器返回的文件 index.html
	}
}
此外,默认的default.conf文件中默认也有一些nginx的状态码返回的页面信息...
看完之后想必肯定有自己的理解,我们结合案例进行实际的操作。
1.基础案例展示
使用写好的HTML5小游戏源码,搭建一个简单的nginx页面
[root@web01 ~]# yum install -y nginx
[root@web01 ~]# systemctl start nginx
[root@web01 ~]# netstat -nltup
Active Internet connections (only servers)
Proto Recv-Q Send-Q Local Address           Foreign Address         State       PID/Program name
tcp        0      0 0.0.0.0:22              0.0.0.0:*               LISTEN      964/sshd: /usr/sbin
tcp        0      0 0.0.0.0:80              0.0.0.0:*               LISTEN      3430/nginx: master
默认安装不做配置会出现一个nginx默认的启动页面
访问 Linux主机IP即可
我们默认做一下配置,把小霸王游戏机的源码写入到nginx的默认欢迎的目录中
[root@web01 ~]# ll /usr/share/nginx/html/
total 44
-rw-r--r-- 1 root root   497 May 30  2024 50x.html
-rw-r--r-- 1 root root 28032 May 24  2021 bgm.mp3
drwxr-xr-x 2 root root    23 May 24  2021 css
drwxr-xr-x 2 root root    23 May 24  2021 images
-rw-r--r-- 1 root root   615 May 30  2024 index.html
drwxr-xr-x 2 root root   213 May 24  2021 js
drwxr-xr-x 2 root root  4096 May 24  2021 roms
-rw-r--r-- 1 root root   811 May 24  2021 shuoming.html
重启即可
[root@web01 ~]#systemctl restart nginx
再次访问我们的Linux主机的ip就看到小霸王页面
看到这个页面,就说明我们搭建成功了...
2.进阶案例展示
那我们如果想自己定义nginx的访问目录以及策略可以修改他的default.conf或者nginx.conf因为上方我们提到,这两个在配置文件中指出是包含的关系。
我们自己定义访问 /code的目录下面的index.html下面的页面。
[root@web01 ~]# cd /etc/nginx/conf.d/
[root@web01 /etc/nginx/conf.d]# cd
[root@web01 ~]# cat /etc/nginx/conf.d/default.conf
server {
  listen 80;
  server_name www.game.com;
  location / {
    root /code;
    index index.html;
  }
}
[root@web01 /etc/nginx/conf.d]# nginx -t
nginx: the configuration file /etc/nginx/nginx.conf syntax is ok
nginx: configuration file /etc/nginx/nginx.conf test is successful
这时候我们要完善一下配置文件所需要的东西
域名我们没有,但是我们可以通过本机的Windows的hosts解析来做一个,将我们定义的域名解析成Linux的nginx主机IP地址
 ## 10.0.0.7的nginx解析
10.0.0.7 www.game.com
在hosts中写入保存退出后,看看是否可以ping通了
C:\Users\91468>ping www.game.com

正在 Ping www.game.com [10.0.0.7] 具有 32 字节的数据:
来自 10.0.0.7 的回复: 字节=32 时间<1ms TTL=64
来自 10.0.0.7 的回复: 字节=32 时间<1ms TTL=64
来自 10.0.0.7 的回复: 字节=32 时间<1ms TTL=64
来自 10.0.0.7 的回复: 字节=32 时间<1ms TTL=64

10.0.0.7 的 Ping 统计信息:
    数据包: 已发送 = 4,已接收 = 4,丢失 = 0 (0% 丢失),
往返行程的估计时间(以毫秒为单位):
    最短 = 0ms,最长 = 0ms,平均 = 0ms
那么域名这一步我们就完成了,但是我们的目录还没有创建,如果不创建目录,但是我们又将nginx相应的目录定义到code下面,那么就会出现404NotFound页面
这时我们去创建这个目录
[root@web01 ~]# !mkdir
mkdir /code
再刷新一下nginx查看变成了403错误代码,说明我们有这个目录了,但是目录下的文件为空,那我们写一个index.html文件再访问一下
[root@web01 ~]# echo 'hello,world' > /code/index.html
刷新页面,可以看到问题已经解决,那么我们把我们想要看到的html页面放进去即可
到这里我们就可以自定义自己网页的内容了。如果不懂这里的404和403这串代码的含义,可以看我之前的:纯新手一样能看懂什么是HTTP?-优快云博客这一篇文章。
nginx请求限制重定向(扩展)
在nginx请求限制的过程中,我们可以自定义一个返回值,也就是错误页面的状态码。
默认情况下是 503
1)修改默认返回状态码
server {
	listen 80;
	server_name module.oldboy.com;
	charset utf-8,gbk;
	location / {
		root /code;
		index index.html index.htm;
		limit_req zone=req_zone burst=3 nodelay;
		#修改返回状态码为:478
		limit_req_status 478
	}
}
2)页面太丑,重定向页面
server {
	listen 80;
	server_name module.oldboy.com;
	charset utf-8,gbk;
	location / {
		root /code;
		index index.html index.htm;
		limit_req zone=req_zone burst=3 nodelay;
		limit_req_status 478
#重定错误页面
		error_page 478 /err.html;
	}
}
vim /code/err.html
<img style='width:100%;height:100%;' src=https://www.linuxnc.com/478_page.png>
棒极了~
在之前我们讲到过nginx是一个高性能的web服务器,所以我们可以使用nginx来代理多个业务。
在nginx中,我们可以在/etc/nginx/conf.d/下面配置多个.conf配置文件,例如,game.conf,blog.conf,code.conf。。。也可以在一个default.conf(名称随意)的文件中,写多个server模块,通过端口,主机IP,或者域名来代理多个业务。
### 基于多IP地址   了解
10.0.0.7----------->忍者
10.0.0.8----------->小霸王
[root@web01 ~]# ip add add 10.0.0.8/24 dev ens33
[root@web01 ~]# ip a   可以查看
[root@web01 ~]# ping 10.0.0.8
PING 10.0.0.8 (10.0.0.8) 56(84) bytes of data.
64 bytes from 10.0.0.8: icmp_seq=1 ttl=64 time=0.052 ms
64 bytes from 10.0.0.8: icmp_seq=2 ttl=64 time=0.030 ms
那么我们的ens33的网卡就有多个IP地址
就可以分别指向不同的业务
## 8让nginx代理小霸王的游戏
[root@web01 /etc/nginx/conf.d]# vim xbwGame.conf
server {
  listen 10.0.0.8:80;
  server_name ;
  location / {
    root /code;
    index index.html;
  }
}
#7让nginx代理忍者的游戏
[root@web01 /etc/nginx/conf.d]# vim rz.conf
server {
  listen 10.0.0.7:80;
  server_name ;
  location / {
    root /rz;
    index index.html;
  }
}
查看各自的目录
[root@web01 /etc/nginx/conf.d]# ll /code/ /rz/
/code/:
total 7768
-rw-r--r-- 1 root root   28032 May 24  2021 bgm.mp3
drwxr-xr-x 2 root root      23 May 24  2021 css
drwxr-xr-x 2 root root      23 May 24  2021 images
-rw-r--r-- 1 root root    8956 May 24  2021 index.html
drwxr-xr-x 2 root root     213 May 24  2021 js
drwxr-xr-x 2 root root    4096 May 24  2021 roms
-rw-r--r-- 1 root root     811 May 24  2021 shuoming.html
-rw-r--r-- 1 root root 7902976 Dec  6 09:52 小霸王_FC怀旧游戏机-HTML源码.zip

/rz/:
total 144
drwxr-xr-x 2 root root    40 Mar  5  2024 _build
drwxr-xr-x 2 root root    40 Mar  5  2024 css
drwxr-xr-x 2 root root    63 Mar  5  2024 data
-rw-r--r-- 1 root root 78923 Mar  5  2024 icon.png
-rw-r--r-- 1 root root  1660 Mar  5  2024 index.html
drwxr-xr-x 3 root root    74 Mar  5  2024 media
drwxr-xr-x 2 root root    59 Mar  5  2024 sounds
-rw-r--r-- 1 root root 59813 Mar  5  2024 下载.png
drwxr-xr-x 2 root root    41 Mar  5  2024 水印图
检查nginx配置是否成功
[root@web01 /etc/nginx/conf.d]# nginx -t
nginx: the configuration file /etc/nginx/nginx.conf syntax is ok
nginx: configuration file /etc/nginx/nginx.conf test is successful
重启加载nginx服务
[root@web01 /etc/nginx/conf.d]# nginx -s reload
访问测试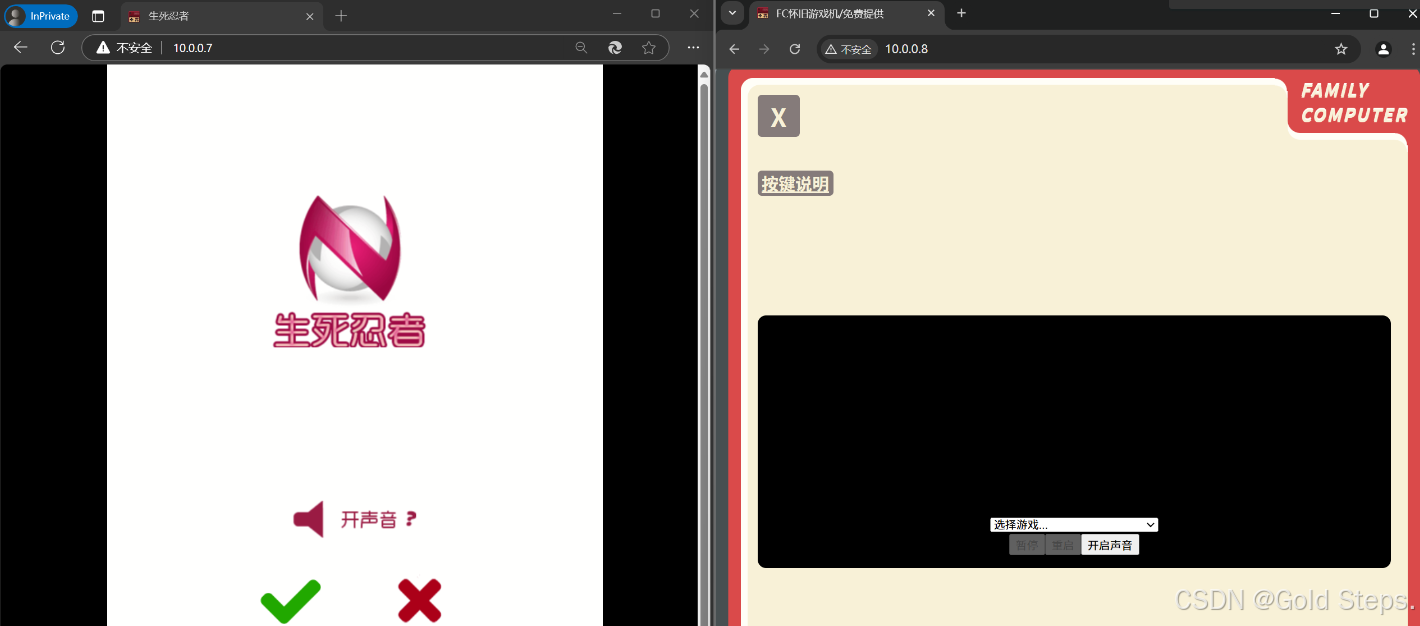
但是现在基于IP来代理多业务的方式越来越少了。
[root@web01 /etc/nginx/conf.d]# netstat -nltup
Active Internet connections (only servers)
Proto Recv-Q Send-Q Local Address           Foreign Address         State       PID/Program name
tcp        0      0 0.0.0.0:22              0.0.0.0:*               LISTEN      964/sshd: /usr/sbin
tcp        0      0 0.0.0.0:80              0.0.0.0:*               LISTEN      3571/nginx: master
为什么基于IP的用的少? 因为现在的带宽大部分都是BGP多线路。而不是单线
这里还可以使用第二种方法,基础多端口
### 基于多端口  -->常见
[root@web01 /etc/nginx/conf.d]# cat rz.conf
server {
  listen 81;
  server_name 10.0.0.7;     ### 7使用81端口--->忍者
  location / {
    root /rz;
    index index.html;
  }
}
[root@web01 /etc/nginx/conf.d]# cat xbwGame.conf
server {
  listen 80;
  server_name 10.0.0.7;   ### 7 使用80端口--->小霸王
  location / {
    root /code;
    index index.html;
  }
}
重新加载nginx
[root@web01 /etc/nginx/conf.d]# nginx -s reload
访问测试
也可以基于多域名
### 基于多域名 ---->常见
[root@web01 /etc/nginx/conf.d]# cat xbwGame.conf
server {
  listen 80;
  server_name www.xbwGame.com;
  location / {
    root /code;
    index index.html;
  }
}
[root@web01 /etc/nginx/conf.d]# cat  rz.conf
server {
  listen 80;
  server_name game.renzhe.com;
  location / {
    root /rz;
    index index.html;
  }
}
我们配置多域名需要通过Windows的hosts解析,如果是云服务器,直接配置域名的A类解析即可
我们去修改Windows的hosts
 ## 小霸王的nginx解析
10.0.0.7 www.xbwGame.com
## 忍者游戏的nginx解析
10.0.0.7 game.renzhe.com
重新加载nginx服务
[root@web01 /etc/nginx/conf.d]# nginx -s reload
访问测试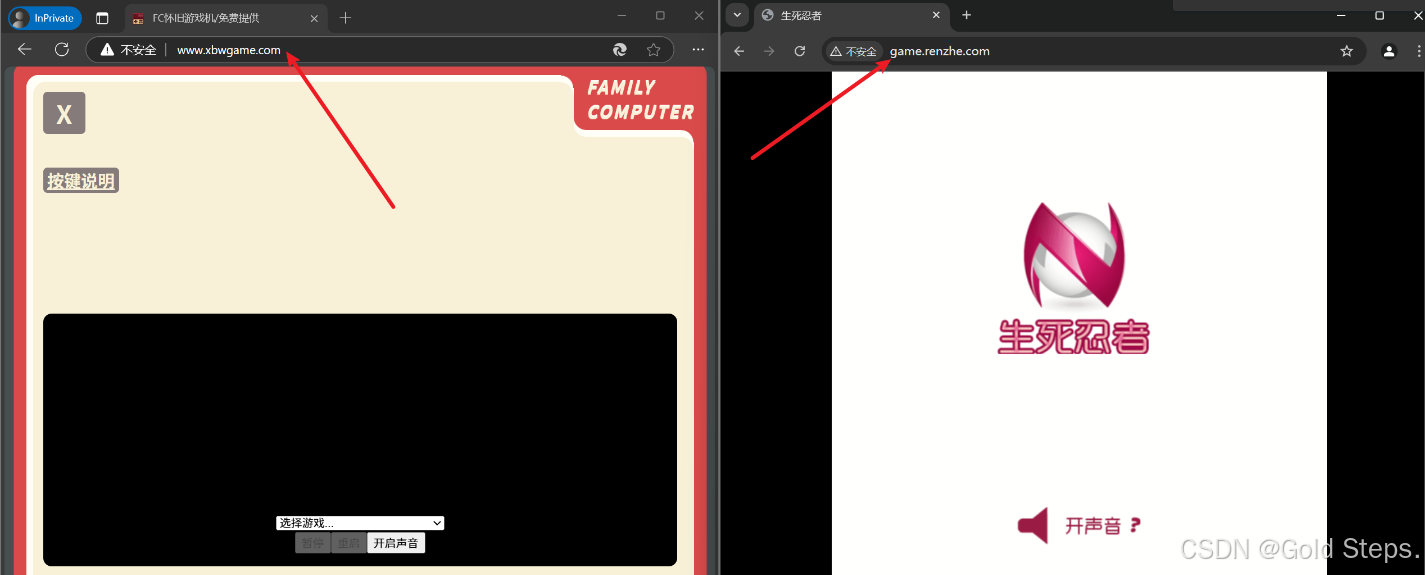
到这里,我们第一阶段的nginx基础知识就已经结束了。
三、nginx的常用模块
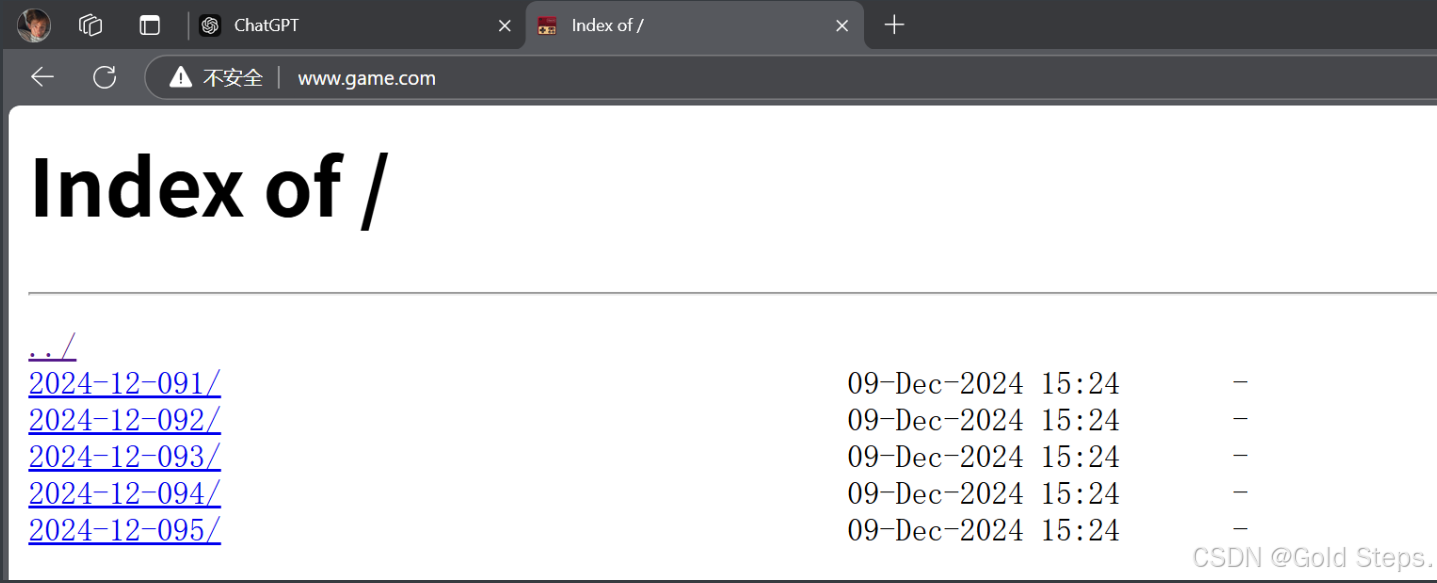
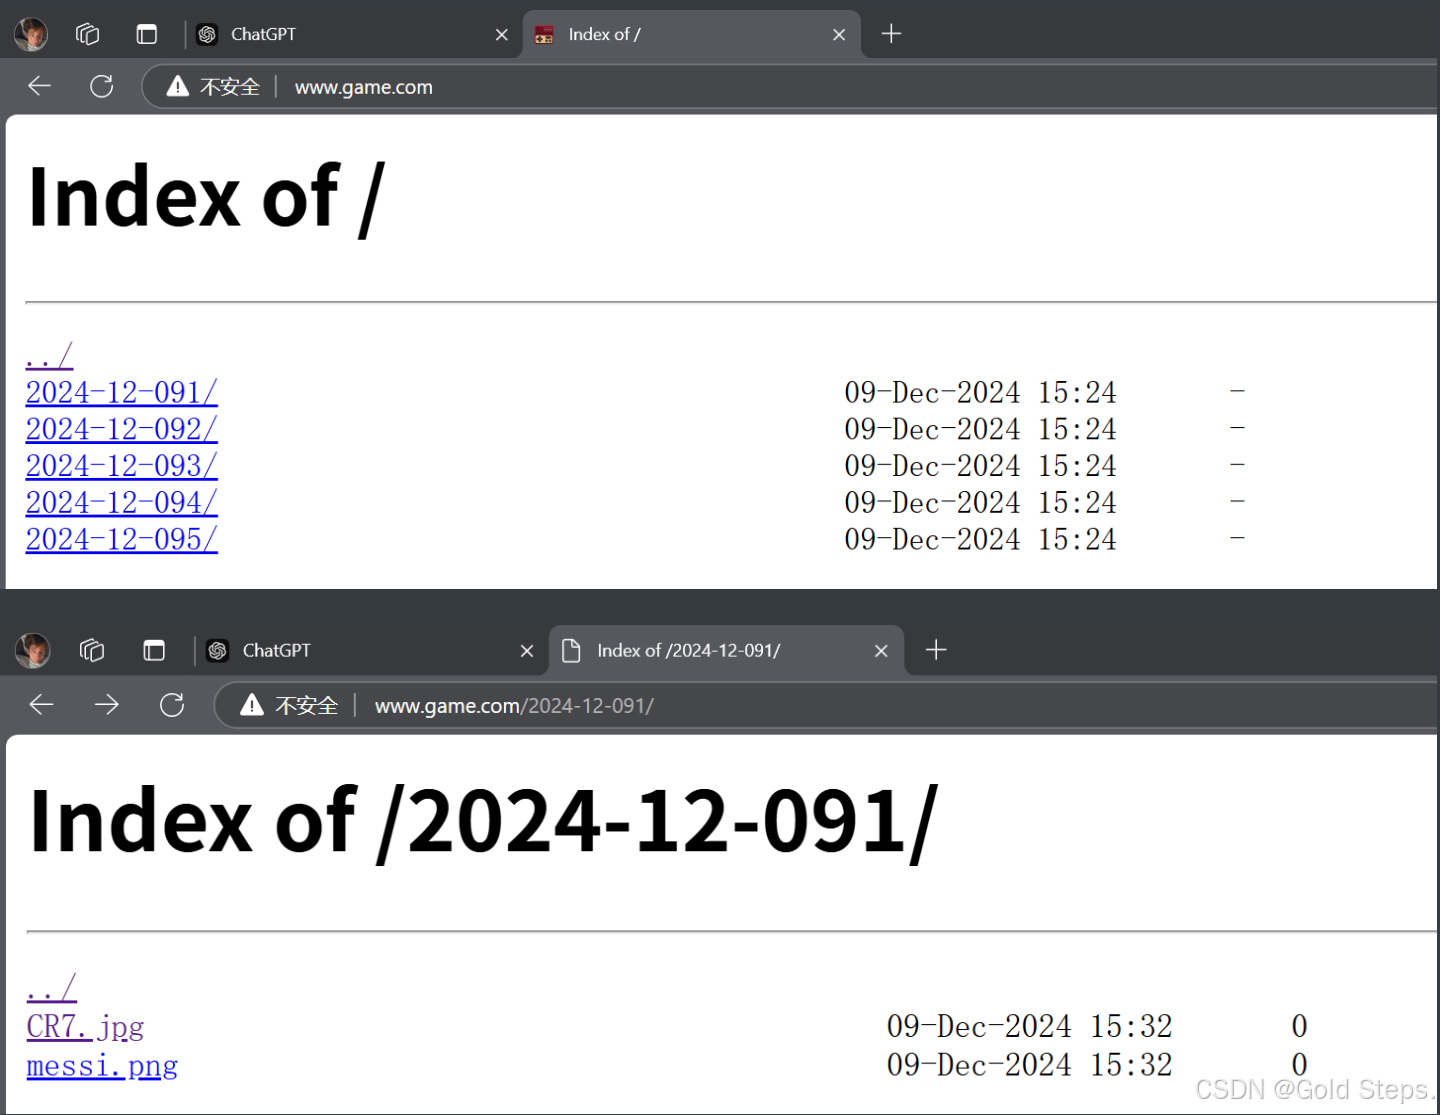
1. Nginx目录索引(Index Module)
Nginx支持目录索引功能,它允许在访问目录时返回一个默认的网页,比如 index.html 或 index.php。当用户访问一个目录时,如果目录里有这个默认文件,Nginx就会自动返回这个文件;Nginx 默认是不允许列出整个目录浏览下载。
效果展示:
配置讲解
Syntax(语法): autoindex on | off;
Default(默认值): autoindex off;
Context(上下文): http, server, location   --->可以写在http\server\location模块
# autoindex常用参数
##################################################################
# 类似于charset,local time,exact——size最好写到全局变量http模块去。 #
###################################################################
### 这里方面演示就写到当前模块了
autoindex_exact_size off;
默认为on, 显示出文件的确切大小,单位是bytes。
修改为off,显示出文件的大概大小,单位是kB或者MB或者GB。
autoindex_localtime on;
默认为off,显示的文件时间为GMT时间。
修改为on, 显示的文件时间为文件的服务器时间。
charset utf-8,gbk;
默认中文目录乱码,添加上解决乱码。
#################################
# 对下载资源进行限速
全局限速
Syntax: limit_rate rate;
Default: limit_rate 0;
Context: http, server, location, if in location
限速到指定的大小之后再限速
Syntax: limit_rate_after size;
Default: limit_rate_after 0;
Context: http, server, location, if in location
开始配置
配置文件案例:
[root@web01 /index/code]# cat /etc/nginx/conf.d/index.conf
server {
listen 80;
server_name www.game.com;
location / {
root /index/code;
index index.html;
location / {
autoindex on; # 开启目录浏览功能;
autoindex_exact_size off; # 显示出文件的大概大小,单位是kB或者MB或者GB。
autoindex_localtime on; # 显示的文件时间为文件的服务器时间。
charset uft-8,gbk; # 默认中文目录乱码,添加上解决乱码。
}
}
}
再继续我们要做Linux系统的hosts解析
[root@web01 /index/code]# vim /etc/hosts
127.0.0.1 localhost localhost.localdomain localhost4 localhost4.localdomain4
::1 localhost localhost.localdomain localhost6 localhost6.localdomain6
10.0.0.7 www.game.com
保存
因为我们的www.game.com是做在window的系统中,我们Linux不做解析默认访问www.game.com是访问真正的公网域名,所有我们Linux也要做解析,跟Windows一致。
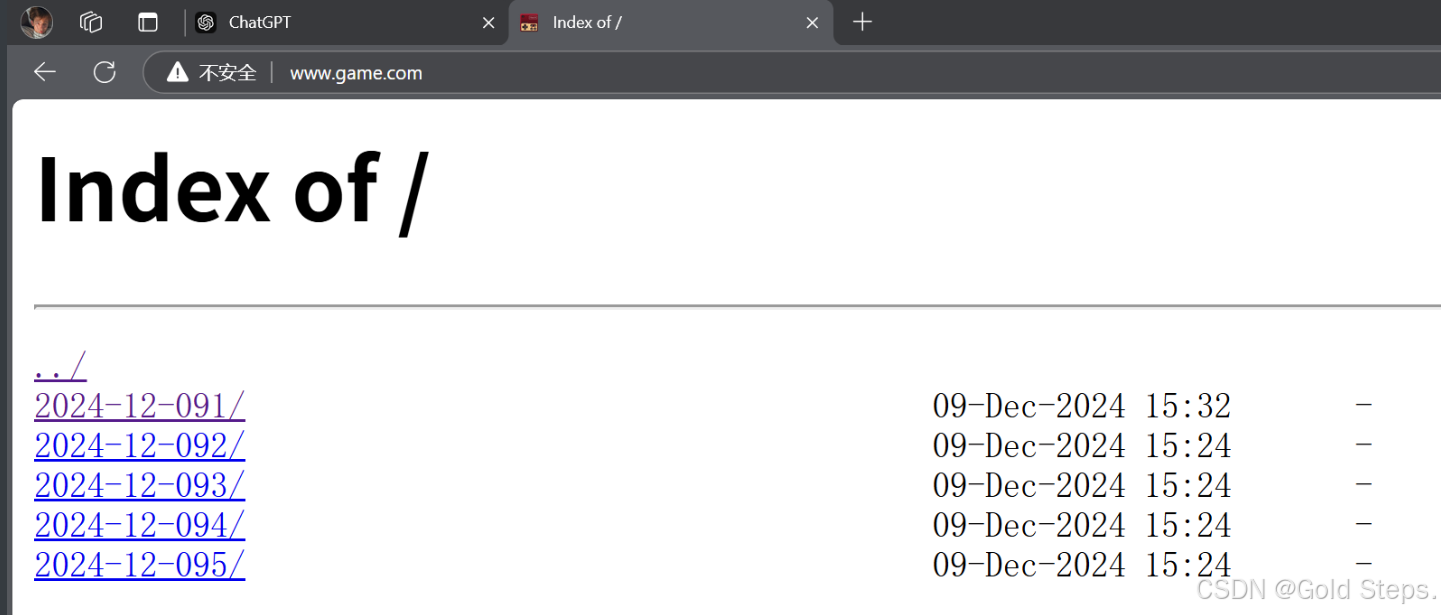
### 我们另外创建配置文件所需要的目录
[root@web01 /index/code]# mkdir `date +%F`{1..5}
[root@web01 /index/code]# ll
total 0
drwxr-xr-x 2 root root 6 Dec 9 15:24 2024-12-091
drwxr-xr-x 2 root root 6 Dec 9 15:24 2024-12-092
drwxr-xr-x 2 root root 6 Dec 9 15:24 2024-12-093
drwxr-xr-x 2 root root 6 Dec 9 15:24 2024-12-094
drwxr-xr-x 2 root root 6 Dec 9 15:24 2024-12-095
### 随便塞两个文件进去
[root@web01 /index/code]# cd 2024-12-091/
[root@web01 /index/code/2024-12-091]# ll
total 0
[root@web01 /index/code/2024-12-091]# touch CR7.jpg ; touch messi.png效果展示
2.用户验证模块
[root@web01 /etc/nginx/conf.d]# htpasswd -c -b /etc/nginx/auth.conf oldboy oldboy
Adding password for user oldboy
# -b 免交互直接在命令行输入密码 -c 创建文件的意思
### 配置用户登录模块
在server区块配置
auth_basic "hehe"; # 用户提示字符
auth_basic_user_file auth.conf; # 指定用户名密码文件的位置

[root@web01 /etc/nginx/conf.d]# cat /etc/nginx/auth.conf
oldboy:$apr1$J2Hr5dRg$Tn7NA/tztHhHa5MBO33a8/
包含关系,所以放/etc/nginx下面就可以了
## 配置文件示例

[root@web01 /etc/nginx/conf.d]# nginx -t
nginx: [emerg] invalid number of arguments in "auth_basic" directive in /etc/nginx/conf.d/index.conf:14
nginx: configuration file /etc/nginx/nginx.conf test failed
[root@web01 /etc/nginx/conf.d]# vim index.conf
server {
        listen 80;
        server_name www.game.com;
        location / {
                root /index/code;
                index index.html;
                autoindex on;              #开启索引
                charset utf-8.gbk;    	   #设置字符集,防止资源乱码
                autoindex_localtime on;	   #显示本地时间
                autoindex_exact_size off;  #以KB MB GB显示大小
                limit_rate_after 50m;      #到50M不限速,之后进行限速
                limit_rate 1m;    		   #限速每秒1MB/S下载
                auth_basic "This is limit modlue"; #访问模块提示符
                auth_basic_user_file auth.conf;	   # 访问显示模块的名称和密码位置,放在/etc/nginx/conf.d/index.conf配置文件里面,相当于放在/etc/nginx/nginx.conf里面
  }
}
访问测试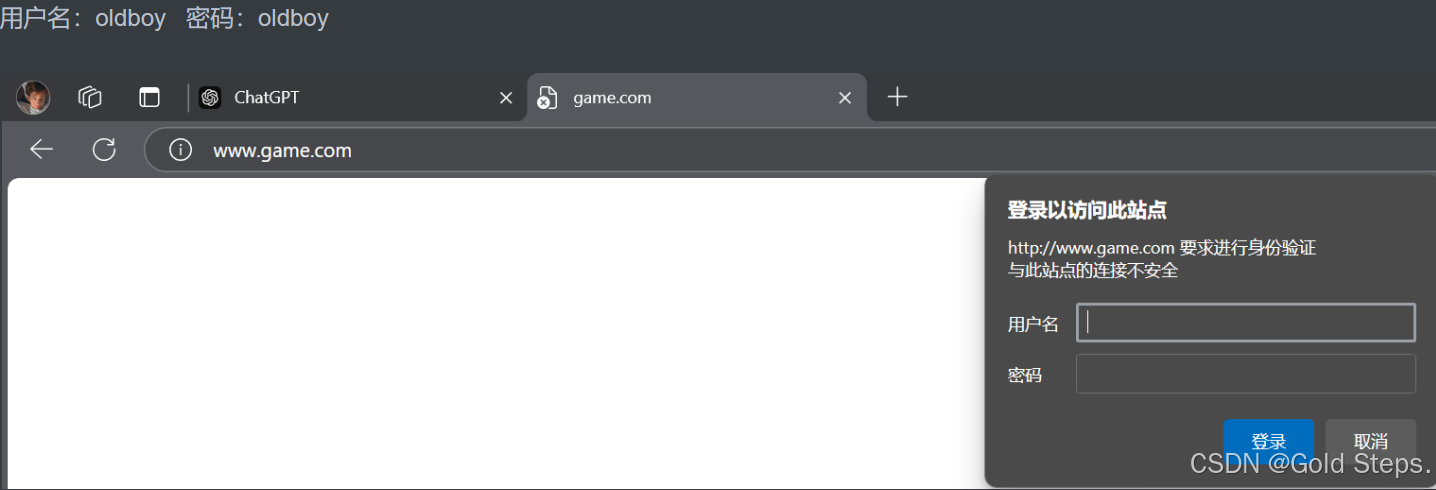
登录后
3. Nginx状态监控(Status Monitoring Module)
Nginx有一个用于监控状态的模块,可以查看服务器的性能和健康状况。这通常通过 stub_status 模块来实现,它能提供关于Nginx工作进程的活动信息,如请求数、连接数等。
语法示例:
Syntax: stub_status;
Default: —
Context: server, location
# 配置文件实例
server {
    location /nginx_status {
        stub_status on;
    }
}
配置文件实例
[root@web01 /etc/nginx/conf.d]# cat status.conf
server {
	listen 80;
	server_name www.game.com;
	location / {
  		root /index/code/;
		index index.html;
        location /nginx_status {
        	stub_status on;
    }
  }
}
这样配置后,访问 http://www.game.com/nginx_status 就能看到Nginx的状态信息。
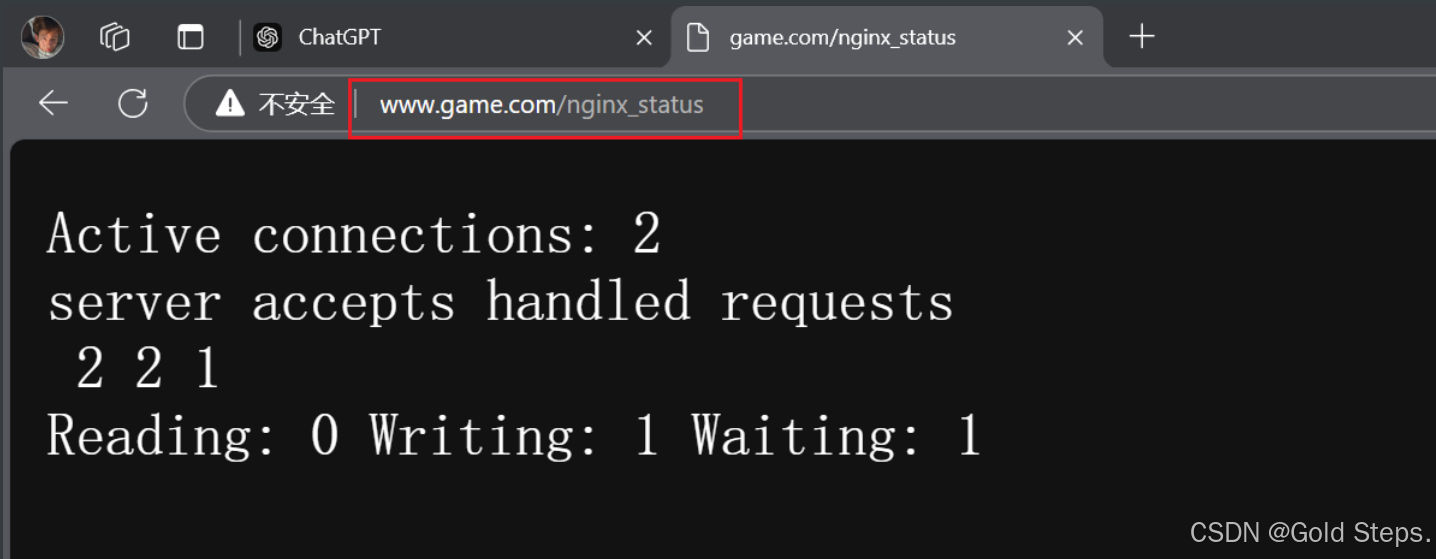
状态信息解释
Active connections: 2 # 当前TCP连接数
server  accepts        handled              requests
            28          28                  167
    已接收的tcp连接数  已响应的tcp连接数     http总请求
Reading: 0    Writing: 1      Waiting: 1
读取头数量 响应头 等待连接,开启了keepalive4.Nginx使用IP的访问控制(Access Control Module)
Nginx的访问控制模块允许你设置谁可以访问你的服务器或特定资源。你可以通过 allow 和 deny 指令来控制访问。
语法示例:
#允许配置语法
Syntax: allow address | CIDR | unix: | all;
Default: —
Context: http, server, location, limit_except
#拒绝配置语法
Syntax: deny address | CIDR | unix: | all;
Default: —
Context: http, server, location, limit_except
### 配置文件案例
server {
    location /secure/ {
        allow 192.168.1.0/24;  # 允许内网IP段访问
        deny all;  # 禁止所有其他IP访问
    }
}
配置实例
[root@web01 /code]# vim /etc/nginx/conf.d/index.conf
server {
        listen 80;
        server_name www.game.com;
        location / {
                root /game;
                index index.html;
        location /nginx_status {
                stub_status;
                deny 10.0.0.1; #拒绝0.1访问,如果我们直接写deny all;的话,后面再开放也没有意义了,所有一般拒绝所有都写后面
                allow all;     #允许所有
    }
  }
}
[root@web01 /code]# nginx -t
nginx: the configuration file /etc/nginx/nginx.conf syntax is ok
nginx: configuration file /etc/nginx/nginx.conf test is successful
[root@web01 /code]# nginx -s reload
[root@web01 /code]# curl www.game.com/nginx_status
Active connections: 1
server accepts handled requests
 31 31 52
Reading: 0 Writing: 1 Waiting: 0
[root@web01 /code]# !vim
vim /etc/nginx/conf.d/index.conf
server {
        listen 80;
        server_name www.game.com;
        location / {
                root /game;
                index index.html;
        location /nginx_status {
                stub_status on;
                allow 10.0.0.1;      #允许0.1
                deny all;            #其他全部拒绝
    }
  }
}
[root@web01 /code]# curl www.game.com/nginx_status
<html>
<head><title>403 Forbidden</title></head>
<body>
<center><h1>403 Forbidden</h1></center>
<hr><center>nginx/1.26.1</center>
</body>
</html>
只有10.0.0.1可以访问了,当前Linux主机10.0.0.7以及失败
5. Nginx的TCP连接数限制(Rate Limiting Module)
在企业中经常会遇到这种情况,服务器流量异常,负载过大等等。对于大流量恶意的攻击访问, 会带来带宽的浪费,服务器压力,影响业务,往往考虑对同一个ip的连接数,请求数、进行限制。
Nginx也提供了限制访问频率的功能,可以防止恶意攻击(比如DDoS攻击)或过度请求造成服务器压力。常用的指令有 limit_req 和 limit_conn。
配置示例:
#模块名ngx_http_limit_conn_module
Syntax: limit_conn_zone key zone=name:size;
Default: —
Context: http
######
Syntax: limit_conn zone number;
Default: —
Context: http, server, location
server {
    location / {
        limit_req zone=req_limit_per_ip burst=10 nodelay;
    }
}
配置实例
[root@web01 /etc/nginx/conf.d]# vim index.conf
limit_conn_zone $remote_addr zone=conn_zone:10m;
# 限制模块名称  客户端IP    开辟内存空间名称叫conn_zone 大小为10m
server {
        listen 80;
        server_name www.game.com;
        location / {
                root /game;
                index index.html;
                limit_conn conn_zone 1; #限制空间的所有IP同一时间只有1个TCP连接
  }
}
### 案例2:
[root@web01 /etc/nginx/conf.d]# vim index.conf
#limit_conn_zone $remote_addr zone=conn_zone:10m;
limit_req_zone $binary_remote_addr zone=req_zone:10m rate=20r/s;
# 限制模块名称  客户端IP    开辟内存空间名称叫conn_zone 大小为10m
server {
        listen 80;
        server_name www.game.com;
        location / {
                root /game;
                index index.html;
                #limit_conn conn_zone 1; #限制空间的所有IP同一时间只有1个TCP连接
                limit_req zone=req_zone burst=3 nodelay;   #限制延时处理3个,剩余返回503等错误码
        location /nginx_status {
                stub_status;
                allow 10.0.0.1;
                deny all;
    }
  }
}
[root@web01 /etc/nginx/conf.d]# nginx -t
nginx: the configuration file /etc/nginx/nginx.conf syntax is ok
nginx: configuration file /etc/nginx/nginx.conf test is successful
[root@web01 /etc/nginx/conf.d]# nginx -s reload
在这个例子中,limit_req 用于限制每个IP的请求频率,每秒最多可以发送一定数量的请求(例如:限制每秒10次)。burst=10 允许短时间内有10次的突发请求,而 nodelay 则表示请求不会被延迟。
使用ab工具进行压力测试
yum install -y httpd-tools
ab -n 2000 -c 50 http://www.game.com/nginx_status
命令解释:
ab:调用 Apache Bench 工具进行压力测试。
-n 2000:指定总共发起 2000个请求(requests)。这个参数告诉 ab 工具向指定的URL发送2000次HTTP请求。
-c 50:指定 并发请求数为50。这意味着 ab 会同时发起 50个请求,模拟50个客户端并发地访问目标URL。每当有请求完成后,会立即发起下一个请求,直到达到总共2000个请求。
http://www.game.com/nginx_status:目标URL,即你要进行压力测试的地址。这里的URL指向的是 nginx_status 页面,通常是Nginx的状态监控页面。在该页面上,Nginx会显示有关当前请求、连接数等状态信息。
### 查看日志
[root@web01 /etc/nginx/conf.d]# tail -f /var/log/nginx/access.log
10.0.0.7 - - [09/Dec/2024:16:34:38 +0800] "GET /nginx_status HTTP/1.0" 503 197 "-" "ApacheBench/2.3" "-"
10.0.0.7 - - [09/Dec/2024:16:34:38 +0800] "GET /nginx_status HTTP/1.0" 503 197 "-" "ApacheBench/2.3" "-"
10.0.0.7 - - [09/Dec/2024:16:34:38 +0800] "GET /nginx_status HTTP/1.0" 503 197 "-" "ApacheBench/2.3" "-"
10.0.0.7 - - [09/Dec/2024:16:34:38 +0800] "GET /nginx_status HTTP/1.0" 503 197 "-" "ApacheBench/2.3" "-"
10.0.0.7 - - [09/Dec/2024:16:34:38 +0800] "GET /nginx_status HTTP/1.0" 503 197 "-" "ApacheBench/2.3" "-"
6. Nginx Location 模块(Location Module)
location 是Nginx中一个非常重要的模块,它允许你根据请求的URI(即URL路径)来匹配不同的处理规则。通过 location 模块,你可以对不同路径的请求进行不同的处理,比如返回静态文件、转发到后端应用等。
Nginx的location指令用于根据请求的URI路径来匹配并执行相应的配置。location指令可以根据路径的不同进行不同的处理,如代理请求、返回静态文件、启用某些模块等。
语法实例
location [modifier] /uri {
    # 配置内容
}
modifier(可选):用于指定匹配规则的修饰符。常见的有:

=:精确匹配,只有完全匹配时才会执行。
^~:前缀匹配,匹配时优先级高于正则表达式匹配。
~:正则匹配(大小写敏感)。
~*:正则匹配(不区分大小写)。
无修饰符:前缀匹配(从左到右匹配路径的一部分)。
/uri:请求的URI路径,可以是完整路径、目录或正则表达式。-
location语法优先级排列===>表格展示
| 匹配符 | 匹配规则 | 优先级 |
|---|---|---|
| = | 精准匹配 | 1 |
| ^~ | 以某个字符串开头 | 2 |
| ~ | 区分大小写的正则匹配 | 3 |
| ~* | 不区分大小写的正则匹配 | 4 |
| / | 通用匹配,任何请求都会匹配到 | 5 |
配置实例
[root@web01 /etc/nginx/conf.d]# vim index.conf
server {
    listen 80;
    server_name www.game.com/documents/123456.gif;
    default_type text/html;

    location = / {
        return 200 "configuration A";  # 精确匹配 '/'
    }

    location / {
        return 200 "configuration B";  # 前缀匹配 '/'
    }

    location /documents/ {
        return 200 "configuration C";  # 前缀匹配 '/documents/'
    }

    location ^~ /images/ {
        return 200 "configuration D";  # 前缀匹配 '/images/',并且不进行正则匹配
    }

    location ~* \.(gif|jpg|jpeg)$ {
        return 200 "configuration E";  # 匹配 .gif, .jpg, .jpeg 文件,且不区分大小写
    }
    location ~* \^123456  {
        return 200 "configuration F";  # 匹配 .gif, .jpg, .jpeg 文件,且不区分大小写
    }
}
The “/” request will match configuration A, the “/index.html” request will match configuration B, the “/documents/document.html” request will match configuration C, the “/images/1.gif” request will match configuration D, and the “/documents/1.jpg” request will match configuration E.
测试:
[root@web01 /etc/nginx/conf.d]# curl 127.0.0.1
configuration A
[root@web01 /etc/nginx/conf.d]# curl 127.0.0.1/index.html
configuration B
[root@web01 /etc/nginx/conf.d]# curl 127.0.0.1/documents/documents.html
configuration C
[root@web01 /etc/nginx/conf.d]# curl 127.0.0.1/images/1.gif
configuration D
[root@web01 /etc/nginx/conf.d]# curl 127.0.0.1/documents/1.gif
configuration E四、nginx反向代理
-
解释正向代理和反向代理。
-
1. 正向代理
正向代理就像一个“中介”或者“代理人”。它是客户端(通常是用户)和服务器之间的一个“中转站”,它代表客户端向目标服务器发送请求。
举个例子: 假设你在中国,想访问国外的某个网站。因为某些原因(比如防火墙),你直接访问不了这个网站。那么你可以通过一个正向代理服务器(比如一个位于国外的代理服务器)来访问这个网站。你请求访问该网站时,代理服务器代替你去访问网站,然后将网站的内容返回给你。
工作原理:
-
用户发送请求到代理服务器。
-
代理服务器再将请求转发到目标服务器。
-
目标服务器返回数据给代理服务器,代理服务器再将数据返回给用户。
-
2. 反向代理
反向代理则是服务器端的“中介”。它代表目标服务器接受外部的请求,并将请求转发到多个后端服务器之一处理。用户并不知道到底是哪台服务器在处理他们的请求。
举个例子: 你访问一个大网站(比如一个电商网站),这个网站其实背后有多个服务器在同时运行,分别处理不同的任务(比如处理支付、查询商品、用户登录等)。你访问网站时,反向代理服务器会决定将你的请求转发给哪台后端服务器去处理,然后将处理结果返回给你。
工作原理:
-
用户发送请求到反向代理服务器。
-
反向代理服务器决定将请求转发给哪个后端服务器。
-
后端服务器处理请求并将结果返回给反向代理服务器,反向代理服务器再返回给用户。
-
总结:
-
正向代理:客户端通过代理服务器访问目标服务器,代理服务器代表客户端发请求。
-
反向代理:服务器通过代理服务器接受用户请求,并将请求转发给后端服务器处理,用户不直接访问后端服务器。
a.新建一个反向代理的服务器,新建一台虚拟机也就是
[root@lb01 ~]# ip a s ens33 |sed -ne '3s#^.*et ##g' -e '3s#/.*##gp'
10.0.0.5
[root@lb01 ~]# ip a s ens36 |sed -ne '3s#^.*et ##g' -e '3s#/.*##gp'
172.16.1.5
b.配置反向代理
安装nginx
[root@lb01 ~]# yum -y install nginx

配置代理
[root@lb01 /etc/nginx/conf.d]# cat lb.conf
server {
	listen 80;
	server_name www.wp.com;
	location / {
		proxy_pass http://10.0.0.7;
		proxy_set_header Host $http_host;
		proxy_http_version 1.1;
  }
}


解释 : proxy_set_header Host $http_host;
   这行代码设置代理请求中的 `Host` 头为原始请求中的 `Host` 头。 `$http_host` 是 Nginx 中一个变量,它表示客户端请求的 `Host` 头的值,通常是访问的域名或 IP 地址。这样做可以确保在代理请求中,后端服务器能知道原始请求的 `Host` 值,可能用于正确处理域名、虚拟主机等。
### 总结location下面的三行含义:
- 所有请求被代理到 10.0.0.7。
- 保持原始请求的 Host 头信息。
- 使用 HTTP/1.1 协议与后端通信。
[root@lb01 conf.d]# nginx -t
nginx: the configuration file /etc/nginx/nginx.conf syntax is ok
nginx: configuration file /etc/nginx/nginx.conf test is successful
[root@lb01 conf.d]# systemctl restart nginx

windowshosts指向到10.0.0.5
10.0.0.5 www.wp.com-
通过抓包可以看出我们的数据包传输过程,例如wireshark,小鲨鱼抓http的包。
五、负载均衡
0.什么是负载均衡
Nginx 的 负载均衡 是指将客户端的请求智能地分发到多个后端服务器,以实现流量的均匀分配,从而提高系统的可用性、可靠性和性能。Nginx 支持多种负载均衡策略,如轮询、最少连接、IP哈希等,确保每台服务器的负载保持平衡,避免单一服务器过载。负载均衡可以帮助处理高流量,提升网站的响应速度和稳定性。
nginx的proxy_pass模块将请求转发给了地址池,地址池是通过upstream模块来定义的。
这里我们可以准备两台nginx的web服务器,简单的配置一个静态页面,这里忘记怎么配置的可以查看我们第二阶段的基础案例。
1.负载均衡配置
| 配置项 | 含义 | 作用 |
|---|---|---|
proxy_connect_timeout 30; | 设置与后端服务器建立连接的超时时间为 30 秒。如果超时,Nginx 将放弃连接。 | 避免在无法连接到后端服务器时浪费时间和资源。 |
proxy_send_timeout 60; | 设置向后端服务器发送请求数据的超时时间为 60 秒。如果超时,Nginx 将关闭连接并返回错误。 | 处理大请求或文件上传时,防止连接超时。 |
proxy_read_timeout 60; | 设置从后端服务器读取响应数据的超时时间为 60 秒。如果超时,Nginx 将关闭连接并返回错误。 | 适用于处理慢速响应的请求,避免等待过长时间。 |
proxy_buffering on; | 启用代理缓存,将后端服务器的响应数据缓存在内存中,直到完全接收到响应才发送给客户端。 | 提升性能,减少后端服务器负担,减少客户端等待时间。 |
proxy_buffer_size 32k; | 设置每个代理缓冲区的大小为 32KB,用于存储响应头部数据。 | 提供足够的空间缓存较大的响应头部,防止头部数据过大导致错误。 |
proxy_buffers 4 128k; | 设置为每个请求分配 4 个缓冲区,每个缓冲区的大小为 128KB,用于存储响应体数据。 | 缓存大响应内容,提升大文件传输的效率,减少客户端等待。 |
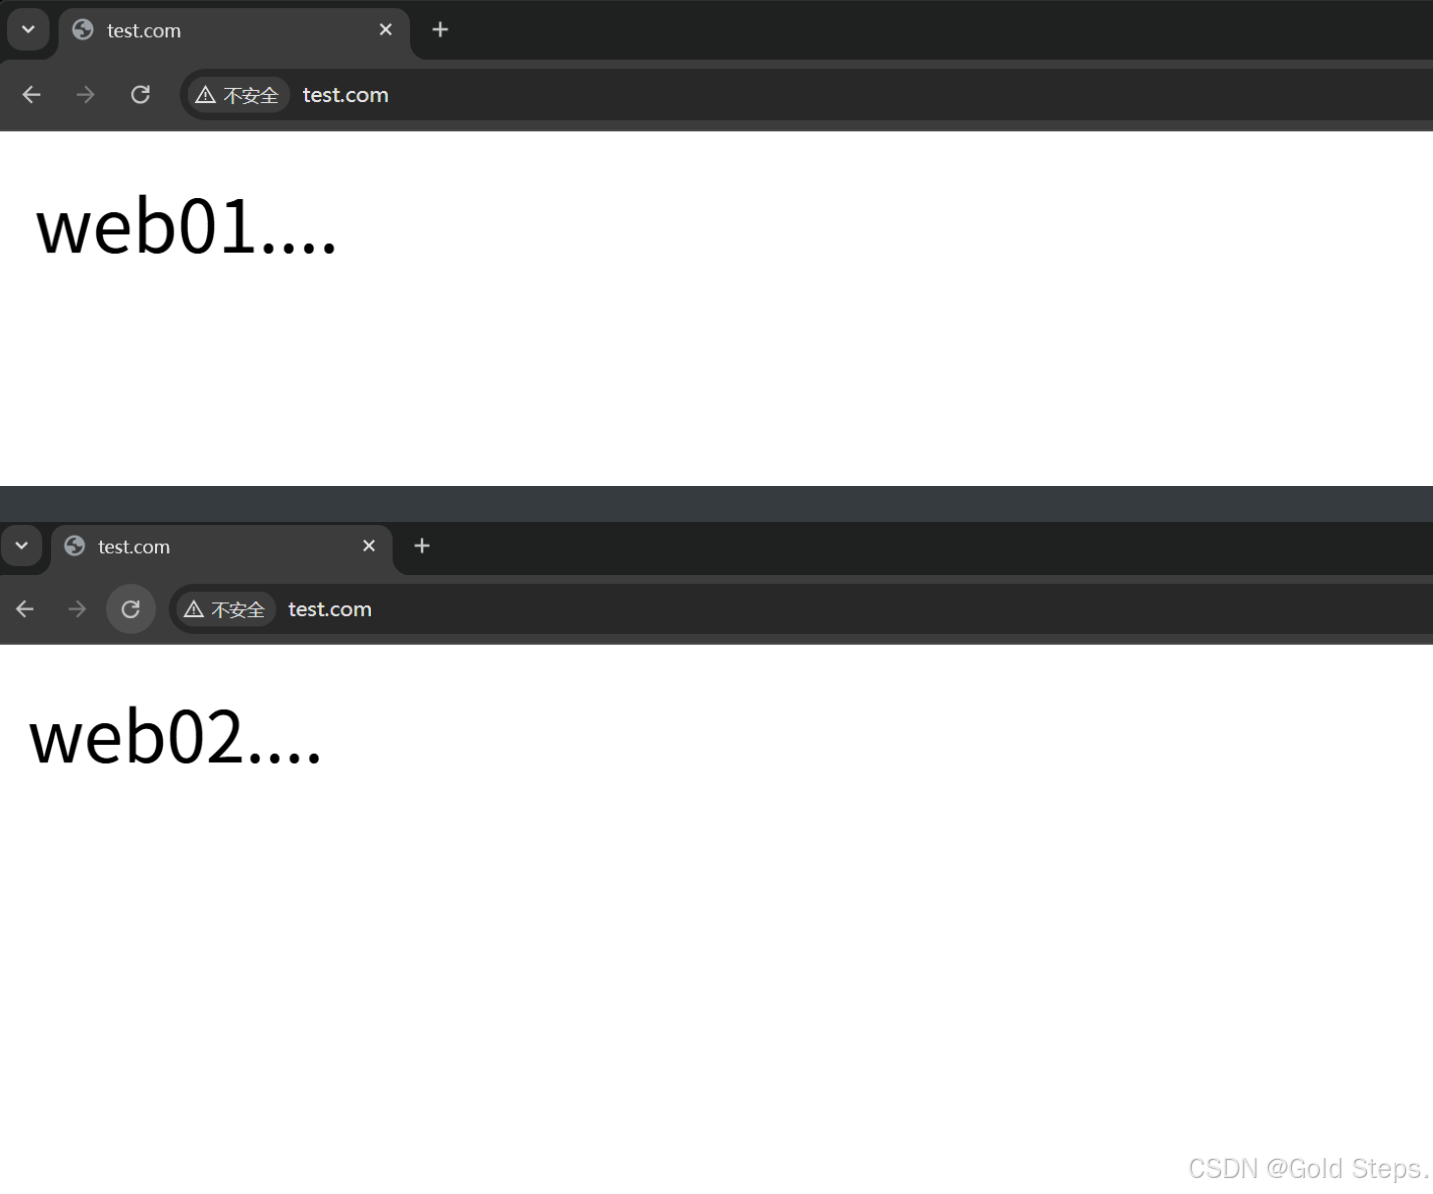
web01的静态页面
[root@web01 /etc/nginx/conf.d]# vim test.conf
server {
        listen 80;
        server_name www.test.com;

        location / {
                root /code/test;
                index index.html;
  }
}
[root@web01 /etc/nginx/conf.d]# nginx -t
nginx: the configuration file /etc/nginx/nginx.conf syntax is ok
nginx: configuration file /etc/nginx/nginx.conf test is successful
[root@web01 /etc/nginx/conf.d]# nginx -s reload
[root@web01 /etc/nginx/conf.d]# mkdir /code/test
[root@web01 /etc/nginx/conf.d]# echo web01.... >/code/test/index.html

web02的静态页面
[root@web02 /etc/yum.repos.d]# vim /etc/nginx/conf.d/test.conf
server {
        listen 80;
        server_name www.test.com;

        location / {
                root /code/test;
                index index.html;
  }
}
[root@web02 /etc/yum.repos.d]# nginx -t
nginx: the configuration file /etc/nginx/nginx.conf syntax is ok
nginx: configuration file /etc/nginx/nginx.conf test is successful
[root@web02 /etc/yum.repos.d]# nginx -s reload
[root@web02 /etc/yum.repos.d]# mkdir /code/test
[root@web02 /etc/yum.repos.d]# echo web02.... >/code/test/index.html

###
做Windows的hosts解析
10.0.0.5 www.test.com
2.查看nginx负载均衡
访问:www.test.com,然后多刷新页面会看到请求平均分配到7和8上面,页面内容也会是web01.。。web02
A.NGINX七层负载均衡与会话保持
负载均衡(Load Balancing)是分配网络流量到多个服务器的技术,以确保高可用性和更好的性能。它可以分为四层负载均衡(L4)和七层负载均衡(L7),主要区别在于它们处理流量的层级和方式。
七层负载均衡(L7 Load Balancing)
-
工作层级:L7负载均衡在OSI模型的应用层(Application Layer)工作,能够读取并理解传输的数据内容,比如HTTP头信息、URL路径、HTTP请求方法等。
-
主要依据:L7负载均衡不仅可以基于传统的TCP/UDP元数据,还能基于HTTP请求的具体内容(如URL路径、主机头、Cookie等)进行路由决策。
-
适用场景:适用于更复杂的应用需求,比如基于内容路由、SSL终止、用户认证等场景。
负载均衡的参数配置
1.错误代码
作用: 代理服务器向后转发如果遇到500 502 503 504 则直接请求下一台WEB服务器,这样可以避免将请求分给down掉的机器上,导致访问不正常。
[root@lb01 /etc/nginx/conf.d]# vim lb.conf
upstream webs {
        server 172.16.1.7;
        server 172.16.1.8;
}
server {
        listen 80;
        server_name www.wp.com;
        location / {
        proxy_pass http://webs;
        include proxy_params;
        proxy_next_upstream error timeout http_500 http_502 http_503 http_504;
        }
}
[root@lb01 /etc/nginx/conf.d]# nginx -t
nginx: the configuration file /etc/nginx/nginx.conf syntax is ok
nginx: configuration file /etc/nginx/nginx.conf test is successful
[root@lb01 /etc/nginx/conf.d]# nginx -s reload
2.负载均衡的调度算法
1.rr轮循      默认使用的调度算法
2.weight     加权轮询  后端服务器配置不同的时候
3.ip_hash    以IP地址的方式进行转发,第一次10.0.0.1请求的是WEB01 那么以后每次来访问都是web01来响应你
4.url_hash   以url来转发到不同的web服务器
5.least_conn 最少链接数 看哪台web服务器的TCP链接少,我就分给谁。
B.会话保持
在使用负载均衡的时候会遇到会话保持的问题,可通过如下方式进行解决。
1.使用nginx的 ip_hash ,根据客户端的IP,将请求分配到对应的IP上
2.基于服务端的 session 会话共享(NFS,MySQL,memcache,redis,file)
在解决负载均衡绘画问题,我们需要了解 session 和 cookie 的区别。
浏览器端存的是 cookie 每次浏览器发请求到服务端时,报文头是会自动添加 cookie 信息的。
服务端会查询用户的 cookie 作为key去存储里找对应的value(session)同意域名下的网站的 cookie 都是一样的,所以无论几台服务器,无论请求分配到哪一台服务器上同一用户的 cookie 是不变的。也就是说 cookie 对应的 session 也是唯一的。所以,这里只要保证多台业务服务器访问同一个共享存储服务器(NFS,MySQL,memcache,redis,file)就行了。
1.搭建服务体验会话保持
我们这边部署一个服务来更直观的体验一下会话保持
这里需要用到数据库服务,这里实验我们使用mariadb,有兴趣的伙伴可以跟着做一下。
1.部署phpmyadmin的业务(两台web机器)
# 两台机器都要部署phpmyadmin业务,部署的步骤相同,这里只展示一次部署步骤。
[root@web01 ~]# cat /etc/nginx/conf.d/admin.conf
server {
        listen 80;
        server_name www.admin.com;
        root /code/admin;
        location / {
                index index.php index.html;
        }
        location ~ \.php$ {
                fastcgi_pass 127.0.0.1:9000;
                fastcgi_param SCRIPT_FILENAME $document_root$fastcgi_script_name;
                include fastcgi_params;
        }
}
[root@web01 /etc/nginx/conf.d]# nginx -t
nginx: the configuration file /etc/nginx/nginx.conf syntax is ok
nginx: configuration file /etc/nginx/nginx.conf test is successful
[root@web01 /etc/nginx/conf.d]# systemctl restart nginx
[root@web01 /etc/nginx/conf.d]# mkdir /code/admin && cd /code/admin
[root@web01 /code/admin]# wget https://files.phpmyadmin.net/phpMyAdmin/5.2.1/phpMyAdmin-5.2.1-all-languages.zip
[root@web01 /code/admin]# unzip phpMyAdmin-5.2.1-all-languages.zip
解压发现有两层目录,所以我们要移动出来
[root@web01 /code/admin]# ll
total 14748
drwxr-xr-x 12 root root     4096 Feb  7  2023 phpMyAdmin-5.2.1-all-languages
-rw-r--r--  1 root root 15096155 Mar 14  2024 phpMyAdmin-5.2.1-all-languages.zip
[root@web01 /code/admin]# mv phpMyAdmin-5.2.1-all-languages/* .
### 然后手动配置代码指向数据库
[root@web01 /code/admin]# grep -n '172' config.sample.inc.php
30:$cfg['Servers'][$i]['host'] = '172.16.1.51';
### 因为这个是sample样本示例文件,所以默认不生效,我们要改个名字,把sample删除掉即可。
[root@web01 /code/admin]# mv config.sample.inc.php ./config.inc.php
[root@web01 /code/admin]# ll
。。。
-rw-r--r--  1 root root     4812 Dec 12 16:18 config.inc.php
### 修改session会话目录的权限
[root@web01 /code/admin]# chown www.www /var/lib/php/session/
[root@web01 /code/admin]# ll -d /var/lib/php/session/
drwxrwx--- 2 www www 6 Feb 23  2024 /var/lib/php/session/
[root@web02 /code/admin]# systemctl restart nginx
[root@web02 /code/admin]# systemctl restart php-fpm.service
### Windows做hosts解析
## nginx的phpmyadmin业务
10.0.0.7 www.admin.com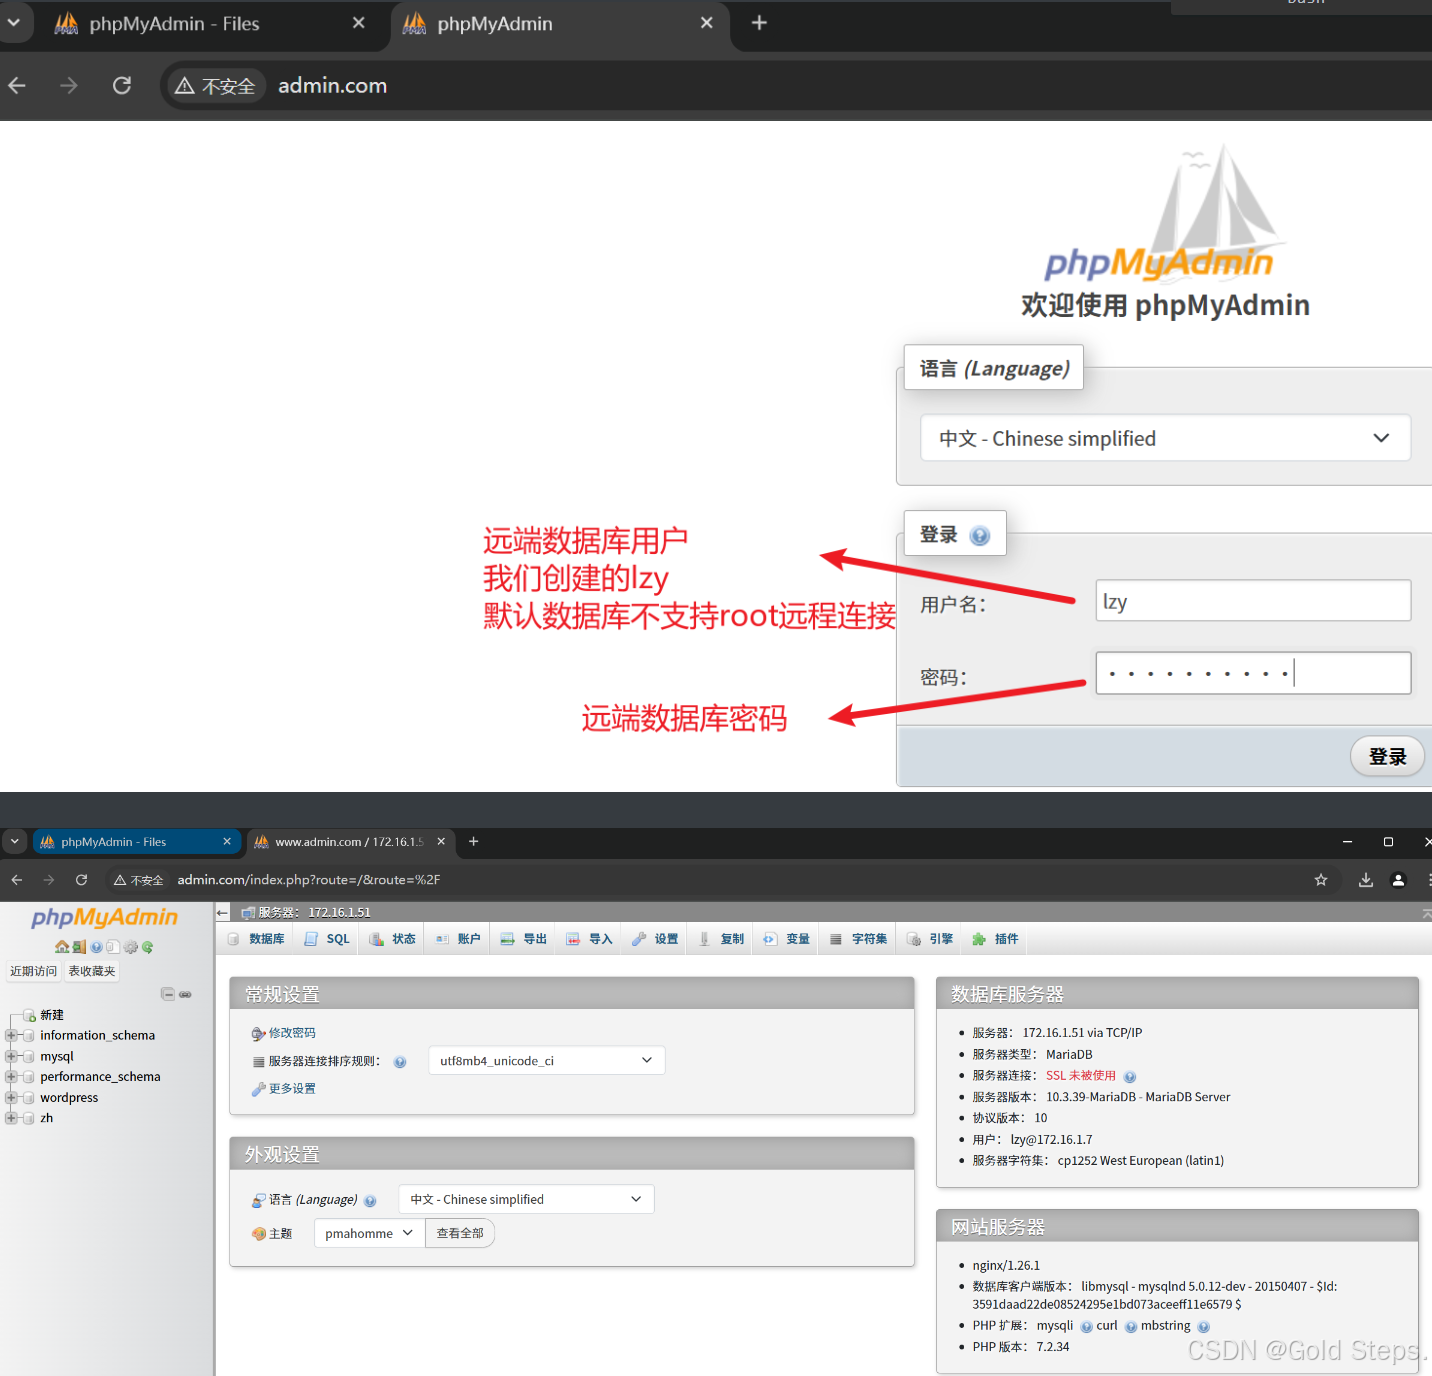
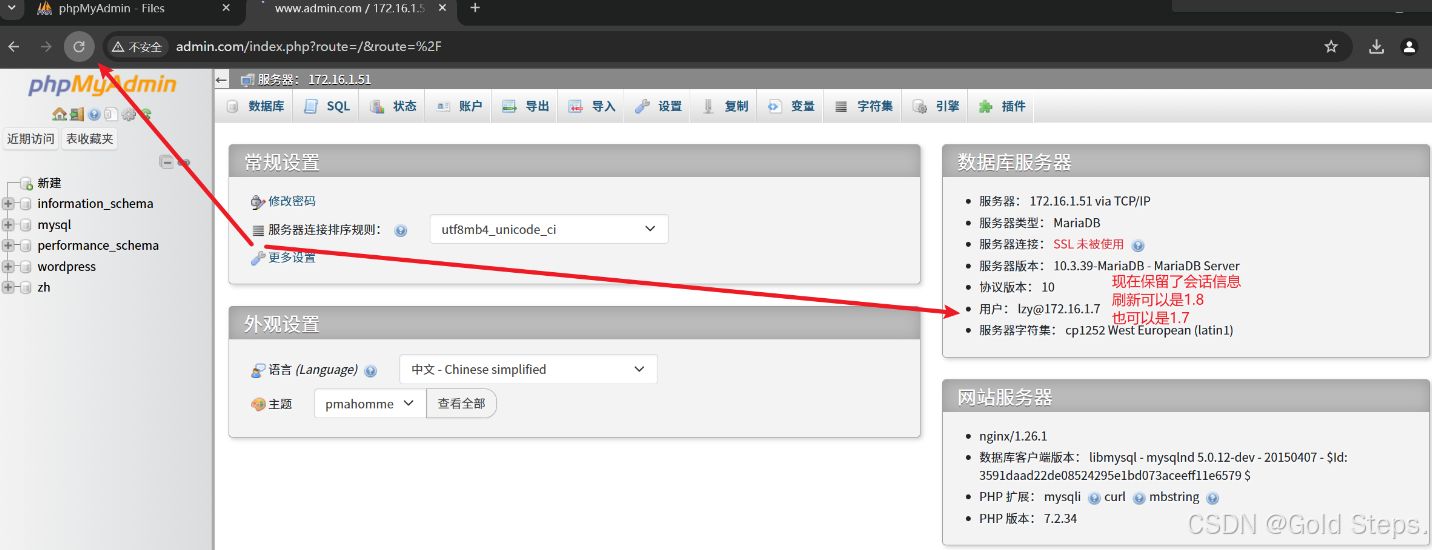
2.配置负载均衡
[root@lb01 /etc/nginx/conf.d]# vim lb.conf
upstream admin {
        server 172.16.1.7:80;
        server 172.16.1.8:80;
}
server {
        listen 80;
        server_name www.admin.com;
        location / {
                proxy_pass http://admin;
                include proxy_params;
        }
}

[root@lb01 /etc/nginx/conf.d]# nginx -t
nginx: the configuration file /etc/nginx/nginx.conf syntax is ok
nginx: configuration file /etc/nginx/nginx.conf test is successful
[root@lb01 /etc/nginx/conf.d]# systemctl restart nginx


Windows的hosts解析到10.0.0.5节点上
## nginx的phpmyadmin业务
10.0.0.5 www.admin.com

web01的会话信息:
[root@web01 /code/admin]# ll /var/lib/php/session/
total 20
-rw------- 1 www www 2890 Dec 12 16:24 sess_6bj66u70geas71h91k4ni31evc
-rw------- 1 www www  103 Dec 12 16:31 sess_k8rodmist5qlppvhikc1sktg63
-rw------- 1 www www  103 Dec 12 16:31 sess_pectgg9j8cgsv2ja3v2fr5pde6
-rw------- 1 www www  103 Dec 12 16:31 sess_tu0grk993kfrjdrb3d0iauiuu2
-rw------- 1 www www  103 Dec 12 16:31 sess_uu64m8dd7ci81een97bdjnvebr
####################################################
web02的会话信息:
[root@web02 /code/admin]# ll /var/lib/php/session/
total 20
-rw------- 1 www www  103 Dec 12 16:31 sess_2o8jl1gam0427fhl376odus2hf
-rw------- 1 www www  103 Dec 12 16:31 sess_8h52o97mpb6p9e6vf7lvq7927n
-rw------- 1 www www  103 Dec 12 16:31 sess_91d5vmqobld4n91kfnlclg5fgv
-rw------- 1 www www  103 Dec 12 16:31 sess_aahdqd8olneudhalcvmj3tsfrt
-rw------- 1 www www 2890 Dec 12 16:28 sess_pa3l1hgoii0adcttc6cjr4rigc


配置完成后我们发现登录不上去了,一直重新登陆。
使用负载均衡的轮询功能之后,会发现,如果将session保存在本地文件的话,永远都登录不上去www.admin.com
######详细解释
会话存储在本地文件中
每个服务器(web01 和 web02)将用户的 PHP 会话(session)存储在自己的本地文件系统中。
会话文件以文件名(如 sess_xxx)标识,每个会话对应特定用户的状态信息。
负载均衡的轮询策略

负载均衡会根据某种算法(如轮询)将用户的请求分配到不同的后端服务器(web01 或 web02)。
由于轮询机制,同一个用户的连续请求可能会被分配到不同的服务器。
会话不一致导致重新登录

当用户第一次访问时,会在某台服务器(如 web01)上生成会话并存储。
下一次请求被分配到另一台服务器(如 web02),但 web02 的本地存储中并不存在与用户会话对应的 session 文件,因此用户状态丢失,系统会认为用户未登录,强制重新登录。
为什么“永远都登录不上”?
负载均衡的轮询会导致:

第一次请求:分配到 web01,生成 session 文件。
第二次请求:分配到 web02,找不到该 session 文件,用户状态丢失。
第三次请求:分配回 web01,可能重新生成新的 session,导致循环。
因此,用户无法保持会话,系统表现为“不断重新登录”。
3.安装redis
这是我们需要用到共享存储服务器了,这次实验我们使用的是Redis。需要新建一个虚拟机,安装Redis。
51服务器上部署redis服务
[root@db01 ~]# yum -y install redis

配置redis监听端口 默认127.0.0.1
[root@db01 ~]# vim /etc/redis/redis.conf
[root@db01 ~]# grep -n 172.16.1.51 /etc/redis/redis.conf
75:bind 127.0.0.1 172.16.1.51

启动redis
[root@db01 ~]# systemctl start redis
[root@db01 ~]# systemctl enable redis

登录查看
[root@db01 ~]# redis-cli
127.0.0.1:6379> keys *
(empty array)
127.0.0.1:6379> quit
4.配置web机器使用redis解决会话登录问题(两台都部署redis)
PHP安装redis插件  # 注意两台web都需要安装
默认安装redis没有与php建立连接的模块
如果yum install 安装的redis有的话则直接安装即可。
我们这里直接编译安装。
### 编译安装redis
第一步: 下载redis源码包
[root@web01 ~]# wget http://pecl.php.net/get/redis-4.0.1.tgz
第二步: 解压代码
[root@web01 ~]# tar xf redis-4.0.1.tgz
如果默认源包里面没有Makefile的文件的话,我们需要用到`phpize`命令来初始化一下
第三步配置
我们这个redis4.0.1的源包发现没有Makefile文件,需要我们初始化一下。
[root@web01 ~/redis-4.0.1]# yum install php-devel
[root@web01 ~/redis-4.0.1]# phpize
Configuring for:
PHP Api Version:         20170718
Zend Module Api No:      20170718
Zend Extension Api No:   320170718
[root@web01 ~/redis-4.0.1]# ./configure
第四步开始编译安装
[root@web01 ~/redis-4.0.1]# make && make install
第五步开启redis插件功能,配置文件增加以下一行内容
[root@web01 ~/redis-4.0.1]# grep 'redis.so' -n /etc/php.ini
1360:extension=redis.so
第六步修改配置文件,指向redis服务
[root@web01 ~]# awk 'NR==1222||NR==1255' /etc/php.ini
session.save_handler = redis
session.save_path = "tcp://172.16.1.51:6379"
[root@web01 ~]# tail -4 /etc/php-fpm.d/www.conf
##注释前两行
;php_value[session.save_handler] = files
;php_value[session.save_path]    = /var/lib/php/session
php_value[soap.wsdl_cache_dir]  = /var/lib/php/wsdlcache
;php_value[opcache.file_cache]  = /var/lib/php/opcache
第七步重启服务
[root@web01 ~/redis-4.0.1]# systemctl restart php-fpm.service
###
web02部署方式一样,这里不在赘述,直接安装即可
############注意:
两台一定都要编译安装redis,不然只修改配置文件是不成功的!!!


############
#   测试    #
############
www.admin.com

[root@db01 ~]# redis-cli
127.0.0.1:6379> keys *
1) "PHPREDIS_SESSION:21fa6ee638oblb6rje27r16vda"
2) "PHPREDIS_SESSION:h4k21bq3tm1mn6s30nba7gbkbe"
3) "PHPREDIS_SESSION:5cd6h1u6kl1863mapdfne5js2u"
4) "PHPREDIS_SESSION:dbhh56cgihrtiajfji3cuj82dd"
5) "PHPREDIS_SESSION:9a4cpunh16et9ock18qbs3adh3"
6) "PHPREDIS_SESSION:k8j4pd44s8d1gkmd0ke79i1ruj"
127.0.0.1:6379>
C.NGINX四层负载与动静分离
1、什么是四层负载
-
四层负载均衡(L4 Load Balancing)
-
工作层级:L4负载均衡在OSI模型的传输层(Transport Layer)工作,主要根据TCP或UDP协议来进行流量的分配。
-
主要依据:它根据源IP地址、目标IP地址、源端口、目标端口等信息来决定如何转发流量。L4负载均衡并不关心应用层数据的内容,只关注TCP/UDP连接的元数据。
-
适用场景:通常用于简单的基于IP和端口的流量分配,比如HTTP请求的前期路由等。
2.七层与四层的负载区别
-
主要区别
-
层级不同:四层负载均衡在传输层工作,七层负载均衡在应用层工作。
-
关注内容不同:L4负载均衡仅基于网络连接的信息进行流量分发,而L7负载均衡可以基于应用层的数据(如HTTP请求的内容)做更细粒度的路由。
-
性能与灵活性:L4负载均衡更为简单和高效,通常适用于不需要深度数据分析的场景;而L7负载均衡更灵活,适用于需要精细控制流量和多样化业务需求的场景,但由于需要处理更多的数据内容,性能上通常不如L4。
-
L4只支持IP加端口负载,但是L7支持域名
简而言之,L4主要用于基本的流量分发,而L7则能够做更复杂的路由决策和处理。
四层负载均衡是基于传输层协议包来封装的(如:TCP/IP),那我们前面使用到的七层是指的应用层,他的组装在四层的基础之上,无论四层还是七层都是指的OSI网络模型。
### 面试题
Nginx支持四层负载吗?
支持,但是是假的,不是真四层,只是模拟的四层代理。底层还是NAT模式。(代理模式)。可以用LVS来做四层转发。
那我们简单看一下真正做四层负载的LVS服务
LVS(Linux Virtual Server)是一种负载均衡技术,能够通过多种工作模式实现流量的分发和管理。以下是LVS几种常见工作模式的简要总结:
| 工作模式 | 描述 | 优缺点 |
|---|---|---|
| NAT(Network Address Translation) | 通过改变源IP地址和目标IP地址来进行负载均衡,将请求转发到不同的后端服务器。 | 优点:支持不同类型的应用;配置简单。 缺点:负载均衡服务器可能成为瓶颈。 |
| DR(Direct Routing) | 请求直接通过负载均衡器转发到后端服务器,负载均衡器只修改目标IP地址,响应直接返回客户端。 | 优点:负载均衡器的负载较低;高效,适用于高流量场景。 缺点:后端服务器需要在同一网络上。 |
| TUN(IP Tunneling) | 负载均衡器通过隧道技术将请求转发到后端服务器,隧道技术可跨越不同的网络环境。 | 优点:支持跨网络架构的负载均衡;能在复杂网络环境中工作。 缺点:性能较低,增加延迟。 |
| FULL NAT模式 | 适合需要高度控制流量和安全性场景,但可能会带来性能瓶颈和配置复杂性。 | 优点:Full NAT模式简化了客户端配置,增强了安全性,并适应多种应用场景。 缺点:可能导致负载均衡器成为性能瓶颈,并增加网络延迟。 |
3.四层负载的应用场景
1、四层+七层来做负载均衡,四层可以保证七层的负载均衡的高可用性;如:nginx就无法保证自己的服务高可用,需
要依赖LVS或者keepalive。
2、如:tcp协议的负载均衡,有些请求是TCP协议的(mysql、ssh),或者说这些请求只需要使用四层进行端口的转发
就可以了,所以使用四层负载均衡。

小结一下四层负载:
1、四层负载均衡仅能转发TCP/IP协议、UDP协议、通常用来转发端口,如:tcp/22、udp/53;
2、四层负载均衡可以用来解决七层负载均衡端口限制问题;(七层负载均衡最大使用65535个端口号)3、四层负载均衡可以解决七层负载均衡高可用问题;(多台后端七层负载均衡能同事的使用)
4、四层的转发效率比七层的高得多,但仅支持tcp/ip协议,不支持http和https协议;
5、通常大并发场景通常会选择使用在七层负载前面增加四层负载均衡。
4.Nginx四层负载均衡场景实践
新建一台lb02并且同步lb01的配置
[root@lb02 ~]# ip a s ens33 |awk -F '[ /]+' 'NR==3{print $3}'
10.0.0.6
[root@lb02 ~]# ip a s ens36 |awk -F '[ /]+' 'NR==3{print $3}'
172.16.1.6
1.配置nginx仓库
[root@lb02 ~]# scp 10.0.0.7:/etc/yum.repos.d/nginx.repo /etc/yum.repos.d/
2.安装nginx服务
[root@lb02 ~]# yum -y install nginx
3.同步lb01的配置
[root@lb02 ~]# rsync -avz --delete 10.0.0.5:/etc/nginx/ /etc/nginx/

4.启动nginx
[root@lb02 conf.d]# systemctl start nginx
[root@lb02 conf.d]# systemctl enable nginx
新建一台lbL4做四层负载
[root@lbL4 ~]# ip a s ens33 |awk -F '[ /]+' 'NR==3{print $3}'
10.0.0.4
[root@lbL4 ~]# ip a s ens36 |awk -F '[ /]+' 'NR==3{print $3}'
172.16.1.4
1.配置nginx仓库
[root@lb02 ~]# scp 10.0.0.7:/etc/yum.repos.d/nginx.repo /etc/yum.repos.d/
2.安装nginx服务
[root@lb02 ~]# yum -y install nginx
# 做四层负载
删除下面的/etc/nginx/conf.d/default.conf
不然不能启动,报错nginx: [emerg] bind() to 0.0.0.0:80 failed (98: Address already in use)
[root@lbL4 /etc/nginx]# vim nginx.conf
user nginx;
worker_processes auto;
error_log /var/log/nginx/error.log notice;
pid /var/run/nginx.pid;
events {
worker_connections 1024;
}
### 四层配置
stream {
upstream web {
server 10.0.0.5:80;
server 10.0.0.6:80;
}
server {
listen 80;
proxy_pass web;
}
}
http {
.....
[root@lbL4 /etc/nginx]# nginx -t
nginx: the configuration file /etc/nginx/nginx.conf syntax is ok
nginx: configuration file /etc/nginx/nginx.conf test is successful
[root@lbL4 /etc/nginx]# systemctl restart nginx
## 写Windows的hosts解析
windows将hosts解析到10.0.0.4
admin
注意浏览器的缓存
可以使用curl命令测试5.配置路由转发
配置访问10.0.0.4的2222端口则转发给后端web01的22端口
stream {
upstream web01 {
        server 172.16.1.7:22;
        }

     server {
     listen 2222;
     proxy_pass web01;
        }
}
[root@lb nginx]# nginx -t
nginx: the configuration file /etc/nginx/nginx.conf syntax is ok
nginx: configuration file /etc/nginx/nginx.conf test is successful
[root@lb nginx]# systemctl restart nginx

测试
ssh 10.0.0.4 2222 实际连接的172.16.1.7的22端口
[C:\~]$ ssh 10.0.0.4:2222
Last login: Fri Dec 13 15:14:57 2024 from 10.0.0.1
[root@web01 ~]# ip a
2: ens33: <BROADCAST,MULTICAST,UP,LOWER_UP> mtu 1500 qdisc fq_codel state UP group default qlen 1000
    inet 10.0.0.7/24 brd 10.0.0.255 scope global noprefixroute ens33
3: ens36: <BROADCAST,MULTICAST,UP,LOWER_UP> mtu 1500 qdisc fq_codel state UP group default qlen 1000
    inet 172.16.1.7/24 brd 172.16.1.255 scope global noprefixroute ens36
六、NGINX实现Rewrite重写
1.Rewrite重写基本概述
Nginx的Rewrite重写 是一种通过规则将客户端请求的URL重定向或重写为其他路径的机制;就是把传入 web 的请求重定向到其他 url 的过程。它主要用于网站URL优化、跳转和访问控制。

### 核心概述:
rewrite指令:用于基于正则表达式匹配URL,将请求重写为新的URL。
规则定义:在 nginx.conf 配置文件中,通过 rewrite 语句结合正则表达式进行重写。
应用场景:URL重定向、SEO优化、伪静态页面、路径调整等。
### 使用场景
1、地址跳转,用户访问www.lzy.com这个URL时,将其定向至一个新的域名mobile.lzy.com
2、协议跳转,用户通过http协议请求网站时,将其重新跳转至https协议方式
3、伪静态,将动态页面显示为静态页面方式的一种技术,便于搜索引擎的录入,同时减少动态URL地址对外暴露过多的参数,提升更高的安全性。
4、搜索引擎,SEO优化依赖于url路径,好记的url便于支持搜索引擎录入
2.Rewrite标记flag
| flag | 作用 |
|---|---|
| last | 本条规则匹配完成后,重新请求,继续匹配后面的规则。 |
| break | 本条规则匹配完成后,停止匹配,不再匹配后面的规则。 |
| redirect | 返回302临时重定向,地址栏会显示跳转后的地址。 |
| permanent | 返回301永久重定向,地址栏会显示跳转后的地址。 |
3.配置简单的rewrite流程
### 案例1,简单的rewrite流程
[root@web01 /etc/nginx/conf.d]# vim rewrite.conf
server {
        listen 80;
        server_name test.oldboy.com;
        root /code/test/;

        location / {
        rewrite /1.html /2.html;
        rewrite /2.html /3.html;
        }

        location /2.html {
        rewrite /2.html /a.html;
        }

        location /3.html {
        rewrite /3.html /b.html;
        }
}
### Windows的hosts解析
## nginxRewrite业务
10.0.0.7 test.oldboy.com
#### 创建文件
[root@web01 /etc/nginx/conf.d]# ll /code/test/
total 20
-rw-r--r-- 1 root root  7 Dec 16 14:54 2.html
-rw-r--r-- 1 root root  7 Dec 16 14:54 3.html
-rw-r--r-- 1 root root  7 Dec 16 14:54 a.html
-rw-r--r-- 1 root root  7 Dec 16 14:54 b.html
当我们访问:test.oldboy.com/1.html
返回信息是b.html内容。
### break 停止向后匹配,返回2.html中的资源
[root@web01 /etc/nginx/conf.d]# vim rewrite.conf
server {
listen 80;
server_name test.oldboy.com;
root /code/test/;
location / {
rewrite /1.html /2.html break;
rewrite /2.html /3.html;
}
location /2.html {
rewrite /2.html /a.html;
}
location /3.html {
rewrite /3.html /b.html;
}
}
[root@web01 /etc/nginx/conf.d]# !systemctl
systemctl restart nginx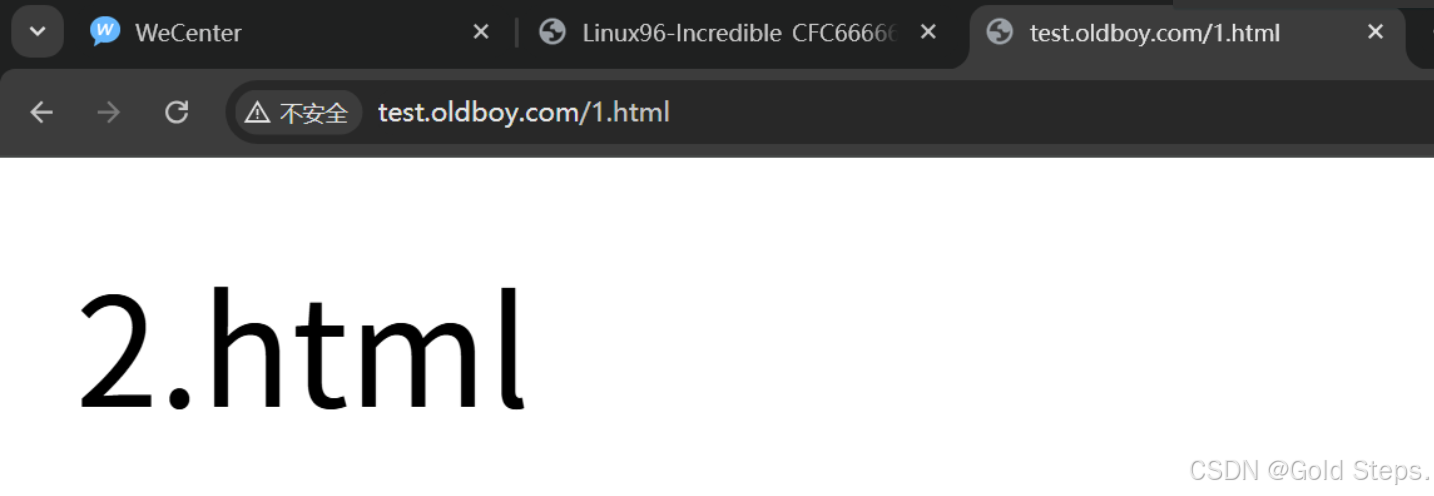
### last: 停止向后匹配,但是浏览器会重新对服务器发起请求。
[root@web01 /etc/nginx/conf.d]# vim rewrite.conf
server {
        listen 80;
        server_name test.oldboy.com;
        root /code/test/;

        location / {
        rewrite /1.html /2.html last;
        rewrite /2.html /3.html;
        }

        location /2.html {
        rewrite /2.html /a.html;
        }

        location /3.html {
        rewrite /3.html /b.html;
        }
}

#匹配到2.html之后停止向后匹配,但是重新向服务器请求。那么就类似变成了/2.html,----------->a.html
[root@web01 /etc/nginx/conf.d]# !systemctl
systemctl restart nginx 
4.302临时重定向
[root@web01 /etc/nginx/conf.d]# vim rewrite.conf
server {
        listen 80;
        server_name test.oldboy.com;
        root /code;

        location /baidu {
                rewrite ^(.*)$  http://www.baidu.com redirect;
                #rewrite ^(.*)$  http://www.oldboy.com permanent;
                #return 301 http://www.oldboy.com;
                #return 302 http://www.oldboy.com;
        }
}
rewrite和return两种方法一样。
浏览器访问:
test.oldboy.com/baidu

##临时重定向
停止nginx在访问测试,不能实现跳转
[root@web01 /etc/nginx/conf.d]# systemctl stop nginx
会显示无法访问此请求,连接拒绝 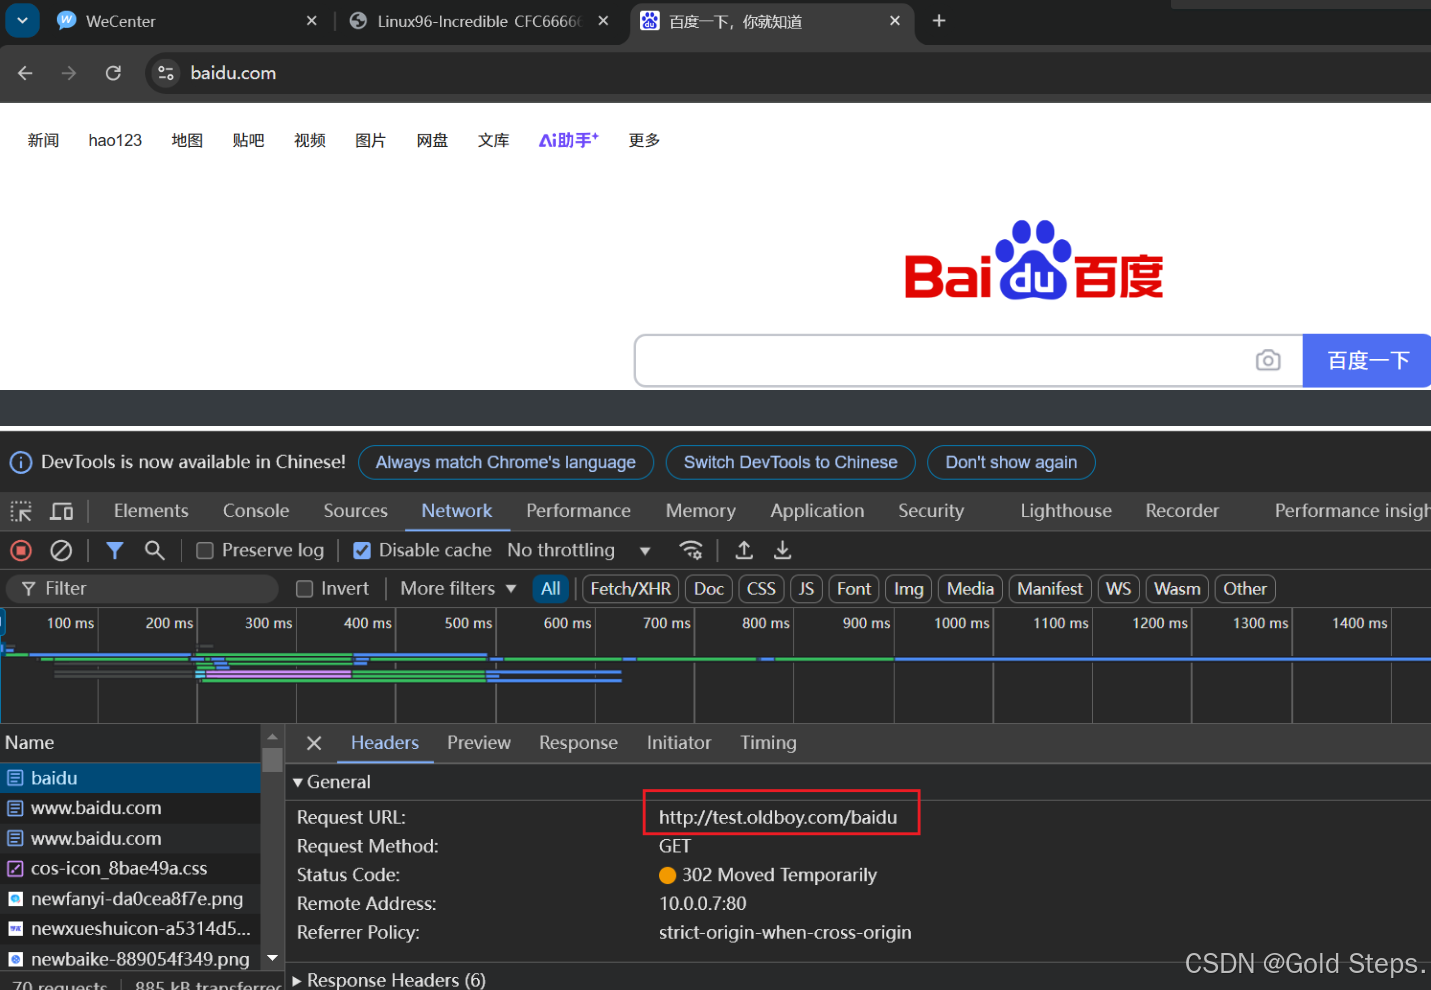
5.301永久重定向
### 301永久重定向
[root@web01 /etc/nginx/conf.d]# vim rewrite.conf
server {
        listen 80;
        server_name test.oldboy.com;
        root /code;

        location /baidu {
                #rewrite ^(.*)$  http://www.baidu.com redirect;
                rewrite ^(.*)$  http://www.baidu.com permanent;
                #return 301 http://www.baidu.com;
                #return 302 http://www.baidu.com;
        }
}
#测试直接访问和关闭nginx后访问,都可以访问到百度
redirect: 每次请求都会询问服务器,如果当服务器不可用时,则会跳转失败。
permanent: 第一次请求会询问浏览器,浏览器会记录跳转的地址,第二次则不再询问服务器,直接通过浏览器缓存的地址跳转。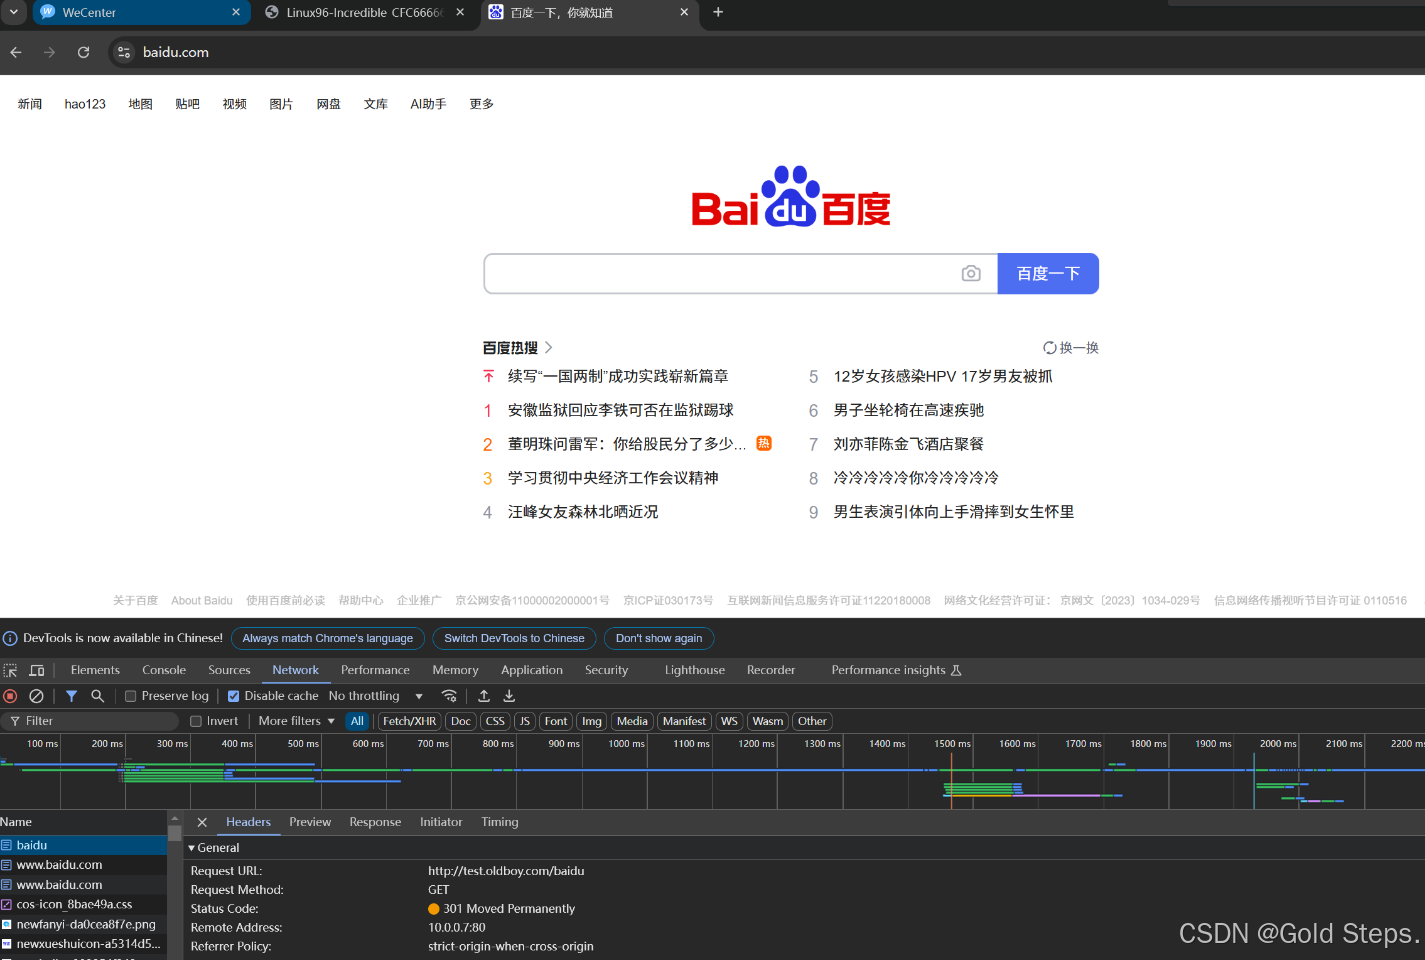
6.rewrite规则实战
在写rewrite规则之前,我们需要开启rewrite日志对规则的匹配进行调试。
http {
。。。
rewrite_log     on;
。。。
### 用户访问 /abc/.... 实际上真实访问的是 /ccc/bbb/2.html,只要匹配上/abc/后面都可以跳转。
[root@web01 /etc/nginx/conf.d]# vim rewrite.conf
server {
        listen 80;
        server_name test.oldboy.com;
        root /code;
        location / {
                root /code;
                index index.html;
        }
        location /abc {
      # location ~ abc$ {               # 匹配以abc结尾的url
      # location ~ ^/abc$ {			   # 必须为abc
                rewrite (.*) /ccc/bbb/2.html redirect;
                #return 302 /ccc/bbb/2.html;
        }
}
[root@web01 /etc/nginx/conf.d]# mkdir /code/ccc/bbb/ -p
[root@web01 /etc/nginx/conf.d]# echo 2.html.... >/code/ccc/bbb/2.html
[root@web01 /etc/nginx/conf.d]# nginx -t
nginx: the configuration file /etc/nginx/nginx.conf syntax is ok
nginx: configuration file /etc/nginx/nginx.conf test is successful
[root@web01 /etc/nginx/conf.d]# nginx -s reload

### 用户访问 /2020/11/22/33/tip.html 实际上真实访问的是 /2024/11/22/33/tip.html
[root@web01 /etc/nginx/conf.d]# vim rewrite.conf
charset utf-8,gbk;
server {
        listen 80;
        server_name test.oldboy.com;
        root /code;
        location / {
                root /code;
                index index.html;
        }

        location /2022 {
                rewrite ^/2022/(.*)$ /2024/$1 redirect;

        }
}
[root@web01 /etc/nginx/conf.d]# nginx -t
nginx: the configuration file /etc/nginx/nginx.conf syntax is ok
nginx: configuration file /etc/nginx/nginx.conf test is successful
[root@web01 /etc/nginx/conf.d]# nginx -s reload
[root@web01 /etc/nginx/conf.d]# mkdir -p /code/2024/11/22/33/
[root@web01 /etc/nginx/conf.d]# echo 2024的广告策划.. > /code/2024/11/22/33/tip.html


### 用户访问http://test.oldboy.com/2022/aa-bb.html实际上真实访问的是 http://test.oldboy.com/2024/aa/bb/tip.html
[root@web01 /etc/nginx/conf.d]# vim rewrite.conf
charset utf-8,gbk;
server {
        listen 80;
        server_name test.oldboy.com;
        root /code;
        location / {
                root /code;
                index index.html;
        }

        location /2022 {
      		   #灵活配法
                rewrite ^/2022-(.*)-(.*).html$ /2024/$1/$2/tip.html redirect;
			   #固定配法
 	 		   #rewrite ^/2022-(.*) /2024/11/22/tip.html redirect;
        }
}

### 错误跳转可以在下面加入:
error_page 403 404 500 501 502 @error_test;
location @error_test {
rewrite ^(.*)$ /404.html break;
}
7.rewrite变量使用
变量使用
案例1:需要在跳转后的请求行加上想要的参数&showoffline=1
# 当客户端为10.0.0.1时候,在请求行添加参数
[root@web01 conf.d]# cat re.conf
server {
    listen 80;
    server_name test.oldboy.com;
    # $args为Nginx内置变量请求行的参数
    set $args "&showoffline=1";
    location / {
    root /code;
    index index.html;
    }
    if ($remote_addr = 10.0.0.1){    # 判断如果客户端是10.0.0.1 才执行下面的rewrite。
    rewrite (.*) http://test.oldboy.com$1;
    }
}
[root@web01 /etc/nginx/conf.d]# nginx -t
nginx: the configuration file /etc/nginx/nginx.conf syntax is ok
nginx: configuration file /etc/nginx/nginx.conf test is successful
[root@web01 /etc/nginx/conf.d]# nginx -s reload


### 跳转维护页面,指定IP正常访问
[root@web01 /etc/nginx/conf.d]# vim rewrite.conf +17
server {
    listen 80;
    server_name test.oldboy.com;
    root /code;
    index index.html;

    location / {
        set $ip 0;       # 设置变量为0
        if ($remote_addr = "10.0.0.1"){
            set $ip 1;   # 如果来源IP为0.1则设置为1
        }
        if ($ip = 0){    # 判断如果变量为0 则跳转维护页面
            rewrite ^(.*)$ /wh.html break;
        }
    }
}
[root@web01 /etc/nginx/conf.d]# nginx -t
nginx: the configuration file /etc/nginx/nginx.conf syntax is ok
nginx: configuration file /etc/nginx/nginx.conf test is successful
[root@web01 /etc/nginx/conf.d]# systemctl restart nginx
[root@web01 /etc/nginx/conf.d]# echo tihs page is fixing... >/code/wh.html
8.模拟DNS劫持
# 案例1.模拟网站被篡改
[root@web01 /etc/nginx/conf.d]# vim H5.conf
server {
         listen 80;
         server_name test.oldboy.com;
         root /code/test;
         index index.html;
}
[root@web01 /etc/nginx/conf.d]# cd /code/test/
[root@web01 /code/test]# ll
-rw-r--r-- 1 root root 18 Dec 15 13:55 index.html

[root@web01 /code/test]# vim index.html
<!DOCTYPE html>
<html lang="en">
<head>
    <meta charset="UTF-8">
    <title>我是title</title>
</head>
<body>
<article>
  <header>
    <h1>我是妹妹</h1>
    <p>创建时间:<time pubdate="pubdate">2025/5/20</time></p>
  </header>
  <p>
    <b>Aticle</b>第一次用h5写文章,好他*的紧张...
  </p>
  <footer>
    <p><small>版权所有!</small></p>
  </footer>
</article>
</body>
</html>
[root@web01 /code/test]# systemctl restart nginx
测试访问: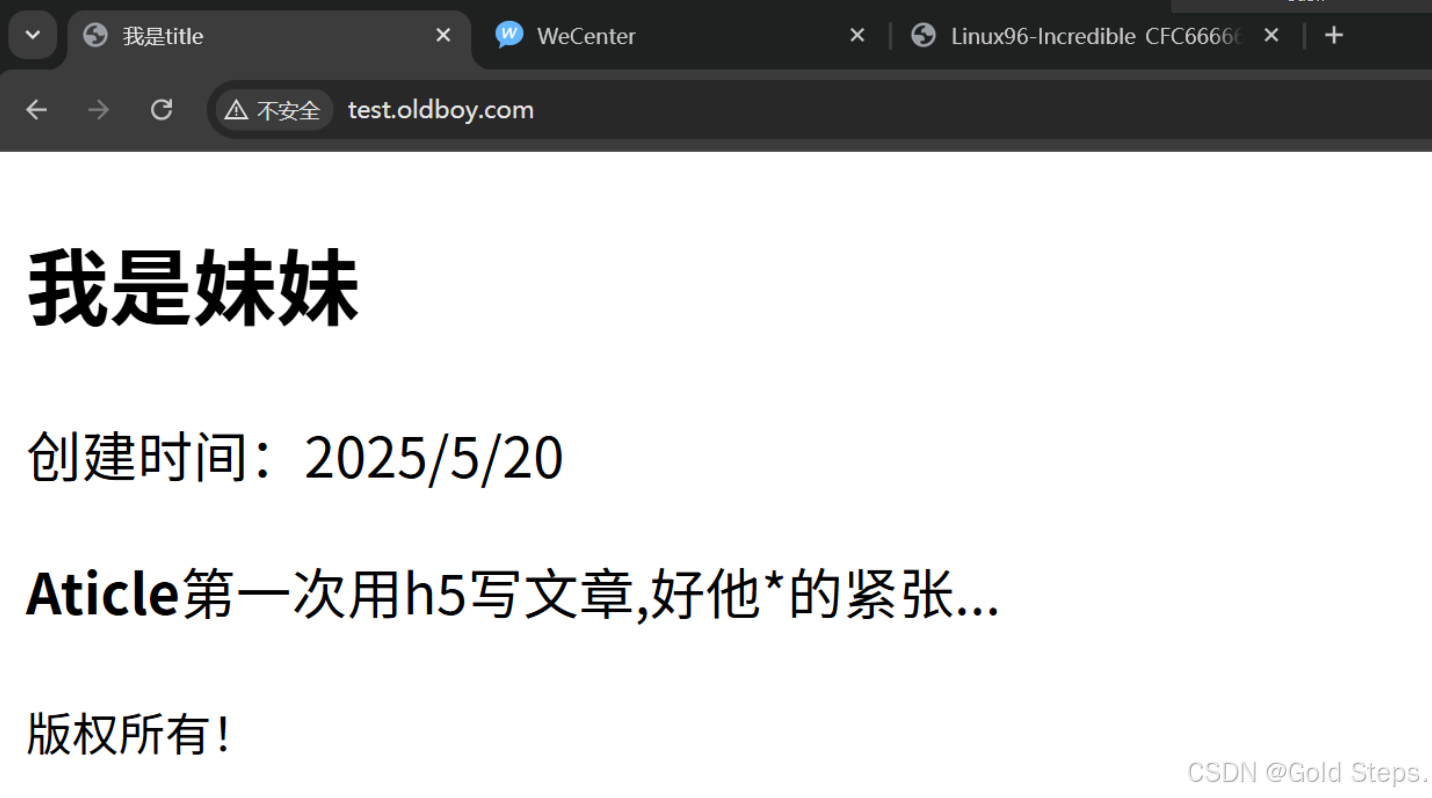
-
配置劫持
web02配置劫持test.oldboy.com
[root@web02 /etc/nginx/conf.d]# vim jc.conf
upstream jiechi {
        server 10.0.0.7:80;
}

server {
        listen 80;
        server_name test.oldboy.com;

        location / {
                proxy_pass http://jiechi;
                proxy_set_header Host $http_host;
                sub_filter '<h1>我是妹妹' '<h1>澳门赌场 德州扑克 牛牛 老虎机随时提现 ';
                sub_filter '<b>Aticle</b>第一次用h5写文章,好他*的紧张...' '<img src="https://p2.itc.cn/q_70/images03/20230828/
b88f3181994f45c3b9d0b86d9cc449ba.jpeg">';
                sub_filter '<small>版权所有' ' <small>开源';
        }
}
[root@web02 /etc/nginx/conf.d]# systemctl restart nginx
Windows配置hosts解析
## nginxRewrite业务
10.0.0.8 test.oldboy.com
测试访问
七、HTTPS证书
HTTPS证书配置
我们先来了解一下https的加密流程
HTTPS通过非对称加密交换对称密钥,再用对称加密保护数据传输,兼顾安全和效率。

1、 浏览器请求服务器向服务器发送HTTPS请求。

2、网站服务器返回SSL证书信息包含证书公钥,域名信息...,并选择一个加密算法给浏览器客户端。

3、 浏览器验证证书的合法性,如果不合法提示警告信息,如果合法,则进行第三步。

4、 浏览器使用网站服务器公钥生成一个随机数,并使用公钥对随机数进行加密,之后再将加密后的密钥发给服务器。

6、服务器用自己的私钥解密加密后的随机数,获取对称密钥。

# 6、服务器以随机数为密钥使用了对称加密算法加密网页内容并传输给浏览器。
# 7、浏览器以随机数为密钥使用之前约定好的解密算法获取网页内容。
6和7简而言之就是双方使用协商好的对称密钥进行加密数据传输,确保传输内容的保密性和完整性。
SSL证书获取方式: 1.自己去正规的CA机构购买SSL证书-- 2.OpenSSL命令生成假证书。
一、OpenSSL命令生成证书
1.创建证书存放目录
 [root@web01 ~]# mkdir -p /etc/nginx/ssl_key
 [root@web01 ~]# cd /etc/nginx/ssl_key/
 [root@web01 /etc/nginx/ssl_key]#
2.生成私钥与证书
[root@web01 /etc/nginx/ssl_key]# openssl genrsa -idea -out server.key 2048
Generating RSA private key, 2048 bit long modulus (2 primes)
.........................................................................................................................................................+++++
..+++++
e is 65537 (0x010001)
Enter pass phrase for server.key: ## 给key设置个密码
Verifying - Enter pass phrase for server.key: ## 确认密码
[root@web01 /etc/nginx/ssl_key]# ll
total 4
-rw------- 1 root root 1747 Dec 17 14:45 server.key
#### 命令解析 #### openssl:这是 OpenSSL 命令行工具的调用,OpenSSL 是一个广泛使用的开源工具集,用于实现各种加密功能。 genrsa:这是 OpenSSL 的一个子命令,用来生成 RSA 私钥。 -idea:这个选项指定使用 IDEA(International Data Encryption Algorithm)算法来进行私钥的加密。IDEA 是一种对称加密算法,可以用来加密私钥文件。这个选项的使用表明生成的私钥在保存时会使用 IDEA 算法加密。 -out server.key:这个选项指定输出文件名,即生成的 RSA 私钥将被保存到名为 server.key 的文件中。 2048:这是生成的 RSA 密钥的位数。在这种情况下,生成的是一个 2048 位的 RSA 密钥。2048 位的密钥是目前普遍使用的推荐大小,既能保证较好的安全性,又能保持较高的计算效率。 总结: 这条命令的作用是使用 OpenSSL 工具生成一个 2048 位的 RSA 私钥,并用 IDEA 算法加密该私钥,最终将其保存在名为 server.key 的文件中。 ### 生成证书
[root@web01 /etc/nginx/ssl_key]# openssl req -days 36500 -x509 \
 > > -sha256 -nodes -newkey rsa:2048 -keyout server.key -out server.crt
#### 命令解析 这条命令用于生成一个 RSA 2048 位的私钥(server.key)和一个自签名的 X.509 证书(server.crt)。证书的有效期为 36500 天(100 年),签名使用 SHA-256 哈希算法,私钥没有密码保护。生成的私钥和证书可以用于服务器的加密通信,如 HTTPS。 Generating a RSA private key ...........................+++++ ...........................................+++++ writing new private key to 'server.key' ----- You are about to be asked to enter information that will be incorporated into your certificate request. What you are about to enter is what is called a Distinguished Name or a DN. There are quite a few fields but you can leave some blank For some fields there will be a default value, If you enter '.', the field will be left blank. ----- Country Name (2 letter code) [AU]:CN State or Province Name (full name) [Some-State]:BJ Locality Name (eg, city) []:CP Organization Name (eg, company) [Internet Widgits Pty Ltd]:oldboy Organizational Unit Name (eg, section) []:IT Common Name (e.g. server FQDN or YOUR name) []:incredible Email Address []:1@2.com [root@web01 /etc/nginx/ssl_key]# ll total 8 -rw-r--r-- 1 root root 1371 Dec 17 14:47 server.crt -rw------- 1 root root 1704 Dec 17 14:47 server.key ### : 如何查看证书的有效时间 [root@web01 /etc/nginx/ssl_key]# openssl x509 -in server.crt -noout -enddate notAfter=Nov 23 06:47:59 2124 GMT
3.配置HTTPS
[root@web01 /etc/nginx/conf.d]# vim https.conf
server {
listen 443 ssl;
server_name test.oldboy.com;
ssl_certificate ssl_key/server.crt;
ssl_certificate_key ssl_key/server.key;
location / {
root /code;
index index.html;
}
}
#配置将用户访问http请求强制跳转https
server {
listen 80;
server_name test.oldboy.com;
return 302 https://$server_name$request_uri;
}
[root@web01 /etc/nginx/conf.d]# echo '<h1><p>hello,world.</p></h1>' >/code/index.html
## Windows做hosts解析
## nginxRewrite业务
10.0.0.7 test.oldboy.com
测试访问
4.配置真的证书
1.购买证书
2.下载证书到本地
3.配置到nginx服务
[root@web01 /etc/nginx/ssl_key]# unzip 16367856_test.linuxnc.com_nginx.zip
Archive: 16367856_test.linuxnc.com_nginx.zip
Aliyun Certificate Download
inflating: test.linuxnc.com.pem
inflating: test.linuxnc.com.key
[root@web01 /etc/nginx/ssl_key]# ll
total 16
-rw-r--r-- 1 root root 4148 Dec 17 15:07 16367856_test.linuxnc.com_nginx.zip
-rw-r--r-- 1 root root 0 Dec 17 14:47 -sha256
-rw-r--r-- 1 root root 1679 Dec 17 09:12 test.linuxnc.com.key
-rw-r--r-- 1 root root 3809 Dec 17 09:12 test.linuxnc.com.pem
[root@web01 /etc/nginx/ssl_key]# mv test.linuxnc.com.key server.key
[root@web01 /etc/nginx/ssl_key]# mv test.linuxnc.com.pem server.crt
[root@web01 /etc/nginx/ssl_key]# ll
total 16
-rw-r--r-- 1 root root 4148 Dec 17 15:07 16367856_test.linuxnc.com_nginx.zip
-rw-r--r-- 1 root root 3809 Dec 17 09:12 server.crt
-rw-r--r-- 1 root root 1679 Dec 17 09:12 server.key
-rw-r--r-- 1 root root 0 Dec 17 14:47 -sha256
## 这里方便配置我们改名一下
# 现在去修改一下配置文件的域名
[root@web01 /etc/nginx/conf.d]# vim https.conf
server {
listen 443 ssl;
server_name test.linuxnc.com;
ssl_certificate ssl_key/server.crt;
ssl_certificate_key ssl_key/server.key;
location / {
root /code;
index index.html;
}
}
#配置将用户访问http请求强制跳转https
server {
listen 80;
server_name test.linuxnc.com;
return 302 https://$server_name$request_uri;
}
[root@web01 /etc/nginx/conf.d]# nginx -t
nginx: the configuration file /etc/nginx/nginx.conf syntax is ok
nginx: configuration file /etc/nginx/nginx.conf test is successful
[root@web01 /etc/nginx/conf.d]# systemctl reload nginx5.集群实现HTTPS功能
## web01机器
[root@web01 /etc/nginx/conf.d]# vim test.conf +8
server {
listen 80;
server_name test.oldboy.com;
location / {
root /code;
index index.html;
}
}
[root@web01 /etc/nginx/conf.d]# nginx -t
nginx: the configuration file /etc/nginx/nginx.conf syntax is ok
nginx: configuration file /etc/nginx/nginx.conf test is successful
[root@web01 /etc/nginx/conf.d]# systemctl restart nginx
[root@web01 /etc/nginx/conf.d]# cat /code/index.html
<h1><p>hello,world.</p></h1>
## web02机器
[root@web02 /etc/nginx/conf.d]# vim test.conf
server {
listen 80;
server_name test.oldboy.com;
location / {
root /code;
index index.html;
}
}
[root@web02 /etc/nginx/conf.d]# echo '<h1><p>hello,cfc.</p></h1>' >/code/index.html
[root@web02 /etc/nginx/conf.d]# cat /code/index.html
<h1><p>hello,cfc.</p></h1>
[root@web02 /etc/nginx/conf.d]# nginx -t
nginx: the configuration file /etc/nginx/nginx.conf syntax is ok
nginx: configuration file /etc/nginx/nginx.conf test is successful
[root@web02 /etc/nginx/conf.d]# systemctl restart nginx
## lb01负载均衡机器做证书配置
[root@lb01 /etc/nginx/conf.d]# cat https.conf
upstream https {
server 172.16.1.7:80;
server 172.16.1.8:80;
}
server {
listen 443 ssl;
server_name test.oldboy.com;
ssl_certificate ssl_key/server.crt;
ssl_certificate_key ssl_key/server.key;
ssl_session_cache shared:SSL:1m;
ssl_session_timeout 5m;
#自定义设置使用的TLS协议的类型以及加密套件(以下为配置示例,请您自行评估是否需要配置)
#TLS协议版本越高,HTTPS通信的安全性越高,但是相较于低版本TLS协议,高版本TLS协议对浏览器的兼容性较差。
ssl_ciphers ECDHE-RSA-AES128-GCM-SHA256:ECDHE:ECDH:AES:HIGH:!NULL:!aNULL:!MD5:!ADH:!RC4;
ssl_protocols TLSv1.1 TLSv1.2 TLSv1.3;
location / {
proxy_pass http://https;
include proxy_params;
proxy_next_upstream error timeout http_500 http_502 http_503 http_504;
}
}
server {
listen 80;
server_name test.linuxnc.com;
return 302 https://$server_name$request_uri;
}
[root@lb01 /etc/nginx/conf.d]# ll ../ssl_key/
total 8
-rw-r--r-- 1 root root 1326 Dec 17 15:23 server.crt
-rw------- 1 root root 1704 Dec 17 15:23 server.key
-rw-r--r-- 1 root root 0 Dec 17 15:23 -sha256
[root@lb01 /etc/nginx/ssl_key]# nginx -t
nginx: the configuration file /etc/nginx/nginx.conf syntax is ok
nginx: configuration file /etc/nginx/nginx.conf test is successful
[root@lb01 /etc/nginx/ssl_key]# systemctl restart nginx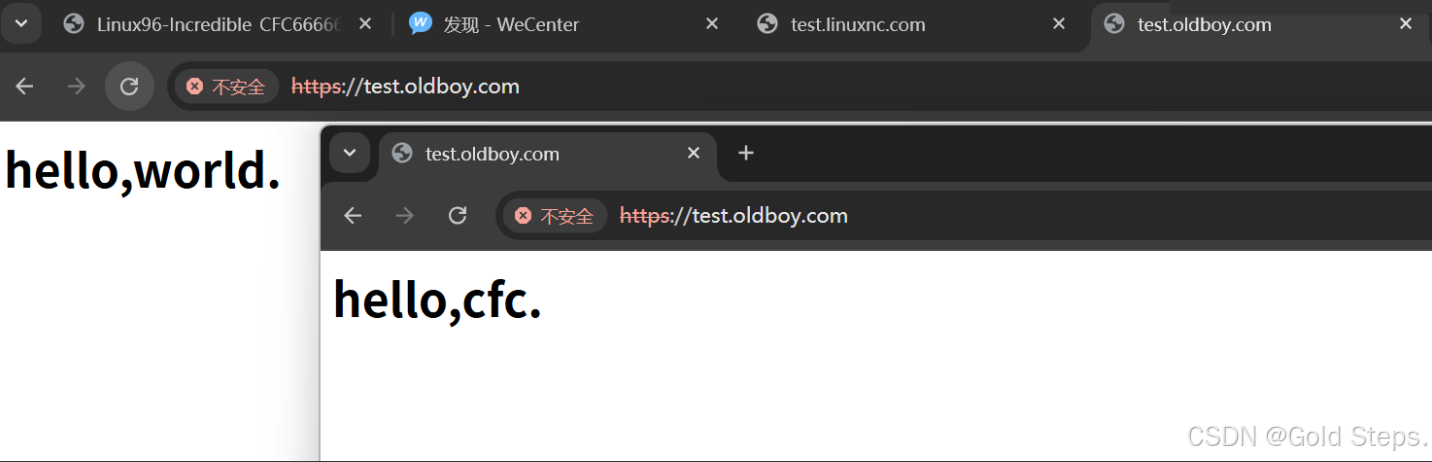
6.wordpress实现HTTPS
## 第一步配置
[root@lb01 /etc/nginx/conf.d]# vim wp.conf
upstream wp {
server 172.16.1.7:80;
server 172.16.1.8:80;
}
server {
listen 443 ssl;
server_name www.wp.com;
ssl_certificate ssl_key/server.crt;
ssl_certificate_key ssl_key/server.key;
ssl_session_cache shared:SSL:1m;
ssl_session_timeout 5m;
#自定义设置使用的TLS协议的类型以及加密套件(以下为配置示例,请您自行评估是否需要配置)
#TLS协议版本越高,HTTPS通信的安全性越高,但是相较于低版本TLS协议,高版本TLS协议对浏览器的兼容性较差。
ssl_ciphers ECDHE-RSA-AES128-GCM-SHA256:ECDHE:ECDH:AES:HIGH:!NULL:!aNULL:!MD5:!ADH:!RC4;
ssl_protocols TLSv1.1 TLSv1.2 TLSv1.3;
location / {
proxy_pass http://wp;
include proxy_params;
proxy_next_upstream error timeout http_500 http_502 http_503 http_504;
}
}
server {
listen 80;
server_name www.wp.com;
return 302 https://$server_name$request_uri;
}
~
"wp.conf" [New] 29L, 971C written
[root@lb01 /etc/nginx/conf.d]# ll ../ssl_key/
total 8
-rw-r--r-- 1 root root 1326 Dec 17 15:23 server.crt
-rw------- 1 root root 1704 Dec 17 15:23 server.key
-rw-r--r-- 1 root root 0 Dec 17 15:23 -sha256
[root@lb01 /etc/nginx/conf.d]# nginx -t
nginx: the configuration file /etc/nginx/nginx.conf syntax is ok
nginx: configuration file /etc/nginx/nginx.conf test is successful
[root@lb01 /etc/nginx/conf.d]# systemctl restart nginx
## 第二步 WEB01和WEB02开启PHP支持HTTPS
root@web01 conf.d]# cat wp.conf
server {
listen 80;
server_name www.wp.com;
root /code/wordpress;
location / {
index index.php index.html;
}
location ~ \.php$ {
fastcgi_pass 127.0.0.1:9000;
fastcgi_param SCRIPT_FILENAME $document_root$fastcgi_script_name;
include fastcgi_params;
fastcgi_param HTTPS on; # 开机PHP对HTTPS的支持
}
}
[root@web01 /etc/nginx/conf.d]# nginx -t
nginx: the configuration file /etc/nginx/nginx.conf syntax is ok
nginx: configuration file /etc/nginx/nginx.conf test is successful
[root@web01 /etc/nginx/conf.d]# systemctl restart nginx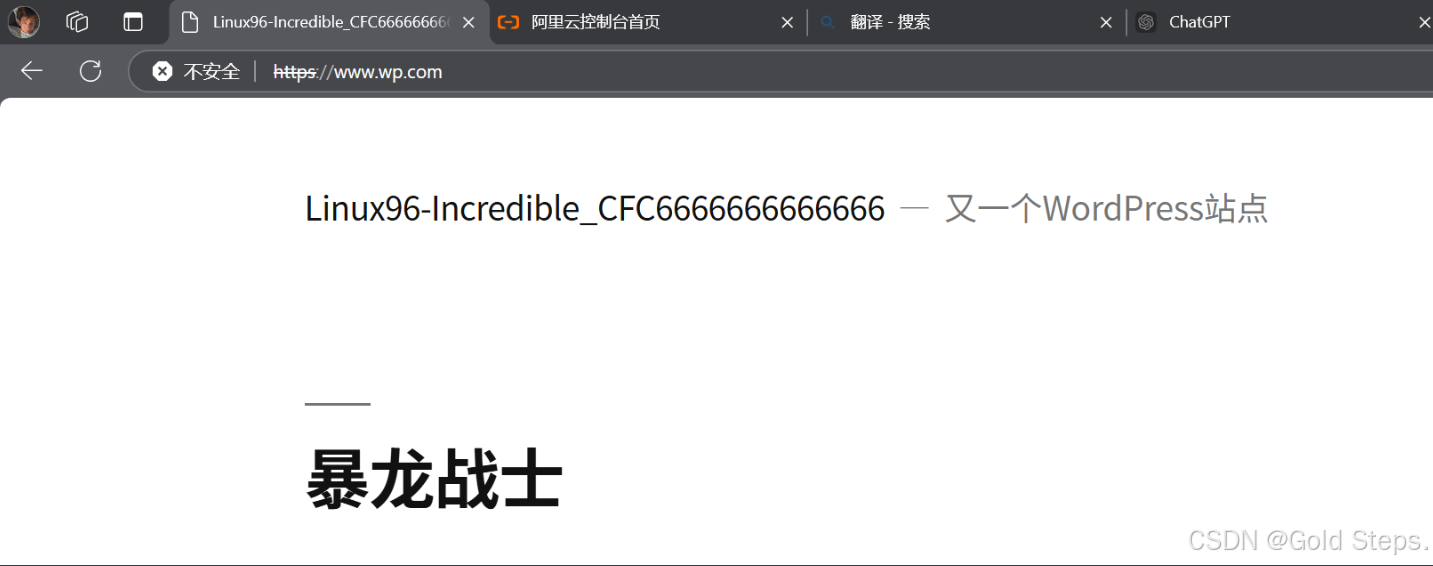
二、云服务器ECS配置HTTPS证书
阿里云SSL证书配置(HTTPS证书配置)-阿里云开发者社区
-
↑ ↑ ↑参考官网文档准没错^_^
结语
在本文中,我们深入探讨了 Nginx 的核心功能及其常见用法。作为一个高性能的 Web 服务器和反向代理服务器,Nginx 被广泛应用于网站托管、负载均衡、反向代理以及流量控制等场景。其常见模块包括:`http`模块用于处理HTTP请求,`server`模块用于配置虚拟主机,`location`模块用于请求路径的匹配与处理,`proxy`模块实现反向代理功能,以及`load balancing`模块进行负载均衡。通过合理配置这些模块,Nginx 可以有效地提升网站的性能与可扩展性。
此外,Nginx 的高并发处理能力和轻量级架构,使得它在大流量网站和微服务架构中尤为适用。无论是静态内容的快速响应,还是作为反向代理和负载均衡器,Nginx 都能在多种应用场景中发挥重要作用。掌握这些基本模块和用法,将帮助你更好地理解和运用 Nginx,提升你的网站性能和稳定性。


 被折叠的 条评论
为什么被折叠?
被折叠的 条评论
为什么被折叠?
 到【灌水乐园】发言


