


环境要求:Centos7, jdk8,mysql 5.6-5.7,内存2G以上。要不装完会很卡。
- 安装mysql:这里不讲解,可以参考https://blog.youkuaiyun.com/shidebin/article/details/83548436
- 新建保存sonar表的库:
mysql –uroot -proot
create database sonarQube DEFAULT CHARACTER SET utf8 COLLATE utf8_general_ci; - 上传或下载sonar压缩包,我这里选择上传,下载会比较慢( wget https://binaries.sonarsource.com/Distribution/sonarqube/sonarqube-6.7.6.zip)
cd /usr/local/resource
rz
mkdir …/sonar
unzip sonarqube-6.7.6.zip -d …/sonar - 修改sonar的配置:
vim /usr/local/sonar/sonarqube-6.7.6/conf/sonar.properties
#mysql数据用户名
sonar.jdbc.username=root
sonar.jdbc.password=root
#配置mysql数据库
sonar.jdbc.url=jdbc:mysql://localhost:3306/sonarQube?useUnicode=true&characterEncodixxxx
设置sonar服务
sonar.web.host=0.0.0.0
sonar.web.context=/sonarQube
sonar.web.port=9000 - 新建sonar的启动用户:
useradd esuser
chown -R esuser:esuser /usr/local/sonar
chmod 777 -R /usr/local/sonar/sonarqube-6.7.6 - 修改elasticsearch.yml
vim /usr/local/sonar/sonarqube-6.7.6/elasticsearch/config/elasticsearch.yml
network.host: 192.168.126.130(请填写自己服务器的ip)
http.port: 9200 - 启动sonar
su esuser
/usr/local/sonar/sonarqube-6.7.6/bin/linux-x86-64/sonar.sh start - 查看sonar状态
/usr/local/sonar/sonarqube-6.7.6/bin/linux-x86-64/sonar.shstatus - 如果没成功查看日志
/usr/local/sonar/sonarqube-6.7.6/bin/linux-x86-64/sonar.shconsole
根据错误提示进行修改
成功后在浏览器中打开:http://192.168.126.135:9000/sonarQube
登录名和密码:admin/admin
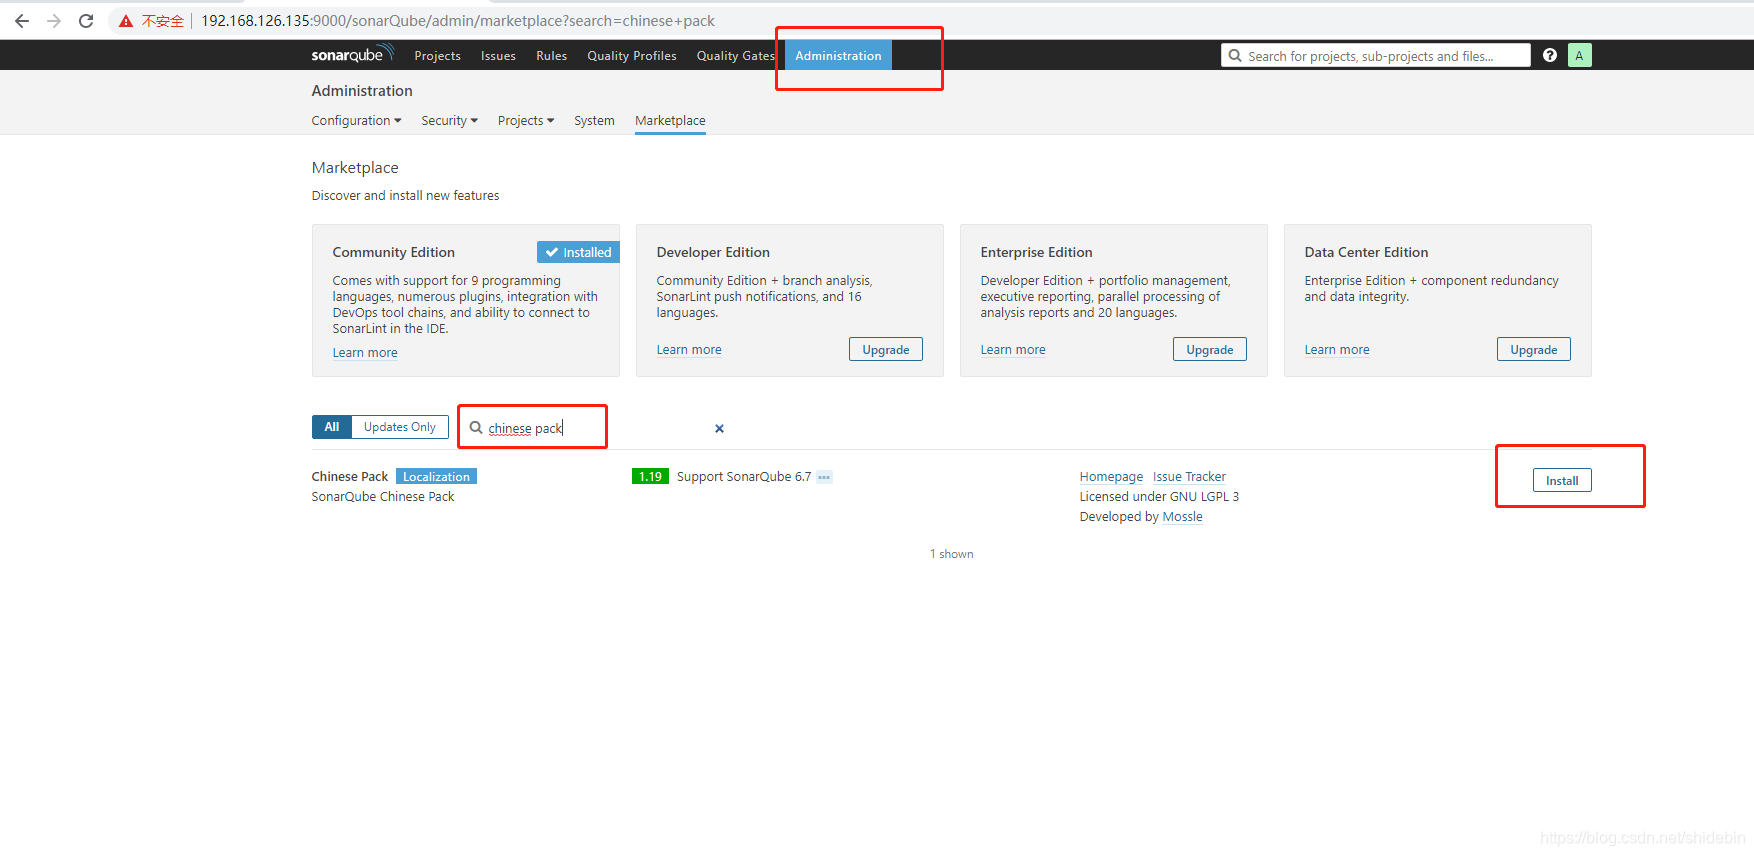
下载汉化包:
- 下载或上传sonar-scanner,我这选择上传(wget https://docs.sonarqube.org/display/SCAN/Analyzing+with+SonarQube+Scanner)
cd /usr/local/source
rz
unzip sonar-scanner-cli-3.2.0.1227-linux.zip -d …/sonar - 修改文件
vim /usr/local/sonar/sonar-scanner-3.2.0.1227-linux/conf/sonar-scanner.properties
sonar.host.url=http://192.168.126.130:9000/sonarQube
#----- Default source code encoding
sonar.sourceEncoding=UTF-8 - 配置环境变量
vim /etc/profile
export PATH=$PATH:/usr/local/sonar/sonar-scanner-3.2.0.1227-linux/bin
source /etc/profile - 查看是否成功:
[root@master source]# sonar-scanner -v
INFO: Scanner configuration file: /usr/local/sonar/sonar-scanner-3.2.0.1227-linux/conf/sonar-scanner.properties
INFO: Project root configuration file: NONE
INFO: SonarQube Scanner 3.2.0.1227
INFO: Java 1.8.0_121 Oracle Corporation (64-bit)
INFO: Linux 3.10.0-514.el7.x86_64 amd64 - 扫描代码:
cd /usr/local/src/zqsign-web-wesign
vim sonar-project.properties
#当前项目实例的唯一表示
sonar.projectKey=kafka
#显示在sonarqube 界面上的项目名称
sonar.projectName=kafka
sonar.projectVersion=1.0
#相对于当前配置文件目录 下的源代码目录 不管什么平台路径分隔符只能有 / 不能使用
sonar.sources=src/main/java
sonar.java.binaries=target/classes
#源代码的字符集
sonar.sourceEncoding=UTF-8
14.1扫描:
sonar-scanner
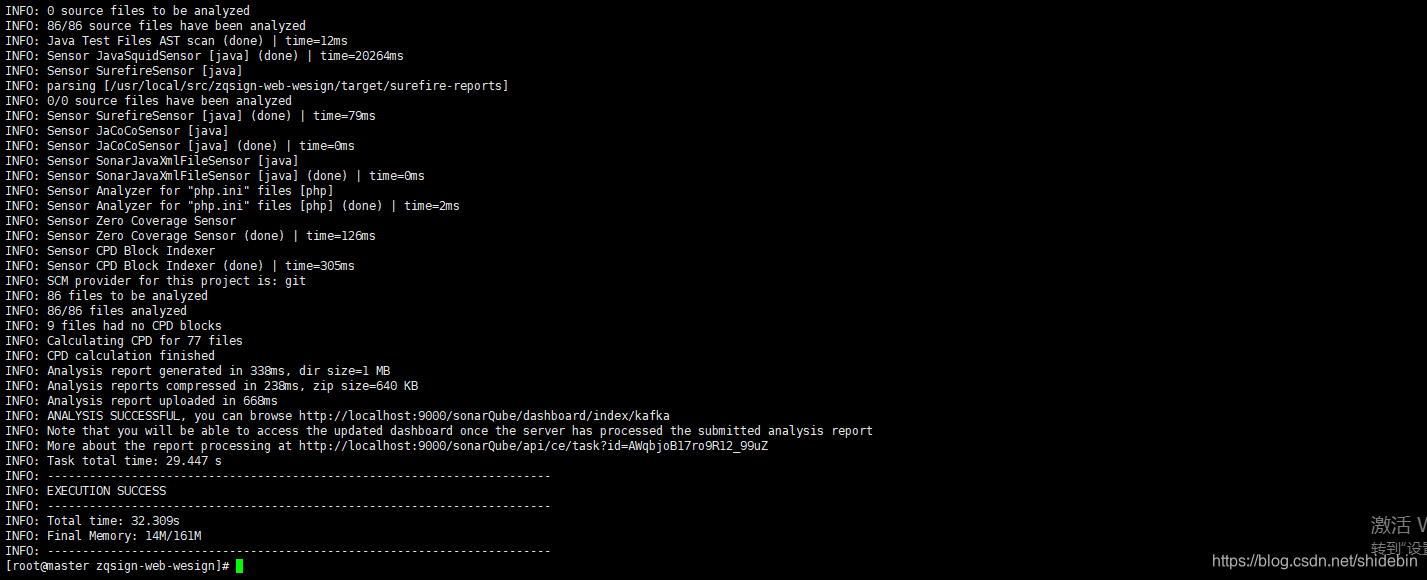
如果报错则通过报错解决。成功后就可以到sonar的web页面查看结果了。
15. 在windows上安装一个 sonar-scanner,配置跟在linux上一个。
16. maven使用sonar插件:
在setting.xml配置:
 <profile>
            <id>sonar</id>
            <activation>
                <activeByDefault>true</activeByDefault>
            </activation>
            <properties>
              <sonar.host.url>http://192.168.126.135:9000/sonarQube</sonar.host.url>
            </properties>
    </profile>
在eclipse运行:
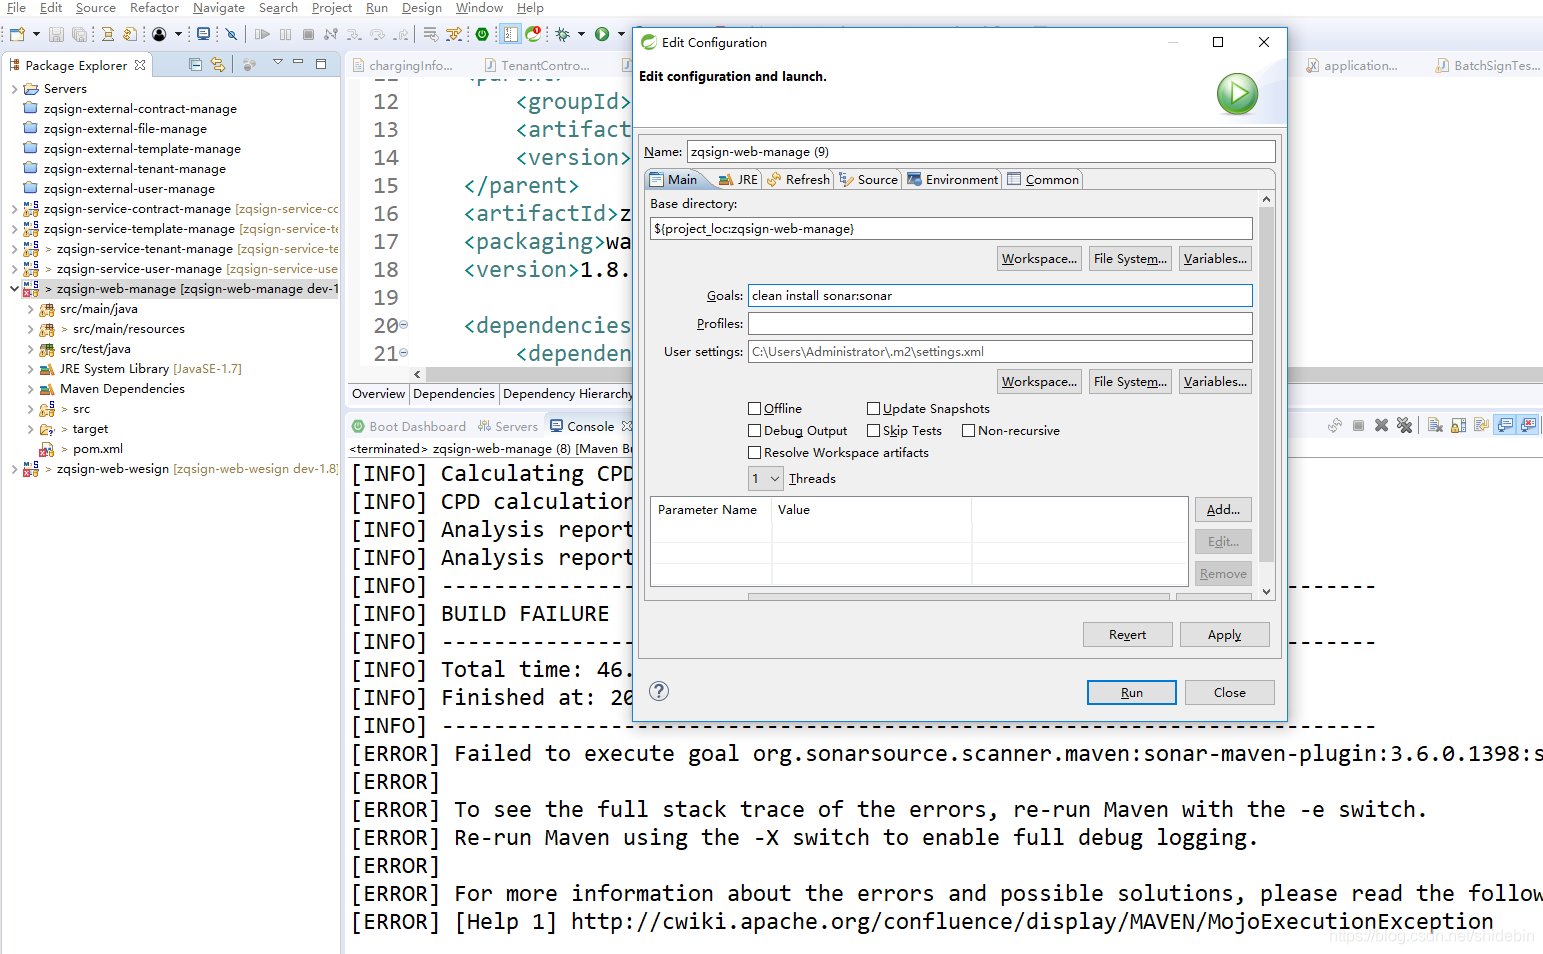
报错:
[INFO] Analysis report generated in 1563ms, dir size=17 MB
[INFO] Analysis reports compressed in 1132ms, zip size=5 MB
[INFO] ------------------------------------------------------------------------
[INFO] BUILD FAILURE
[INFO] ------------------------------------------------------------------------
[INFO] Total time: 46.187 s
[INFO] Finished at: 2019-05-09T18:21:22+08:00
[INFO] ------------------------------------------------------------------------
[ERROR] Failed to execute goal org.sonarsource.scanner.maven:sonar-maven-plugin:3.6.0.1398:sonar (default-cli) on project zqsign-web-manage: Failed to upload report - 500: An error has occurred. Please contact your administrator -> [Help 1]
[ERROR]
[ERROR] To see the full stack trace of the errors, re-run Maven with the -e switch.
[ERROR] Re-run Maven using the -X switch to enable full debug logging.
[ERROR]
[ERROR] For more information about the errors and possible solutions, please read the following articles:
[ERROR] [Help 1] http://cwiki.apache.org/confluence/display/MAVEN/MojoExecutionException
重点在这俩行:
[INFO] Analysis report generated in 1563ms, dir size=17 MB
[INFO] Analysis reports compressed in 1132ms, zip size=5 MB
意思是生成了17MB的report,然后通过压缩生成了5MB的report需要上传,但最后失败了。通过查找发现是mysql上传文件大小有限制。
mysql>  show VARIABLES like '%max_allowed_packet%';
+--------------------------+------------+
| Variable_name            | Value      |
+--------------------------+------------+
| max_allowed_packet       | 4194304    |
| slave_max_allowed_packet | 1073741824 |
+--------------------------+------------+
2 rows in set (0.01 sec)
可以看到max_allowed_packet 大概是4MB,所以不够。
修改上传文件的大小:
vim /etc/my.cnf
加入:
max_allowed_packet = 20M
重启mysql:
service mysql restart
然后再在eclipse执行之前的命令:
[INFO] ANALYSIS SUCCESSFUL, you can browse http://192.168.126.135:9000/sonarQube/dashboard/index/com.zqsign:zqsign-web-manage
[INFO] Note that you will be able to access the updated dashboard once the server has processed the submitted analysis report
[INFO] More about the report processing at http://192.168.126.135:9000/sonarQube/api/ce/task?id=AWqcKZcEa_Mcw9GS4MqI
[INFO] Task total time: 43.932 s
[INFO] ------------------------------------------------------------------------
[INFO] BUILD SUCCESS
[INFO] ------------------------------------------------------------------------
[INFO] Total time: 47.198 s
[INFO] Finished at: 2019-05-09T18:35:33+08:00
[INFO]
成功后就可以到网页上查看scanner的结果


 2647
2647

 被折叠的 条评论
为什么被折叠?
被折叠的 条评论
为什么被折叠?
 到【灌水乐园】发言


