


 本文详细介绍了MyBatis3的使用,从下载、配置开始,逐步讲解了全局配置、Mapper映射文件、二级缓存、插件开发、动态SQL及工作原理。还涵盖了与Spring的整合、逆向工程MBG、批量执行和存储过程。此外,重点讨论了#{}与${}的区别,以及如何自定义TypeHandler处理枚举类型。
1.为什么要使用MyBatis?
- MyBatis是一个半自动的持久化层框架
- 对开发人员而言,核心SQL还是需要自己优化
- SQL和JAVA编码分开,功能边界清晰,一个专注业务、一个专注数据
- JDBC
- SQL夹在JAVA代码块里,耦合度高导致硬编码
- 维护不易且实际开发需求中SQL是有变化,频繁修改的情况很多见
- Hibernate和JPA
- 长、难、复杂的SQL,对于Hibernate而言,处理不容易
- 内部自动生成SQL,不容易做特殊优化
- 基于全映射的全自动框架,大量字段的POJO进行部分映射时比较困难,导致数据库性能下降
2.下载MyBatis
下载链接:https://github.com/mybatis/mybatis-3/
3.构建MyBatis的HelloWord
1. 引入jar包
如果是maven项目,直接拷贝依赖配置到pom.xml中
<dependency>
  <groupId>org.mybatis</groupId>
  <artifactId>mybatis</artifactId>
  <version>x.x.x</version>
</dependency>
如果是Gradle项目,直接拷贝配置到build.gradle中
implementation group: 'org.mybatis', name: 'mybatis', version: 'x.x.x'
如果是J2SE项目,则直接下载jar包,拷贝到类路径下:https://github.com/mybatis/mybatis-3/releases
2.创建全局配置文件mybatis-config.xml
需要修改对应的数据源配置信息和mapper.xml的资源路径
<?xml version="1.0" encoding="UTF-8" ?>
<!DOCTYPE configuration
  PUBLIC "-//mybatis.org//DTD Config 3.0//EN"
  "http://mybatis.org/dtd/mybatis-3-config.dtd">
<configuration>
  <environments default="development">
    <environment id="development">
      <transactionManager type="JDBC"/>
      <dataSource type="POOLED">
        <property name="driver" value="${driver}"/>
        <property name="url" value="${url}"/>
        <property name="username" value="${username}"/>
        <property name="password" value="${password}"/>
      </dataSource>
    </environment>
  </environments>
  <mappers>
    <mapper resource="org/mybatis/example/BlogMapper.xml"/>
  </mappers>
</configuration>
3.创建xxxx-mapper.xml
<?xml version="1.0" encoding="UTF-8" ?>
<!DOCTYPE mapper
  PUBLIC "-//mybatis.org//DTD Mapper 3.0//EN"
  "http://mybatis.org/dtd/mybatis-3-mapper.dtd">
<mapper namespace="org.mybatis.example.BlogMapper">
  <select id="selectBlog" resultType="Blog">
    select * from Blog where id = #{id}
  </select>
</mapper>
4. 获取SqlSessionFactory
String resource = "org/mybatis/example/mybatis-config.xml";
InputStream inputStream = Resources.getResourceAsStream(resource);
SqlSessionFactory sqlSessionFactory = new SqlSessionFactoryBuilder().build(inputStream);
5.创建Mapper接口
public interface BlogMapper{
	public Bolg selectOne(Integer i);
}
6.获取SqlSession并调用接口查询数据库
SqlSession session = sqlSessionFactory.openSession();
BlogMapper mapper = session.getMapper(BlogMapper.class);
Blog blog = mapper.selectBlog(101);
session.close();
4.全局配置文件参数(Configuration)标签配置
1.<properties>
mybatis可以使用properties标签来引入外部properties配置文件的内容,可以通过${xxxx}获取到配置文件参数的值
**resource:**引用类路径下的资源
**url:**引入网络路径或者磁盘路径下的资源
<properties resource="org/mybatis/example/config.properties"/>
2.<settings>
这是Mybatis的一个非常重要的标签,可以设置Mybatis运行时的行为
| 设置名 | 描述 | 有效值 | 默认值 |
|---|---|---|---|
| cacheEnabled | 全局性地开启或关闭所有映射器配置文件中已配置的任何缓存。 | true | false | true |
| lazyLoadingEnabled | 延迟加载的全局开关。当开启时,所有关联对象都会延迟加载。 特定关联关系中可通过设置 fetchType 属性来覆盖该项的开关状态。 | true | false | false |
| aggressiveLazyLoading | 开启时,任一方法的调用都会加载该对象的所有延迟加载属性。 否则,每个延迟加载属性会按需加载(参考 lazyLoadTriggerMethods)。 | true | false | false (在 3.4.1 及之前的版本中默认为 true) |
| multipleResultSetsEnabled | 是否允许单个语句返回多结果集(需要数据库驱动支持)。 | true | false | true |
| useColumnLabel | 使用列标签代替列名。实际表现依赖于数据库驱动,具体可参考数据库驱动的相关文档,或通过对比测试来观察。 | true | false | true |
| useGeneratedKeys | 允许 JDBC 支持自动生成主键,需要数据库驱动支持。如果设置为 true,将强制使用自动生成主键。尽管一些数据库驱动不支持此特性,但仍可正常工作(如 Derby)。 | true | false | False |
| autoMappingBehavior | 指定 MyBatis 应如何自动映射列到字段或属性。 NONE 表示关闭自动映射;PARTIAL 只会自动映射没有定义嵌套结果映射的字段。 FULL 会自动映射任何复杂的结果集(无论是否嵌套)。 | NONE, PARTIAL, FULL | PARTIAL |
| autoMappingUnknownColumnBehavior | 指定发现自动映射目标未知列(或未知属性类型)的行为。NONE: 不做任何反应WARNING: 输出警告日志(‘org.apache.ibatis.session.AutoMappingUnknownColumnBehavior’ 的日志等级必须设置为 WARN)FAILING: 映射失败 (抛出 SqlSessionException) | NONE, WARNING, FAILING | NONE |
| defaultExecutorType | 配置默认的执行器。SIMPLE 就是普通的执行器;REUSE 执行器会重用预处理语句(PreparedStatement); BATCH 执行器不仅重用语句还会执行批量更新。 | SIMPLE REUSE BATCH | SIMPLE |
| defaultStatementTimeout | 设置超时时间,它决定数据库驱动等待数据库响应的秒数。 | 任意正整数 | 未设置 (null) |
| defaultFetchSize | 为驱动的结果集获取数量(fetchSize)设置一个建议值。此参数只可以在查询设置中被覆盖。 | 任意正整数 | 未设置 (null) |
| defaultResultSetType | 指定语句默认的滚动策略。(新增于 3.5.2) | FORWARD_ONLY | SCROLL_SENSITIVE | SCROLL_INSENSITIVE | DEFAULT(等同于未设置) | 未设置 (null) |
| safeRowBoundsEnabled | 是否允许在嵌套语句中使用分页(RowBounds)。如果允许使用则设置为 false。 | true | false | False |
| safeResultHandlerEnabled | 是否允许在嵌套语句中使用结果处理器(ResultHandler)。如果允许使用则设置为 false。 | true | false | True |
| mapUnderscoreToCamelCase | 是否开启驼峰命名自动映射,即从经典数据库列名 A_COLUMN 映射到经典 Java 属性名 aColumn。 | true | false | False |
| localCacheScope | MyBatis 利用本地缓存机制(Local Cache)防止循环引用和加速重复的嵌套查询。 默认值为 SESSION,会缓存一个会话中执行的所有查询。 若设置值为 STATEMENT,本地缓存将仅用于执行语句,对相同 SqlSession 的不同查询将不会进行缓存。 | SESSION | STATEMENT | SESSION |
| jdbcTypeForNull | 当没有为参数指定特定的 JDBC 类型时,空值的默认 JDBC 类型。 某些数据库驱动需要指定列的 JDBC 类型,多数情况直接用一般类型即可,比如 NULL、VARCHAR 或 OTHER。 | JdbcType 常量,常用值:NULL、VARCHAR 或 OTHER。 | OTHER |
| lazyLoadTriggerMethods | 指定对象的哪些方法触发一次延迟加载。 用逗号分隔的方法列表。 | equals,clone,hashCode,toString | |
| defaultScriptingLanguage | 指定动态 SQL 生成使用的默认脚本语言。 | 一个类型别名或全限定类名。 | org.apache.ibatis.scripting.xmltags.XMLLanguageDriver |
| defaultEnumTypeHandler | 指定 Enum 使用的默认 TypeHandler 。(新增于 3.4.5) | 一个类型别名或全限定类名。 | org.apache.ibatis.type.EnumTypeHandler |
| callSettersOnNulls | 指定当结果集中值为 null 的时候是否调用映射对象的 setter(map 对象时为 put)方法,这在依赖于 Map.keySet() 或 null 值进行初始化时比较有用。注意基本类型(int、boolean 等)是不能设置成 null 的。 | true | false | false |
| returnInstanceForEmptyRow | 当返回行的所有列都是空时,MyBatis默认返回 null。 当开启这个设置时,MyBatis会返回一个空实例。 请注意,它也适用于嵌套的结果集(如集合或关联)。(新增于 3.4.2) | true | false | false |
| logPrefix | 指定 MyBatis 增加到日志名称的前缀。 | 任何字符串 | 未设置 |
| logImpl | 指定 MyBatis 所用日志的具体实现,未指定时将自动查找。 | SLF4J | LOG4J | LOG4J2 | JDK_LOGGING | COMMONS_LOGGING | STDOUT_LOGGING | NO_LOGGING | 未设置 |
| proxyFactory | 指定 Mybatis 创建可延迟加载对象所用到的代理工具。 | CGLIB | JAVASSIST | JAVASSIST (MyBatis 3.3 以上) |
| vfsImpl | 指定 VFS 的实现 | 自定义 VFS 的实现的类全限定名,以逗号分隔。 | 未设置 |
| useActualParamName | 允许使用方法签名中的名称作为语句参数名称。 为了使用该特性,你的项目必须采用 Java 8 编译,并且加上 -parameters 选项。(新增于 3.4.1) true | false true | |
| configurationFactory | 指定一个提供 Configuration 实例的类。 这个被返回的 Configuration 实例用来加载被反序列化对象的延迟加载属性值。 这个类必须包含一个签名为static Configuration getConfiguration() 的方法。(新增于 3.2.3) | 一个类型别名或完全限定类名。 | 未设置 |
| shrinkWhitespacesInSql | 从SQL中删除多余的空格字符。请注意,这也会影响SQL中的文字字符串。 (新增于 3.5.5) | true | false | false |
| defaultSqlProviderType | Specifies an sql provider class that holds provider method (Since 3.5.6). This class apply to the type(or value) attribute on sql provider annotation(e.g. @SelectProvider), when these attribute was omitted. | 一个类型别名或完全限定类名。 | 未设置 |
3.<typeAliases>
别名处理器,可以给java类型起别名,默认别名不区分大小写
- 单个起别名:<typeAliase>
type:需要起别名的类型的全类名,默认是类名小写
alias: 指定新的别名 - 批量起别名<package>
name: 指定的包名,为当前包及其子孙包下的类起一个默认的别名,默认是类名小写。当不同的包下有相同的类名,此时会出现别名冲突,因此可以在不同的类上添加注解@Alias指定别名。
mybatis为我们提供底层支持的几种默认的别名:
| 别名 | 映射的类型 |
|---|---|
| _byte | byte |
| _long | long |
| _short | short |
| _int | int |
| _integer | int |
| _double | double |
| _float | float |
| _boolean | boolean |
| string | String |
| byte | Byte |
| long | Long |
| short | Short |
| int | Integer |
| integer | Integer |
| double | Double |
| float | Float |
| boolean | Boolean |
| date | Date |
| decimal | BigDecimal |
| bigdecimal | BigDecimal |
| object | Object |
| map | Map |
| hashmap | HashMap |
| list | List |
| arraylist | ArrayList |
| collection | Collection |
| iterator | Iterator |
4.<typeHandlers>
类型处理器
数据库类型与java类型的映射关系
eg: JSR-310日期类型处理器,在mybatis3.4之前是需要自己显式配置的,在mybatis3.4+,默认已经把日期类型处理器添加到了底层中,无需再显式地配置
5.<plugins>
插件配置
可以拦截到mybatis的底层运行过程,在运行过程中进行修改mybatis的一些执行行为。
主要可以拦截有四大对象:Executor、StatementHandler、ParamenterHandler、ResultSetHandler
6.<environments>
环境配置
环境的相关配置,可以配置多环境设置,主要是事务管理器与数据源的配置,动态设置不同的运行环境
transactionManager: 事务管理器,type: 可以设置值:JDBC|MANAGED,自定义事务管理:实现接口TransactionFactory
dataSource: 数据源, type: UNPOOLED|POOLED|JNDI, 自定义数据源:实现接口DataSourceFactory
7.<databaseIdProvider>
支持多数据库厂商,type: DB_VENDOR(VendorDataBaseIdProvider),作用是得到数据库厂商的标识(驱动:getDatabaseProductName),myBatis就能根据数据库厂商的标识来执行不同的SQL
<databaseIdProvider typr="DB_VENDOR">
	<property name="MySQL" value="mysql"/>
	<property name="Oracle" value="oracle"/>
	<property name="SQL Server" value="sqlserver"/>
</databaseIdProvider>
当设置了该数据库厂商标识的别名之后,在配置执行SQL的时候,就可以指定是哪个数据库的SQL
 <select id="getEmp" resultType="Employee" databaseId="mysql">
 select * from tb_emp where id=#{id}
</select>
8.<mappers>
将sql映射注册到全局配置中
- resource: 引用类路径下的sql映射文件
- url: 引用网路上或磁盘路径下的sql映射文件
- class: 引用mapper接口,但是该方式有一些限制条件,1.有sql映射文件,映射文件名必须与接口名相同,并且放在与接口同一路径下。2.没有sql映射文件,所有的sql都是利用注解写在接口上
推荐: - 比较重要,复杂的Dao接口我们来写sql映射文件
- 不重要,简单的Dao接口为了快速开发,可以使用注解的方式
9.特别注意: Configuration标签下的以上这些标签是有先后顺序的
properties> settings> typeAliases> typeHandlers> objectFactory> objectWrapperFactory> reflectorFactory> plugins> environments> databaseIdProvider> mappers
这些标签的配置可以没有配置,但是只要配置了,就必须按照以上的顺序进行配置
5.mapper映射文件
1.增删改<insert>、<update>、<delete>
- mybatis 允许增删改直接定义以下类型的返回值
Integer、Long、Boolean,表示执行sql是否成功或执行成功的行数- 需要手动提交事务
一般用法(以insert为例):
<!--parameterType属性可以省略-->
<insert id="addEmp" parameterType="com.xxx.Employee">
 insert into tb_emp (id,last_name,gender) values (#{id},#{lastName},#{gender})
</insert>
mysql支持主键自增的,自增主键的该怎么获取呢?
mybatis也是利用了statement.genGenreatedKeys();获取的,只需要在insert标签上添加属性userGeneratedKeys=“true”;使用主键自增获取主键值的策略,并将获取到的主键值复制给javabean的哪个属性
<insert id="addEmp" parameterType="com.xxx.Employee" userGeneratedKeys="true" keyProperty="id">
 insert into tb_emp (id,last_name,gender) values (#{id},#{lastName},#{gender})
</insert>
那如果是非自增逐渐的值则该如何获取?
比如Oracle数据库,是通过序列来模拟自增。每次插入的数据的主键是从序列中拿到的值。
<insert id="addEmp" databaseId="oracle">
	<!--keyProperty查出的主键值赋值给javabean中的哪一个属性  order="BEFORE"在插入SQL之前运行  resultType:查出的数据的返回值类型-->
	<selectKey keyProperty="id" order="BEFORE" resultType="Integer">
		select EMPLOYEES_SEQ.nextVal from dual
	</selectKey>
	insert into employees (id,last_name,gender) values (#{id},#{lastName},#{gender})
</insert>
参数处理
- 单个参数:
mybatis不会做特殊处理。#{参数名,任意}取出参数值- 多个参数:
mybatis会做特殊处理,多个参数会被封装成一个map,实际研究源码可以发现:mybatis实际会将参数做两份,一份是特殊处理,没有指定参数名时key: 0,1…,指定参数名时,key:参数名,value:实际的值,另外一份则是key:param1,param2…value:实际的值。#{}实际就是从map中获取指定的key的值- 命名参数:
明确指定封装参数时map的key,使用参数注解@Param(“id”),此时就可以通过#{“id”}获取到值- POJO:
如果多个参数正好是我们业务逻辑的数据模型,我们就可以直接传入POJO,如果多个参数不是业务模型中的数据,为了方便,我们也可以传入POJO- Map:
此时参数的Map的key与value可以直接通过#{“key”}获取到value- TO(DTO):
如果多个参数不是业务模型中的数据,但是经常会被使用,推荐编写一个TO(DTO)数据传输对象- 集合/数组
如果是Collection(List、Set)类型或者数组,mybatis也会进行特殊处理,也是把传入的List或者数组封装在Map中。key:collection、list、array- null值处理
jdbcType通常需要在某种特定的条件下被设置:在我们数据为null的时候,有些数据库可能不能识别mybatis对null的默认处理,即默认为OTHER。比如Oracle会报错:无效的类型(OTHER)。因为mybatis对所有的null值映射的原生jdbc的OTHER(JdbcType)类型,需要给设置参数时,添加属性#{email, jdbcType=NULL},也可以在上文讲述过全局配置的<settings>配置中,将配置jdbcTypeForNull默认时OTHER设置为NULL
#{}与${}区别
#{}:可以获取map、List、Array中的值或者pojo对象属性的值
${}:可以获取map、List、Array中的值或者pojo对象属性的值
区别:
#{}: 是以预编译的形式,将参数以占位符设置到sql语句中, PreparedStatement,防止注入攻击
SELECT * FROM TABLE WHERE ID=#{id}==>SELECT * FROM TABLE WHERE ID=?
${}: 取出的值直接拼接在sql语句中,会有安全问题,容易遭受注入攻击
SELECT * FROM TABLE WHERE ID=${id}==>SELECT * FROM TABLE WHERE ID=1
因此,建议在大多数情况下,我们参数的值都应该使用#{}, 只有在原生JDBC不支持占位符的地方,我们才使用${}进行取值,比如在分表(按照年份分表拆分) eg:SELECT * FROM ${year}_TABLE或eg:SELECT * FROM TABLE ORDER BY ${f_name} ${order}
#{}更丰富的用法:
规定参数的一些规则:javaType、jdbcType、mode(存储过程)、numericScale、resultMap、typeHandler、jdbcTypeName、expression(未来准备支持的功能)
2. 查询<select>
一般用法:
<select id="getEmp" resultType="com.xxx.Employee">
 select * from tb_emp where id=#{id}
</select >
查询结果为List
如果resultType返回值是一个List,只需要指定List中元素的类型即可
<select id="getEmp" resultType="com.xxx.Employee">
 select * from tb_emp where id=#{id}
</select >
查询结果为Map
单条结果数据的封装,key为属性名,value为查出的数据,直接resultMap=“map”,因为map在mybatis底层中已经取了别名
<select id="getEmp" resultType="map">
 select * from tb_emp where id=#{id}
</select >
多条结果数据的封装,key为主键,value为查询出的整条数据的封装对象类型,需要在对应的Mapper接口的方法上设置注解@MapKey("id"),即设置对象中的哪个属性作为Map的key
<select id="getEmps" resultType="com.xxx.Employee">
 select * from tb_emp where last_name like #{lastName}
</select >
resultMap自定义结果集映射
1.一般用法
resultType与resultMap只能二选一,不能同时用
type: 自定义某个javaBean的封装规则。 id: 唯一id方便引用
定义主键列的封装规则<id column="id" property="id">column指定哪一列,property指定对应的javaBean属性
定义普通列的封装规则<result column="last_name" property="lastName">column指定哪一列,property指定对应的javaBean属性,其它不指定的列会自动封装。但是建议,只要我们编写了resultMap的映射规则,就把所有列的映射规则都写上
2. 关联查询
eg: 员工中有部门信息
class Employee{
	String id;
	String lastName;
	Integer gender;
	Department dept;
}

class Department{
	String id;
	String name;
	List<Employee> emps;
}
返回结果集的resultMap
<!-- 方式一:采用级联属性-->
<resultMap id="difEmp" type="com.xxx.Employee">
	<id column="id" property="id">
	<result column="last_name" property="lastName">
	<result column="gender" property="gender">
	<result column="did" property="dept.id">
	<result column="dept_name" property="dept.name">
</resultMap>

<!-- 方式二:采用association指定联合的javaBean对象-->
<resultMap id="difEmp" type="com.xxx.Employee">
	<id column="id" property="id">
	<result column="last_name" property="lastName">
	<result column="gender" property="gender">
	<association property="dept" javaType="com.xxx.Department">
		<id column="id" property="id">
		<result column="dept_name" property="name">
	</association >
</resultMap>
association 定义关联对象,即一对一,collection定义关联集合,即一对多
association 分步查询
- 先按照员工id查询出员工信息
- 根据查询的员工信息的d_id的值去部门查询部门信息
- 部门信息设置到员工中
<mapper namespaces="com.xxx.deptNamespaceMapper">
	<select id="getDeptById" resultType="com.xxx.Department">
		select * from tb_dept where id=#{id}
	</select>
</mapper>

<mapper namespaces="com.xxx.empNamespaceMapper">
	<select id="getEmpById" resultMmap="difEmp">
		select * from tb_emp where id=#{id}
	</select>
</mapper>
<resultMap id="difEmp" type="com.xxx.Employee">
	<id column="id" property="id">
	<result column="last_name" property="lastName">
	<result column="gender" property="gender">
	<!-- select: 表明当前属性是调用select指定的方法查出的结果,column指定将哪一列的值传给这个方法-->
	<association property="dept" select="com.xxx.deptNamespaceMapper.getDeptById" column="d_id">
	</association >
</resultMap>
association 延时加载(懒加载)
在以上分步查询的基础上,再加上两个配置即可。
在全局配置文件中的<setting>中,加上
<setting name="lazyLoadingEnabled" value="true">
<setting name="aggressiveLazyLoading" value="false">
如果只是某个查询采用延时加载,可以在association或collection上添加属性fetchType="lazy"
collection 定义关联集合类型的属性的封装规则
<resultMap id="difEmp" type="com.xxx.Department">
	<id column="id" property="id">
	<result column="dept_name" property="name">
	<!-- ofType: 指定集合里面元素的类型-->
	<collection property="emps" ofType="com.xxx.Employee">
		<id column="id" property="id">
		<result column="last_name" property="lastName">
		<result column="gender" property="gender">
	</collection>
</resultMap>
collection 分步查询
<resultMap id="difEmp" type="com.xxx.Department">
	<id column="id" property="id">
	<result column="dept_name" property="name">
	<collection property="emps" select="com.xxx.empNamespaceMapper.getEmpByDId" column="id">
	</collection >
</resultMap>
分步查询所传的参数,colunm如果需要传递多个列的参数,可以使用column="{key1=value1,key2=value2}"
3. <discriminator>鉴别器
mybatis可以使用discriminator判断某列的值,然后根据某列的值改变封装行为
eg: 如果查出是女生,就把部门信息查询处理,否则不查询;如果是男生,把last_name这一列的值设置id的值
<resultMap id="difEmp" type="com.xxx.Employee">
	<id column="id" property="id">
	<result column="last_name" property="lastName">
	<result column="gender" property="gender">
	<discriminator javaType="string" column="gender">
		<case value="0" resultType="com.xxx.Department">
			<association property="dept" select="com.xxx.deptNamespaceMapper.getDeptById" column="d_id">
			</association >
		</case>
		<case value="1" resultType="com.xxx.Employee">
			<id column="id" property="id">
			<result column="id" property="lastName">
			<result column="gender" property="gender">
		</case>
</discriminator>
</resultMap>
3.动态SQL
1. if
OGNL表达式(特殊字符需要转义)
访问对象属性:person.name
调用方法:person.getName()
调用静态属性/方法:@java.lang.Majth@PI | @java.util.UUID@randomUUID()
调用构造方法: new com.xxx.Employee(“admin”).name
运算符: +, -, *, /, %
逻辑运算符: in, not in, >, >=, <, <=, ==, !=
List/Set/Map.size()
List/Set/Map.isEmpty()
List/Set.iterator()
Map.keySet()/Map.values()
Iterator.next()/Iterator.hasNext()
<select id="getEmp" resultType="com.xxx.Employee">
	select * from tb_emp where
		<!-- test:判断表达式(OGNL表达式)-->
		<if test="lastName != null and lastName.trim() != ''">
			last_name like #{lastName}
		</if>
		<if test="gender == 0 or gender == 1">
			and gender = #{gender}
		</if>
</select>
但是上述的代码中,如果lastName为空,但是gender不为空,那么sql会出现select * from tb_emp where and gender=?报语法错误。
解决办法:
- 在where 语句后面加上
1=1,后面所有的if的开头都加上and<select id="getEmp" resultType="com.xxx.Employee"> select * from tb_emp where 1=1 <if test="lastName != null and lastName.trim() != ''"> and last_name like #{lastName} </if> <if test="gender == 0 or gender == 1"> and gender = #{gender} </if> </select>
- mybatis使用
<where>标签将所有的查询条件包含在内,where标签会将多余的and或者or清除,但是如果多余的and或者or是写在语句的结尾,则where标签也是没办法清除的,可以参考trim标签<select id="getEmp" resultType="com.xxx.Employee"> select * from tb_emp <where> <if test="lastName != null and lastName.trim() != ''"> last_name like #{lastName} </if> <if test="gender == 0 or gender == 1"> and gender = #{gender} </if> </where> </select>
2. choose
分支选择,带break的switch-case,只会进入其中一个
<select id="getEmp" resultType="com.xxx.Employee">
	select * from tb_emp
	<where>
		<choose>
			<when test="lastName != null and lastName.trim() != ''">
				and last_name like #{lastName}
			</when>
			<when test="gender == 0 or gender == 1">
				and gender = #{gender}
			</when>
			<otherwise>
				1=1
			</otherwise>
		</choose>
		</where>
</select>
3. trim
- 解决如果多余的and或者or是写在语句的结尾
<select id="getEmp" resultType="com.xxx.Employee">
	select * from tb_emp
	<!-- prefix:前缀,trim标签体是整个字符串拼接之后的结果,prefix给拼接后的整个字符串加上前缀
 		prefixOverrides: 前缀覆盖,去掉整个字符串前面多余的字符
 		suffix:后缀。suffix给拼接后的整个字符串加上后缀
 		suffixOverrides:后缀覆盖:去掉整个字符串后面多余的字符
 	-->
  	<trim prefix="where" suffixOverrides="and">
		<if test="lastName != null and lastName.trim() != ''">
			last_name like #{lastName}
		</if>
		<if test="gender == 0 or gender == 1">
			and gender = #{gender}
		</if>
	</trim>
 </select>
- set修改与if结合
解决更新操作时,多余的逗号
<update id="updateEmp">
	update tb_emp
	<set>
		<if test="lastName != null and lastName.trim() != ''">
			last_name=#{lastName},
		</if>
		<if test="gender == 0 or gender == 1">
			gender = #{gender}
		</if>
	</set>
	where id=#{id}
</update>
- 使用trim解决前后缀问题
<update id="updateEmp">
	update tb_emp
	<trim prefix="set" suffixOverrides=",">
		<if test="lastName != null and lastName.trim() != ''">
			last_name=#{lastName},
		</if>
		<if test="gender == 0 or gender == 1">
			gender = #{gender}
		</if>
	</trim>
	where id=#{id}
</update>
4. foreach
collection: 指定要遍历的集合,list类型参数会特殊处理在map中,map的key就叫list
item: 将当前遍历出的元素赋值给指定的变量
separator: 每个元素之间的分隔符
open: 遍历出所有结果拼接一个开始字符
close: 遍历出所有结果拼接一个结束字符
index: 索引。遍历list的时候,index就是索引,item就是对应的值。遍历Map的时候,index就是map的key,item就是map的value
#{变量名}就能获取对应变量的值
<select id="getEmps" resultType="com.xxx.Employee">
	select * from tb_emp in
	<foreach collection="ids" item="item_id" separator="," open="(" close=")">
		#{item_id}
	</foreach>
</select>
- mysql 的批量插入
<!--方式一-->
<insert id="addEmps">
	insert into tb_emp (last_name,gender) values
	<foreach collection="emps" item="emp" separator=",">
		(#{emp.lastName},#{emp.gender})
	</foreach>
</insert>

<!--方式二:需要开启mysql可以以(分号;)相隔的sql语句。jdbc.url="jdbc:mysql://localhost:3306/mybatis?allowMultiQueries=true"-->
<insert id="addEmps">
	<foreach collection="emps" item="emp" separator=";">
		insert into tb_emp (last_name,gender) values (#{emp.lastName},#{emp.gender})
	</foreach>
</insert>
- oracle 的批量插入
<!--方式一: 多个insert放在begin和end之间-->
<insert id="addEmps">
	<foreach collection="emps" item="emp" open="begin" close="end;">
		insert into tb_emp (last_name,gender) values (#{emp.lastName},#{emp.gender})
	</foreach>
</insert>

<!--方式二:-->
<insert id="addEmps">
	insert into tb_emp (last_name,gender)
		select tb_emp_seq.nextval,lastName,gender from
	<foreach collection="emps" item="emp" separator="union" open="(" close=")">
		select #{emp.lastName} lastName, #{emp.gender} gender from dual
	</foreach>
</insert>
5.内置参数
mybatis提供的两个内置参数
- _parameter:代表整个参数
- 单个参数:_parameter就是这个参数
- 多个参数:参数会封装为一个map; _parameter就是这个map
- _databaseId:如果配置了databaseIdProvider标签,则代表当前数据库的别名
<select id="getEmp" resultType="com.xxx.Employee">
	<if test="_databaseId == 'mysql'">
		select * from tb_emp
		<if test="_parameter != null">
			where last_name=#{lastName}
		</if>
	</if>
	<if test="_databaseId == 'oracle'">
		select * from tb_emp
	</if>
</select>
6.bind
可以将OGNL表达式的值直接绑定到一个变量中,方便后来引用这个变量
<select id="getEmp" resultType="com.xxx.Employee">
	<bind name="_lastName" value="'%' + lastName + '%'">
	select * from tb_emp where last_name like #{_lastName}
</select>
7.可重用SQL
抽取可重用的SQL片段,方便后面引用
- sql抽取:经常将要查询的列名,或者插入用的列名抽取出来方便引用
- include来引用已经抽取的sql
- include还可以自定义一些property,sql标签内部就能使用自定义的属性${属性名},不能使用#{属性名}的方式
<sql id="insertColumn">
	<if test="_databaseId == 'mysql'">
		id, last_name, gender, ${testPro}
	</if>
	<if test="_databaseId == 'oracle'">
		emp_id, last_name, gender, ${testPro}
	</if>
</sql>

<insert id="addEmp">
	insert into tb_emp (
	<include refid="insertColumn">
		<property name="testPro" value="abc" />
	</include>
	) values (#{id},#{lastName},#{gender})
</insert>
6. 两级缓存
1.一级缓存
一级缓存也叫本地缓存,是SqlSession级别的缓存,一级缓存是一直开启的,其实就是SqlSession级别的一个Map。与数据库在同一次会话期间查询到的数据会放在本地缓存中。如果以后需要获取到相同的数据,则直接从缓存中拿,没必要再去查询数据库。
一级缓存失效四种情况:
1. SqlSession不同。SqlSession sqlSession01 = sqlSessionFactory.openSession(); XXXMapper mapper01 = sqlSession01.getMapper(XXX.class); XXX xxx = mapper01.getXXX(1); System.out.println(xxx); SqlSession sqlSession02 = sqlSessionFactory.openSession(); XXXMapper mapper02 = sqlSession02.getMapper(XXX.class); XXX xxx = mapper02.getXXX(1); System.out.println(xxx);2. SqlSession相同,查询条件不同。
当前的一级缓存还没有这个数据SqlSession sqlSession = sqlSessionFactory.openSession(); XXXMapper mapper = sqlSession01.getMapper(XXX.class); XXX xxx = mapper.getXXX(1); System.out.println(xxx); XXX xxx = mapper.getXXX(2); System.out.println(xxx);3. SqlSession相同,两次查询之间执行了增删改操作
此次增删改操作可能对当前数据有影响SqlSession sqlSession = sqlSessionFactory.openSession(); XXXMapper mapper = sqlSession01.getMapper(XXX.class); XXX xxx = mapper.getXXX(1); System.out.println(xxx); mapper.insertXXX(XXX xxx); XXX xxx = mapper.getXXX(1); System.out.println(xxx);4. SqlSession相同,手动清除了一级缓存
一级缓存清空SqlSession sqlSession = sqlSessionFactory.openSession(); XXXMapper mapper = sqlSession01.getMapper(XXX.class); XXX xxx = mapper.getXXX(1); System.out.println(xxx); sqlSession.clearCache(); XXX xxx = mapper.getXXX(1); System.out.println(xxx);
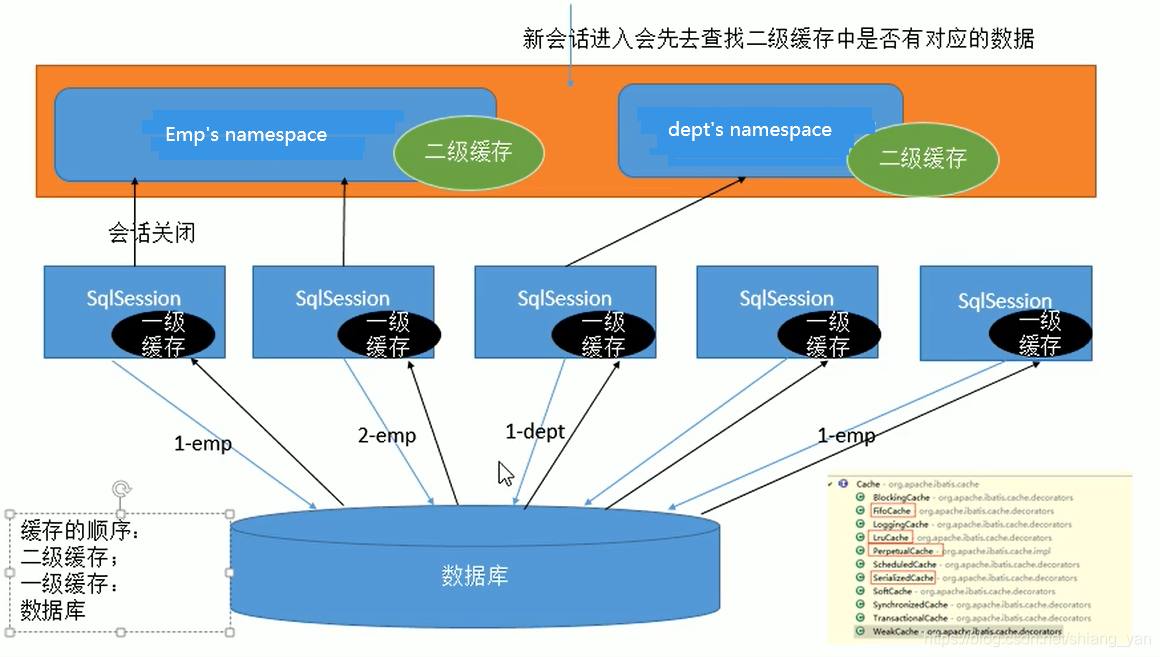
2.二级缓存
二级缓存也叫全局缓存,它是基于namespace级别的缓存,即一个namespace对应一个二级缓存。
工作机制:
- 一个会话,查询一条数据,这个数据就会被放在当前会话的一级缓存中;
- 如果会话关闭,一级缓存中的数据会被保存到二级缓存中,新的会话查询信息,就可以参照二级缓存
- 不同的namespace查出的数据会放在自己对应的缓存中(Map)
使用步骤
- 开启全局二级缓存配置
<setting name="cacheEnabled" value="true"/>- 在XXXMapper.xml中配置全局使用二级缓存
<cache eviction="LRU" blocking="" flushInterval="60000" readOnly="false" size="1024" type=""></cache>
eviction:缓存的回收策略
LRU - 最近最少使用的,移除最长时间不被使用的对象,默认
FIFO - 先进先出,按对象进入缓存的顺序来移除它们
SOFT - 软引用,移除基于垃圾回收器状态和软引用规则的对象
WEAK - 弱引用,更积极地移除基于垃圾收集器状态和弱引用规则的对象
blocking:是否阻塞
若缓存中找不到对应的key,是否会一直blocking,直到有对应的数据进入缓存
flushInterval:缓存刷新间隔
缓存多长时间清空一次,默认是不清空,设置毫秒值
readOnly:缓存是否只读
true:只读;mybatis认为所有从缓存中获取数据的操作都是只读操作,不会修改数据。mybatis为了加快获取速度,直接就会将数据在缓存中的引用交给用户。不安全,但是速度快
false:非只读;默认的,mybatis认为获取的数据可能会被修改,mybatis会使用序列化和反序列的技术,克隆一份新的数据。安全,速度稍慢
size:缓存存放多少个元素
type:指定自定义缓存元素的全类名
实现Cache接口即可- 由于缓存涉及到序列化与反序列化,所有缓存对象javaBean需要实现序列化接口Serializable
3.缓存设置
- 如果是针对某个<select>添加二级缓存,可以添加属性
useCache="true"- 每个增删改标签都有一个属性:
flushCache="true",增删改执行完成之后就会清除缓存,一级缓存和二级缓存都会被清除,<select>标签也有属性:flushCache="false",但是默认是false,如果设置为true,每次查询之后都会清空缓存,这样缓存就没有被使用到<setting localCacheScope="SESSION">:本地缓存作用域,一级缓存的配置,取值有SESSION|STATEMENT,默认是SESSION,作用于当前会话。如果设置为STATEMENT,则没有数据将会被放到缓存中,相当于禁用一级缓存
4.缓存原理图示
5.第三方缓存整合
第三方整合缓存可以参考Mybatis官方教程:https://github.com/mybatis
此处以Ehcache为例:http://mybatis.org/ehcache-cache/
- 导入第三方缓存包
- 导入与第三方缓存的整合适配包,这个可以在官方mybatis的github上下载
- mapper.xml中配置使用自定义缓存
<mapper namespace="org.acme.FooMapper">
 <cache type="org.mybatis.caches.ehcache.EhBlockingCache"/>
</mapper>
7. Mybatis、SpringMVC与Spring整合
1. 下载适配包
- 查看不同mybatis版本整合Spring时使用的适配包:http://www.mybatis.org/spring/
- 下载整合适配包:https://github.com/mybatis/spring/releases
- 官方整合示例:https://github.com/mybatis/jpetstore-6
2.导入相应的jar包
- Spring相关的jar包
- mybatis相关的jar包
- 数据库相关的jar包
- Spring与Mybatis的适配包
3.配置web.xml
<!--Spring配置-->
<context-param>
	<param-name>contextConfigLocation</param-name>
	<param-value>classpath:applicationContext.xml</param-value>
</context-param>
<listener>
	<listener-class>org.springframework.web.context.ContextLoaderListener</listener-class>
</listener>
<!--SpringMVC配置-->
<servlet>
    <servlet-name>dispatcherServlet</servlet-name>
    <servlet-class>org.springframework.web.servlet.DispatcherServlet</servlet-class>
    <!--SpringMVC会默认找到WEB-INF/下的spring-servlet.xml的配置文件,如果需要改变该文件的路径或者名称,可以添加以下配置
		<init-param>
        	<param-name>contextConfigLocation</param-name>
            <param-value>/WEB-INF/bean.xml</param-value>
    	</init-param>
	-->
    <load-on-startup>1</load-on-startup>
</servlet>

<servlet-mapping>
    <servlet-name>dispatcherServlet</servlet-name>
    <url-pattern>/</url-pattern>
</servlet-mapping>
4.配置spring-servlet.xml
<!--只扫描控制器-->
<context:component-scan base-package="com.xxx.xxx">
	<context:include-filter type="annotation" expression="org.springframework.stereotype.Controller"/>
</context:component-scan>
<!--视图解析器-->
<bean class="org.springframework.web.servlet.view.InternalResourceViewResolver">
	<property name="prefix" value="/WEB-INF/pages/"/>
	<property name="suffix" value=".jsp"/>
</bean>

<mvc:annotation-driven />
<mvc:default-servlet-handler />
5.配置applicationContext.xml
<!--只扫描控制器以外的javabean-->
<context:component-scan base-package="com.xxx.xxx">
	<context:exclude-filter type="annotation" expression="org.springframework.stereotype.Controller"/>
</context:component-scan>
<!--引入数据库配置文件-->
<context:property-placeholder location="classpath:db.properties"/>
<!--配置数据源-->
<bean id="dataSource" class="com.mchange.v2.c3p0.ComboPooledDataSource">
	<property name="jdbcUrl" value="${jdbc.url}"/>
    <property name="driverClass" value="${jdbc.driverclass}"/>
    <property name="user" value="${jdbc.user}" />
    <property name="password" value="${jdbc.password}" />
</bean>
<!-- 事务管理器 -->
<bean id="transactionManager" class="org.springframework.jdbc.datasource.DataSourceTransactionManager">
    <property name="dataSource" ref="dataSource" />
</bean>
<!-- 开启基于注解的事务 -->
<tx:annotation-driven transaction-manager="transactionManager"/>
<!-- define the SqlSessionFactory -->
<bean id="sqlSessionFactory" class="org.mybatis.spring.SqlSessionFactoryBean">
    <property name="dataSource" ref="dataSource" />
    <!-- 指定mybatis的配置文件路径 -->
    <property name="configLocation" value="classpath:mybatis-config.xml" />
    <property name="mapperLocation" value="classpath:mybatis/mapper/*.xml" />
</bean>
<!-- 扫描所有的mapper接口 -->
<mybatis:scan base-package="org.mybatis.jpetstore.mapper" />
6.配置mybatis-config.xml
<?xml version="1.0" encoding="UTF-8" ?>
<!DOCTYPE configuration
  PUBLIC "-//mybatis.org//DTD Config 3.0//EN"
  "http://mybatis.org/dtd/mybatis-3-config.dtd">
<configuration>
	<settings>
		<setting name="cacheEnabled" value="true"/>
	</settings>
	<databaseIdProvider typr="DB_VENDOR">
		<property name="MySQL" value="mysql"/>
		<property name="Oracle" value="oracle"/>
		<property name="SQL Server" value="sqlserver"/>
	</databaseIdProvider>
</configuration>
8. Mybatis逆向工程
1. Mybatis Generator (MBG)
是一个专门为Mybatis框架使用者定制的代码生成器,可以快速地根据表生成对应的映射文件、接口以及bean类。支持基本的增删改查以及QBC风格的条件查询,但是表连接、存储过程等这些复杂sql的定义需要我们手工编写。
官方文档地址:http://www.mybatis.org/generator/
官方工程地址:https://github.com/mybatis/generator/releases
2. 创建MBG工程
1. 在项目路径下新建mbg.xml
<?xml version="1.0" encoding="UTF-8"?>
<!DOCTYPE generatorConfiguration
  PUBLIC "-//mybatis.org//DTD MyBatis Generator Configuration 1.0//EN"
  "http://mybatis.org/dtd/mybatis-generator-config_1_0.dtd">

<generatorConfiguration>
  <classPathEntry location="/Program Files/IBM/SQLLIB/java/db2java.zip" />

  <context id="DB2Tables" targetRuntime="MyBatis3Simple">
    <jdbcConnection driverClass="com.mysql.jdbc.Driver"
        connectionURL="jdbc:mysql://localhost:3306/mybatis?allowMultiQueries=true"
        userId="root"
        password="123456">
    </jdbcConnection>

	<!-- 类型解析器 -->
    <javaTypeResolver >
      <property name="forceBigDecimals" value="false" />
    </javaTypeResolver>

	<!-- 指定javabean的生成策略:
	targetProject:目标包名
	targetProject:目标工程 -->
    <javaModelGenerator targetPackage="com.xxx.bean" targetProject=".\src">
      <property name="enableSubPackages" value="true" />
      <property name="trimStrings" value="true" />
    </javaModelGenerator>

	<!-- sql映射生成策略:
	targetProject:目标包名
	targetProject:目标工程 -->
    <sqlMapGenerator targetPackage="com.xxx.dao"  targetProject=".\src">
      <property name="enableSubPackages" value="true" />
    </sqlMapGenerator>

	<!-- 指定mapper接口所在位置-->
    <javaClientGenerator type="XMLMAPPER" targetPackage="com.xxx.mapper"  targetProject=".\src">
      <property name="enableSubPackages" value="true" />
    </javaClientGenerator>

	<!-- 指定逆向分析哪些表,根据表创建javaBean-->
    <table tableName="tb_emp" domainObjectName="Employee" >
      <property name="useActualColumnNames" value="true"/>
      <generatedKey column="ID" sqlStatement="DB2" identity="true" />
      <columnOverride column="DATE_FIELD" property="startDate" />
      <ignoreColumn column="FRED" />
      <columnOverride column="LONG_VARCHAR_FIELD" jdbcType="VARCHAR" />
    </table>

  </context>
</generatorConfiguration>
2. 将mbg运行起来
public static void main(String[] args) {
   List<String> warnings = new ArrayList<String>();
   boolean overwrite = true;
   File configFile = new File("mbg.xml");
   ConfigurationParser cp = new ConfigurationParser(warnings);
   Configuration config = cp.parseConfiguration(configFile);
   DefaultShellCallback callback = new DefaultShellCallback(overwrite);
   MyBatisGenerator myBatisGenerator = new MyBatisGenerator(config, callback, warnings);
   myBatisGenerator.generate(null);
}
9. Mybatis工作原理
1. SqlSessionFactory
- Mapper.xml中的每一个元素信息解析出来并保存在全局配置中,将增删改查标签的每一个属性都解析出来封装成一个MappedStatement,一个MappedStatement就代表了一个增删改查标签的详细信息
- Configuration对象包含了所有的信息,包括全局配置文件的信息和mapper文件的信息
- Configuration对象中一个重要属性: MappedStatement–》key:命名空间.标签ID,value:MappedStatement对象
- Configuration对象中一个重要属性:mapperRegistry–》保存了mapper接口对应的mapperProxyFactory工厂类
2. openSession()
返回一个DefaultSqlSession对象,包含了Executor和Configuration,这一步会创建Excutor对象
3. getMapper()
使用MapperProxyFactory创建一个MapperProxy的代理对象,里面包含了DefaultSqlSession(Excutor)
4. 执行接口方法-增删改查
执行接口方法总结:
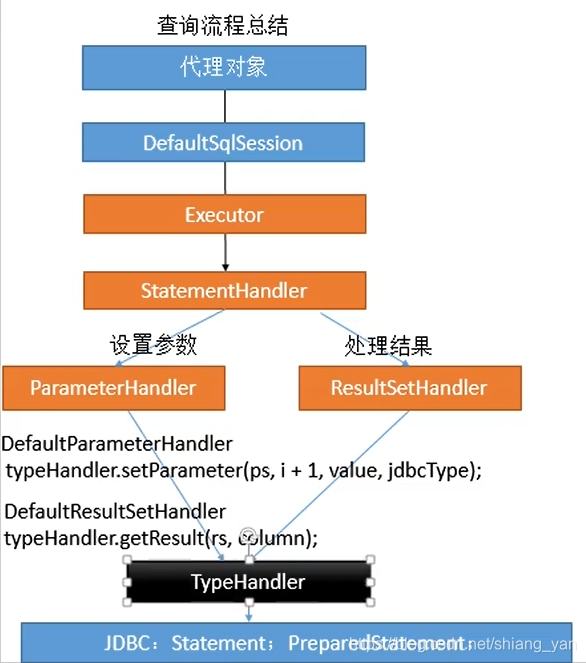
总结
- 根据配置文件(全局、mapper映射文件)初始化Configuration对象
- 创建一个DefaultSqlSession对象,包含了Configuration以及Executor(根据全局配置文件中的defaultExecutorType创建出对应的Executor)
- DefaultSqlSession.getMapper()拿到Mapper接口对应的MapperProxy
- MapperProxy包含了DefaultSqlSession
- 执行增删改查方法:
- 调用DefaultSqlSession的增删改查(Executor)
- 创建一个StatementHandler对象,同时也会创建出ParameterHandler和ResultSetHandler
- 调用StatementHandler预编译和ParameterHandler预编译设置参数
- 调用StatementHandler的增删改查方法
- ResultSetHandler封装结果
注意: 四大对象:Executor,StatementHandler,ParameterHandler,ResultSetHandler创建的时候都会有interceptorChain.pluginAll()
10.mybatis的插件
原理:
在四大对象创建的时候:
- 每个对象都不是直接返回的,而是通过interceptorChain.pluginAll()返回的
- 获取倒所有的Interceptor.plugin(target),返回包装后的对象
- 插件机制,我们可以使用插件为目标对象创建一个代理对象(类似AOP),可以为四大对象创建出代理对象,代理对象就可以拦截到四大对象的每一个执行
- 实现插件需要实现mybatis的Interceptor接口
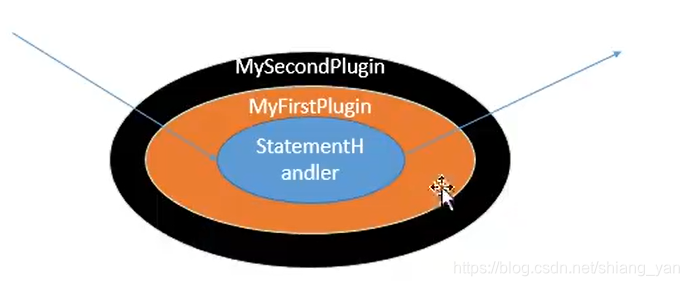
插件开发
当有多个插件同时拦截同一个对象的同一个方法,那么创建代理对象的时候,是按照插件配置的顺序层层创建代理对象,但是执行目标方法,是按照逆向顺序进行执行:
- 编写插件类
/**
完成插件签名:告诉mubatis当前的插件用来拦截哪个对象的哪个方法
**/
@Intercepts(
	{
		@Signatire(type=StatementHandler.class, method="parameterize",args=java.sql.Statement.class)
	}
)
public class MyFirstPlugin implements Interceptor{
	/**
	intercept:拦截目标对象的目标方法的执行
	**/
	@Override
	public Object intercept(Invocation invocation){
		//动态改变sql运行参数,假设查N号员工,但是实际查的是3号员工
		//拿到StatementHandler->ParameterHandler->parameterObject
		MetaObject metaObject = SystemMetaObject.forObject(target);
		Object value = metaObject.getValue("parameterHandler.parameterObject");
		metaObject.setValue("parameterHandler.parameterObject",3);
		//执行目标方法
		Object proceed = invocation.proceed();
		//返回执行后的返回值
		return proceed;
	}

	/**
	plugin:包装目标对象,即为目标对象创建一个代理对象
	**/
	@Override
	public Object plugin(Object target){
		//可以自己编写代理接口,但是为了使用方便,mybatis提供了创建代理对象的包装方法
		//Proxy.newInstance()
		Object wrap = Plugin.wrap(target, this);
		return wrap;
	}
	/**
	setProperties:将插件注册时的property属性设置进来
	**/
	@Override
	public void setProperties(Properties properties){
		System.out.printLn("插件的配置信息" + properties);
	}

}
- 配置全局配置文件
<plugins>
	<plugin interceptor="com.xxx.MyFirstPlugin">
		<property name="userName" value="张三">
	</plugin>
</plugins>
- 测试
@Test
public void test(){
	SqlSessionFactory factory = getSqlSessionFactory();
	SqlSession sqlSession = factory.openSession();
	EmpMapper mapper = sqlSession.getMapper(com.xxx.EmpMapper.class);
	mapper.getEmpById(1);
}
分页插件PageHelper
https://github.com/pagehelper/Mybatis-PageHelper
引入jar包
<dependency>
    <groupId>com.github.pagehelper</groupId>
    <artifactId>pagehelper</artifactId>
    <version>最新版本</version>
</dependency>
添加plugin配置
<plugin interceptor="com.github.pagehelper.PageInterceptor"></plugin>
方式一:
public List<Employee> getList(){
	Page<Object> page = PageHelper.startPage(1,10);
	List<Employee> emps = mapper.getAllEmps();
	System.out.printLn("当前页码:" + page.getPageNum());
	System.out.printLn("总记录数:" + page.getTotal());
	System.out.printLn("每页记录数:" + page.getPageSize());
	System.out.printLn("总页码:" + page.getPages());
}
方式二:
public List<Employee> getList(){
	Page<Object> page = PageHelper.startPage(1,10);
	List<Employee> emps = mapper.getAllEmps();
	//用PageInfo对结果进行包装
	PageInfo page = new PageInfo(emps);
	//PageInfo<Employee> page = new PageInfo<>(emps,5);//连续显示的页数
	//测试PageInfo全部属性
	//PageInfo包含了非常全面的分页属性
	assertEquals(1, page.getPageNum());
	assertEquals(10, page.getPageSize());
	assertEquals(1, page.getStartRow());
	assertEquals(10, page.getEndRow());
	assertEquals(183, page.getTotal());
	assertEquals(19, page.getPages());
	assertEquals(1, page.getFirstPage());
	assertEquals(8, page.getLastPage());
	assertEquals(true, page.isFirstPage());
	assertEquals(false, page.isLastPage());
	assertEquals(false, page.isHasPreviousPage());
	assertEquals(true, page.isHasNextPage());
}
11.批量执行
方式一: 全局配置文件中指定ExecutorType由默认的SIMPLE修改为BATCH,但是由于是在全局配置文件中所做修改,会导致所有的操作都变成BATCH
<setting name="defaultExecutorType" value="BATCH">
方式二: 在获取SqlSession的时候,指定ExecutorType为BATCH
SqlSession sqlSession = sqlSessionFactory.openSession(ExecutorType.BATCH);
EmpMapper mapper = sqlSession.getMapper(EmpMapper.class);
for(int i=0; i<1000; i++){
	mapper.addEmp(new Employee(i,"1"));
}
//批量:预编译sql(1次)==》设置参数(1000次)==》执行(1次)
//非批量:预编译sql(1000次)==》设置参数(1000次)==》执行(1000次)
方式三: 与Spring整合
<bean id="sqlSession" class="org.mybatis.spring.SqlSessionTemplate">
	<constructor-arg name="sqlSessionFactory" ref="sqlSessionFactory"/>
	<constructor-arg name="executorType" ref="BATCH"/>
</bean>
@Autowired
private SqlSession sqlSession;
public void addEmps(){
	EmpMapper mapper = sqlSession.getMapper(EmpMapper.class);
}
12.存储过程
<!--
	1.使用select标签定义调用存储过程
	2.statementType="CALLABLE"表示要调用存储过程
	3.{call 存储过程名称(parmas)} -->
<select id="getPageByProcedure" statementType="CALLABLE">
	{call hello_test(
		#{start, mode=IN,jdbcType=INTEGER}
		#{end, mode=IN,jdbcType=INTEGER}
		#{count, mode=out,jdbcType=INTEGER}
		#{emps, mode=out,jdbcType=CURSOR,javaType=ResultSet,resultMap=difEmp}
	)}
</select>
<resultMap id="difEmp" type="com.xxx.Employee">
	<id column="id" property="id">
	<result column="last_name" property="lastName">
	<result column="gender" property="gender">
	<result column="did" property="dept.id">
	<result column="dept_name" property="dept.name">
</resultMap>
13.自定义TypeHandler-枚举
mybatis底层提供了两种枚举的处理方式,分别是:
- EnumTypeHandler:在处理枚举的时候,保存的是枚举的名字
- EnumOrdinalTypeHandler:在处理枚举的时候,保存的是枚举的索引
mybatis默认的是EnumTypeHandler保存枚举名字
如果修改保存的是EnumOrdinalTypeHandler枚举的索引,需要在全局配置文件中配置:<typeHandlers> <typeHandler handler="org.apache.ibatis.type.EnumOrdinalTypeHandler" javaType="com.xxx.XxxEnum" /> </typeHandlers>
自定义类型处理器
- 实现TypeHandler接口或者继承BaseTypeHandler
public class MyEnumTypeHandler implements TypeHandler<MyEnum> {
    //定义当前数据如何保存到数据库
    @Override
    public void setParameter(PreparedStatement ps, int i, DemandState parameter, JdbcType jdbcType) throws SQLException {
        ps.setString(i,parameter.getCode().toString);
    }

    @Override
    public DemandState getResult(ResultSet rs, String columnName) throws SQLException {
        //需要从数据库中拿到的枚举的状态码返回一个枚举对象
        int code = rs.getInt(columnName);
        return MyEnum.getEnum(code);
    }

    @Override
    public DemandState getResult(ResultSet rs, int columnIndex) throws SQLException {
        //需要从数据库中拿到的枚举的下标返回一个枚举对象
        int code = rs.getInt(columnIndex);
        return MyEnum.getEnum(code);
    }

    @Override
    public DemandState getResult(CallableStatement cs, int columnIndex) throws SQLException {
        //需要从存储过程中拿到的枚举的下标返回一个枚举对象
        int code = cs.getInt(columnIndex);
        return MyEnum.getEnum(code);
    }
}
2.在全局配置文件中指定类型处理器
<typeHandlers>
		<typeHandler handler="com.xxx.MyEnumTypeHandler" javaType="com.xxx.XxxEnum" />
</typeHandlers>
3.也可以在针对某个接口指定对应的类型处理器
insert:#{empStatus,typeHandler=xxx}
select:<resultMap>中<result column="empStatus" property="empStatus" typeHandler="xxx">
注意: 如果在参数位置修改TypeHandler,应该保证保存数据和查询数据用的TypeHandler是一样的


 1138
1138

 被折叠的 条评论
为什么被折叠?
被折叠的 条评论
为什么被折叠?
 到【灌水乐园】发言


