


目录
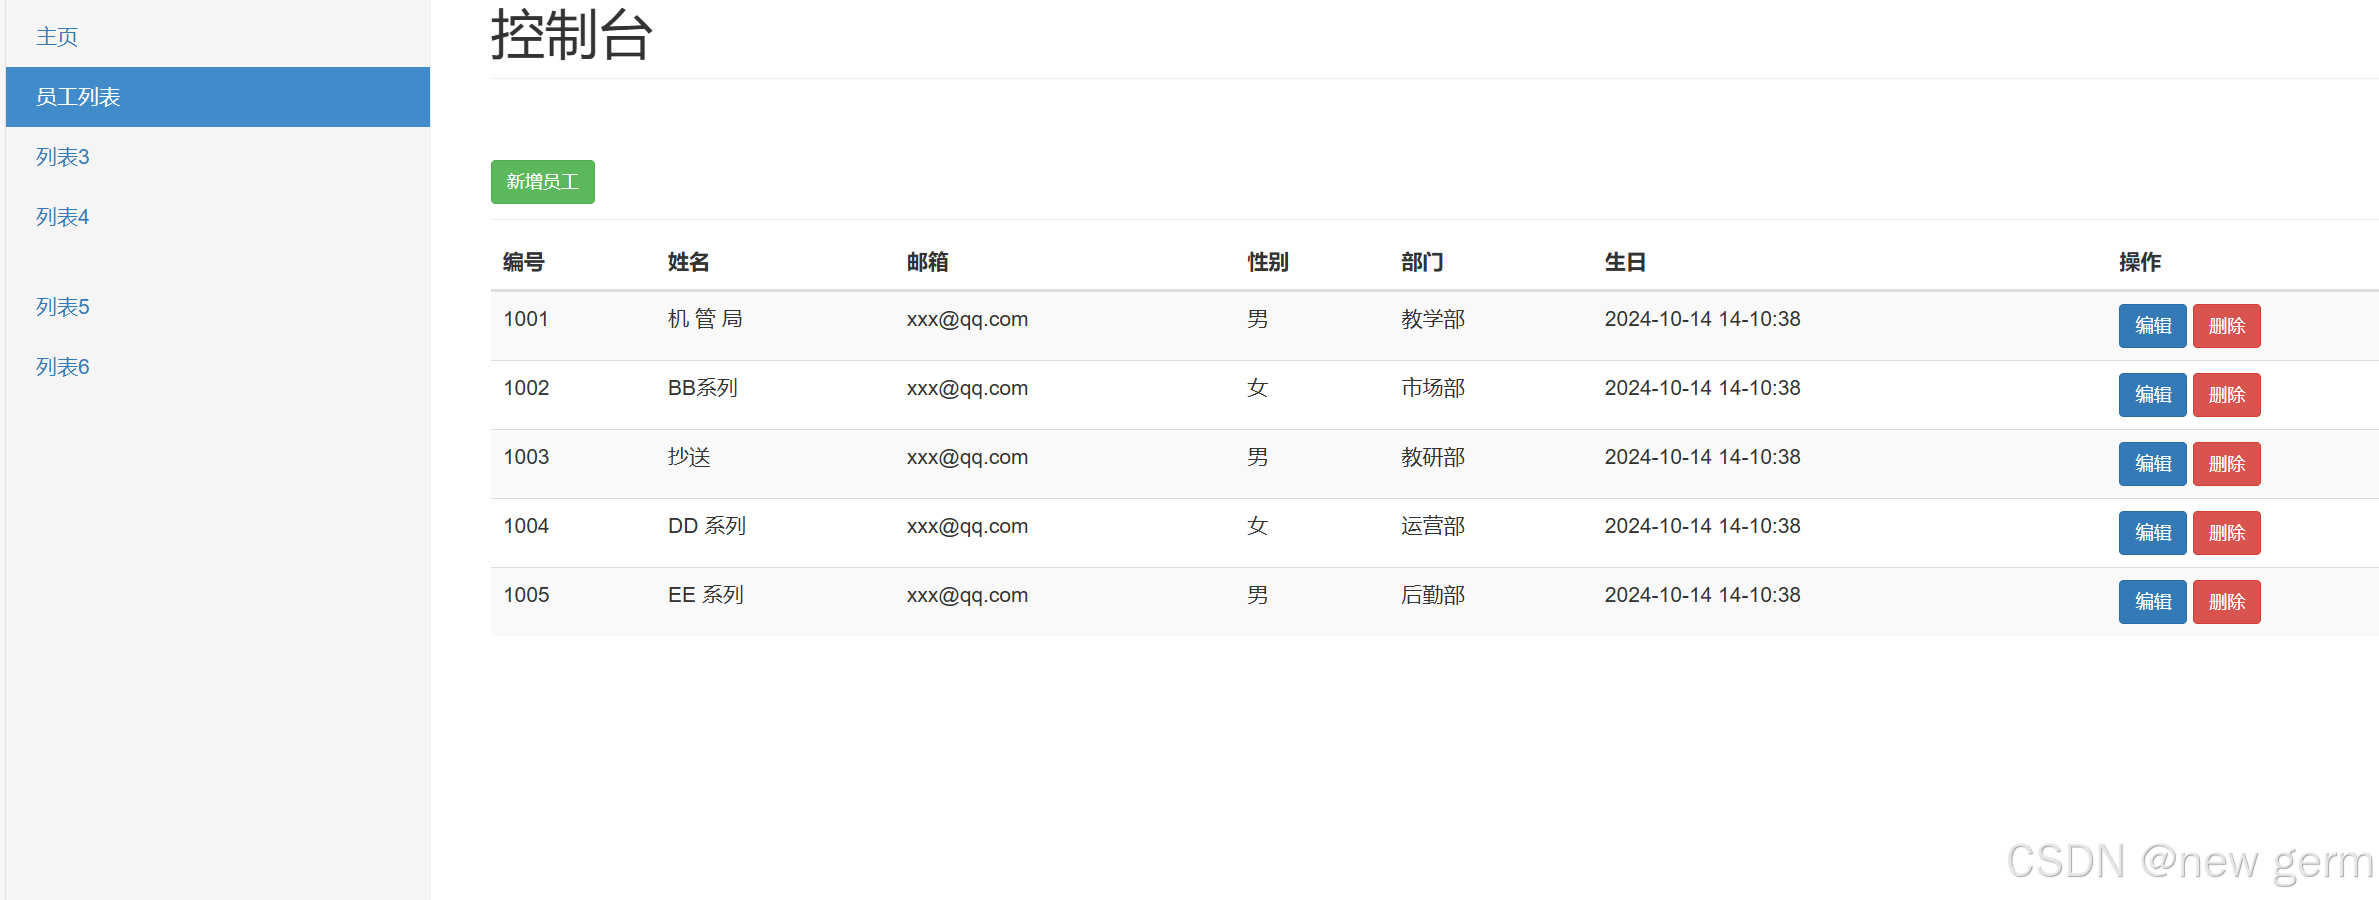
1.3.2EmployeeController(实现增删改查页面跳转。。)
3.2指定数据源,配置druid,配置监控统计拦截的filters
文章是看狂神后的总结,由于手贱(心碎一地)不小心把之前写的删了所以跳过一部分。前部分大概是spring boot的
hello world ,yaml配置文件相对@value和properties的优势,多环境和数据校验,静态资源导入,themleaf模板引擎,页面国际化。
一:员工管理系统
1.1pojo实体类
1.1.1employee员工
package com.kuang.pojo;


import lombok.AllArgsConstructor;
import lombok.Data;
import lombok.NoArgsConstructor;

import java.util.Date;

//员工表
@Data
@NoArgsConstructor

public class Employee {
    private Integer id;
    private String name;
    private String email;
    private Integer gender;

    private Department department;
    private Date birth;

    public Employee(Integer id, String name, String email, Integer gender,Department department) {
        this.department = department;
        this.gender = gender;
        this.email = email;
        this.name = name;
        this.id = id;
//        默认的创建日期
        this.birth = new Date();
    }
}
1.1.2 department部门
package com.kuang.pojo;


import lombok.AllArgsConstructor;
import lombok.Data;
import lombok.NoArgsConstructor;

//部门表
@Data
@NoArgsConstructor
@AllArgsConstructor
public class Department {
    private int id;
    private String name;
}
1.2dao层
这里我们模拟数据库,springboot和数据库的连接在后序课程中。
1.2.1DepartmentDao
package com.kuang.dao;

import com.kuang.pojo.Department;
import org.springframework.stereotype.Repository;

import java.util.Collection;
import java.util.HashMap;
import java.util.Map;

//部门
@Repository
public class DepartmentDao {
//    模拟数据库中的数据
    private static Map<Integer, Department> departments = null;


    static {
        departments = new HashMap<Integer, Department>();//创建一个部门表
        departments.put(101,new Department(101,"教学部"));
        departments.put(102,new Department(102,"市场部"));
        departments.put(103,new Department(103,"教研部"));
        departments.put(104,new Department(104,"运营部"));
        departments.put(105,new Department(105,"后勤部"));
    }
//    获取所有部门信息
    public Collection<Department> getDepartments() {
        return departments.values();
    }
    //通过id得到部门
    public Department getDepartment(int id) {
        return departments.get(id);
    }
}
1.2.2 EmployeeDao
package com.kuang.dao;

import com.kuang.pojo.Department;
import com.kuang.pojo.Employee;
import org.springframework.beans.factory.annotation.Autowired;
import org.springframework.stereotype.Repository;

import java.util.Collection;
import java.util.HashMap;
import java.util.Map;

//员工Dao
@Repository
public class EmployeeDao {
//    模拟数据库中的数据
private static Map<Integer, Employee> employees = null;
//员工与所属的部门
    @Autowired
    private DepartmentDao departmentDao ;
    static {
        employees = new HashMap<Integer, Employee>();//创建一个部门表
        employees.put(1001,new Employee(1001,"AA","xxx@qq.com",1,new Department(101,"教学部")));
        employees.put(1002,new Employee(1002,"BB","xxx@qq.com",0,new Department(102,"市场部")));
        employees.put(1003,new Employee(1003,"CC","xxx@qq.com",1,new Department(103,"教研部")));
        employees.put(1004,new Employee(1004,"DD","xxx@qq.com",0,new Department(104,"运营部")));
        employees.put(1005,new Employee(1005,"EE","xxx@qq.com",1,new Department(105,"后勤部")));
    }
    //主键自增
    private static Integer initId=1006;
    //增加一个员工
    public void save(Employee employee) {
        if (employee.getId() == null) {
            employee.setId(initId++);
        }
        employee.setDepartment(departmentDao.getDepartment(employee.getDepartment().getId()));
        employees.put(employee.getId(), employee);
    }
//    查询全部员工信息
    public Collection<Employee> getEmployees() {
        return employees.values();
    }
//    通过id查员工
    public Employee getEmployee(Integer id) {
        return employees.get(id);
    }
//    删除员工
    public void deleteEmployee(Integer id) {
        employees.remove(id);
    }
}
1.3 Controller层
1.3.1LoginController
package com.kuang.Controller;


import org.springframework.stereotype.Controller;
import org.springframework.ui.Model;
import org.springframework.util.StringUtils;
import org.springframework.web.bind.annotation.RequestMapping;
import org.springframework.web.bind.annotation.RequestParam;

import javax.servlet.http.HttpSession;

@Controller
public class LoginController {
    @RequestMapping("/user/login")
    public String login(@RequestParam("username") String username,
                        @RequestParam("passwd") String pwd,
                        HttpSession session,
                        Model model){
        if(!StringUtils.isEmpty(username) && "123456".equals(pwd)){
            session.setAttribute("loginUser",username);
            return "redirect:/main.html";
        }else{
            model.addAttribute("error","用户名或者密码错误");
            System.out.println(username+" ===> "+pwd);
            return "index";
        }
    }

    @RequestMapping("/user/logout")
    public String logout(HttpSession session){
        session.invalidate();
        return "redirect:/index";
    }


}
1.3.2EmployeeController(实现增删改查页面跳转。。)
package com.kuang.Controller;


import com.kuang.dao.DepartmentDao;
import com.kuang.dao.EmployeeDao;
import com.kuang.pojo.Department;
import com.kuang.pojo.Employee;
import org.springframework.beans.factory.annotation.Autowired;
import org.springframework.stereotype.Controller;
import org.springframework.ui.Model;
import org.springframework.web.bind.annotation.*;

import java.util.Collection;

@Controller
public class EmployeeController {

    @Autowired
    private DepartmentDao departmentDao;

    @Autowired
    private EmployeeDao employeeDao;

    @RequestMapping("/ems")
    public String getAllEmployee(Model model){
        Collection<Employee> employees = employeeDao.getEmployees();
        model.addAttribute("ems",employees);
        return "emp/list";
    }

    @GetMapping("/emp")
    public String toAdd(Model model){

        Collection<Department> departments = departmentDao.getDepartments();
        model.addAttribute("departments",departments);
        return "emp/add";
    }

    @PostMapping("/emp")
    public String addEmp(Employee employee){
        System.out.println(employee);

        employeeDao.save(employee); /*保存员工信息*/
        return "redirect:/ems";
    }

    /*去员工的修改页面*/
    @GetMapping("/emp/{id}")
    public String toUpdate(@PathVariable("id") Integer id , Model model){
        Employee employee = employeeDao.getEmployee(id);
        model.addAttribute("employee",employee);
        Collection<Department> departments = departmentDao.getDepartments();
        model.addAttribute("departments",departments);
        return "emp/update";
    }
    /*修改页面*/
    @PostMapping("/updateEmp")
    public String updateEmp(Employee employee) {
        employeeDao.save(employee); /*保存员工信息*/
        return "redirect:/ems";
    }

    /*删除*/
    @GetMapping("/delEmp/{id}")
    public String delEmp(@PathVariable("id") Integer id){
        employeeDao.deleteEmployee(id);
        return "redirect:/ems";
    }

}
1.4Config配置类
myMvcConfig类
package com.kuang.Config;

import org.springframework.context.annotation.Bean;
import org.springframework.context.annotation.Configuration;
import org.springframework.web.servlet.LocaleResolver;
import org.springframework.web.servlet.config.annotation.InterceptorRegistry;
import org.springframework.web.servlet.config.annotation.ResourceHandlerRegistry;
import org.springframework.web.servlet.config.annotation.ViewControllerRegistry;
import org.springframework.web.servlet.config.annotation.WebMvcConfigurer;


@Configuration
public class MyMvcConfig  implements WebMvcConfigurer {

    /*视图跳转*/
    @Override
    public void addViewControllers(ViewControllerRegistry registry) {
        registry.addViewController("/").setViewName("index");
        registry.addViewController("/index").setViewName("index");
        registry.addViewController("/index.html").setViewName("index");
        registry.addViewController("/main.html").setViewName("dashboard");
    }

    /**
     * SpringBoot 2.x 要重写该方法,不然 css、js、image 等静态资源路径无法访问
     */
    @Override
    public void addResourceHandlers(ResourceHandlerRegistry registry) {
        registry.addResourceHandler("/**")
                .addResourceLocations("classpath:/META-INF/resources/")
                .addResourceLocations("classpath:/resources/")
                .addResourceLocations("classpath:/static/")
                .addResourceLocations("classpath:/public/");
    }

    //自定义的国际化组件就生效了, 只有注入才能生效
    @Bean
    public LocaleResolver localeResolver(){
        return new MyLocaleResolver();
    }

    @Override
    public void addInterceptors(InterceptorRegistry registry) {
        registry.addInterceptor(new LoginHandlerInterceptor()).addPathPatterns("/**")
                .excludePathPatterns("/index.html", "/user/login", "/", "/css/*", "/js/**", "/img/**");
    }
}
Intercepter拦截器
package com.kuang.Config;

import org.springframework.web.servlet.HandlerInterceptor;
import org.springframework.web.servlet.ModelAndView;

import javax.servlet.http.HttpServletRequest;
import javax.servlet.http.HttpServletResponse;

public class LoginHandlerInterceptor implements HandlerInterceptor {
    @Override
    public boolean preHandle(HttpServletRequest request, HttpServletResponse response, Object handler) throws Exception {

        /*登录成功之后应该偶用户的session*/
        Object loginUser = request.getSession().getAttribute("loginUser");
        if(loginUser == null){
            request.setAttribute("error","没有权限, 请先登录");
            request.getRequestDispatcher("/index.html").forward(request,response);
            return false; /*不放行*/
        }else{
            return true; /*放行*/
        }
    }
}
MyLocaleResolver类
package com.kuang.Config;

import org.springframework.util.StringUtils;
import org.springframework.web.servlet.LocaleResolver;

import javax.servlet.http.HttpServletRequest;
import javax.servlet.http.HttpServletResponse;
import java.util.Locale;

/*重写国际化处理的相关的类*/
public class MyLocaleResolver implements LocaleResolver {
    @Override
    public Locale resolveLocale(HttpServletRequest request) {
        //获取请求语言的参数链接
        String language = request.getParameter("l");
        Locale locale = Locale.getDefault();//如果没有就使用默认

        //如果请求的链接携带了国际化参数
        if (!StringUtils.isEmpty(language)) {
            //zh_CN
            String[] split = language.split("_");
            //国家, 地区
            locale = new Locale(split[0], split[1]);
        }
        return locale;
    }

    @Override
    public void setLocale(HttpServletRequest request, HttpServletResponse response, Locale locale) {

    }
}
1.4前端大概的东西:

1.5效果
二:springboot整合jdbc
开启MySQL连接数据库导入依赖后编写代码
controller
package com.kuang.controller;


import org.springframework.beans.factory.annotation.Autowired;
import org.springframework.jdbc.core.JdbcTemplate;
import org.springframework.stereotype.Controller;
import org.springframework.web.bind.annotation.GetMapping;
import org.springframework.web.bind.annotation.PathVariable;
import org.springframework.web.bind.annotation.RestController;

import java.util.List;
import java.util.Map;
import java.util.Objects;

@RestController
public class JDBCController {
    @Autowired
    JdbcTemplate jdbcTemplate;
//    查询数据库的所有信息
    @GetMapping("/userList")
    public List<Map<String, Object>> userList(){
        String sql = "select * from user";
        return jdbcTemplate.queryForList(sql);
    }
    //增加一个用户
    @GetMapping("/addUser")
    public String addUser(){
        String sql = "insert into mybatis.user(id,name,pwd) values(4,'xxx','1234')";
        jdbcTemplate.update(sql);
        return "add-ok";
    }
    @GetMapping("/updateUser/{id}")
    public String updateUser(@PathVariable("id") int id){
        String sql="update mybatis.user set name=?,pwd=? where id="+id;
        Object[] objects=new Object[2];
        objects[0]="小明2";
        objects[1]="pzazz";
        jdbcTemplate.update(sql,objects);
        return "update-ok";
    }
    @GetMapping("/deleteUser/{id}")
    public String deleteUser(@PathVariable("id") int id){
        String sql="delete from mybatis.user where id="+id;
        jdbcTemplate.update(sql);
       return "deleteUser-ok";
    }
}
遇到的问题:
IDEA Build报错“类文件具有错误的版本 61.0, 应为 52.0”
修改版本将jdk升到17以上
三:整合druid
3.1pom.xml导入druid,log4j
<dependency>
    <groupId>com.alibaba</groupId>
    <artifactId>druid-spring-boot-starter</artifactId>
    <version>1.2.6</version>
</dependency>
<!-- https://mvnrepository.com/artifact/log4j/log4j -->
<dependency>
<groupId>log4j</groupId>
<artifactId>log4j</artifactId>
<version>1.2.17</version>
</dependency>
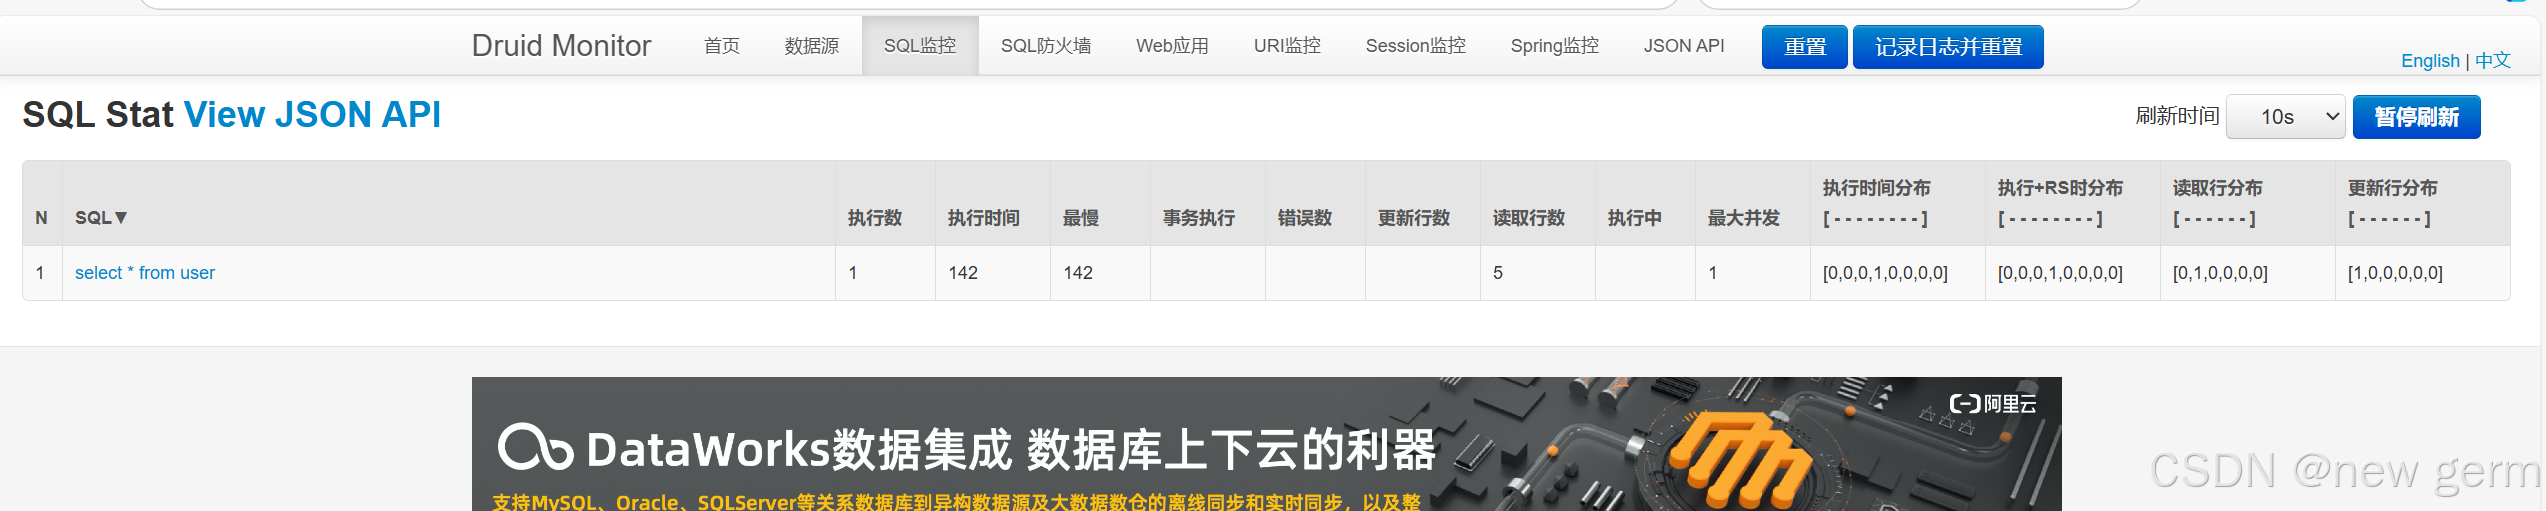
3.2指定数据源,配置druid,配置监控统计拦截的filters
spring:
  datasource:
    username: root
    password: 123456
    url: jdbc:mysql://localhost:3306/mybatis?serverTimezone=UTC&useUnicode=true&characterEncoding=utf-8
    driver-class-name: com.mysql.cj.jdbc.Driver
    type: com.alibaba.druid.pool.DruidDataSource
      #Spring Boot 默认是不注入这些属性值的,需要自己绑定
      #druid 数据源专有配置
    initialSize: 5
    minIdle: 5
    maxActive: 20
    maxWait: 60000
    timeBetweenEvictionRunsMillis: 60000
    minEvictableIdleTimeMillis: 300000
    validationQuery: SELECT 1 FROM DUAL
    testWhileIdle: true
    testOnBorrow: false
    testOnReturn: false
    poolPreparedStatements: true

      #配置监控统计拦截的filters,stat:监控统计、log4j:日志记录、wall:防御sql注入
      #如果允许时报错  java.lang.ClassNotFoundException: org.apache.log4j.Priority
      #则导入 log4j 依赖即可,Maven 地址:https://mvnrepository.com/artifact/log4j/log4j
    filters: stat,wall,log4j
    maxPoolPreparedStatementPerConnectionSize: 20
    useGlobalDataSourceStat: true
    connectionProperties: druid.stat.mergeSql=true;druid.stat.slowSqlMillis=500
3.3druidConfig配置类
package com.kuang.config;


import com.alibaba.druid.pool.DruidDataSource;
import com.alibaba.druid.support.jakarta.StatViewServlet;
import com.alibaba.druid.support.jakarta.WebStatFilter;

import org.springframework.boot.context.properties.ConfigurationProperties;
import org.springframework.boot.web.servlet.FilterRegistrationBean;
import org.springframework.boot.web.servlet.ServletRegistrationBean;
import org.springframework.context.annotation.Bean;
import org.springframework.context.annotation.Configuration;

import javax.sql.DataSource;
import java.util.HashMap;

@Configuration
public class DruidConfig {
    @ConfigurationProperties(prefix = "spring.datasource")
    @Bean
    public DataSource DruidDataSource() {
    return new DruidDataSource();
    }
//    后台监控
    @Bean
    public ServletRegistrationBean StatViewServlet() {
        ServletRegistrationBean<StatViewServlet> bean = new ServletRegistrationBean<>(new StatViewServlet(), "/druid/*");
//        后台需要有人登录
        HashMap<String, String> initParameters = new HashMap<>();
//        增加配置
        initParameters.put("loginUsername", "admin");
        initParameters.put("loginPassword", "123456");
//        允许谁可以访问
        initParameters.put("allow", "");
        //禁止谁能访问
//        initParameters.put("kuangshen", "");
        bean.setInitParameters(initParameters);//设置初始化参数
        return bean;
    }
//    filter
    @Bean
    public FilterRegistrationBean webStatFilter() {
        FilterRegistrationBean bean = new FilterRegistrationBean();
        bean.setFilter(new WebStatFilter());
//        可以过滤哪些请求
        HashMap<String, String> initParameters = new HashMap<>();
        initParameters.put("exclusions", "*.js,*.css,*.ico,/druid/*");
        bean.setInitParameters(initParameters);
        return  bean;
    }
}
效果
四:整合Mybatis
4.1、导入 MyBatis 所需要的依赖
<dependency>
    <groupId>org.projectlombok</groupId>
    <artifactId>lombok</artifactId>
</dependency>
<!-- https://mvnrepository.com/artifact/org.mybatis.spring.boot/mybatis-spring-boot-starter --> <!-- mybatis-spring-boot-starter:整合--> <dependency> <groupId>org.mybatis.spring.boot</groupId> <artifactId>mybatis-spring-boot-starter</artifactId> <version>3.0.3</version> </dependency>
4.2 pojo实体类
package com.kuang.pojo;

import lombok.AllArgsConstructor;
import lombok.Data;
import lombok.NoArgsConstructor;

@Data
@AllArgsConstructor
@NoArgsConstructor
public class User {
    private int id;
    private String name;
    private String pwd;
}
4.3UserMapper.xml
<?xml version="1.0" encoding="UTF-8" ?>
<!DOCTYPE mapper
        PUBLIC "-//mybatis.org//DTD Mapper 3.0//EN"
        "http://mybatis.org/dtd/mybatis-3-mapper.dtd">
<mapper namespace="com.kuang.mapper.UserMapper">
    <select id="queryUserById" parameterType="int" resultType="User">
        select * from user where id = #{id}
    </select>
    <select id="queryUserList" resultType="User">
        select * from user
    </select>

    <insert id="addUser" parameterType="User">
        insert into mybatis.user (id,name,pwd) values (#{id},#{name},#{pwd})
    </insert>

    <update id="updateUser" parameterType="User">
        update user set name=#{name},pwd=#{pwd} where id = #{id}
    </update>
    <delete id="deleteUser" parameterType="int">
        delete from user where id = #{id}
    </delete>

</mapper>
4.4配置文件
spring.application.name=springboot-05-mybatis
spring.datasource.username=root
spring.datasource.password=123456
spring.datasource.url=jdbc:mysql://localhost:3306/mybatis?serverTimeZone=UTC&useUnicode=true&characterEncoding=utf-8
spring.datasource.driver-class-name=com.mysql.cj.jdbc.Driver
#??mybatis
mybatis.type-aliases-package=com.Kuang.pojo
mybatis.mapper-locations=classpath:mybatis/mapper/*.xml
4.5 UserMapper接口
package com.kuang.mapper;

import com.kuang.pojo.User;
import org.apache.ibatis.annotations.Mapper;
import org.springframework.stereotype.Repository;

import java.util.List;

//这个注解表示他是mybaits的mapper类
@Mapper
@Repository
public interface UserMapper {
List<User> queryUserList();
User queryUserById(int id);
int addUser(User user);
int updateUser(User user);
int deleteUser(int id);
}
4.5UserController
package com.kuang.controller;
import com.kuang.mapper.UserMapper;
import com.kuang.pojo.User;
import org.springframework.beans.factory.annotation.Autowired;
import org.springframework.web.bind.annotation.GetMapping;
import org.springframework.web.bind.annotation.PathVariable;
import org.springframework.web.bind.annotation.RestController;
import java.util.List;
@RestController
public class UserController {
@Autowired
private UserMapper userMapper;
@GetMapping("/queryUserList")
public List<User> queryUserList(){
List<User> users = userMapper.queryUserList();
for (User user : users) {
System.out.println(user);
}
return users;
}
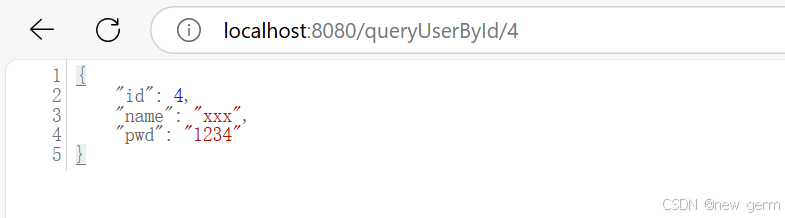
@GetMapping("/queryUserById/{id}")
public User queryUserList(@PathVariable int id){
User user = userMapper.queryUserById(id);
System.out.println(user);
return user;
}
@GetMapping("/addUser")
public String addUser(){
userMapper.addUser(new User(10,"tang","123456"));
return "ok";
}
@GetMapping("/updateUser")
public String updateUser(){
userMapper.updateUser(new User(10,"tangWeiwei","123456"));
return "ok";
}
@GetMapping("/deleteUser/{id}")
public String updateUser(@PathVariable int id){
userMapper.deleteUser(10);
return "ok";
}
}
效果:
五:springSecurity
由于版本更新狂神的教的已经启用。看了网上其他教程!
六:shiro
核心:userRealm拿到用户权限和登录认证封装成securityManager注入到ShiroFilterFactoryBean进行权限匹配访问。
package com.kuang.shirospringboot.config;

import at.pollux.thymeleaf.shiro.dialect.ShiroDialect;
import org.apache.shiro.spring.web.ShiroFilterFactoryBean;
import org.apache.shiro.web.mgt.DefaultWebSecurityManager;
import org.springframework.beans.factory.annotation.Qualifier;
import org.springframework.context.annotation.Bean;
import org.springframework.context.annotation.Configuration;

import java.util.LinkedHashMap;
import java.util.Map;

@Configuration
public class ShiroConfig {
  //  ShiroFilterFactoryBean:3
    @Bean(name = "shiroFilterFactoryBean")
    public ShiroFilterFactoryBean getShiroFilterFactoryBean(@Qualifier("securityManager") DefaultWebSecurityManager defaultWebSecurityManager) {
        ShiroFilterFactoryBean bean = new ShiroFilterFactoryBean();
//        设置安全管理器
        bean.setSecurityManager(defaultWebSecurityManager);
//        添加shiro的内置过滤器
        /*
        anon:无需认证就可以访问
        authc:必须认证了才能访问
        user:必须拥有记住我 功能才能用
        perms:拥有对每个资源的权限才能访问:
        roles:拥有某个角色权限才能访问
         */
        Map<String,String> filterMap = new LinkedHashMap<>();
//        filterMap.put("/user/add","authc");
//        filterMap.put("/user/add","authc");
        filterMap.put("/user/*","authc");
        //设置登录的请求
        bean.setLoginUrl("/toLogin");
        bean.setFilterChainDefinitionMap(filterMap);
        return bean;
    }
    //DefaultWebSecurityManager:2
    @Bean(name="securityManager")
public DefaultWebSecurityManager securityManager(@Qualifier("userRealm") UserRealm userRealm) {
    DefaultWebSecurityManager securityManager = new DefaultWebSecurityManager();
//    关联UserRealm
    securityManager.setRealm(userRealm);
    return securityManager;
}
    //创建realm对象,需要自定义类:1
@Bean
    public UserRealm userRealm() {
    return new UserRealm();
}
//整合shiroDialect:用来整合shiro thymeleaf
    @Bean
    public ShiroDialect getShiroDialect() {
        return new ShiroDialect();
    }
}
跟着打完了,但是报了错org.springframework.beans.factory.BeanCreationException: Error creating bean with name 'shiroFilterFactoryBean' 找了挺久的到现在还没解决。。。
七:Swagger
产生的问题
- 前后端集成,前端或者后端无法做到“及时协商,尽早解决”,最终导致问题集中爆发
-
解决方案
首先定义schema [ 计划的提纲 ],并实时跟踪最新的API,降低集成风险
早些年制定word计划文档
前后端分离:前端测试后端接口:postman
后端提供接口,需要实时更新最新的消息及改动!
Swagger号称世界上最流行的API框架
Restful Api 文档在线自动生成器 => API 文档 与API 定义同步更新
直接运行,在线测试API接口(其实就是controller requsetmapping)
支持多种语言 (如:Java,PHP等)
官网:https://swagger.io/ -
7.1依赖导入pom.xml
<!-- Swagger 2 -->
<dependency>
    <groupId>io.springfox</groupId>
    <artifactId>springfox-swagger2</artifactId>
    <version>2.9.2</version>
</dependency>

<!-- Swagger UI -->
<dependency>
    <groupId>io.springfox</groupId>
    <artifactId>springfox-swagger-ui</artifactId>
    <version>2.9.2</version>
</dependency>
7.2pojo实体类
package com.kuang.swaggerdemo.pojo;


import io.swagger.annotations.Api;
import io.swagger.annotations.ApiModel;
import io.swagger.annotations.ApiModelProperty;

@ApiModel("用户实体类")
public class User {
    @ApiModelProperty("用户名")
    public String username;
    @ApiModelProperty("密码")
    public String password;
}
7.3controller层
package com.kuang.swaggerdemo.controller;


import com.kuang.swaggerdemo.pojo.User;
import io.swagger.annotations.Api;
import io.swagger.annotations.ApiOperation;
import io.swagger.annotations.ApiParam;
import org.springframework.web.bind.annotation.GetMapping;
import org.springframework.web.bind.annotation.PostMapping;
import org.springframework.web.bind.annotation.RequestMapping;
import org.springframework.web.bind.annotation.RestController;


@Api("hello控制类")
@RestController
public class HelloController {
    @GetMapping(value="/hello")
    public String hello(){
        return "Hello World";
    }
    //只要接口中存在实体类,他就会被扫描到swagger中
    @PostMapping(value = "/user")
    public User user(){
        return new User();
    }
    @ApiOperation("hello控制类")
    @GetMapping(value="/hello2")
    public String hello2(@ApiParam("用户名") String userName){
        return "Hello World"+userName;
    }

    @ApiOperation("Post测试类")
    @PostMapping(value="/postt")
    public User postt(@ApiParam("用户名") User user){
        new User();
        return user;
    }
}
7.4Config配置类
package com.kuang.swaggerdemo.config;
import org.springframework.context.annotation.Bean;
import org.springframework.context.annotation.Configuration;
import org.springframework.context.annotation.Profile;
import org.springframework.core.env.Environment;
import org.springframework.core.env.Profiles;
import springfox.documentation.builders.RequestHandlerSelectors;
import springfox.documentation.service.ApiInfo;
import springfox.documentation.service.Contact;
import springfox.documentation.spi.DocumentationType;
import springfox.documentation.spring.web.plugins.Docket;
import springfox.documentation.swagger2.annotations.EnableSwagger2;
import java.sql.Array;
import java.util.ArrayList;
@Configuration
@EnableSwagger2 //开启了swagger2
public class SwaggerConfig {
//配置多个分组,多个Docket实例即可
@Bean
public Docket docket1(){
return new Docket(DocumentationType.SWAGGER_2).groupName("A");
}
@Bean
public Docket docket2(){
return new Docket(DocumentationType.SWAGGER_2).groupName("B");
}
@Bean
public Docket docket3(){
return new Docket(DocumentationType.SWAGGER_2).groupName("C");
}
//配置了swagger的docket的bean实例
@Bean
public Docket docket(Environment environment) {
//设置要显示的swagger环境
Profiles profiles = Profiles.of("dev", "test");
//获取项目的环境
boolean flag = environment.acceptsProfiles(profiles);
System.out.println(flag);
return new Docket(DocumentationType.SWAGGER_2)
.apiInfo(apiInfo())
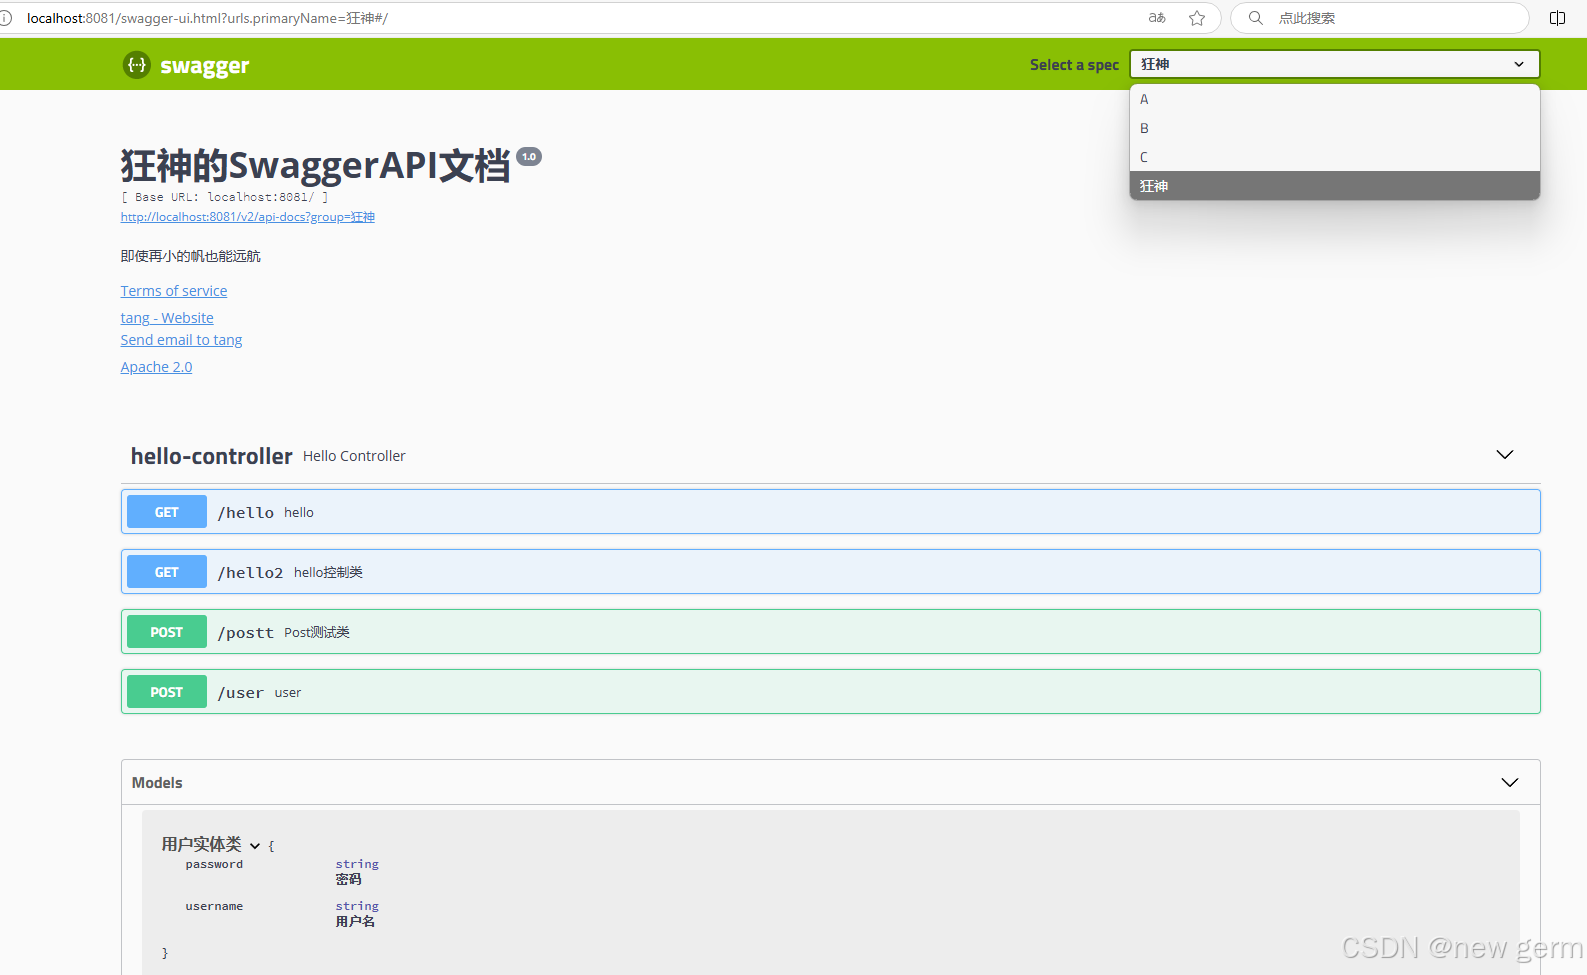
.groupName("狂神")
.enable(true)
.select()
.apis(RequestHandlerSelectors.basePackage("com.kuang.swaggerdemo.controller"))
//paths()过滤什么路径
// .paths(pathSelector.ant("/kuang/**"))
.build();
}
//配置swagger信息=apiinfo
private ApiInfo apiInfo() {
//作者信息
Contact contact = new Contact("tang", "https://baidu.com/", "3035202256@qq.com");
return new ApiInfo("狂神的SwaggerAPI文档",
"即使再小的帆也能远航",
"1.0",
"https://baidu.com/",
contact,
"Apache 2.0",
"http://www.apache.org/licenses/LICENSE-2.0",
new ArrayList()
);
}
}
效果:
八:异步任务 邮件任务 定时任务
加了注解瞬间执行
8.1 异步任务AsyncService
package com.kuang.springboot09test1.service;


import org.springframework.scheduling.annotation.Async;
import org.springframework.stereotype.Service;

@Service
public class AsyncService {
    //告诉spring这是一个异步的方法
    @Async
public void hello() {
    try {
        Thread.sleep(3000);
    } catch (InterruptedException e) {
        throw new RuntimeException(e);
    }
    System.out.println("数据正在处理....");
}
}
8.2controller
package com.kuang.springboot09test1.controller;


import com.kuang.springboot09test1.service.AsyncService;
import org.springframework.beans.factory.annotation.Autowired;
import org.springframework.web.bind.annotation.RequestMapping;
import org.springframework.web.bind.annotation.RestController;

@RestController
public class AsyncController {


    @Autowired
    AsyncService asyncService;

    @RequestMapping("/hello")
    public String hello()   {
            asyncService.hello();//停止3秒
        return "ok";

    }
}
8.3 邮件任务导入依赖pom.xml
<!--       javax.mail-->
       <dependency>
          <groupId>org.springframework.boot</groupId>
          <artifactId>spring-boot-starter-mail</artifactId>
       </dependency>
8.4测试类
package com.kuang.springboot09test1;

import jakarta.mail.MessagingException;
import jakarta.mail.internet.MimeMessage;
import org.junit.jupiter.api.Test;
import org.springframework.beans.factory.annotation.Autowired;
import org.springframework.boot.test.context.SpringBootTest;
import org.springframework.mail.SimpleMailMessage;
import org.springframework.mail.javamail.JavaMailSender;
import org.springframework.mail.javamail.MimeMailMessage;
import org.springframework.mail.javamail.MimeMessageHelper;

import java.io.File;

@SpringBootTest
class Springboot09Test1ApplicationTests {

    @Autowired
    JavaMailSender mailSender;
    @Test
    void contextLoads() {
       //一个简单的邮件~
       SimpleMailMessage mailMessage = new SimpleMailMessage();
       mailMessage.setSubject("小狂神你好呀~");
       mailMessage.setText("谢谢你的狂神说java系列课程~");
       mailMessage.setFrom("3035202256@qq.com");
       mailMessage.setTo("3035202256@qq.com");
       mailSender.send(mailMessage);
    }
    @Test
    void contextLoads2() throws MessagingException {
       //一个复杂的邮件~
       MimeMessage mimeMessage = mailSender.createMimeMessage();
       //组装~
       MimeMessageHelper helper = new MimeMessageHelper(mimeMessage,true);

       //正文
       helper.setSubject("小狂神你好呀~plus");
       helper.setText("<p style='color:red'>谢谢你的狂神说java系列课程~</p>",true);
       //附件
       helper.addAttachment("1.jpg",new File("C:\\Users\\30352\\Pictures\\1.jpg"));
       helper.addAttachment("2.jpg",new File("C:\\Users\\30352\\Pictures\\1.jpg"));
       helper.setTo("3035202256@qq.com");
       helper.setFrom("3035202256@qq.com");
       mailSender.send(mimeMessage);
    }

}
发送邮箱效果图:

8.5定时任务
8.5.1service层
@Service
public class ScheduledService {
//秒 分 时 日 月 周几
//0 * * * * MON-FRI
//注意cron表达式的用法;
@Scheduled(cron = "0 * * * * 0-7")
public void hello(){
System.out.println("hello.....");
}
}
8.5.2主线程
@EnableAsync //开启异步注解功能
@EnableScheduling //开启基于注解的定时任务
@SpringBootApplication
public class SpringbootTaskApplication {public static void main(String[] args) {
SpringApplication.run(SpringbootTaskApplication.class, args);
}}
常用表达式:
(1)0/2 * * * * ? 表示每2秒 执行任务
(1)0 0/2 * * * ? 表示每2分钟 执行任务
(1)0 0 2 1 * ? 表示在每月的1日的凌晨2点调整任务
(2)0 15 10 ? * MON-FRI 表示周一到周五每天上午10:15执行作业
(3)0 15 10 ? 6L 2002-2006 表示2002-2006年的每个月的最后一个星期五上午10:15执行作
(4)0 0 10,14,16 * * ? 每天上午10点,下午2点,4点
(5)0 0/30 9-17 * * ? 朝九晚五工作时间内每半小时
(6)0 0 12 ? * WED 表示每个星期三中午12点
(7)0 0 12 * * ? 每天中午12点触发
(8)0 15 10 ? * * 每天上午10:15触发
(9)0 15 10 * * ? 每天上午10:15触发
(10)0 15 10 * * ? 每天上午10:15触发
(11)0 15 10 * * ? 2005 2005年的每天上午10:15触发
(12)0 * 14 * * ? 在每天下午2点到下午2:59期间的每1分钟触发
(13)0 0/5 14 * * ? 在每天下午2点到下午2:55期间的每5分钟触发
(14)0 0/5 14,18 * * ? 在每天下午2点到2:55期间和下午6点到6:55期间的每5分钟触发
(15)0 0-5 14 * * ? 在每天下午2点到下午2:05期间的每1分钟触发
(16)0 10,44 14 ? 3 WED 每年三月的星期三的下午2:10和2:44触发
(17)0 15 10 ? * MON-FRI 周一至周五的上午10:15触发
(18)0 15 10 15 * ? 每月15日上午10:15触发
(19)0 15 10 L * ? 每月最后一日的上午10:15触发
(20)0 15 10 ? * 6L 每月的最后一个星期五上午10:15触发
(21)0 15 10 ? * 6L 2002-2005 2002年至2005年的每月的最后一个星期五上午10:15触发
(22)0 15 10 ? * 6#3 每月的第三个星期五上午10:15触发


 10万+
10万+

 被折叠的 条评论
为什么被折叠?
被折叠的 条评论
为什么被折叠?
 到【灌水乐园】发言


