


 本文详细介绍了 MongoDB 中 WiredTiger 存储引擎的初始化过程,包括存储引擎配置参数初始化、collection 创建与初始化流程等。此外,还深入分析了 insert 操作的具体流程,从 insert 命令接收处理到文档数据插入,再到日志提交的全过程。
初始化
mongodb中wiredtiger初始化
MONGO_INITIALIZER_WITH_PREREQUISITES(WiredTigerEngineInit, ("SetGlobalEnvironment"))
(InitializerContext* context) {
    getGlobalServiceContext()->registerStorageEngine(kWiredTigerEngineName,
                                                     new WiredTigerFactory());

    return Status::OK();
}
主要的初始化相关处理:
1、storeMongodOptions():初始化存储引擎相关配置参数。
2、KVStorageEngine类实例初始化时会调用_engine->createRecordStore、_catalog->init(&opCtx);,然后初始化所有已有的collection及对应db。
3、WiredTigerKVEngine中调用如下函数,建立wiredtiger存储引擎的_conn。wiredtiger_open(path.c_str(), &_eventHandler, config.c_str(), &_conn);4、WiredTigerKVEngine构造函数中,实例化了wiredtiger存储引擎的_sessionCache。
_sessionCache.reset(new WiredTigerSessionCache(this));

class WiredTigerSessionCache {
   ... ...
   typedef std::vector<WiredTigerSession*> SessionCache;
   SessionCache _sessions;
   ...
}
class WiredTigerSession {
   ... ...
   WiredTigerSession(WT_CONNECTION* conn, uint64_t epoch = 0, uint64_t cursorEpoch = 0);
   ... ...
   typedef std::list<WiredTigerCachedCursor> CursorCache;
   WT_SESSION* _session;  // owned
   CursorCache _cursors;  // owned
   ... ...
}
sequenceDiagram
participant db.cpp
participant wiredtiger_\ninit.cpp
participant server_\ncontext_d.cpp
participant wiredtiger_\nkv_engine.cpp
participant wiredtiger_\nsession_cache.cpp
participant wiredtiger_\nsize_store.cpp

wiredtiger_\ninit.cpp->>server_\ncontext_d.cpp: registerStorageEngine(const std::string& name,\nconst StorageEngine::Factory* factory)
server_\ncontext_d.cpp->>server_\ncontext_d.cpp: _storageFactories[name] = factory;
db.cpp->>db.cpp: _initAndListen()
db.cpp->>server_\ncontext_d.cpp: initializeGlobalStorageEngine()
server_\ncontext_d.cpp->>server_\ncontext_d.cpp: const StorageEngine::Factory* factory = \n _storageFactories[storageGlobalParams.engine];\n... ...\n_storageEngine = factory->>create(\nstorageGlobalParams, *_lockFile);
server_\ncontext_d.cpp->>wiredtiger_\nkv_engine.cpp: WiredTigerKVEngine* kv = new WiredTigerKVEngine()
wiredtiger_\nkv_engine.cpp->>wiredtiger_\nsession_cache.cpp: _sessionCache.reset(new \n WiredTigerSessionCache(this));
wiredtiger_\nkv_engine.cpp->>wiredtiger_\nsession_cache.cpp: _journalFlusher->>go();
wiredtiger_\nkv_engine.cpp->>wiredtiger_\nsize_store.cpp: _sizeStorer->>fillCache();
server_\ncontext_d.cpp->>kv_storage_\nengine.cpp: return new KVStorageEngine(kv, options);
collection初始化流程
1、以mongodb接收到insert命令后的处理为例:
CmdInsert::CmdInsert() : WriteCmd("insert", BatchedCommandRequest::BatchType_Insert) {}

bool WriteCmd::run(...){
    ... ...
    writeBatchExecutor.executeBatch(request, &response);
    ... ...
}
WriteBatchExecutor::executeBatch() -> WriteBatchExecutor::bulkExecute() -> WriteBatchExecutor::execInserts()
-> WriteBatchExecutor::insertMany() -> insertOne()
static void insertOne(WriteBatchExecutor::ExecInsertsState* state, WriteOpResult* result){
    ... ...
    if (state->lockAndCheck(result)) {
    ... ...
}
调用lockAndCheck函数,最终会调用Database::createCollection创建并初始化collection。
2、Database::createCollection会调用如下代码创建collection:
... ...
Status status = _dbEntry->createCollection(txn, ns, options, true /*allocateDefaultSpace*/);
Collection* collection = _getOrCreateCollectionInstance(txn, ns);
_collections[ns] = collection;
... ...
其中,KVDatabaseCatalogEntry中createCollection函数会初始化collection相关名字和对应的WT_SESSION。
Status KVDatabaseCatalogEntry::createCollection(OperationContext* txn, StringData ns,
                    const CollectionOptions& options, bool allocateDefaultSpace)
{
    ... ...
    Status status = _engine->getCatalog()->newCollection(txn, ns, options);
    string ident = _engine->getCatalog()->getCollectionIdent(ns);
    status = _engine->getEngine()->createRecordStore(txn, ns, ident, options);
    RecordStore* rs = _engine->getEngine()->getRecordStore(txn, ns, ident, options);
    _collections[ns.toString()] = new KVCollectionCatalogEntry(_engine->getEngine(), _engine->getCatalog(), ns, ident, rs);
    ... ...
}
1)KVCatalog::newCollection()函数会调用_newUniqueIdent()函数获得collection对应的文件名字(ident),并且,会将collection的ns、ident存储到元数据文件_mdb_catalog中。
元数据文件_mdb_catalog对应的io结构体和btree会在KVStorageEngined的构造函数中初始化完成。
Status status = _engine->createRecordStore(&opCtx, catalogInfo, catalogInfo, >>CollectionOptions());
_catalogRecordStore.reset( _engine->getRecordStore(&opCtx, catalogInfo, catalogInfo, >>CollectionOptions()));
_catalog.reset(new KVCatalog(_catalogRecordStore.get(),_supportsDocLocking,
                     _options.directoryPerDB,_options.directoryForIndexes));
_catalog->init(&opCtx);
//由于每个collection创建时都会存储到元数据文件_mdb_catalog中,
//因此,可以直接从这个文件中得到所有已创建的collection。
_catalog->getAllCollections(&collections);
2)KVDatabaseCatalogEntry::createCollection()函数会调用WiredTigerKVEngine::createRecordStore()函数创建和初始化WT_SESSION结构体。同时会调用__session_create函数创建文件和初始化对应的btree。
3、 WiredTigerKVEngine::createRecordStore()函数会调用WT_SESSION结构体的__session_create函数创建collection对应ident文件和初始化对应的btree。
Status WiredTigerKVEngine::createRecordStore(OperationContext* opCtx, StringData ns,
                                 StringData ident, const CollectionOptions& options) {
    ... ...
    //ident是类似这种形式:collection-0-rand.wt,_uri(ident)返回的是string("table:") + ident.toString();
    string uri = _uri(ident);
    WT_SESSION* s = session.getSession();
    return wtRCToStatus(s->create(s, uri.c_str(), config.c_str()));
}
4、WT_SESSION结构体的__session_create函数会创建collection对应ident文件和初始化对应的btree。其中,uri的格式为table:collection-x-xxxxx。
__session_create(WT_SESSION *wt_session, const char *uri, const char *config) -> __wt_session_create() ->
__wt_schema_create() -> __create_table()
static int __create_table(WT_SESSION_IMPL *session, const char *name, bool exclusive, const char *config){
    ... ...
    if (!exists) {
		WT_ERR(__wt_metadata_insert(session, name, tableconf));
		WT_ERR(__wt_schema_get_table(session, tablename, strlen(tablename), true, &table));

		if (ncolgroups == 0) {
			cgsize = strlen("colgroup:") + strlen(tablename) + 1;
			WT_ERR(__wt_calloc_def(session, cgsize, &cgname));
			snprintf(cgname, cgsize, "colgroup:%s", tablename);
			WT_ERR(__create_colgroup(session, cgname, exclusive, config));
		}
	}
	... ...
}
5、如果ncolgroups为0,即配置文件中没有配置colgroup,则会调用__create_colgroup()函数,在该函数中又会调用__wt_schema_create()函数会创建该table对应的source file和初始化对应的btree。
static int __create_colgroup(WT_SESSION_IMPL *session,const char *name, bool exclusive, const char *config) {
    ... ...
    //__wt_schema_colgroup_source会得到file:collection-x-xxxxx.wt的文件名,后面设置到配置文件中source参数中。
    WT_ERR(__wt_schema_colgroup_source(session, table, cgname, config, &namebuf));
	source = namebuf.data;
	WT_ERR(__wt_buf_fmt(session, &confbuf, "source=\"%s\"", source));
	... ...
	WT_ERR(__wt_schema_create(session, source, sourceconf));  //创建之前得到的source文件名对应文件的io结构体和btree。
	... ...
	if (!exists) {
		WT_ERR(__wt_metadata_insert(session, name, cgconf));
		WT_ERR(__wt_schema_open_colgroups(session, table));
	}
}
6、__wt_schema_create()函数会调用__create_file()函数实际完成创建table对应的source file文件和初始化对应的btree的功能。
static int __create_file(WT_SESSION_IMPL *session, const char *uri, bool exclusive, const char *config){
    /* create、open对应的source文件*/
	WT_ERR(__wt_block_manager_create(session, filename, allocsize));
    ... ...
    //__wt_session_get_btree()函数中会调用__wt_conn_btree_open()函数创建对应的btree。
    WT_ERR(__wt_session_get_btree(session, uri, NULL, NULL, WT_DHANDLE_EXCLUSIVE));
}

int __wt_conn_btree_open(WT_SESSION_IMPL *session, const char *cfg[], uint32_t flags){
    ... ...
    WT_ERR(__wt_btree_open(session, cfg));
    ... ...
}

int __wt_btree_open(WT_SESSION_IMPL *session, const char *op_cfg[]){
    ... ...
    // Initialize and configure the WT_BTREE structure
	WT_ERR(__btree_conf(session, &ckpt));
	//__wt_block_manager_open()函数内部会调用__bm_method_set()函数设置btree->bm结构体(WT_BM)的相关方法。
	WT_ERR(__wt_block_manager_open(session, filename, dhandle->cfg, forced_salvage, readonly, btree->allocsize, &btree->bm));
	... ...
	WT_ERR(bm->checkpoint_load(bm, session, ckpt.raw.data, ckpt.raw.size, root_addr, &root_addr_size, readonly));
	if (creation || root_addr_size == 0)
	    WT_ERR(__btree_tree_open_empty(session, creation));
	else {
		WT_ERR(__wt_btree_tree_open(session, root_addr, root_addr_size));
		if (!F_ISSET(btree, WT_BTREE_REBALANCE)) {
			WT_WITH_PAGE_INDEX(session, ret = __btree_preload(session));
		    if (btree->type != BTREE_ROW)  WT_ERR(__btree_get_last_recno(session));
		}
	}
}
__btree_tree_open_empty()或者__wt_btree_tree_open()函数会初始化一颗btree,每次分配都是按linux的一个page的大小分配的,__btree_conf()函数里会调用__btree_page_sizes()函数设置btree相关的。
collection的insert流程
1、以insert一个collection为例,当insertOne()函数中创建了collection后,会调用collection的insertDocument函数插入相关文档数据。
static void insertOne(WriteBatchExecutor::ExecInsertsState* state, WriteOpResult* result){
    ... ...
    Status status = state->getCollection()->insertDocument(txn, insertDoc, true);
    ... ...
}

Status Collection::insertDocument(OperationContext* txn, const DocWriter* doc, bool enforceQuota) {
    ... ...
    StatusWith<RecordId> loc = _recordStore->insertRecord(txn, doc, _enforceQuota(enforceQuota));
    ... ...
}
_recordStore->insertRecord(xxx)最终会调用如下函数:
Status WiredTigerRecordStore::insertRecords(OperationContext* txn, std::vector<Record>* records, bool enforceQuota) {
    ... ...
    //会先调用__session_open_cursor()函数打开一个cursor,uri是table:collection-x-xxxxx的格式
    WiredTigerCursor curwrap(_uri, _tableId, true, txn);
    WT_CURSOR* c = curwrap.get();
    ... ...
    for (auto& record : *records) {
        c->set_key(c, _makeKey(record.id));
        WiredTigerItem value(record.data.data(), record.data.size());
        c->set_value(c, value.Get());
        int ret = WT_OP_CHECK(c->insert(c));
    }
    ... ...
}
2、__session_open_cursor()函数会获取或打开btree相关结构及初始化WT_CURSOR结构体的相关函数指针成员。
static int __session_open_cursor(WT_SESSION *wt_session, const char *uri, WT_CURSOR *to_dup,
                      const char *config, WT_CURSOR **cursorp){
    ... ...
    WT_ERR(__session_open_cursor_int(session, uri, NULL, statjoin ? to_dup : NULL, cfg, &cursor));
    ... ...
}

static int __session_open_cursor_int(WT_SESSION_IMPL *session, const char *uri,
        WT_CURSOR *owner, WT_CURSOR *other, const char *cfg[], WT_CURSOR **cursorp){
    ... ...
    WT_RET(__wt_curtable_open(session, uri, owner, cfg, cursorp));
    ... ...
}

int __wt_curtable_open(WT_SESSION_IMPL *session, const char *uri, WT_CURSOR *owner, const char *cfg[], WT_CURSOR **cursorp){
    ... ...
    if (table->is_simple) {
		ret = __wt_open_cursor(session, table->cgroups[0]->source, NULL, cfg, cursorp);
    }
    ... ...
}

int __wt_open_cursor(WT_SESSION_IMPL *session, const char *uri, WT_CURSOR *owner, const char *cfg[], WT_CURSOR **cursorp)
{
	return (__session_open_cursor_int(session, uri, owner, NULL, cfg, cursorp));
}

static int __session_open_cursor_int(WT_SESSION_IMPL *session, const char *uri,
            WT_CURSOR *owner, WT_CURSOR *other, const char *cfg[], WT_CURSOR **cursorp){
	... ...
	WT_RET(__wt_curfile_open(session, uri, owner, cfg, cursorp));
    ... ...
}

int __wt_curfile_open(WT_SESSION_IMPL *session, const char *uri, WT_CURSOR *owner, const char *cfg[], WT_CURSOR **cursorp){
    ... ...
    ret = __wt_session_get_btree_ckpt(session, uri, cfg, flags);
    ... ...
    WT_ERR(__wt_curfile_create(session, owner, cfg, bulk, bitmap, cursorp));
    ... ...
}
__wt_curfile_create()函数会初始化WT_CURSOR结构体的相关函数指针成员,c->insert©调用时即会调用WT_CURSOR结构体中初始化的insert指针成员。
3、c->insert( c )最终会调用__curfile_insert()函数完成内存数据的修改和log文件的写入。
1、第一步会先调用__txn_logrec_init()函数初始化__wt_txn::logrec,然后再插入__wt_txn::logrec中。
__curfile_insert() -> __wt_btcur_insert() -> __cursor_row_modify() -> __wt_row_modify() -> __wt_txn_log_op() -> __txn_op_log()。
2、第一步的操作完成后,会调用WiredTigerRecoveryUnit::_commit()函数执行log日志的提交。
insertOne() -> WriteUnitOfWork::commit() -> WiredTigerRecoveryUnit::commitUnitOfWork() -> WiredTigerRecoveryUnit::_commit() -> WiredTigerRecoveryUnit::_txnClose() -> s->commit_transaction(…) -> __session_commit_transaction() -> __wt_txn_commit() -> __wt_txn_log_commit()函数完成日志写入。config_def.c文件中wiredtiger_open_all的配置设置了transaction_sync.method会刷入硬盘。
3、wiredtiger_open() -> __wt_connection_workers() -> __wt_logmgr_open(),在函数中会创建线程,执行__log_server()函数,专门执行journal日志的落地。
#define	WT_LOG_FILENAME	"WiredTigerLog"		/* Log file name */
#define	WT_LOG_PREPNAME	"WiredTigerPreplog"	/* Log pre-allocated name */
#define	WT_LOG_TMPNAME	"WiredTigerTmplog"	/* Log temporary name */
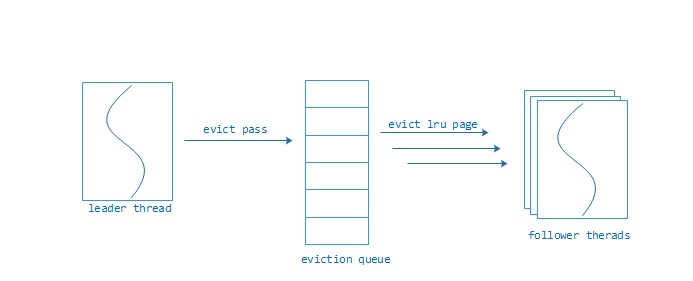
cache淘汰
__wt_btcur_insert() -> __cursor_func_init() -> __curfile_enter() ->
__cursor_enter() -> __wt_cache_eviction_check() ->
__wt_eviction_needed()、__wt_cache_eviction_worker()
WiredTiger实现:一个LRU cache深坑引发的分析
CheckPoint + WAL
1.插入或修改记录时,调用__wt_txn_log_op()写入wal日志
__curfile_insert() -> __wt_btcur_insert() -> __cursor_row_modify() ->
__wt_row_modify() -> __wt_txn_log_op()
2.在后台线程函数__ckpt_server中,判断是否满足出发条件:(journal容量达到阈值,默认2G、每隔60s执行一次), 如果满足条件,则进行checkpoint,将cache中dirty page刷到文件中,最终在__checkpoint_tree函数中调用__wt_txn_checkpoint_log()函数,将checkpoint对应lsn和offset写入到metadata中. 同时调用__wt_log_ckpt函数,通知log相关线程删除已经checkpoint的wal文件
wiredtiger_open() -> __wt_connection_workers() -> __wt_checkpoint_server_create() ->
__ckpt_server_start() -> __ckpt_server() -> __session_checkpoint() ->
__wt_txn_checkpoint() -> __txn_checkpoint_wrapper() -> __txn_checkpoint() ->
__wt_checkpoint() -> __checkpoint_tree() -> __wt_txn_checkpoint_log()、__wt_log_ckpt()
3.当checkpoint完成后会给conn->log_cond发送通知,在线程函数__log_server()中,__wt_cond_auto_wait_signal会返回,然后调用__log_archive_once函数,在__log_archive_once函数中会遍历所有的wal文件,然后调用__wt_log_remove函数将checkpoint之前的wal文件删除。
wiredtiger_open() -> __wt_connection_workers() -> __wt_logmgr_open() ->
__log_server() -> __log_archive_once() -> __wt_log_remove()
4.checkpoint时lock page的处理方式(以btree中page1、page2两个page为例),典型如传统数据库的in-place update时checkpoint。
- checkpoint流程开始触发,记录下一条LSN=1000,LSN=1000时修改page1,设置page1最后一次修改LSN=1000,写journal日志LSN=1000,此时,lock page1并flush page1到磁盘(包括page1最后一次修改LSN=1000)。
- LSN=1001时修改page2,设置page2最后一次修改LSN=1001,写journal日志LSN=1001,然后,lock page2并flush page2到磁盘(包括page2最后一次修改LSN=1001),
此时磁盘中数据包括了LSN=1001的修改。- 写checkpoint完成的journal日志LSN=1002,在LSN=1002的日志中记录checkpoint的开始LSN=1000,journal日志的视图:
LSN=1000 | LSN=1001 | LSN=1002。- 从checkpoint点恢复时,将checkpoint点数据load到内存,然后再从journal日志恢复,从journal日志恢复时会先找到LSN=1002的日志,然后从LSN=1002的日志中找到checkpoint恢复的起始LSN=1000。
- redo LSN=1000,但是page1的最新LSN=1000,忽略redo LSN=1000。
- redo LSN=1001,但是page2的最新LSN=1001,忽略redo LSN=1001。
Block Reuse
- 写入文件时,会调用__rec_split_write_reuse()函数查找当前未再使用的old block,然后将数据写入到该block中。
内存里的结构
__wt_evict_file() -> __wt_reconcile() -> __rec_row_int() ->
__rec_split_finish() -> __rec_split_write() -> __rec_split_write_reuse()
磁盘block的reuse,调用__wt_block_alloc函数,在该函数中调用__block_first_srch函数获取当前可重用 的block的offset
__rec_split_write() -> __wt_bt_write() -> __wt_block_write() ->
__wt_block_write_off() -> __wt_block_alloc() -> __block_first_srch()
- 写入文件时,当写入完成后,会最终调用__block_off_srch函数将当前写入的block放入可用block队列中
__wt_reconcile() -> __rec_write_wrapup() -> __wt_ref_block_free() ->
__wt_btree_block_free() -> __bm_free() -> __wt_block_free() ->
__wt_block_off_free() -> __wt_block_off_remove_overlap() ->
__block_ext_insert() -> __block_off_srch()
MongoDB 3.2.9 请求 hang 分析及 wiredtiger 调优
wiredtiger了解
mongodb的存储引擎
MongoDB 3.0挂起原因?
MongoDB WiredTiger 存储引擎(1) cache_pool设计
MongoDB WiredTiger 存储引擎cache_pool设计 (下) – 实践篇
Mongodb如何使用wiredTiger
7-10倍写入性能提升:剖析WiredTiger数据页无锁及压缩黑科技
Mongodb存储特性与内部原理
解析MongoDB存储引擎WiredTiger:事务实现
Fast Updates with MongoDB (update-in-place)
ubifs out-of-place update & Garbage Collection
Nand Flash管理算法介绍之FTL简介


 302
302

 被折叠的 条评论
为什么被折叠?
被折叠的 条评论
为什么被折叠?
 到【灌水乐园】发言


