


什么是Canvas
Canvas是HTML5新增的组件,它就像一块幕布,可以用JavaScript在上面绘制各种图表、动画等。
没有Canvas的年代,绘图只能借助Flash插件实现,页面不得不用JavaScript和Flash进行交互。有了Canvas,我们就再也不需要Flash了,直接使用JavaScript完成绘制。
一个Canvas定义了一个指定尺寸的矩形框,在这个范围内我们可以随意绘制。Canvas利用坐标点来绘制图形
<canvas id="test-canvas" width="300" height="200"></canvas>
canvas.getContext(“2d”)
获取这个元素的context——图像稍后将在此被渲染。由 CanvasRenderingContext2D 接口完成实际的绘制
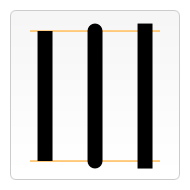
注意:canvas最好不要设置css的宽高
- canvas 标签中的 width 和 height 属性并不是 css 中的宽高,而是 canvas 绘图上下文(绘图区域)的宽高,当不设置 canvas 的 css 宽高时,canvas 会将 width 和 height 的值作为 css 宽高,而 css 宽高使元素在页面上的可见尺寸
- 但是 canvas 的上下文宽高略奇怪,它可不管像素比是 1 是 2 还是 3,它就是会将整个 canvas 绘图区域塞进 css 宽高中并且填满,绘图的时候会将绘制的图形的宽高按照塞进 css 时宽与高的缩放比率分别进行缩放(所以如果缩放比率不同,就会导致绘制的图形变形)
- anvas 绘图时,会从两个物理像素的中间位置开始绘制并向两边扩散 0.5 个物理像素。当设备像素比为 1 时,一个 1px 的线条实际上占据了两个物理像素(每个像素实际上只占一半),由于不存在 0.5 个像素,所以这两个像素本来不应该被绘制的部分也被绘制了,于是 1 物理像素的线条变成了 2 物理像素,视觉上就造成了模糊
- 解决方案
ctx.scale(2, 2)
修改实际宽高和样式宽高比例
矩形
- 绘制填充矩形
		ctx.fillStyle = "rgb(200,0,0)";
		ctx.fillRect (10, 10, 55, 50);
- 绘制矩形边框
ctx.strokeRect(50,50,100,100);
- 清除矩形区域
ctx.clearRect(x, y, width, height);
样式和颜色
color
strokeStyle="#000000"
笔触颜色
fillStyle = "orange"
填充色
globalAlpha = 0.5;
	createLinearGradient(x1, y1, x2, y2)
		返回一个canvasGradient对象
		var file=ctx.createLinearGradient(0,0,200,200);
       file.addColorStop(0,"red");
       file.addColorStop(1,"#FFFF00");
       ctx.fillStyle=file;
       ctx.fillRect(0,0,200,200);
	createRadialGradient(x1, y1, r1, x2, y2, r2)
		reateRadialGradient 方法接受 6 个参数,前三个定义一个以 (x1,y1) 为原点,半径为 r1 的圆,后三个参数则定义另一个以 (x2,y2) 为原点,半径为 r2 的圆。
	var radgrad = ctx.createRadialGradient(45,45,10,52,50,30);
 radgrad.addColorStop(0, '#A7D30C');
 radgrad.addColorStop(0.9, '#019F62');
 radgrad.addColorStop(1, 'rgba(1,159,98,0)');
       ctx.fillStyle=radgrad;
       ctx.fillRect(0,0,100,100);
图案填充
		createPattern(image, type)
			type
				repeat
				repeat-x
				repeat-y
				no-repeat。
			   var img=new Image();
        img.src="./img/IMG_20170529_115817.jpg";
       img.addEventListener("load",loadHandler);
       function loadHandler(e){
        var fill=ctx.createPattern(img,"no-repeat");
        ctx.fillStyle=fill;
        ctx.fillRect(0,0,200,200);
       }
阴影
shadowOffsetX(x偏移)
shadowOffsetY(y偏移)
shadowBlur(模糊)
shadowColor(颜色)
ctx.fillStyle=fill;
ctx.shadowOffsetX=2;
ctx.shadowOffsetY=2;
ctx.shadowBlur=2;
ctx.shadowColor="#999999";
线条粗细
lineWidth = 2
笔触
lineCap
线条线段端点样式
- butt
- round
- square
lineJoin
两线段连接处所显示的样子
- round
- bevel
- miter(默认)
beginPath
新建一条路径,生成之后,图形绘制命令被指向到路径上生成路径
closePath
闭合路径之后图形绘制命令又重新指向到上下文中。
就是闭合路径closePath(),不是必需的。这个方法会通过绘制一条从当前点到开始点的直线来闭合图形
moveTo(x,y)
移动到开始点
lineTo(x,y)
绘制笔触线条到什么位置
stroke()
通过线条绘制图形轮廓
fill()
通过填充路径的内容区域生成实心的图形。
arc(x, y, radius, startAngle, endAngle, anticlockwise)
- 绘制弧线
- ctx.arc(100,100,100,Math.PI/1800,Math.PI/180180,true);
- 这里是弧度不是角度,需要使用Math.PI/180*角度
- 最后一个参数布尔值是顺时针或者逆时针
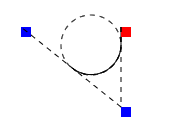
arcTo(x1, y1, x2, y2, radius);
- 连接弧线
- ctx.moveTo(150, 20);
+ctx.arcTo(150,100,50,20,30); - movTo是移动到蓝点
- x1,y1是下面的红点
- x2,y2是左边的红点
- 最后一个参数是半径
quadraticCurveTo(cp1x, cp1y, x, y)
-
二次贝塞尔曲线
- 对话气泡
ctx.beginPath();
ctx.moveTo(75,25);
ctx.quadraticCurveTo(25,25,25,62.5);
ctx.quadraticCurveTo(25,100,50,100);
ctx.quadraticCurveTo(50,120,30,125);
ctx.quadraticCurveTo(60,120,65,100);
ctx.quadraticCurveTo(125,100,125,62.5);
ctx.quadraticCurveTo(125,25,75,25);
ctx.stroke(); - 圆角矩形
function roundedRect(ctx,x,y,width,height,radius){
ctx.beginPath();
ctx.moveTo(x,y+radius);
ctx.lineTo(x,y+height-radius);
ctx.quadraticCurveTo(x,y+height,x+radius,y+height);
ctx.lineTo(x+width-radius,y+height);
ctx.quadraticCurveTo(x+width,y+height,x+width,y+height-radius);
ctx.lineTo(x+width,y+radius);
ctx.quadraticCurveTo(x+width,y,x+width-radius,y);
ctx.lineTo(x+radius,y);
ctx.quadraticCurveTo(x,y,x,y+radius);
ctx.stroke();
}
- 对话气泡
-
cp1x,cp1y为一个控制点,x,y为结束点
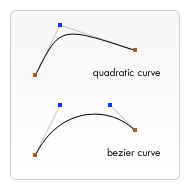
bezierCurveTo(cp1x, cp1y, cp2x, cp2y, x, y)
- 三次贝塞尔曲线
- cp1x,cp1y为控制点一,cp2x,cp2y为控制点二,x,y为结束点。
- 桃心
ctx.moveTo(75,40);
ctx.bezierCurveTo(75,37,70,25,50,25);
ctx.bezierCurveTo(20,25,20,62.5,20,62.5);
ctx.bezierCurveTo(20,80,40,102,75,120);
ctx.bezierCurveTo(110,102,130,80,130,62.5);
ctx.bezierCurveTo(130,62.5,130,25,100,25);
ctx.bezierCurveTo(85,25,75,37,75,40);
- 桃心
- Path2D
new Path(2D)用于装载绘制路径
		var circle = new Path2D();
		    circle.moveTo(125, 35);
		    circle.arc(100, 35, 25, 0, 2 * Math.PI);
也可以用来装载SVG
var p = new Path2D("M10 10 h 80 v 80 h -80 Z");
- 这条路径将先移动到点 (M10 10) 然后再水平移动80个单位(h 80),然后下移80个单位 (v 80),接着左移80个单位 (h -80),再回到起点处 (z)。
案例
写字
	 var canvas=document.querySelector("canvas");
     var ctx=canvas.getContext("2d");
        ctx.strokeStyle="#000000";
        ctx.lineWidth=5;
        ctx.lineCap="round";
        canvas.addEventListener("mousedown",mouseHandler);
        function mouseHandler(e){
            if(e.type==="mousedown"){
                canvas.addEventListener("mousemove",mouseHandler);
                document.addEventListener("mouseup",mouseHandler);
                ctx.moveTo(e.offsetX,e.offsetY);
            }else if(e.type==="mousemove"){
                ctx.lineTo(e.offsetX,e.offsetY);
                ctx.stroke();
            }else if(e.type==="mouseup"){
                canvas.removeEventListener("mousemove",mouseHandler);
                document.removeEventListener("mouseup",mouseHandler);
            }
        }
文本
- fillText(text, x, y [, maxWidth])
ctx.font = "48px serif";
 ctx.fillText("Hello world", 10, 50);
-
strokeText(text, x, y [, maxWidth])
-
font = value(字体)
-
textAlign = value
start, end, left, right or center. -
textBaseline = value
top, hanging, middle, alphabetic, ideographic, bottom。 -
direction = value
ltr, rtl, inherit -
measureText()
- 将返回一个 TextMetrics对象的宽度、所在像素,这些体现文本特性的属性。
var text = ctx.measureText("foo"); // TextMetrics object
  text.width; // 16;
图片
- 图片源
- new Image
- video视频截图
<video src="./video/a.mp4" id="myvideo" autoplay></video> <canvas width="1280" height="720" id="canvas1"></canvas> <script> document.addEventListener("click",function(){ var canvas1=document.getElementById("canvas1"); var ctx1=canvas1.getContext("2d"); ctx1.drawImage(document.getElementById('myvideo'),0,0); }) </script>- 另一个canvas截图
- ImageBitmap位图
- 绘制图片
- drawImage(image, x, y)
添加图片和图片的放置的位置
- drawImage(image, x, y)
			var img=new Image();
        img.src="./img/IMG_20170529_115817.jpg";
        img.addEventListener("load",loadHandler);
        function loadHandler(e){
            ctx.drawImage(img,50,50);
        }
- drawImage(image, x, y, width, height)
添加图片放置,并缩放大小
	 var img=new Image();
      img.src="./img/IMG_20170529_115817.jpg";
      img.addEventListener("load",loadHandler);
      function loadHandler(e){
          ctx.drawImage(img,50,50,200,120);
      }
-
drawImage(image, sx, sy, sWidth, sHeight, dx, dy, dWidth, dHeight)
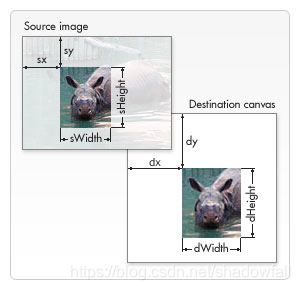
前4个是定义图像源的切片位置和大小
偏移位置和裁切大小
后4个则是定义切片的目标显示位置和大小。
坐标和大小- 放大镜
	<canvas width="800" height="400" id="canvas1"></canvas>
    <canvas width="800" height="400" id="canvas2"></canvas>
       <script>
        var canvas1=document.querySelector("#canvas1");
        var canvas2=document.querySelector("#canvas2");
        var ctx1=canvas1.getContext("2d");
        var ctx2=canvas2.getContext("2d");
        var img=new Image();
        img.src="./img/IMG_20170529_115817.jpg";
        img.addEventListener("load",loadHandler);
        function loadHandler(e){
            canvas1.addEventListener("mousemove",mouseHandler)
            ctx1.drawImage(img,0,0,800,400);
        }

        function mouseHandler(e){
            ctx2.clearRect(0,0,800,400);
            ctx2.drawImage(img,e.offsetX/0.8,e.offsetY/0.4,400,200,0,0,800,400);
        }
    </script>
变形
save() 保存
- 保存为入栈,恢复为出栈
- context上下文属性主要包括以下
- canvas 取得画布元素
fillStyle 填充路径的当前的颜色、模式或渐变
globalCompositeOperation 指定颜色如何与画布上已有颜色组合(合成)
lineCap 指定线段端点的绘制方式
lineJoin 指定线段连接的绘制方式
lineWidth 绘制线段的宽度
miterLimit 当lineJoin为miter时,这个属性指定斜连接长度和二分之一线宽的最大比率
shadowBlur 指定阴影模糊度
shadowColor 指定阴影颜色
shadowOffsetX 指定阴影水平偏移值
shadowOffsetY 指定阴影垂直偏移值
strokeStyle 指定线段颜色
- canvas 取得画布元素
- 当保存入栈时,将当前的上下文属性存入栈,当restore时表示将上次保存上下文属性恢复出栈,restore不能多于save,并且只能让上一次的出栈。例如下面的案例,默认填充色是黑色,透明度是1,先做了save入栈,然后设置填充色红色,半透明,然后绘制完成圆形后,调用restore后,把上次入栈的黑色不透明调用出来,重绘圆形
- var canvas=document.querySelector(“canvas”)
var ctx=canvas.getContext(“2d”);
ctx.save();
ctx.fillStyle=“red”;
ctx.globalAlpha=0.5;
ctx.beginPath();
ctx.arc(50,50,50,Math.PI/1800,Math.PI/180360);
ctx.closePath();
ctx.fill();
ctx.restore();
ctx.beginPath();
ctx.arc(100,100,50,Math.PI/1800,Math.PI/180360);
ctx.closePath();
ctx.fill();
- var canvas=document.querySelector(“canvas”)
restore() 恢复
translate(x, y)
- 平移x,y
- 如果不使用 translate 方法,那么所有矩形都将被绘制在相同的位置(0,0)。translate 方法同时让我们可以任意放置这些图案,而不需要在 fillRect() 方法中手工调整坐标值
function draw() {
  var ctx = document.getElementById('canvas').getContext('2d');
  for (var i = 0; i < 3; i++) {
    for (var j = 0; j < 3; j++) {
      ctx.save();
      ctx.fillStyle = 'rgb(' + (51 * i) + ', ' + (255 - 51 * i) + ', 255)';
      ctx.translate(10 + j * 50, 10 + i * 50);
      ctx.fillRect(0, 0, 25, 25);
      ctx.restore();
    }
  }
}
- rotate(angle) 旋转
- 旋转要配合偏移使用,因为旋转都是以canvas左上角为顶点做,因此先要偏移,然后旋转,最后才能绘制
var canvas=document.querySelector("canvas")
        var ctx=canvas.getContext("2d");
        ctx.fillStyle="red";
        ctx.save();
        ctx.translate(200,200);
        ctx.rotate(Math.PI/180*60);
        ctx.fillRect(0,0,50,50);
        ctx.restore();
scale(x,y) 缩放
x,y是缩放因子
var ctx=canvas.getContext("2d");
     ctx.fillStyle="red";
     ctx.save();
     ctx.translate(200,200);
     ctx.scale(0.5,0.5);
     ctx.fillRect(0,0,50,50);
     ctx.restore();
- 形变
-
形变矩阵
-
transform(m11, m12, m21, m22, dx, dy)
m11:水平方向的缩放m12:水平方向的倾斜偏移
m21:竖直方向的倾斜偏移
m22:竖直方向的缩放
dx:水平方向的移动
dy:竖直方向的移动
-
setTransform(m11, m12, m21, m22, dx, dy)
-
裁切
clip
橡皮擦效果
		  var canvas=document.querySelector("canvas")
        var ctx=canvas.getContext("2d");
        ctx.fillRect(0,0,canvas.width,canvas.height);
        var img=new Image();
        img.src="./img/IMG_20170529_115817.jpg";
        img.addEventListener("load",loadHandler);
        function loadHandler(e){
            canvas.addEventListener("mousemove",mouseHandler);
        }
        function mouseHandler(e){
            ctx.save();
            ctx.beginPath();
            ctx.arc(e.offsetX,e.offsetY,10,0,Math.PI/180*360);
            ctx.clip();
            ctx.drawImage(img,0,0,canvas.width,canvas.height);
            ctx.restore();
        }
动画
<canvas width="1280" height="760"></canvas>
    <script>
        var canvas = document.querySelector("canvas")
        var ctx = canvas.getContext("2d");


        class Ball {
            x = 50;
            y = 50;
            alpha = 1;
            radius = 50;
            fillColor = "red";
            speedX = 1;
            speedY = 1;
            constructor() {

            }
            draw(ctx) {
                if (ctx) this.ctx = ctx;
                this.ctx.fillStyle = this.fillColor;
                this.ctx.beginPath();
                this.ctx.arc(this.x, this.y, this.radius, 0, Math.PI / 180 * 360);
                this.ctx.closePath();
                this.ctx.fill();

            }

            update() {
                if (!this.ctx) return;
                this.x += this.speedX;
                this.y += this.speedY;
                if (this.x > canvas.width - this.radius || this.x - this.radius < 0) this.speedX = -this.speedX;
                if (this.y > canvas.height - this.radius || this.y - this.radius < 0) this.speedY = -this.speedY;
                this.draw();
            }
        }


        let list = [];
        init()
       function init(){
            for (var i = 0; i < 10; i++) {
                var b = new Ball();
                b.x = Math.random() * 1180 + 50;
                b.y = Math.random() * 660 + 50;
                b.speedX = Math.random() > 0.5 ? 1 : -1;
                b.speedY = Math.random() > 0.5 ? 1 : -1;
                b.draw(ctx);
                list.push(b);
            }
            animation();

       }


        function animation() {
            requestAnimationFrame(animation);
            for (let i = 0; i < list.length; i++) {
                list[i].update();
            }
            this.ctx.fillStyle = 'rgba(255,255,255,0.2)';
            this.ctx.fillRect(0, 0, canvas.width, canvas.height);
        }
    </script>


 1005
1005

 被折叠的 条评论
为什么被折叠?
被折叠的 条评论
为什么被折叠?
 到【灌水乐园】发言


