


 本文分析了在Android 6.0及以上版本中使用ConnectivityManager时出现的内存泄露问题。问题源于ConnectivityManager持有传入的Context引用,若为Activity则会导致内存泄露。文中详细介绍了Context的实现机制,并给出了解决方案。
#写在开头
写文章,其实是一个梳理思维,学习成长的过程,有意的可以一块学习,互相交流。谢谢大家!有错误或者意见还请指出共同进步。
今天在用LeakCanary检测内存泄露过程中,发现ConnectivityManager报出内存泄露的警告(context),这不是系统Framework的网络管理模块吗,系统服务还能泄露了。。。
###问题分析(就ConnectivityManager而言)
通过在不同的测试手机上测试,发现此问题只在android6.0以上才有。5.0或4.4的手机中并无此问题。大家都知道,使用这些系统服务会传入一个上下文环境,也就是我们所说的context,在android的源码中,这些服务的对象是通过单例创建的,但是在6.0以上,它会持有我们传入的context的引用。所以,如果你传入的是activity,当你的activity销毁时,它却持有这个activity的引用,就会造成内存泄露。在5.1的源码中,ConnectivityManager实现为单例但不持有Context的引用,在5.0有以下版本ConnectivityManager既不为单例,也不持有Context的引用。本文就6.0以上说明一下。
##Context详解
在解释问题前,先说下context。都知道,Context是维持Android程序中各组件能够正常工作的一个核心功能类。他的继承关系如下图:
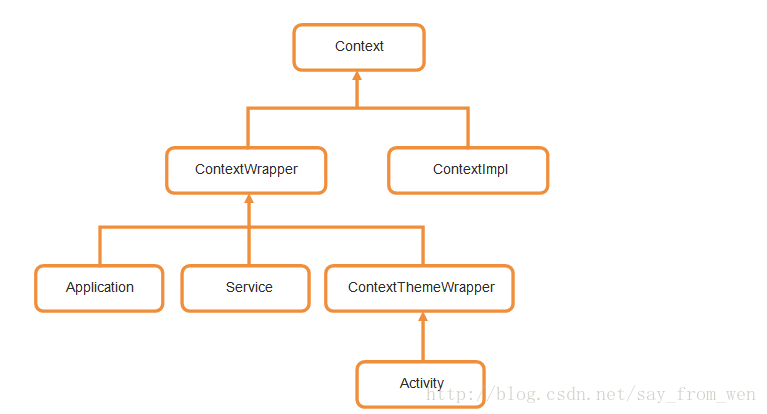
Context的继承结构如图,它的直系子类有两个,一个是ContextWrapper,一个是ContextImpl。ContextWrapper是上下文功能的封装类,而ContextImpl则是上下文功能的实现类。而ContextWrapper又有三个直接的子类,ContextThemeWrapper、Service和Application。其中,ContextThemeWrapper是一个带主题的封装类,而它有一个直接子类就是Activity。
通过上面我们可以看出,我们说的context就三种,activity,service,application。这三个类虽然分别各种承担着不同的作用,但它们都属于Context的一种,而它们具体Context的功能则是由ContextImpl类去实现的。
PS:如果您想看ContextImpl的源码,你会发现从AS看context的继承结构并没有ContextImpl,这时你需要去sdk中/android-sdk/sources/android-25/android/app/ContextImpl.java 去查找观看。
###进一步分析Context
从上面可以看到,Activity根本上是从ContextWrapper继承而来的,跟进源码,ContextWrapper中持有一个mBase实例
public class ContextWrapper extends Context {
    Context mBase;

    public ContextWrapper(Context base) {
        mBase = base;
    }
这个实例指向一个ContextImpl对象,我们可以看ContextWrapper中的attachBaseContext方法。
	protected void attachBaseContext(Context base) {
        if (mBase != null) {
            throw new IllegalStateException("Base context already set");
        }
        mBase = base;
    }
这个方法中传入了一个base参数,并把这个参数赋值给了mBase对象。而attachBaseContext()方法其实是由系统来调用的,它会把ContextImpl对象作为参数传递到attachBaseContext()方法当中,从而赋值给mBase对象,之后ContextWrapper中的所有方法其实都是通过这种委托的机制交由ContextImpl去具体实现的。
同时ContextImpl对象持有一个OuterContext对象,对于Activity来说,这个OuterContext就是Activity对象。
也就是构造中的那个this。
	 private ContextImpl(ContextImpl container, ActivityThread mainThread,
            LoadedApk packageInfo, IBinder activityToken, UserHandle user, int flags,
            Display display, Configuration overrideConfiguration, int createDisplayWithId) {
        mOuterContext = this;

        // If creator didn't specify which storage to use, use the default
        // location for application.
        if ((flags & (Context.CONTEXT_CREDENTIAL_PROTECTED_STORAGE
                | Context.CONTEXT_DEVICE_PROTECTED_STORAGE)) == 0) {
            final File dataDir = packageInfo.getDataDirFile();
            if (Objects.equals(dataDir, packageInfo.getCredentialProtectedDataDirFile())) {
                flags |= Context.CONTEXT_CREDENTIAL_PROTECTED_STORAGE;
            } else if (Objects.equals(dataDir, packageInfo.getDeviceProtectedDataDirFile())) {
                flags |= Context.CONTEXT_DEVICE_PROTECTED_STORAGE;
            }
        }

        mMainThread = mainThread;
        mActivityToken = activityToken;
        mFlags = flags;
	......
所以您通过context调用getSystemService时最终会调用到ContextImpl的getSystemService方法。而这个getSystemService是通过ContextImpl的SystemServiceRegistry来完成。
代码流程如下。
第一步:
	public Object getSystemService(String name) {
	    return SystemServiceRegistry.getSystemService(this, name);
		}
第二步:
	public static Object getSystemService(ContextImpl ctx, String name) {
	      ServiceFetcher<?> fetcher = SYSTEM_SERVICE_FETCHERS.get(name);
	 }
第三步:SystemServiceRegistry提供ConnectivityManager的实例。
	registerService(Context.CONNECTIVITY_SERVICE, ConnectivityManager.class, new StaticOuterContextServiceFetcher<ConnectivityManager>() {
	 @Override
	 public ConnectivityManager createService(Context context) {
	 IBinder b = ServiceManager.getService(Context.CONNECTIVITY_SERVICE); IConnectivityManager service = IConnectivityManager.Stub.asInterface(b);
	 return new ConnectivityManager(context, service); }});

	static abstract class StaticOuterContextServiceFetcher<T> implements ServiceFetcher<T> {
	private T mCachedInstance;
	@Override
	public final T getService(ContextImpl ctx) {
	if (mCachedInstance == null) {
	mCachedInstance = createService(ctx.getOuterContext());
		}
	}
}
	public abstract T createService(Context applicationContext); }
#总结
Context在ConnectivityManager 创建时传入,这个Context在StaticOuterContextServiceFetcher中由ContextImpl对象转换为OuterContext,如果我们的context是Activity对象,ConnectivityManager的单实例就持有了Activity的实例引用。这样即使Activity退出后仍然无法释放,导致内存泄漏。在源码中,public abstract T createService(Context applicationContext); },人家提示的非常明显了,这个上下文环境,人家想要的是一个Application中提供的context。
#省心的解决办法
获取系统服务getSystemService时使用我们在自定义Application中提供的context。
#写在后头
对于其他的系统服务,有些传入activty的引用也是不会造成内存泄露的,所以这方面还是就实际而言,有问题解决,看人家源码的提示,没问题就没问题喽,安心的写其他代码。


 5196
5196

 被折叠的 条评论
为什么被折叠?
被折叠的 条评论
为什么被折叠?
 到【灌水乐园】发言


