


一.Mybatis的简单概述
1.1简介
Mybatis是用于简化JDBC开发的一款优秀的免费的开源的持久层框架,是Apache的一个开源项目iBatis。
特点:
-
MyBatis是支持普通SQL查询,存储过程和高级映射的优秀持久层框架。
-
MyBatis封装了几乎所有的JDBC代码和参数的手工设置以及结果集的检索;
-
MyBatis使用简单的XML或注解做配置和定义映射关系,将Java的POJO(Plain Old Java Objects)映射成数据库中的记录。
持久层:指的就是数据访问层,是用来操作数据库的。
框架:是一个半成品软件,是一套可重用的、通用的、软件基础代码模型。在框架的基础上进行软件开发更加高效、规范、通用、可拓展。
1.2MyBatis快速入门
1.2.0 maven项目的组织结构
项目名称:
    -src:   写代码的地方法
       -- main:  写项目代码的地方
          --- java: 正常写代码的地方,相当于java项目的src
                ----com.mybatis.pojo.User
          --- resources: java代码所依赖的classpath: 一般用于放置各种配置文件
               jdbc.properties
               .......
       -- test:  maven提供的用于测试的包路径
    -pom.xml   :用来配置maven的jar包坐标以及其他插件配置信息
1.2.1准备数据
建立一个数据库并建立相关表格,添加数据。
例如:
-- 创建数据库mybatis_db, 设置编码集 UTF8
create database if not exists mybatis_db character set utf8;
-- 切换到mybatis_db数据库
use mybatis_db;

-- 创建学生信息表
drop table student;
create table `student`(
`id` int comment '学生ID,学生证ID',
`name` varchar(20) not null comment '学生名称',
`gender` char(1) not null comment '学生性别',
`age` int not null comment '学生年龄',
`address` varchar(50) not null comment '家庭地址'
) ENGINE=InnoDB DEFAULT CHARSET=utf8 COMMENT='学生信息表';

-- 插入数据
insert into student values
(1001,'刘备','m',40,'江南'),
(1002,'关羽','m',35,'上海'),
(1003,'虞姬','f',26,'北京'),
(1004,'赵云','m',27,'长春'),
(1005,'甄姬','f',26,'广州'),
(1005,'甄姬','f',26,'广州');

select * from student;


create table studentcard(
	id int primary key auto_increment comment '学生证ID号',
	name varchar(20) not null comment '学生姓名',
	classno varchar(20) not null comment '班级编号',
	remark varchar(50)  comment '备注'
);

insert into studentcard values
(1001,'刘备','高三一班','一个三好学生'),
(1002,'关羽','高三一班','学习一班的普通学生'),
(1003,'虞姬','高二二班','一个c位的射手'),
(1004,'赵云','高二二班','打野位'),
(1005,'甄姬','高一一班','一个法师');
1.2.2 创建模块,导入坐标
<dependencies>
   <!--mybatis的依赖-->
   <dependency>
      <groupId>org.mybatis</groupId>
      <artifactId>mybatis</artifactId>
      <version>3.5.5</version>
   </dependency>
   <!--mysql 驱动-->
   <dependency>
      <groupId>mysql</groupId>
      <artifactId>mysql-connector-java</artifactId>
      <version>8.0.31</version>
   </dependency>
   <!--junit 测试-->
   <dependency>
      <groupId>junit</groupId>
      <artifactId>junit</artifactId>
      <version>4.13</version>
      <scope>test</scope>
   </dependency>
</dependencies>
1.2.3 编写MyBatis核心配置文件
替换连接信息,解决硬编码问题 文件名:mybatis-config.xml
<?xml version="1.0" encoding="UTF-8" ?>
<!DOCTYPE configuration
PUBLIC "-//mybatis.org//DTD Config 3.0//EN"
"https://mybatis.org/dtd/mybatis-3-config.dtd">
<configuration>
<environments default="development">
<environment id="development">
<transactionManager type="JDBC"/>
<dataSource type="POOLED">
<!--连接信息-->
<property name="driver" value="com.mysql.cj.jdbc.Driver"/>
<property name="url" value="jdbc:mysql://localhost:3306/edu_mybatis?useSSL=false&serverTimezone=Asia/Shanghai&useTimezone=true"/>
<property name="username" value="root"/>
<property name="password" value="mmforu"/>
</dataSource>
</environment>
</environments>
<mappers>
<!--配置相应的实体接口映射文件 resource属性里是文件的路径-->
<mapper resource="UserMapper.xml"/>
</mappers>
</configuration>1.2.4 编写sql映射文件
统一管理sql语句,解决硬编码问题 文件名:UserMapper.xml
<?xml version="1.0" encoding="UTF-8" ?>
<!DOCTYPE mapper
        PUBLIC "-//mybatis.org//DTD Mapper 3.0//EN"
        "https://mybatis.org/dtd/mybatis-3-mapper.dtd">
<!--   属性 namespace:名称空间   建议:写相应实体接口的全名  -->
<mapper namespace="test">
    <select id="findAll" resultType="com.shuilidianli.pojo.User">
        select * from tb_user;
    </select>
</mapper>
1.2.5 编写代码
① 根据数据库表,定义pojo类
② 加载核心配置文件,获取SqlSessionFactory对象
③ 获取SqlSession对象,执行sql语句
④ 释放资源
public static void main(String[] args) throws IOException {
   // 1. 加载mybatis的核心配置文件,获取SqlSessionFactory
   String resource = "mybatis-config.xml";
   InputStream inputStream = Resources.getResourceAsStream(resource);
   SqlSessionFactory sqlSessionFactory =
      new SqlSessionFactoryBuilder().build(inputStream);

   //2. 获取SqlSession对象,用他来执行sql
   SqlSession sqlSession = sqlSessionFactory.openSession();

   //3. 执行sql   调用selectList方法,传参 namespace.id,来指定要执行的sql语句
   List<User> users = sqlSession.selectList("test.findAll");
   System.out.println(users);

   //4. 释放资源
   sqlSession.close();
}
二 Mapper代理开发
2.1目的
解决原生方式中的硬编码,简化后期执行的SQL
原生写法
//3 执行sql  namespace.id
List<User> users = sqlSession.selectList("test.findAll");
代理写法
//3 获取UserMapper接口的代理对象
UserMapper mapper = sqlSession.getMapper(UserMapper.class);
List<User> users = mapper.findAll();
2.2步骤
使用Mapper代理方式完成入门案例
(1) 定义与SQL映射文件同名的Mapper接口
public interface UserMapper {
	// ...抽象的增删改查等方法
}
(2)将SQL映射文件放置在resources下的与Mapper接口同名的路径里,
注意创建的是Directory,不是pakage
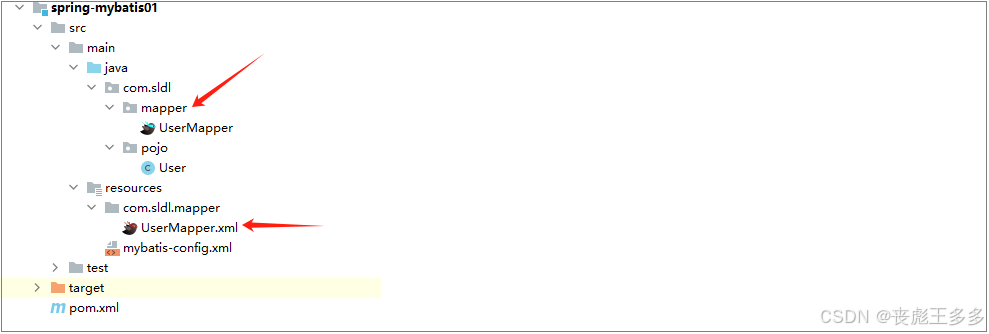
(3) 设置SQL映射文件的namespace属性为Mapper接口全限定名
<mapper namespace="com.sldl.mapper.UserMapper">
</mapper>
(4) 在Mapper接口中定义方法,方法名就是SQL映射文件中SQL语法的id,并保持参数类型和返回值类型一致
package com.sldl.mapper;

import com.sldl.pojo.User;
import java.util.List;

public interface UserMapper {
    /*查询所有的用户信息*/
    List<User> findAll();
}
(5) 编码
- 通过SqlSession的getMapper方法获取Mapper接口的代理对象
- 调用对应方法完成sql的执行
@Test
public void test2() throws IOException {
   //1. 获取SqlSessionFactory
   InputStream stream = Resources.getResourceAsStream("mybatis-config.xml");
   SqlSessionFactory factory = new SqlSessionFactoryBuilder().build(stream);

   //2. 获取SqlSession对象
   SqlSession sqlSession = factory.openSession();

   //3. 调用getMapper方法
   UserMapper mapper = sqlSession.getMapper(UserMapper.class);
   List<User> users = mapper.findAll();
   for (User user : users) {
      System.out.println(user);
   }

   //4. 关闭会话
   sqlSession.close();
}
细节:如果Mapper接口名称与SQL映射文件名称相同,并且在同一个目录下,则可以使用包扫描的方式简化sql映射文件的加载
<mappers>
   <mapper resource=/>
   <package namne="com.sldl.mapper"/>
</mappers>
三 Mybatis配置文件解析
3.1核心配置文件解析
<?xml version="1.0" encoding="UTF-8" ?>
<!DOCTYPE configuration
PUBLIC "-//mybatis.org//DTD Config 3.0//EN"
"https://mybatis.org/dtd/mybatis-3-config.dtd">
<!--configuration: mybatis核心配置文件的根元素-->
<configuration>
<!--用于给pojo实体类起别名,起别名-->
<typeAliases>
<package name="com.sldl.pojo"/>
</typeAliases>
<!--environments: 设置连接数据库的环境,可以配置多个环境environment
属性default: 表示要连接哪一个environment, 值为environment的id-->
<environments default="development">
<!-- 环境设置: id作为唯一标识符,-->
<environment id="development">
<!--配置事务管理方式:JDBC/MANAGED
JDBC:使用JDBC的事务管理方式,需要手动的提交或者回滚
MANAGED:将事务交给别的容器来管理:比如Spring....-->
<transactionManager type="JDBC"/>
<!--dataSource: 数据源的设置 JNDI/POOLED/UNPOOLED
JNDI:使用上下文中的数据源,已过时
POOLED:使用连接池(推荐)
UNPOOLED:不使用连接池-->
<dataSource type="POOLED">
<!--连接mysql的驱动-->
<property name="driver" value="com.mysql.cj.jdbc.Driver"/>
<!--连接mysql的url路径-->
<property name="url" value="jdbc:mysql://localhost:3306/mybatis_db?useSSL=false&serverTimezone=Asia/Shanghai&useTimezone=true"/>
<!--连接mysql的用户名-->
<!--连接mysql的密码-->
<property name="username" value="root"/>
<property name="password" value="mmforu"/>
</dataSource>
</environment>
<environment id="wangcm">
<transactionManager type="JDBC"/>
<dataSource type="POOLED">
<!--连接mysql的驱动-->
<property name="driver" value="oracle"/>
<!--连接mysql的url路径-->
<property name="url" value="oracle"/>
<property name="username" value="oracle"/>
<property name="password" value="oracle"/>
</dataSource>
</environment>
</environments>
<!--加载sql映射文件-->
<mappers>
<!--resource: 用于书写映射文件的具体路径,注意:斜杠'/'作为分隔符-->
<!--<mapper resource="com/sldl/mapper/UserMapper.xml"/>-->
<!--如果文件路径较多, 可以使用路径扫描方式-->
<package name="com.sldl.mapper"/>
</mappers>
</configuration>3.2 Sql映射文件
<?xml version="1.0" encoding="UTF-8" ?>
<!DOCTYPE mapper
        PUBLIC "-//mybatis.org//DTD Mapper 3.0//EN"
        "https://mybatis.org/dtd/mybatis-3-mapper.dtd">
<!--Sql映射文件:
  namespace: 命名空间,可以理解为mapper的唯一标识
             命名特点: 尽量使用Sql映射文件对应的接口的全限定名。 从src下的第一个包名开始写

  mapper里配置的是各种与数据库交互的增删改查等操作标签
-->
<mapper namespace="com.sldl.mapper.UserMapper">
    <!--select:  表示查询,
           *id          对应的是操作方法
           *resultType:返回的类型,   如果核心配置文件里配置了typeAliases,则可以写短名,大小写不敏感
    -->
    <select id="findAll" resultType="user">
        select * from user
    </select>
</mapper>
四 Mybatis完成CURD
4.1 MyBatisX插件
4.1.1 主要功能
① 智能补全与提示
MyBatisX 可以智能地提示和补全 SQL 语句中的关键字、表名、列名等信息,从而显著提高开发效率
② 代码生成器
- 虽然 MyBatisX 本身可能不直接提供一个完整的、独立的代码生成器,但它可能集成了或支持与其他代码生成工具(如 MyBatis Generator)的配合使用,以简化 Mapper 接口、Mapper XML 文件和 Java 实体类的生成过程。
- 通过 MyBatisX 的 GUI 界面,开发者可以根据数据库表结构快速生成所需的代码,减少重复劳动和降低出错率。
③ XML 校验器
MyBatisX 可以根据 XSD Schema 对 Mapper XML 文件进行验证,帮助开发者及时发现和解决 XML 文件中的语法错误。
④ 参数映射
MyBatisX 可以自动将 Java 方法参数与 Mapper XML 文件中的 SQL 语句参数进行映射,减少手动编写参数映射代码的需要
⑤ 快速导航与跳转
MyBatisX 支持在 Mapper 接口和 Mapper XML 文件之间快速导航和跳转,方便开发者在接口和 SQL 实现之间切换
⑥ 一键运行
MyBatisX 提供了一键运行的功能,允许开发者直接在编辑器中运行 SQL 语句,并查看执行结果和日志输出,方便调试和排错
4.1.2 安装与使用
① 安装插件
打开 IntelliJ IDEA,进入 File -> Settings -> Plugins -> Marketplace,搜索 “mybatisx” 并点击安装。注意,使用的 IDEA 版本需要与 MyBatisX 插件版本相兼容。
② 配置数据源
在 IDEA 中配置好数据库数据源,以便 MyBatisX 能够连接到数据库并根据数据库表结构生成代码。
③ 使用代码生成器
连接好数据源后,右键需要生成代码的表名,选择 MyBatisX 提供的代码生成器选项(如 MybatisX-Generator),然后按照提示填写相应信息并生成代码。
4.2 准备工作
4.2.1 数据库的表
-- 创建数据库mybatis_db, 设置编码集 UTF8
create database if not exists mybatis_db character set utf8;
-- 切换到mybatis_db数据库
use mybatis_db;
-- 删除emp表结构
drop table if exists emp;
-- 创建emp表结构
CREATE TABLE `emp` (
  `EMPNO` int primary key auto_increment COMMENT '员工编号',
  `ENAME` varchar(10) DEFAULT NULL COMMENT '员工姓名',
  `JOB` varchar(9) DEFAULT NULL COMMENT '员工职位',
  `MGR` int DEFAULT NULL COMMENT '员工的直属领导编号,注意,领导也是员工,领导的信息也在这个表中',
  `HIREDATE` date DEFAULT NULL COMMENT '入职日期',
  `SAL` int DEFAULT NULL COMMENT '员工工资',
  `COMM` int DEFAULT NULL COMMENT '员工奖金',
  `DEPTNO` int DEFAULT NULL COMMENT '员工所在部门编号'
) ENGINE=InnoDB DEFAULT CHARSET=utf8mb3 COMMENT='员工信息表'


-- 插入数据
insert into emp values
(7369,'SMITH','CLERK',7902,'1980-12-17',800,null,20),
(7499,'ALLEN','SALESMAN',7698,'1981-02-20',1600,300,30),
(7521,'WARD','SALESMAN',7698,'1981-02-22',1250,500,30),
(7566,'JONES','MANAGER',7839,'1981-04-02',2975,null,20),
(7654,'MARTIN','SALESMAN',7698,'1981-09-28',1250,1400,30),
(7698,'BLAKE','MANAGER',7839,'1981-05-01',2850,null,30),
(7782,'CLARK','MANAGER',7839,'1981-06-09',2450,null,10),
(7788,'SCOTT','ANALYST',7566,'1987-04-19',3000,null,20),
(7839,'KING','PRESIDENT',null,'1981-11-17',5000,null,10),
(7844,'TURNER','SALESMAN',7698,'1981-09-08',1500,0,30),
(7876,'ADAMS','CLERK',7788,'1987-05-23',1100,null,20),
(7900,'JAMES','CLERK',7698,'1981-12-03',950,null,30),
(7902,'FORD','ANALYST',7566,'1981-12-02',3000,null,20),
(7934,'MILLER','CLERK',7782,'1982-01-23',1300,null,10);
-- 查询表记录
select * from emp;
4.2.2 根据表映射实体类
4.2.3 根据实体类或者表映射Mapper接口
4.2.4 根据Mapper接口创建SQL映射文件
4.3 CRUD的R
4.3.1 CRUD的R1
<?xml version="1.0" encoding="UTF-8" ?>
<!DOCTYPE mapper
        PUBLIC "-//mybatis.org//DTD Mapper 3.0//EN"
        "https://mybatis.org/dtd/mybatis-3-mapper.dtd">
<mapper namespace="改成自己的接口的全限定名">

</mapper>
(1)在Mapper接口里添加findAll方法
public interface EmployeeMapper {
    List<Employee> findAll();
}
(2)在SQL映射文件中添加对应的配置
<select id="findAll" resultType="student">
   select * from emp
</select>
(3)执行方法,测试
@Test
public void test3() throws IOException {

   InputStream stream = Resources.getResourceAsStream("mybatis-config.xml");
   SqlSessionFactory factory = new SqlSessionFactoryBuilder().build(stream);
   SqlSession sqlSession = factory.openSession();

   StudentMapper mapper = sqlSession.getMapper(StudentMapper.class);
   List<Student> students = mapper.findAll();

   for (Student student : students) {
      System.out.println(student);
   }

   sqlSession.close();
}
4.3.2 MyBatis获取参数的方式
如果接口里的方法带有参数,那么Mybatis的Sql语句是如何获取参数的呢?Mybatis提供了两种参数占位符,分别是 #{} 和 ${}
(1)#{}:
相当于JDBC中的问号(?)占位符,是为SQL语句中的参数值进行占位,大部分情况下都是使用#{}占位符;并且当#{}占位符是为字符串或者日期类型的值进行占位时,在参数值传过来替换占位符的同时,会进行转义处理(在字符串或日期类型的值的两边加上单引号);
在mapper文件中:
	select * from employee where name=#{name}
在程序执行时替换成:
	select * from employee where name=?

如果传入的是一个字符串,比如String name = "zhangsan", 	  ?则会被zhangsan这个字符串替换。替换后,会自动转成
数据库中的字符串形式:   ....wehre name = 'zhangsan'
()2)${}:
是为SQL片段(字符串)进行占位,将传过来的SQL片段直接拼接在 `${}` 占位符所在的位置,不会进行任何的转义处理。(由于是直接将参数拼接在SQL语句中,因此可能会引发SQL注入攻击问题)
需要注意的是:使用 ${} 占位符为SQL语句中的片段占位时,即使只有一个占位符,需要传的也只有一个参数,也需要将参数先封装再传递!mybatis3.5.x后可以不封装。
4.3.3 CRUD的R2
(1)在接口里添加findById方法
Student findById(int id);
(2)在Sql映射文件中添加对应的配置
<select id="findById" resultType="com.sldl.pojo.Student" resultMap="a">
   select * from student where id = #{id}
</select>
(3)测试
@Test
    public void test4() throws IOException {
        InputStream stream = Resources.getResourceAsStream("mybatis-config.xml");
        SqlSessionFactory factory = new SqlSessionFactoryBuilder().build(stream);

        SqlSession sqlSession = factory.openSession();

        StudentMapper mapper = sqlSession.getMapper(StudentMapper.class);

        Student student = mapper.findById(1);
        System.out.println(student);

        sqlSession.close();
    }
4.4 CRUD的CUD
4.4.1 MyBatis事务
<transactionManager type="JDBC"/>
在核心配置文件中,我们配置了数据源的事务管理方式,要么是JDBC,要么是MANAGED。
-
JDBC: 即利用java.sql.Connection对象完成对事务的提交(commit())、回滚(rollback())等。
-
MANAGED: MyBatis自身不会去实现事务管理,而是让程序的容器如(SPRING)来实现对事务的管理。
MyBatis在进行数据库的增删改(CUD)操作时,就涉及到了事务这个概念。
-
openSession(): 默认开启事务,进行增删改操作后需要使用sqlSession.commit(); 手动提交事务。(推荐使用)
-
openSession(true): 向方法中传入true,表示设置自动提交事务。(不推荐)
4.4.2 CRUD的D
1)在Mapper接口里添加修改方法
void updateEmployee(Employee e);2)在Sql映射文件中添加对应的update配置
    <!--修改员工信息-->
    <update id="updateStudent" parameterType="student">
        update student set
            name = #{name},
            age = #{age},
            gender = #{gender},
            id_card = #{idcard},
            address = #{address}
        where id = #{id}
    </update>
3)测试
  @Test
    public void test5() throws IOException {

        InputStream stream = Resources.getResourceAsStream("mybatis-config.xml");
        SqlSessionFactory factory = new SqlSessionFactoryBuilder().build(stream);
        SqlSession sqlSession = factory.openSession();

        StudentMapper mapper = sqlSession.getMapper(StudentMapper.class);

        //新创建一个Student类型
        Student s =new Student(1,"张三一",22,"女","220102000011112222", "北京");

        mapper.updateStudent(s);

        //提交操作
        sqlSession.commit();
        //关闭
        sqlSession.close();
    }
4.4.3 CRUD的C
1)在StudentMapper.java里添加如下方法
void addStudent(Student s);2)在StudentMapper.xml里添加对应的insert配置
<!--添加学生功能-->
<insert id="addStudent" parameterType="student">
	insert into student values (null, #{name},#{age},#{gender},#{idcard},#{address})
</insert>
3)测试
@Test
public void test6() throws IOException {

   InputStream stream = Resources.getResourceAsStream("mybatis-config.xml");
   SqlSessionFactory factory = new SqlSessionFactoryBuilder().build(stream);
   SqlSession sqlSession = factory.openSession();

   StudentMapper mapper = sqlSession.getMapper(StudentMapper.class);

   //新创建一个Student类型
   Student s =new Student("老七",22,"女","220102000011113333", "深圳");

   mapper.addStudent(s);

   //提交操作
   sqlSession.commit();
   //关闭
   sqlSession.close();
}
4.4.4 CRUD的D
1)在接口StudentMapper.java里添加如下方法
void delStudent(int id)2)在映射文件StudentMapper.xml里完善delete标签
<delete id="delStudent">
   delete from student where id = #{id}
</delete>
3)测试
@Test
public void test7() throws IOException {
   //获取SqlSession对象
   InputStream stream = Resources.getResourceAsStream("mybatis-config.xml");
   SqlSessionFactory factory = new SqlSessionFactoryBuilder().build(stream);
   SqlSession sqlSession = factory.openSession();

   //获取代理对象
   StudentMapper mapper = sqlSession.getMapper(StudentMapper.class);

   //调用删除方法 删除id为1的记录
   mapper.delStudent(1);

   //增删改的事务会自动开启,因此需要手动提交
   sqlSession.commit();
   sqlSession.close();
}
4.5 多条件CRUD
上面的案例中,接口里方法的形参个数都是1个;如果方法形参是两个或者两个以上时,MyBatis又该如何获取获取参数呢?
Mybatis提供了好几种方式,可以获取多个参数的值
第一种:使用arg0,arg1…或者param1,param2…来按照参数顺序获取对应的值
//2个或者2个以上的参数
Employee findByCondition1(String username,String password)
接口里的方法与Sql映射文件中的语句进行映射后,并且在调用方法期间,Mybatis会默认将所有传入到方法中的实际参数封装到一个Map对象中,实际参数作为value,按照从左到右的顺序,分别绑定到key名为arg0,arg1…或者param1,param2…上。
因此我们在获取参数时,可以这样写
select...from...where username = #{arg0} and password = #{arg1} .....
或者
select...from...where username = #{param1} and password = #{param2} .....
第二种:Map作为参数
map 集合:只需要保证 SQL 中的参数名和 map 集合的键的名称对应上,即可设置成功
List<Student> findByCondition2(Map<String,Object> map);第三种:实体类作为参数
实体类封装参数:只需要保证 SQL 中的参数名和实体类属性名对应上,即可设置成功
List<Student> findByCondition1(Student student);第四种:使用@Param注解命名参数
List<Student> findByCondition1(@Param("id") int id, @Param("name") String name, @Param("address") String address);2)在StudentMapper.xml里添加对应的select配置
<select id="findByCondition1" resultType="com.shuilidianli.pojo.Student">
   select * from student where id=#{id} and name=#{name} and address=#{address}
</select>
3)测试
 @Test
    public void test1() throws IOException {
        InputStream stream = Resources.getResourceAsStream("mybatis-config.xml");
        SqlSessionFactory factory = new SqlSessionFactoryBuilder().build(stream);
        SqlSession sqlSession = factory.openSession();

        StudentMapper mapper = sqlSession.getMapper(StudentMapper.class);
//        List<Student> byCondition1 = mapper.findByCondition1(1, "张三一", "北京");
        Student student = new Student(1,"张三一",-1,null,null,"北京");
//        List<Student> byCondition1 = mapper.findByCondition1(student);
        Map<String,Object> map = new HashMap<>();
        //map.put("id",1);
        map.put("name","张三一");
        map.put("address","北京");
        List<Student> byCondition1 = mapper.findByCondition1(map);
        System.out.println(byCondition1);
    }
4.6 动态SQL
SQL语句会随着用户的输入和外部条件的变化而变化,我们称之为动态SQL。MyBatis对动态SQL有很强大的支持。
4.6.1 where/if标签
if标签,是根据test属性中的布尔表达式的值,从而决定是否执行包含在其中的SQL片段。如果判断结果为true,则执行其中的SQL片段;如果结果为false,则不执行其中的SQL片段
存在的问题:第一个条件不需要逻辑运算符。
案例演示:
在接口StudentMapper.java里添加如下方法
在映射文件StudentMapper.xml里配置如下
第一种方案:使用恒等式让所有条件格式都一样
<select id="findByCondition1" >
        select *
        from student
        where 1 = 1
        <if test="id != null">
            and id = #{id}
        </if>
        <if test="name != null and name != '' ">
            and name = #{name}
        </if>
        <if test="address != null and address != '' ">
            and address = #{address}
        </if>
</select>第二种方案:使用<where>标签替换where关键字。 注意:where标签会将第一个条件之前的连接符自动去掉
<select id="findByCondition1" >
   select *
   from student
   /* where 1 = 1*/
   <where>
      <if test="id != null">
         and id = #{id}
      </if>
      <if test="name != null and name != '' ">
         and name = #{name}
      </if>
      <if test="address != null and address != '' ">
         and address = #{address}
      </if>
   </where>
</select>
4.6.2 choose/when标签

choose(when,otherwise):类似于java的switch-case-default, 只要满足一个when,choose就结束了,如果都不满足,就会执行otherwise。
1)在接口StudentMapper里添加如下方法
List<Student> findByCondition1(Map map);2)在sql映射文件StudentMapper.xml里添加如下内容
<select id="findByCondition1" >
   select *
   from student
   where
   <choose><!-- 类似于switch-->
      <when test=" id != null"><!-- 类似于case-->
         id = #{id}
      </when>
      <when test=" name != null and name != '' ">
         name = #{name}
      </when>
      <when test=" address != null and address != ''">
         address = #{address}
      </when>
      <otherwise><!-- 类似于default-->
         1 = 1
      </otherwise>
   </choose>
</select>
3)测试
@Test
public void test9() throws IOException {
   //获取SqlSession对象
   InputStream stream = Resources.getResourceAsStream("mybatis-config.xml");
   SqlSessionFactory factory = new SqlSessionFactoryBuilder().build(stream);
   SqlSession sqlSession = factory.openSession();

   //获取代理对象
   StudentMapper mapper = sqlSession.getMapper(StudentMapper.class);

   //创建一个map对象
   Map<String,Object> map = new HashMap<>();
   //        map.put("id",2);
   //        map.put("name","小明");
   //        map.put("address","长春朝阳区");

   /*选择map中的一个条件进行查询,*/
   List<Student> students = mapper.findByCondition1(map);

   for (Student student : students) {
      System.out.println(student);
   }

   sqlSession.close();
}
4.6.3 set/if标签
当进行修改时,有些字段可能有选择的进行修改,这时我们就可以使用`<set>`标签 配合`<if>`标签来完成操作。set标签会自动将最后一个条件的逗号去掉。
1)在接口StudentMapper里添加如下方法
//修改学生信息
void modifyStudent(Map map);
2)在StudentMapper.xml里添加如下内容
<update id="modifyStudent">
   update student
   <set>
      <if test="name !=null  and name != ''">
         name = #{name},
      </if>
      <if test="age != null and age != '' ">
         age = #{age},
      </if>
      <if test="gender != null and gender != '' ">
         gender = #{gender},
      </if>
      <if test="idcard != null and idcard != '' ">
         idcard = #{idcard},
      </if>
      <if test="address != null and address != '' ">
         address = #{address},
      </if>
   </set>
   where id = #{id}
</update>
3)测试
@Test
public void test10() throws IOException {
   InputStream stream = Resources.getResourceAsStream("mybatis-config.xml");
   SqlSessionFactory factory = new SqlSessionFactoryBuilder().build(stream);
   SqlSession sqlSession = factory.openSession();
   StudentMapper mapper = sqlSession.getMapper(StudentMapper.class);

   Map<String,Object> info = new HashMap<>();
   //存储id为2的信息
   info.put("id",2);
   info.put("name","王小二");
   info.put("gender","女");
   info.put("age",23);
   info.put("address","净月区");

   mapper.modifyStudent(info);

   sqlSession.commit();
   sqlSession.close();

}
4.6.4 foreach标签
<foreach>标签的使用, 比如进行集合查询等操作
1)在接口StudentMapper里添加如下方法
List<Student> findByIds(List list);2)在StudentMapper.xml里添加如下内容
<select id="findByIds" resultType="com.sldl.pojo.Student">
   select *
   from student
   where id in
   <foreach collection="list" separator="," open="(" close=")" item="id">
      #{id}
   </foreach>
</select>
3)测试
@Test
public void test11() throws IOException {
   InputStream stream = Resources.getResourceAsStream("mybatis-config.xml");
   SqlSessionFactory factory = new SqlSessionFactoryBuilder().build(stream);
   SqlSession sqlSession = factory.openSession();
   StudentMapper mapper = sqlSession.getMapper(StudentMapper.class);

   List<Integer> ids = new ArrayList<>();
   ids.add(1);
   ids.add(2);
   ids.add(3);
   ids.add(4);
   ids.add(5);

   List<Student> byIds = mapper.findByIds(ids);
   for (Student byId : byIds) {
      System.out.println(byId);
   }

   sqlSession.close();

}
4.7 不同返回值类型的查询
4.7.1 返回基本数据类型
/**查询student表中的记录个数 */
int selectCount();
<select id="selectCount" resultType="_int">
select count(*) from student;
</select>4.7.2 返回引用类型(实体类)
/**返回值为实体类的*/
Student findById(Integer id);
<!-- 属性resultType:书写方法的返回值类型 代理对象通过sql语句进行查询,然后将查询到的结果自动封装成返回值类型的实例 -->
<select id="findById" resultType="Student">
select * from student where id = #{arg0};
</select>4.7.3 返回List类型
List<Student> findByPage(@Param("offset") int offset, @Param("pageSize") int pageSize);<!--返回值类型: 如果方法的返回值类型是List,那么在属性resultType上只需要指定集合的元素类型的名字即可-->
<select id="findByPage" resultType="Student">
select * from student limit #{offset},#{pageSize}
</select>4.7.4 返回Map类型
Map<String,Object> findByName(String name);<!--应用场景: 就是将从数据库查询出来的数据,封装成Map对象
字段名作为key
字段值作为value -->
<select id="findByName" resultType="map">
select * from student where name = #{name}
</select>4.7.5 返回Map实例的集合
/**应用场景: 一条记录封装一个Map实例,多个Map实例封装到List集合中
*  条件: 通过性别,可以查询出来多条记录,封装到List集合中,泛型为Map   */
List<Map<String,Object>>  findByGender(@Param("gender")String gender);
<select id="findByGender" resultType="map">
select * from student where gender = #{gender}
</select>4.7.6 返回Map的另一种情况
/**
     * 1001  => {address=江南, gender=m, name=刘备, age=40, sid=1001}
     * 1002  => {address=上海, gender=m, name=关羽, age=35, sid=1002}
     * 1003  => {address=长春, gender=m, name=赵云, age=27, sid=1004}
     */
@MapKey("sid")
Map<Integer,Object>  findByGender2(@Param("gender")String gender);
<select id="findByGender2" resultType="map">
select * from student where gender = #{gender}
</select>4.7.7 返回Set集合
/*
    * 应用场景:  数据库里的记录可能有重复数据,  然后再进行查询时,想要进行去重操作,我们就可以设计方法的
    * 返回值为Set,  泛型为该表的实体类   注意:  实体类必须重写equals方法和hashCode方法。
    * */
Set<Student> findAllByDistinct();
<select id="findAllByDistinct" resultType="student">
select * from student
</select>4.8 特殊SQL的查询
4.8.1 模糊查询
like '%${username}%'
like concat('%',#{username},'%')
like "%"#{username}"%"
4.8.2 批量删除
使用${},不能使用#{}
4.8.3 动态指定表名
/**动态指定表名 */
List<Student> findAllByTableName(String tableName);
<!--动态指定表名: 占位符使用${} -->
<select id="findAllByTableName" resultType="Student">
select * from ${tablaName}
</select>4.8.4 主键返回
自增长类型主键
1)在接口StudentMapper里添加如下方法
int insertStudent(Student s);
2)在StudentMapper.xml里添加如下内容
<!-- int insertEmployee(Employee employee); -->
<!-- useGeneratedKeys属性字面意思就是“使用生成的主键” -->
<!-- keyProperty属性可以指定主键在实体类对象中对应的属性名,Mybatis会将拿到的主键值存入这个属性 -->
<insert id="insertStudent" useGeneratedKeys="true" keyProperty="id" parameterType="student">
   insert into student
   (name, age, gender, id_card, address)
   values
   (#{name},#{age},#{gender},#{idcard},#{address})
</insert>3)测试
@Test
public void test12() throws IOException {
   InputStream stream = Resources.getResourceAsStream("mybatis-config.xml");
   SqlSessionFactory factory = new SqlSessionFactoryBuilder().build(stream);
   SqlSession sqlSession = factory.openSession();
   StudentMapper mapper = sqlSession.getMapper(StudentMapper.class);

   Student student = new Student("张鲁一",40,"男","2222233333","北京");
   mapper.insertStudent(student);
   System.out.println(student.getId());

   sqlSession.commit();
   sqlSession.close();

}
非自增长类型主键
而对于不支持自增型主键的数据库(例如 Oracle)或者字符串类型主键,则可以使用 selectKey 子元素:selectKey 元素将会首先运行,id 会被设置,然后插入语句会被调用!
使用 selectKey 帮助插入UUID作为字符串类型主键示例:
<insert id="insertUser" parameterType="User">
    <selectKey keyProperty="id" resultType="java.lang.String"
        order="BEFORE">
        SELECT UUID() as id
    </selectKey>
    INSERT INTO user (id, username, password)
    VALUES (
        #{id},
        #{username},
        #{password}
    )
</insert>
在上例中,我们定义了一个 insertUser 的插入语句来将 User 对象插入到 user 表中。我们使用 selectKey 来查询 UUID 并设置到 id 字段中。
通过 keyProperty 属性来指定查询到的 UUID 赋值给对象中的 id 属性,而 resultType 属性指定了 UUID 的类型为 java.lang.String。
需要注意的是,我们将 selectKey 放在了插入语句的前面,这是因为 MySQL 在 insert 语句中只支持一个 select 子句,而 selectKey 中查询 UUID 的语句就是一个 select 子句,因此我们需要将其放在前面。
最后,在将 User 对象插入到 user 表中时,我们直接使用对象中的 id 属性来插入主键值。
使用这种方式,我们可以方便地插入 UUID 作为字符串类型主键。当然,还有其他插入方式可以使用,如使用Java代码生成UUID并在类中显式设置值等。需要根据具体应用场景和需求选择合适的插入方式。
4.9 级联查询
4.9.1 多对一查询
多对一,指的是表与表之间的记录关系,比如学生信息表(`S_ID`,`S_NAME`,……,`T_ID`)与教师(班主任)信息表(`T_ID`,`T_NAME`,……)。多个学生是一个老师教的。通过学生信息表里的任意一条记录,都可以找到教师信息表里的对应的老师信息。
第一种写法:字段映射
第二种写法:association(关联,联合)
第三种写法:分步写法
//查询7369这个员工的员工信息和其所在部门信息
select * from emp e join dept d on  e.deptno = d.deptno where empno = 7369;


select * from emp where empno = 7379;
select * from dept where deptno =
4.9.2 一对多查询
一对多,其实就是多对一的反向操作。教师信息表是主表,学生信息表是副表,通过教师信息表的任意一条记录,都可以在学生信息表里找到该教师的多个学生信息。
//查询10号部门的信息及其所有员工信息
select * from dept d left join emp e on d.deptno = e.deptno where d.deptno = 10;
第一种写法:collection
第二种写法:分步写法
第一步:查询accounting部门的信息
select * from dept where dname = 10;
第二步:在员工表里查询,
select * from emp where deptno = ?
4.9.3 多对多查询
一般多对多,都会涉及到第三张表。 学生信息表(每个学生的信息都是唯一的一条记录), 课程信息表(每个科目也都是唯一的一条记录),学生课程表(一个学生可以选择多个科目进行学习,一个科目可以被多个学生选择学习)。学生信息表和课程信息表通过学生课程表进行的对应关系,就是多对多的关系。
需求: 查询每个学生的学号,姓名,年龄,所学科目名称,及其成绩
select s.id,s.name,s.age,c.c_name,sc.score
from student s , course c,  score sc
where s.id = sc.s_id and c.c_id = sc.c_id

select s.id,s.name,s.age,c.c_name,sc.score
from student s
left join score sc  on  s.id = sc.s_id
left join course c  on  c.c_id = sc.c_id

select s.id,s.name,s.age,c.c_name,sc.score
from student s
left join score sc
left join course c
on  c.c_id = sc.c_id and s.id = sc.s_id
4.9.4 延迟加载
延迟加载,就是在使用数据时,进行查询操作,不使用时,不提前加载。可以节省内存,提高查询效率。
第一种方式: 局部配置(映射文件)
在
<association> 标记里
配置如下属性:
fetchType="lazy"          lazy: 延迟加载   eager: 不延迟加载

如下:
<association property="dept" fetchType="eager" .....第二种方法:全局配置(核心配置文件)
<settings>
   <setting name="logImpl" value="STDOUT_LOGGING"/>
   <!--全局的延迟加载开关, value设置为true,表示开启全局延迟加载, 不写value属性,默认就是false-->
   <setting name="lazyLoadingEnabled" value="true"/>
</settings>
4.10 分页查询
4.10.1 简介
在开发过程中,**分页查询**是一个常见的需求。为了简化分页查询的操作,我们可以使用 Mybatis 的分页插件,如 PageHelper。
分页插件的概念
分页查询时,通常需要传入**页数(page)\**和\**每页条数(pageSize)**。返回的数据包括**页面数据**、**总条数**、**总页数**、**当前页面**、**每页条数**等。使用分页插件可以快速帮助我们获取这些数据。
分页插件的核心原理
分页查询的核心原理是通过 **SQL 语句中的 LIMIT 关键字**,根据传入的参数(当前页码、每页显示条数)来控制返回的当前页的内容范围。
4.10.2 步骤
1)添加依赖
<!-- https://mvnrepository.com/artifact/com.github.pagehelper/pagehelper -->
<dependency>
   <groupId>com.github.pagehelper</groupId>
   <artifactId>pagehelper</artifactId>
   <version>5.2.0</version>
</dependency>
2)在MyBatis的核心配置文件( mybatis-config.xml)中配置插件
<plugins>
<!--设置分页插件-->
<plugin interceptor="com.github.pagehelper.PageInterceptor"></plugin>
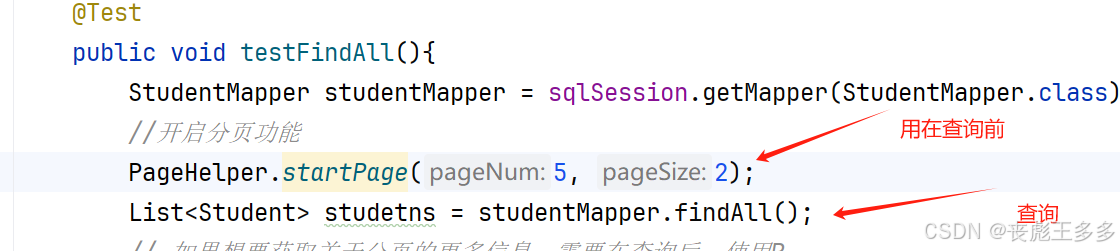
</plugins>4.10.3 分页的应用
1)开启分页功能
在查询功能之前使用 PageHelper.startPage(int pageNum, int pageSize) 开启分页功能,传入当前页码和每页显示的条数:
-
pageNum:当前页的页码 -
pageSize:每页显示的条数
2)打印方法的返回值,查看
Page<Object> page = PageHelper.startPage(1, 3);
System.out.println(page);
Page{
count=true,
pageNum=2,
pageSize=3,
startRow=3,
endRow=6,
total=19,
pages=7,
reasonable=false,
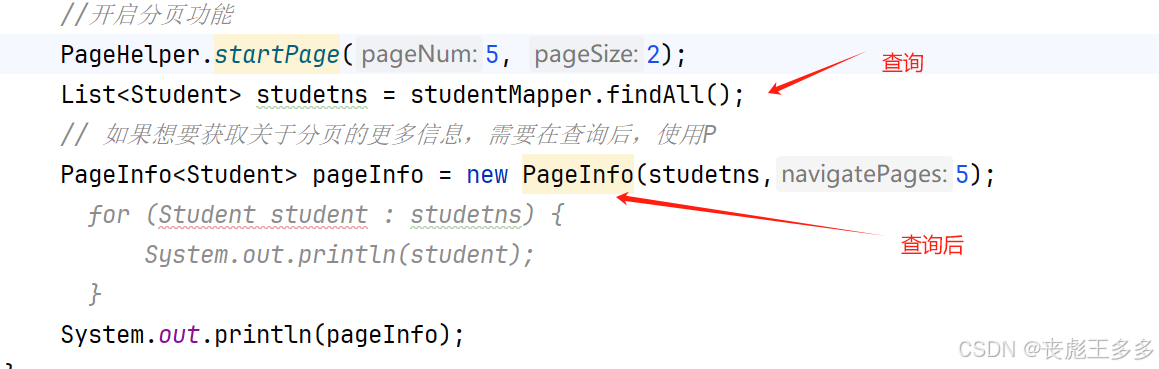
pageSizeZero=false}[Student{id=1002, name='关羽', gender='m', age=35, address='上海', scores=[Score{sid=1002, cid=1, score=70}, Score{sid=1002, cid=2, score=60}, Score{sid=1002, cid=3, score=80}]', courses=[Course{cid=1, cname='高数', tid=1, academy='信息学院', note='高等数学,微积分', students=null}, Course{cid=2, cname='英语', tid=2, academy='工程学院', note='英语选修', students=null}, Course{cid=3, cname='JAVA', tid=3, academy='信息学院', note='面向对象的编程语言', students=null}]}]3)另外一个API:
PageInfo 这个类型封装的信息更多一些,包括了导航分页的信息。 用于在查询之后
new PageInfo(List list, int navegatePage);
list: 分页查询的返回数据
navegatePage: 用来定义导航分页的页码显示数量
PageInfo{
pageNum=2,
pageSize=3,
size=1, startRow=4, endRow=4,
total=19,
pages=7,
prePage=1, nextPage=3,
isFirstPage=false,
isLastPage=false,
hasPreviousPage=true,
hasNextPage=true, navigatePages=5, navigateFirstPage=1, navigateLastPage=5, navigatepageNums=[1, 2, 3, 4, 5]}
4.11 注解完成增删改查
使用注解开发会比配置文件开发更方便。
- @Select 查询
- @Insert 添加
- @Update 修改
- @Delete
案例演示
1)Mapper接口里:
package com.sldl.mapper;

import com.sldl.pojo.Student;
import org.apache.ibatis.annotations.Delete;
import org.apache.ibatis.annotations.Insert;
import org.apache.ibatis.annotations.Select;
import org.apache.ibatis.annotations.Update;

import java.util.List;

public interface StudentMapper1 {
    @Select("select * from student ")
    List<Student> findAll();

    @Select("select * from student where id = #{id}")
    Student findById(int id);

    @Insert("insert into student values (null,#{name},#{age},#{gender},#{idcard},#{address})")
    void addStudent(Student s);

    @Update("update student set name=#{name},age=#{age} where id=#{id}")
    void modStudent(Student s);

    @Delete("delete from student where id = #{id}")
    void delStudent(int id);
}
2)测试:
package com.sldl.test;

import com.sldl.mapper.ComputerMapper;
import com.sldl.mapper.StudentMapper;
import com.sldl.mapper.StudentMapper1;
import com.sldl.pojo.Computer;
import com.sldl.pojo.Student;
import org.apache.ibatis.io.Resources;
import org.apache.ibatis.session.SqlSession;
import org.apache.ibatis.session.SqlSessionFactory;
import org.apache.ibatis.session.SqlSessionFactoryBuilder;
import org.junit.After;
import org.junit.Before;
import org.junit.Test;

import java.io.IOException;
import java.io.InputStream;
import java.util.ArrayList;
import java.util.List;

public class MyBatisTest3 {
    SqlSession  sqlSession = null;
    @Before
    public void testBefore() throws IOException {
        String mybatis_config = "mybatis-config.xml";
        InputStream stream = Resources.getResourceAsStream(mybatis_config);
        SqlSessionFactory factory = new SqlSessionFactoryBuilder().build(stream);
        sqlSession = factory.openSession();
    }
    @After
    public void testAfter(){
        sqlSession.close();
    }
    @Test
    public void test1(){
        StudentMapper1 mapper = sqlSession.getMapper(StudentMapper1.class);
        //测试查询方法
        List<Student> all = mapper.findAll();
        for (Student student : all) {
            System.out.println(student);
        }
    }
    @Test
    public void test2(){
        StudentMapper1 mapper = sqlSession.getMapper(StudentMapper1.class);
        //测试查询方法
        Student student = mapper.findById(3);
        System.out.println(student);
    }
    @Test
    public void test3(){
        StudentMapper1 mapper = sqlSession.getMapper(StudentMapper1.class);

        Student s1  = new Student();
        s1.setName("sunny");
        s1.setAge(18);
        s1.setGender("女");
        s1.setIdcard("1234567890");
        s1.setAddress("长春绿园");

        mapper.addStudent(s1);

        sqlSession.commit();
    }
    @Test
    public void test4(){
        StudentMapper1 mapper = sqlSession.getMapper(StudentMapper1.class);
        Student s1  = new Student();
        s1.setId(19);
        s1.setName("sun");
        s1.setAge(28);
        mapper.modStudent(s1);
        sqlSession.commit();
    }
    @Test
    public void test5(){
        StudentMapper1 mapper = sqlSession.getMapper(StudentMapper1.class);
        mapper.delStudent(19);
        sqlSession.commit();
    }
}
使用注解来映射简单语句会使代码显得更加简洁,但对于稍微复杂一点的语句,Java 注解不仅力不从心,还会让本就复杂的 SQL 语句更加混乱不堪。 因此,如果你需要做一些很复杂的操作,最好用 XML 来映射语句。
选择何种方式来配置映射,以及是否应该要统一映射语句定义的形式,完全取决于你和你的团队。 换句话说,永远不要拘泥于一种方式,你可以很轻松地在基于注解和 XML 的语句映射方式间自由移植和切换。
简单来说:
- 注解用于完成简单功能
- 配置文件完成复杂功能
五 Mybatis的缓存
5.1Mybatis缓存简介
缓存(cache):提前把数据存放到缓存当中,下一次再使用的时候,直接从缓存中拿,而不用再次去数据库中查询一次了。这样的优势在于:通过减少IO的⽅式,来提⾼程序的执⾏效率。 比如浏览器就有缓存功能…..
MyBatis的缓存:将select语句的查询结果放到缓存(内存)当中,下⼀次还是这条相同select语句的话,直接从缓存中取,不再查数据库。⼀⽅⾯是减少了IO,另⼀⽅⾯不再执⾏繁琐的查找算法;效率⼤⼤提升。
mybatis缓存包括:
- ⼀级缓存:将查询到的数据存储到SqlSession中。
- ⼆级缓存:将查询到的数据存储到SqlSessionFactory中。
- 集成其它第三⽅的缓存:⽐如EhCache【Java语⾔开发的】、Memcache【C语⾔开发的】 等。
缓存只针对于DQL语句,也就是说缓存机制只对应select语句。
5.2一级缓存
一级缓存的范围是SqlSession
- ⼀级缓存默认是开启的,不需要做任何配置。
- 原理:只要使⽤同⼀个SqlSession对象执⾏同⼀条SQL语句,就会⾛缓存。
什么时候不走缓存
- 第⼀种:不同的SqlSession对象。
- 第⼆种:查询条件变化了。
什么时候缓存失效
- ①第⼀次查询和第⼆次查询之间,执行了clearCache()方法,⼿动清空了⼀级缓存。
- ②第⼀次查询和第⼆次查询之间,执⾏了增、删、改操作。
5.2二级缓存
⼆级缓存的范围是SqlSessionFactory对象。使⽤⼆级缓存需要具备以下⼏个条件
- ①全局性地开启或关闭所有映射器配置⽂件中已配置的任何缓存。默认就是true,⽆需设置(默认二级缓存就是开启的)!
<setting name="cacheEnabled" value="true">-②在需要使⽤⼆级缓存的SqlMapper.xml⽂件中添加一个标签:<catche />
坑: 测试使用的增删改方法,也要使用同一个配置
- ③使⽤⼆级缓存的实体类对象必须是可序列化的,也就是必须实现java.io.Serializable接⼝
- ④SqlSession对象提交之后,⼀级缓存中的数据才会被写⼊到⼆级缓存当中;此时⼆级缓存才可⽤。(注意,一级缓存还存储数据呢,并没有清空)
⼆级缓存的失效:
-
只要两次查询之间出现了增、删、改操作,⼆级缓存就会失效。【当然⼀级缓存也会失效】!
二级缓存相关配置
① eviction:指定从缓存中移除某个对象的淘汰算法。(默认采⽤LRU策略)
LRU:Least Recently Used。最近最少使⽤,优先淘汰在间隔时间内使⽤频率最低的对象。(其实还有⼀种淘汰算法LFU,最不常⽤)
FIFO:First In First Out。⼀种先进先出的数据缓存器,先进⼊⼆级缓存的对象最先被淘汰。
SOFT:软引⽤,淘汰软引⽤指向的对象。具体算法和JVM的垃圾回收算法有关。
WEAK:弱引⽤,淘汰弱引⽤指向的对象。具体算法和JVM的垃圾回收算法有关。
② flushInterval:⼆级缓存的刷新时间间隔,单位毫秒(刷新了也会使原来的缓存失效)。如果没有设置,就代表不刷新缓存,只要内存⾜够⼤,⼀ 直会向⼆级缓存中缓存数据,除⾮执⾏了增删改。
③size:设置⼆级缓存中最多可存储的java对象数量,默认值1024。
④readOnly
true: 只读缓存,多条相同的sql语句执⾏之后返回的对象是共享的同⼀个,性能好。但是多线程并发可能会存在安全问题。
false:读写缓存,多条相同的sql语句执⾏之后返回的对象是副本,调⽤了clone⽅法。性能⼀般,但安全。
5.4 Mybatis缓存查询顺序
-
先查询二级缓存,因为二级缓存中可能会有其他程序已经查出来的数据,可以拿来直接使用
-
如果二级缓存没有命中,再查询一级缓存
-
如果一级缓存也没有命中,则查询数据库
-
SqlSession提交之后,一级缓存中的数据会写入二级缓存
5.5 MyBatis集成第三方缓存EhCache
mybatis对外提供了接⼝,也可以集成第三⽅的缓存组件;⽐如EhCache、Memcache等。 EhCache是Java写的、Memcache是C语⾔写的,所以mybatis集成EhCache较为常⻅,按照以下步骤操作,就可以完成集成
第⼀步:在pom.xml配置中引⼊MyBatis整合ehcache的依赖
ehcache需要slf4j的⽇志组件,log4j不好使!
<!--mybatis集成ehcache的组件-->
<dependency>
   <groupId>org.mybatis.caches</groupId>
   <artifactId>mybatis-ehcache</artifactId>
   <version>1.2.2</version>
</dependency>


<dependency>
   <groupId>ch.qos.logback</groupId>
   <artifactId>logback-classic</artifactId>
   <version>1.2.11</version>
   <scope>test</scope>
</dependency>
第⼆步:在类的根路径下(resources)新建ehcache.xml⽂件,并提供以下配置信息。
<?xml version="1.0" encoding="UTF-8"?>

<ehcache xmlns:xsi="http://www.w3.org/2001/XMLSchema-instance"
         xsi:noNamespaceSchemaLocation="http://ehcache.org/ehcache.xsd" updateCheck="false">
   <!--磁盘存储:将缓存中暂时不使⽤的对象,转移到硬盘,类似于Windows系统的虚拟内存-->
   <diskStore path="D:/ehcache"/>

   <defaultCache eternal="false"
                 maxElementsInMemory="1000"
                 overflowToDisk="false"
                 diskPersistent="false"
                 timeToIdleSeconds="0"
                 timeToLiveSeconds="600"
                 memoryStoreEvictionPolicy="LRU"/>
</ehcache>
第三步:修改CarMapper.xml⽂件中的标签,添加type属性,引入EhcacheCache
<?xml version="1.0" encoding="UTF-8" ?>
<!DOCTYPE mapper
        PUBLIC "-//mybatis.org//DTD Mapper 3.0//EN"
        "http://mybatis.org/dtd/mybatis-3-mapper.dtd">

<mapper namespace="com.bjpowernode.mybatis.mapper.CarMapper">
   <!--集成EhcacheCache组件-->
   <cache type="org.mybatis.caches.ehcache.EhcacheCache"/>
   <select id="selectById2" resultType="Car">
      select * from t_car where id = #{id}
   </select>
</mapper>
第四步:编写测试程序使⽤,代码还是和上面使用二级缓存的测试代码相同,效果展示也是相同的,都是第一次命中率是0.0,第二次命中率是0.5
六 MyBatis的逆向工程
MyBatis的逆向工程是指根据数据库表结构自动生成对应的Java实体类、Mapper接口和XML映射文件的过程。逆向工程可以帮助开发人员快速生成与数据库表对应的代码,减少手动编写重复代码的工作量。
我们在MyBatis中通过逆向工具来帮我简化繁琐的搭建框架,减少我们对实体类的创建和mapper接口等,包括生产xml映射文件,不过一般开发中,我们不怎么使用映射文件生成的东西,因为生成的xml文件并不符合我们实际开发中使用的,所以我们一般通过逆向工具帮我们创建相关文件之后,然后我们在根据创建的文件进行处理。
逆向工程的好处
1. 提高开发效率:逆向工程可以自动生成实体类、Mapper接口和XML映射文件,减少了手动编写这些代码的时间和工作量。开发人员可以专注于业务逻辑的实现,提高开发效率。
2. 保持代码一致性:逆向工程生成的代码与数据库表结构保持一致,避免了手动编写代码时可能出现的拼写错误、字段类型不匹配等问题。这样可以确保代码的准确性和一致性。
3. 易于维护和更新:当数据库表结构发生变化时,可以通过重新运行逆向工程来更新生成的代码,而不需要手动修改和调整代码。这样可以减少维护工作的复杂性和风险。
4. 提供基础代码框架:逆向工程生成的代码提供了基础的增删改查操作,开发人员可以在此基础上进行扩展和定制,快速构建具体业务功能。
5. 避免重复劳动:逆向工程可以自动生成大量的基础代码,避免了开发人员重复编写相似的代码的劳动,提高了开发效率和代码质量
- 正向工程:先创建Java实体类,由框架负责根据实体类生成数据库表。Hibernate是支持正向工程的
- 逆向工程:先创建数据库表,由框架负责根据数据库表,反向生成如下资源:
Java实体类
Mapper接口
Mapper映射文件
6.1 生成基本的CRUD(清新简洁版)
1)添加依赖和插件
 <dependencies>
    <!-- MyBatis核心依赖包 -->
    <dependency>
      <groupId>org.mybatis</groupId>
      <artifactId>mybatis</artifactId>
      <version>3.5.9</version>
    </dependency>
    <!-- junit测试 -->
    <dependency>
      <groupId>junit</groupId>
      <artifactId>junit</artifactId>
      <version>4.13.2</version>
      <scope>test</scope>
    </dependency>
    <!-- MySQL驱动 -->
    <dependency>
      <groupId>mysql</groupId>
      <artifactId>mysql-connector-java</artifactId>
      <version>8.0.31</version>
    </dependency>
    <!-- log4j日志 -->
    <dependency>
      <groupId>log4j</groupId>
      <artifactId>log4j</artifactId>
      <version>1.2.17</version>
    </dependency>
  </dependencies>
  <!-- 控制Maven在构建过程中相关配置 -->
  <build>
    <!-- 构建过程中用到的插件 -->
    <plugins>
      <!-- 具体插件,逆向工程的操作是以构建过程中插件形式出现的 -->
      <plugin>
        <groupId>org.mybatis.generator</groupId>
        <artifactId>mybatis-generator-maven-plugin</artifactId>
        <version>1.4.2</version>
<!--        生产环境中尽量别覆盖写-->
        <configuration>
          <overwrite>true</overwrite>
        </configuration>
        <!-- 插件的依赖 -->
        <dependencies>
          <!-- 逆向工程的核心依赖 -->
          <dependency>
            <groupId>org.mybatis.generator</groupId>
            <artifactId>mybatis-generator-core</artifactId>
            <version>1.4.2</version>
          </dependency>
          <!-- 数据库连接池 -->
          <dependency>
            <groupId>com.alibaba</groupId>
            <artifactId>druid</artifactId>
            <version>1.1.20</version>
          </dependency>
          <!-- MySQL驱动 -->
          <dependency>
            <groupId>mysql</groupId>
            <artifactId>mysql-connector-java</artifactId>
            <version>8.0.31</version>
          </dependency>
        </dependencies>
      </plugin>
    </plugins>
  </build>
2)创建逆向工程配置文件
文件名必须是:generatorConfig.xml
<?xml version="1.0" encoding="UTF-8"?>
<!DOCTYPE generatorConfiguration
PUBLIC "-//mybatis.org//DTD MyBatis Generator Configuration 1.0//EN"
"http://mybatis.org/dtd/mybatis-generator-config_1_0.dtd">
<generatorConfiguration>
<!--
targetRuntime: 执行生成的逆向工程的版本
MyBatis3Simple: 生成基本的CRUD(清新简洁版)
MyBatis3: 生成带条件的CRUD(奢华尊享版)
-->
<context id="DB2Tables" targetRuntime="MyBatis3Simple">
<!-- 数据库的连接信息 -->
<jdbcConnection driverClass="com.mysql.cj.jdbc.Driver"
connectionURL="jdbc:mysql://localhost:3306/mybatis_db?serverTimezone=Asia/Shanghai&useTimezone=true&useSSL=false"
userId="root"
password="mmforu">
</jdbcConnection>
<!-- javaBean的生成策略-->
<javaModelGenerator targetPackage="com.mybatis.pojo" targetProject=".\src\main\java">
<property name="enableSubPackages" value="true" />
<property name="trimStrings" value="true" />
</javaModelGenerator>
<!-- SQL映射文件的生成策略 -->
<sqlMapGenerator targetPackage="com.mybatis.mapper"
targetProject=".\src\main\resources">
<property name="enableSubPackages" value="true" />
</sqlMapGenerator>
<!-- Mapper接口的生成策略 -->
<javaClientGenerator type="XMLMAPPER"
targetPackage="com.mybatis.mapper" targetProject=".\src\main\java">
<property name="enableSubPackages" value="true" />
</javaClientGenerator>
<!-- 逆向分析的表 -->
<!-- tableName设置为*号,可以对应所有表,此时不写domainObjectName -->
<!-- domainObjectName属性指定生成出来的实体类的类名 -->
<table tableName="emp" domainObjectName="Emp"/>
<table tableName="dept" domainObjectName="Dept"/>
</context>
</generatorConfiguration>3)log4j.properties
log4j.rootLogger=WARN, stdout
log4j.appender.stdout=org.apache.log4j.ConsoleAppender
log4j.appender.stdout.layout=org.apache.log4j.PatternLayout
log4j.appender.stdout.layout.ConversionPattern=%d %p [%c] - %m%n
4)log4j.xml
<?xml version="1.0" encoding="UTF-8" ?>
<!DOCTYPE log4j:configuration SYSTEM "log4j.dtd">
<log4j:configuration xmlns:log4j="http://jakarta.apache.org/log4j/">
<appender name="STDOUT" class="org.apache.log4j.ConsoleAppender">
<param name="Encoding" value="UTF-8" />
<layout class="org.apache.log4j.PatternLayout">
<param name="ConversionPattern" value="%-5p %d{MM-dd HH:mm:ss,SSS}%m (%F:%L) \n" />
</layout>
</appender>
<logger name="java.sql">
<level value="debug" />
</logger>
<logger name="org.apache.ibatis">
<level value="info" />
</logger>
<root>
<level value="debug" />
<appender-ref ref="STDOUT" />
</root>
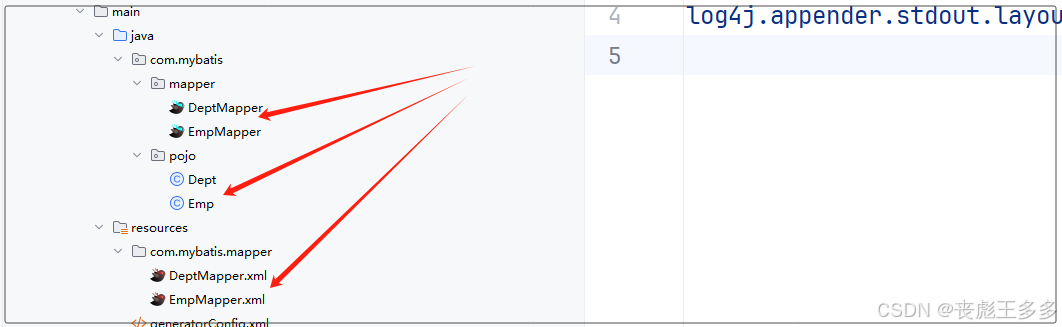
</log4j:configuration>5)接下来我们就通过MBG插件的generate构建我们的相关文件 双击运行
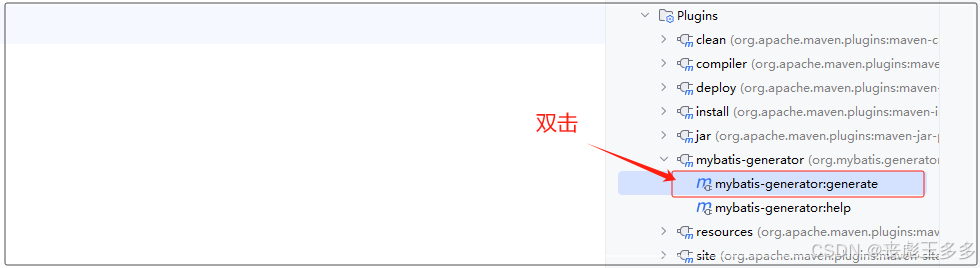
然后我们就可以等待看到我们的目录下,出现了相关生成的文件了。
七 Mybatis日志组件
7.1日志概念
假如,你开了一家火锅店,每天的营业额、顾客的反馈、商品的进出、库存等等,你都会记录下来。这就像是程序的日志。不管是C端,还是B端,还是移动端的的应用程序(Application),日志这个东西都是非常重要的。
日志,用来记录程序运行时发生的事情。比如,程序启动了、执行了某个操作、遇到了问题等等,这些都可以通过日志记录下来。
再比如:
- 电商网站:记录用户的登录、浏览、购买行为,监控交易过程,及时发现异常交易;通过日志分析你的浏览记录,实现精准推送等等
- 服务器:记录服务器的启动、运行、关闭状态,以及发生的各种错误,帮助管理员及时发现并解决问题
日志的其他作用:
- 调试帮助:当程序出现问题时,通过查看日志,可以快速定位问题发生的地方和原因。
- 监控运行状态:通过日志可以了解程序的运行状态,比如用户的操作、系统的性能等。
- 安全审计:在需要记录用户行为或系统操作的场合,日志可以作为审计的依据。
public class TEst(){
   public static void main(String[] args){
      System.out.println("程序启动");
      Scanner sc = new Scanner(System.in);
      // 假设这里是用户输入数据
      String userInput = sc.nextInt();
      System.out.println("用户输入了: " + userInput);
      // 处理数据
      String result = processInput(userInput);
      System.out.println("处理结果: " + result);
      try {
         //可能异常的逻辑代码
      }catch(Exception e){
         e.printStackTrace()
      }
      // 程序结束
      System.out.println("程序结束");
   }
   private static String processInput(String input) {
      // 这里是处理逻辑
      return "Processed: " + input;
   }
}
上面的案例,我们使用输出语句来打印程序的运行状态,使用e.printStackTrace()来打印异常信息,这是最简单的日志打印方法。
这种方式简单直接,但也有一些缺点:
-
灵活性差:不能方便地控制日志的输出格式、级别等。
-
性能问题:大量日志输出可能会影响程序性能。
-
不易管理:日志信息混在标准输出中,不易于查找和分析。
所以我们要引入各种功能强大的日志框架进行日志管理。Mybatis常用的日志组件
-
STDOUT_LOGGING:标准日志,Mybatis框架本身已经实现了这种日志,我们只需要使用<setting>标签开启日志即可。 -
SLF4J -
LOG4J -
LOG4J2
7.2 MyBatis内置的日志组件:
<!--设置日志输出组件-->
<settings>
   <setting name="logImpl" value="STDOUT_LOGGING"/>
</settings>-
STDOUT_LOGGING我们可以直接使用,但是如果想使用SLF4J等第三方日志组件,需要引入相应jar包。
-
注意: 这个标签必须在
<properties></properties>后<typeAliases></typeAliases>前,这是dtd对xml文件的约束规范。
7.3 SLF4J日志组件
第一步:引入相应jar包logback。
<dependency>
   <groupId>ch.qos.logback</groupId>
   <artifactId>logback-classic</artifactId>
   <version>1.2.11</version>
   <scope>test</scope>
</dependency>
第二步:引入logback所必须的xml配置文件。这个xml文件必须在类的根路径下,文件名必须是logback.xml。
<?xml version="1.0" encoding="UTF-8"?>

<configuration debug="false">
	 <!--定义⽇志⽂件的存储地址-->
	 <property name="LOG_HOME" value="D:/home"/>

	 <!-- 控制台输出 -->
	 <appender name="STDOUT" class="ch.qos.logback.core.ConsoleAppender">
		 <encoder class="ch.qos.logback.classic.encoder.PatternLayoutEncoder">
			 <!--格式化输出:%d表示⽇期,%thread表示线程名,%-5level:级别从左显示5 个字符宽度%msg:⽇志消息,%n是换⾏符-->
			 <pattern>%d{yyyy-MM-dd HH:mm:ss.SSS} [%thread] %-5level %logger{50} - %msg%n</pattern>
		 </encoder>
	 </appender>

	 <!-- 按照每天⽣成⽇志⽂件 -->
	 <appender name="FILE" class="ch.qos.logback.core.rolling.RollingFileAppender">

		 <rollingPolicy class="ch.qos.logback.core.rolling.TimeBasedRollingPolicy">
			 <!--⽇志⽂件输出的⽂件名-->
			 <FileNamePattern>${LOG_HOME}/TestWeb.log.%d{yyyy-MM-dd}.log</FileNamePattern>
			 <!--⽇志⽂件保留天数-->
			 <MaxHistory>30</MaxHistory>
		 </rollingPolicy>

		 <encoder class="ch.qos.logback.classic.encoder.PatternLayoutEncoder">
			 <!--格式化输出:%d表示⽇期,%thread表示线程名,%-5level:级别从左显示5 个字符宽度%msg:⽇志消息,%n是换⾏符-->
			 <pattern>%d{yyyy-MM-dd HH:mm:ss.SSS} [%thread] %-5level %logger{50} - %msg%n</pattern>
		 </encoder>

		 <!--⽇志⽂件最⼤的⼤⼩-->
		 <triggeringPolicy class="ch.qos.logback.core.rolling.SizeBasedTriggeringPolicy">
			 <MaxFileSize>100MB</MaxFileSize>
		 </triggeringPolicy>

	 </appender>

	 <!--mybatis log configure-->
	 <logger name="com.apache.ibatis" level="TRACE"/>
	 <logger name="java.sql.Connection" level="DEBUG"/>
	 <logger name="java.sql.Statement" level="DEBUG"/>
	 <logger name="java.sql.PreparedStatement" level="DEBUG"/>
	 <!-- ⽇志输出级别,logback⽇志级别包括五个:TRACE < DEBUG < INFO < WARN < ER
	ROR -->
	 <root level="DEBUG">
		 <appender-ref ref="STDOUT"/>
		 <appender-ref ref="FILE"/>
	 </root>
</configuration>
第三步:开启日志输出
<!--设置日志输出组件-->
<settings>
   <setting name="logImpl" value="SLF4J"/>
</settings>
7.4 Log4J日志组件
Log4j 是Apache软件基金组织旗下的一款开源日志框架,是一款非常老牌的日志框架,功能非常强大,可以自定义很多日志的细节,比如日志级别、输出格式、输出目的地等。
目前已出log4j2,它在log4j上做了很大改动,性能提升了不少。但是有些老项目还会在使用,所以我们也来用一用
日志的级别:
- TRACE:追踪级别,通常用来记录程序运行的详细轨迹,比如方法调用的顺序等。这个级别非常详细,一般在开发阶段或者调试时用得比较多。
- DEBUG:调试级别,用来记录程序的运行状态,比如变量的值、程序的流程等。当你需要深入了解程序的内部工作时,DEBUG级别就非常有用。
- INFO:信息级别,用来记录程序的正常运行状态,比如程序启动、配置信息、正常结束等。INFO级别的日志对用户和开发者了解程序的运行情况很有帮助。
- WARN:警告级别,用来记录一些可能引起问题的情况,但程序仍然可以继续运行。比如,程序遇到了一个不常见的情况,或者某个操作失败了但不影响大局。
- ERROR:错误级别,用来记录程序运行中的错误,这些错误通常会影响程序的正常功能,但程序可能还能继续运行。
- FATAL:致命级别,用来记录非常严重的错误,这些错误会导致程序完全无法继续运行。比如,程序的某个关键部分失败了,整个应用可能需要重启。
TRACE(追踪) < DEBUG(调试) < INFO(信息) < WARN(警告) < ERROR(错误) < FATAL(致命) 从左到右打印的内容越来少
<!--设置日志输出组件-->
<settings>
   <setting name="logImpl" value="LOG4J"/>
</settings>
第一步:引入依赖
<!--log4j依赖的jar包    -->
<dependency>
   <groupId>log4j</groupId>
   <artifactId>log4j</artifactId>
   <version>1.2.17</version>
</dependency>
第二步:编写LOG4J配置文件。 log4j.properties 和 log4j.xml 这两种配置文件最常用。选择其中一种即可。存放的位置是src/main/resources目录下。
log4j.properties
#    %m 输出代码中指定的消息
#    %p 输出日志级别,即DEBUG,INFO,WARN,ERROR,FATAL
#    %r 输出自应用启动到输出该log信息耗费的毫秒数
#    %c 输出所属的类目,通常就是所在类的全名
#    %t 输出产生该日志事件的线程名
#    %n 输出一个回车换行符,Windows平台为“rn”,Unix平台为“n”
#    %d 输出日志时间点的日期或时间,默认格式为ISO8601,也可以在其后指定格式,比如:%d{yyyy MMM dd HH:mm:ss,SSS},输出类似:2002年10月18日 :10:28,921
#    %l 输出日志事件的发生位置,包括类目名、发生的线程,以及在代码中的行数。
# Log4j一个关键设置,用于定义日志的全局级别和输出目的地。该设置的基本语法如下
# log4j.rootLogger = [level], appenderName1, appenderName2, ...
log4j.rootLogger=DEBUG,console,file

###第一个目的地的相关配置
### 目的地的实现类
log4j.appender.console = org.apache.log4j.ConsoleAppender
### 输出目标:System.out表示控制台输出,默认值, 也可以是System.err
log4j.appender.console.Target = System.out
### 日志级别,局部设置
log4j.appender.console.Threshold = DEBUG
### 布局,即输出的外观样式,使用自定义格式化布局
log4j.appender.console.layout = org.apache.log4j.PatternLayout
### 具体的格式,使用站位符来布局
##log4j.appender.console.layout.ConversionPattern= %5p %d{yyyy-MM-dd HH:mm:ss} %c %m %n
log4j.appender.console.layout.ConversionPattern=[%p][%d{yyyy-MM-dd HH:mm:ss}] %l %t %m %n
log4j.appender.console.encoding=UTF-8

###第二个目的地file的配置
#将日志输出到文件中,并且指定文件的大小,当文件大于指定大小,会生成一个新的日志文件
log4j.appender.file=org.apache.log4j.RollingFileAppender
#路径
log4j.appender.file.File=D:/applog/logs/log.txt
#日志最大限制
log4j.appender.file.MaxFileSize=1024KB
#最多只保存1000个备份文件
log4j.appender.file.MaxBackupIndex=1000
log4j.appender.file.Threshold=debug
log4j.appender.file.layout=org.apache.log4j.PatternLayout
log4j.appender.file.layout.ConversionPattern=%d{yyyy-MM-dd HH:mm:ss} %-5p %c{1}:%L - %m%n
log4j.appender.file.encoding=UTF-8

# 显示mybatis的部分
log4j.logger.com.mybatis=DEBUG
log4j.logger.com.mybatis.common.jdbc.SimpleDataSource=DEBUG
log4j.logger.com.mybatis.common.jdbc.ScriptRunner=DEBUG
log4j.logger.com.mybatis.sqlmap.engine.impl.SqlMapClientDelegate=DEBUG、
log4j.logger.java.sql=DEBUG
log4j.logger.java.sql.Connection=DEBUG
log4j.logger.java.sql.Statement=DEBUG
log4j.logger.java.sql.PreparedStatement=DEBUG
log4j.logger.java.sql.ResultSet=DEBUG
log4j.xml
<?xml version="1.0" encoding="UTF-8" ?>
<!DOCTYPE log4j:configuration SYSTEM "log4j.dtd">
<log4j:configuration xmlns:log4j="http://jakarta.apache.org/log4j/">
   <appender name="STDOUT" class="org.apache.log4j.ConsoleAppender">
      <param name="Encoding" value="UTF-8" />
      <layout class="org.apache.log4j.PatternLayout">
         <param name="ConversionPattern" value="%-5p %d{MM-dd HH:mm:ss,SSS} %m (%F:%L) \n" />
      </layout>
   </appender>
   <logger name="java.sql">
      <level value="debug" />
   </logger>
   <logger name="org.apache.ibatis">
      <level value="info" />
   </logger>
   <root>
      <level value="debug" />
      <appender-ref ref="STDOUT" />
   </root>
</log4j:configuration>
7.5 Log4J2日志组件
<!--设置日志输出组件-->
<settings>
   <setting name="logImpl" value="LOG4j2"/>
</settings>第一步:
<properties>
   <logging.log4j.version>2.17.1</logging.log4j.version>
</properties>

<!-- log4j2 -->
<dependency>
   <groupId>org.apache.logging.log4j</groupId>
   <artifactId>log4j-api</artifactId>
   <version>${logging.log4j.version}</version>
</dependency>
<dependency>
   <groupId>org.apache.logging.log4j</groupId>
   <artifactId>log4j-core</artifactId>
   <version>${logging.log4j.version}</version>
</dependency>
<dependency>
   <groupId>org.apache.logging.log4j</groupId>
   <artifactId>log4j-slf4j-impl</artifactId>
   <version>${logging.log4j.version}</version>
</dependency>
第二步:log4j2.xml
<?xml version="1.0" encoding="UTF-8"?>
<configuration status="debug">
    <properties>
        <!-- 基本的文件的输出信息的配置 -->
        <property name="LOG_HOME">D:\logs</property>
        <!-- 日志备份目录 -->
        <property name="SERVER_NAME">web-font</property>
    </properties>
    <appenders>
        <!-- 定义控制台输出 -->
        <CONSOLE name="CONSOLE" target="SYSTEM_OUT" follow="true">
            <PatternLayout pattern="[%d{yyyy-MM-dd HH:mm:ss,SSS}] %p [%t] %l - %m%n"/>
        </CONSOLE>
        <!-- 文件日志 -->
        <RollingRandomAccessFile name="DAILY-ROLL-FILE" fileName="${LOG_HOME}/${SERVER_NAME}.log"
                                 filePattern="${LOG_HOME}/${SERVER_NAME}.%d{yyyy-MM-dd-HH}.log">
            <PatternLayout pattern="[%d{yyyy-MM-dd HH:mm:ss,SSS}] %p [%t] %l - %m%n"/>
            <Policies>
                <TimeBasedTriggeringPolicy interval="1" modulate="true"/>
            </Policies>
        </RollingRandomAccessFile>

    </appenders>
    <loggers>
        <logger name="org.springframework" level="info" additivity="false">
            <appender-ref ref="CONSOLE"/>
            <appender-ref ref="DAILY-ROLL-FILE"/>
        </logger>
        <logger name="org.apache.ibatis" level="debug" additivity="false">
            <appender-ref ref="CONSOLE"/>
            <appender-ref ref="DAILY-ROLL-FILE"/>
        </logger>
        <root level="debug">
            <appender-ref ref="CONSOLE"/>
            <appender-ref ref="DAILY-ROLL-FILE"/>
        </root>
    </loggers>
</configuration>


 84万+
84万+

 被折叠的 条评论
为什么被折叠?
被折叠的 条评论
为什么被折叠?
 到【灌水乐园】发言


