


1、Fragment是什么?
Fragment是安卓3.0之后解决屏幕分辨率不同引起的软件适配问题所加入的
2、Fragment静态加载:就是在布局文件中直接加载Fragment。在XML文件中,利用Fragment标签即可实现静态加载Fragment。
<fragment
        android:id="@+id/fragment1"
        android:layout_width="match_parent"
        android:layout_height="match_parent"
        android:name="com.example.administrator.fragment.Fragment1"/>
其中,name对应自己写的Fragment类,id对应该fragment控件,不可为空。
对应的Fragment1类必须继承Fragment类,并在onCreateView中实现其与layout文件的对应:
public class Fragment1 extends Fragment {
    @Nullable
    @Override
    public View onCreateView(LayoutInflater inflater, @Nullable ViewGroup container, @Nullable Bundle savedInstanceState) {
        View view=inflater.inflate(R.layout.fragment_1,container,false);
        return view;
    }
}
可以在加载Fragment的Activity中,直接与FindViewByID方法来获取Fragment的layout下对应的控件:
private void init() {
        mbutton= (Button) findViewById(R.id.button2);
        mtv= (TextView) findViewById(R.id.textview);
        mbutton.setOnClickListener(new View.OnClickListener() {
            @Override
            public void onClick(View v) {
                mtv.setText("。。。。");
            }
        });
    }
3、Fragment的动态加载
先创建两个Fragment
再加在main_activity.xml文件中
<?xml version="1.0" encoding="utf-8"?>
<LinearLayout xmlns:android="http://schemas.android.com/apk/res/android"
xmlns:app="http://schemas.android.com/apk/res-auto"
xmlns:tools="http://schemas.android.com/tools"
android:layout_width="match_parent"
android:layout_height="match_parent"
tools:context=".MainActivity">

    <LinearLayout
        android:layout_width="100dp"
        android:layout_height="match_parent"
        android:orientation="vertical">

        <Button
            android:layout_width="match_parent"
            android:layout_height="50dp"
            android:id="@+id/btn1"
            android:text="页面一"/>

        <Button
            android:layout_width="match_parent"
            android:layout_height="50dp"
            android:id="@+id/btn2"
            android:text="页面二"/>

    </LinearLayout>

    <FrameLayout
        android:id="@+id/main_frame"
        android:layout_width="match_parent"
        android:layout_height="match_parent">


    </FrameLayout>

</LinearLayout>
第三步在主函数中
package com.example.a13756.richangapplication;

import android.app.FragmentManager;
import android.app.FragmentTransaction;
import android.support.v7.app.AppCompatActivity;
import android.os.Bundle;
import android.view.View;
import android.widget.Button;

public class MainActivity extends AppCompatActivity implements View.OnClickListener{

    private Button btn1;
    private Button btn2;
    private FragmentManager fragmentManager;
    private FragmentTransaction fragmentTransaction;
    private HelloFragment helloFragment;
    private ListFragment listFragment;

    @Override
    protected void onCreate(Bundle savedInstanceState) {
        super.onCreate(savedInstanceState);
        setContentView(R.layout.activity_main);

        btn1 = findViewById(R.id.btn1);
        btn2 = findViewById(R.id.btn2);
        btn1.setOnClickListener(this);
        btn2.setOnClickListener(this);

        fragmentManager = getFragmentManager();

    }

    @Override
    public void onClick(View v) {
        fragmentTransaction = fragmentManager.beginTransaction();
        switch (v.getId()){
            case R.id.btn1:
                if (helloFragment==null){
                    helloFragment = new HelloFragment();
                }
                fragmentTransaction.replace(R.id.main_frame,helloFragment);
                break;
            case R.id.btn2:
                if (listFragment==null){
                    listFragment = new ListFragment();
                }
                fragmentTransaction.replace(R.id.main_frame,listFragment);
                break;
                default:
                break;
        }
        fragmentTransaction.commit();
    }
}
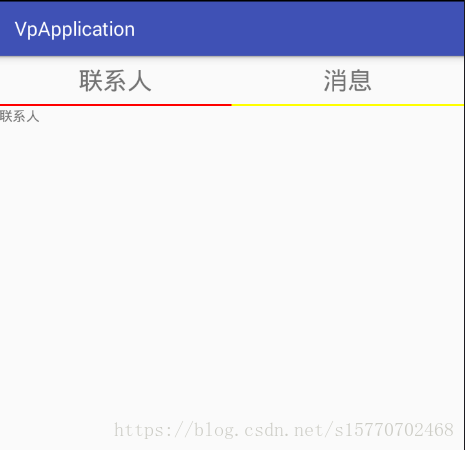
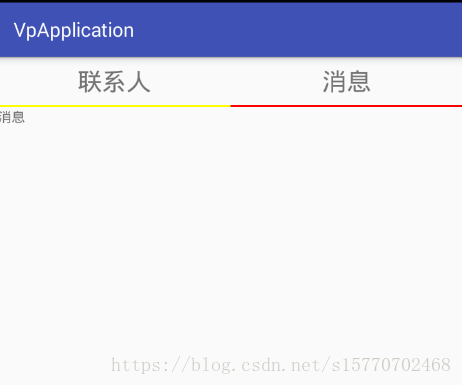
4、ViewPager+Fragment实现页卡滑动:
先创建两个fragment修改布局文件
<?xml version="1.0" encoding="utf-8"?>
<FrameLayout xmlns:android="http://schemas.android.com/apk/res/android"
    xmlns:tools="http://schemas.android.com/tools"
    android:layout_width="match_parent"
    android:layout_height="match_parent"
    tools:context=".lxrFragment">

    <!-- TODO: Update blank fragment layout -->
    <TextView
        android:layout_width="match_parent"
        android:layout_height="match_parent"
        android:text="联系人"
        />

</FrameLayout>
<?xml version="1.0" encoding="utf-8"?>
<FrameLayout xmlns:android="http://schemas.android.com/apk/res/android"
xmlns:tools="http://schemas.android.com/tools"
android:layout_width="match_parent"
android:layout_height="match_parent"
tools:context=".xiaoxiFragment">
<!-- TODO: Update blank fragment layout -->
<TextView
android:layout_width="match_parent"
android:layout_height="match_parent"
android:text="消息" />
</FrameLayout>创建适配器:
package com.example.vpapplication;

import android.support.v4.app.Fragment;
import android.support.v4.app.FragmentManager;
import android.support.v4.app.FragmentPagerAdapter;

import java.util.List;

public class MyPagerAdapter extends FragmentPagerAdapter{

    private List<Fragment> fragmentList;

    public MyPagerAdapter(FragmentManager fm,List<Fragment> fragmentList) {
        super(fm);
        this.fragmentList = fragmentList;
    }

    @Override
    public Fragment getItem(int position) {
        return fragmentList.get(position);
    }

    @Override
    public int getCount() {
        return fragmentList.size();
    }
}
在布局文件中加入ViewPager
<?xml version="1.0" encoding="utf-8"?>
<LinearLayout xmlns:android="http://schemas.android.com/apk/res/android"
    xmlns:app="http://schemas.android.com/apk/res-auto"
    xmlns:tools="http://schemas.android.com/tools"
    android:layout_width="match_parent"
    android:layout_height="match_parent"
    tools:context=".MainActivity"
    android:orientation="vertical">

    <LinearLayout
        android:orientation="horizontal"
        android:layout_width="match_parent"
        android:layout_height="50dp">

        <TextView
            android:text="联系人"
            android:textSize="25sp"
            android:gravity="center"
            android:id="@+id/lxr_tv"
            android:layout_width="0dp"
            android:layout_height="match_parent"
            android:layout_weight="1"/>

        <TextView
            android:text="消息"
            android:textSize="25sp"
            android:gravity="center"
            android:id="@+id/xiaoxi_tv"
            android:layout_width="0dp"
            android:layout_height="match_parent"
            android:layout_weight="1"/>

    </LinearLayout>

    <LinearLayout
        android:layout_width="match_parent"
        android:layout_height="2dp">

        <View
        android:id="@+id/lxr_view"
        android:background="#666666"
        android:layout_width="0dp"
        android:layout_height="match_parent"
        android:layout_weight="1" />

        <View
            android:id="@+id/xiaoxi_view"
            android:background="#666666"
            android:layout_width="0dp"
            android:layout_height="match_parent"
            android:layout_weight="1" />

    </LinearLayout>

    <android.support.v4.view.ViewPager
        android:layout_width="match_parent"
        android:layout_height="match_parent"
        android:id="@+id/main_vp">

    </android.support.v4.view.ViewPager>


</LinearLayout>
最后MainActivity代码:
package com.example.vpapplication;

import android.graphics.Color;
import android.support.v4.app.Fragment;
import android.support.v4.view.ViewPager;
import android.support.v7.app.AppCompatActivity;
import android.os.Bundle;
import android.support.v7.widget.ContentFrameLayout;
import android.view.View;
import android.widget.TextView;

import java.util.ArrayList;
import java.util.List;

public class MainActivity extends AppCompatActivity implements View.OnClickListener{

    private ViewPager viewPager;
    private lxrFragment lxrFragment;
    private xiaoxiFragment xiaoxiFragment;
    private List<Fragment> fragmentList = new ArrayList<>();
    private View lxr_view;
    private View xiaoxi_view;
    private TextView lxr_tv;
    private TextView xiaoxi_tv;

    @Override
    protected void onCreate(Bundle savedInstanceState) {
        super.onCreate(savedInstanceState);
        setContentView(R.layout.activity_main);

        lxr_view = findViewById(R.id.lxr_view);
        xiaoxi_view = findViewById(R.id.xiaoxi_view);
        viewPager = findViewById(R.id.main_vp);
        lxrFragment = new lxrFragment();
        xiaoxiFragment = new xiaoxiFragment();
        fragmentList.add(lxrFragment);
        fragmentList.add(xiaoxiFragment);
        lxr_tv = findViewById(R.id.lxr_tv);
        xiaoxi_tv = findViewById(R.id.xiaoxi_tv);
        lxr_tv.setOnClickListener(this);
        xiaoxi_tv.setOnClickListener(this);

        lxr_view.setBackgroundColor(Color.YELLOW);

        MyPagerAdapter adapter = new MyPagerAdapter(getSupportFragmentManager(),fragmentList);
        viewPager.setAdapter(adapter);

        viewPager.setOnPageChangeListener(new ViewPager.OnPageChangeListener() {
            @Override
            public void onPageScrolled(int position, float positionOffset, int positionOffsetPixels) {

            }

            @Override
            public void onPageSelected(int position) {
                lxr_view.setBackgroundColor(Color.YELLOW);
                xiaoxi_view.setBackgroundColor(Color.YELLOW);
                switch (position){
                    case 0:
                        lxr_view.setBackgroundColor(Color.RED);
                        break;
                    case 1:
                        xiaoxi_view.setBackgroundColor(Color.RED);
                        break;
                        default:
                            break;
                }
            }

            @Override
            public void onPageScrollStateChanged(int state) {

            }
        });

    }

    @Override
    public void onClick(View v) {
        switch (v.getId()){
            case R.id.lxr_tv:
                viewPager.setCurrentItem(0);
                break;
            case R.id.xiaoxi_tv:
                viewPager.setCurrentItem(1);
                break;
                default:
                    break;
        }
    }
}
结果图:
5、Fragment生命周期
onAttach():执行该方法时,Fragment与Activity已经完成绑定,该方法有一个Activity类型的参数,代表绑定的Activity,这时候你可以执行诸如mActivity = activity的操作。
onCreate():初始化Fragment。可通过参数savedInstanceState获取之前保存的值。
onCreateView():初始化Fragment的布局。加载布局和findViewById的操作通常在此函数内完成,但是不建议执行耗时的操作,比如读取数据库数据列表。
onActivityCreated():执行该方法时,与Fragment绑定的Activity的onCreate方法已经执行完成并返回,在该方法内可以进行与Activity交互的UI操作,所以在该方法之前Activity的onCreate方法并未执行完成,如果提前进行交互操作,会引发空指针异常。
onStart():执行该方法时,Fragment由不可见变为可见状态。
onResume():执行该方法时,Fragment处于活动状态,用户可与之交互。
onPause():执行该方法时,Fragment处于暂停状态,但依然可见,用户不能与之交互。
onStop():执行该方法时,Fragment完全不可见。
onDestroyView():销毁与Fragment有关的视图,但未与Activity解除绑定,依然可以通过
onDestroy():销毁Fragment。通常按Back键退出或者Fragment被回收时调用此方法。
onDetach():解除与Activity的绑定。在onDestroy方法之后调用。
ragment生命周期执行流程(注意红色的不是生命周期方法):
Fragment创建:setUserVisibleHint()>onAttach()>onCreate()>onCreateView()>onActivityCreated()>onStart()>onResume();
Fragment变为不可见状态(锁屏、回到桌面、被Activity完全覆盖):onPause()>onStop();
Fragment由不可见变为活动状态:onStart()->OnResume();
退出应用:onPause()>onStop()>onDestroyView()>onDestroy()>onDetach()


 被折叠的 条评论
为什么被折叠?
被折叠的 条评论
为什么被折叠?
 到【灌水乐园】发言


