


 本文介绍了在Ubuntu 18.04系统环境下,如何编译安装nginx,包括指定pcre、openssl源代码路径,启用stream模块和线程池等功能。还涵盖了nginx的基本操作,如启动、关闭、配置文件管理以及模块框架的简单介绍。
0. 系统环境
操作系统:ubuntu 18.04
GCC:系统自带
第三方库:
- zlib:
sudo apt-get install libz-dev - pcre:
sudo apt-get install libpcre3-dev - openssl:
sudo apt-get install libssl-dev
源代码:编译 nginx 可以指定 pcre、openssl 的源代码路径
- nginx:https://nginx.org/en/download.html
- pcre:https://www.pcre.org/
- openssl:https://github.com/openssl/openssl
1. nginx编译
$ ./configure \
--prefix=/opt/nginx \
--with-stream \
--with-threads \
--with-pcre=path-to-pcre \
--with-openssl=path-to-openssl \
--with-http_ssl_module --with-http_v2_module \
--without-http_fastcgi_module \
--build="renzheng build at `date +%Y%m%d`" \
--with-debug
$ make
$ sudo make install
- –prefix:默认工作目录为
/usr/local/nginx/,定制安装可设置其他目录作为区别 - –with-stream:启用 stream 模块,让 nginx 工作在四层网络上,处理 TCP/UDP 协议
- –with-threads:启用线程池机制
- –with-pcre:使用高版本的pcre库
- –with-http_ssl_module:支持 SSL/TLS
- –with-http_v2_module:支持 HTTP/2
- –without-http_fastcgi_module:不使用 fastcgi
- –build:在 nginx 的版本信息里加入自定义的字符串信息
- –add-module:指定第三方模块的源码路径
- –add-dynamic-module:将模块编译为 *.so 形式的动态库,使用
make modules只编译变动的模块
2. nginx操作
启动
$ sudo /opt/nginx/sbin/nginx -c /opt/nginx/conf/nginx.conf
关闭
$ nginx-1.16.1 sudo /usr/local/nginx/sbin/nginx -s stop
- -c:指定配置文件
- -s:
- quit:处理完当前所有连接后再停止服务,优雅退出
- stop
- reload:重启服务,重新加载配置文件,但服务不会中断
- reopen
3. nginx配置
有很多资料可以查阅,所以未整理
worker_processes 1;

events {
    worker_connections 1024;
}

########
# http 服务
http {
    keepalive_timeout 60 # 客户端服用 HTTP 长连接
    upstream {
        ...
    }

    server {
        listen 80;
        server_name localhost;

        location / {
            ...
        }

        location /http_reverse {         # 该 location 对应于 upstream
            proxy_set_header Host $host; # 转发原始请求的 host 头部
            proxy_pass http://backend;
            ...
        }
    }
}

########
# tcp/udp 服务
stream {
    upstream {
        ...
    }

    server {
        listen 53;        # 监听 tcp 53 端口
        ...
    }

    server {
        listen 520 udp;   # 监听 udp 520 端口
        ...
    }
}

########
# 反向代理
upstream backend {
    keepalive 32;
    zone shared_upstream_storage 64k; # 多个 worker 进程之间实现数据共享

    server 127.0.0.1:80;
}
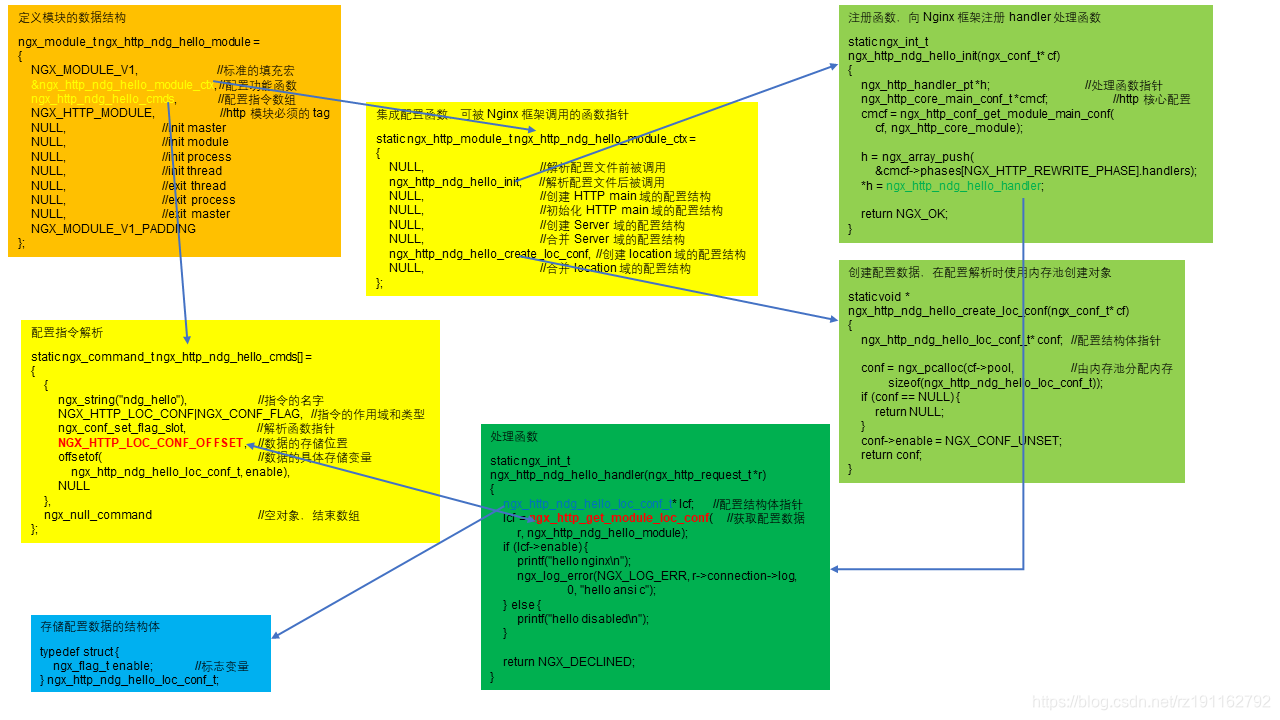
4. nginx 的模块框架
ndg_hello,展示如何使用 Nginx 框架完成一个模块,相对与 C 语言的 hello world。源代码位于 github ndg_hello 模块,
这里以一张图粗略展示模块框架:


 1499
1499

 被折叠的 条评论
为什么被折叠?
被折叠的 条评论
为什么被折叠?
 到【灌水乐园】发言


