


 本文介绍了JavaScript中的一些常见事件处理,包括鼠标事件如onmouseover和onmouseout,键盘事件如onkeydown和onkeyup,以及浏览器事件如onload和onscroll。同时,文章讲解了如何通过事件监听器添加和移除事件,事件对象的使用,以及如何阻止事件冒泡和默认行为。此外,还讨论了元素属性的操作和样式的设置方法。
1.案例扩展
(1)隔行换色
案例一:完成对无序列表的隔行换色(原理~~~通过循环获取元素得到的伪数组进行取余逻辑判断操作)
var btn = document.getElementById("btn");
var liObj = document.getElementById("list").getElementsByTagName("li");
console.log(liObj);
btn.onclick = function () {
//第一种
for (var i = 0; i < liObj.length; i += 2) {
console.log(liObj[i]);
/* if (i % 2 == 0) {
liObj[i].style.color = "red";
} */
liObj[i].style.color = "red";
}
//第二种
/* for (var i = 0; i < liObj.length; i++) {
console.log(liObj[i]);
if (i % 2 == 0) {
liObj[i].style.color = "red";
}
} */
}
思考代码还有没有能优化的空间(是不是还可以使用三元表达式)
(2)美女画廊
效果展示:
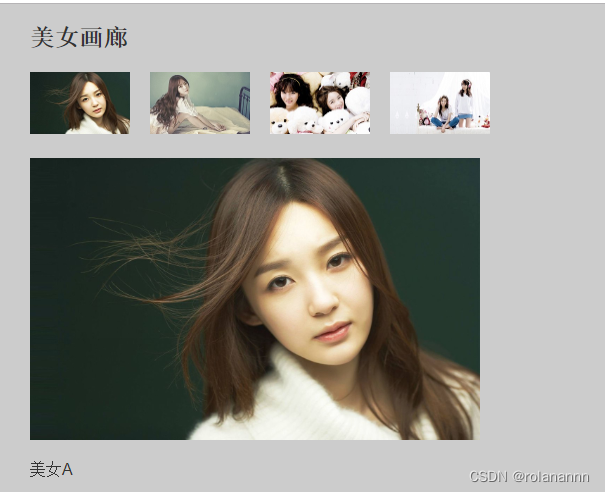
点击小图完成大图切换
思路:遍历伪数组,给四张小图绑定单机事件,让当前被单击的小图的src属性值赋给大图的src属性值,让小图的title的属性值,赋给下册文本内容
<script>
/*
步骤:
1、页面的搭建
2、获取元素
3、遍历伪数组
4、给四个小美女绑定单击事件
5、把事件源的src属性值赋给大图的src属性值
6、把事件源的title属性值赋给标题的innerText属性值
*/
// 获取小图
var smallPic = document.getElementById("smallPicObj").getElementsByTagName("img");
// 获取大图
var bigPic = document.getElementById("bigPic");
// 获取文本
var title = document.querySelector("#text");
for (var i = 0; i < smallPic.length; i++) {
smallPic[i].onclick = function () {
bigPic.src = this.src;
title.innerText = this.title;
}
}
</script>
3.新事件
(1)鼠标事件
案例一:完成对无序列表的隔行换色(原理:通过循环获取元素的道德伪数组进行取余逻辑判断操作)
onmouseover 鼠标移入事件:在鼠标指针移动到元素上时触发
onmouseout 鼠标移出事件:在鼠标指针移出元素后触发
//鼠标移入事件
box1.onmouseover = function () {
this.style.fontSize = "26px";
this.style.height = "60px";
console.log(111)
}
// 鼠标移出事件
box1.onmouseout = function () {
this.innerText = "鼠标移出了哈!";
this.style.height = "30px";
this.style.fontSize = "16px";
}
onmouseenter 鼠标进入事件:在鼠标指针进入到元素上时触发
onmouseleave 鼠标离开事件:在鼠标指针离开元素后触发
// 鼠标进入事件
box2.onmouseenter = function () {
this.style.borderRadius = "12px";
this.style.backgroundColor = "blue";
}
//鼠标的离开事件
box2.onmouseleave = function () {
this.style.borderRadius = "0";
this.style.backgroundColor = "purple";
}
onfocus获取焦点事件:在鼠标光标获取输入框焦点时触发
onblur失去焦点事件:在鼠标光标失去焦点时触发。
//获取焦点事件
user.onfocus = function () {
this.style.border = "3px solid red";
this.style.outline = "0";
}
// 失去焦点事件
user.onblur = function () {
console.log(th
is.value);
}
onclick 单击事件:在鼠标指针单击时触发
ondblclick 双击事件:在鼠标光标双击时触发
box1.ondblclick = function () {
this.style.backgroundColor = "yellow";
}
(2)键盘事件
onkeydown :键盘按下
onkeyup 键盘抬起
document.getElementById("user").onkeydown = function () {
console.log("按下了!!1");
}
document.getElementById("user").onkeyup = function () {
console.log("抬起来了!!1");
console.log(this.value);
}
(3)浏览器事件
案例一:完成对无序列表的隔行换色(原理~~~通过循环获取元素得到的伪数组进行取余逻辑判断操作)
onload:浏览器加载完成执行
onscroll:滚动浏览器滚动条时触发
window.onscroll = function () {
console.log("滚动了!");
}
3.事件进阶
执行事件的步骤:获取元素、绑定事件、书写事件驱动程序
- 、监听事件
绑定监听事件 addEventListener("事件的类型",事件的处理程序)
box1.addEventListener("click", myFunc)
function myFunc() {
this.style.backgroundColor = "blue";
}
解绑监听事件removeEventListener("事件的类型",事件的处理程序)
box1.removeEventListener("click", myFunc);
2、事件对象
任何事件都有内置对象event,event 对象代表事件的状态,比如事件在其中发生的元素、键盘按键的状态、鼠标的位置、鼠标按钮的状态。事件对象的兼容性写法为
var event = event || window.event;
// 事件的类型
console.log(event.type);
// 元素的ID
console.log(event.target.id);
// 文本的内容
console.log(event.target.innerText);
// 事件的触发点是距离浏览器左侧的横纵坐标
console.log("横坐标:" + event.clientX + "," + "纵坐标:" + event.clientY);
console.log("横坐标:" + event.pageX + "," + "纵坐标:" + event.pageY);
console.log("我单击header!");
3、元素的坐标
1、clientX与clientY
clientX 事件属性返回当事件被触发时鼠标指针相对于浏览器页面(或客户区)的水平坐标。客户区指的是当前窗口。
clientY 事件属性返回当事件被触发时鼠标指针向对于浏览器页面(客户区)的垂直坐标。 客户区指的是当前窗口。
2、pageX与e.pageY
pageX/Y:相对于文档边缘,包含滚动条距离
clientX/Y:相对于当前页面且不包含滚动条距离
有兼容性问题 从IE9以后才支持,pageY = clientY + 页面滚动出去的距离
演示示例:pageX与clientX的区别
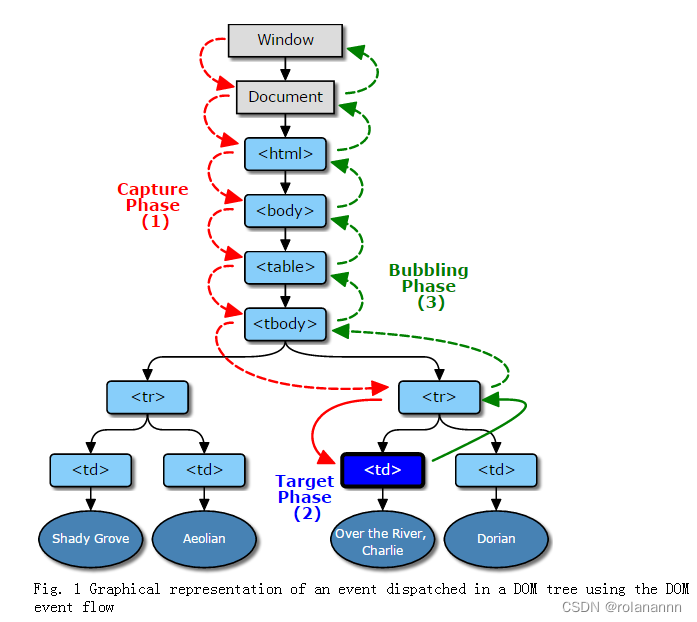
4、事件冒泡
什么是冒泡事件
事件冒泡阶段:事件从事件目标(target)开始,往上冒泡直到页面的最上一级标签。
假设一个元素div,它有一个下级元素p。
<div>
<p>元素</p>
</div>
这两个元素都绑定了click事件,如果用户点击了p,它在div和p上都触发了click事件,那这两个事件处理程序哪个先执行呢?事件顺序是什么?
注意:mouseenter不支持冒泡,而mouseover支持冒泡
<!DOCTYPE html>
<html lang="en">
<head>
<meta charset="UTF-8">
<title>onmouseover&onmouseenter</title>
<style>
#outer{
position: relative;
width: 200px;
height: 200px;
margin: 100px;
border: 1px solid #ccc;
}
#inner{
position: absolute;
left: -50px;
top: 0;
width: 100px;
height: 100px;
border: 1px solid #ccc;
}
</style>
</head>
<body>
<div id="outer">
<div id="inner"></div>
</div>
<script>
outer.onmouseenter = function(e){
console.log(e.target.id) // outer
}
outer.onmouseover = function(e){
console.log(e.target.id) // inner
}
</script>
</body>
</html>
4.阻止默认事件
(1)阻止事件冒泡
<body>
<div id="outer">
<p id=inner>这是盒子中的p标签</p>
我是div#outer
</div>
</body>
<script>
inner.addEventListener("click", function (event) {
// 阻止默认冒泡事件的发生
var event = event || window.event;
// propagation n. 传播; 英[ˌprɒpə'ɡeɪʃ(ə)n]
event.stopPropagation();
console.log("我单击到P元素上了!");
})
outer.addEventListener("click", function () {
console.log("我单击到div元素上了!");
})
</script>
(2)、阻止事件默认行为
什么元素有默认行为呢?如链接<a>,提交按钮<input type=”submit”>等。当Event 对象的 cancelable为false时,表示没有默认行为,这时即使有默认行为,调用preventDefault也是不会起作用的。
<a href="http://www.baidu.com">测试</a>
$("a").click(function (e) {
alert("默认行为被禁止喽");
e.preventDefault();
});
5.阻止a链接跳转
(1)、单return
<!-- 第一种方法 -->
<a href="https://www.baidu.com" οnclick="alert('单击链接了!'); return false">百度一下</a>
<a href="https://www.baidu.com" οnclick="fn1(); return false">百度两下</a>
function fn1() {
alert("单击链接了哈");
}
第一种缺点:代码不分离,不符合低耦合,高内聚的规范
(2)、双return
<!-- 第二种方法 -->
<a href="https://www.baidu.com" οnclick="return fn2();">百度三下</a>
function fn2() {
alert("单击百度三了哈!");
return false;
}
第二种代码 缺点同上
第二种代码 缺点同上
(3)、先获取再绑定
<!-- 第三种方法 -->
<a href="https://www.baidu.com" id="link">百度四下</a>
document.getElementById("link").onclick = function () {
alert("单击百度四了哈!");
return false;
}
第三种 行为与结构分离 想想还有没有更加优化的空间?
6.元素的属性操作
(1)、自定义属性
元素除了本身的属性之外可以设置自定义属性
<div id="box1" class="box_1" name1="divObj">我是盒子</div>
(2)、获取属性
getAttribute("属性的名字")
getAttribute("属性"):不仅可以获取元素本身的属性的属性值,还可以获取元素自定义的属性的属性值
console.log(in1.getAttribute("type"));//text
console.log(in1.getAttribute("name"));//user
console.log(in1.getAttribute("id"));//text1
console.log(in1.getAttribute("style"));//color: red;
(3)、设置属性
setAttribute("属性的名字","属性的值");
元素的属性的设置:不仅可以设置元素本身的属性,还可以设置元素自定义的属性
setObj1.onclick = function () {
in1.setAttribute("name", "password");
// in1.setAttribute("class", "");
in1.className = "";
// in1.setAttribute("style", "border:5px dotted pink");
in1.style.border = "5px dotted pink";
console.log(in1.getAttribute("name"));//password
}
(4)、移除属性
removeAttribute("属性"):不仅可以移除元素本身的属性,还可以移除元素自定义的属性
var removeObj = document.getElementById("remove");
removeObj.onclick = function () {
in1.removeAttribute("class");
div1.removeAttribute("name1");
}
7.元素样式设置的几种方式
- 对象.style
- 对象.className
- 对象.setAttribute("style")
- 对象.setAttribute("class")
- 对象.style.setProperty("CSS属性","CSS属性值")
- 对象.style.cssText
<body>
<div class="box1" id="box1"></div>
<input type="button" value="改变样式" id="change">
</body>
<script>
var box = document.getElementById("box1");
var changeBtn = document.getElementById("change");
changeBtn.onclick = function () {
// 1、对象.style
// box.style.backgroundColor = "red";
// 2、对象.className
// box.className = "box2";
// 3、对象.setAttribute("style")
// box.setAttribute("style", "background-color:red");
// 4、对象.setAttribute("class")
// box.setAttribute("class", "box2");
// 5、对象.style.setProperty("CSS属性","CSS属性值")
// box.style.setProperty("background-color", "red");
// 6、对象.style.cssText
box.style.cssText = "background-color: red;height:80px";
}
</script>


 被折叠的 条评论
为什么被折叠?
被折叠的 条评论
为什么被折叠?
 到【灌水乐园】发言


