


Spring Boot 和 Vue 是两个独立的技术,可以结合使用来构建前后端分离的Web应用程序。Vue.js是一个流行的JavaScript框架,用于构建用户界面。它采用了组件化的开发方式,可以轻松地构建交互式的前端应用程序。
关于Vue的课程请参考: https://blog.youkuaiyun.com/richieandndsc/category_12604641.html
这里,我们先创建名称为 “vuedemo” 的vue2工程
vue create vuedemo
我们查看一下 “vuedemo” 工程目录

接下来,我们给当前的vuedemo工程添加vue-router ,axios ,vuex,element-ui四个常用的组件。
npm install vuex@3.6.2 -save
npm install axios@1.6.0 -save
npm install vue-router@3.5.2 -save
npm install element-ui@2.15.14 -save
以下是 “package.json” 文件内容
{
  "name": "vuedemo",
  "version": "0.1.0",
  "private": true,
  "scripts": {
    "serve": "vue-cli-service serve",
    "build": "vue-cli-service build",
    "lint": "vue-cli-service lint"
  },
  "dependencies": {
    "axios": "^1.6.0",
    "core-js": "^3.8.3",
    "element-ui": "^2.15.14",
    "vue": "^2.6.14",
    "vue-router": "^3.5.2",
    "vuex": "^3.6.2"
  },
  "devDependencies": {
    "@babel/core": "^7.12.16",
    "@babel/eslint-parser": "^7.12.16",
    "@vue/cli-plugin-babel": "~5.0.0",
    "@vue/cli-plugin-eslint": "~5.0.0",
    "@vue/cli-service": "~5.0.0",
    "eslint": "^7.32.0",
    "eslint-plugin-vue": "^8.0.3",
    "vue-template-compiler": "^2.6.14"
  },
  "eslintConfig": {
    "root": true,
    "env": {
      "node": true
    },
    "extends": [
      "plugin:vue/essential",
      "eslint:recommended"
    ],
    "parserOptions": {
      "parser": "@babel/eslint-parser"
    },
    "rules": {
	  "no-mixed-spaces-and-tabs":0,
	  "vue/multi-word-component-names":0
	}
  },
  "browserslist": [
    "> 1%",
    "last 2 versions",
    "not dead"
  ]
}
如果是下载的工程文件,是没有 “node_modules” 目录的,需要我们执行 “npm install” 命令安装一下。

接下来,我们删除 “src/assets” 和 “src/components” 目录,只保留 “App.vue” 和 “main.js” 两个文件。
<template>
	<div id="app">{{message}}</div>
</template>

<script>
export default {
	name: 'App',
	data: function() {
		return {
			message: 'hello world'
		}
	}
}
</script>

<style>
	#app { text-align: center; color: #2c3e50; }
</style>
以上是对 “App.vue” 文件的修改。
import Vue from 'vue'
import App from './App.vue'

Vue.config.productionTip = false

new Vue({
  render: h => h(App),
}).$mount('#app')
以上是对 “main.js” 的修改。
接下来,我们执行 “npm run serve” 命令来运行vue工程。

我们打开浏览器查看页面

如果需要打包到正式环境(例如Nginx)下的话,就需要使用“npm run build”命令进行打包操作。
这里,我们修改一下端口号,我们修改vue的配置文件“vue.config.js”文件。
const { defineConfig } = require('@vue/cli-service')
module.exports = defineConfig({
  transpileDependencies: true,
  devServer: { port: 90 }
})
我们重新运行测试一下啊


对于Vue工程,我们暂且到这里。
接下来,我们创建 “SpringBootVueDemo” 工程。

然后我们修改编码格式以及Maven仓库地址,我们省略这个过程了。
接下来,我们修改 “pom.xml” 文件,添加SpringBoot和Web依赖,如下所示
<?xml version="1.0" encoding="UTF-8"?>
<project xmlns="http://maven.apache.org/POM/4.0.0"
         xmlns:xsi="http://www.w3.org/2001/XMLSchema-instance"
         xsi:schemaLocation="http://maven.apache.org/POM/4.0.0 http://maven.apache.org/xsd/maven-4.0.0.xsd">
    <modelVersion>4.0.0</modelVersion>

    <groupId>com.demo</groupId>
    <artifactId>SpringBootVueDemo</artifactId>
    <version>1.0-SNAPSHOT</version>

    <properties>
        <maven.compiler.source>8</maven.compiler.source>
        <maven.compiler.target>8</maven.compiler.target>
    </properties>

    <parent>
        <groupId>org.springframework.boot</groupId>
        <artifactId>spring-boot-starter-parent</artifactId>
        <version>2.6.13</version>
        <relativePath/>
    </parent>

    <dependencies>
        <dependency>
            <groupId>org.springframework.boot</groupId>
            <artifactId>spring-boot-starter-web</artifactId>
        </dependency>
    </dependencies>

    <build>
        <plugins>
            <plugin>
                <groupId>org.springframework.boot</groupId>
                <artifactId>spring-boot-maven-plugin</artifactId>
                <version>2.7.18</version>
            </plugin>
        </plugins>
    </build>

</project>
由于前后端分离,由vue来完成视图层的部分,因此我们不需要添加 “thymeleaf” 依赖了。
接下来,我们创建 Appliaction 入口类文件
package com.demo;

import org.springframework.boot.SpringApplication;
import org.springframework.boot.autoconfigure.SpringBootApplication;

@SpringBootApplication
public class Application {

    public static void main(String[] args) {

        SpringApplication.run(Application.class, args);
    }
}
前后端分离项目中,我们的Vue工程和SpringBoot工程通信的数据格式通常是json格式,协议就是http/https协议。我们之前使用 “@Controller” 来注解控制器返回 “thymeleaf” 视图文件,而这里则使用 “@RestController” 来注解控制器返回 json 格式的数据。@RestController 是一个组合注解,它结合了 @Controller 和 @ResponseBody 注解的功能。我们也可以在控制器的方法上都添加了 @ResponseBody 注解返回json数据。总结,@RestController 适用于构建 RESTful 风格的 API,其中每个方法的返回值会直接序列化为 JSON 或 XML 数据并发送给客户端。而 @Controller 适用于传统的 MVC 架构,它负责处理请求并返回相应的视图。
接下来,我们创建一个 “TestController” 控制器
package com.demo.controller;

import org.springframework.web.bind.annotation.GetMapping;
import org.springframework.web.bind.annotation.RestController;

import java.util.HashMap;
import java.util.Map;

@RestController
public class TestController {

    @GetMapping("/test")
    public Map<String, String> test(){

        Map<String, String> result = new HashMap();
        result.put("code", "200");
        result.put("message", "hello, spring boot vue!");
        return result;
    }

}
接下来,我们直接运行后通过浏览器访问 “http://localhost:8080/test” 这个接口。

接下来,我们就可以使用 vue 组件 “axios” 来请求这个接口。但是,再此之前,我们还需要做一件事情。那就是跨域的处理,SpringBoot可以通过一个简单的配置类来完成,如下所示
package com.demo.config;

import org.springframework.context.annotation.Bean;
import org.springframework.context.annotation.Configuration;
import org.springframework.web.cors.CorsConfiguration;
import org.springframework.web.cors.UrlBasedCorsConfigurationSource;
import org.springframework.web.filter.CorsFilter;
import org.springframework.web.servlet.config.annotation.WebMvcConfigurer;

@Configuration
public class CorsConfig implements WebMvcConfigurer {

    @Bean
    public CorsFilter corsFilter() {
        // 跨域配置类
        CorsConfiguration config = new CorsConfiguration();
        // 是否发送Cookie
        config.setAllowCredentials(true);
        // 放行所有域名
        config.addAllowedOriginPattern("*");
        // 放行所有请求方式
        config.addAllowedHeader("*");
        // 放行所有请求头部
        config.addAllowedMethod("*");
        // 添加映射路径(拦截所有请求)
        UrlBasedCorsConfigurationSource source = new UrlBasedCorsConfigurationSource();
        source.registerCorsConfiguration("/**", config);
        // 返回新的 CorsFilter
        return new CorsFilter(source);
    }

}
接下来,我们重启一下 “SpringBootVueDemo” 工程即可。
接下来,我们回到 “vuedemo” 前端vue工程上来,我们使用“axios”发起ajax请求。
我们在“src”目录下创建“utils”目录,然后创建“request.js”文件(封装一下axios)。
这里我们使用 “Visual Studio Code” 来打开“vuedemo” 前端工程。
import axios from 'axios'

// 设置默认 Content-Type 为json格式
axios.defaults.headers['Content-Type'] = 'application/json;charset=utf-8'

// 创建axios实例
const service = axios.create({
  baseURL: "http://localhost:8080",
  timeout: 5000
})

// 添加请求拦截器
service.interceptors.request.use(
  config => {
    // 设置请求数据类型为表单格式
    config.headers['Content-Type'] = 'application/x-www-form-urlencoded';
		// 简单打印一下请求数据
		console.log("请求:" + JSON.stringify(config.data));
		return config;
  },
  error => {
    console.log(error)
    return Promise.reject(error)
  }
)

// 添加响应拦截器
service.interceptors.response.use(
  response => {
    // 简单打印一下返回数据
	console.log("响应:" + JSON.stringify(response.data));
	return response;
  },
  error => {
    console.log(error)
    return Promise.reject(error)
  }
)

export default service
接下来我们在 “App.vue” 文件中使用 “request.js”文件
<template>
	<div id="app">{{message}}</div>
</template>

<script>
import request from '@/utils/request'

export default {
	name: 'App',
	data: function() {
		return {
			message: 'hello world'
		}
	},
	created:function(){
		this.getTestData()
	},
	methods: {
		requestServer: function() {
			return request({url: '/test', method: 'get'})
    	},
    	getTestData: function() {
      		this.requestServer().then(res => {
				let result = res.data
        		this.message = result.message
      		})
    	}
  	}
}
</script>

<style>
	#app { text-align: center; color: #2c3e50; }
</style>
接下来,我们执行 “npm run serve” 命令运行测试一下

我们在浏览器中访问一下

我们通过浏览器的开发者工具也能看到正确请求到了 “SpringBootVueDemo” 后端的接口。
接下来,我们使用 “MyBatisPlus” 查询MySQL数据库中的学生表,然后使用 “element-ui” 来显示这个学生列表。关于在SpringBoot中如何使用“MyBatisPlus”查询学生列表,我们就不详细介绍了。 这里只给出 “StudentInfo” 数据实体类和 “StudentController” 控制器代码
package com.demo.model;

import com.baomidou.mybatisplus.annotation.IdType;
import com.baomidou.mybatisplus.annotation.TableField;
import com.baomidou.mybatisplus.annotation.TableId;
import com.baomidou.mybatisplus.annotation.TableName;
import com.fasterxml.jackson.annotation.JsonFormat;
import lombok.Data;

import java.util.Date;

@Data
@TableName("student_info")
public class StudentInfo {

    @TableId(type = IdType.AUTO)
    @TableField("stu_id")
    private int stuId;

    @TableField("stu_name")
    private String StuName;

    @TableField("stu_age")
    private int StuAge;

    @TableField("add_time")
    @JsonFormat(pattern = "yyyy-MM-dd HH:mm:ss", timezone="GMT+8")
    private Date addTime;
}
package com.demo.controller;
import com.demo.mapper.StudentInfoMapper;
import com.demo.model.StudentInfo;
import org.springframework.beans.factory.annotation.Autowired;
import org.springframework.web.bind.annotation.GetMapping;
import org.springframework.web.bind.annotation.RestController;
import java.util.List;
@RestController
public class StudentController {
@Autowired
private StudentInfoMapper studentInfoMapper;
@GetMapping("/student")
public List<StudentInfo> student(){
return studentInfoMapper.selectList(null);
}
}最后再给出接口访问截图

接下来,我们再次回到vue前端工程,我们需要在“main.js”中引入“element-ui”依赖库。
import Vue from 'vue'
import ElementUI from 'element-ui'
import 'element-ui/lib/theme-chalk/index.css'
Vue.use(ElementUI)
import App from './App.vue'
Vue.config.productionTip = false
new Vue({
render: h => h(App),
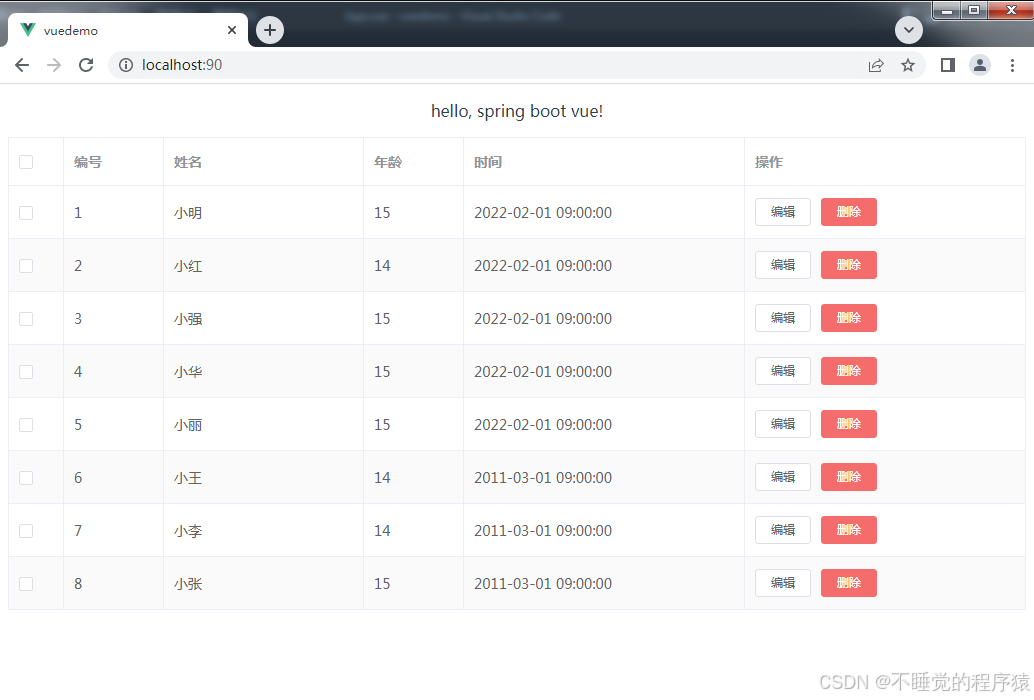
}).$mount('#app')接下来,修改 “App.vue”文件
<template>
<div id="app">
	<p>{{message}}</p>

	<el-table :data="tableData" stripe border style="width: 100%">
	<el-table-column type="selection" width="55"></el-table-column>
	<el-table-column prop="stuId" label="编号" width="100"></el-table-column>
	<el-table-column prop="stuName" label="姓名" width="200"></el-table-column>
	<el-table-column prop="stuAge" label="年龄" width="100"></el-table-column>
	<el-table-column prop="addTime" label="时间"></el-table-column>
	<el-table-column label="操作">
		<el-button size="mini">编辑</el-button>
		<el-button size="mini" type="danger">删除</el-button>
	</el-table-column>
</el-table>
</div>
</template>

<script>
import request from '@/utils/request'

export default {
	name: 'App',
	data: function() {
		return {
			message: 'hello world',
			tableData: []
		}
	},
	created:function(){
		this.getTestData()
		this.getStudentData()
	},
	methods: {
		requestServer: function() {
			return request({url: '/test', method: 'get'})
    	},
    	getTestData: function() {
      		this.requestServer().then(res => {
				let result = res.data
        		this.message = result.message
      		})
    	},
		requestStudentApi: function() {
			return request({url: '/student', method: 'get'})
    	},
		getStudentData: function() {
      		this.requestStudentApi().then(res => {
        		this.tableData =  res.data
      		})
    	}
  	}
}
</script>

<style>
	#app { text-align: center; color: #2c3e50; }
</style>
我们使用浏览器测试一下吧
本工程完整代码下载: https://download.youkuaiyun.com/download/richieandndsc/89953270


 601
601

 被折叠的 条评论
为什么被折叠?
被折叠的 条评论
为什么被折叠?
 到【灌水乐园】发言


