


学习目标
- 会使用Spring AMQP
- 利用MQ实现搜索和静态页面的数据同步
1、简介
Sprin有很多不同的项目,其中就有对AMQP的支持:
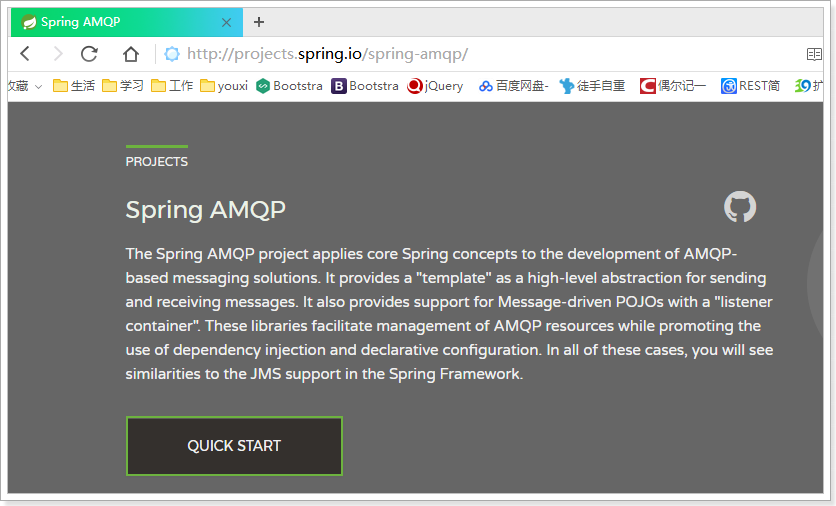
Spring AMQP的页面:http://projects.spring.io/spring-amqp/
注意这里一段描述:

Spring-amqp是对AMQP协议的抽象实现,而spring-rabbit 是对协议的具体实现,也是目前的唯一实现。底层使用的就是RabbitMQ。
1.2.依赖和配置
添加AMQP的启动器:
<dependency>
    <groupId>org.springframework.boot</groupId>
    <artifactId>spring-boot-starter-amqp</artifactId>
</dependency>
在application.yml中添加RabbitMQ地址:
spring:
  rabbitmq:
    host: 192.168.56.101
    username: leyou
    password: leyou
    virtual-host: /leyou
1.3.监听者
在SpringAmqp中,对消息的消费者进行了封装和抽象,一个普通的JavaBean中的普通方法,只要通过简单的注解,就可以成为一个消费者。
@Component
public class Listener {

    @RabbitListener(bindings = @QueueBinding(
            value = @Queue(value = "spring.test.queue", durable = "true"),
            exchange = @Exchange(
                    value = "spring.test.exchange",
                    ignoreDeclarationExceptions = "true",
                    type = ExchangeTypes.TOPIC
            ),
            key = {"#.#"}))
    public void listen(String msg){
        System.out.println("接收到消息:" + msg);
    }
}
@Componet:类上的注解,注册到Spring容器@RabbitListener:方法上的注解,声明这个方法是一个消费者方法,需要指定下面的属性:bindings:指定绑定关系,可以有多个。值是@QueueBinding的数组。@QueueBinding包含下面属性:value:这个消费者关联的队列。值是@Queue,代表一个队列exchange:队列所绑定的交换机,值是@Exchange类型key:队列和交换机绑定的RoutingKey
类似listen这样的方法在一个类中可以写多个,就代表多个消费者。
1.4.AmqpTemplate
Spring最擅长的事情就是封装,把他人的框架进行封装和整合。
Spring为AMQP提供了统一的消息处理模板:AmqpTemplate,非常方便的发送消息,其发送方法:
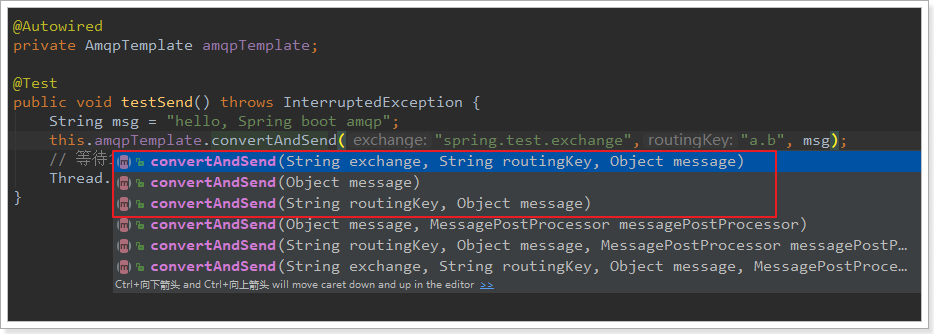
红框圈起来的是比较常用的3个方法,分别是:
- 指定交换机、RoutingKey和消息体
- 指定消息
- 指定RoutingKey和消息,会向默认的交换机发送消息
1.5.测试代码
@RunWith(SpringRunner.class)
@SpringBootTest(classes = Application.class)
public class MqDemo {

    @Autowired
    private AmqpTemplate amqpTemplate;

    @Test
    public void testSend() throws InterruptedException {
        String msg = "hello, Spring boot amqp";
        this.amqpTemplate.convertAndSend("spring.test.exchange","a.b", msg);
        // 等待10秒后再结束
        Thread.sleep(10000);
    }
}
运行后查看日志:

2、项目改造
2.1.思路分析
发送方:商品微服务
-
什么时候发?
当商品服务对商品进行写操作:增、删、改的时候,需要发送一条消息,通知其它服务。
-
发送什么内容?
对商品的增删改时其它服务可能需要新的商品数据,但是如果消息内容中包含全部商品信息,数据量太大,而且并不是每个服务都需要全部的信息。因此我们只发送商品id,其它服务可以根据id查询自己需要的信息。
接收方:搜索微服务、静态页微服务
- 接收消息后如何处理?
- 搜索微服务:
- 增:添加新的数据到索引库
- 删:删除索引库数据
- 改:修改索引库数据
- 静态页微服务:
- 增:创建新的静态页
- 删:删除原来的静态页
- 改:创建新的静态页并删除原来的
- 搜索微服务:
2.2.发送消息
我们先在商品微服务ly-item-service中实现发送消息。
2.2.1引入依赖
<dependency>
    <groupId>org.springframework.boot</groupId>
    <artifactId>spring-boot-starter-amqp</artifactId>
</dependency>
2.2.2.配置文件
我们在application.yml中添加一些有关RabbitMQ的配置:
spring:
  rabbitmq:
    host: 192.168.56.101
    username: leyou
    password: leyou
    virtual-host: /leyou
    template:
      retry:
        enabled: true
        initial-interval: 10000ms
        max-interval: 300000ms
        multiplier: 2
      exchange: ly.item.exchange
    publisher-confirms: true
- template:有关
AmqpTemplate的配置- retry:失败重试
- enabled:开启失败重试
- initial-interval:第一次重试的间隔时长
- max-interval:最长重试间隔,超过这个间隔将不再重试
- multiplier:下次重试间隔的倍数,此处是2即下次重试间隔是上次的2倍
- exchange:缺省的交换机名称,此处配置后,发送消息如果不指定交换机就会使用这个
- retry:失败重试
- publisher-confirms:生产者确认机制,确保消息会正确发送,如果发送失败会有错误回执,从而触发重试
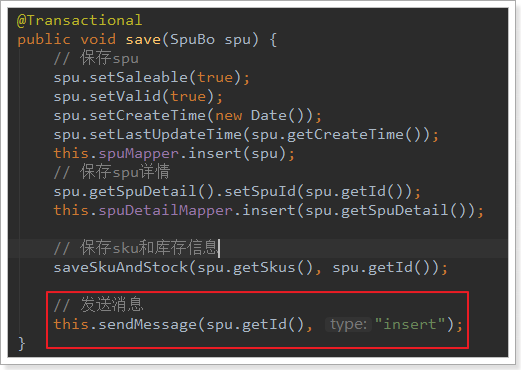
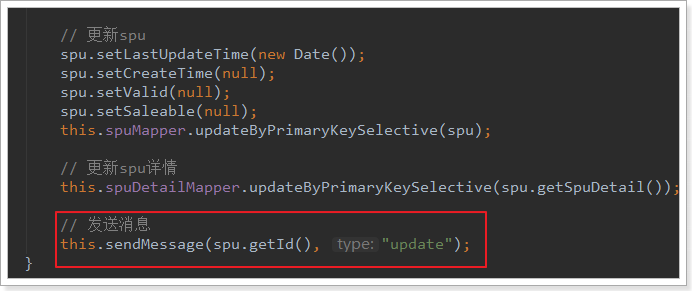
2.2.3.改造GoodsService
封装一个发送消息到mq的方法:
private void sendMessage(Long id, String type){
    // 发送消息
    try {
        this.amqpTemplate.convertAndSend("item." + type, id);
    } catch (Exception e) {
        logger.error("{}商品消息发送异常,商品id:{}", type, id, e);
    }
}
- 这里没有指定交换机,因此默认发送到了配置中的:
ly.item.exchange
注意:这里要把所有异常都try起来,不能让消息的发送影响到正常的业务逻辑
然后在新增的时候调用:
修改的时候调用:
2.3.搜索服务接收消息
搜索服务接收到消息后要做的事情:
- 增:添加新的数据到索引库
- 删:删除索引库数据
- 改:修改索引库数据
因为索引库的新增和修改方法是合二为一的,因此我们可以将这两类消息一同处理,删除另外处理。
2.3.1.引入依赖
<dependency>
    <groupId>org.springframework.boot</groupId>
    <artifactId>spring-boot-starter-amqp</artifactId>
</dependency>
2.3.2.添加配置
spring:
  rabbitmq:
    host: 192.168.56.101
    username: leyou
    password: leyou
    virtual-host: /leyou
这里只是接收消息而不发送,所以不用配置template相关内容。
2.3.3.编写监听器
代码:
@Component
public class GoodsListener {

    @Autowired
    private SearchService searchService;

    /**
     * 处理insert和update的消息
     *
     * @param id
     * @throws Exception
     */
    @RabbitListener(bindings = @QueueBinding(
            value = @Queue(value = "ly.create.index.queue", durable = "true"),
            exchange = @Exchange(
                    value = "ly.item.exchange",
                    ignoreDeclarationExceptions = "true",
                    type = ExchangeTypes.TOPIC),
            key = {"item.insert", "item.update"}))
    public void listenCreate(Long id) throws Exception {
        if (id == null) {
            return;
        }
        // 创建或更新索引
        this.searchService.createIndex(id);
    }

    /**
     * 处理delete的消息
     *
     * @param id
     */
    @RabbitListener(bindings = @QueueBinding(
            value = @Queue(value = "ly.delete.index.queue", durable = "true"),
            exchange = @Exchange(
                    value = "ly.item.exchange",
                    ignoreDeclarationExceptions = "true",
                    type = ExchangeTypes.TOPIC),
            key = "item.delete"))
    public void listenDelete(Long id) {
        if (id == null) {
            return;
        }
        // 删除索引
        this.searchService.deleteIndex(id);
    }
}
2.3.4.编写创建和删除索引方法
这里因为要创建和删除索引,我们需要在SearchService中拓展两个方法,创建和删除索引:
public void createIndex(Long id) throws IOException {
    // 查询spu
    ResponseEntity<Spu> spuResp = this.goodsClient.querySpuById(id);
    if(!spuResp.hasBody()){
        logger.error("索引对应的spu不存在,spuId:{}", id);
        // 抛出异常,让消息回滚
        throw new RuntimeException();
    }
    Spu spu = spuResp.getBody();
    // 查询sku信息
    ResponseEntity<List<Sku>> skuResp = this.goodsClient.querySkuBySpuId(id);
    // 查询详情
    ResponseEntity<SpuDetail> detailResp = this.goodsClient.querySpuDetailById(id);
    // 查询商品分类名称
    ResponseEntity<List<String>> categoryResp = this.categoryClient.queryNameByIds(
        Arrays.asList(spu.getCid1(), spu.getCid2(), spu.getCid3()));
    if (!skuResp.hasBody() || !detailResp.hasBody() || !categoryResp.hasBody()) {
        logger.error("索引对应的spu详情及sku不存在,spuId:{}", id);
        // 抛出异常,让消息回滚
        throw new RuntimeException();
    }
    List<Sku> skus = skuResp.getBody();
    SpuDetail detail = detailResp.getBody();
    List<String> categoryNames = categoryResp.getBody();

    // 准备sku集合
    List<Map<String, Object>> skuList = new ArrayList<>();
    // 准备价格集合
    Set<Long> price = new HashSet<>();
    for (Sku s : skus) {
        price.add(s.getPrice());
        Map<String, Object> sku = new HashMap<>();
        sku.put("id", s.getId());
        sku.put("price", s.getPrice());
        sku.put("image", StringUtils.isBlank(s.getImages()) ? "" : s.getImages().split(",")[0]);
        sku.put("title", s.getTitle());
        skuList.add(sku);
    }

    // 获取商品详情中的规格模板
    List<Map<String, Object>> specTemplate = mapper.readValue(
        detail.getSpecifications(), new TypeReference<List<Map<String, Object>>>() {
    });
    Map<String, Object> specs = new HashMap<>();
    // 过滤规格模板,把所有可搜索的信息保存到Map中
    specTemplate.forEach(m -> {
        List<Map<String, Object>> params = (List<Map<String, Object>>) m.get("params");
        params.forEach(p -> {
            if ((boolean) p.get("searchable")) {
                if (p.get("v") != null) {
                    specs.put(p.get("k").toString(), p.get("v"));
                } else if (p.get("options") != null) {
                    specs.put(p.get("k").toString(), p.get("options"));
                }
            }
        });
    });

    Goods goods = new Goods();
    goods.setBrandId(spu.getBrandId());
    goods.setCid1(spu.getCid1());
    goods.setCid2(spu.getCid2());
    goods.setCid3(spu.getCid3());
    goods.setCreateTime(spu.getCreateTime());
    goods.setId(spu.getId());
    goods.setSubTitle(spu.getSubTitle());
    goods.setAll(spu.getTitle() + " " + StringUtils.join(categoryNames, " ")); //全文检索字段
    goods.setPrice(new ArrayList<>(price));
    goods.setSkus(mapper.writeValueAsString(skuList));
    goods.setSpecs(specs);

    // 保存数据到索引库
    this.goodsRepository.save(goods);
}

public void deleteIndex(Long id) {
    this.goodsRepository.deleteById(id);
}
创建索引的方法可以从之前导入数据的测试类中拷贝和改造。
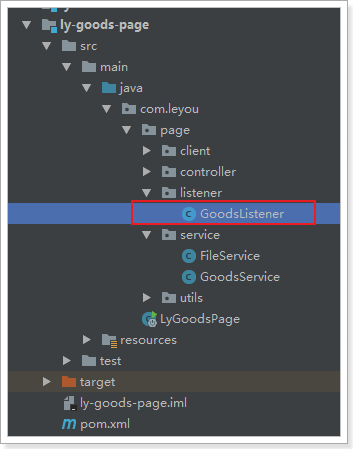
2.4.静态页服务接收消息
商品静态页服务接收到消息后的处理:
- 增:创建新的静态页
- 删:删除原来的静态页
- 改:创建新的静态页并删除原来的
不过,我们编写的创建静态页的方法也具备覆盖以前页面的功能,因此:增和改的消息可以放在一个方法中处理,删除消息放在另一个方法处理。
2.4.1.引入依赖
<dependency>
    <groupId>org.springframework.boot</groupId>
    <artifactId>spring-boot-starter-amqp</artifactId>
</dependency>
2.4.2.添加配置
spring:
  rabbitmq:
    host: 192.168.56.101
    username: leyou
    password: leyou
    virtual-host: /leyou
这里只是接收消息而不发送,所以不用配置template相关内容。
2.4.3.编写监听器
代码:
@Component
public class GoodsListener {

    @Autowired
    private FileService fileService;

    @RabbitListener(bindings = @QueueBinding(
            value = @Queue(value = "ly.create.page.queue", durable = "true"),
            exchange = @Exchange(
                    value = "ly.item.exchange",
                    ignoreDeclarationExceptions = "true",
                    type = ExchangeTypes.TOPIC),
            key = {"item.insert", "item.update"}))
    public void listenCreate(Long id) throws Exception {
        if (id == null) {
            return;
        }
        // 创建页面
        fileService.createHtml(id);
    }

    @RabbitListener(bindings = @QueueBinding(
            value = @Queue(value = "ly.delete.page.queue", durable = "true"),
            exchange = @Exchange(
                    value = "ly.item.exchange",
                    ignoreDeclarationExceptions = "true",
                    type = ExchangeTypes.TOPIC),
            key = "item.delete"))
    public void listenDelete(Long id) {
        if (id == null) {
            return;
        }
        // 创建页面
        fileService.deleteHtml(id);
    }
}
2.4.4.添加删除页面方法
public void deleteHtml(Long id) {
    File file = new File(this.destPath, id + ".html");
    file.deleteOnExit();
}
2.5.测试
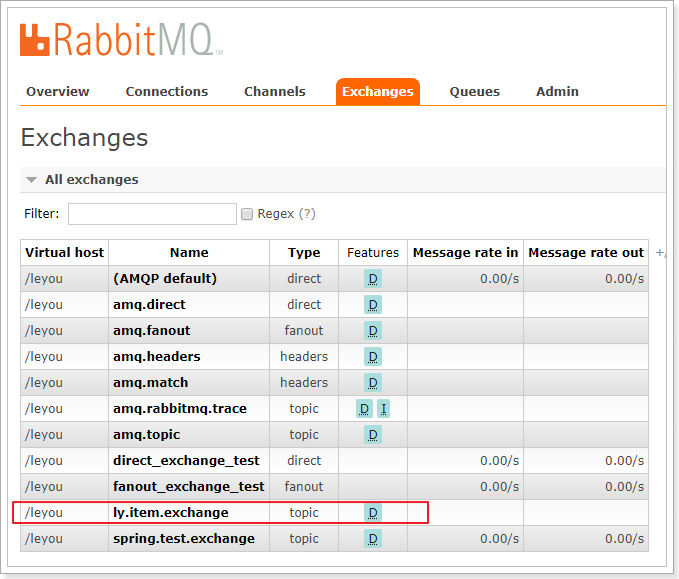
查看RabbitMQ控制台
重新启动项目,并且登录RabbitMQ管理界面:http://192.168.56.101:15672
可以看到,交换机已经创建出来了:
队列也已经创建完毕:
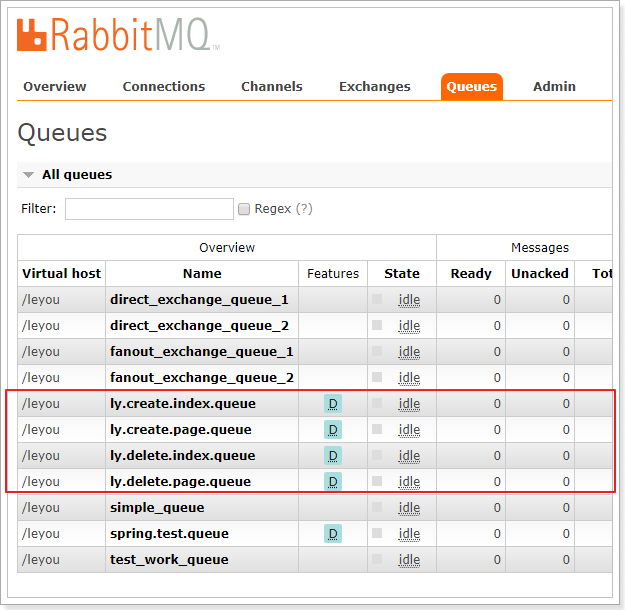
并且队列都已经绑定到交换机:

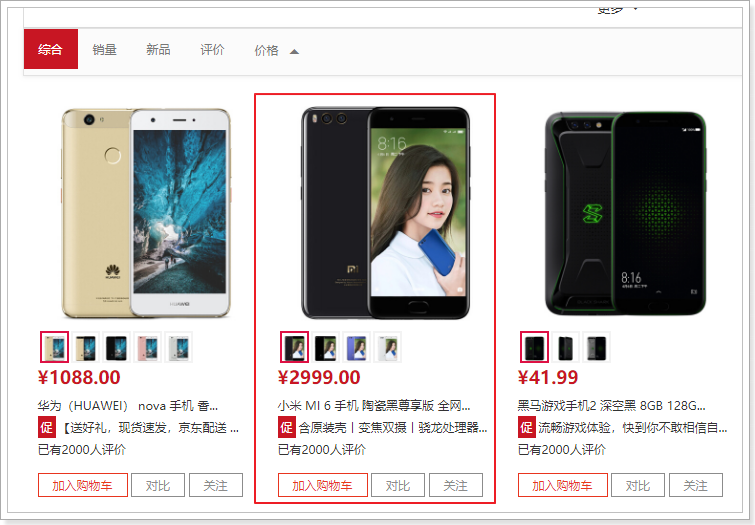
查看数据
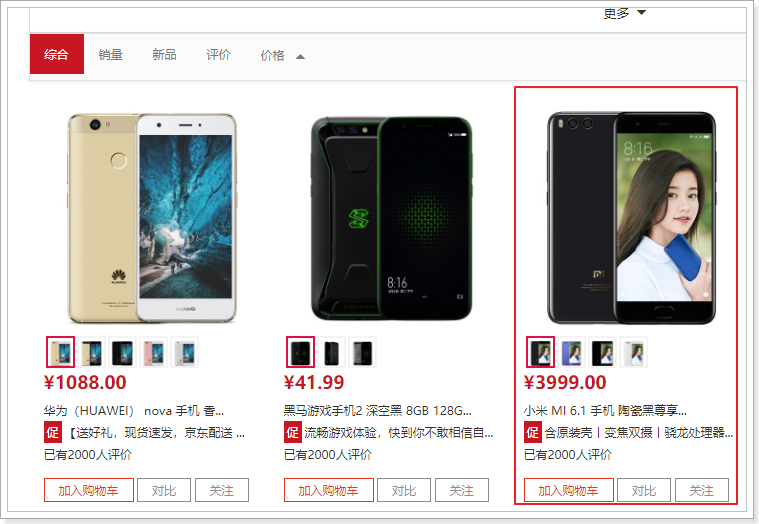
我们搜索下手机:
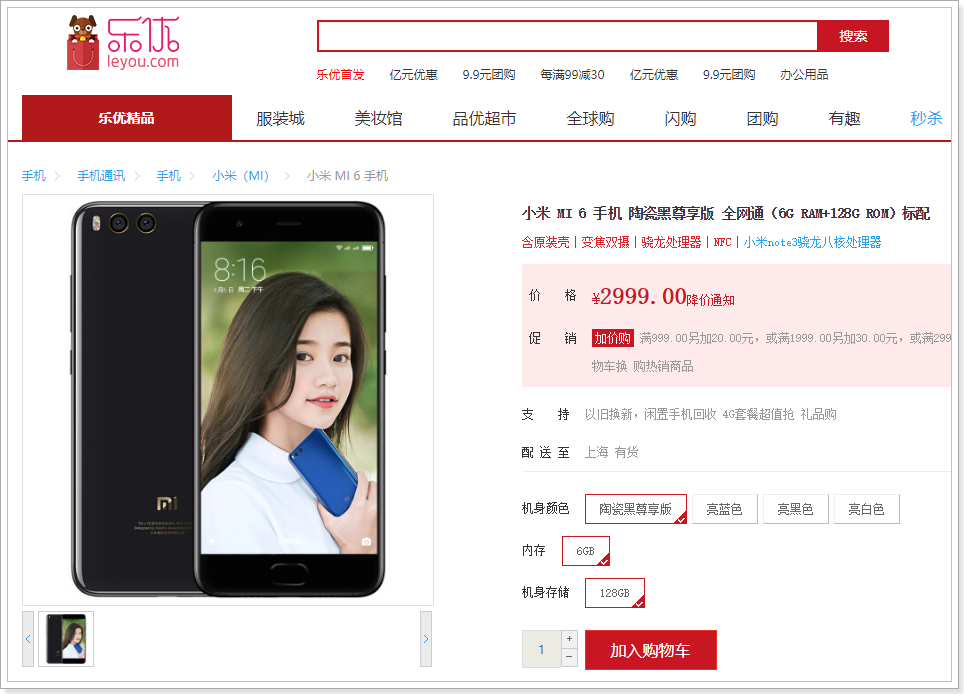
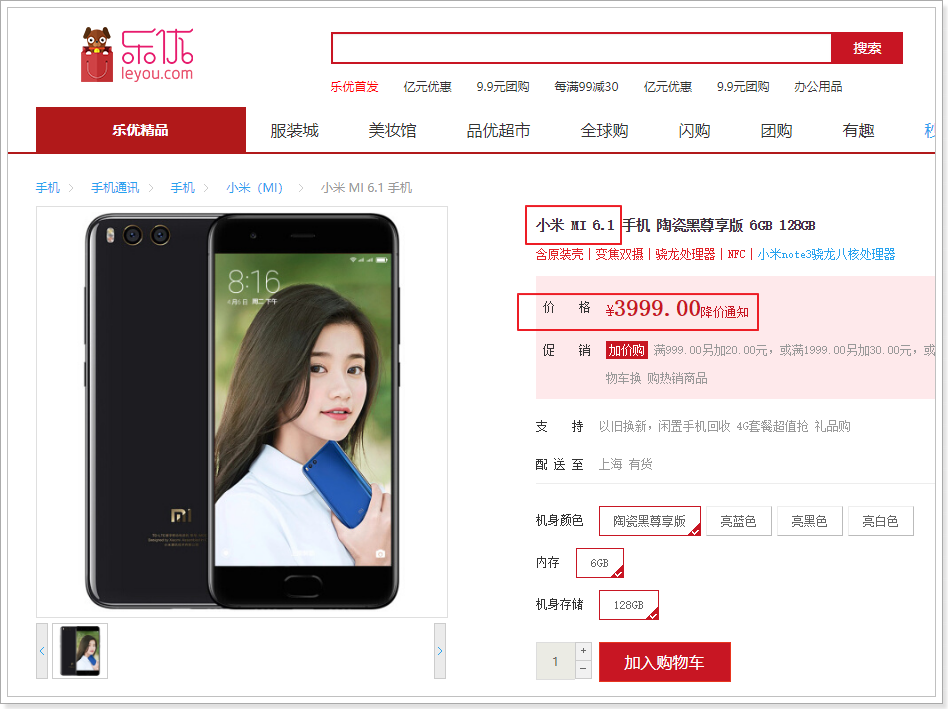
商品详情页:
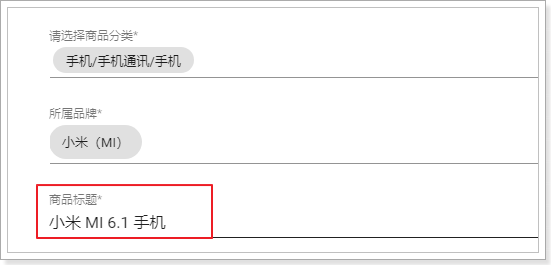
修改商品
然后在管理后台修改商品:
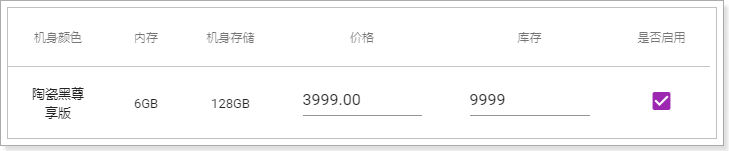
我们修改以下内容:
标题改成6.1
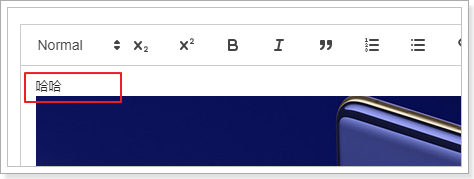
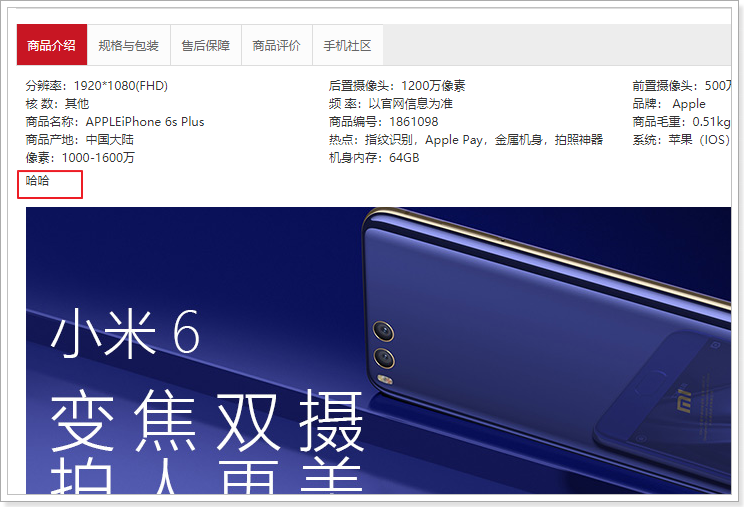
商品详情加点文字:
价格改为3999
再次查看数据


 1530
1530

 被折叠的 条评论
为什么被折叠?
被折叠的 条评论
为什么被折叠?
 到【灌水乐园】发言


