


摘要:银河麒麟v10sp3安装mysql5.7.44(也适用于8.0,8.4LTS),systemd多实例启动,基础建模及数据操作。标题中带DBA的表示数据库管理员掌握的内容。
0、准备工作:Linux二进制通用包下载地址
参考:MySQL :: MySQL Secure Deployment Guide :: 2 Downloading the MySQL for Linux Generic Binary Package
下载地址:MySQL :: MySQL Community Downloads
选择Linux - Generic
# 查看glibc的版本,方法一
ldd --version
# 方法二
getconf GNU_LIBC_VERSION
银河麒麟v10sp3的glibc的版本为2.28,测试安装2.12版64位的5.7.44没有问题。
1、银河麒麟v10sp3版的Linux二进制安装(DBA)
参考:MySQL :: MySQL 5.7 Reference Manual :: 2.2 Installing MySQL on Unix/Linux Using Generic Binaries
银河麒麟v10sp3,高级服务器版。
1.1检查Linux上是否建立mysql相关账号及用户组
id mysqlmysql5.7.44最后Linux通用二进制版本下载地址:https://downloads.mysql.com/archives/get/p/23/file/mysql-5.7.44-linux-glibc2.12-x86_64.tar.gz
1.2 二进制安装
参考:MySQL :: MySQL Secure Deployment Guide :: 4 Installing the MySQL Binary Package
注意:检查是否有以前的安装,做好备份,清理以前的安装配置文件,Linux默认配置文件位置如下:
/etc/my.cnf
/etc/mysql/my.cnf
~/.my.cnf
参考MySQL :: MySQL 5.7 Reference Manual :: 4.2.2.2 Using Option Files
1.2.1设置mysql系统账号,解压部署
安装位置:/usr/local/mysql
# 以root账号运行, 如果没有mysql系统账号及用户组
$ groupadd mysql
$ useradd -r -g mysql -s /bin/false mysql
# 解压部署到/usr/local
$ cd /usr/local
$ tar zxvf mysql-5.7.44-linux-glibc2.12-x86_64.tar.gz
$ ln -s mysql-5.7.44-linux-glibc2.12-x86_64 mysql
$ cd mysql
$ mkdir -p /data/mysql/data /data/mysql/logs
$ chown -R mysql:mysql /data/mysql
$ chmod -R 750 /data/mysql1.2.2 设置/etc/my.cnf
参考:MySQL :: MySQL Secure Deployment Guide :: 5 Post Installation Setup
$ vim /etc/my.cnf配置文件指定数据存放目录、socket、端口、错误日志、pid文件
[mysqld]
datadir=/data/mysql/data
socket=/tmp/mysql.sock
port=3306
log-error=/data/mysql/logs/mysqld.log
pid-file=/data/mysql/logs/mysqld.pid
1.2.3 初始化数据库及手动启动
参考:MySQL :: MySQL Secure Deployment Guide :: 5 Post Installation Setup
# 初始化配置
$ bin/mysqld --initialize --user=mysql
$ bin/mysql_ssl_rsa_setup
# 手动启动mysql server
$ bin/mysqld_safe --user=mysql &
# Next command is optional
$> cp support-files/mysql.server /etc/init.d/mysql.server
$ export PATH=$PATH:/usr/local/mysql/bin配置参见MySQL :: MySQL 5.7 Reference Manual :: 2.9 Postinstallation Setup and Testing
MySQL :: MySQL Secure Deployment Guide :: 5 Post Installation Setup
1.2.4 修改root临时密码
查看临时密码
tail /data/mysql/logs/mysqld.log
# 类似下面形式
2024-05-03T11:27:43.789402Z 1 [Note] A temporary password is generated for root@localhost: qu<>*t)Po4+2
参考:MySQL :: MySQL Secure Deployment Guide :: 5 Post Installation Setup
# 登录mysql
mysql -uroot -p'qu<>*t)Po4+2'
# 修改密码
mysql> alter user root@localhost identified by '123';
1.2.5 测试及手动停止数据库
$ bin/mysqladmin -uroot -p'123' version
$ bin/mysqladmin -uroot -p'123' variables
$ bin/mysqlshow -uroot -p'123' mysql
$ bin/mysqladmin -uroot -p'123' shutdown1.2.6 用systemd启动mysql服务
1.2.6.1 启动单实例服务
参考:MySQL :: MySQL Secure Deployment Guide :: 5 Post Installation Setup
1.Add a systemd service unit configuration file with details about the MySQL service. The file is named mysqld.service and is placed in /usr/lib/systemd/system.
2.Add a configuration file for the systemd tmpfiles feature. The file is named mysql.conf and is placed in /usr/lib/tmpfiles.d.
3.To ensure the systemd configuration works, start the mysqld service manually using systemctl.
4.Check the status of the mysqld service. The output should appear similar to the following, which shows that the mysqld service was started successfully.
[root@kylin10sp3 ~]# systemctl status mysqld
● mysqld.service - MySQL Server
   Loaded: loaded (/usr/lib/systemd/system/mysqld.service; enabled; vendor preset: disabled)
   Active: active (running) since Sat 2024-05-04 22:11:41 CST; 38min ago
     Docs: man:mysqld(7)
           http://dev.mysql.com/doc/refman/en/using-systemd.html
  Process: 1268 ExecStart=/usr/local/mysql/bin/mysqld --defaults-file=/etc/my.cnf --daemonize --pid-file=/data/mysql/mysqld.pid $MYSQLD_OPTS (code=exited, status=0/SUCCESS)
 Main PID: 1301 (mysqld)
    Tasks: 29
   Memory: 221.2M
   CGroup: /system.slice/mysqld.service
           └─1301 /usr/local/mysql/bin/mysqld --defaults-file=/etc/my.cnf --daemonize --pid-file=/data/mysql/mysqld.pid

5月 04 22:11:40 kylin10sp3 systemd[1]: Starting MySQL Server...
5月 04 22:11:41 kylin10sp3 systemd[1]: Started MySQL Server.
1.2.6.2 启动多实例服务
参考:
MySQL :: MySQL 5.7 Reference Manual :: 2.5.10 Managing MySQL Server with systemd
How To Use systemd in Linux to Configure and Manage Multiple MySQL Instances (percona.com)
1.2.6.2.1 为多实例创建MySQL配置
文件位置:/etc/my2.cnf
[mysqld@replica01]
datadir=/data/mysql-replica01/data
socket=/data/mysql-replica01/mysql.sock
port=3307
log-error=/data/mysql-replica01/logs/mysqld.log
pid-file=/data/mysql-replica01/mysqld.pid
lc_messages_dir=/usr/local/mysql/share
user=mysql
character-set-server=utf8mb4
collation-server=utf8mb4_unicode_ci
[mysqld@replica02]
datadir=/data/mysql-replica02/data
socket=/data/mysql-replica02/mysql.sock
port=3308
log-error=/data/mysql-replica02/logs/mysqld.log
pid-file=/data/mysql-replica02/mysqld.pid
lc_messages_dir=/usr/local/mysql/share
user=mysql
character-set-server=utf8mb4
collation-server=utf8mb4_unicode_ci说明:每个实例的datadir、socket、port、log-error、pid-file参数值与其他实例不同,也不能与上面单实例的相同。
1.2.6.2.2 创建多实例的systemd的service unit配置文件
文件位置:/usr/lib/systemd/system/mysqld@.service
[Unit]
Description=MySQL Server
Documentation=man:mysqld(7)
Documentation=http://dev.mysql.com/doc/refman/en/using-systemd.html
After=network.target
After=syslog.target
[Install]
WantedBy=multi-user.target
[Service]
User=mysql
Group=mysql
Type=forking
# PIDFile=/usr/local/mysql/data/mysqld.pid
PIDFile=/data/mysql-%i/mysqld.pid
# Disable service start and stop timeout logic of systemd for mysqld service.
TimeoutSec=0
# Start main service
ExecStart=/usr/local/mysql/bin/mysqld --defaults-file=/etc/my2.cnf --defaults-group-suffix=@%I --daemonize --pid-file=/data/mysql-%i/mysqld.pid $MYSQLD_OPTS
# Use this to switch malloc implementation
EnvironmentFile=-/etc/sysconfig/mysql
# Sets open_files_limit
LimitNOFILE = 5000
Restart=on-failure
RestartPreventExitStatus=1
PrivateTmp=false
注意:上面的“ExecStart=......."不能换行。
1.2.6.2.3 创建每个实例的目录,初始化data文件夹
文件位置:/data/mysql-replica01/ /data/mysql-replica02/
# 创建单独目录并分配合适权限
cd /data/
mkdir -p /data/mysql-replica0{1,2}/{data,logs}
chown -R mysql:mysql /data/mysql-replica0{1,2}
chmod 750 -R /data/mysql-replica0{1,2}初始化数据文件目录,注意:bin/mysql命令不换行
cd /usr/local/mysql
# 初始化replica01实例数据库文件
bin/mysqld --initialize --user=mysql  --basedir=/usr/local/mysql  --datadir=/data/mysql-replica01/data --log-error=/data/mysql-replica01/logs/mysqld.log
# 启用replica01实例ssl功能,可选
bin/mysql_ssl_rsa_setup --datadir=/data/mysql-replica01/data --verbose
# 初始化replica02实例数据库文件
bin/mysqld --initialize --user=mysql  --basedir=/usr/local/mysql  --datadir=/data/mysql-replica02/data --log-error=/data/mysql-replica02/logs/mysqld.log
# 启用replica02实例ssl功能,可选
bin/mysql_ssl_rsa_setup --datadir=/data/mysql-replica02/data --verbose
1.2.6.2.4 启动服务
# 分别启动服务
systemctl start mysqld@replica01
systemctl start mysqld@replica02
# 查看服务状态
systemctl status mysqld@replica01
systemctl status mysqld@replica02
#如果正常启动,设置服务自动启动
systemctl enable mysqld@replica01
systemctl enable mysqld@replica021.2.6.2.5 连接服务测试
用各自实例配置的socket的连接服务,修改root账号密码
[root@kylin10sp3 mysql]# bin/mysql -S /data/mysql-replica01/mysql.sock -uroot -p
[root@kylin10sp3 mysql]# bin/mysql -S /data/mysql-replica02/mysql.sock -uroot -p
设置root账号密码
mysql> ALTER USER 'root'@'localhost' IDENTIFIED BY 'root-password';如上,连接另外一个实例修改root密码
2、创建新库、账号并授权(DBA)
参考:MySQL Administration (mysqltutorial.org)
2.1 创建数据库
字符集参考MySQL :: MySQL 5.7 Reference Manual :: 10.5 Configuring Application Character Set and Collation
以root账号,创建数据库testdb,字符集选择utf8mb4,排序utf8mb4_unicode_ci
mysql> create database if not exists testdb CHARACTER SET utf8mb4 COLLATE utf8mb4_unicode_ci;2.2 创建数据库账号并授权
MySQL :: MySQL 5.7 Reference Manual :: 13.7.1 Account Management Statements
创建数据库账号mytest并授权testdb数据库的所有权限
mysql> create user mytest@'%' identified by '123';
mysql> grant all on testdb.* to mytest;
2.3 开通防火墙
firewall-cmd --permanent --zone=public --add-port=3306/tcp
firewall-cmd --zone=public --add-port=3306/tcp
2.4 创建样例数据库并授权
mysql> create database if not exists classicmodels CHARACTER SET utf8mb4 COLLATE utf8mb4_unicode_ci;
mysql> grant all on classicmodels.* to mytest;
# 收回授权
mysql> revoke all on classicmodels.* from mytest;3、MySQL基础-建模
3.1 连接到MySQL Server导入样例数据
参见How to Connect to MySQL Server (mysqltutorial.org)
参考How to Load Sample Database into MySQL Database Server (mysqltutorial.org)
mysqlsampledatabase.sql
mysql样例库Sakila 下载地址:MySQL :: Sakila Sample Database :: 4 Installation
$ mysql -umytest -p'123' -h 192.168.199.134
3.2 逆向模型
MySQL workbench: 菜单Database->Reverse Engineer...
3.3 建模教程(正向工程)
参考:MySQL :: MySQL Workbench Manual :: 9.3 Modeling Tutorials
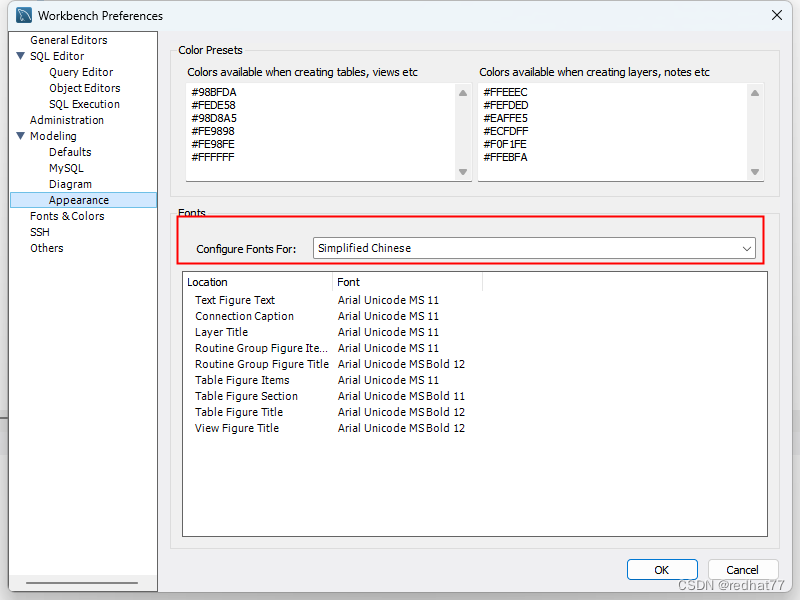
显示中文设置,模型内的中文显示乱码,设置方式:菜单Edit->Preferences,Modeling->Appearance,Fonts选择simplified chinese,可以识别
4、MySQL基础-数据操作
参考:MySQL :: MySQL 5.7 Reference Manual :: 13.2 Data Manipulation Statements
4.1查询数据
单表查询:MySQL SELECT FROM (mysqltutorial.org)/
排序:MySQL ORDER BY (mysqltutorial.org)
过滤:MySQL WHERE (mysqltutorial.org)
连接join:MySQL Join Made Easy For Beginners (mysqltutorial.org)
分组:MySQL GROUP BY (mysqltutorial.org)
子查询:MySQL Subquery (mysqltutorial.org)
集合操作:MySQL UNION (mysqltutorial.org)
4.2修改数据
插入多行数据示例:MySQL Insert Multiple Rows By Practical Examples (mysqltutorial.org)
更新数据:MySQL UPDATE


 4521
4521

 被折叠的 条评论
为什么被折叠?
被折叠的 条评论
为什么被折叠?
 到【灌水乐园】发言


