


环境:
![]()

从上文找到 maven home对conf/settings.xml中的mirros和profiles进行粘贴
<mirrors>
      <mirror>
        <id>nexus-aliyun</id>
        <mirrorOf>central</mirrorOf>
        <name>Nexus aliyun</name>
        <url>http://maven.aliyun.com/nexus/content/groups/public</url>
      </mirror>
  </mirrors>

  <profiles>
         <profile>
              <id>jdk-1.8</id>
              <activation>
                <activeByDefault>true</activeByDefault>
                <jdk>1.8</jdk>
              </activation>
              <properties>
                <maven.compiler.source>1.8</maven.compiler.source>
                <maven.compiler.target>1.8</maven.compiler.target>
                <maven.compiler.compilerVersion>1.8</maven.compiler.compilerVersion>
              </properties>
         </profile>
  </profiles>
Spring家族
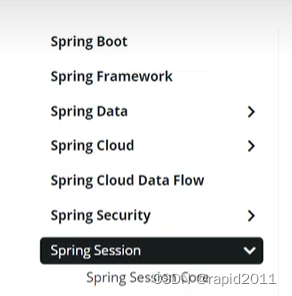
SpringBoot2基于Spring Framework5,而Spring Framework是基于Java8
SpringBoot是更高级的应用,整合Spring家族其他成员,简化配置
特点:社区活跃,经常升级
官方文档:Spring Boot 点击GA标记版本的Reference DOC
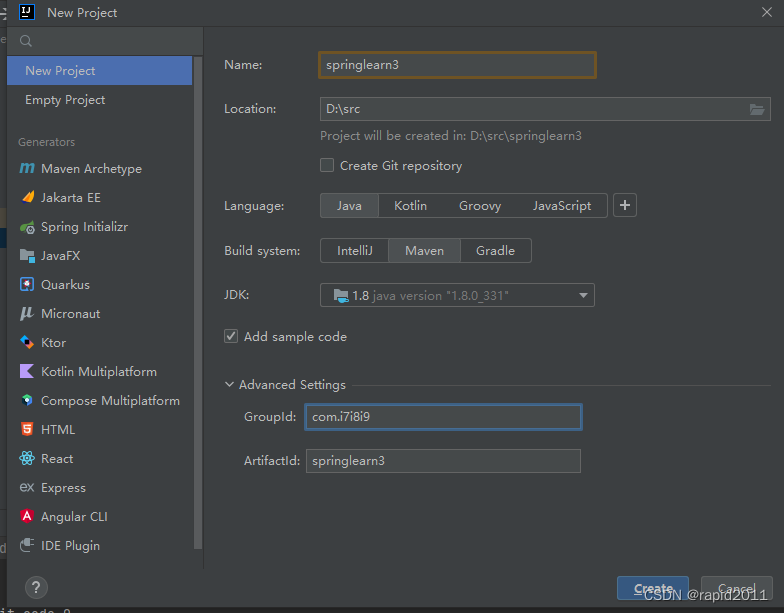
idea:
确认maven使用的是自己安装的,如下
注意修改Groupid
 创建出来可以运行
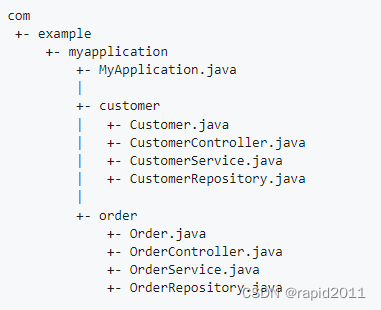
建立主程序类 com.i7i8i9./boot/main/
MainApplication
@SpringBootApplication   //告诉SPringBoot这是一个SpringBoot应用,这是主程序类
public class MainApplication {
    public static void main(String[] args) {
        SpringApplication.run(MainApplication.class,args);
    }
}
建立一个controller
//@ResponseBody   //可以卸载某个方法上,也可以写在类上,代表所有方法均返回字符串写给浏览器而不是跳转页面
//@Controller
@RestController   //以上二者合体
public class HelloConroller {


    @RequestMapping("/hello")
    public String handle01(){
        return "Hello,i7i8i9";
    }
}
强大能力
springboot整合了其他框架,包括tomcat,所有配置都可以在一个properties中完成
比如修改端口号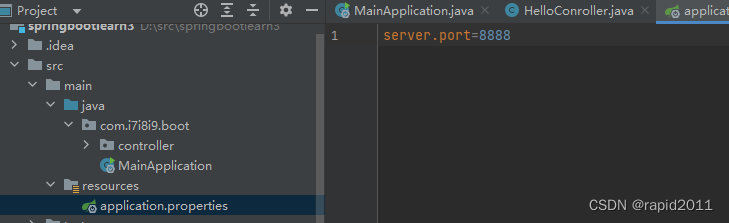
具体可以配置哪些,参照官方文档
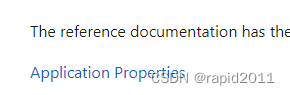
https://docs.spring.io/spring-boot/docs/current/reference/html/application-properties.html#appendix.application-properties部署
fat jars Getting Started
选中clean ,package 点击右侧的执行箭头
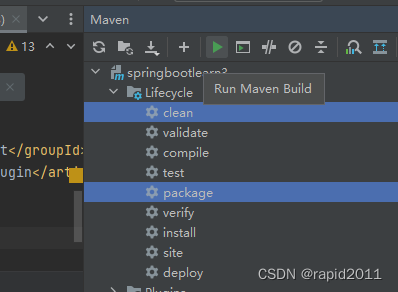
完成后在target中找到
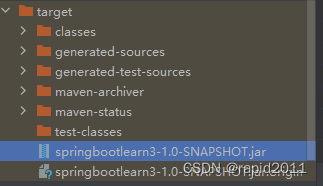
复制到一个文件夹,对其执行cmd 之后 java -jar 即可看到网站已经启动
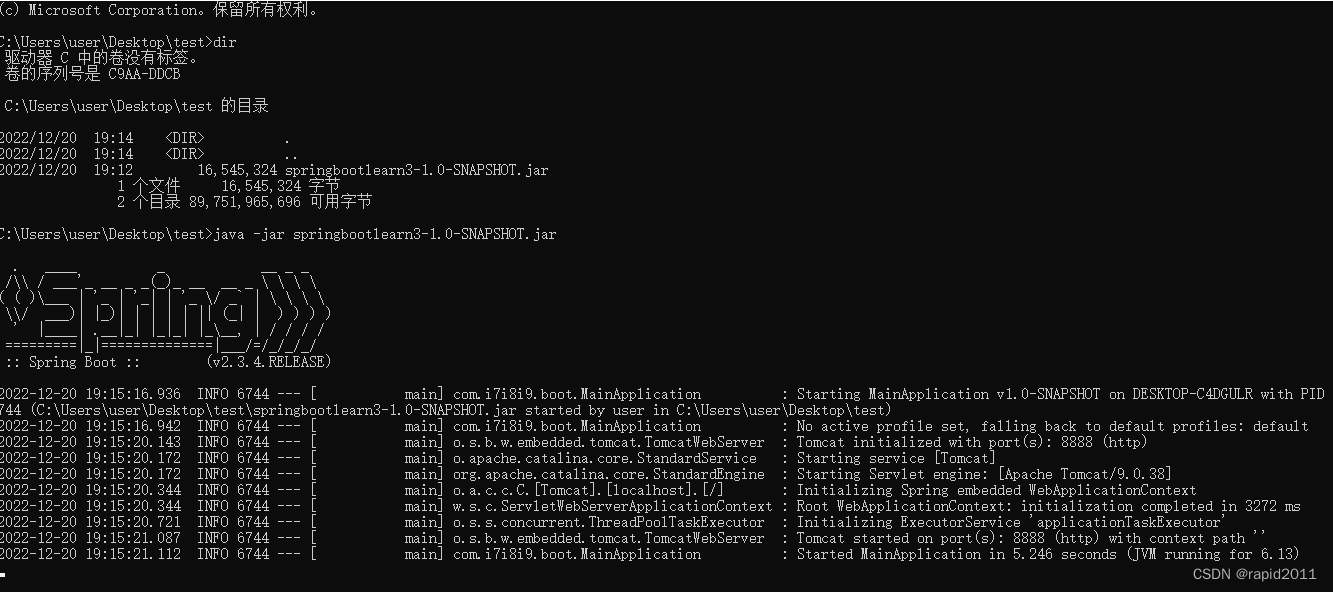
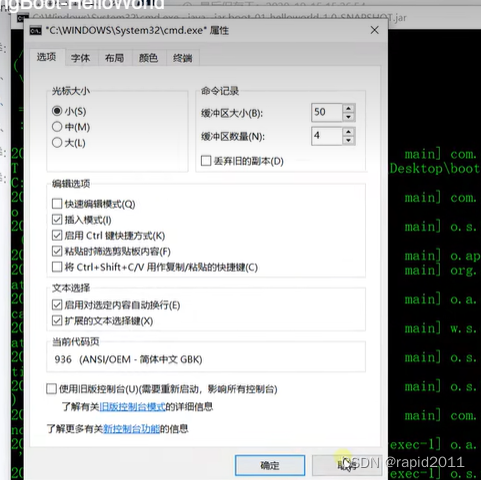
注意cmd不要使用快速编辑模式,否则鼠标点一下就会卡住
cmd窗口头部白框右键
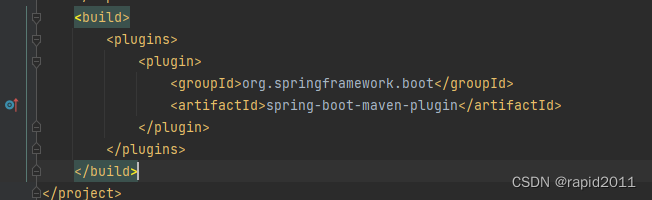
pom说明
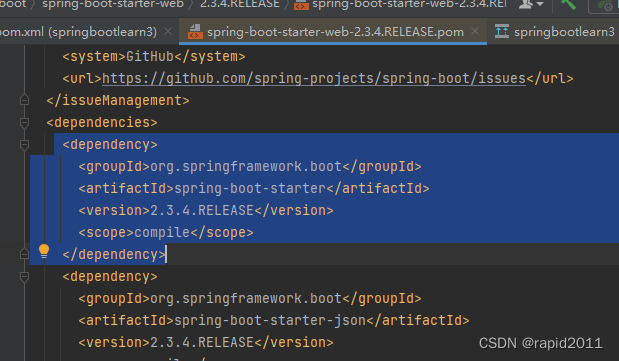
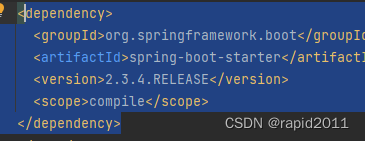
parent是做依赖管理的,声明了是2.3.4.RELEASE,则其它依赖可以不必指定版本
<parent>
        <groupId>org.springframework.boot</groupId>
        <artifactId>spring-boot-starter-parent</artifactId>
        <version>2.3.4.RELEASE</version>
    </parent>
点击中间的spring-boot-starter-parent可以进入爷爷项目
<project xmlns="http://maven.apache.org/POM/4.0.0" xsi:schemaLocation="http://maven.apache.org/POM/4.0.0 http://maven.apache.org/xsd/maven-4.0.0.xsd" xmlns:xsi="http://www.w3.org/2001/XMLSchema-instance">
  <modelVersion>4.0.0</modelVersion>
  <parent>
    <groupId>org.springframework.boot</groupId>
    <artifactId>spring-boot-dependencies</artifactId>
    <version>2.3.4.RELEASE</version>
  </parent>
  <artifactId>spring-boot-starter-parent</artifactId>
  <packaging>pom</packaging>
  <name>spring-boot
再点击parent中的spring-boot-dependencies,可以进入太爷项目
其中有properties声明了依赖版本
<properties>
<activemq.version>5.15.13</activemq.version>
<antlr2.version>2.7.7</antlr2.version>
<appengine-sdk.version>1.9.82</appengine-sdk.version>
<artemis.version>2.12.0</artemis.version>
<aspectj.version>1.9.6</aspectj.version>
<assertj.version>3.16.1</assertj.version>
<atomikos.version>4.0.6</atomikos.version>
<awaitility.version>4.0.3</awaitility.version>
<bitronix.version>2.1.4</bitronix.version>
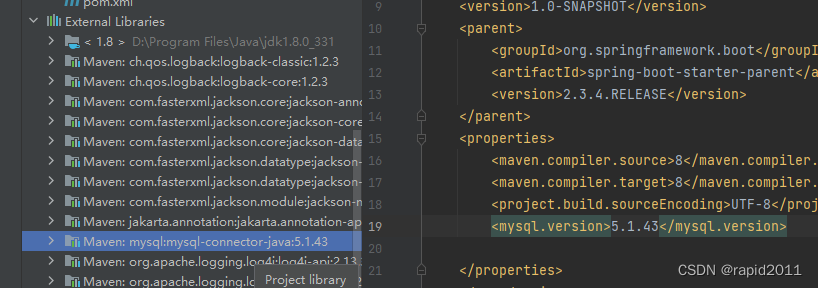
<build-helper-maven-plugin.比如在pom中配置mysql驱动
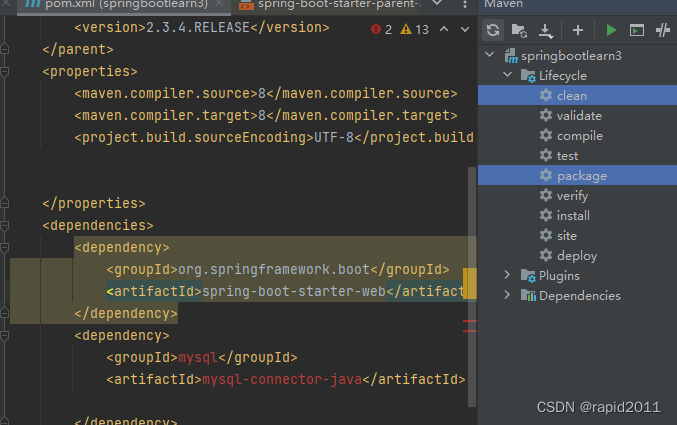
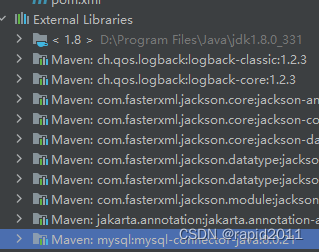
配置之后点击右侧maven的 刷新,就可以引入新依赖到external lib
其版本符合太爷归档

不想用其裁决的驱动
比如想用mysql5
1)先从太爷拿到当前key
<mysql.version>8.0.21</mysql.version>
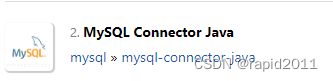
2)来到maven仓库,搜索mysql,找到for java
想使用
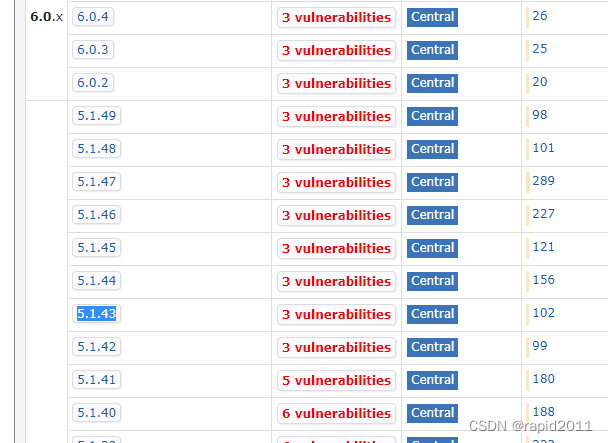
3)那么修改pom properties,添加类似太爷key,增加version要求,重新刷新mvn 依赖
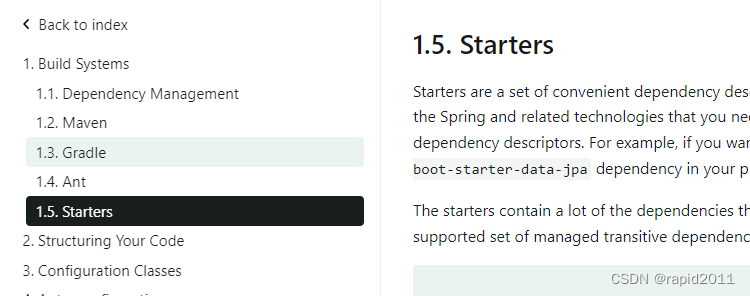
Starters 场景启动器
简化开发
Spring Boot Reference Documentation
只要引入一个Starter,官方的依赖全部引入
Starter官方命名方式都类似 spring-boot-starter-*
第三方命名就是thirdpartyproject-spring-boot-starter.
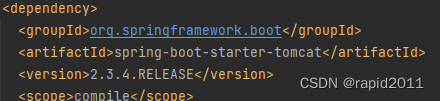
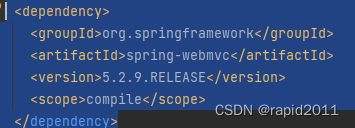
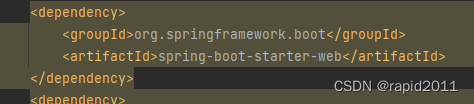
引入一个web starter,分析其依赖树
<artifactId>spring-boot-starter-web</artifactId>
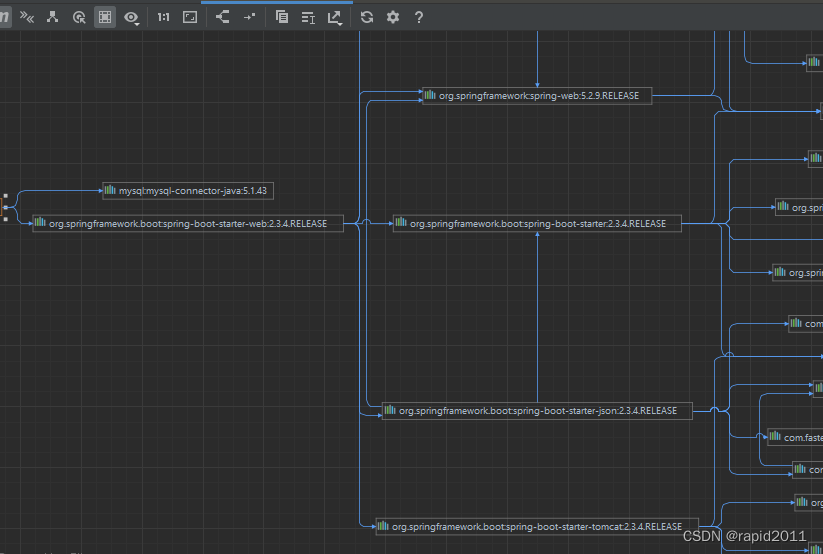
另外从其太爷中可以看到最基本的依赖
<artifactId>spring-boot-starter</artifactId>
自动配置
1)自动配好tomcat
根据Starter-web场景启动器引入
配置tomcat
2)自动配好springmvc
根据Starter-web场景启动器引入
自动配好SpringMvc常用组件
3)自动配好web常见功能,如字符编码拦截器
比如:dispatcherServlet characterEncodingFilter保证返回中文不乱码
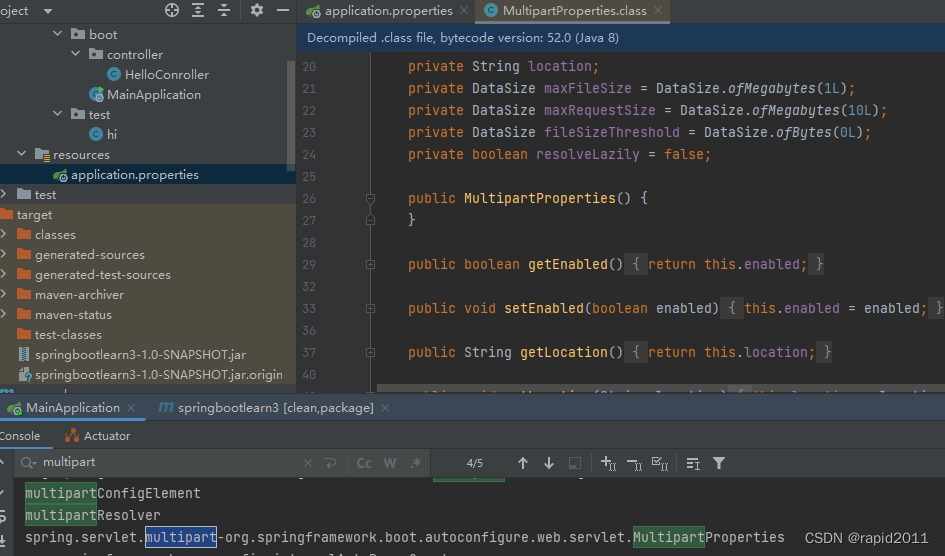
文件上传解析器multipartResolver
在main中验证
public class MainApplication {
public static void main(String[] args) {
//返回IOC容器
ConfigurableApplicationContext applicationContext= SpringApplication.run(MainApplication.class,args);
//查看容器中的组件
String[] names= applicationContext.getBeanDefinitionNames();
for (String name:names) {
System.out.println(name);
}
}
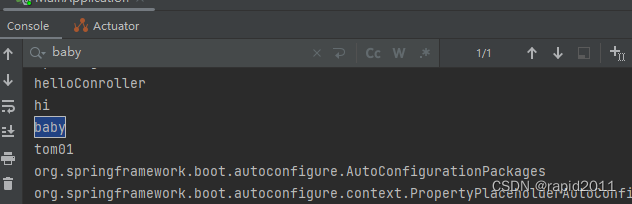
}运行会输出
org.springframework.context.annotation.internalConfigurationAnnotationProcessor
org.springframework.context.annotation.internalAutowiredAnnotationProcessor
org.springframework.context.annotation.internalCommonAnnotationProcessor
org.springframework.context.event.internalEventListenerProcessor
org.springframework.context.event.internalEventListenerFactory
mainApplication
org.springframework.boot.autoconfigure.internalCachingMetadataReaderFactory
helloConroller
org.springframework.boot.autoconfigure.AutoConfigurationPackages
org.springframework.boot.autoconfigure.context.PropertyPlaceholderAutoConfiguration
propertySourcesPlaceholderConfigurer
org.springframework.boot.autoconfigure.websocket.servlet.WebSocketServletAutoConfiguration$TomcatWebSocketConfiguration
websocketServletWebServerCustomizer
org.springframework.boot.autoconfigure.websocket.servlet.WebSocketServletAutoConfiguration
org.springframework.boot.autoconfigure.web.servlet.ServletWebServerFactoryConfiguration$EmbeddedTomcat
tomcatServletWebServerFactory
org.springframework.boot.autoconfigure.web.servlet.ServletWebServerFactoryAutoConfiguration
servletWebServerFactoryCustomizer
tomcatServletWebServerFactoryCustomizer
org.springframework.boot.context.properties.ConfigurationPropertiesBindingPostProcessor
org.springframework.boot.context.internalConfigurationPropertiesBinderFactory
org.springframework.boot.context.internalConfigurationPropertiesBinder
org.springframework.boot.context.properties.BoundConfigurationProperties
org.springframework.boot.context.properties.ConfigurationBeanFactoryMetadata
server-org.springframework.boot.autoconfigure.web.ServerProperties
webServerFactoryCustomizerBeanPostProcessor
errorPageRegistrarBeanPostProcessor
org.springframework.boot.autoconfigure.web.servlet.DispatcherServletAutoConfiguration$DispatcherServletConfiguration
dispatcherServlet
spring.mvc-org.springframework.boot.autoconfigure.web.servlet.WebMvcProperties
org.springframework.boot.autoconfigure.web.servlet.DispatcherServletAutoConfiguration$DispatcherServletRegistrationConfiguration
dispatcherServletRegistration
org.springframework.boot.autoconfigure.web.servlet.DispatcherServletAutoConfiguration
org.springframework.boot.autoconfigure.task.TaskExecutionAutoConfiguration
taskExecutorBuilder
applicationTaskExecutor
spring.task.execution-org.springframework.boot.autoconfigure.task.TaskExecutionProperties
org.springframework.boot.autoconfigure.web.servlet.error.ErrorMvcAutoConfiguration$WhitelabelErrorViewConfiguration
error
beanNameViewResolver
org.springframework.boot.autoconfigure.web.servlet.error.ErrorMvcAutoConfiguration$DefaultErrorViewResolverConfiguration
conventionErrorViewResolver
org.springframework.boot.autoconfigure.web.servlet.error.ErrorMvcAutoConfiguration
errorAttributes
basicErrorController
errorPageCustomizer
preserveErrorControllerTargetClassPostProcessor
spring.resources-org.springframework.boot.autoconfigure.web.ResourceProperties
org.springframework.boot.autoconfigure.web.servlet.WebMvcAutoConfiguration$EnableWebMvcConfiguration
requestMappingHandlerAdapter
requestMappingHandlerMapping
welcomePageHandlerMapping
mvcConversionService
mvcValidator
mvcContentNegotiationManager
mvcPathMatcher
mvcUrlPathHelper
viewControllerHandlerMapping
beanNameHandlerMapping
routerFunctionMapping
resourceHandlerMapping
mvcResourceUrlProvider
defaultServletHandlerMapping
handlerFunctionAdapter
mvcUriComponentsContributor
httpRequestHandlerAdapter
simpleControllerHandlerAdapter
handlerExceptionResolver
mvcViewResolver
mvcHandlerMappingIntrospector
org.springframework.boot.autoconfigure.web.servlet.WebMvcAutoConfiguration$WebMvcAutoConfigurationAdapter
defaultViewResolver
viewResolver
requestContextFilter
org.springframework.boot.autoconfigure.web.servlet.WebMvcAutoConfiguration
formContentFilter
org.springframework.boot.autoconfigure.jmx.JmxAutoConfiguration
mbeanExporter
objectNamingStrategy
mbeanServer
org.springframework.boot.autoconfigure.admin.SpringApplicationAdminJmxAutoConfiguration
springApplicationAdminRegistrar
org.springframework.boot.autoconfigure.aop.AopAutoConfiguration$ClassProxyingConfiguration
org.springframework.boot.autoconfigure.aop.AopAutoConfiguration
org.springframework.boot.autoconfigure.availability.ApplicationAvailabilityAutoConfiguration
applicationAvailability
org.springframework.boot.autoconfigure.context.ConfigurationPropertiesAutoConfiguration
org.springframework.boot.autoconfigure.context.LifecycleAutoConfiguration
lifecycleProcessor
spring.lifecycle-org.springframework.boot.autoconfigure.context.LifecycleProperties
org.springframework.boot.autoconfigure.jackson.JacksonAutoConfiguration$Jackson2ObjectMapperBuilderCustomizerConfiguration
standardJacksonObjectMapperBuilderCustomizer
spring.jackson-org.springframework.boot.autoconfigure.jackson.JacksonProperties
org.springframework.boot.autoconfigure.jackson.JacksonAutoConfiguration$JacksonObjectMapperBuilderConfiguration
jacksonObjectMapperBuilder
org.springframework.boot.autoconfigure.jackson.JacksonAutoConfiguration$ParameterNamesModuleConfiguration
parameterNamesModule
org.springframework.boot.autoconfigure.jackson.JacksonAutoConfiguration$JacksonObjectMapperConfiguration
jacksonObjectMapper
org.springframework.boot.autoconfigure.jackson.JacksonAutoConfiguration
jsonComponentModule
org.springframework.boot.autoconfigure.http.HttpMessageConvertersAutoConfiguration$StringHttpMessageConverterConfiguration
stringHttpMessageConverter
org.springframework.boot.autoconfigure.http.JacksonHttpMessageConvertersConfiguration$MappingJackson2HttpMessageConverterConfiguration
mappingJackson2HttpMessageConverter
org.springframework.boot.autoconfigure.http.JacksonHttpMessageConvertersConfiguration
org.springframework.boot.autoconfigure.http.HttpMessageConvertersAutoConfiguration
messageConverters
org.springframework.boot.autoconfigure.info.ProjectInfoAutoConfiguration
spring.info-org.springframework.boot.autoconfigure.info.ProjectInfoProperties
org.springframework.boot.autoconfigure.task.TaskSchedulingAutoConfiguration
taskSchedulerBuilder
spring.task.scheduling-org.springframework.boot.autoconfigure.task.TaskSchedulingProperties
org.springframework.boot.autoconfigure.web.client.RestTemplateAutoConfiguration
restTemplateBuilder
org.springframework.boot.autoconfigure.web.embedded.EmbeddedWebServerFactoryCustomizerAutoConfiguration$TomcatWebServerFactoryCustomizerConfiguration
tomcatWebServerFactoryCustomizer
org.springframework.boot.autoconfigure.web.embedded.EmbeddedWebServerFactoryCustomizerAutoConfiguration
org.springframework.boot.autoconfigure.web.servlet.HttpEncodingAutoConfiguration
characterEncodingFilter
localeCharsetMappingsCustomizer
org.springframework.boot.autoconfigure.web.servlet.MultipartAutoConfiguration
multipartConfigElement
multipartResolver
spring.servlet.multipart-org.springframework.boot.autoconfigure.web.servlet.MultipartProperties
org.springframework.aop.config.internalAutoProxyCreator
4)默认的包结构
主程序所在的包及其下面的所有子包里面的组件都会被默认扫描进来
但是其主程序所在包外面的包不会被扫描,也就是注解无效
如果一定要用则给主程序增加扫描注解 ,扩大扫描范围
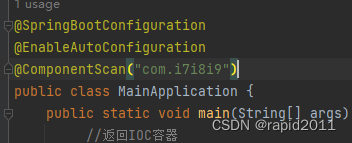
@SpringBootApplication(scanBasePackages = "com.i7i8i9")
或者用@ComponentScan指定也可以:
经分析得出@SpringBootApplication是由三个注解合成
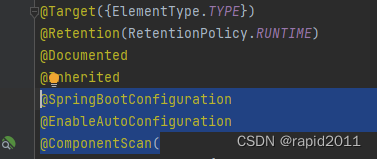
可以把这三个一起复制到主程序
5)各种配置拥有默认值
比如上传文件大小默认为1M

这些参数最终都映射到到了java类
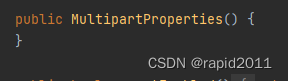
进一步在console也可以找到这个类
所以配置文件中的值最终绑定在某个类上,而这个类会在springboot主程序所创建的IOC容器中创建对象
6)按需加载所有配置项
全部配置集中在
上层依赖
在其里面有
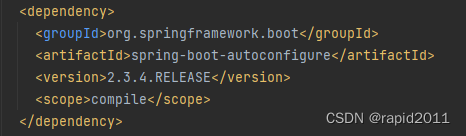
<dependency>
  <groupId>org.springframework.boot</groupId>
  <artifactId>spring-boot-autoconfigure</artifactId>
  <version>2.3.4.RELEASE</version>
  <scope>compile</scope>
</dependency>
注解
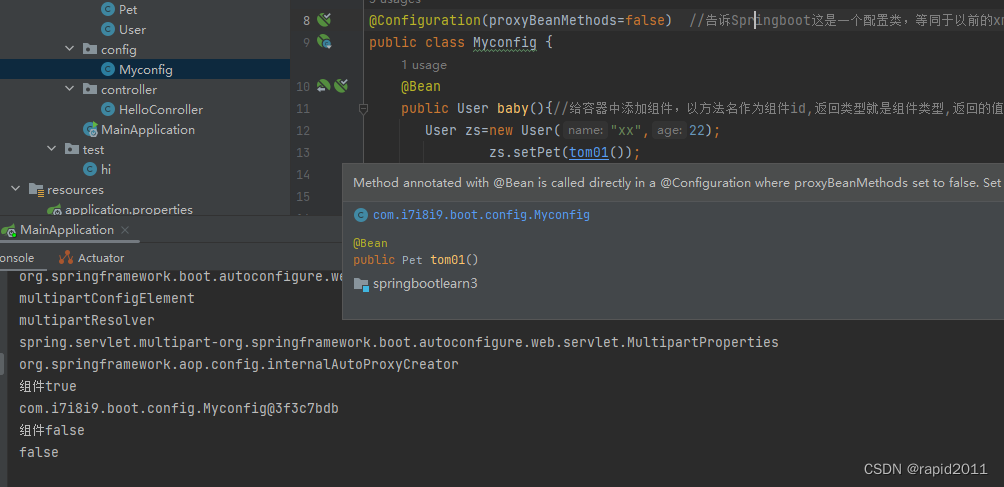
增加config文件夹,在其下建立配置类
在配置类中,通过在方法上标注@Bean 给容器注册组件,默认单实例
@Configuration  //告诉Springboot这是一个配置类,等同于以前的xml
public class Myconfig {
    @Bean
    public User baby(){//给容器中添加组件,以方法名作为组件id,返回类型就是组件类型,返回的值就是组件在容器中的实例
        return new User("a",12);

    }
    @Bean
    public Pet tom01(){
        return new Pet("jack");

    }
}
再次运行本项目,执行后可以在输出中看到,这些注释生效了,生成了对象实例
1)通过配置生成的是唯一的对象
Pet ak01=applicationContext.getBean("tom01", Pet.class);
Pet ak02=applicationContext.getBean("tom01", Pet.class);
System.out.println("组件"+(ak02==ak01));
true
2)配置类本身也是组件
Myconfig helloConfig=applicationContext.getBean(Myconfig.class);
System.out.println(helloConfig);
输出
组件true
com.i7i8i9.boot.config.Myconfig$$EnhancerBySpringCGLIB$$52ab910e@78d39a69
3)代理默认为true
通过点击@configurtaion可以看到
boolean proxyBeanMethods() default true;
等价于
@Configuration(proxyBeanMethods=true)
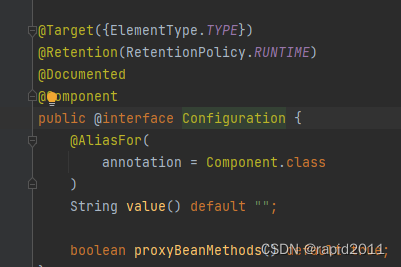
为true就是 Full模式
为false就是lite模式
主要用于组件依赖
举例:
User打算养宠物
public class User {
    private  String name;
    private  Integer age;
    private Pet pet;

    public Pet getPet() {
        return pet;
    }

    public void setPet(Pet pet) {
        this.pet = pet;
    }
修改配置类
@Configuration(proxyBeanMethods=true)  //告诉Springboot这是一个配置类,等同于以前的xml
public class Myconfig {
    @Bean
    public User baby(){//给容器中添加组件,以方法名作为组件id,返回类型就是组件类型,返回的值就是组件在容器中的实例
       User zs=new User("xx",22)
               zs.setPet(tom01());
        return zs;

    }
    @Bean
    public Pet tom01(){
        return new Pet("jack");

    }
}
public class MainApplication {
public static void main(String[] args) {
//返回IOC容器
ConfigurableApplicationContext applicationContext= SpringApplication.run(MainApplication.class,args);
//查看容器中的组件
String[] names= applicationContext.getBeanDefinitionNames();
for (String name:names) {
System.out.println(name);
}
Pet ak01=applicationContext.getBean("tom01", Pet.class);
Pet ak02=applicationContext.getBean("tom01", Pet.class);
System.out.println("组件"+(ak02==ak01));
Myconfig helloConfig=applicationContext.getBean(Myconfig.class);
System.out.println(helloConfig);
Pet pet1=helloConfig.tom01();
Pet pet2=helloConfig.tom01();
User usr=helloConfig.baby();
System.out.println("组件"+(pet1==pet2));
//因为usr里面有个pet属性,也就是依赖于pet,如果代理设置为ture,则user创建pet时会先在spring容器中查找是否存在
//存在就不单独创建,这是真正的依赖
System.out.println(usr.getPet()==pet1);
}
}如果设置为false,则baby创建pet时不会去容器中检查,也就是实际上没有形成依赖,
优点是启动速度快些
新注解1 @Import ()
给容器中自动创建引入class的对象,本质是调用其无参构造器,注意这不是通过
applicationContext.getBean得来的,所以与其生成不同的对象
比如在配置文件中写
@Import({HelloConroller.class, DBHelper.class}),默认组件名字就是全类名
@Import({User.class, DBHelper.class})
@Configuration(proxyBeanMethods=false)  //告诉Springboot这是一个配置类,等同于以前的xml
public class Myconfig {
    @Bean
    public User baby(){//给容器中添加组件,以方法名作为组件id,返回类型就是组件类型,返回的值就是组件在容器中的实例
       User zs=new User("xx",22);
               zs.setPet(tom01());
        return zs;

    }
    @Bean
    public Pet tom01(){
        return new Pet("jack");

    }
}
让主程序输出结果
public class MainApplication {
    public static void main(String[] args) {
         //返回IOC容器
        ConfigurableApplicationContext applicationContext= SpringApplication.run(MainApplication.class,args);
        //查看容器中的组件
       String[] names= applicationContext.getBeanDefinitionNames();
        for (String name:names) {
            System.out.println(name);
        }

        Pet ak01=applicationContext.getBean("tom01", Pet.class);
        Pet ak02=applicationContext.getBean("tom01", Pet.class);
        System.out.println("组件"+(ak02==ak01));
        Myconfig helloConfig=applicationContext.getBean(Myconfig.class);
        System.out.println(helloConfig);
        Pet pet1=helloConfig.tom01();
        Pet pet2=helloConfig.tom01();
        User usr=helloConfig.baby();
        System.out.println("组件"+(pet1==pet2));
        //因为usr里面有个pet属性,也就是依赖于pet,如果代理设置为ture,则user创建pet时会先在spring容器中查找是否存在
        //存在就不单独创建,这是真正的依赖
        System.out.println(usr.getPet()==pet1);
        String[] beanNamesForTypes=applicationContext.getBeanNamesForType(User.class);
        System.out.println("==================");
        for (String s:beanNamesForTypes
             ) {
            System.out.println(s);
        }
    }
}
最后输出:
==================
com.i7i8i9.boot.bean.User
baby
可见User.class的对象有两个,一个是getBean得来的,一个是Import得来的
新注解2
条件装配 ,满足条件时才会注入相应的组件
搜索到该类

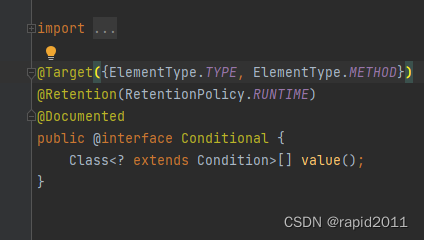
选中Conditional 按下cirl+H

比如On代表有,missing代表没有
举例 @ConditionalOnBean(name ="tom01") //表示如果没有tome01这个依赖,那么也不需要生成baby
甚至可以给它标记在类上,则没有它,类中对象都不生成
public class Myconfig {
    @ConditionalOnBean(name ="tom01") //表示如果没有tome01这个依赖,那么也不需要生成baby
    @Bean
    public User baby(){//给容器中添加组件,以方法名作为组件id,返回类型就是组件类型,返回的值就是组件在容器中的实例
       User zs=new User("xx",22);
               zs.setPet(tom01());
        return zs;

    }
   // @Bean
    public Pet tom01(){  //或生成名称为tom01的组件
        return new Pet("jack");

    }
}
boolean tom=applicationContext.containsBean("tom");//false
System.out.println("tom="+tom);
boolean u=applicationContext.containsBean("baby");//没有conditional就是true,有了就是false
System.out.println("user="+u);
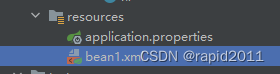
新注解3ImportResource
表示在配置类中导入类似bean1.xml文件,以避免逐个去重写
@ImportResource("classpath:beans.xml")
注意XML文件存放地址,跟Spring不同,否则会报
Caused by: java.io.FileNotFoundException: class path resource [bean2.xml] cannot be opened because it does not exist
<bean name="dog" class="com.i7i8i9.boot.bean.Dog"></bean>验证 结果为true
 boolean dog= applicationContext.containsBean("dog");
        System.out.println("dog"+dog);


 2908
2908

 被折叠的 条评论
为什么被折叠?
被折叠的 条评论
为什么被折叠?
 到【灌水乐园】发言


