


1、HAProxy 介绍
HAProxy(High Availability Proxy,高可用性代理)是一款开源的高性能 TCP/HTTP 反向代理服务器与负载均衡器。它采用事件驱动、单进程多线程(或多进程)**模型,能高效处理海量并发连接,广泛应用于高流量场景(如大型网站、服务集群),实现**请求负载分发、服务高可用(故障转移)、流量控制等核心能力。
核心优势:
- 高性能:采用事件驱动架构,单进程可处理数万并发连接
- 高可用性:支持健康检查、故障转移等机制
- 灵活性:支持四层(TCP)和七层(HTTP)代理
- 可靠性:广泛应用于各大互联网公司,经过生产环境验证
- 四层通过ip+port决定负载均衡的去向
- 七层根据应用层信息(例如URI、Cookie、 HTTP header等信息)进行解析,决定是否需要进行负载均衡
主要应用场景:
- Web服务器负载均衡
- 数据库负载均衡
- SSL终端代理
- 高可用解决方案
2、HAProxy 安装及配置
[root@haproxy ~]# yum install haproxy -y
[root@haproxy ~]# haproxy -v
HAProxy version 2.4.22-f8e3218 2023/02/14 - https://haproxy.org/
# haproxy的主配置文件:/etc/haproxy/haproxy.cfg
2.1 配置文件说明
HAProxy 配置文件(通常为/etc/haproxy/haproxy.cfg)采用分段式结构,核心包含global(全局配置)、frontend(前端请求入口)、backend(后端服务器集群)、listen(前端 + 后端合并简化版)等段。
2.1.1 全局配置段 (global)
用于设置 HAProxy 进程的全局参数(如权限、日志、性能调优),影响整个服务运行环境。
示例配置及参数解析:
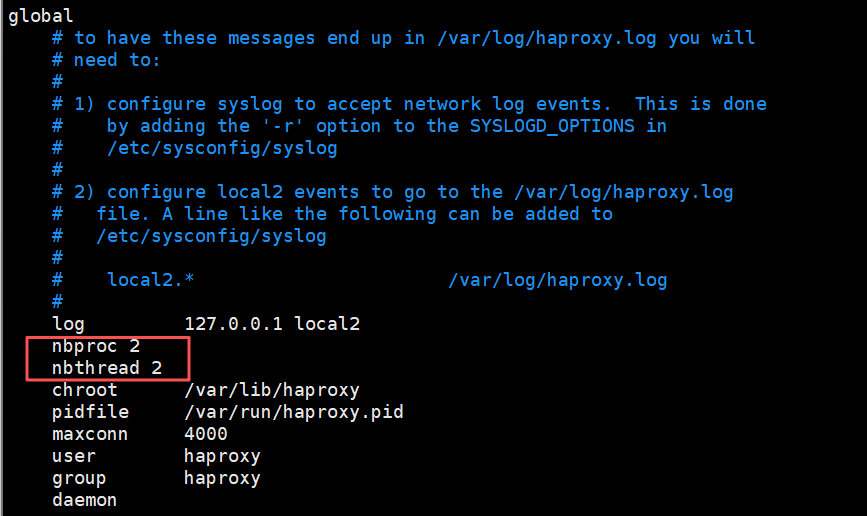
global
    log         127.0.0.1 local2  #定义日志输出设置,local2是日志输出设置
    chroot      /var/lib/haproxy  #修改haproxy的工作目录至指定的目录
    pidfile     /var/run/haproxy.pid  #指定pid文件
    maxconn     4000    #默认最大连接数
    user        haproxy  #指定haproxy的运行用户
    group       haproxy  #指定haproxy的运行组
    daemon   #让haproxy以守护进程的方式工作于后台
    stats socket /var/lib/haproxy/stats  #指定haproxy的套接字文件
    nbproc 2 #指定haproxy的worker进程数量, 默认是1个
	cpu-map 1 0 #指定第一个work绑定第一个cpu核心
	cpu-map 2 1 #指定第二个work绑定第二个cpu核心
	nbthread 2 #指定haproxy的线程数量, 默认每个进程一个线程, 此参数与nbproc互斥
	maxsslconn 100000 #每个haproxy进程ssl最大连接数,用于haproxy配置了证书的场景下
	maxconnrate 100 #指定每个客户端每秒建立连接的最大数量
#如果同时设置线程和进程,服务就会启动不了
[root@haproxy ~]# systemctl restart haproxy.service
Job for haproxy.service failed because the control process exited with error code.
See "systemctl status haproxy.service" and "journalctl -xeu haproxy.service" for details.
(1)启用多进程
在global中添加如下配置

[root@haproxy ~]# systemctl restart haproxy.service
# 查看进程树,能看到主进程下有2个子进程(因为nbproc=2)
[root@haproxy ~]# pstree -p | grep haproxy
           |-haproxy(39681)-+-haproxy(39684)
           |                 -haproxy(39685)
# 查看进程绑定的CPU核心(PSR列是核心编号),39684绑定0号,39685绑定1号
[root@haproxy ~]# ps -axo pid,psr,cmd  | grep haproxy | grep -v grep
  39681   1 /usr/sbin/haproxy -Ws -f /etc/haproxy/haproxy.cfg -f /etc/haproxy/conf.d -p /run/haproxy.pid
  39684   0 /usr/sbin/haproxy -Ws -f /etc/haproxy/haproxy.cfg -f /etc/haproxy/conf.d -p /run/haproxy.pid
  39685   1 /usr/sbin/haproxy -Ws -f /etc/haproxy/haproxy.cfg -f /etc/haproxy/conf.d -p /run/haproxy.pid
(2)启用多线程
[root@haproxy ~]# systemctl restart haproxy.service
# 查看进程树,主进程下有一个子进程,子进程里有多个线程({haproxy}是线程)
[root@haproxy ~]# pstree -p | grep haproxy
           |-haproxy(39697)---haproxy(39699)-+-{haproxy}(39700)
           |                                 |-{haproxy}(39701)
           |                                 |-{haproxy}(39702)
           |                                 |-{haproxy}(39703)
           |                                 `-{haproxy}(39704)
# 查看指定进程(39699)下的线程(SPID是线程ID)
[root@haproxy ~]# ps -T -p 39699
    PID    SPID TTY          TIME CMD
  39699   39699 ?        00:00:00 haproxy
  39699   39700 ?        00:00:00 haproxy
  39699   39701 ?        00:00:00 haproxy
  39699   39702 ?        00:00:00 haproxy
  39699   39703 ?        00:00:00 haproxy
  39699   39704 ?        00:00:00 haproxy
2.1.2 代理配置段 (proxies)
proxies是frontend、backend、listen的统称,共同实现 “接收请求→转发请求→处理响应” 流程:
-
defaults:默认配置项,针对以下的frontend、backend和listen生效,可以多个name也可以没有name -
frontend:定义客户端请求的入口(监听 IP / 端口、协议、ACL 路由规则等)。 -
backend:定义后端服务器集群(服务器列表、负载算法、健康检查等)。 -
listen:frontend + backend的简化版,适用于前后端逻辑简单且一一对应的场景。
[!WARNING]
name字段只能使用大小写字母,数字,‘-’(dash),’_‘(underscore),’.’ (dot)和 ‘:'(colon),并且严格区分大小写
Proxies配置-defaults
defaults 配置参数:
defaults
    mode                    http  #使用协议,http是七层,tcp是四层
    log                     global   #全局日志记录
    option                  httplog  #日志记录选项, httplog表示记录与 HTTP会话相关的各种属性值
    option                  dontlognull  #表示不记录空会话连接日志
    option http-server-close  #等待客户端完整HTTP请求的时间, 此处为等待10s。
    option forwardfor       except 127.0.0.0/8 #透传客户端真实IP至后端web服务器
    option                  redispatch  #当server Id对应的服务器挂掉后,强制定向到其他健康的服务器,重新派发
    retries                 3  #连接后端服务器失败次数
    timeout http-request    10s #等待客户端请求完全被接收和处理的最长时间
    timeout queue           1m  #如果请求在队列中等待时间超过 1m,haproxy会返回503错误
    timeout connect         10s  #客户端请求从haproxy到后端server最长连接等待时间(TCP连接之前),默认单位ms
    timeout client          1m  #设置haproxy与客户端的最长非活动时间,默认单位ms,建议和timeout server相同
    timeout server          1m  #客户端请求从haproxy到后端服务端的请求处理超时时长(TCP连接之后),默认单位ms,如果超时,会出现502错误,此值建议设置较大些,访止502错误
    timeout http-keep-alive 10s  #session 会话保持超时时间,此时间段内会转发到相同的后端服务器
    timeout check           10s  #对后端服务器的默认检测超时时间
    maxconn                 3000
	default-server inter 1000 weight 3   #指定后端服务器的默认设置
Proxies配置-frontend
frontend 配置参数:
#指定HAProxy的监听地址,可以是IPV4或IPV6,可以同时监听多个IP或端口,可同时用于listen字段中,格式如下:
bind [<address>]:<port_range> [, ...] [param*]

#注意:如果需要绑定在非本机的IP,需要开启内核参数:net.ipv4.ip_nonlocal_bind=1
示例:
frontend  jungle-web               #可以采用:业务-服务-端口号 形式命名
    bind :80,:8080					# 监听本机所有IP的80和8080端口
    bind 10.0.0.7:10080,:8801-8810,10.0.0.17:9001-9010	# 同时监听指定IP的端口,以及端口范围
    mode  http|tcp              #指定负载协议类型
    use_backend <backend_name>  #调用的后端服务器组名称
Proxies配置-backend
定义一组后端服务器,backend服务器将被frontend调用。
backend
	mode  http|tcp      #指定负载协议类型,和对应的frontend必须一致
	server              #定义后端real server
server配置如下:
check  #对指定real server进行健康状态检查,如果不加此设置,默认不开启检查。默认对相应的后端服务器IP和端口利用TCP连接进行周期性健康检查,注意必须指定端口才能进行健康检查;
    addr  <IP>    #可指定的健康状态监测IP,可以是专门的数据网段,减少业务网络的流量;
    port  <num>   #指定的健康状态监测端口;
    inter <num>   #健康状态检查间隔时间,默认2000 ms;
    fall  <num>   #后端服务器从线上转为线下的检查的连续失效次数,默认为3;
    rise  <num>   #后端服务器从下线恢复上线的检查的连续有效次数,默认为2;
weight  <weight>  #默认为1,最大值为256,0表示不参与负载均衡,但仍接受持久连接;
backup            #将后端服务器标记为备份状态,只在所有非备份主机down机时提供服务,类似Sorry Server;
disabled          #将后端服务器标记为不可用状态,即维护状态,除了持久模式,将不再接受连接;
redirect prefix  http://www.baidu.com/      #将请求临时(302)重定向至其它URL,只适用于http模式;
maxconn <maxconn>     #当前后端server的最大并发连接数
2.2 frontend+backend 配置实例
以下是 “前端接收 HTTP 请求,按域名转发到不同后端 Web 集群” 的典型配置:
(思路:用 frontend 接收请求,然后转发到对应的 backend,backend 里的服务器处理请求):
| 主机名 | ip地址 | 说明 |
|---|---|---|
| haproxy | 192.168.2.40 | 代理服务器 |
| nginx1 | 192.168.2.42 | web服务器(nginx提供) |
| nginx2 | 192.168.2.43 | web服务器(nginx提供) |
| client | 192.168.2.41 | 客户端 |
[root@haproxy ~]# tail -11 /etc/haproxy/haproxy.cfg
frontend rch-web			# 前端名字:rch-web
	bind 192.168.2.40:80	# 监听192.168.2.40的80端口(用户访问这个地址)
	mode http				# 用七层HTTP协议
	use_backend rch-web-hjn	# 把请求转发到名为rch-web-hjn的后端
backend rch-web-hjn			# 后端名字:rch-web-hjn
	mode http				# 和前端一致,用HTTP
	option forwardfor		# 给后端传客户端真实IP
	# 后端服务器1:名字rch1,IP192.168.2.42:80,开启健康检查(每3秒查一次,3次失败下线,5次成功上线)
	server rch1 192.168.2.42:80 check inter 3000 fall 3 rise 5
	server rch2 192.168.2.43:80 check inter 3000 fall 3 rise 5
[root@haproxy ~]# systemctl restart haproxy.service

#nginx后端服务器
[root@nginx1 ~]# echo "nginx1 192.168.2.42" > /usr/share/nginx/html/index.html
[root@nginx2 ~]# echo "nginx2 192.168.2.43" > /usr/share/nginx/html/index.html

#客户端访问
[root@client ~]# for i in {1..10};do curl 192.168.2.40;done
nginx1 192.168.2.42
nginx2 192.168.2.43
nginx1 192.168.2.42
nginx2 192.168.2.43
nginx1 192.168.2.42
nginx2 192.168.2.43
nginx1 192.168.2.42
nginx2 192.168.2.43
nginx1 192.168.2.42
nginx2 192.168.2.43
frontend rch-web通过hdr(host)匹配请求域名,将192.168.2.40:80转发到192.168.2.42:80,192.168.2.43:80。- 每个
backend定义了后端服务器、负载算法、健康检查(check参数启用健康探测,异常服务器会被自动剔除)。
2.3 listen 配置实例
(思路:当 frontend 和 backend 的关系很简单(一一对应),可以用 listen 简化配置,把监听和转发写在一起)
[root@haproxy ~]# tail -6 /etc/haproxy/haproxy.cfg
listen rch-web-all		# listen名字:rch-web-all(同时承担前端和后端的角色)
	bind 192.168.2.40:80
	mode http
	option forwardfor
	server rch1 192.168.2.42:80 check inter 3000 fall 3 rise 5
	server rch2 192.168.2.43:80 check inter 3000 fall 3 rise 5
[root@haproxy ~]# systemctl restart haproxy.service
[root@client ~]# for i in {1..10};do curl 192.168.2.40;done
nginx1 192.168.2.42
nginx2 192.168.2.43
nginx1 192.168.2.42
nginx2 192.168.2.43
nginx1 192.168.2.42
nginx2 192.168.2.43
nginx1 192.168.2.42
nginx2 192.168.2.43
nginx1 192.168.2.42
nginx2 192.168.2.43
listen rch-web-all同时承担 “监听80 端口” 和 “转发到 后端服务器” 的角色。
2.4 HAProxy 日志配置
HAProxy 日志默认情况下haproxy的日志在/var/log/messages,需结合系统日志服务(如rsyslog)配置,才能完整记录请求与服务状态。
[root@haproxy ~]# vim /etc/haproxy/haproxy.cfg
global
    log         127.0.0.1 local2	#所有haproxy的日志推送到rsyslog的local2接口
    log         127.0.0.1 local1 warning	#将warn级(及以上)的日志推送到rsyslog的local1接口
defaults
    mode                    http
    log                     global	#所有frontend都默认使用global中的日志配置
注:在生产环境中,建议将日志级别调整为notice
[root@haproxy ~]# vim  /etc/rsyslog.d/haproxy.conf
$ModLoad imudp  #加载rsyslog的udp模块
$UDPServerRun 514  #监听514端口
local2.*     /var/log/haproxy.log  #local2接口对应的日志输出文件
local1.*     /var/log/haproxy_warn.log  #local1接口对应的日志输出文件
#重启rsyslog和HAProxy
[root@haproxy ~]# systemctl restart haproxy rsyslog
3. HAProxy 调度算法
HAProxy通过固定参数balance指明对后端服务器的调度算法,该参数可以配置在listen或backend选项中。
HAProxy的调度算法分为静态和动态调度算法,但是有些算法可以根据参数在静态和动态算法中相互转换。
3.1 静态算法(不考虑后端实时负载,按预设规则分配)
静态算法无状态、逻辑简单,适合后端性能均匀、无特殊会话需求的场景,且无法实时修改权重,只能靠重启HAProxy生效。
3.1.1 static-rr(静态轮询)
- 原理:按顺序循环分配请求到后端服务器(不跳过不可用服务器),不支持运行时动态调整权重及后端服务器慢启动,相当于LVS中的 wrr。
- 特点:请求分配 “绝对均匀”,但不感知服务器健康状态;若后端性能差异大,易导致 “性能差的服务器过载,性能好的闲置”。
- 场景:后端性能完全一致,且无需健康检查的测试场景。
配置(思路:用 static-rr 算法,给服务器设不同权重,权重高的被分配的请求更多):
[root@haproxy ~]# cd /etc/haproxy/conf.d/
[root@haproxy conf.d]# vim haproxy-rr.cfg
[root@haproxy conf.d]# cat haproxy-rr.cfg
listen rch-web-rr
	bind 192.168.2.40:81
	mode http
	balance static-rr	# 用静态轮询算法
	option forwardfor
	# 服务器1:权重2(会比权重1的多分配请求)
	server rch1 192.168.2.42:80 check inter 3000 fall 3 rise 5 weight 2
	# 服务器2:默认权重1
	server rch2 192.168.2.43:80 check inter 3000 fall 3 rise 5
[root@haproxy conf.d]# systemctl restart haproxy.service
#客户端访问
[root@client ~]# for i in {1..10};do curl 192.168.2.40:81;done
nginx1 192.168.2.42
nginx1 192.168.2.42
nginx2 192.168.2.43
nginx1 192.168.2.42
nginx1 192.168.2.42
nginx2 192.168.2.43
nginx1 192.168.2.42
nginx1 192.168.2.42
nginx2 192.168.2.43
nginx1 192.168.2.42
3.1.2 first(优先第一个服务器)
- 原理:始终将请求分配给列表中第一个可用服务器,仅当第一个不可用时才尝试后续服务器。
- 特点:极端场景会导致 “第一个服务器过载,其余闲置”,极少用于生产(多为调试)。
- 场景:临时测试或强制请求打向某台特定服务器的场景。
配置(思路:用 first 算法,给第一个服务器设最大连接数,满了就用第二个):
[root@haproxy conf.d]# cp haproxy-rr.cfg haproxy-first.cfg
[root@haproxy conf.d]# vim haproxy-first.cfg
[root@haproxy conf.d]# cat haproxy-first.cfg
listen rch-web-first
bind 192.168.2.40:82
mode http
balance first # 用优先第一个服务器的算法
option forwardfor
# 服务器1:最多同时处理2个连接(超过就用服务器2)
server rch1 192.168.2.42:80 check inter 3000 fall 3 rise 5 maxconn 2
server rch2 192.168.2.43:80 check inter 3000 fall 3 rise 5
[root@haproxy conf.d]# systemctl restart haproxy.service
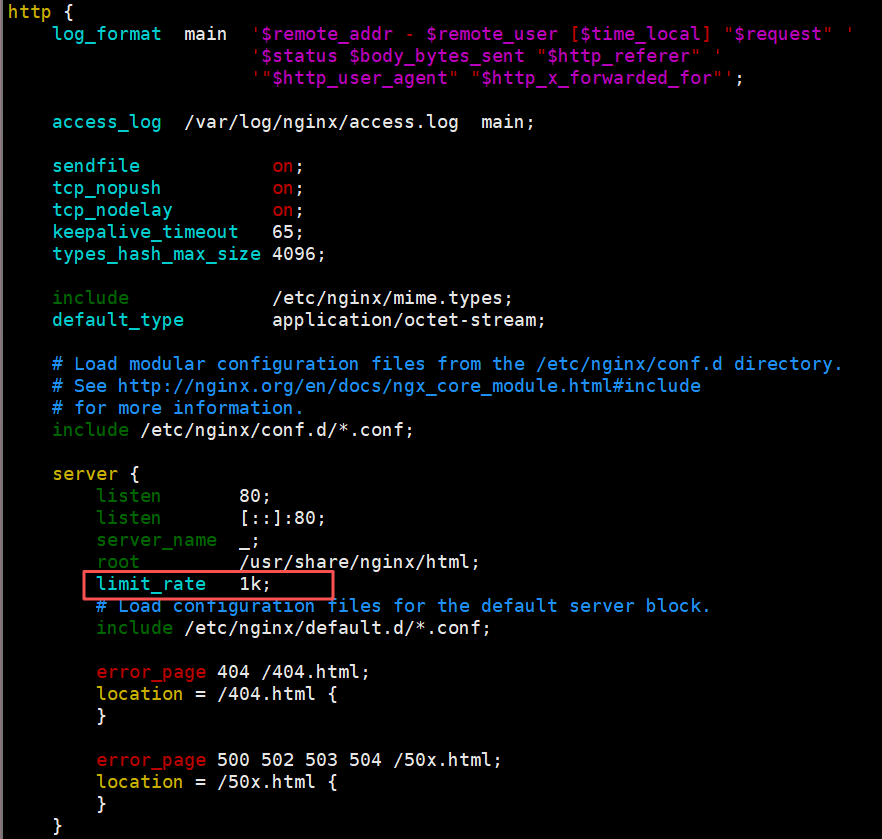
# 在后端服务器创建大文件,配置limit_rate 1k限速(让连接保持更久,方便测试)
[root@nginx1 ~]# cd /usr/share/nginx/html/
[root@nginx1 html]# dd if=/dev/zero of=test.html bs=2M count=1
记录了1+0 的读入
记录了1+0 的写出
2097152字节(2.1 MB,2.0 MiB)已复制,0.00119642 s,1.8 GB/s
[root@nginx1 html]# ll -h test.html
-rw-r--r-- 1 root root 2.0M 10月 6 21:01 test.html
[root@nginx1 html]# scp test.html root@192.168.2.43:/usr/share/nginx/html
客户端测试(思路:用两个连接占满服务器 1 的 maxconn,新请求就会用服务器 2):
#开启两个客户端下载文件
[root@client ~]# wget 192.168.2.40:82/test.html
[root@client ~]# wget 192.168.2.40:82/test.html
#查看web服务
[root@nginx1 html]# ss -tnpe | grep 80
ESTAB 0      0       192.168.2.42:80   192.168.2.40:49758 users:(("nginx",pid=33722,fd=12)) uid:978 ino:77587 sk:2 cgroup:/system.slice/nginx.service <->
ESTAB 0      0       192.168.2.42:80   192.168.2.40:49582 users:(("nginx",pid=33722,fd=14)) uid:978 ino:77596 sk:5 cgroup:/system.slice/nginx.service <->
#客户端访问
[root@client ~]# for i in {1..10};do curl 192.168.2.40:82;done
nginx2 192.168.2.43
nginx2 192.168.2.43
nginx2 192.168.2.43
nginx2 192.168.2.43
nginx2 192.168.2.43
nginx2 192.168.2.43
nginx2 192.168.2.43
nginx2 192.168.2.43
nginx2 192.168.2.43
nginx2 192.168.2.43
3.2 动态算法(根据后端实时状态分配)
动态算法感知后端负载(如连接数、响应时间),适合后端性能差异大、请求分布不均的场景;优先调度至当前负载较低的服务器,且权重可以在haproxy运行时动态调整无需重启,支持慢启动。
3.2.1 roundrobin(动态轮询)
- 原理:类似
static-rr,但跳过不可用服务器,且支持weight(权重)。 - 特点:结合健康状态与权重,性能好的服务器可通过
weight承担更多请求,是最通用的算法之一,roundrobin为默认调度算法。 - 场景:后端性能有差异(需权重调优)、需基本负载均衡的场景。
配置(带权重,思路:用 roundrobin 算法,默认轮询,改权重后实时生效):
[root@haproxy conf.d]# cp haproxy-first.cfg  haproxy-roundrobin.cfg
[root@haproxy conf.d]# vim haproxy-roundrobin.cfg
[root@haproxy conf.d]# cat haproxy-roundrobin.cfg
listen rch-web-roundrobin
	bind 192.168.2.40:83
	mode http
	balance roundrobin
	log global
	option forwardfor
	server rch1 192.168.2.42:80 check inter 3000 fall 3 rise 5
	server rch2 192.168.2.43:80 check inter 3000 fall 3 rise 5
[root@haproxy conf.d]# systemctl restart haproxy.service
#客户端访问
[root@client ~]# for i in {1..10};do curl 192.168.2.40:83;done
nginx1 192.168.2.42
nginx2 192.168.2.43
nginx1 192.168.2.42
nginx2 192.168.2.43
nginx1 192.168.2.42
nginx2 192.168.2.43
nginx1 192.168.2.42
nginx2 192.168.2.43
nginx1 192.168.2.42
nginx2 192.168.2.43
接下来用 socat 工具动态调整权重(socat 是 Linux 的网络工具,能通过 HAProxy 的 stats socket 文件改配置,不用重启):
# 修改HAProxy配置,开启stats socket(用于动态管理)
[root@haproxy conf.d]# vim /etc/haproxy/haproxy.cfg
global
	# 创建一个套接字文件,权限600,管理员级别(能改配置)
    stats socket /var/lib/haproxy/stats mode 600 level admin

[root@haproxy conf.d]# systemctl restart haproxy
# 安装socat工具
[root@haproxy conf.d]# yum install -y socat
# 查看帮助(通过socket能执行哪些命令)
[root@haproxy conf.d]# echo help | socat stdio /var/lib/haproxy/stats
# 设个别名,方便操作(后面用socat-ha代替长命令)
[root@haproxy conf.d]# alias socat-ha="socat stdio 	/var/lib/haproxy/stats"
#查看当前进程信息
[root@haproxy conf.d]# echo "show info" | socat-ha
Name: HAProxy
Version: 2.4.22-f8e3218
Release_date: 2023/02/14
Nbthread: 6
Nbproc: 1
#查看后端服务器组
[root@haproxy conf.d]# echo "show backend" | socat-ha
# name
rch-web-all
rch-web-first
rch-web-roundrobin
rch-web-rr
# 查看后端服务器状态(ID、IP、权重等)
[root@haproxy conf.d]# echo "show servers state" | socat-ha
1
# be_id be_name srv_id srv_name srv_addr srv_op_state srv_admin_state srv_uweight srv_iweight srv_time_since_last_change srv_check_status srv_check_result srv_check_health srv_check_state srv_agent_state bk_f_forced_id srv_f_forced_id srv_fqdn srv_port srvrecord srv_use_ssl srv_check_port srv_check_addr srv_agent_addr srv_agent_port
2 rch-web-all 1 rch1 192.168.2.42 2 0 1 1 258 6 3 7 6 0 0 0 - 80 - 0 0 - - 0
2 rch-web-all 2 rch2 192.168.2.43 2 0 1 1 258 6 3 7 6 0 0 0 - 80 - 0 0 - - 0
3 rch-web-first 1 rch1 192.168.2.42 2 0 1 1 258 6 3 7 6 0 0 0 - 80 - 0 0 - - 0
3 rch-web-first 2 rch2 192.168.2.43 2 0 1 1 258 6 3 7 6 0 0 0 - 80 - 0 0 - - 0
4 rch-web-roundrobin 1 rch1 192.168.2.42 2 0 1 1 258 6 3 7 6 0 0 0 - 80 - 0 0 - - 0
4 rch-web-roundrobin 2 rch2 192.168.2.43 2 0 1 1 258 6 3 7 6 0 0 0 - 80 - 0 0 - - 0
5 rch-web-rr 1 rch1 192.168.2.42 2 0 2 2 258 6 3 7 6 0 0 0 - 80 - 0 0 - - 0
5 rch-web-rr 2 rch2 192.168.2.43 2 0 1 1 258 6 3 7 6 0 0 0 - 80 - 0 0 - - 0
# 查看rch1的当前权重
[root@haproxy conf.d]# echo "get weight rch-web-roundrobin/rch1" | socat-ha
1 (initial 1)
# 把rch1的权重改成3
[root@haproxy conf.d]# echo "set weight rch-web-roundrobin/rch1 3" | socat-ha
# 再次查看,权重已改
[root@haproxy conf.d]# echo "get weight rch-web-roundrobin/rch1" | socat-ha
3 (initial 1)
# 客户端测试:rch1权重3,rch2权重1,大概3:1分配
[root@client ~]# for i in {1..10};do curl 192.168.2.40:83;done
nginx1 192.168.2.42
nginx1 192.168.2.42
nginx1 192.168.2.42
nginx2 192.168.2.43
nginx1 192.168.2.42
nginx1 192.168.2.42
nginx1 192.168.2.42
nginx2 192.168.2.43
nginx1 192.168.2.42
nginx1 192.168.2.42

#将后端服务器禁用
[root@haproxy conf.d]# echo "disable server  rch-web-roundrobin/rch1" | socat-ha
#发现权重不变,但是服务停止了
[root@haproxy conf.d]# echo "get weight rch-web-roundrobin/rch1" | socat-ha
3 (initial 1)
[root@client ~]# for i in {1..10};do curl 192.168.2.40:83;done
nginx2 192.168.2.43
nginx2 192.168.2.43
nginx2 192.168.2.43
nginx2 192.168.2.43
nginx2 192.168.2.43
nginx2 192.168.2.43
nginx2 192.168.2.43
nginx2 192.168.2.43
nginx2 192.168.2.43
nginx2 192.168.2.43

# 把rch1权重设为0(软下线,和禁用效果类似)
[root@haproxy conf.d]# echo "set weight rch-web-roundrobin/rch1 0" | socat-ha
#发现权重置为0了
[root@haproxy conf.d]# echo "get weight rch-web-roundrobin/rch1" | socat-ha
0 (initial 1)
[root@client ~]# for i in {1..10};do curl 192.168.2.40:83;done
nginx2 192.168.2.43
nginx2 192.168.2.43
nginx2 192.168.2.43
nginx2 192.168.2.43
nginx2 192.168.2.43
nginx2 192.168.2.43
nginx2 192.168.2.43
nginx2 192.168.2.43
nginx2 192.168.2.43
nginx2 192.168.2.43
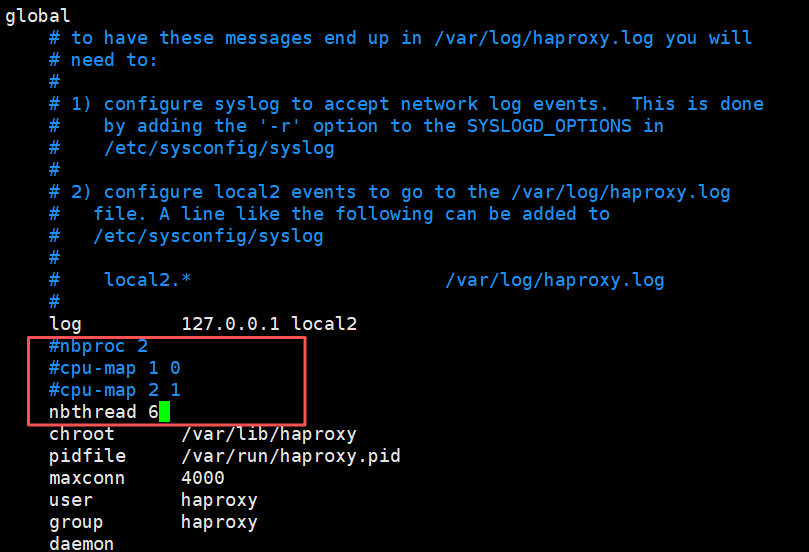
在 HAProxy 启用多进程(nbproc)时,改一个进程的权重不会同步到其他进程。需要给每个进程配单独的 socket:
global
	nbproc 2     # 启动 4 个进程
	stats socket /var/lib/haproxy/stats1 level admin process 1
	stats socket /var/lib/haproxy/stats2 level admin process 2
这样每个进程就会有单独的sock文件来进行单独管理。
3.2.2 leastconn(最少连接)
- 原理:将新请求分配给当前活跃连接数最少的后端服务器。
- 特点:动态平衡负载,适合长连接场景(如数据库、WebSocket)或 “请求处理时间不稳定” 的场景(避免某服务器因慢请求堆积连接)。
- 场景:API 服务、数据库代理、长连接协议(如 WebSocket)。
配置(思路:用 leastconn 算法,连接少的服务器优先接收新请求):
[root@haproxy conf.d]# cp haproxy-roundrobin.cfg haproxy-leastconn.cfg
[root@haproxy conf.d]# vim haproxy-leastconn.cfg
[root@haproxy conf.d]# cat haproxy-leastconn.cfg
listen rch-web-leastconn
	bind 192.168.2.40:84
	mode http
	balance leastconn	# 用最少连接算法
	log global
	option forwardfor
	server rch1 192.168.2.42:80 check inter 3000 fall 3 rise 5
	server rch2 192.168.2.43:80 check inter 3000 fall 3 rise 5
[root@haproxy conf.d]# systemctl restart haproxy.service
[root@client ~]# wget 192.168.2.40:84/test.html	#保持连接
[root@client ~]# for i in {1..6};do curl 192.168.2.40:84;done
nginx2 192.168.2.43
nginx2 192.168.2.43
nginx2 192.168.2.43
nginx2 192.168.2.43
nginx2 192.168.2.43
nginx2 192.168.2.43
3.2.3 random(随机分配)
- 原理:随机选择后端服务器分配请求,支持weight的动态调整,weight较大的主机有更大概率获取新请求。
- 特点:实现简单,后端规模大且性能均匀时,效果接近轮询;但小样本下分配可能波动。
- 场景:后端规模大、性能均匀、无需严格会话保持的场景(如 CDN 静态资源分发)。
配置(思路:用 random 算法,随机分配请求,权重高的服务器被选中的概率大):
[root@haproxy conf.d]# cp haproxy-leastconn.cfg haproxy-random.cfg
[root@haproxy conf.d]# vim haproxy-random.cfg
[root@haproxy conf.d]# cat haproxy-random.cfg
listen rch-web-random
	bind 192.168.2.40:85
	mode http
	balance random		# 用随机算法
	log global
	option forwardfor
	server rch1 192.168.2.42:80 check inter 3000 fall 3 rise 5
	server rch2 192.168.2.43:80 check inter 3000 fall 3 rise 5
[root@haproxy conf.d]# systemctl restart haproxy.service
#客户端访问
[root@client ~]# for i in {1..10};do curl 192.168.2.40:85;done
nginx2 192.168.2.43
nginx2 192.168.2.43
nginx2 192.168.2.43
nginx2 192.168.2.43
nginx2 192.168.2.43
nginx1 192.168.2.42
nginx2 192.168.2.43
nginx1 192.168.2.42
nginx2 192.168.2.43
nginx2 192.168.2.43
3.3 基于请求特征的算法(会话保持或内容路由)
这类算法通过提取请求特征(IP、URL、Cookie 等)做哈希 / 匹配,实现会话保持或精细路由,适合需 “同一客户端 / 请求路由到同后端” 的场景。
3.3.1 source(客户端 IP 一致性哈希)
-
原理:对客户端 IP 地址哈希,同一 IP 的请求始终打同后端。
-
方法:源地址有两种转发客户端请求到后端服务器的服务器选取计算方式,分别是取模法和一致性hash
-
特点:实现会话保持(适合无 Cookie 的场景,如 TCP 服务、内网服务);但后端数量变化时,哈希映射易大规模失效(会话丢失)。
-
场景:企业内网服务、无 Cookie 的 TCP 服务(如数据库代理)。
-
map-base取模法
map-based:取模法,对source地址进行hash计算,再基于服务器总权重的取模,最终结果决定将此请求转发至对应的后端服务器。此方法是静态的,即不支持在线调整权重,不支持慢启动,可实现对后端服务器均衡调度。缺点是当服务器的总权重发生变化时,即有服务器上线或下线,都会因总权重发生变化而导致调度结果整体改变,hash-type 指定的默认值为此算法。
map-based算法:基于权重取模,hash(客户端IP) % sum(所有服务器的权重)
- 一致性hash
一致性哈希,当服务器的总权重发生变化时,对调度结果影响是局部的,不会引起大的变动,该hash算法是动态的,支持使用 socat等工具进行在线权重调整,支持慢启动。
1、计算客户端IP的哈希值 key1 = hash(source_ip) % (2^32)(范围0-4294967295)
2、计算每个后端服务器的虚拟IP哈希值 keyA = hash(后端服务器虚拟ip) % (2^32)
3、把key1和keyA都放在环上,客户端请求发给顺时针离key1最近的keyA对应的服务器
配置(启用一致性哈希减少会话丢失,思路:用 source 算法,分别测试取模法和一致性哈希):
取模法:
[root@haproxy conf.d]# cp haproxy-leastconn.cfg haproxy-source-map-based.cfg
[root@haproxy conf.d]# vim haproxy-source-map-based.cfg
[root@haproxy conf.d]# cat haproxy-source-map-based.cfg
listen rch-web-source-map-based	# 名字:rch-web-source-map-based
	bind 192.168.2.40:86	# 监听86端口
	mode http
	balance source		# 用客户端IP哈希算法
	hash-type map-based	# 取模法
	log global
	option forwardfor
	server rch1 192.168.2.42:80 check inter 3000 fall 3 rise 5
	server rch2 192.168.2.43:80 check inter 3000 fall 3 rise 5
[root@haproxy conf.d]# systemctl restart haproxy.service
# 客户端测试:同一IP的请求总是到同一服务器(这里客户端IP固定,所以全是nginx2)
[root@client ~]# for i in {1..10};do curl 192.168.2.40:86;done
nginx2 192.168.2.43
nginx2 192.168.2.43
nginx2 192.168.2.43
nginx2 192.168.2.43
nginx2 192.168.2.43
nginx2 192.168.2.43
nginx2 192.168.2.43
nginx2 192.168.2.43
nginx2 192.168.2.43
nginx2 192.168.2.43

# 尝试改权重(取模法不支持动态改权重,只能设0或100%)
[root@haproxy conf.d]# echo "get weight rch-web-source-map-based/rch1" | socat-ha
1 (initial 1)

[root@haproxy conf.d]# echo "set weight rch-web-source-map-based/rch1 0" | socat-ha
# 设2会报错,因为静态算法只支持0或100%
[root@haproxy conf.d]# echo "set weight rch-web-source-map-based/rch1 2" | socat-ha
Backend is using a static LB algorithm and only accepts weights '0%' and '100%'.

[root@haproxy conf.d]# echo "set weight rch-web-source-map-based/rch1 1" | socat-ha
一致性哈希法:
[root@haproxy conf.d]# cat haproxy-source-consistent.cfg
listen rch-web-source-consistent
	bind 192.168.2.40:87
	mode http
	balance source
	hash-type consistent	# 一致性哈希
	log global
	option forwardfor
	server rch1 192.168.2.42:80 check inter 3000 fall 3 rise 5
	server rch2 192.168.2.43:80 check inter 3000 fall 3 rise 5
[root@haproxy conf.d]# systemctl restart haproxy.service
# 客户端测试:同一IP请求到同一服务器
[root@client ~]# for i in {1..10};do curl 192.168.2.40:86;done
nginx2 192.168.2.43
nginx2 192.168.2.43
nginx2 192.168.2.43
nginx2 192.168.2.43
nginx2 192.168.2.43
nginx2 192.168.2.43
nginx2 192.168.2.43
nginx2 192.168.2.43
nginx2 192.168.2.43
nginx2 192.168.2.43

# 一致性哈希支持动态改权重
[root@haproxy conf.d]# echo "get weight rch-web-source-consistent/rch1" | socat-ha
1 (initial 1)

[root@haproxy conf.d]# echo "set weight rch-web-source-consistent/rch1 0" | socat-ha

[root@haproxy conf.d]# echo "get weight rch-web-source-consistent/rch1" | socat-ha
0 (initial 1)

[root@haproxy conf.d]# echo "set weight rch-web-source-consistent/rch1 3" | socat-ha

[root@haproxy conf.d]# echo "get weight rch-web-source-consistent/rch1" | socat-ha
3 (initial 1)

[root@haproxy conf.d]# echo "set weight rch-web-source-consistent/rch1 1" | socat-ha
3.3.2 uri(请求 URI 哈希)
- 原理:对 HTTP 请求的URI 路径(如
/test.html)哈希,相同 URI 打同后端,也可以通过hash-type指定map-based和consistent,来定义使用取模法还是一致性hash。 - 特点:适合缓存场景(同一资源请求打同服务器,利用本地缓存)或 “URI 与后端强关联” 的场景(如微服务路由)。
- 场景:静态资源服务(如图片 / 视频缓存)、基于 URI 路由的微服务架构。
注意:此算法是应用层,只支持 mode http ,不支持 mode tcp
配置(思路:用 uri 算法,相同 URI 的请求到同一服务器,方便缓存):
取模法:
[root@haproxy conf.d]# cp haproxy-source-map-based.cfg haproxy-uri-map-based.cfg
[root@haproxy conf.d]# vim haproxy-uri-map-based.cfg
[root@haproxy conf.d]# cat haproxy-uri-map-based.cfg
listen rch-web-uri-map-based
	bind 192.168.2.40:88
	mode http
	balance uri		# 用URI哈希算法
	hash-type map-based	# 取模法
	log global
	option forwardfor
	server rch1 192.168.2.42:80 check inter 3000 fall 3 rise 5
	server rch2 192.168.2.43:80 check inter 3000 fall 3 rise 5
[root@haproxy conf.d]# systemctl restart haproxy.service
# 后端服务器创建不同文件(方便区分)
[root@nginx1 html]# echo web1 index1 > index1.html
[root@nginx1 html]# echo web1 index2 > index2.html
[root@nginx2 html]# echo web2 index1 > index1.html
[root@nginx2 html]# echo web2 index2 > index2.html
# 测试:同一URI总是到同一服务器(/index1.html到nginx2,/index2.html到nginx1)
[root@client ~]# curl 192.168.2.40:88
nginx2 192.168.2.43
[root@client ~]# curl 192.168.2.40:88/index1.html
web2 index1
[root@client ~]# curl 192.168.2.40:88/index1.html
web2 index1
[root@client ~]# curl 192.168.2.40:88/index2.html
web1 index2
[root@client ~]# curl 192.168.2.40:88/index2.html
web1 index2
一致性哈希法:
[root@haproxy conf.d]# cp haproxy-uri-map-based.cfg haproxy-uri-consistent.cfg
[root@haproxy conf.d]# vim haproxy-uri-consistent.cfg
[root@haproxy conf.d]# cat haproxy-uri-consistent.cfg
listen rch-web-uri-consistent
	bind 192.168.2.40:89
	mode http
	balance uri
	hash-type consistent
	log global
	option forwardfor
	server rch1 192.168.2.42:80 check inter 3000 fall 3 rise 5
	server rch2 192.168.2.43:80 check inter 3000 fall 3 rise 5
[root@haproxy conf.d]# systemctl restart haproxy.service
# 测试:同一URI到同一服务器(结果可能和取模法不同,但自身一致)
[root@client ~]# curl 192.168.2.40:89
nginx2 192.168.2.43
[root@client ~]# curl 192.168.2.40:89/index1.html
web1 index1
[root@client ~]# curl 192.168.2.40:89/index2.html
web2 index2
3.3.3 url_param(URL 参数哈希)
- 原理:提取 URL 中指定参数的值(如
?uid=123中的123)哈希,相同参数值打同后端。 - 特点:精准控制会话粒度(通过业务参数,如用户 ID),适合 “按业务维度会话保持”。
- 场景:电商网站(按用户 ID 保持会话)、带业务参数的 API 服务。
配置(提取userid参数,思路:相同 userid 的请求到同一服务器,方便用户会话保持):
取模法:
[root@haproxy conf.d]# cp haproxy-uri-consistent.cfg haproxy-url-param-map-based.cfg
[root@haproxy conf.d]# vim haproxy-url-param-map-based.cfg
[root@haproxy conf.d]# cat haproxy-url-param-map-based.cfg
listen rch-web-uri-param-map-based
	bind 192.168.2.40:90
	mode http
	balance url_param userid	# 按URL中的userid参数哈希
	hash-type map-based		# 取模法
	log global
	option forwardfor
	server rch1 192.168.2.42:80 check inter 3000 fall 3 rise 5
	server rch2 192.168.2.43:80 check inter 3000 fall 3 rise 5
[root@haproxy conf.d]# systemctl restart haproxy.service
# 测试:不带参数时轮询;带相同userid时到同一服务器
[root@client ~]# for i in {1..4};do curl 192.168.2.40:90;done
nginx1 192.168.2.42
nginx2 192.168.2.43
nginx1 192.168.2.42
nginx2 192.168.2.43
[root@client ~]# for i in {1..4};do curl 192.168.2.40:90/?userid=ren;done
nginx2 192.168.2.43
nginx2 192.168.2.43
nginx2 192.168.2.43
nginx2 192.168.2.43
[root@client ~]# for i in {1..4};do curl 192.168.2.40:90/?userid=he;done
nginx2 192.168.2.43
nginx2 192.168.2.43
nginx2 192.168.2.43
nginx2 192.168.2.43
一致性哈希法:
[root@haproxy conf.d]# cp haproxy-url-param-map-based.cfg haproxy-url-param-consistent.cfg
[root@haproxy conf.d]# vim haproxy-url-param-consistent.cfg
[root@haproxy conf.d]# cat haproxy-url-param-consistent.cfg
listen rch-web-uri-param-consistent
	bind 192.168.2.40:91
	mode http
	balance url_param userid
	hash-type consistent
	log global
	option forwardfor
	server rch1 192.168.2.42:80 check inter 3000 fall 3 rise 5
	server rch2 192.168.2.43:80 check inter 3000 fall 3 rise 5
[root@haproxy conf.d]# systemctl restart haproxy.service
# 测试:相同userid到同一服务器(不同userid可能到不同服务器)
[root@client ~]# for i in {1..4};do curl 192.168.2.40:90/?userid=ren;done
nginx2 192.168.2.43
nginx2 192.168.2.43
nginx2 192.168.2.43
nginx2 192.168.2.43
[root@client ~]# for i in {1..4};do curl 192.168.2.40:90/?userid=he;done
nginx2 192.168.2.43
nginx2 192.168.2.43
nginx2 192.168.2.43
nginx2 192.168.2.43
[root@client ~]# for i in {1..4};do curl 192.168.2.40:90/?userid=liu;done
nginx1 192.168.2.42
nginx1 192.168.2.42
nginx1 192.168.2.42
nginx1 192.168.2.42
3.3.4 hdr(HTTP 请求头哈希)
- 原理:提取 HTTP 请求头中指定字段的值(如
Cookie、X-User-ID)哈希,相同头值打同后端。 - 特点:灵活度高,是 Web 应用会话保持的核心算法(通常基于
Cookie头)。 - 场景:Web 应用会话保持(如基于
Session Cookie,确保用户请求落在同后端,避免 Session 丢失)。
配置(基于User-Agent头,思路:相同浏览器的请求到同一服务器,测试请求头哈希效果):
取模法:
[root@haproxy conf.d]# cp haproxy-url-param-consistent.cfg haproxy-hdr-map-based.cfg
[root@haproxy conf.d]# vim haproxy-hdr-map-based.cfg
[root@haproxy conf.d]# cat haproxy-hdr-map-based.cfg
listen rch-web-hdr-map-based
	bind 192.168.2.40:92
	mode http
	balance hdr(User-Agent)	# 按User-Agent请求头哈希
	hash-type map-based
	log global
	option forwardfor
	server rch1 192.168.2.42:80 check inter 3000 fall 3 rise 5
	server rch2 192.168.2.43:80 check inter 3000 fall 3 rise 5
[root@haproxy conf.d]# systemctl restart haproxy.service
# 测试:默认User-Agent的请求到nginx1;自定义User-Agent可能到不同服务器
[root@client ~]# for i in {1..4};do curl 192.168.2.40:92;done
nginx1 192.168.2.42
nginx1 192.168.2.42
nginx1 192.168.2.42
nginx1 192.168.2.42
[root@client ~]# curl -A "rchagent" 192.168.2.40:92
nginx1 192.168.2.42
[root@client ~]# curl -A "hjnagent" 192.168.2.40:92
nginx2 192.168.2.43
一致性哈希法:
[root@haproxy conf.d]# cp haproxy-hdr-map-based.cfg haproxy-hdr-consistent.cfg
[root@haproxy conf.d]# vim haproxy-hdr-consistent.cfg
[root@haproxy conf.d]# cat haproxy-hdr-consistent.cfg
listen rch-web-hdr-consistent
	bind 192.168.2.40:93
	mode http
	balance hdr(User-Agent)
	hash-type consistent
	log global
	option forwardfor
	server rch1 192.168.2.42:80 check inter 3000 fall 3 rise 5
	server rch2 192.168.2.43:80 check inter 3000 fall 3 rise 5
[root@haproxy conf.d]# systemctl restart haproxy.service
#客户端测试
[root@client ~]# for i in {1..4};do curl 192.168.2.40:92;done
nginx1 192.168.2.42
nginx1 192.168.2.42
nginx1 192.168.2.42
nginx1 192.168.2.42
[root@client ~]# curl -A "rchagent" 192.168.2.40:92
nginx1 192.168.2.42
[root@client ~]# curl -A "hjnagent" 192.168.2.40:92
nginx2 192.168.2.43
[root@client ~]# curl -A "xrxagent" 192.168.2.40:92
nginx2 192.168.2.43
3.4 算法总结
static-rr--------->tcp/http  静态
first------------->tcp/http  静态

roundrobin-------->tcp/http 动态
leastconn--------->tcp/http 动态
random------------>tcp/http 动态

以下静态和动态取决于hash_type是否consistent
source------------>tcp/http
uri--------------->http
url_param--------->http
hdr--------------->http
各算法使用场景
first       #使用较少

static-rr   #做了session共享的web集群
roundrobin
random

leastconn   #数据库
source      #基于客户端公网IP的会话保持

uri------->http  #缓存服务器,CDN服务商,蓝汛、百度、阿里云、腾讯
url_param--->http

hdr         #基于客户端请求报文头部做下一步处理
| 算法类型 | 具体算法 | 核心原理 | 适用场景 |
|---|---|---|---|
| 静态算法 | static-rr | 顺序轮询(不跳过不可用服务器) | 后端性能完全一致、无需健康检查的测试场景 |
first | 优先选第一个可用服务器 | 调试 / 临时场景(极少用于生产) | |
| 动态算法 | roundrobin | 动态轮询(跳过不可用 + 支持权重) | 后端性能有差异、需基本负载均衡的通用场景 |
leastconn | 选当前连接数最少的服务器 | 长连接、请求处理时间不稳定的场景(如 API、数据库) | |
random | 随机选择服务器 | 后端规模大、性能均匀、无需严格会话保持的场景(如 CDN 静态资源) | |
| 特征路由算法 | source | 客户端 IP 哈希 | 无 Cookie 的会话保持(如 TCP 服务、内网服务) |
uri | 请求 URI 哈希 | 缓存场景、URI 与后端强关联的场景(如微服务路由) | |
url_param | URL 参数值哈希 | 按业务参数(如用户 ID)保持会话的场景(如电商、业务 API) | |
hdr | HTTP 请求头值哈希(如 Cookie) | Web 应用的会话保持(如基于Session Cookie确保用户请求落在同一后端) |
4. HAProxy 高级功能
HAProxy 的高级功能围绕流量精细化控制、服务可观测性、协议适配展开,是其从 “基础负载均衡” 升级为 “服务架构核心组件” 的关键。以下分模块详细讲解:
4.1 HAProxy 的状态页
HAProxy 内置实时统计状态页,可直观监控前端 / 后端 / 服务器的连接数、流量、健康状态、响应时间等,是运维排查问题的核心工具。
配置启用
在listen或frontend段中添加统计页规则:
状态页配置项
stats enable          #基于默认的参数启用stats page
stats hide-version    #将状态页中haproxy版本隐藏
stats refresh <delay> #设定自动刷新时间间隔,默认不自动刷新
stats uri <prefix>   #自定义stats page uri,默认值:/haproxy?stats
stats realm <realm>  #账户认证时的提示信息,示例:stats realm   HAProxy\ Statistics
stats auth <user>:<passwd>  #认证时的账号和密码,可使用多次,默认:no authentication,可有多行用户
stats admin { if | unless } <cond> #启用stats page中的管理功能
[root@haproxy conf.d]# vim stats.cfg  # 创建配置文件
[root@haproxy conf.d]# cat stats.cfg  # 配置内容如下
listen stats  # 定义一个名为stats的监听段
    bind :9527  # 监听9527端口(访问状态页用这个端口)
    stats enable  # 启用状态页
    #stats hide-version  # 注释掉,暂时不隐藏版本(方便测试)
    stats uri  /haproxy-stats  # 访问路径设为/haproxy-stats
    stats realm HAPorxy\ Stats\ Page  # 认证提示为"HAPorxy Stats Page"
    stats auth rchadmin:123  # 第一个账号:rchadmin,密码123
    stats auth admin:123  # 第二个账号:admin,密码123
    #stats refresh 30s  # 注释掉,不自动刷新
    stats admin if TRUE  # 允许通过状态页进行管理操作(任何条件下都生效)
[root@haproxy conf.d]# systemctl restart haproxy.service  # 重启HAProxy生效
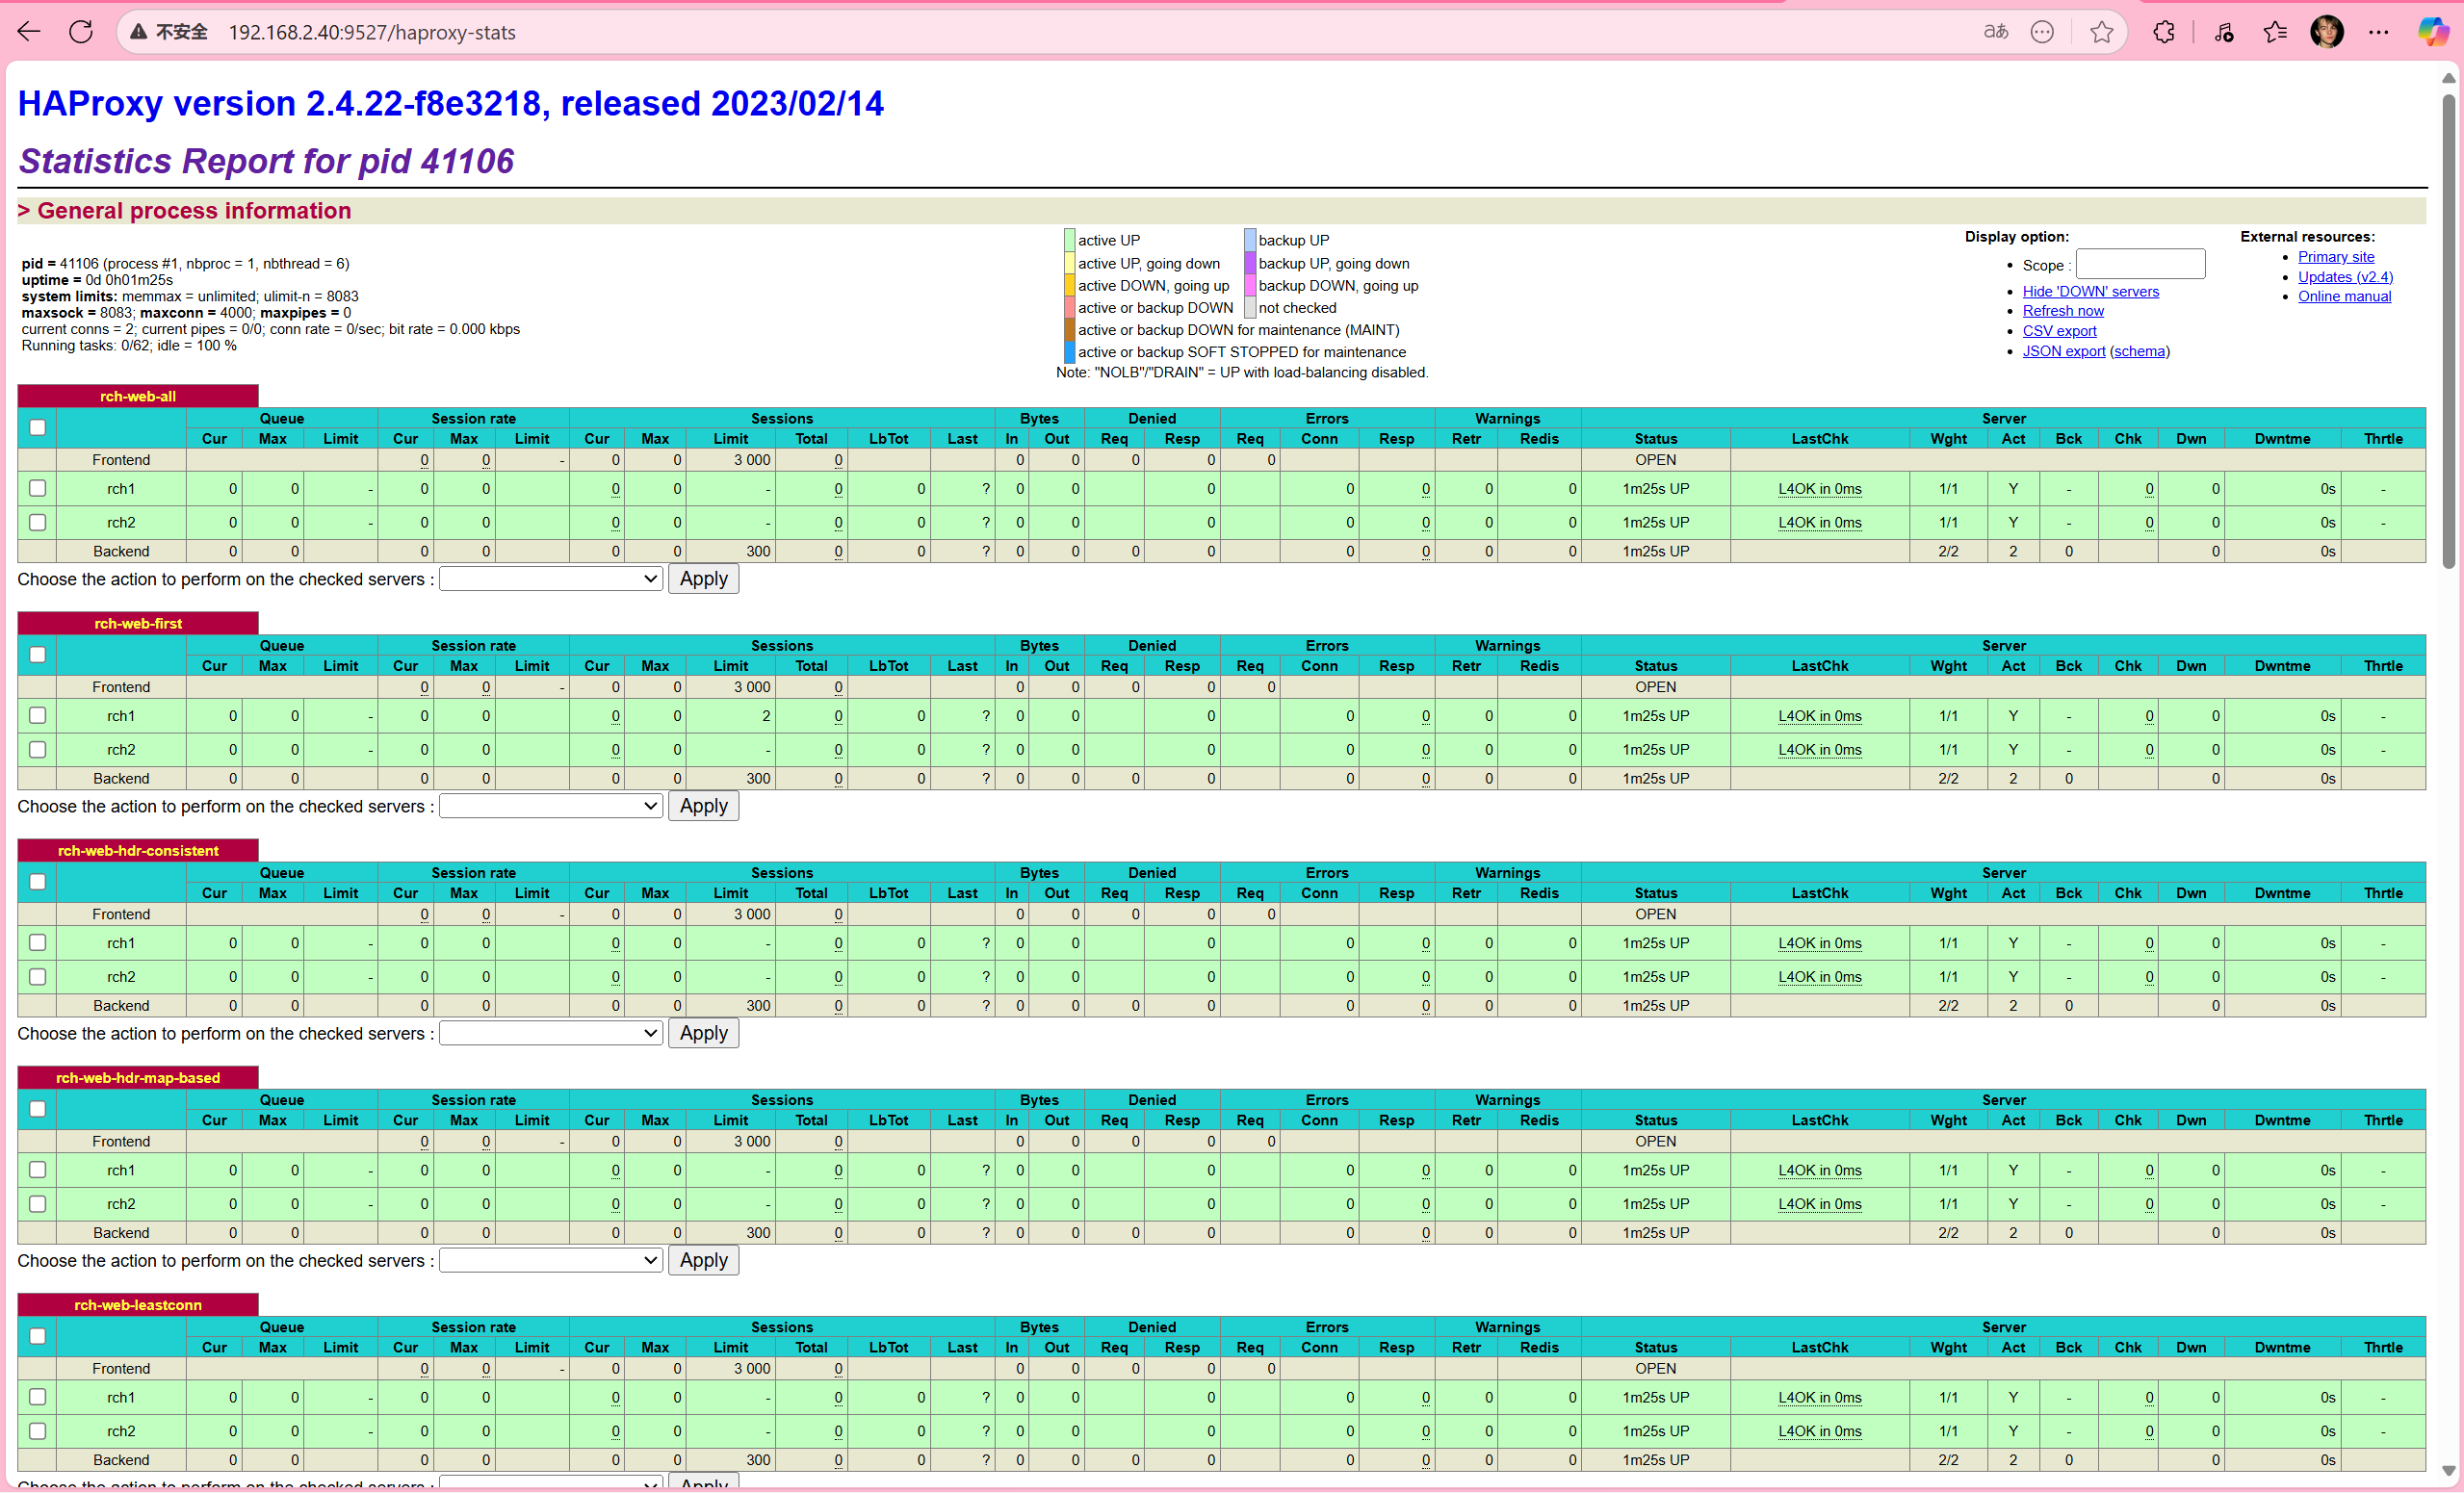
pid = 13340 (process #1, nbproc = 1, nbthread = 1) #pid为当前pid号,process为当前进程号,nbproc和nbthread为一共多少进程和每个进程多少个线程
uptime = 0d 0h01m03s; warnings = 1  #启动了多长时间
system limits: memmax = unlimited; ulimit-n = 200038  #系统资源限制:内存;最大打开文件数
maxsock = 200038; maxconn = 100000; reached = 0; maxpipes = 0 #最大socket连接数;单进程最大连接数;最大管道数maxpipes
current conns = 4; current pipes = 0/0; conn rate = 0/sec; bit rate = 0.000 kbps   #当前连接数;当前管道数;当前连接速率
Running tasks: 0/25 (0 niced); idle = 100 %  #运行的任务当前空闲率

active UP:                              #在线服务器
backup UP:                              #标记为backup的服务器
active UP, going down:                  #监测未通过正在进入down过程
backup UP, going down:                  #备份服务器正在进入down过程
active DOWN, going up:                  #down的服务器正在进入up过程
backup DOWN, going up:                  #备份服务器正在进入up过程
active or backup DOWN:                  #在线的服务器或者是backup的服务器已经转换成了down状态
not checked:                            #标记为不监测的服务器
active or backup DOWN for maintenance (MAINT) #active或者backup服务器人为下线的
active or backup SOFT STOPPED for maintenance #active或者backup被人为软下线(人为将weight改成0)
backend server信息
| session rate(每秒的连接会话信息): | Errors(错误统计信息): |
|---|---|
| cur:每秒的当前会话数量 | Req:错误请求量 |
| max:每秒新的最大会话数量 | conn:错误链接量 |
| limit:每秒新的会话限制量 | Resp:错误响应量 |
| sessions(会话信息): | Warnings(警告统计信息): |
| cur:当前会话量 | Retr:重新尝试次数 |
| max:最大会话量 | Redis:再次发送次数 |
| limit: 限制会话量 | |
| Total:总共会话量 | Server(real server信息): |
| LBTot:选中一台服务器所用的总时间 | Status:后端机的状态,包括UP和DOWN |
| Last:和服务器的持续连接时间 | LastChk:持续检查后端服务器的时间 |
| Wght:权重 | |
| Bytes(流量统计): | Act:活动链接数量 |
| In:网络的字节输入总量 | Bck:备份的服务器数量 |
| Out:网络的字节输出总量 | Chk:心跳检测时间 |
| Dwn:后端服务器连接后都是DOWN的数量 | |
| Denied(拒绝统计信息): | Dwntme:总的downtime时间 |
| Req:拒绝请求量 | Thrtle:server 状态 |
| Resp:拒绝回复量 |
核心监控信息
访问状态页后,可查看:
- 全局概览:总连接数、并发数、HAProxy 版本、运行时长。
- 前端(Frontend):接收请求数 / 字节数、当前连接数、拒绝数。
- 后端(Backend):分发请求数 / 字节数、活跃服务器数、健康状态。
- 服务器(Server):单台服务器的连接数、响应时间、权重、健康检查结果(UP/DOWN)。
通过状态页,能快速定位 “流量突增的前端”“响应慢的后端”“健康检查失败的节点”,是排查 HAProxy 与后端问题的 “第一入口”。
4.2 基于 Cookie 的会话保持
Web 应用中,用户会话(Session)需与特定后端服务器绑定(否则登录状态会丢失)。HAProxy 可通过Cookie实现 “同一客户端请求始终路由到同一后端”。
**注意:**不支持 tcp mode,使用 http mode。
配置选项
cookie name  [ rewrite | insert | prefix ][ indirect ] [ nocache ][ postonly ] [ preserve ][ httponly ] [ secure ][ domain ]* [ maxidle <idle> ][ maxlife ]

name:       #cookie 的key名称,用于实现持久连接
insert:     #插入新的cookie,默认不插入cookie
indirect:   #如果客户端已经有cookie,则不会再发送cookie信息
nocache:    #当client和haproxy之间有缓存服务器(如:CDN)时,不允许中间缓存器缓存cookie,因为这会导致很多经过同一个CDN的请求都发送到同一台后端服务器
[root@haproxy conf.d]# vim cookie.cfg
[root@haproxy conf.d]# cat cookie.cfg
listen rch-web-cookie
	bind :9528
	mode http
	cookie websrv insert nocache indirect
	server rch1 192.168.2.42:80 check cookie rch1
  	server rch2 192.168.2.43:80 check cookie rch2
[root@haproxy conf.d]# systemctl restart haproxy.service
#客户端测试
[root@client ~]# curl 192.168.2.40:9528 -I
HTTP/1.1 200 OK
server: nginx/1.20.1
date: Mon, 06 Oct 2025 15:27:43 GMT
content-type: text/html
content-length: 20
last-modified: Mon, 06 Oct 2025 12:14:47 GMT
etag: "68e3b2b7-14"
accept-ranges: bytes
set-cookie: websrv=rch1; path=/
cache-control: private

[root@client ~]# curl 192.168.2.40:9528 -I
HTTP/1.1 200 OK
server: nginx/1.20.1
date: Mon, 06 Oct 2025 15:27:47 GMT
content-type: text/html
content-length: 20
last-modified: Mon, 06 Oct 2025 12:15:00 GMT
etag: "68e3b2c4-14"
accept-ranges: bytes
set-cookie: websrv=rch2; path=/
cache-control: private
#携带cookie再次访问
[root@client ~]# curl -b websrv=rch1 192.168.2.40:9528
nginx1 192.168.2.42
[root@client ~]# curl -b websrv=rch2 192.168.2.40:9528
nginx2 192.168.2.43
4.3 IP 透传(传递客户端真实 IP 到后端)
HAProxy 作为反向代理,默认会隐藏客户端真实 IP(后端看到的源 IP 是 HAProxy 的 IP)。需通过 “透传” 让后端获取客户端 IP,用于日志审计、权限控制。
4.3.1 四层(TCP)IP 透传:proxy_protocol
- HAProxy: 使用
send-proxy发送 PROXY 协议头 - Nginx: 配置了
proxy_protocol接收 PROXY 协议
在 TCP 模式下,当 HAProxy 作为中间代理时,后端服务器默认只能看到 HAProxy 的 IP 地址,无法获取客户端的真实信息。send-proxy 通过在建立连接时发送 PROXY 协议头来解决这个问题。
HAProxy 发送 Proxy Protocol
[root@haproxy conf.d]# vim tcp.cfg
[root@haproxy conf.d]# cat tcp.cfg
listen rch-web-tcp
	bind :9529
	mode tcp
	server web1 192.168.2.42:80 send-proxy check inter 3000 fall 3 rise 5	# 发送Proxy Protocol
[root@haproxy conf.d]# systemctl restart haproxy.service
#可以在web端查看日志,请求头变为了PROXY TCP4
[root@nginx1 html]# tail -f /var/log/nginx/access.log
192.168.2.40 - - [06/Oct/2025:23:41:40 +0800] "PROXY TCP4 192.168.2.40 192.168.2.42 52540 80" 400 0 "-" "-" "-"
192.168.2.40 - - [06/Oct/2025:23:41:43 +0800] "PROXY TCP4 192.168.2.40 192.168.2.42 52696 80" 400 0 "-" "-" "-"
192.168.2.40 - - [06/Oct/2025:23:41:46 +0800] "PROXY TCP4 192.168.2.40 192.168.2.42 48890 80" 400 0 "-" "-" "-"
192.168.2.40 - - [06/Oct/2025:23:41:49 +0800] "PROXY TCP4 192.168.2.40 192.168.2.42 49052 80" 400 0 "-" "-" "-"
192.168.2.40 - - [06/Oct/2025:23:41:52 +0800] "PROXY TCP4 192.168.2.40 192.168.2.42 49186 80" 400 0 "-" "-" "-"
#客户端访问,400原因是nginx服务看不懂PROXY TCP4这个请求头
[root@client ~]# curl 192.168.2.40:9529
<html>
<head><title>400 Bad Request</title></head>
<body>
<center><h1>400 Bad Request</h1></center>
<hr><center>nginx/1.20.1</center>
</body>
</html>
后端接收 Proxy Protocol
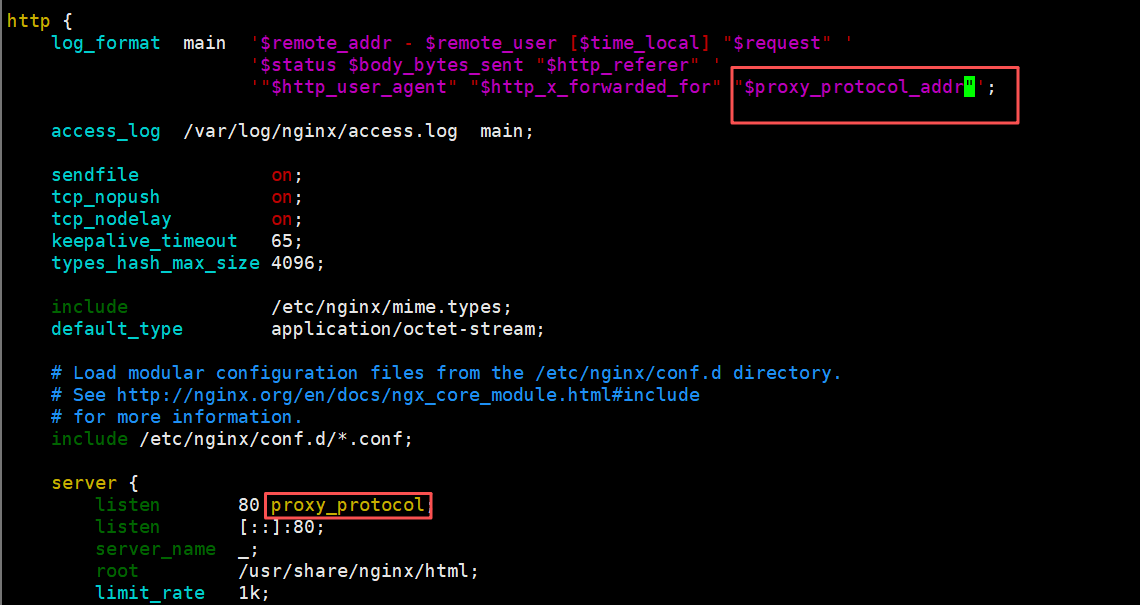
#在nginx服务器上开启日志格式和proxy_protocol;变量proxy_protocol_addr 记录透传过来的客户端IP
[root@nginx1 html]# vim /etc/nginx/nginx.conf
http {
    log_format  main  '$remote_addr - $remote_user [$time_local] "$request" '
                      '$status $body_bytes_sent "$http_referer" '
                      '"$http_user_agent" "$http_x_forwarded_for" "$proxy_protocol_addr"';
    server {
        listen       80 proxy_protocol; #启用此项,将无法直接访问此网站,只能通过四层代理访问
}
[root@nginx1 html]# systemctl restart nginx
#客户端测试
[root@client ~]# curl 192.168.2.40:9529
nginx1 192.168.2.42
#web端查看日志
[root@nginx1 html]# tail -f /var/log/nginx/access.log
192.168.2.40 - - [06/Oct/2025:23:47:29 +0800] "GET / HTTP/1.1" 200 20 "-" "curl/7.76.1" "-" "192.168.2.41"
4.3.2 七层(HTTP)IP 透传:X-Forwarded-For 头
适用于HTTP/HTTPS 协议,HAProxy 在请求头中添加X-Forwarded-For字段,记录客户端 IP 链路。
option forwardfor [ except <network> ] [ header <name> ] [ if-none ]
	#[ except <network> ]:请求来自此处指定的网络时不予添加此首部,如haproxy自身所在网络
	#[ header <name> ]:使用自定义的首部名称,而非“X-Forwarded-For”,示例:X-client
	#[ if-none ]  如果没有首部才添加首部,如果有使用默认值
HAProxy 添加 X-Forwarded-For
#后台服务器没变,要把四层备份掉,减小影响,包括主配置文件的proxy_protocol
[root@haproxy conf.d]# mv tcp.cfg tcp.cfg.bak
[root@haproxy conf.d]# vim http.cfg
[root@haproxy conf.d]# cat http.cfg
listen rch-web-http
	bind :9530
	option forwardfor
	mode http
	server web1 192.168.2.42:80  check inter 3000 fall 3 rise 5
[root@haproxy conf.d]# systemctl restart haproxy.service
后端提取真实 IP
#apache 配置:
LogFormat "%{X-Forwarded-For}i %a %l %u %t \"%r\" %>s %b \"%{Referer}i\" \"%{User-Agent}i\"" combined
#nginx 日志格式:
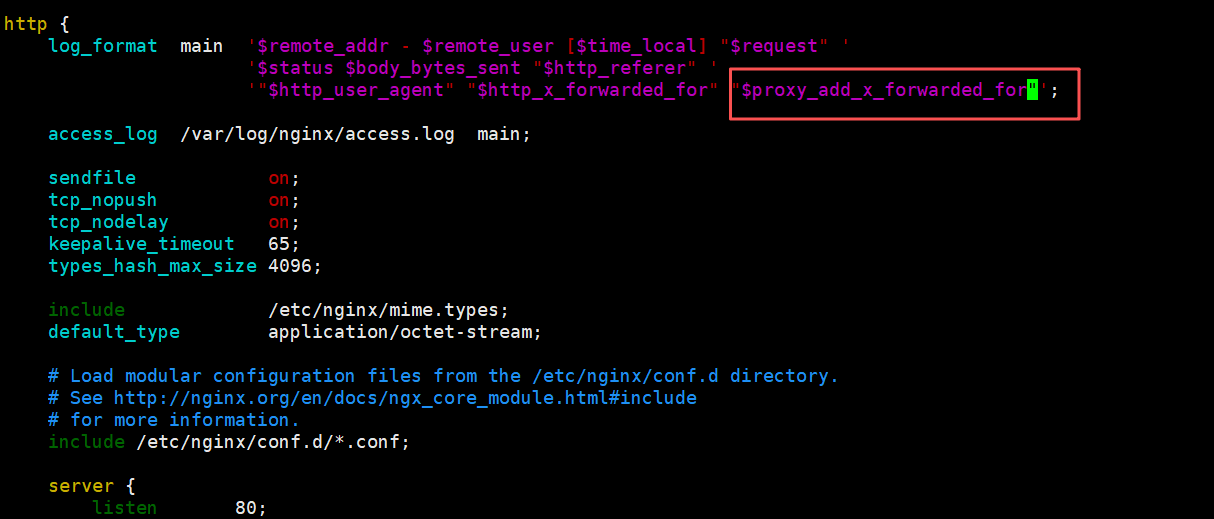
#proxy_add_x_forwarded_for:包括客户端IP和中间经过的所有代理的ip
#http_x_forwarded_For:只有客户端IP
log_format main '$remote_addr - $remote_user [$time_local] "$request" '
'$status $body_bytes_sent "$http_referer" '
'"$http_user_agent" "$http_x_forwarded_for" "$proxy_add_x_forwarded_for"';
#tomcat 配置:conf目录下的server.xml
<Valve className="org.apache.catalina.valves.AccessLogValve" directory="logs"
prefix="localhost_access_log" suffix=".txt"
pattern="%{X-Forwarded-For}i %h %l %u %t "%r" %s %b" />
此处使用的nginx的后端
http {
    log_format  main  '$remote_addr - $remote_user [$time_local] "$request" '
                      '$status $body_bytes_sent "$http_referer" '
                      '"$http_user_agent" "$http_x_forwarded_for" "$proxy_add_x_forwarded_for"';

    server {
        listen       80;
	}
}
[root@web1 html]# systemctl restart nginx
客户端测试
[root@client ~]# curl 192.168.2.40:9530
nginx1 192.168.2.42
#$proxy_add_x_forwarded_for值中第一个就是客户端IP
[root@nginx1 html]# tail -1 /var/log/nginx/access.log
192.168.2.40 - - [06/Oct/2025:23:59:56 +0800] "GET / HTTP/1.1" 200 20 "-" "curl/7.76.1" "192.168.2.41" "192.168.2.41, 192.168.2.40"
4.4 报文修改(请求 / 响应的定制)
HAProxy 可修改 HTTP 请求 / 响应的头、内容,用于适配后端、隐藏细节、注入标识等。通过reqadd和reqdel在请求报文添加删除字段,通过rspadd与rspidel在响应报文中添加与删除字段。
4.4.1 修改请求报文
[root@haproxy conf.d]# vim request.cfg
[root@haproxy conf.d]# cat request.cfg
listen rch-web-request
	bind :9531
	mode http
	http-request add-header testheader haproxyserver
  	http-request add-header haproxydate %T
  	server web1 192.168.2.42:80  check inter 3000 fall 3 rise 5
[root@haproxy conf.d]# systemctl restart haproxy.service
后端web配置日志
http {
    log_format  main  '$remote_addr - $remote_user [$time_local] "$request" '
                      '$status $body_bytes_sent "$http_referer" '
                      '"$http_user_agent" "$http_x_forwarded_for" "$proxy_add_x_forwarded_for" "$http_testheader" "$http_haproxydate"';
}
后端服务时apache的httpd时日志配置
[root@server2 ~]# vim /etc/httpd/conf/httpd.conf
LogFormat "%{testheader}i  %{haproxydate}i %h %l %u %t \"%r\" %>s %b \"%{Referer}i\" \"%{User-Agent}i\"" combined
测试
[root@client ~]# curl 192.168.2.40:9531
nginx1 192.168.2.42
#查看web服务器日志
[root@nginx1 html]# tail -1 /var/log/nginx/access.log
192.168.2.40 - - [07/Oct/2025:00:07:03 +0800] "GET / HTTP/1.1" 200 20 "-" "curl/7.76.1" "192.168.2.41" "192.168.2.41, 192.168.2.40" "haproxyserver" "06/Oct/2025:16:07:03 +0000"
4.4.2 修改响应报文
[root@haproxy conf.d]# vim response.cfg
[root@haproxy conf.d]# cat response.cfg
listen rch-web-response
	bind :9532
	mode http
	http-response del-header server
  	http-response add-header server testnginx
  	http-response add-header x-via haproxy
  	server web1 192.168.2.42:80  check inter 3000 fall 3 rise 5
[root@haproxy conf.d]# systemctl restart haproxy.service
客户端测试
[root@client ~]# curl 192.168.2.40:9532 -I
HTTP/1.1 200 OK
date: Mon, 06 Oct 2025 16:12:10 GMT
content-type: text/html
content-length: 20
last-modified: Mon, 06 Oct 2025 12:14:47 GMT
etag: "68e3b2b7-14"
accept-ranges: bytes
server: testnginx
x-via: haproxy
4.5 Web 服务状态监测(健康检查)
HAProxy 不仅能检查 “端口是否通”,还能通过HTTP 请求、内容匹配、脚本执行等方式,精细判断后端 “是否真正可用”。
三种状态监测方式
基于四层的传输端口做状态监测,此为默认方式
基于指定 URI 做状态监测
基于指定 URI 的request请求头部内容做状态监测,建议使用此方式
基于应用层http协议进行健康性检测
基于应用层http协议,采用不同的监测方式,对后端real server进行状态监测
option httpchk          #启用七层健康性检测,对tcp 和 http 模式都支持,默认为:OPTIONS / HTTP/1.0
option httpchk <uri>
option httpchk <method> <uri>
option httpchk <method> <uri> <version>

#期望以上检查得到的响应码
http-check expect [!] <match> <pattern>
#示例:
http-check expect status 200
http-check expect ! rstatus ^5
配置示例
#后端web配置
[root@nginx1 html]# mkdir monitor/
[root@nginx1 html]# echo check9533 > monitor/check.html
[root@haproxy conf.d]# vim mon.cfg
[root@haproxy conf.d]# cat mon.cfg
listen rch-web-monitor
bind :9533
mode http
#option httpchk GET /monitor/check.html
#option httpchk GET /monitor/check.html HTTP/1.0
#option httpchk GET /monitor/check.html HTTP/1.1 #注意:HTTP/1.1强制要求必须有Host字段
option httpchk HEAD /monitor/check.html HTTP/1.1 #使用HEAD减少网络流量
http-check send hdr host www.realserver.com #向后端传递host头,主要用在后端配置了虚拟主机的情况下
server rch1 192.168.2.42:80 check inter 3000 fall 3 rise 5
server rch2 192.168.2.43:80 check
[root@haproxy conf.d]# systemctl restart haproxy.service
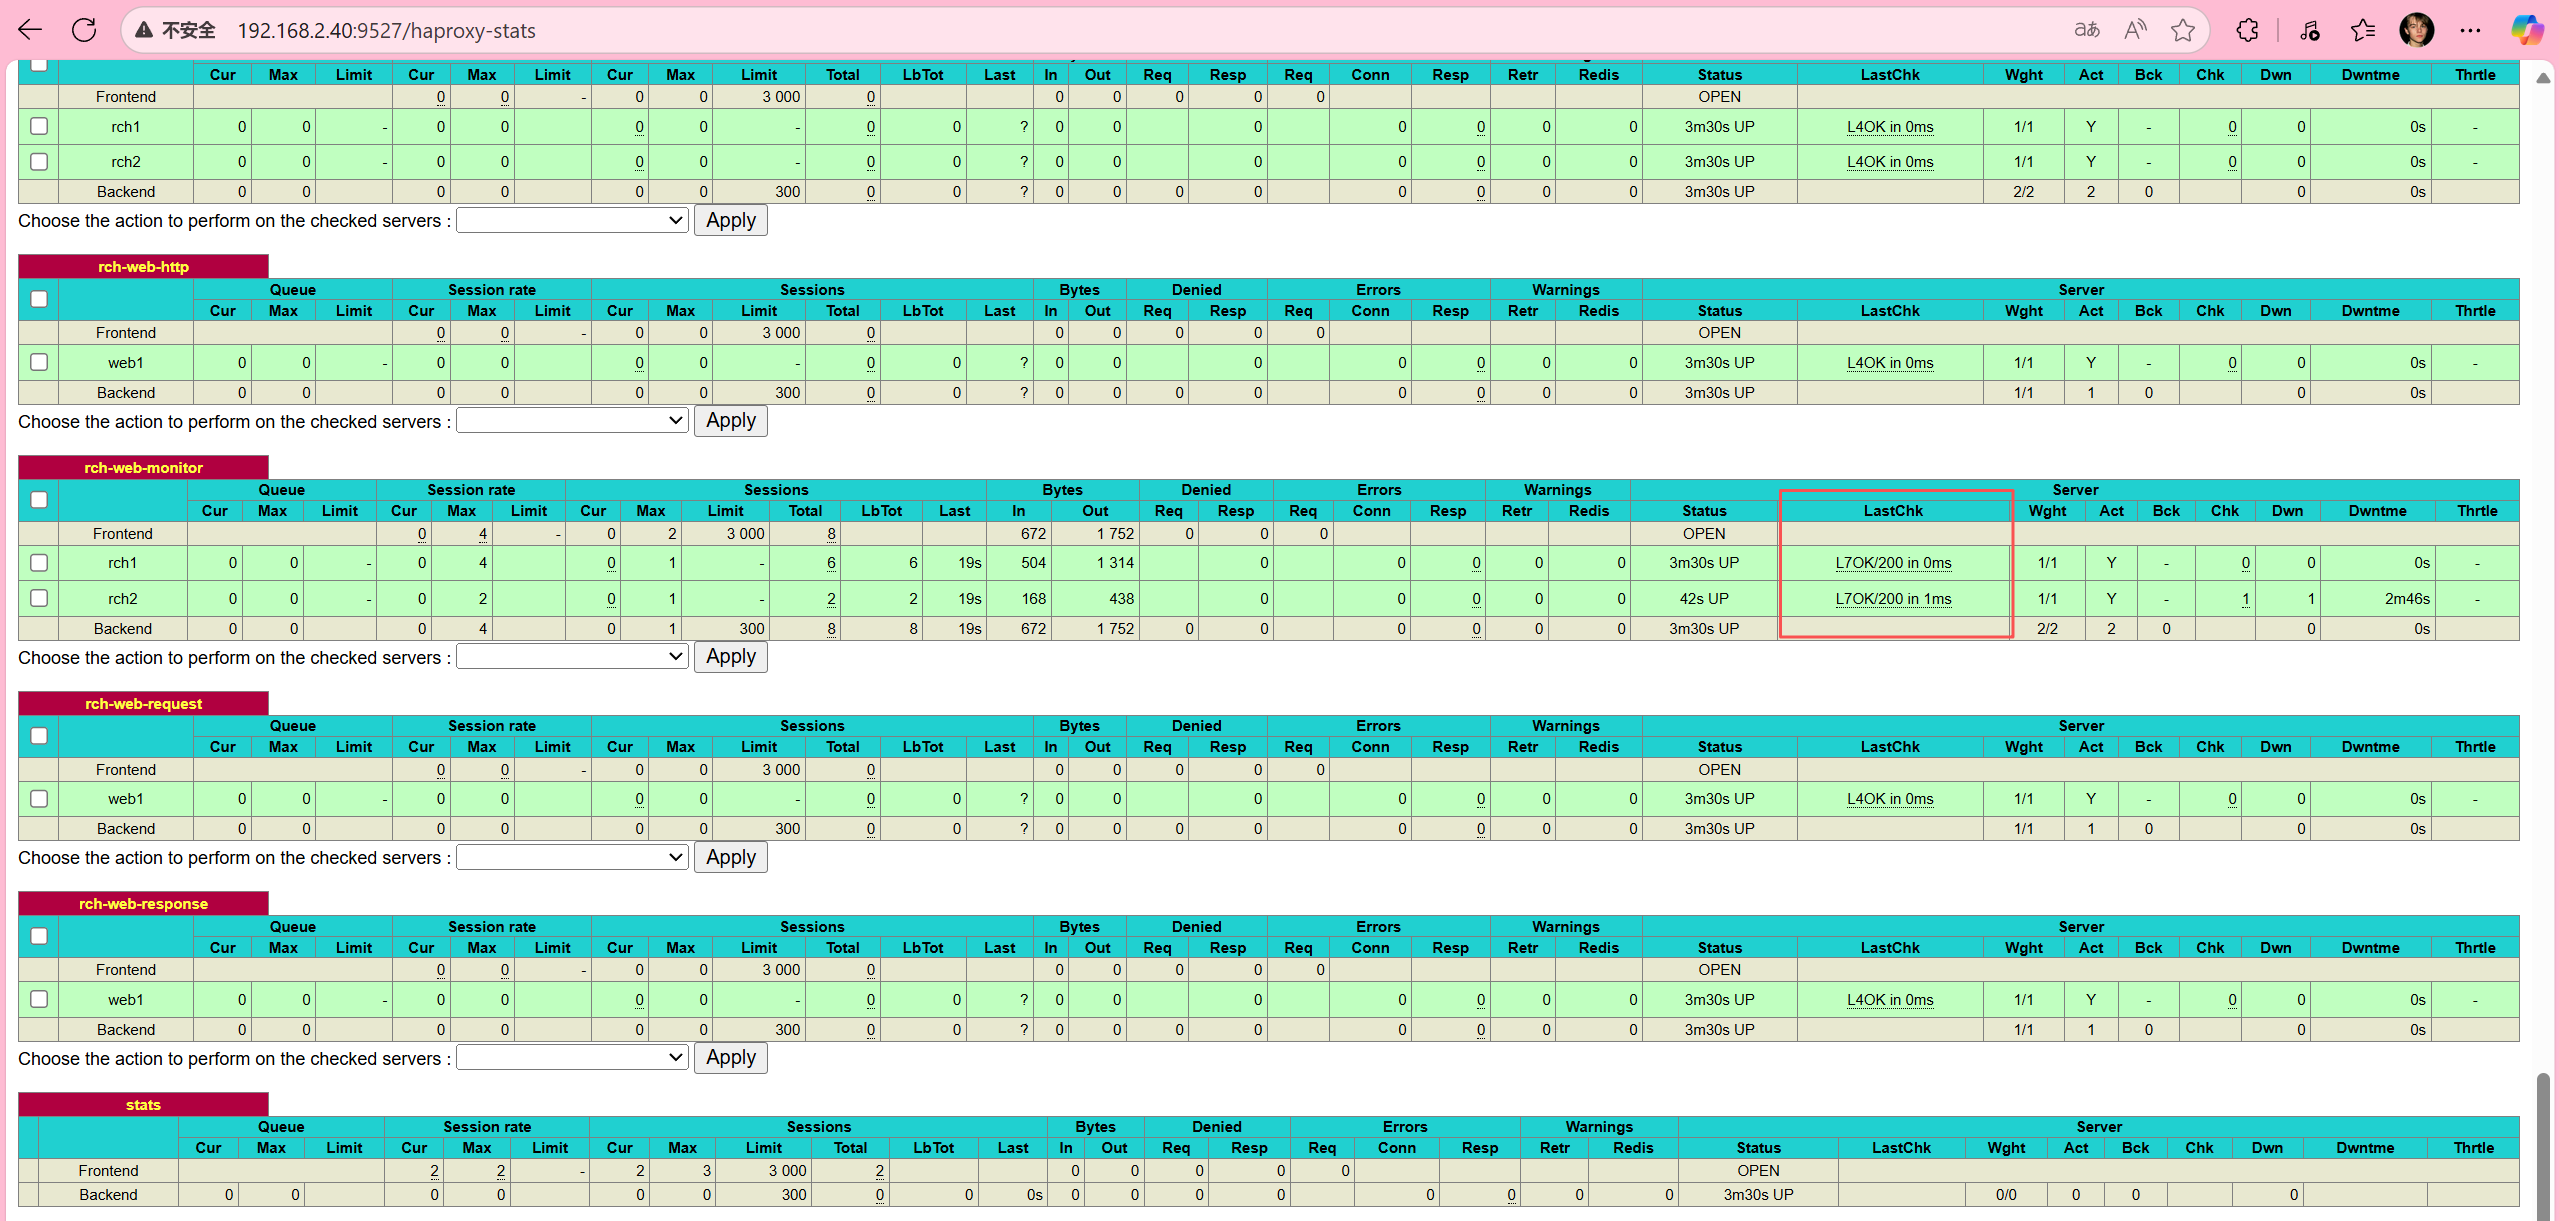
#由于nginx2上没有健康检查的文件,所以认为nginx2离线
[root@client ~]# for i in {1..4};do curl 192.168.2.40:9533;done
nginx1 192.168.2.42
nginx1 192.168.2.42
nginx1 192.168.2.42
nginx1 192.168.2.42
#web2上创建文件
[root@nginx2 html]# mkdir monitor/
[root@nginx2 html]# echo check9533 > monitor/check.html
#客户端再次测试
[root@client ~]# for i in {1..4};do curl 192.168.2.40:9533;done
nginx1 192.168.2.42
nginx2 192.168.2.43
nginx1 192.168.2.42
nginx2 192.168.2.43
验证http监测:查看状态页,可以看到开启了七层检测功能:LastChk字段:L7
4.6 ACL(访问控制列表)
ACL 是 HAProxy强大的规则引擎,可基于 “域名、IP、URL、请求头、方法” 等条件,实现 “路由、拦截、头修改、限速” 等功能。
ACL配置选项
acl   <aclname>  <criterion>  [flags]  [operator] [<value>]
acl    名称       匹配规范       匹配模式  具体操作符   操作对象类型
(1)ACL-Name:ACL名称
#可以使用大字母A-Z、小写字母a-z、数字0-9、冒号、点、中横线和下划线,并且严格区分大小写,比如Image_site和image_site就是两个完全不同的acl
(2)ACL-criterion:定义ACL匹配规范,即:判断条件
hdr([<name> [,<occ>]]) #完全匹配字符串,如果未指定<occ>,默认匹配第一次出现的字段值
hdr_beg([<name> [,<occ>]]) #前缀匹配,header中指定匹配内容的begin
hdr_end([<name> [,<occ>]]) #后缀匹配,header中指定匹配内容end
hdr_dom([<name> [,<occ>]]) #域匹配,header中的domain name
hdr_dir([<name> [,<occ>]]) #路径匹配,header的uri路径
hdr_len([<name> [,<occ>]]) #长度匹配,header的长度匹配
hdr_reg([<name> [,<occ>]]) #正则表达式匹配,自定义表达式(regex)模糊匹配
hdr_sub([<name> [,<occ>]]) #子串匹配,header中的uri模糊匹配
#示例:
hdr(<string>)   #用于测试请求头部首部指定内容
hdr_dom(host)   #请求的host名称,如 www.jungle.com
hdr_beg(host)   #请求的host开头,如 www.   img.   video.
hdr_end(host)   #请求的host结尾,如 .com   .net   .cn

#有些功能是类似的,比如以下几个都是匹配用户请求报文中host的开头是不是www:
acl short_form  hdr_beg(host)  www.
acl alternate1  hdr_beg(host) -m beg www.
acl alternate2  hdr_dom(host) -m beg www.
acl alternate3  hdr(host)     -m beg www.
(3)ACL-flags:ACL匹配模式
-i #不区分大小写
-m #使用指定的pattern匹配方法
-n #不做DNS解析
-u #禁止acl重名,否则多个同名ACL匹配或关系
(4)ACL-operator:ACL 操作符
#整数比较:eq、ge、gt、le、lt
#字符比较:
- exact match     (-m str) :字符串必须完全匹配模式
- substring match (-m sub) :在提取的字符串中查找模式,如果其中任何一个被发现,ACL将匹配
- prefix match    (-m beg) :在提取的字符串首部中查找模式,如果其中任何一个被发现,ACL将匹配
- suffix match    (-m end) :将模式与提取字符串的尾部进行比较,如果其中任何一个匹配,则ACL进行匹配
- subdir match    (-m dir) :查看提取出来的用斜线分隔(“/”)的字符串,如其中任一个匹配,则ACL进行匹配
- domain match    (-m dom) :查找提取的用点(“.”)分隔字符串,如果其中任何一个匹配,则ACL进行匹配
(5)ACL-value:value的类型
The ACL engine can match these types against patterns of the following types :
- Boolean                    #布尔值
- integer or integer range   #整数或整数范围,比如用于匹配端口范围
- IP address / network       #IP地址或IP范围, 192.168.0.1,192.168.0.1/24
- string--> www.jungle.com
  exact –精确比较
  substring—子串
  suffix-后缀比较
  prefix-前缀比较
  subdir-路径, /wp-includes/js/jquery/jquery.js
  domain-域名,www.jungle.com
- regular expression      #正则表达式
- hex block               #16进制
4.6.2 ACL调用方式
与:隐式(默认)使用
或:使用“or” 或 “||”表示
否定:使用 "!" 表示

#示例:
if valid_src valid_port         #与关系,A和B都要满足为true,默认为与
if invalid_src || invalid_port  #或,A或者B满足一个为true
if ! invalid_src                #非,取反,A和B哪个也不满足为true
4.6.3 ACL示例-域名匹配
- 原理:通过提取 HTTP 请求头中的 Host 字段,与预设域名进行匹配(可通过
-i参数忽略大小写),当匹配成功时将请求路由到对应后端服务器,实现多域名对应不同服务的分流。 - 特点:基于 Host 头精准匹配,支持多域名并行路由;配置规则直观,可快速扩展新域名;匹配优先级高于默认路由,适合精细化域名管理。
- 场景:同一 IP / 端口下部署多个网站(如 PC 端站点
www.rch.org和移动端站点www.hjn.com),需按域名将请求分发到不同后端集群。
配置(思路:定义匹配不同域名的 ACL 规则,将匹配到的请求分别路由到对应后端,未匹配的请求走默认后端):
[root@haproxy ~]# vim acl.cfg
[root@haproxy ~]# cat acl.cfg
frontend rch-acl
	mode http
	bind :7777
	log global
	acl pc_domain hdr_dom(host) -i www.rch.org
	acl mobile_domain hdr_dom(host) -i www.hjn.com
	use_backend pc_domains if pc_domain
	use_backend mobile_domains if mobile_domain
	default_backend pc_domains
backend pc_domains
		mode http
		server rch1 192.168.2.42:80 check inter 2000 fall 3 rise 5
backend mobile_domains
		mode http
		server rch2 192.168.2.43:80 check inter 2000 fall 3 rise 5
[root@haproxy ~]# systemctl restart haproxy.service
ACL 规则定义
acl pc_domain hdr_dom(host) -i www.rch.org
- 作用:定义 ACL 规则
pc_domain - 分解:
acl pc_domain:创建名为 pc_domain 的访问控制列表hdr_dom(host):提取 HTTP 请求头中的 Host 字段的域名部分-i www.rch.org:不区分大小写匹配域名 www.rch.org
- 效果:当 Host 头为 www.rch.org 时,此 ACL 为真
acl mobile_domain hdr_dom(host) -i www.hjn.com
- 作用:定义 ACL 规则
mobile_domain - 分解:
- 匹配 Host 头为 www.hjn.com 的请求
- 效果:当 Host 头为 www.hjn.com 时,此 ACL 为真
路由规则
use_backend pc_domains if pc_domain
- 作用:条件路由规则
- 说明:如果
pc_domainACL 为真,使用pc_domains后端
use_backend mobile_domains if mobile_domain
- 作用:条件路由规则
- 说明:如果
mobile_domainACL 为真,使用mobile_domains后端
default_backend pc_domains
-
作用:默认路由规则
-
说明:如果所有 ACL 都不匹配,默认使用
pc_domains后端测试
[root@client ~]# echo "192.168.2.40 www.rch.org www.hjn.com" >> /etc/hosts
[root@client ~]# curl www.rch.org
nginx1 192.168.2.42
[root@client ~]# curl www.hjn.com
nginx2 192.168.2.43
[root@client ~]# echo "192.168.2.40 www.xrx.com" >> /etc/hosts
[root@client ~]# curl www.xrx.com
nginx1 192.168.2.42
配置验证成功:
- www.rch.org →
nginx1 192.168.2.42✅- 匹配
pc_domainACL - 路由到
pc_domains后端
- 匹配
- www.hjn.com →
nginx2 192.168.2.43✅- 匹配
mobile_domainACL - 路由到
mobile_domains后端
- 匹配
- www.xrx.com →
nginx1 192.168.2.42✅- 不匹配任何 ACL
- 使用
default_backend pc_domains
4.6.4 ACL示例—基于源ip或子网调度访问
- 原理:通过提取客户端的源 IP 地址或所属子网,与预设 IP 范围匹配,将符合条件的请求定向到指定后端服务器,实现 “特定 IP 段访问特定服务” 的精准调度。
- 特点:基于网络层标识做路由,不受应用层信息(如域名、URL)影响;支持单 IP、CIDR 子网等多种匹配方式,规则优先级可灵活调整。
- 场景:内部办公 IP 访问测试环境后端、特定地域用户访问就近节点、VIP 用户路由到专属服务集群。
配置(思路:定义匹配源 IP 的 ACL 规则,将特定 IP 的请求强制路由到目标后端,同时保留域名匹配规则):
[root@haproxy ~]# vim acl.cfg
[root@haproxy ~]# cat acl.cfg
frontend rch-acl
	mode http
	bind :7777
	log global
	# 域名匹配规则
	acl pc_domain hdr_dom(host) -i www.rch.org
	acl mobile_domain hdr_dom(host) -i www.hjn.com
	#当客户端IP为192.168.2.40时强制路由到pc_hosts后端
	acl ip_range_test src 192.168.2.40
	use_backend pc_hosts if pc_domain
	use_backend mobile_hosts if mobile_domain
	use_backend pc_hosts if ip_range_test
	default_backend pc_hosts
	backend pc_hosts
		mode http
		server rch1 192.168.2.42:80 check inter 2000 fall 3 rise 5
	backend mobile_hosts
		mode http
		server rch2 192.168.2.43:80 check inter 2000 fall 3 rise 5
路由逻辑
- 域名 www.rch.org → pc_hosts
- 域名 www.hjn.com → mobile_hosts
- 源IP 192.168.2.40 → pc_hosts (优先级低于域名匹配)
- 其他情况 → pc_hosts (默认)
测试
[root@haproxy conf.d]# curl www.rch.org:7777
nginx1 192.168.2.42
[root@haproxy conf.d]# curl www.hjn.com:7777
nginx2 192.168.2.43
[root@haproxy conf.d]# curl www.test.com:7777
nginx1 192.168.2.42
4.6.5 ACL示例-基于源地址的访问控制
- 原理:通过 ACL 匹配客户端源 IP,对符合条件的请求执行 “拒绝访问” 操作,直接拦截恶意 IP 或未授权来源的流量,保护后端服务。
- 特点:在前端层阻断流量,避免无效请求到达后端;支持 “白名单”“黑名单” 模式,规则优先级高于路由逻辑。
- 场景:防御已知攻击 IP、限制外部网络访问内部服务、禁止特定区域 IP 访问敏感接口。
配置(思路:定义需拦截的源 IP ACL,使用http-request deny指令拒绝匹配请求):
[root@haproxy conf.d]# vim acl.cfg
[root@haproxy conf.d]# cat acl.cfg
frontend rch-acl
	mode http
	bind :7777
	log global
	acl pc_domain hdr_dom(host) -i www.rch.org
	acl mobile_domain hdr_dom(host) -i www.hjn.com
	acl ip_range_test src 192.168.2.40
	 # 黑名单ACL:拦截192.168.2.41
	acl acl_deny_src src 192.168.2.41
	use_backend pc_hosts if pc_domain
	use_backend mobile_hosts if mobile_domain
	use_backend pc_hosts if ip_range_test
	#http-request deny 规则会拦截来自 192.168.2.41 的所有请求,无论域名匹配什么规则
	http-request deny if acl_deny_src
	default_backend pc_hosts
	backend pc_hosts
		mode http
		server rch1 192.168.2.42:80 check inter 2000 fall 3 rise 5
	backend mobile_hosts
		mode http
		server rch2 192.168.2.43:80 check inter 2000 fall 3 rise 5
[root@haproxy conf.d]# systemctl restart haproxy.service
测试
# 从黑名单IP(192.168.2.41)访问,被拒绝
[root@client ~]# curl www.rch.org:7777
<html><body><h1>403 Forbidden</h1>
Request forbidden by administrative rules.
</body></html>
[root@client ~]# curl www.hjn.com:7777
<html><body><h1>403 Forbidden</h1>
Request forbidden by administrative rules.
</body></html>
# 从允许IP(192.168.2.40)访问,正常路由
[root@haproxy conf.d]# curl www.rch.org:7777
nginx1 192.168.2.42
[root@haproxy conf.d]# curl www.hjn.com:7777
nginx2 192.168.2.43
4.6.6 ACL示例-匹配浏览器类型
- 原理:提取 HTTP 请求头中的
User-Agent字段,匹配客户端类型(如爬虫、特定浏览器、自定义标识),执行重定向、拒绝或路由操作,实现客户端差异化处理。 - 特点:基于应用层标识做控制,可识别爬虫、移动端 / PC 端浏览器;规则灵活,支持子串、正则等多种匹配方式。
- 场景:拦截恶意爬虫(如 wget、curl)、为特定浏览器提供适配页面、限制非官方客户端访问 API。
配置(思路:匹配User-Agent中的特征字符串,对爬虫执行重定向,对自定义标识执行拒绝):
[root@haproxy conf.d]# vim acl.cfg
[root@haproxy conf.d]# cat acl.cfg
frontend rch-acl
	mode http
	bind :7777
	log global
	#acl pc_domain hdr_dom(host) -i www.rch.org
	#acl mobile_domain hdr_dom(host) -i www.hjn.com
	#acl ip_range_test src 192.168.2.40
	#acl acl_deny_src src 192.168.2.41
	#检查 User-Agent 头是否包含 "curl" 或 "wget"

	acl acl_user_agent hdr_sub(User-Agent) -i curl wget
	#检查 User-Agent 头是否包含 "rchao"
	acl acl_user_agent_ab hdr_sub(User-Agent) -i rchao

	#use_backend pc_hosts if pc_domain
	#use_backend mobile_hosts if mobile_domain
	#use_backend pc_hosts if ip_range_test
	#http-request deny if acl_deny_src

	#如果 User-Agent 包含 curl/wget,重定向到 192.168.2.40:81
	redirect prefix http://192.168.2.40:81 if acl_user_agent
	#如果 User-Agent 包含 "rchao",直接拒绝请求
	http-request deny if acl_user_agent_ab
	default_backend pc_hosts
	backend pc_hosts
		mode http
		server rch1 192.168.2.42:80 check inter 2000 fall 3 rise 5
	backend mobile_hosts
		mode http
		server rch2 192.168.2.43:80 check inter 2000 fall 3 rise 5
[root@haproxy conf.d]# systemctl restart haproxy.service
测试
[root@client ~]# curl -I 192.168.2.40:7777
HTTP/1.1 302 Found
content-length: 0
location: http://192.168.2.40:81/
cache-control: no-cache

[root@client ~]# curl -L 192.168.2.40:7777
nginx1 192.168.2.42
[root@client ~]# wget -O - -q 192.168.2.40:7777
nginx1 192.168.2.42
[root@client ~]# curl -A rch 192.168.2.40:7777
nginx1 192.168.2.42
[root@client ~]# curl -A rchao 192.168.2.40:7777
<html><body><h1>403 Forbidden</h1>
Request forbidden by administrative rules.
</body></html>
4.6.7 ACL示例-基于文件后缀名实现动静分离
- 原理:通过请求 URL 的文件后缀(如
.jpg、.php)区分静态资源和动态脚本,将静态请求路由到静态资源服务器(如 Nginx),动态请求路由到应用服务器(如 PHP-FPM),实现资源处理专业化。 - 特点:减少应用服务器负载,静态资源可通过 CDN 加速;规则清晰,易扩展新后缀类型。
- 场景:Web 架构中分离静态资源(图片、CSS、JS)和动态脚本(PHP、JSP),优化性能。
配置(思路:匹配不同文件后缀的 ACL,分别路由到静态和动态后端):
[root@haproxy conf.d]# vim acl.cfg
[root@haproxy conf.d]# cat acl.cfg
frontend rch-acl
	mode http
	bind :7777
	log global
	#检查请求路径是否以静态文件扩展名结尾
	acl acl_static path_end -i .jpg .jpeg .png .gif .css .js
	#检查请求路径是否以 .php 结尾
	acl acl_php path_end -i .php
	#静态文件请求路由到 mobile_hosts 后端 (192.168.2.43)
	use_backend mobile_hosts if acl_static
	#PHP 文件请求路由到 pc_hosts 后端 (192.168.2.42)
  	use_backend pc_hosts if acl_php
	default_backend pc_hosts
	backend pc_hosts
		mode http
		server rch1 192.168.2.42:80 check inter 2000 fall 3 rise 5
	backend mobile_hosts
		mode http
		server rch2 192.168.2.43:80 check inter 2000 fall 3 rise 5
[root@haproxy conf.d]# systemctl restart haproxy.service
应用场景:这种配置常用于动静分离架构,将静态资源(图片、CSS、JS)和动态脚本(PHP)分别路由到不同的后端服务器,优化性能和资源利用。
4.6.8 ACL-匹配访问路径实现动静分离
- 原理:结合 URL 路径前缀(如
/static/、/api/)和文件后缀双重条件,更精细地区分请求类型,覆盖 “路径标识资源类型” 的场景(如/static/下均为静态资源)。 - 特点:比单纯后缀匹配更灵活,支持 “目录级” 资源划分;同名 ACL 自动合并为 “或” 关系,简化配置。
- 场景:复杂 Web 应用中,静态资源集中在
/static/目录,API 接口集中在/api/目录,需分别路由。
配置(思路:定义路径前缀和后缀的同名 ACL,合并为 “或” 条件,实现多维度匹配):
[root@haproxy conf.d]# vim acl.cfg
[root@haproxy conf.d]# cat acl.cfg
frontend rch-acl
	mode http
	bind :7777
	log global
	# 两条同名的 acl_static 会被自动合并,逻辑关系为"或" (OR)
	#acl_static 现在匹配以下任意情况:
	#路径以静态文件扩展名结尾:.jpg .jpeg .png .gif .css .js
	#或 路径以特定前缀开头:/rch /hjn /gzh
	acl acl_static path_end -i .jpg .jpeg .png .gif .css .js
	acl acl_static path_beg -i /rch /hjn /gzh
	# 单独的 PHP 规则
	acl acl_php path_end -i .php
	use_backend mobile_hosts if acl_static
  	use_backend pc_hosts if acl_php
	default_backend pc_hosts
	backend pc_hosts
		mode http
		server rch1 192.168.2.42:80 check inter 2000 fall 3 rise 5
	backend mobile_hosts
		mode http
		server rch2 192.168.2.43:80 check inter 2000 fall 3 rise 5
[root@haproxy conf.d]# systemctl restart haproxy.service
测试
[root@nginx2 ~]# cd /usr/share/nginx/html/
[root@nginx2 html]# mkdir rch
[root@nginx2 html]# echo rchao > rch/index.html

[root@client ~]# curl 192.168.2.40:7777/rch/
rchao
注意:如果一个请求同时匹配多个条件(如 /rch/test.php),会按照配置顺序使用第一个匹配的规则。
4.6.9 ACL示例-预定义ACL使用
官方帮助文档:https://docs.haproxy.org/2.4/configuration.html#7.4
- 原理:HAProxy 内置一系列预定义 ACL(如
METH_GET、HTTP_1.1),封装了常见的协议特征(请求方法、HTTP 版本等),可直接调用简化配置,无需手动定义基础规则。 - 特点:减少重复配置,降低出错率;覆盖 HTTP 协议核心特征,满足多数基础场景。
- 场景:限制特定 HTTP 方法(如禁止
TRACE)、仅允许特定协议版本(如强制HTTP/1.1)、拦截异常请求(如无内容的 POST)。
| ACL name | Equivalent to | Usage |
|---|---|---|
| FALSE | always_false | 从不匹配 |
| HTTP | req_proto_http | 如果协议是有效的HTTP,则匹配 |
| HTTP_1.0 | req_ver 1.0 | 匹配HTTP版本1.0 |
| HTTP_1.1 | req_ver 1.1 | 匹配HTTP版本1.1 |
| HTTP_CONTENT | hdr_val(content-length) gt 0 | 匹配现有内容长度 |
| HTTP_URL_ABS | url_reg [/:]*😕/ | 将绝对URL与方案匹配 |
| HTTP_URL_SLASH | url_beg / | 匹配以“/”开头的URL |
| HTTP_URL_STAR | url * | 匹配URL等于“*” |
| LOCALHOST | src 127.0.0.1/8 | 匹配来自本地主机的连接 |
| METH_CONNECT | method CONNECT | 匹配HTTP CONNECT方法 |
| METH_DELETE | method DELETE | 匹配HTTP DELETE方法 |
| METH_GET | method GET HEAD | 匹配HTTP GET或HEAD方法 |
| METH_HEAD | method HEAD | 匹配HTTP HEAD方法 |
| METH_OPTIONS | method OPTIONS | 匹配HTTP OPTIONS方法 |
| METH_POST | method POST | 匹配HTTP POST方法 |
| METH_PUT | method PUT | 匹配HTTP PUT方法 |
| METH_TRACE | method TRACE | 匹配HTTP TRACE方法 |
| RDP_COOKIE | req_rdp_cookie_cnt gt 0 | 匹配RDP cookie的存在 |
| REQ_CONTENT | req_len gt 0 | 匹配请求缓冲区中的数据 |
| TRUE | always_true | 始终匹配 |
| WAIT_END | wait_end | 等待内容分析结束 |
配置(思路:使用预定义 ACL 限制HEAD方法与HTTP/1.1的组合请求):
[root@haproxy conf.d]# vim acl.cfg
[root@haproxy conf.d]# cat acl.cfg
frontend rch-acl
	mode http
	bind :7777
	log global
	#如果HTTP请求方法为 HEAD并且HTTP协议版本为 HTTP/1.1则拒绝
	http-request deny if METH_HEAD HTTP_1.1
	backend pc_hosts
		mode http
		server rch1 192.168.2.42:80 check inter 2000 fall 3 rise 5
	backend mobile_hosts
		mode http
		server rch2 192.168.2.43:80 check inter 2000 fall 3 rise 5
[root@haproxy conf.d]# systemctl restart haproxy.service
测试
[root@client ~]# curl -I 192.168.2.40:7777
HTTP/1.1 403 Forbidden
content-length: 93
cache-control: no-cache
content-type: text/html

[root@client ~]# curl -I -XHEAD 192.168.2.40:7777
HTTP/1.1 403 Forbidden
content-length: 93
cache-control: no-cache
content-type: text/html
[root@client ~]# curl  192.168.2.40:7777
nginx1 192.168.2.42
#-0表示强制使用HTTP/1.0协议请求头
[root@client ~]# curl -I -0 -XHEAD  192.168.2.40:7777
#查看web服务器日志
[root@web2 ~]# tail -1 /var/log/nginx/access.log
192.168.2.40 - - [24/Sep/2025:22:03:08 +0800] "GET / HTTP/1.0" 200 20 "-" "curl/7.29.0" "192.168.2.41"
4.7 自定义HAProxy错误界面
HAProxy 默认的错误页面(如 503、403 等)风格简陋且缺乏业务标识。自定义错误界面可优化用户体验、传递品牌信息,并在错误场景中嵌入排障指引,是生产环境的常见需求。
配置原理与步骤
HAProxy 通过 errorfile 指令,为不同 HTTP 状态码关联自定义 HTML 文件。当触发对应错误时,HAProxy 会返回该文件内容。
准备自定义错误页:创建 HTML 文件(如 /etc/haproxy/errors/503.html),示例内容(可包含品牌样式、故障说明、恢复时间等):
配置(思路:创建自定义错误 HTML 文件,通过errorfile绑定状态码与文件路径):
[root@haproxy conf.d]# mkdir /etc/haproxy/errors/
[root@haproxy conf.d]# vim /etc/haproxy/errors/503.http
[root@haproxy conf.d]# cat /etc/haproxy/errors/503.http
HTTP/1.1 503 Service Unavailable
Content-Type:text/html;charset=utf-8

<!DOCTYPE html>
<html>
<head>
    <title>服务暂时不可用</title>
    <style>body{font-family:Arial;margin:2em;text-align:center;}</style>
</head>
<body>
    <h1>503 Service Unavailable</h1>
    <p>我们的服务正在维护,预计10分钟后恢复。如有紧急问题,请联系 support@example.com。</p>
    <p>当前时间: <span id="time"></span></p>
    <script>document.getElementById("time").innerText = new Date().toLocaleString();</script>
</body>
</html>
[root@haproxy errors]# vim /etc/haproxy/haproxy.cfg
[root@haproxy errors]# grep errorfile /etc/haproxy/haproxy.cfg
    errorfile 503  /etc/haproxy/errors/503.http
后端服务器都down了后,访问haproxy可以观察到以下页面

还可以使用errorloc,(思路:将错误码重定向到外部错误服务的 URL):
#haproxy配置
[root@haproxy conf.d]# grep errorloc ../haproxy.cfg
    errorloc 503  http://192.168.2.41/error_page/503.html
[root@haproxy conf.d]# systemctl restart haproxy.service
#192.168.2.41配置
[root@client ~]# mkdir  /usr/local/nginx/html/error_page
[root@client ~]# vim /usr/local/nginx/html/error_page/503.html
[root@client ~]# cat /usr/local/nginx/html/error_page/503.html
<!DOCTYPE html>
<html lang="en">
<head>
<title>Error</title>
</head>
<body>
<center><h1>error</h1></center>
<center><h2>telephone:400-888-8888</h2></center>
<center><h3>503 Service Unavailable</h3></center>
</body>
[root@client ~]# systemctl restart nginx

4.8 HAProxy 实现四层负载
四层负载基于TCP/UDP 协议(OSI 传输层),HAProxy 不解析应用层内容(如 HTTP 头、数据库协议),仅按 “IP + 端口” 转发流量。适合数据库(MySQL)、SSH、邮件服务(SMTP)等场景。
MySQL
Redis
Memcache
RabbitMQ
4.8.1 四层负载示例(以 MySQL 代理为例)
将客户端的 MySQL 连接请求负载均衡到多台后端数据库,实现高可用与性能分发。
#Redis示例
listen redis-port
    bind 192.168.2.40:6379
    mode tcp
    balance leastconn
    server server1 192.168.2.42:6379 check
    server server1 192.168.2.43:6379 check backup
MySQL 服务实现四层负载
- haproxy配置
[root@haproxy conf.d]# vim mysql.cfg
[root@haproxy conf.d]# cat mysql.cfg
listen rch-mysql
	bind :3306
	mode tcp
	balance leastconn
	server mysql1 192.168.2.42:3306
	server mysql2 192.168.2.43:3306
[root@haproxy conf.d]# systemctl restart haproxy.service
- 后端服务器配置(都配置)
yum install mysql-server -y
systemctl start mysqld
mysql -uroot

mysql> create user rchao@'%' identified by '123';
Query OK, 0 rows affected (0.00 sec)

mysql> grant all on *.* to rchao@'%';
- 测试
[root@haproxy conf.d]# yum install mysql -y
[root@haproxy conf.d]# mysql -urchao -p123 -h 192.168.2.40 -e "show variables like 'hostname'"
+---------------+--------+
| Variable_name | Value  |
+---------------+--------+
| hostname      | nginx1 |
+---------------+--------+
[root@haproxy conf.d]# mysql -urchao -p123 -h 192.168.2.40 -e "show variables like 'hostname'"
+---------------+--------+
| Variable_name | Value  |
+---------------+--------+
| hostname      | nginx2 |
+---------------+--------+
4.8.2 ACL 示例 - 四层访问控制(限制 MySQL 访问 IP)
基于源 IP,实现 “仅允许办公网 IP 访问数据库,其余 IP 拒绝” 的安全控制。
[root@haproxy conf.d]# vim mysql.cfg
[root@haproxy conf.d]# cat mysql.cfg
listen rch-mysql
	bind :3306
	mode tcp
	balance leastconn
	#拒绝来自 192.168.2.40 的连接
	acl invalid_src src 192.168.2.40
	tcp-request connection reject if invalid_src
	server mysql1 192.168.2.42:3306
	server mysql2 192.168.2.43:3306
[root@haproxy conf.d]# systemctl restart haproxy.service
#测试连接提示连接中断,换个客户端测试即可
[root@haproxy conf.d]# mysql -urchao -p123 -h 192.168.2.40 -e "show variables like 'hostname'"
mysql: [Warning] Using a password on the command line interface can be insecure.
ERROR 2013 (HY000): Lost connection to MySQL server at 'reading initial communication packet', system error: 104
4.9 HAProxy-HTTPS 实现
HTTPS 涉及 SSL/TLS 证书处理,HAProxy 支持两种核心模式:SSL 终端(HAProxy 解密 HTTPS,后端走明文 HTTP)和SSL 直通(HAProxy 转发加密流量到后端,由后端解密)。
#配置HAProxy支持https协议,支持ssl会话;
    bind *:443 ssl crt /PATH/TO/SOME_PEM_FILE  #crt 后证书文件为PEM格式,且同时包含证书和所有私钥cat  demo.crt demo.key > demo.pem

#把80端口的请求重定向443
    bind *:80
    redirect scheme https if !{ ssl_fc }

#向后端传递用户请求的协议和端口
    http_request set-header X-Forwarded-Port %[dst_port]
    http_request add-header X-Forwared-Proto https if { ssl_fc }
制作证书
[root@haproxy conf.d]# mkdir /etc/haproxy/certs
[root@haproxy conf.d]# cd /etc/haproxy/certs
[root@haproxy certs]# openssl  genrsa -out haproxy.key 2048
[root@haproxy certs]# openssl req  -x509 -newkey rsa:2048 -subj "/CN=www.jungle.org" -keyout haproxy.key -nodes -days 365 -out haproxy.crt
[root@haproxy certs]# cat haproxy.key  haproxy.crt > haproxy.pem
#查看证书内容
[root@haproxy certs]# openssl  x509 -in  haproxy.pem -noout -text
haproxy配置https
[root@haproxy conf.d]# vim https.cfg
[root@haproxy conf.d]# cat https.cfg
frontend rch-https
  bind 192.168.2.40:80
  bind 192.168.2.40:443 ssl crt /etc/haproxy/certs/haproxy.pem
  redirect scheme https if !{ ssl_fc }
  http-request set-header forwardPort %[dst_port]
  http-request add-header forwardProto https if { ssl_fc }
  use_backend static_hosts
  mode http
  balance roundrobin
  log global
backend static_hosts
  mode http
  server rch1 192.168.2.42:80 check inter 2000 fall 3 rise 5
  server rch2 192.168.2.43:80 check inter 2000 fall 3 rise 5
[root@haproxy conf.d]# systemctl restart haproxy.service
[root@haproxy conf.d]# ss -lntup | grep 443
tcp   LISTEN 0      3000    192.168.2.40:443        0.0.0.0:*    users:(("haproxy",pid=42562,fd=24))
修改后端服务器日志
[root@nginx1 ~]# vim /etc/nginx/nginx.conf
[root@nginx1 ~]# grep -A2 log_format /etc/nginx/nginx.conf
    log_format  main  '$remote_addr - $remote_user [$time_local] "$request" '
                      '$status $body_bytes_sent "$http_referer" '
                      '"$http_user_agent" "$http_x_forwarded_for" "$proxy_add_x_forwarded_for" "$http_testheader" "$http_haproxydate" "$http_forwardPort" "$http_forwardProto"';
[root@nginx1 ~]# systemctl restart nginx
验证并测试
[root@client ~]# curl -I 192.168.2.40
HTTP/1.1 302 Found
content-length: 0
location: https://192.168.2.40/
cache-control: no-cache

[root@client ~]# curl -k  192.168.2.40
nginx1 192.168.2.42
[root@client ~]# curl -k  192.168.2.40
nginx2 192.168.2.43
查看后端日志
192.168.2.40 - - [09/Oct/2025:00:18:04 +0800] "GET / HTTP/1.1" 200 20 "-" "curl/7.76.1" "192.168.2.41" "192.168.2.41, 192.168.2.40" "-" "-" "443" "https"
nf.d]# mkdir /etc/haproxy/certs
[root@haproxy conf.d]# cd /etc/haproxy/certs
[root@haproxy certs]# openssl genrsa -out haproxy.key 2048
[root@haproxy certs]# openssl req -x509 -newkey rsa:2048 -subj “/CN=www.jungle.org” -keyout haproxy.key -nodes -days 365 -out haproxy.crt
[root@haproxy certs]# cat haproxy.key haproxy.crt > haproxy.pem
#查看证书内容
[root@haproxy certs]# openssl x509 -in haproxy.pem -noout -text
**haproxy配置https**

```bash
[root@haproxy conf.d]# vim https.cfg
[root@haproxy conf.d]# cat https.cfg
frontend rch-https
  bind 192.168.2.40:80
  bind 192.168.2.40:443 ssl crt /etc/haproxy/certs/haproxy.pem
  redirect scheme https if !{ ssl_fc }
  http-request set-header forwardPort %[dst_port]
  http-request add-header forwardProto https if { ssl_fc }
  use_backend static_hosts
  mode http
  balance roundrobin
  log global
backend static_hosts
  mode http
  server rch1 192.168.2.42:80 check inter 2000 fall 3 rise 5
  server rch2 192.168.2.43:80 check inter 2000 fall 3 rise 5
[root@haproxy conf.d]# systemctl restart haproxy.service
[root@haproxy conf.d]# ss -lntup | grep 443
tcp   LISTEN 0      3000    192.168.2.40:443        0.0.0.0:*    users:(("haproxy",pid=42562,fd=24))
修改后端服务器日志
[root@nginx1 ~]# vim /etc/nginx/nginx.conf
[root@nginx1 ~]# grep -A2 log_format /etc/nginx/nginx.conf
    log_format  main  '$remote_addr - $remote_user [$time_local] "$request" '
                      '$status $body_bytes_sent "$http_referer" '
                      '"$http_user_agent" "$http_x_forwarded_for" "$proxy_add_x_forwarded_for" "$http_testheader" "$http_haproxydate" "$http_forwardPort" "$http_forwardProto"';
[root@nginx1 ~]# systemctl restart nginx
验证并测试
[root@client ~]# curl -I 192.168.2.40
HTTP/1.1 302 Found
content-length: 0
location: https://192.168.2.40/
cache-control: no-cache

[root@client ~]# curl -k  192.168.2.40
nginx1 192.168.2.42
[root@client ~]# curl -k  192.168.2.40
nginx2 192.168.2.43
查看后端日志
192.168.2.40 - - [09/Oct/2025:00:18:04 +0800] "GET / HTTP/1.1" 200 20 "-" "curl/7.76.1" "192.168.2.41" "192.168.2.41, 192.168.2.40" "-" "-" "443" "https"


 3423
3423

 被折叠的 条评论
为什么被折叠?
被折叠的 条评论
为什么被折叠?
 到【灌水乐园】发言


