


1.源码编译安装nginx-1.24
安装nginx所需要的库
openssl-devel:让 Nginx 支持 HTTPS 加密传输pcre-devel:支持正则表达式,用于 URL 匹配zlib-devel:支持 gzip 压缩,减少传输数据量gcc:C 语言编译器,用来编译 Nginx 源码
yum install openssl-devel pcre-devel gcc zlib-devel -y
源码安装 Nginx
#创建专用用户
[root@nginx ~]# useradd nginx -s /sbin/nologin -M
[root@nginx ~]# cd /opt/
[root@nginx opt]# ls
nginx-1.24.0.tar.gz  nginx-1.28.0.tar.gz
# 解压源码包
[root@nginx opt]# tar xf nginx-1.24.0.tar.gz
[root@nginx opt]# ll
总用量 2340
drwxr-xr-x 8 nginx nginx     158  4月 11  2023 nginx-1.24.0
-rw-r--r-- 1 root  root  1112471  9月 13 15:22 nginx-1.24.0.tar.gz
-rw-r--r-- 1 root  root  1280111  9月 13 15:22 nginx-1.28.0.tar.gz
[root@nginx opt]# cd nginx-1.24.0/
[root@nginx nginx-1.24.0]# ll
总用量 816
drwxr-xr-x 6 nginx nginx   4096  9月 13 15:23 auto
-rw-r--r-- 1 nginx nginx 323312  4月 11  2023 CHANGES
-rw-r--r-- 1 nginx nginx 494234  4月 11  2023 CHANGES.ru
drwxr-xr-x 2 nginx nginx    168  9月 13 15:23 conf
-rwxr-xr-x 1 nginx nginx   2611  4月 11  2023 configure
drwxr-xr-x 4 nginx nginx     72  9月 13 15:23 contrib
drwxr-xr-x 2 nginx nginx     40  9月 13 15:23 html
-rw-r--r-- 1 nginx nginx   1397  4月 11  2023 LICENSE
drwxr-xr-x 2 nginx nginx     21  9月 13 15:23 man
-rw-r--r-- 1 nginx nginx     49  4月 11  2023 README
drwxr-xr-x 9 nginx nginx     91  9月 13 15:23 src
# 配置编译选项
[root@nginx nginx-1.24.0]# ./configure --user=nginx --group=nginx --prefix=/usr/local/nginx --with-http_stub_status_module --with-http_ssl_module --with-http_v2_module  --with-http_realip_module --with-http_gzip_static_module  --with-pcre  --with-stream  --with-stream_ssl_module  --with-stream_realip_module

--user/--group:指定运行用户和组

--prefix:指定安装目录

--with-http_ssl_module:支持 HTTPS

--with-http_v2_module:支持 HTTP/2 协议

--with-stream:支持 TCP/UDP 代理

# 编译并安装
[root@nginx ~]# /usr/local/nginx/sbin/nginx -V
nginx version: nginx/1.24.0
built by gcc 11.4.1 20230605 (Red Hat 11.4.1-2) (GCC)
built with OpenSSL 3.0.7 1 Nov 2022
TLS SNI support enabled
configure arguments: --user=nginx --group=nginx --prefix=/usr/local/nginx --with-http_stub_status_module --with-http_ssl_module --with-http_v2_module --with-http_realip_module --with-http_gzip_static_module --with-pcre --with-stream --with-stream_ssl_module --with-stream_realip_module
启动Nginx
[root@nginx ~]# /usr/local/nginx/sbin/nginx  -h
  -s signal     : send signal to a master process: stop, quit, reopen, reload
##########信号说明#########
stop #立即停止,没处理完的请求也会被立即断开,相当于信号 SIGTERM,SIGINT
quit #优雅退出,不再接收新的请求,但己建立的连接不受影响,相当于信号 SIGQUIT
reopen #重开一个新的日志文件,日志内容写新文件,相当于信号 SIGUSR1
reload #重新加载配置文件,重新生成worker 进程,不中断正在处理的请求,己建立的连接按照旧配置处理,新连接用新配置处理,同systemctl reload nginx
SIGUSR2 #平滑升级二进制文件,适用于版本升级
SIGWINCH #优雅的停止工作进程,适用于版本升级
###########说明结束##########
# 启动 Nginx
[root@nginx ~]# /usr/local/nginx/sbin/nginx
# 检查是否启动成功
[root@nginx ~]# ss -lntup | grep 80
tcp    LISTEN     0      128       *:80                    *:*                   users:(("nginx",pid=4142,fd=6),("nginx",pid=4141,fd=6))
# 创建软链接,方便使用
[root@nginx ~]# ln -s  /usr/local/nginx/sbin/nginx  /usr/sbin/nginx
# 为了让 Nginx 像系统服务一样管理(开机自启、systemctl 控制等),我们创建服务脚本
[root@nginx ~]# cat /usr/lib/systemd/system/nginx.service
[Unit]
Description=The nginx HTTP and reverse proxy server
After=network-online.target remote-fs.target nss-lookup.target
Wants=network-online.target

[Service]
Type=forking
PIDFile=/usr/local/nginx/logs/nginx.pid
ExecStartPre=/usr/sbin/nginx -t -c /usr/local/nginx/conf/nginx.conf
ExecStart=/usr/sbin/nginx -c /usr/local/nginx/conf/nginx.conf
ExecReload=/usr/sbin/nginx -s reload
ExecStop=/bin/kill -s QUIT $MAINPID
PrivateTmp=true

[Install]
WantedBy=multi-user.target

[root@nginx ~]# systemctl daemon-reload
[root@nginx ~]# systemctl enable --now nginx
[root@nginx ~]# ss -lntup | grep 80
tcp    LISTEN     0      128       *:80                    *:*                   users:(("nginx",pid=9564,fd=6),("nginx",pid=9563,fd=6))
[root@nginx ~]# curl -I 192.168.2.41
HTTP/1.1 200 OK
Server: nginx/1.24.0
Date: Wed, 10 Sep 2025 14:17:53 GMT
Content-Type: text/html
Content-Length: 615
Last-Modified: Wed, 10 Sep 2025 13:44:59 GMT
Connection: keep-alive
ETag: "68c180db-267"
Accept-Ranges: bytes
现在可以使用 systemctl start|stop|reload nginx 来管理 Nginx 服务了。
2.nginx平滑升级和回滚
Nginx 支持在不停止服务的情况下升级版本,这就是平滑升级。
准备工作,当前是nginx-1.24,准备好升级的二进制文件(这里是nginx-1.28)
[root@nginx nginx-1.24.0]# cd /opt/
[root@nginx opt]# ll
总用量 2340
drwxr-xr-x 9 nginx nginx     186  9月 13 15:23 nginx-1.24.0
-rw-r--r-- 1 root  root  1112471  9月 13 15:22 nginx-1.24.0.tar.gz
-rw-r--r-- 1 root  root  1280111  9月 13 15:22 nginx-1.28.0.tar.gz
[root@nginx opt]# tar xf nginx-1.28.0.tar.gz
[root@nginx opt]# ll
总用量 2344
drwxr-xr-x 9 nginx nginx     186  9月 13 15:23 nginx-1.24.0
-rw-r--r-- 1 root  root  1112471  9月 13 15:22 nginx-1.24.0.tar.gz
drwxr-xr-x 8   502 games    4096  4月 23 19:55 nginx-1.28.0
-rw-r--r-- 1 root  root  1280111  9月 13 15:22 nginx-1.28.0.tar.gz
[root@nginx opt]# cd nginx-1.28.0/
[root@nginx nginx-1.28.0]# ll
总用量 872
drwxr-xr-x 6 502 games   4096  9月 13 15:47 auto
-rw-r--r-- 1 502 games 332023  4月 23 19:55 CHANGES
-rw-r--r-- 1 502 games 507825  4月 23 19:55 CHANGES.ru
-rw-r--r-- 1 502 games   5215  4月 23 19:48 CODE_OF_CONDUCT.md
drwxr-xr-x 2 502 games    168  9月 13 15:47 conf
-rwxr-xr-x 1 502 games   2611  4月 23 19:48 configure
drwxr-xr-x 4 502 games     72  9月 13 15:47 contrib
-rw-r--r-- 1 502 games   4049  4月 23 19:48 CONTRIBUTING.md
drwxr-xr-x 2 502 games     40  9月 13 15:47 html
-rw-r--r-- 1 502 games   1319  4月 23 19:48 LICENSE
drwxr-xr-x 2 502 games     21  9月 13 15:47 man
-rw-r--r-- 1 502 games  14220  4月 23 19:48 README.md
-rw-r--r-- 1 502 games   4857  4月 23 19:48 SECURITY.md
drwxr-xr-x 9 502 games     91  4月 23 19:48 src
[root@nginx nginx-1.28.0]# nginx -V
nginx version: nginx/1.24.0
built by gcc 11.4.1 20230605 (Red Hat 11.4.1-2) (GCC)
built with OpenSSL 3.0.7 1 Nov 2022
TLS SNI support enabled
configure arguments: --user=nginx --group=nginx --prefix=/usr/local/nginx --with-http_stub_status_module --with-http_ssl_module --with-http_v2_module --with-http_realip_module --with-http_gzip_static_module --with-pcre --with-stream --with-stream_ssl_module --with-stream_realip_module
#使用1.24.的配置
[root@nginx nginx-1.28.0]# ./configure --user=nginx --group=nginx --prefix=/usr/local/nginx --with-http_stub_status_module --with-http_ssl_module --with-http_v2_module --with-http_realip_module --with-http_gzip_static_module --with-pcre --with-stream --with-stream_ssl_module --with-stream_realip_module
#编译nginx但是不要安装
[root@nginx nginx-1.28.0]# make
#编译好的新版本nginx在objs目录下面
[root@nginx nginx-1.28.0]# ./objs/nginx  -v
nginx version: nginx/1.28.0
接下来是正式的演示,会用到四条命令(重要提示: 生产环境升级前一定要备份旧版本二进制文件!):
kill -usr2 进程编号			告诉master平滑升级,并拉起新的master和worker进程
kill -winch 进程编号		告诉旧的master结束运行完毕的worker进程,还在运行则等待woker进程结束
kill -quit 进程编号			告诉旧的master优雅退出
kill -hup 进程编号			发送信号,拉起旧的worker进程
1.先查看当前版本,可以看到均为1.24
[root@nginx nginx-1.28.0]# nginx -v
nginx version: nginx/1.24.0
[root@nginx nginx-1.28.0]# curl -I localhost
HTTP/1.1 200 OK
Server: nginx/1.24.0
Date: Sat, 13 Sep 2025 08:54:44 GMT
Content-Type: text/html
Content-Length: 615
Last-Modified: Sat, 13 Sep 2025 07:28:42 GMT
Connection: keep-alive
ETag: "68c51d2a-267"
Accept-Ranges: bytes
2.查看进程号且升级
#替换旧版本的nginx(先给旧版本nginx做备份),生产中一定要备份!!!
#由于是做的软链接,所以直接删除软链接,不会删除旧版本nginx
[root@nginx nginx-1.28.0]# rm -f /usr/sbin/nginx
[root@nginx nginx-1.28.0]# ln -s /opt/nginx-1.28.0/objs/nginx /usr/sbin/nginx
####发现nginx版本变换为了1.28,但是运行的还是1.24
[root@nginx nginx-1.28.0]# nginx -v
nginx version: nginx/1.28.0
[root@nginx nginx-1.28.0]# curl -I localhost
HTTP/1.1 200 OK
Server: nginx/1.24.0

####可以看到kill -usr2命令新拉起了一对master和worker
[root@nginx nginx-1.28.0]# ps -ef | grep nginx | grep -v grep
root       44263       1  0 16:53 ?        00:00:00 nginx: master process /usr/sbin/nginx -c /usr/local/nginx/conf/nginx.conf
nginx      44264   44263  0 16:53 ?        00:00:00 nginx: worker process
[root@nginx nginx-1.28.0]# kill -usr2 44263
[root@nginx nginx-1.28.0]# ps -ef | grep nginx | grep -v grep
root       44263       1  0 16:53 ?        00:00:00 nginx: master process /usr/sbin/nginx -c /usr/local/nginx/conf/nginx.conf
nginx      44264   44263  0 16:53 ?        00:00:00 nginx: worker process
root       44313   44263  0 16:59 ?        00:00:00 nginx: master process /usr/sbin/nginx -c /usr/local/nginx/conf/nginx.conf
nginx      44314   44313  0 16:59 ?        00:00:00 nginx: worker process
[root@nginx nginx-1.28.0]# nginx -v
nginx version: nginx/1.28.0
[root@nginx nginx-1.28.0]# curl -I localhost
HTTP/1.1 200 OK
Server: nginx/1.28.0

####但是旧的master还占用着CPU
[root@nginx nginx-1.28.0]# kill -winch 44263
[root@nginx nginx-1.28.0]# ps -ef | grep nginx | grep -v grep
root       44263       1  0 16:53 ?        00:00:00 nginx: master process /usr/sbin/nginx -c /usr/local/nginx/conf/nginx.conf
root       44313   44263  0 16:59 ?        00:00:00 nginx: master process /usr/sbin/nginx -c /usr/local/nginx/conf/nginx.conf
nginx      44314   44313  0 16:59 ?        00:00:00 nginx: worker process
####此时如果业务没有问题,可以继续发送信号给旧的master让其退出,所有业务完全由新的master进程接手。
[root@nginx nginx-1.28.0]# kill -quit 44263
此时如果切换到新的master出现了问题,那么需要回滚
####当前已经升级到了1.28
[root@nginx nginx-1.28.0]# ps -ef | grep nginx | grep -v grep
root       44263       1  0 16:53 ?        00:00:00 nginx: master process /usr/sbin/nginx -c /usr/local/nginx/conf/nginx.conf
root       44313   44263  0 16:59 ?        00:00:00 nginx: master process /usr/sbin/nginx -c /usr/local/nginx/conf/nginx.conf
nginx      44314   44313  0 16:59 ?        00:00:00 nginx: worker process
[root@nginx nginx-1.28.0]# nginx -v
nginx version: nginx/1.28.0
[root@nginx nginx-1.28.0]# curl -I localhost
HTTP/1.1 200 OK
Server: nginx/1.28.0
Date: Sat, 13 Sep 2025 09:06:03 GMT
Content-Type: text/html
Content-Length: 615
Last-Modified: Sat, 13 Sep 2025 07:28:42 GMT
Connection: keep-alive
ETag: "68c51d2a-267"
Accept-Ranges: bytes

####回滚需要重新拉起旧的master的worker进程
[root@nginx nginx-1.28.0]# rm -f /usr/sbin/nginx
[root@nginx nginx-1.28.0]# ln -s /usr/local/nginx/sbin/nginx /usr/sbin/nginx	#创建一个新的软链接,让/usr/sbin/nginx指向旧版本(1.24.0)的 Nginx 程序(/usr/local/nginx/sbin/nginx)。
[root@nginx nginx-1.28.0]# nginx -v
nginx version: nginx/1.24.0
[root@nginx nginx-1.28.0]# curl -I localhost
HTTP/1.1 200 OK
Server: nginx/1.28.0
[root@nginx nginx-1.28.0]# ps -ef | grep nginx | grep -v grep
root       44263       1  0 16:53 ?        00:00:00 nginx: master process /usr/sbin/nginx -c /usr/local/nginx/conf/nginx.conf
root       44313   44263  0 16:59 ?        00:00:00 nginx: master process /usr/sbin/nginx -c /usr/local/nginx/conf/nginx.conf
nginx      44314   44313  0 16:59 ?        00:00:00 nginx: worker process
[root@nginx nginx-1.28.0]# kill -hup 44263	#这个master进程会重新读取配置,同时启动新的worker进程
[root@nginx nginx-1.28.0]# ps -ef | grep nginx | grep -v grep
root       44263       1  0 16:53 ?        00:00:00 nginx: master process /usr/sbin/nginx -c /usr/local/nginx/conf/nginx.conf
root       44313   44263  0 16:59 ?        00:00:00 nginx: master process /usr/sbin/nginx -c /usr/local/nginx/conf/nginx.conf
nginx      44314   44313  0 16:59 ?        00:00:00 nginx: worker process
nginx      44373   44263  0 17:09 ?        00:00:00 nginx: worker process
[root@nginx nginx-1.28.0]# kill -winch 44313	#让这个master进程的worker工作进程(44314,1.28.0 版本)不再接受新请求,处理完现有请求后退出。
[root@nginx nginx-1.28.0]# ps -ef | grep nginx | grep -v grep
root       44263       1  0 16:53 ?        00:00:00 nginx: master process /usr/sbin/nginx -c /usr/local/nginx/conf/nginx.conf
root       44313   44263  0 16:59 ?        00:00:00 nginx: master process /usr/sbin/nginx -c /usr/local/nginx/conf/nginx.conf
nginx      44373   44263  0 17:09 ?        00:00:00 nginx: worker process
[root@nginx nginx-1.28.0]# kill -quit 44313
[root@nginx nginx-1.28.0]# ps -ef | grep nginx | grep -v grep
root       44263       1  0 16:53 ?        00:00:00 nginx: master process /usr/sbin/nginx -c /usr/local/nginx/conf/nginx.conf
nginx      44373   44263  0 17:09 ?        00:00:00 nginx: worker process
[root@nginx nginx-1.28.0]# nginx -v
nginx version: nginx/1.24.0
[root@nginx nginx-1.28.0]# curl -I localhost
HTTP/1.1 200 OK
Server: nginx/1.24.0
3.Nginx 的配置
Nginx 的配置文件一般是nginx.conf,里面是分块来写的,不同的块负责不同的功能。
可以看到主要分为三大块:全局、events、http
- 全局块:
worker_processes 2;→ 设 2 个工作进程,决定并发处理能力。 - events 块:
worker_connections 1024;→ 单个工作进程最多处理 1024 个连接,控制并发连接数。 - http 块:包含 HTTP 全链路配置( mime 类型、传输 / 超时规则、虚拟主机
server(监听 80 端口、路由location等)),还通过include引入额外配置文件,实现模块化管理。
[root@nginx ~]# grep -Ev '^.*#|^$' /usr/local/nginx/conf/nginx.conf
# 全局块 - 影响整个Nginx服务
worker_processes 2;
# events块 - 处理网络连接
events {
    worker_connections  1024;
}
# http块 - 所有HTTP相关配置
http {
    include       mime.types;
    default_type  application/octet-stream;
    sendfile        on;
    keepalive_timeout  65;
    # server块 - 一个虚拟主机(网站)
    server {
        listen       80;
        server_name  localhost;
        # location块 - URL路径匹配规则
        location / {
            root   html;
            index  index.html index.htm;
        }
        error_page   500 502 503 504  /50x.html;
        location = /50x.html {
            root   html;
        }
    }
include /usr/local/nginx/conf.d/*.conf;
}
3.1 全局配置
这部分是影响整个 Nginx 服务的设置,就是不管访问哪个网站,这些配置都生效。
3.1.1 更改nginx服务的默认用户为nginx
Nginx 默认可能用root或者nobody用户运行。root权限太大了,不安全;nobody权限又不够,可能读不了文件。所以把用户改成nginx,这样权限刚好,运行起来更安全。
#1、可以修改配置文件
user nginx;
#2、也可以在编译时指定用户和组
 ./configure --user=nginx --group=nginx
3.1.2 优化 Nginx 服务器的 worker 进程个数
worker进程是用来处理用户请求的。一般要把worker_processes设成和 CPU 核心数一样,比如你 CPU 是 4 核,就写worker_processes 4;,这样能充分利用 CPU,处理更多请求。也可以写auto,让 Nginx 自己检测 CPU 核心数。
vim /usr/local/nginx/conf/nginx.conf

[root@nginx ~]# lscpu | grep ^CPU:
CPU:                                2
#重新加载配置文件,使修改的内容生效
[root@nginx ~]# systemctl reload nginx
#可以看到一个master和两个worker
[root@nginx ~]# ps -ef  | grep nginx | grep -v grep
avahi        868       1  0 00:42 ?        00:00:01 avahi-daemon: running [nginx.local]
root       10810       1  0 15:26 ?        00:00:00 nginx: master process /usr/sbin/nginx -c /usr/local/nginx/conf/nginx.conf
nginx      10963   10810  0 17:08 ?        00:00:00 nginx: worker process
nginx      10964   10810  0 17:08 ?        00:00:00 nginx: worker process
如果想将nginx工作进程绑定到指定的cpu核心。减少了nginx的工作进程在不同的cpu核心上的来回跳转,减少了cpu对进程的资源分配与回收以及内存管理等,因此可以有效的提升nginx服务器的性能。00000001表示0号cpu,10000000表示7号cpu。
[root@nginx ~]# vim /usr/local/nginx/conf/nginx.conf
worker_cpu_affinity 00000000 00000001;

[root@nginx ~]# nginx -t
nginx: the configuration file /usr/local/nginx/conf/nginx.conf syntax is ok
nginx: configuration file /usr/local/nginx/conf/nginx.conf test is successful
[root@nginx ~]# systemctl reload nginx
[root@nginx ~]# ps axo pid,cmd,psr | grep nginx | grep -v grep
  10991 nginx: master process /usr/   0
  11000 nginx: worker process         1
  11001 nginx: worker process         0
3.1.3 调整worker进程优先级
用worker_priority指令设置优先级,数值范围是 - 20 到 19,数值越小优先级越高。这样 Nginx 的worker进程能更优先拿到 CPU 资源,就算系统里有其他进程,Nginx 也能及时处理请求。
[root@nginx ~]# vim /usr/local/nginx/conf/nginx.conf
worker_priority -20;

#调整 worker 进程优先级,值越小,优先级越高
[root@nginx ~]# ps axo pid,cmd,ni | grep nginx
  10991 nginx: master process /usr/   0
  11000 nginx: worker process       -20
  11001 nginx: worker process       -20
  11278 grep --color=auto nginx       0
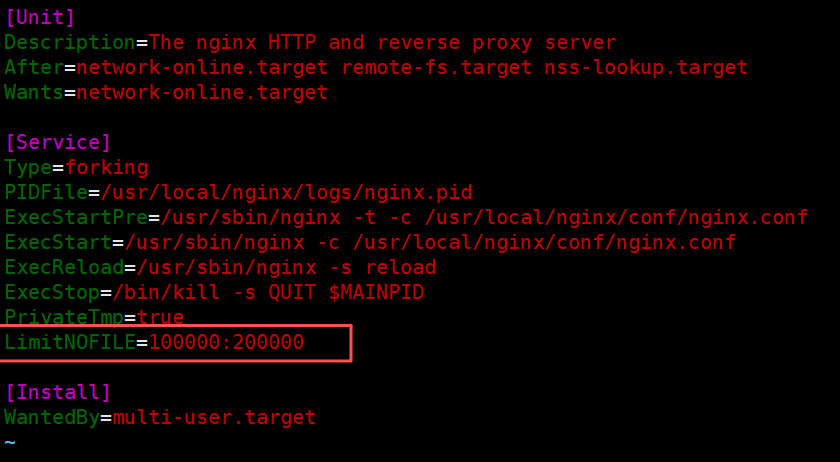
3.1.4 设置 worker 进程文件描述符数量
每个网络连接都需要一个 “文件描述符”,高并发的时候需要很多。用worker_rlimit_nofile设置最大数量,比如写65535,这样 Nginx 就能处理更多的并发连接了。
[root@nginx ~]# find / -name nginx.service
/run/systemd/propagate/nginx.service
/sys/fs/cgroup/system.slice/nginx.service
/usr/lib/systemd/system/nginx.service
[root@nginx ~]# vim /usr/lib/systemd/system/nginx.service
[Service]
LimitNOFILE=100000:200000
[root@nginx ~]# systemctl daemon-reload
[root@nginx ~]# systemctl  restart nginx
[root@nginx ~]# ps -ef  | grep nginx | grep -v grep
avahi        868       1  0 00:42 ?        00:00:01 avahi-daemon: running [nginx.local]
root       11361       1  0 17:29 ?        00:00:00 nginx: master process /usr/sbin/nginx -c /usr/local/nginx/conf/nginx.conf
nginx      11362   11361  0 17:29 ?        00:00:00 nginx: worker process
nginx      11363   11361  0 17:29 ?        00:00:00 nginx: worker process
#master进程能打开的文件描述符
[root@nginx ~]# cat /proc/11361/limits | grep files
Max open files            100000               200000               files
#worker进程能打开的文件描述符
[root@nginx ~]# cat /proc/11362/limits | grep files
Max open files            100000               200000               files
[root@nginx ~]# cat /proc/11363/limits | grep files
Max open files            100000               200000               files
如果想单独改worker进程最大能打开的文件数量,需要在nginx.conf中添加参数
[root@nginx ~]# vim /usr/local/nginx/conf/nginx.conf
worker_rlimit_nofile 300000;
[root@nginx ~]# systemctl reload nginx
[root@nginx ~]# ps -ef  | grep nginx | grep -v grep
avahi        868       1  0 00:42 ?        00:00:01 avahi-daemon: running [nginx.local]
root       11361       1  0 17:29 ?        00:00:00 nginx: master process /usr/sbin/nginx -c /usr/local/nginx/conf/nginx.conf
nginx      11401   11361  0 17:35 ?        00:00:00 nginx: worker process
nginx      11402   11361  0 17:35 ?        00:00:00 nginx: worker process
[root@nginx ~]# cat /proc/11361/limits | grep files
Max open files            100000               200000               files
[root@nginx ~]# cat /proc/11401/limits | grep files
Max open files            300000               300000               files
[root@nginx ~]# cat /proc/11402/limits | grep files
Max open files            300000               300000               files

3.1.5 设置events块参数
events块是配置 Nginx 怎么处理网络事件的。比如use epoll;,在 Linux 系统下,epoll处理大量连接的效率很高。worker_connections设置每个worker能处理的最大连接数,比如1024,这个要和前面的文件描述符配置配合着来。
[root@nginx ~]# vim /usr/local/nginx/conf/nginx.conf
events {
    use epoll;   #指定事件驱动模型,默认不设置此项,nginx 会根据当前系统自行选择
    worker_connections  1024;  #单个worker进程所支持的最大并发连接数,总的并发数用此值乘以worker进程数
    accept_mutex on;  #设置为on表示请求轮流由worker进程处理,而防止同时唤醒所有worker(默认为off,即同时唤醒所有worker)。
    multi_accept on;  #设置为on表示nginx服务器的每个工作进程可以同时接受多个新的网络连接。
}
3.2 http配置
这部分是处理所有 HTTP 相关的配置,里面可以包含多个server块(每个server块对应一个网站)。
3.2.1 http 配置
这里面可以设置全局的 HTTP 选项。比如include mime.types;,这样 Nginx 就知道.html是文本、.jpg是图片这些类型。default_type application/octet-stream;是设置默认的文件类型,要是 Nginx 不知道某个文件的类型,就按二进制流处理(比如强制下载)。还能开gzip压缩,把要传输的内容压缩一下,减少网络传输的数据量。
[root@nginx ~]# vim /usr/local/nginx/conf/nginx.conf
http {
	charset utf-8; #是否在响应头 Content-Type 行中添加字符集,默认 off
    sendfile        on;   #sendfile参数用于开启文件的高效传输模式
	tcp_nopush		on;   #表示有tcp数据了立即发送,on 表示等到数据包满载了再发送,需要配合sendfile on;一起用
	tcp_nodelay 	on;   #此选项生效前提是开启了keepalived,默认值 on表示立即发送数据,off 表示延时
	keepalive_timeout timeout [header_timeout]; #会话保持的时长,单位为秒,第二个值会出现在响应头中,可以和第一个值不一样
	types_hash_max_size N; #默认值1024,用于设置 MIME 类型哈希表大小,Nginx 使用 MIME 类型哈希表来加速 MIME 类型的查找过程,提高性能
	server_tokens on|off|build|string; #默认值on,表示在响应头中显示 nginx 版本信息;off表示不显示;build 表示显示的是编译时设置的值 --build=name;string 指自定义字符串,商业版中支持
	server_names_hash_bucket_size N; #默认值32|64|128,默认值具体取决于服务器缓存大小,此项用于设置服务器名哈希桶大小,当配置了大量虚拟主机时,此项可用来提升性能
	server_name_in_redirect on|off; #默认值off,表示在重定向时响应头中不包含 Server行,on 表示显示 Server 头
	include /etc/nginx/mime.types; #规定了各种后缀的文件在响应报文中的ContentType 对应的值
	default_type application/octet-stream; #除了上述映射外,其它类型文件都用此值
	ssl_protocols [SSLv2] [SSLv3] [TLSv1] [TLSv1.1] [TLSv1.2 [TLSv1.3]; #当前nginx 可支持的 ssl协议版本。默认值 TLSv1 TLSv1.1 TLSv1.2 TLSv1.3
	ssl_prefer_server_ciphers on|off; #默认off,表示在 SSL/TLS 握手时优先使用客户端加密套件,on表示优先使用服务端套件
	access_log path [format [buffer=size] [gzip[=level]] [flush=time] [if=condition]];#访问日志的文件路径、格式以及其他一些选项。默认值 logs/access.log combined, 禁用访问日志写成 access_log off;#path 指定文件路径#format 指定日志格式,不指定格式则使用预定义的combined#buffer=size 设置缓冲区大小,可以异步写#gzip[=level] 启用gzip压缩,可以指定压缩比#if=condition 设置条件,仅在满足时记录日志
	error_log file [level]; #指定错误日志路径和错误级别,默认值 logs/error.log error;#可用级别包括debug|info|notice|warn|error|crit|alert|emerg
	error_page code ... [=[response]] uri; #定义指定状态码的错误页面,可以多个状态码共用一个资源
	gzip on|off; #是否使用gzip 压缩数据后再传输,默认off
	gzip_vary on|off; #在启用了压缩的情况下,是否在响应头中添加 Vary:Accept-Encoding 行,默认off
	gzip_proxied off|expired|no-cache|nostore|private|no_last_modified|no_etag|auth|any ...;    #是否对后端服务器的返回结果进行压缩
	gzip_comp_level N; #设置压缩比,取值1-9,默认 1
	gzip_buffers number size; #设置用于gzip压缩的缓存空间大小,用 number *size,默认值 32 4k|16 8k	#size 取值为系统内存页大小,与当前操作系统和平台有关
	gzip_types mime-type ...; #根据响应资源的 MIME 来决定是否对数据进行压缩,默认值 text/html
	server {
	}
	include /usr/local/nginx/conf.d/*.conf; #可以设置引用其它配置文件,源码安装默认该目录不存在
}
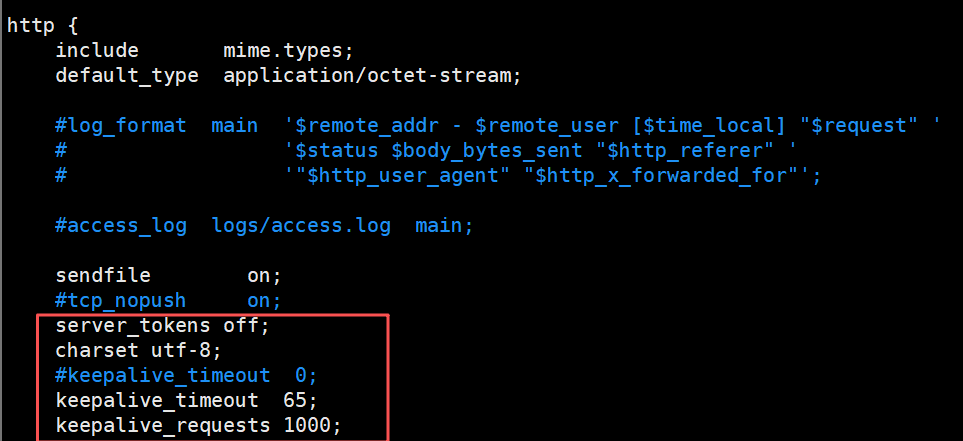
接下来可以加几个参数进来看看效果
[root@nginx ~]# vim  /usr/local/nginx/conf/nginx.conf
server_tokens off; #关闭服务器版本显示
charset utf-8; #设置中文页面显示正常
keepalive_timeout 65; #会话保持的时长,默认值
keepalive_requests 1000; #一次请求不断开连接的情况下最多可以传送多少个资源
[root@nginx ~]# systemctl  restart nginx
[root@nginx ~]# curl -I 192.168.2.41
HTTP/1.1 200 OK
Server: nginx
Date: Tue, 16 Sep 2025 09:54:30 GMT
Content-Type: text/html; charset=utf-8
Content-Length: 615
Last-Modified: Sat, 13 Sep 2025 07:28:42 GMT
Connection: keep-alive
ETag: "68c51d2a-267"
Accept-Ranges: bytes
3.2.2 server配置
server块对应一个网站服务。比如listen 80;是监听 80 端口(HTTP 默认端口);server_name rch.com;指定域名;root /var/www/html;设置网站文件的根目录;index index.html;设置默认的首页文件。这样用户访问rch.com的时候,Nginx 就会去/var/www/html目录找index.html。
3.2.2.1 常见的虚拟主机类型
虚拟主机其实就是 “在一台 Nginx 服务器上跑多个网站”,区分这些网站的方式不同,就有不同类型的虚拟主机。
(1)基于端口的虚拟主机
- 原理:用不同的端口号区分网站。比如同一台服务器,80 端口跑网站 A,8080 端口跑网站 B。
[root@nginx ~]# mkdir /usr/local/nginx/conf.d
[root@nginx ~]# vim /usr/local/nginx/conf/nginx.conf
http {
    include /usr/local/nginx/conf.d/*.conf; #http必须区块新增该配置!!!
}
[root@nginx ~]# cd /usr/local/nginx/conf.d
[root@nginx conf.d]# cat port.conf
server{
	listen 8000;
	root /www/port/8000;

}
server{
	listen 8001;
	root /www/port/8001;
}
[root@nginx ~]# mkdir  -p /www/port/800{0,1}
[root@nginx ~]# echo 8000 > /www/port/8000/index.html
[root@nginx ~]# echo 8001 > /www/port/8001/index.html
[root@nginx ~]# systemctl restart nginx
[root@nginx conf.d]# curl 192.168.2.41:8000
8000
[root@nginx conf.d]# curl 192.168.2.41:8001
8001
(2)基于 IP 的虚拟主机
- 原理:给服务器绑定多个 IP,每个 IP 对应一个网站。比如服务器有 192.168.1.10 和 192.168.1.11 两个 IP,分别对应网站 C 和网站 D。
[root@nginx conf.d]# cat ip.conf
server {
	listen 80;
	server_name 192.168.2.42;
	root /www/ip/42;
}
server {
	listen 80;
	server_name 192.168.2.43;
	root /www/ip/43;
}
[root@nginx conf.d]# ip a
2: ens160: <BROADCAST,MULTICAST,UP,LOWER_UP> mtu 1500 qdisc mq state UP group default qlen 1000
    link/ether 00:0c:29:58:92:6b brd ff:ff:ff:ff:ff:ff
    altname enp3s0
    inet 192.168.2.41/24 brd 192.168.2.255 scope global noprefixroute ens160
       valid_lft forever preferred_lft forever
    inet 192.168.2.42/32 scope global ens160
       valid_lft forever preferred_lft forever
    inet 192.168.2.43/32 scope global ens160
       valid_lft forever preferred_lft forever
    inet6 fe80::20c:29ff:fe58:926b/64 scope link noprefixroute
       valid_lft forever preferred_lft forever
[root@nginx ~]# mkdir /www/ip/{42,43} -p
[root@nginx ~]# echo 42 > /www/ip/42/index.html
[root@nginx ~]# echo 43 > /www/ip/43/index.html
[root@nginx ~]# systemctl restart nginx
[root@nginx conf.d]# curl 192.168.2.42
42
[root@nginx conf.d]# curl 192.168.2.43
43
(3)基于域名的虚拟主机
- 原理:用不同的域名区分网站,服务器 IP 相同,端口都是 80(或 443)。比如
a.com对应网站 E,b.com对应网站 F。
[root@nginx conf.d]# cat name.conf
server {
	listen 80;
	server_name www.rch.com;
	root /www/name/rch;
server {
	listen 80;
	server_name www.hjn.com;
	root /www/name/hjn;
}
[root@nginx ~]# mkdir -p /www/name/{rch,hjn}
[root@nginx ~]# echo rch > /www/name/rch/index.html
[root@nginx ~]# echo hjn > /www/name/hjn/index.html
[root@nginx ~]# systemctl restart nginx
[root@nginx conf.d]# curl www.rch.com
rch
[root@nginx conf.d]# curl www.hjn.com
hjn
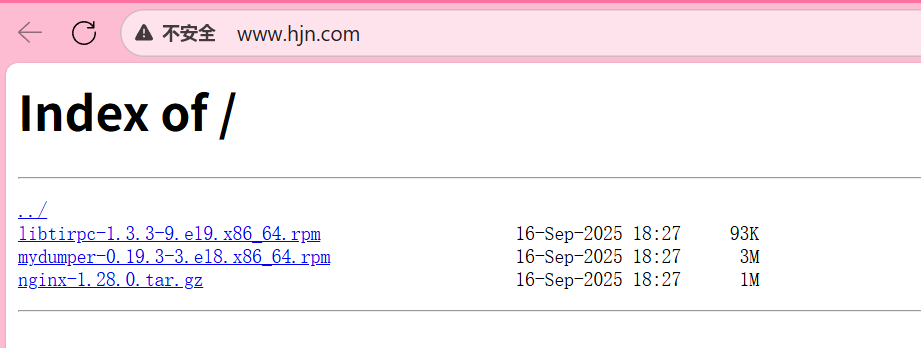
3.2.2.2 将 server 配置为下载服务器
就是让用户访问这个 server 时,能下载指定目录里的文件(比如压缩包、安装包等),核心是让 Nginx 把文件 “当作下载资源” 而不是 “直接打开”。
配置要点:
- 指定存放下载文件的目录(root);
- 强制所有文件都触发下载(而不是浏览器直接打开,比如.txt 文件默认会在浏览器显示,需要改成下载);
- 可选:允许用户浏览目录里的文件列表(方便找文件)。
[root@nginx conf.d]# vim name.conf
server {
    listen 80;
    server_name www.hjn.com;  # 用专门的域名做下载服务器
    root /www/name/hjn;  # 下载文件存在这个目录里(比如放test.zip、setup.exe)

    # 强制所有文件都作为下载资源(关键配置)
    default_type application/octet-stream;  # 二进制流类型,浏览器会触发下载

    # 允许浏览目录(可选,让用户看到目录里的所有文件)
    autoindex on;  # 开启目录索引
    autoindex_exact_size off;  # 显示文件大小(用KB/MB,而不是字节)
    autoindex_localtime on;  # 显示文件的修改时间
    limit_rate 10k;  #每秒下载速度为10K
    limit_rate_after 1m; #前1M不开启限速
}
[root@nginx conf.d]# ll /www/name/hjn/
总用量 4
-rw-r--r-- 1 root root 4  9月 15 14:31 index.html
[root@nginx conf.d]# echo lalalala > /www/name/hjn/temp1
[root@nginx conf.d]# systemctl restart nginx
[root@nginx conf.d]# systemctl restart nginx
[root@nginx conf.d]# mkdir /www/downloads
[root@nginx conf.d]# ll /www/downloads/
总用量 4620
-rw-r--r-- 1 root root   95050  9月 16 18:27 libtirpc-1.3.3-9.el9.x86_64.rpm
-rw-r--r-- 1 root root 3347436  9月 16 18:27 mydumper-0.19.3-3.el8.x86_64.rpm
-rw-r--r-- 1 root root 1280111  9月 16 18:27 nginx-1.28.0.tar.gz
#要记得在Windows做域名解析哦,在C:\Windows\System32\drivers\etc\hosts
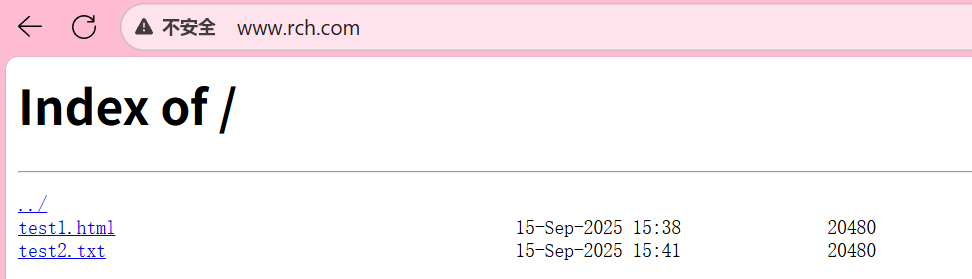
3.2.2.3 在 server 里启用压缩
压缩就是把要传输给用户的内容(比如 HTML、CSS、JS)变小,这样传输更快,省带宽。需要在 server 块里配置 gzip 相关指令。
[root@nginx conf.d]# cat name.conf
server {
	listen 80;
	server_name www.rch.com;
	root /www/name/rch;
	autoindex on;
	autoindex_exact_size on;
	autoindex_localtime on;
	limit_rate 10k;
	limit_rate_after 1m;
	gzip on;
	gzip_types test/html test/txt;
	gzip_vary on;
	location = /test1.html{
		gzip_comp_level 5;
}
	location = /test2.txt{
		gzip off;
}
}
[root@nginx conf.d]# ll /www/name/rch
总用量 40
-rw-r--r-- 1 root root 20480  9月 15 15:38 test1.html
-rw-r--r-- 1 root root 20480  9月 15 15:41 test2.txt
[root@nginx conf.d]# curl -I --compressed  www.rch.com/test1.html
HTTP/1.1 200 OK
Server: nginx
Date: Tue, 16 Sep 2025 10:47:54 GMT
Content-Type: text/html; charset=utf-8
Last-Modified: Mon, 15 Sep 2025 07:38:46 GMT
Connection: keep-alive
Vary: Accept-Encoding	#已经压缩
ETag: W/"68c7c286-5000"
Content-Encoding: gzip
3.2.3 location 配置
location是用来匹配 URL 路径的,不同的 URL 可以有不同的处理规则。比如location /images/ { alias /var/www/images/; },就是说访问/images/开头的路径时,去/var/www/images/目录找文件。还有正则匹配,比如location ~* \.(jpg|png)$ { expires 30d; },匹配.jpg或.png结尾的图片,设置浏览器缓存 30 天,这样用户下次访问就不用重新下载了。
3.2.3.1 root 与 alias 的使用
这俩都是用来指定 “文件在服务器上的实际路径” 的,但用法不一样,容易搞混,得注意区别。
- root:会把
location的路径拼到 root 指定的路径后面,简单理解为拼接
location /images/ {
    root /var/www;  # 实际路径 = root路径 + location路径 = /var/www/images
}
比如当我访问http://www.rch.com/images/pic.jpg时,Nginx 会去找/var/www/images/pic.jpg(因为/var/www + /images/ + pic.jpg)。
- alias:会直接用 alias 指定的路径替换
location的路径,不会拼接,简单理解为替换
location /images/ {
    alias /var/www/pics/;  # 实际路径 = alias路径 + 去掉location前缀后的部分 = /var/www/pics
}
当我访问http://www.rch.com/images/pic.jpg时,Nginx 会去找/var/www/pics/pic.jpg(因为/images/被替换成了/var/www/pics/)。
- 注意:用 alias 时,location 的路径最好以
/结尾,alias 的路径也以/结尾,避免路径拼接出错。
3.2.3.2 location 优先级
location 有多种匹配模式,当多个 location 都能匹配同一个请求时,Nginx 会按 “优先级” 选一个执行。优先级从高到低是:
- 精确匹配(=):用
=开头,完全匹配 URL,优先级最高。
例:location = /test { ... }只匹配http://域名/test,不匹配/test/或/test123。 - 前缀匹配(^~):用
^~开头,匹配 URL 前缀,优先级高于正则匹配。
例:location ^~ /static/ { ... }匹配所有/static/开头的 URL(如/static/css/style.css)。 - 正则匹配(~ 或~*):
~区分大小写,~*不区分大小写,优先级高于普通前缀匹配。
例:location ~* \.html$ { ... }匹配所有以.html结尾的 URL(不管大小写,如.HTML也会匹配)。 - 普通前缀匹配:不加特殊符号,按 URL 前缀匹配,优先级最低,且 “最长匹配” 优先(比如
/static/比/s长,若都匹配则选前者)。
3.2.3.3 location 重定向
就是把用户访问的 URL 跳转到另一个 URL,用rewrite指令,常见场景:换域名、URL 改版。
- 临时重定向(302):用
redirect,告诉浏览器 “这个 URL 暂时换地方了”,搜索引擎不会更新索引。 - 永久重定向(301):用
permanent,告诉浏览器 “这个 URL 永久换地方了”,搜索引擎会更新索引。
[root@nginx conf.d]# cat location.conf
server {
	listen 80;
	server_name www.gzh.com;
	root /www/location;
	location /test1 {
		rewrite ^/test1$ /new redirect;
	}
	location /test2 {
		rewrite ^/test2$ /newnew permanent;
	}
}
# 创建网站根目录(-p表示递归创建,即使父目录不存在也能创建)
[root@nginx conf.d]# mkdir /www/location -p

# 在根目录下创建4个子目录:test1、test2(被重定向的源路径)、new、newnew(重定向的目标路径)
[root@nginx conf.d]# mkdir /www/location/{test1,test2}
[root@nginx conf.d]# mkdir /www/location/{new,newnew}

# 向new目录的index.html写入内容"new"(作为重定向后的目标页面内容)
[root@nginx conf.d]# echo new > /www/location/new/index.html

# 向newnew目录的index.html写入内容"newnew"(作为重定向后的目标页面内容)
[root@nginx conf.d]# echo newnew > /www/location/newnew/index.html

# 重启Nginx服务,使配置文件生效
[root@nginx conf.d]# systemctl restart nginx

# 在本地hosts文件中添加映射:将域名www.gzh.com指向IP 192.168.2.41
# 作用:无需DNS服务器,本地直接通过域名访问该服务器
[root@nginx conf.d]# echo "192.168.2.41 www.gzh.com" >> /etc/hosts
[root@nginx conf.d]# curl www.gzh.com/test1
<html>
<head><title>302 Found</title></head>
<body>
<center><h1>302 Found</h1></center>
<hr><center>nginx</center>
</body>
</html>
[root@nginx conf.d]# curl www.gzh.com/test2 -I
HTTP/1.1 301 Moved Permanently
Server: nginx
Date: Tue, 16 Sep 2025 11:34:20 GMT
Content-Type: text/html
Content-Length: 162
Location: http://www.gzh.com/newnew
Connection: keep-alive

[root@nginx conf.d]# curl www.gzh.com/test2 -L
newnew
[root@nginx conf.d]# curl www.gzh.com/test1 -L
new
3.2.3.4 检测资源是否存在
try_files会按照顺序检查文件是否存在,返回第一个找到的文件或文件夹,如果所有文件或文件夹都找不到,会进行一个内部重定向到最后一个参数。只有最后一个参数可以引起一个内部重定向,之前的参数只设置内部URI的指向。最后一个参数必须存在,否则会出现内部500错误。
[root@nginx conf.d]# cat try-files.conf
server {
	listen 80;
	server_name www.test.com;
	root /www/test;
	location / {
		index index.html index.htm;
		try_files $uri $uri.html $uri/index.html /default.html;
		# try_files 检查顺序:
        # 1. $uri:请求的路径(文件或目录)
        # 2. $uri.html:请求路径+".html"的文件
        # 3. $uri/index.html:请求路径(作为目录)下的index.html
        # 4. 若以上都不存在,返回/default.html
	}

}
测试1 访问不存在的路径
[root@nginx conf.d]# cat /www/test/default.html
default.html
[root@nginx conf.d]# curl www.test.com/rch
default.html
[root@nginx conf.d]# curl www.test.com/rch/
default.html
原因:
try_files 检查 $uri(rch 不存在)→ $uri.html(rch.html 不存在)→ $uri/index.html(rch/index.html 不存在)→ 最后返回 /default.html。
测试2 创建 rch 目录(无 index.html)
[root@nginx conf.d]# mkdir /www/test/rch
[root@nginx conf.d]# curl www.test.com/rch
default.html
[root@nginx conf.d]# curl www.test.com/rch/
default.html
原因:
访问 /rch:$uri 是目录(存在),但下一步检查 $uri.html(rch.html 不存在)→ 再检查 $uri/index.html(rch/index.html 不存在)→ 返回 default.html。
访问 /rch/:$uri 是目录(存在),但 $uri/index.html(rch/index.html 不存在)→ 后续检查也不存在 → 返回 default.html。
测试3 在 rch 目录添加 index.html
[root@nginx conf.d]# echo "hahaha" > /www/test/rch/index.html
[root@nginx conf.d]# curl www.test.com/rch/
hahaha
[root@nginx conf.d]# curl www.test.com/rch
hahaha
原因:
访问 /rch:$uri 是目录(存在)→ $uri.html 不存在 → $uri/index.html(rch/index.html 存在)→ 返回 hahaha。
访问 /rch/:$uri 是目录(存在)→ $uri/index.html 存在 → 返回 hahaha。
测试 4创建 rch.html 文件
[root@nginx conf.d]# echo "lalala" > /www/test/rch.html
[root@nginx conf.d]# curl www.test.com/rch
lalala
[root@nginx conf.d]# curl www.test.com/rch/
hahaha
原因:
访问 /rch:$uri 是目录(存在)→ 下一步 $uri.html(rch.html 存在)→ 返回 lalala(try_files 找到第一个存在的资源就返回)。
访问 /rch/:$uri 是目录 → 直接检查 $uri/index.html(存在)→ 返回 hahaha。
测试5 删除 rch 目录,创建 rch 文件
[root@nginx conf.d]# rm -rf /www/test/rch
[root@nginx conf.d]# echo peipeipei > /www/test/rch
[root@nginx conf.d]# curl www.test.com/rch/
default.html
[root@nginx conf.d]# curl www.test.com/rch
peipeipei
原因:
访问 /rch:$uri 是文件(存在)→ 直接返回文件内容 peipeipei。
访问 /rch/:$uri 是目录(不存在)→ 后续检查均失败 → 返回 default.html。
3.2.3.5 查看状态页
Nginx 有个ngx_http_stub_status_module模块,能显示服务器的连接、请求等状态信息,需要在 location 里配置才能访问。
[root@nginx conf.d]# cat status.conf
server {
	listen 80;
	server_name 192.168.2.41;
	location /status {
		stub_status;
		access_log off;
	}
}
[root@nginx conf.d]# systemctl restart nginx
[root@nginx conf.d]# curl 192.168.2.41/status
Active connections: 1 	#当前 Nginx 的活跃连接数(示例中为 1);
server accepts handled requests 	#server 后三个数值:依次是 Nginx 启动后接受的客户端请求总数、处理完成的客户端请求总数、客户端发来的总请求数(示例中均为 2,正常时前两者相等,代表无请求丢失);
 1 1 1
Reading: 0 Writing: 1 Waiting: 0 	#Reading/Writing/Waiting:分别是正在读取客户端请求首部的连接数(0,数值大则排队严重)、正在向客户端发响应的连接数(1,数值大则访问量大)、keep-alive 模式下等待客户端发请求的空闲连接数(0,等于 “活跃连接数 - 读 + 写连接数”)。
[root@nginx conf.d]# curl 192.168.2.41/status
Active connections: 1
server accepts handled requests
 2 2 2
Reading: 0 Writing: 1 Waiting: 0
[root@nginx conf.d]# curl 192.168.2.41/status
Active connections: 1
server accepts handled requests
 3 3 3
Reading: 0 Writing: 1 Waiting: 0
3.2.3.6 设置浏览器缓存时间
用expires指令,告诉浏览器 “这个资源可以缓存多久”,减少重复请求,加快加载速度。
原理:浏览器会把资源存在本地,在缓存时间内再次访问,直接用本地的,不向服务器请求。
location ~* \.(jpg|png|css|js)$ {
    expires 30d;  # 缓存30天
}
3.3 nginx访问控制
核心作用:通过IP 地址或用户名密码,控制客户端对 Nginx 服务的访问权限,保障服务安全。
3.3.1 基于地址访问控制(IP 黑白名单)
-
依赖模块:
ngx_http_access_module(Nginx 默认内置,无需额外安装) -
核心指令:
allow 地址/CIDR/all:允许指定 IP、IP 段(如192.168.2.0/24)或所有客户端访问;deny 地址/CIDR/all:禁止指定 IP、IP 段或所有客户端访问;- 优先级:
deny和allow按 “配置顺序执行”,匹配到第一条规则即生效。
[root@nginx conf.d]# cat access.conf
server {
	listen 80;
	server_name ip.test.com;
	location / {
		root /www/ip;
		index index.html;
		deny 192.168.2.20;		# 先禁止192.168.2.20
		allow 192.168.2.0/24;	# 再允许整个2网段(除了20)
		deny all;				# 最后禁止其他所有IP
	}
}
- 效果:
- 192.168.2.41(网段内其他 IP)访问:返回正常页面(
ip.test.com); - 192.168.2.20(被禁止 IP)访问:返回 403 Forbidden(无权限)。
- 192.168.2.41(网段内其他 IP)访问:返回正常页面(
3.3.2 基于用户访问控制(用户名密码认证)
- 依赖模块:
ngx_http_auth_basic_module(默认内置) - 核心逻辑:访问指定路径时,要求客户端输入 “用户名 + 密码”,验证通过才能访问。
- 操作步骤
- 安装密码生成工具:
yum install httpd-tools -y(htpasswd工具用于生成加密的密码文件); - 生成密码文件:
htpasswd -cb /usr/local/nginx/conf/auth-password user1 123456(-c 新建文件,-b 直接传密码,用户 user1,密码 123456); - Nginx 配置:
- 安装密码生成工具:
[root@nginx conf.d]# cat basic.conf
server {
	listen 80;
	server_name basic.test.com;
	root /www/admin;
	location / {
		index index.html;
		auth_basic on;
		auth_basic_user_file /usr/local/nginx/conf/auth-password;
	}
}
[root@nginx conf.d]# cat /www/admin/index.html
admin
[root@nginx conf.d]# htpasswd -cb /usr/local/nginx/conf/auth-password rch 123456
Adding password for user rch
[root@nginx conf.d]# systemctl restart nginx
[root@nginx conf.d]# curl basic.test.com -urch
Enter host password for user 'rch':
admin
效果:
- 直接访问
basic.test.com:需输入 rch/123456;
3.4 自定义错误页面:替换 “默认报错页”
核心作用:当 Nginx 返回 404(页面不存在)、403(无权限)、500(服务器错误)等非 200 状态码时,用自定义页面替代 Nginx 默认的 “生硬报错页”,提升用户体验。
[root@nginx conf.d]# cat error.conf
server {
	listen 80;
	server_name error.test.com;
	root /www;
	error_page 403 404 /40x.html;
	location = /40x.html {
		root /www/error;
	}
}
[root@nginx conf.d]# cat /www/error/40x.html
error
[root@nginx conf.d]# curl error.test.com/hjn
error
[root@nginx conf.d]# curl error.test.com
error
- 效果
- 访问
error.test.com(主目录无首页,触发 403):返回自定义的40x.html(内容error); - 访问不存在的路径(如
error.test.com/hjn,触发 404):同样返回40x.html。
- 访问
3.5 配置日志:记录 “服务运行 / 访问情况”
1. 错误日志:记录 “Nginx 自身故障”
-
作用:记录 Nginx 启动、运行中的错误(如配置错误、文件权限不足、后端服务异常等)。
-
核心指令
error_log path [level]path:日志文件路径(如/usr/local/nginx/logs/error.test.com.log);level:可选,日志级别(debug < info < notice < warn < error < crit,默认 error,级别越高记录越少)。
2. 访问日志:记录 “客户端请求细节”
- 依赖模块:
ngx_http_log_module(默认内置) - 核心指令
log_format 格式名 "日志模板":定义日志的格式(用 Nginx 内置变量拼接,如客户端 IP、访问时间、请求路径);access_log path [格式名]:指定访问日志的路径和使用的格式(默认combined格式)。
[root@nginx nginx]# vim /usr/local/nginx/conf/nginx.conf
http {
  # 格式1:普通文本格式(记录核心访问信息)
  log_format nginx_format1 '$remote_addr - $remote_user [$time_local] "$request" '
                           '$status $body_bytes_sent "$http_referer" '
                           '"$http_user_agent" $server_name:$server_port';

  # 格式2:JSON格式(方便日志分析工具解析)
  log_format access_json '{"@timestamp": "$time_iso8601",'
          '"remote_addr": "$remote_addr", '
          '"request": "$request", '
          '"status": $status, '
          '"bytes": $body_bytes_sent, '
          '"request_time": "$request_time"}';

  # 不同路径用不同日志格式
  server {
    location /test3 {
      access_log logs/test_access.log nginx_format1;  # 文本格式
    }
    location /test4 {
      access_log logs/test_json.log access_json;      # JSON格式
    }
  }
}
[root@nginx conf.d]# cat /usr/local/nginx/logs/test_access.log
192.168.2.41 - - [16/Sep/2025:15:28:07 +0800] "GET /test1/ HTTP/1.1" 200 16 "-" "curl/7.76.1" "-" localhost:80
[root@nginx conf.d]# cat /usr/local/nginx/logs/test_json.log
{"@timestamp": "2025-09-16T15:28:42+08:00","remote_addr": "192.168.2.41", "referer": "-", "request": "GET /test2/ HTTP/1.1", "status": 200, "bytes": 9, "agent": "curl/7.76.1", "x_forwarded": "-", "uri":"/test2/index.html","up_addr": "-","up_host": "-","up_resp_time": "-","request_time": "0.000" }
效果
- 访问
/test3:日志记录在test_access.log,文本格式(如192.168.2.41 - - [11/Sep/2025:21:02:05 +0800] "GET /test1/ HTTP/1.1" 200 16 "-" "curl/7.76.1" :80); - 访问
/test4:日志记录在test_json.log,JSON 格式(便于后续用 ELK 等工具分析)。
3.6 Nginx 第三方模块:扩展 “Nginx 原生功能”
核心作用:Nginx 原生功能有限,通过第三方模块可添加额外能力(如输出变量、图片处理、安全防护等),需在编译 Nginx 时指定模块路径。
核心流程(以 echo 模块为例)
重新编译 Nginx:在./configure时用--add-module=模块路径指定第三方模块
[root@nginx conf.d]# ll /opt/
总用量 2396
drwxrwxr-x 5 root  root      174  8月  9  2017 echo-nginx-module-0.61
-rw-r--r-- 1 root  root    53155  9月 16 14:44 echo-nginx-module-0.61.tar.gz
drwxr-xr-x 9 nginx nginx     186  9月 13 15:23 nginx-1.24.0
-rw-r--r-- 1 root  root  1112471  9月 13 15:22 nginx-1.24.0.tar.gz
drwxr-xr-x 9   502 games    4096  9月 13 15:48 nginx-1.28.0
-rw-r--r-- 1 root  root  1280111  9月 13 15:22 nginx-1.28.0.tar.gz

./configure --user=nginx --group=nginx --prefix=/usr/local/nginx --with-http_stub_status_module --with-http_ssl_module --with-http_v2_module --with-http_realip_module --with-http_gzip_static_module --with-pcre --with-stream --with-stream_ssl_module --with-stream_realip_module --add-module=/opt/echo-nginx-module-0.61
配置使用模块
[root@nginx conf.d]# cat echo.conf
server {
	listen 80;
	server_name echo.test.com;
	location /test1 {
		set $var rchao;
		echo "var: $var";
	}
	location /test2{
		echo "uri: $uri";
		echo "request_uri: $request_uri";
	}
}
[root@nginx conf.d]# curl echo.test.com/test1
var: rchao
[root@nginx conf.d]# curl 'echo.test.com/test2faw2?a=123&b=223%jla2'
uri: /test2faw2
request_uri: /test2faw2?a=123&b=223%jla2
3.7 nginx实现https网站
核心前提
- 依赖模块:
ngx_http_ssl_module(Yum 安装默认包含,源码编译需加--with-http_ssl_module); - SSL 证书:需有证书文件(公钥
crt+ 私钥key),可自签(测试用)或从 CA 机构购买(生产用)。
实操步骤(自签证书 + 配置)
-
生成自签证书:
[root@nginx ~]# mkdir /usr/local/nginx/certs [root@nginx ~]# cd /usr/local/nginx/certs # 1. 生成CA根证书(用于签名服务器证书) [root@nginx certs]# openssl req -x509 -newkey rsa:2048 -keyout ca.key -nodes -days 365 -out ca.crt # 2. 生成服务器证书请求文件(CSR) [root@nginx certs]# openssl req -newkey rsa:2048 -nodes -keyout https.key -out https.csr # 3. 用CA根证书签名,生成服务器证书(https.crt) [root@nginx certs]# openssl x509 -req -in https.csr -CA ca.crt -CAkey ca.key -set_serial 20 -days 7 -out https.crt [root@nginx certs]# chmod 600 *.key # 私钥文件权限设为600(安全) # 4. 合并证书(部分场景需,注意顺序) [root@nginx certs]# cat https.crt ca.crt > nginx.crt [root@nginx certs]# cat https.key > nginx.key [root@nginx conf.d]# ll /usr/local/nginx/certs/ 总用量 28 -rw-r--r-- 1 root root 1379 9月 16 15:02 ca.crt -rw------- 1 root root 1700 9月 16 15:01 ca.key -rw-r--r-- 1 root root 1233 9月 16 15:03 https.crt -rw-r--r-- 1 root root 1025 9月 16 15:03 https.csr -rw------- 1 root root 1704 9月 16 15:02 https.key -rw-r--r-- 1 root root 2612 9月 16 15:03 nginx.crt -rw-r--r-- 1 root root 1704 9月 16 15:04 nginx.key -
Nginx HTTPS 配置:
[root@nginx conf.d]# cat https.conf
server {
	listen 80;
	listen 443 ssl;		 # 监听HTTPS 443端口(开启SSL)
	server_name secret.test.com;
	# 指定SSL证书和私钥路径
	ssl_certificate	/usr/local/nginx/certs/nginx.crt;
	ssl_certificate_key /usr/local/nginx/certs/nginx.key;
	root /www/https;
	if ($scheme = http) {
		return 301 https://$host$request_uri;  #访问http://secret.test.com:自动跳转到https://secret.test.com
	}
}
[root@nginx conf.d]# curl -Lk https://secret.test.com
lulalulalei
[root@nginx conf.d]# curl -k https://secret.test.com:443
lulalulalei
[root@nginx conf.d]# curl -Lk secret.test.com
lulalulalei
3.8 Nginx 防盗链:阻止 “资源被盗用”
核心作用:防止其他网站(盗链方)未经允许,直接引用自己网站的资源(如图片、视频、下载文件),避免带宽浪费和资源滥用。
核心原理
- 依赖模块:
ngx_http_referer_module(默认内置); - 关键字段:HTTP 请求头中的
Referer(记录请求来源,即 “从哪个页面跳过来的”); - 逻辑:通过
valid_referers定义 “合法来源”,若Referer不在合法列表中,返回 403 禁止访问。
- 依赖模块:
- 先看看可以盗的
[root@nginx conf.d]# cat valid.conf
server {
	listen 80;
	server_name sss.rch.com;
	root /www/sss;
}

server {
	listen 80;
	server_name sss.hjn.com;
	root /www/sss;
}

server {
	listen 80;
	server_name rrr.rch.com;
	root /www/rrr;
}
[root@nginx conf.d]# mkdir /www/{sss,rrr}
[root@nginx conf.d]# ll /www/rrr/
总用量 356
-rw-r--r-- 1 root root 360686  9月 16 20:54 '屏幕截图 2025-09-11 200744.png'
[root@nginx conf.d]# cat /www/sss/index.html
hello world
<a href="http://rrr.rch.com/屏幕截图 2025-09-11 200744.png">photo</a>
<img src="http://rrr.rch.com/屏幕截图 2025-09-11 200744.png" />
[root@nginx conf.d]# systemctl restart nginx
4.nginx的rewrite
1. 作用
是一个 URL 修改工具。当用户访问一个网址时,Nginx 可以按照你设定的规则,把这个网址在内部改掉,或者让浏览器跳转到另一个新网址。
2. 几个核心指令(干什么用)
rewrite:核心命令。用来匹配网址并改成新的。
set:设置一个变量,供后面使用。
- 例如
[root@nginx ~]# cat  /usr/local/nginx/conf.d/echo.conf
server {
        listen 80;
        server_name echo.test.com;
        location /test {
                set $var welcome;
                echo "var: $var";
        }
        location /test-uri {
                echo "uri: $uri";
                echo "request_uri: $request_uri";
        }
}
[root@nginx ~]# curl  echo.test.com/test/
var: welcome
-
return:立刻停止,并让浏览器跳转或返回一个状态码。 -
例如:
[root@nginx conf.d]# cat return.conf
server {
	listen 80;
	server_name 192.168.2.40;
	location /rch {
		return 201;
	}
	location /hjn {
		return 201 text;
	}
	location /url {
		return http://192.168.2.41;
	}
}
[root@nginx conf.d]# systemctl restart nginx
[root@nginx conf.d]# mkdir ../html/{rch,hjn}
[root@nginx conf.d]# echo "rch" >  ../html/rch/index.html
[root@nginx conf.d]# echo "hjn" >  ../html/hjn/index.html
[root@nginx conf.d]# curl -I 192.168.2.40/rch
HTTP/1.1 201 Created

[root@nginx conf.d]# curl  192.168.2.40/hjn
text
[root@nginx conf.d]# curl  192.168.2.40/url/ -L
web1 192.168.2.41
break:停止执行后面的 rewrite 规则,但还在当前处理流程里。
break; #中断当前相同作用域(location)中的其ngx_http_rewrite_module 模块的配置和指令,返回到上一作用域继续执行
#该指令后的其它指令和配置还会执行,只中断 ngx_http_rewrite_module 指令
#作用域 server, location, if
例如
[root@nginx ~]# cat /usr/local/nginx/conf.d/echo.conf
server {
        listen 80;
        server_name echo.test.com;
        location /test {
                set $var welcome;
                echo "var: $var";
                break;
                set $var1 linux;  #set 是属于 ngx_http_rewrite_module 模块指令,此句在 break 之后,不生效
                echo "$var,$var1"; #该句生效
                return 200 "break";  # return 是属于 ngx_http_rewrite_module 模块指令,此句在 break 之后,不生效
        }
        location /test-uri {
                echo "uri: $uri";
                echo "request_uri: $request_uri";
        }
}
[root@nginx ~]# systemctl restart nginx
[root@nginx ~]# curl echo.test.com/test/
var: welcome
welcome,
if:条件判断。
if (condition) { ... }
	# 允许在配置中使用条件判断,使用正则表达式(pcre风格)对变量进行匹配,匹配成功返回true,执行后续指令
# if指令仅能做单次判断,不支持 if else 多分支
# if ($var){ } 这种写法,如果变量对应的值是空字符串或0,就返回false
# nginx 1.0.1之前$变量的值如果以0开头的任意字符串会返回false
# 支持的运算符
	# = 比较变量和字符串是否相等
	# != 比较变量和字符串是否不相等
	# ~ 区分大小写,是否匹配正则,包含
	# !~ 区分大小写,是否不匹配正则,包含
	# ~* 不区分大小写,是否匹配正则,包含
	# !~* 不区分大小写,是否不匹配正则,不包含
	# -f|!-f 判断文件是否存在|不存在
	# -d|!-d 判断目录是否存在|不存在
	# -x|!-x 判断文件是否可执行|不可执行
	# -e|!-e 判断文件(包括文件,目录,软链接)是否存在|不存在
# 作用域 server, location
例如
[root@nginx ~]# cat /usr/local/nginx/conf.d/if-test.conf
server {
        listen 80;
        listen 443 ssl;
        server_name iftest.test.com;
        root /www/iftest;
        ssl_certificate /usr/local/nginx/certs/nginx.crt;
        ssl_certificate_key /usr/local/nginx/certs/nginx.key;
        location /scheme {
                if ($scheme = http){
                        return 200 "http\n";
                }
                if ($scheme = https){
                        return 200 "https\n";
                }
        }
        location /test {
                return 200 $scheme;
        }
        location /file {
                if (!-e $request_filename) {
                        return 200 "$request_filename file does not exists!\n";
                }
        }
}

[root@nginx ~]# mkdir /www/iftest
[root@nginx ~]# echo file.txt > /www/iftest/file.txt
[root@nginx ~]# systemctl restart nginx

#####测试
[root@nginx ~]# echo 192.168.168.40 iftest.test.com >> /etc/hosts
[root@nginx ~]# curl http://iftest.test.com/scheme
http
[root@nginx ~]# curl -k https://iftest.test.com/scheme
https
[root@nginx ~]# curl -k https://iftest.test.com/test
https
[root@nginx ~]# curl  http://iftest.test.com/test
http
[root@nginx ~]# curl  http://iftest.test.com/file.txt
file.txt
[root@nginx ~]# curl  http://iftest.test.com/file1
/www/iftest/file1 file does not exists!
[root@nginx ~]# curl -k  https://iftest.test.com/file2
/www/iftest/file2 file does not exists!
rewrite_log:把 rewrite 的执行过程记到日志里,用于调试。
rewrite_log on|off; #是否记录 ngx_http_rewrite_module 模块产生的日志到 error_log中,默认值 off
#如果开启,需要将 error_log 的级别设为 notice

# 作用域 http,server, location, if
rewrite 是实现 URL 重写的关键指令, 根据 regex (正则表达式) 部分的内容, 重定向到 replacement 部分, 结尾是 flag 标记。
rewrite regex replacement [flag];

#通过正则表达式匹配来改变URI,在一个配置段中可以有一条或多条,按照顺序从上下往下匹配
#如果有多条规则,被某一条规则命中并替换后,会用新的URI再从头开始逐一匹配,直到没有被命中为止,但是重复匹配次数不能超过10次,否则会报500
#regex PCRE 风格的正则表达式,表示要查找的内容
#replacement 用于替换的字符串
#[flag】标志位,用于控制rewrite 指令的行为last|break|redirect|permanent
#last如果被当前rewrite 规则匹配上,替换后结束本轮替换,开始下轮替换
#break如果被当前rawrite规则匹配上,替换后结束当前代码段的重写替换,后续所有rewrite 都不执行
#redirect如果被当前rewrite规则匹配上,替换后执行 302临时重定向
#permanent如果被当前rewrite 规则匹配上,替换后执行 301 永久重定向

# last 和 break 在服务器内部实现跳转,客户端浏览器地址栏中的信息不会发生变化
# redirect 和 permanent 在客户端实现跳转,客户端浏览器地址栏中的信息会发生变化

# 作用域 server, location, if
last 和 break
相同点:
无论是 break 还是 last,它们都会中止当前 location 块的处理,并跳出该块,客户端浏览器地址栏中的信息不会发生变化
不同点:
break:终止当前代码段中的所有 rewrite 匹配
last:中止当前 location 中的 rewrite 匹配,用替换后的 URI 继续从第一条规则开始执行下一轮rewrite
redirect:302 临时重定向,浏览器地址栏会变化permanent:301 永久重定向,搜索引擎会更新索引
[root@nginx ~]# cat /usr/local/nginx/conf.d/rewrite.conf
server {
        listen 80;
        server_name rewrite.test.com;
        root /www/rewrite;
        location / {
                rewrite /1.html /2.html;
                rewrite /2.html /3.html;
        }
        location /2.html {
                rewrite /2.html /a.html;
        }
        location /3.html {
                rewrite /3.html /b.html;
        }
}
[root@nginx ~]# mkdir /www/rewrite
[root@nginx ~]# echo 111> /www/rewrite/1.html
[root@nginx ~]# echo 111 > /www/rewrite/1.html
[root@nginx ~]# echo 222 > /www/rewrite/2.html
[root@nginx ~]# echo 333 > /www/rewrite/3.html
[root@nginx ~]# echo aaa > /www/rewrite/1.html
[root@nginx ~]# echo aaa > /www/rewrite/a.html
[root@nginx ~]# echo bbb > /www/rewrite/b.html
[root@nginx ~]# echo  index > /www/rewrite/index.html
[root@nginx ~]# systemctl restart nginx
[root@nginx ~]# echo 192.168.168.40 rewrite.test.com >> /etc/hosts
[root@nginx ~]# curl  rewrite.test.com
index
[root@nginx ~]# curl  rewrite.test.com/1.html
bbb
[root@nginx ~]# curl  rewrite.test.com/2.html
aaa
[root@nginx ~]# curl  rewrite.test.com/3.html
bbb
[root@nginx ~]# cat /usr/local/nginx/conf.d/rewrite.conf
server {
        listen 80;
        server_name rewrite.test.com;
        root /www/rewrite;
        location / {
                rewrite /1.html /2.html;
                rewrite /2.html /3.html;
                rewrite /b.html /c.html;
        }
        location /2.html {
                rewrite /2.html /a.html;
        }
        location /3.html {
                rewrite /3.html /b.html;
        }
}
[root@nginx ~]# echo ccc > /www/rewrite/c.html
[root@nginx ~]# systemctl restart nginx
[root@nginx ~]# curl rewrite.test.com/1.html
ccc
- rewrite配合break
[root@nginx ~]# cat /usr/local/nginx/conf.d/rewrite.conf
server {
        listen 80;
        server_name rewrite.test.com;
        root /www/rewrite;
        location / {
                rewrite /1.html /2.html break;
                rewrite /2.html /3.html;
                rewrite /b.html /c.html;
        }
        location /2.html {
                rewrite /2.html /a.html;
        }
        location /3.html {
                rewrite /3.html /b.html;
        }
}
[root@nginx ~]# systemctl restart nginx
#break会结束当前server中的所有rewrite
[root@nginx ~]# curl  rewrite.test.com/1.html
222
- rewrite配合last
[root@nginx ~]# cat /usr/local/nginx/conf.d/rewrite.conf
server {
        listen 80;
        server_name rewrite.test.com;
        root /www/rewrite;
        location / {
                rewrite /1.html /2.html last;
                rewrite /2.html /3.html;
                rewrite /b.html /c.html;
        }
        location /2.html {
                rewrite /2.html /a.html;
        }
        location /3.html {
                rewrite /3.html /b.html;
        }
}
[root@nginx ~]# systemctl restart nginx
#1.html-----2.html   last 结束当前 location 中的本轮 rewrite,继续执行下一轮rewrite
#location /2.html
[root@nginx ~]# curl  rewrite.test.com/1.html
aaa
[root@nginx ~]# cat  /usr/local/nginx/conf.d/rewrite.conf
server {
        listen 80;
        server_name rewrite.test.com;
        root /www/rewrite;
        location / {
                rewrite /1.html /22.html last;
                rewrite /2.html /3.html;
                rewrite /b.html /c.html;
        }
        location /2.html {
                rewrite /2.html /a.html;
        }
        location /3.html {
                rewrite /3.html /b.html;
        }
}
[root@nginx ~]# echo 22html > /www/rewrite/22.html
[root@nginx ~]# systemctl restart nginx
#last 结束当前 location 中的本轮 rewrite,继续执行下一轮rewrite,因为后续没有22.html的location,所以返回22.html
[root@nginx ~]# curl  rewrite.test.com/1.html
22html
[root@nginx ~]# cat /usr/local/nginx/conf.d/rewrite.conf
server {
        listen 80;
        server_name rewrite.test.com;
        root /www/rewrite;
        location / {
                rewrite /1.html /2.html last;
                rewrite /2.html /3.html;
                rewrite /b.html /c.html;
        }
        location /2.html {
                rewrite /2.html /1.html;
        }
        location /3.html {
                rewrite /3.html /b.html;
        }
}
[root@nginx ~]# systemctl restart nginx
#1.html----2.html last
#2.html----1.html
#1.html---2.html last
#....无限循环,最终返回500错误
[root@nginx ~]# curl  rewrite.test.com/1.html
<html>
<head><title>500 Internal Server Error</title></head>
<body>
<center><h1>500 Internal Server Error</h1></center>
<hr><center>nginx</center>
</body>
</html>
- rewrite配合redirect
[root@nginx ~]# cat /usr/local/nginx/conf.d/rewrite.conf
server {
        listen 80;
        server_name rewrite.test.com;
        root /www/rewrite;
        location / {
                rewrite /1.html /2.html redirect;
                rewrite /2.html /3.html;
                rewrite /b.html /c.html;
        }
        location /2.html {
                rewrite /2.html /1.html;
        }
        location /3.html {
                rewrite /3.html /b.html;
        }
}
[root@nginx ~]# systemctl restart  nginx
# 1.html ----> 2.thml redirect 返回客户端让客户端去请求 2.html
# 2.html ----> 1.thml 客户端请求 2.html 被 rewrite 1.html
# 1.html ----> 2.thml redirect 返回客户端让客户端去请求 2.html
# ... 无限循环
[root@nginx ~]# curl  rewrite.test.com/1.html
<html>
<head><title>302 Found</title></head>
<body>
<center><h1>302 Found</h1></center>
<hr><center>nginx</center>
</body>
</html>
[root@nginx ~]# curl  rewrite.test.com/1.html -L
curl: (47) Maximum (50) redirects followed
[root@nginx ~]# cat /usr/local/nginx/conf.d/rewrite.conf
server {
        listen 80;
        server_name rewrite.test.com;
        root /www/rewrite;
        location / {
                rewrite /1.html /2.html redirect;
                rewrite /2.html /3.html;
                rewrite /b.html /c.html;
        }
        location /2.html {
                rewrite /2.html /a.html;
        }
        location /3.html {
                rewrite /3.html /b.html;
        }
}
[root@nginx ~]# systemctl restart  nginx
#1.html---2.html  redirect 返回客户端让客户端去请求2.html,这一步是客户端重定向
#2.html---a.html  客户端请求2.html被rewrite a.html,最终返回a.html,这一步是服务端重定向
[root@nginx ~]# curl  rewrite.test.com/1.html -L
aaa
[root@nginx ~]# cat /usr/local/nginx/conf.d/rewrite.conf
server {
        listen 80;
        server_name rewrite.test.com;
        root /www/rewrite;
        location / {
                rewrite /1.html /2.html redirect;
                rewrite /2.html /3.html;
                rewrite /b.html /c.html;
        }
        location /2.html {
                rewrite /2.html /a.html redirect;
        }
        location /3.html {
                rewrite /3.html /b.html;
        }
}
[root@nginx ~]# systemctl restart  nginx
#1.html---2.html  redirect 返回客户端让客户端去请求2.html,这一步是客户端重定向
#2.html---a.html  redirect 返回客户端让客户端请求 a.html,这一步是客户端重定向。最终访问的是a.html
[root@nginx ~]# curl  rewrite.test.com/1.html -L
aaa
[root@nginx ~]# curl  rewrite.test.com/1.html -LI
HTTP/1.1 302 Moved Temporarily
Server: nginx
Date: Thu, 11 Sep 2025 16:52:25 GMT
Content-Type: text/html
Content-Length: 138
Location: http://rewrite.test.com/2.html
Connection: keep-alive

HTTP/1.1 302 Moved Temporarily
Server: nginx
Date: Thu, 11 Sep 2025 16:52:25 GMT
Content-Type: text/html
Content-Length: 138
Location: http://rewrite.test.com/a.html
Connection: keep-alive

HTTP/1.1 200 OK
Server: nginx
Date: Thu, 11 Sep 2025 16:52:25 GMT
Content-Type: text/html; charset=utf-8
Content-Length: 4
Last-Modified: Thu, 11 Sep 2025 16:27:34 GMT
Connection: keep-alive
ETag: "68c2f876-4"
Accept-Ranges: bytes
- rewrite配合permanent
[root@nginx ~]# cat /usr/local/nginx/conf.d/rewrite.conf
server {
        listen 80;
        server_name rewrite.test.com;
        root /www/rewrite;
        location / {
                rewrite /1.html /2.html permanent;
                rewrite /2.html /3.html;
                rewrite /b.html /c.html;
        }
        location /2.html {
                rewrite /2.html /a.html permanent;
        }
        location /3.html {
                rewrite /3.html /b.html;
        }
}
[root@nginx ~]# systemctl restart nginx
#和redirect除了状态码不一样,流程上没有本质区别
[root@nginx ~]# curl  rewrite.test.com/1.html -LI
HTTP/1.1 301 Moved Permanently
Server: nginx
Date: Thu, 11 Sep 2025 16:53:41 GMT
Content-Type: text/html
Content-Length: 162
Location: http://rewrite.test.com/2.html
Connection: keep-alive

HTTP/1.1 301 Moved Permanently
Server: nginx
Date: Thu, 11 Sep 2025 16:53:41 GMT
Content-Type: text/html
Content-Length: 162
Location: http://rewrite.test.com/a.html
Connection: keep-alive

HTTP/1.1 200 OK
Server: nginx
Date: Thu, 11 Sep 2025 16:53:41 GMT
Content-Type: text/html; charset=utf-8
Content-Length: 4
Last-Modified: Thu, 11 Sep 2025 16:27:34 GMT
Connection: keep-alive
ETag: "68c2f876-4"
Accept-Ranges: bytes
#但是在浏览器中,会缓存此次重定向的流程,在得到最终结果之前,不会访问服务器,通过开发者工具可以看到 disk cache 相关提示
5.Nginx rewrite 的企业应用场景
- 示例1:如果访问不存在的任意网页都重定向到错误页面
[root@nginx conf]# vim /usr/local/nginx/conf/nginx.conf
server {
        listen 80;
        server_name www.test.com;
        location / {
                root html/www; #站点根目录的绝对路径为/usr/local/nginx/html/www
                index index.html index.htm;
                if (!-f $request_filename) {
                  rewrite /.* /err.html permanent;
                }
        }
}
[root@nginx ~]# echo error > /usr/local/nginx/html/www/err.html
[root@nginx ~]# systemctl restart nginx
[root@nginx ~]# curl www.test.com/dkj
<html>
<head><title>301 Moved Permanently</title></head>
<body>
<center><h1>301 Moved Permanently</h1></center>
<hr><center>nginx/1.20.1</center>
</body>
</html>
[root@nginx ~]# curl www.test.com/dkj  -L
error
注:在浏览器访问会实现地址跳转
- 实例2:为某个目录定义别名,用户访问的路径其实并不存在,而是将其转发到另外一个页面
[root@nginx ~]# vim /usr/local/nginx/conf/nginx.conf
server {
        listen 80;
        server_name www.test.com;
        location / {
                root html/www; #站点根目录的绝对路径为/usr/local/nginx/html/www
                index index.html index.htm;
                rewrite ^/fornum/(.*) /dir1/$1 last;
                if (!-f $request_filename) {
                  rewrite /.* /err.html permanent;
                }
        }
}
[root@nginx ~]# mkdir /usr/local/nginx/html/www/dir1/
[root@nginx ~]# echo "alias dir" > /usr/local/nginx/html/www/dir1/alias.html
[root@nginx ~]# curl www.test.com/fornum/alias.html
alias dir

#此处访问alias.h文件,在dir1目录没有该文件,且rewrite写的为last标记,所以会继续向后寻找匹配的规则,便匹配至下一个rewrite
[root@nginx ~]# curl www.test.com/forum/alias.h
<html>
<head><title>301 Moved Permanently</title></head>
<body>
<center><h1>301 Moved Permanently</h1></center>
<hr><center>nginx/1.20.1</center>
</body>
</html>
[root@nginx ~]# curl www.test.com/forum/alias.h  -L
error

#将rewrite的flag修改为break
[root@nginx ~]# vim /usr/local/nginx/conf/nginx.conf
server {
        listen 80;
        server_name www.test.com;
        location / {
                root html/www; #站点根目录的绝对路径为/usr/local/nginx/html/www
                index index.html index.htm;
                rewrite ^/fornum/(.*) /dir1/$1 break;
                if (!-f $request_filename) {
                  rewrite /.* /err.html permanent;
                }

        }
}
[root@nginx ~]# systemctl restart nginx
[root@nginx ~]# curl www.test.com/fornum/alias.html
alias dir
#此处访问alias.h文件,在dir1目录没有该文件,且rewrite写的为break标记,不会继续向后匹配,所以显示为404
[root@nginx ~]# curl www.test.com/fornum/alias.h
<html>
<head><title>404 Not Found</title></head>
<body>
<center><h1>404 Not Found</h1></center>
<hr><center>nginx/1.20.1</center>
</body>
</html>
注:在浏览器访问地址不会跳转
- 实例3:根据不同的设备适配不同的网页
server{
	listen 80;
	server_name www.jungle.com;
	root /www/jungle.com;
	if ($http_user_agent ~* "android|iphone|ipad"){
		rewrite ^(.*)$ http://mobile.jungle.com/$1 redirect;
	}
}
常用场景(什么时候用)
- 换域名:老域名访问时,自动跳转到新域名。
- 网址变好看:把又长又乱的网址(如
/product.php?id=123)变短变整洁(如/product/123)。 - 强制用HTTPS:让所有用
http的访问,自动跳转到更安全的https。 - 防盗链:如果不是从自己网站点过来的图片请求,就给他个错误图片。
- 给PHP等框架用:把所有请求都转给一个入口文件(如
index.php)去处理。


 1795
1795

 被折叠的 条评论
为什么被折叠?
被折叠的 条评论
为什么被折叠?
 到【灌水乐园】发言


