


 本文介绍了nginx的多页面配置,重点讲解了location模块中root与alias的区别,以及server_name的精确匹配、通配符匹配和正则表达式配置。此外,还探讨了如何配置访问部署到jar包和利用Docker部署nginx,包括配置文件的组织和端口映射。
nginx多页面配置
- 必须在location /mypass块中将root html替换为alias html
    server {
        listen       80;
        server_name  localhost;

        #charset koi8-r;

        #access_log  logs/host.access.log  main;

        location / {
            root   html;
            index  index.html index.htm;
        }

		location /mypass {
			alias  html/mypass;
			index index.html index.htm;
		}

		# 做请求转发
		location /test {
			proxy_pass https://www.baidu.com/;
		}

	}
server_name 的配置方式有三种,分别是:
- 精确匹配
- 通配符匹配
- 正则表达式匹配
精确匹配
server {
	listen 80;
	server_name www.zxy.com localhost;
}
通配符匹配
server_name 中支持通配符 “*”, 但需要注意的是通配符不能出现在域名的中间,只能出现在首段或尾段
server_name localhost www.zcy.*;
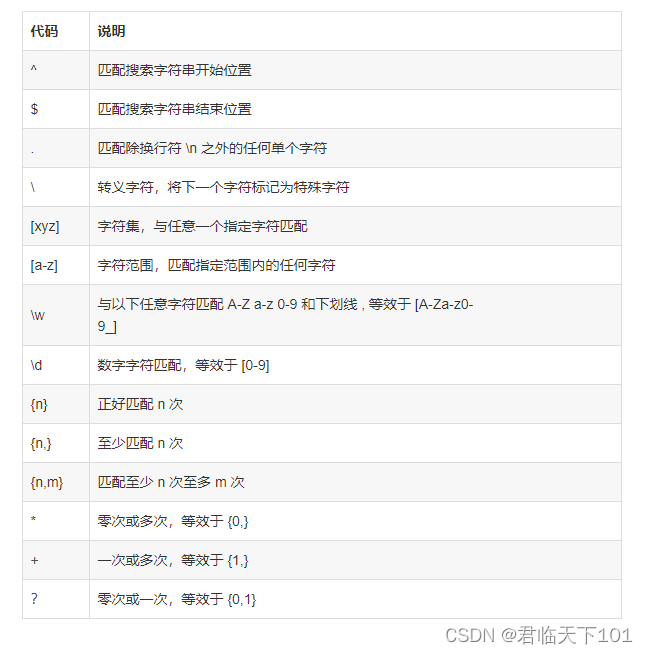
正则表达式配置
server_name 中可以使用正则表达式,并且使用 ~ 作为正则表达式字符串的开始标记
负载均衡
http {
    include       mime.types; #文件扩展名与文件类型映射表
    default_type  application/octet-stream;#默认文件类型

    sendfile        on;#开启高效文件传输模式,sendfile指令指定nginx是否调用sendfile函数来输出文件,对于普通应用设为 on,如果用来进行下载等应用磁盘IO重负载应用,可设置为off,以平衡磁盘与网络I/O处理速度,降低系统的负载。注意:如果图片显示不正常把这个改成off。

    keepalive_timeout  65; #长连接超时时间,单位是秒

    gzip  on;#启用Gizp压缩

    #服务器的集群
    upstream  netitcast.com {  #服务器集群名字
        server    127.0.0.1:18080  weight=1;#服务器配置   weight是权重的意思,权重越大,分配的概率越大。
        server    127.0.0.1:28080  weight=2;
    }

    #当前的Nginx的配置
    server {
        listen       80;#监听80端口,可以改成其他端口
        server_name  localhost;##############   当前服务的域名

    location / {
            proxy_pass http://netitcast.com;
            proxy_redirect default;
        }


        error_page   500 502 503 504  /50x.html;
        location = /50x.html {
            root   html;
        }
    }
配置访问部署到jar包
location / {
    proxy_set_header Host $host;
	proxy_set_header X-Forwarded-For $proxy_add_x_forwarded_for;
	proxy_pass http://localhost:8080/;
}
利用Docker部署nginx
配置文件分开设置,首先创建conf/nginx.conf和conf.d/default.conf
在http配置末尾处添加配置引用
user  nginx;
worker_processes  auto;

error_log  /var/log/nginx/error.log notice;
pid        /var/run/nginx.pid;


events {
    worker_connections  1024;
}


http {
    include       /etc/nginx/mime.types;
    default_type  application/octet-stream;

    log_format  main  '$remote_addr - $remote_user [$time_local] "$request" '
                      '$status $body_bytes_sent "$http_referer" '
                      '"$http_user_agent" "$http_x_forwarded_for"';

    access_log  /var/log/nginx/access.log  main;

    sendfile        on;
    #tcp_nopush     on;

    keepalive_timeout  65;

    #gzip  on;

    include /etc/nginx/conf.d/*.conf;
}
default.conf 编写实际配置文件,注意文件容器中相对路径
server {
    listen       80;
    listen  [::]:80;
    server_name  localhost;

    #access_log  /var/log/nginx/host.access.log  main;

    location / {
        root   /usr/share/nginx/html;
        index  index.html index.htm;
    }

    #error_page  404              /404.html;

    # redirect server error pages to the static page /50x.html
    #
    error_page   500 502 503 504  /50x.html;
    location = /50x.html {
        root   /usr/share/nginx/html;
    }

    # proxy the PHP scripts to Apache listening on 127.0.0.1:80
    #
    #location ~ \.php$ {
    #    proxy_pass   http://127.0.0.1;
    #}

    # pass the PHP scripts to FastCGI server listening on 127.0.0.1:9000
    #
    #location ~ \.php$ {
    #    root           html;
    #    fastcgi_pass   127.0.0.1:9000;
    #    fastcgi_index  index.php;
    #    fastcgi_param  SCRIPT_FILENAME  /scripts$fastcgi_script_name;
    #    include        fastcgi_params;
    #}

    # deny access to .htaccess files, if Apache's document root
    # concurs with nginx's one
    #
    #location ~ /\.ht {
    #    deny  all;
    #}
}
- 创建完成后进行端口映射
-v 主机地址:容器地址
docker run --name my_nginx -p 80:80 \
-v /home/docker_data/nginx/conf/conf.d:/etc/nginx/conf.d \
-v /home/docker_data/nginx/nginx.conf:/etc/nginx/nginx.conf \
-v /home/docker_data/nginx/html:/usr/share/nginx/html \
-v /home/docker_data/nginx/logs/:/var/log/nginx/ \
--privileged=true -d --network nginx_network nginx


 948
948

 被折叠的 条评论
为什么被折叠?
被折叠的 条评论
为什么被折叠?
 到【灌水乐园】发言


