


文章目录
要自定义错误处理,可以
- 自定义错误页面。
- @ControllerAdvice和@ExceptionHandler处理全局异常。
- @ResponseStatus和自定义异常。
- 自定义异常处理解析器:实现HandlerExceptionResolver。
自定义错误页面
关于自定义错误页面,SpringBoot的错误处理和错误处理原理(自动配置解析篇)都介绍过。
在error目录下创建错误视图文件,如/error/404.html、/error/4xx.html、/error/5xx.html。
当响应异常时,如果有与响应状态码精确匹配的错误视图页面,则返回视图页面;
如果没有精确匹配,就找/error/4xx.html或/error/5xx.html,并返回可模糊匹配的视图页面;
如果还找不到,则返回whitelabel页面。
看个具体的例子。
新建Spring项目:demo10,添加依赖:Spring Web、Spring Configuration Processor、Lombok和Thymeleaf。
com.example.boot下新建控制器controller.IndexControlller。
package com.example.boot.controller;

import org.springframework.stereotype.Controller;
import org.springframework.web.bind.annotation.GetMapping;
import org.springframework.web.bind.annotation.RequestParam;

@Controller
public class IndexController {

    @GetMapping("/add")
    public String add(@RequestParam("a") int a,@RequestParam("b") int b){
        int c = a + b;
        return "success";
    }

    @GetMapping("/divide")
    public String divide(){
        int i = 10/0;
        return "success";
    }
}
resources.templates下新建视图文件:index.html和succes.html。
<!-- index.html -->
<!DOCTYPE html>
<html lang="en" xmlns:th="http://www.thymeleaf.org">
<head>
    <meta charset="UTF-8">
    <title>Index</title>
</head>
<body>
    <a th:href="@{/add}">加法:400</a><br/>
    <a th:href="@{/subtract}">减法:404</a><br/>
    <a th:href="@{/divide}">除法:500</a>
</body>
</html>
<!-- success.html -->
<!DOCTYPE html>
<html lang="en">
<head>
    <meta charset="UTF-8">
    <title>success</title>
</head>
<body>
<h1>成功</h1>
</body>
</html>
resources.templates下新建目录error,error下新建404.html和5xx.html。
<!-- 404.html -->
<!DOCTYPE html>
<html lang="en" xmlns:th="http://www.thymeleaf.org">
<head>
  <meta charset="UTF-8">
  <title>404</title>
</head>
<body>
<h1>I'm 404.html</h1>
<p>【status】<span th:text="${status}"></span></p>
<p>【error】<span th:text="${error}"></span></p>
</body>
</html>
<!-- 5xx.html -->
<!DOCTYPE html>
<html lang="en" xmlns:th="http://www.thymeleaf.org">
<head>
  <meta charset="UTF-8">
  <title>5xx</title>
</head>
<body>
<h1>I'm 5xx.html</h1>
<p>【status】<span th:text="${status}"></span></p>
<p>【error】<span th:text="${error}"></span></p>
</body>
</html>
启用应用,测试效果。

@ControllerAdvice和@ExceptionHandler处理全局异常
com.example.boot下新建exception.GlobalExceptionHandler,如下。
package com.example.boot.exception;

import lombok.extern.slf4j.Slf4j;
import org.springframework.web.bind.annotation.ControllerAdvice;
import org.springframework.web.bind.annotation.ExceptionHandler;

@Slf4j
@ControllerAdvice
public class GlobalExceptionHandler {

    @ExceptionHandler({ArithmeticException.class,NullPointerException.class})
    public String handleArithAndNullException(Exception e){
        log.error("出现异常,如下:",e);
        return "exception";
    }
}
用@ControllerAdvice注解,表明GlobalExceptionHandler用来处理web controller异常。
用@ExceptionHandler注解,表示handleArithAndNullException方法处理指定异常:数学运算异常(ArithmeticException)和空指针异常(NullPointerException)。
另外,slf4j打印异常时,异常是不需要占位符的。即,
正确:log.error("出现异常,如下:",e);
错误:log.error("出现异常,如下:{}",e);
resources.templates下新建视图文件exception.html,如下。
<!DOCTYPE html>
<html lang="en">
<head>
    <meta charset="UTF-8">
    <title>success</title>
</head>
<body>
<h1>成功</h1>
</body>
</html>
重启应用,测试效果。
通过调试源码来理解异常处理原理。
- DispatcherServlet#doDispatch
protected void doDispatch(HttpServletRequest request, HttpServletResponse response) throws Exception {
	try {
		try {
			// Actually invoke the handler.
			mv = ha.handle(processedRequest, response, mappedHandler.getHandler());
		}
		catch (Exception ex) {
			dispatchException = ex;
		}
		processDispatchResult(processedRequest, response, mappedHandler, mv, dispatchException);
	}
}
- DispatcherServlet#processDispatchResult
private void processDispatchResult(HttpServletRequest request, HttpServletResponse response,
		@Nullable HandlerExecutionChain mappedHandler, @Nullable ModelAndView mv,
		@Nullable Exception exception) throws Exception {
	mv = processHandlerException(request, response, handler, exception);
}
- DispatcherServlet#processHandlerException
protected ModelAndView processHandlerException(HttpServletRequest request, HttpServletResponse response,
			@Nullable Object handler, Exception ex) throws Exception {
	// Check registered HandlerExceptionResolvers...
	ModelAndView exMv = null;
	if (this.handlerExceptionResolvers != null) {
		for (HandlerExceptionResolver resolver : this.handlerExceptionResolvers) {
			exMv = resolver.resolveException(request, response, handler, ex);
			if (exMv != null) {
				break;
			}
		}
	}
}
- HandlerExceptionResolverComposite#resolveException
找到能够处理该控制器异常的解析器,找到了ExceptionHandlerExceptionResolver。
public ModelAndView resolveException(
		HttpServletRequest request, HttpServletResponse response, @Nullable Object handler, Exception ex) {

	if (this.resolvers != null) {
		for (HandlerExceptionResolver handlerExceptionResolver : this.resolvers) {
			ModelAndView mav = handlerExceptionResolver.resolveException(request, response, handler, ex);
			if (mav != null) {
				return mav;
			}
		}
	}
	return null;
}
- AbstractHandlerExceptionResolver#resolveException
public ModelAndView resolveException(
		HttpServletRequest request, HttpServletResponse response, @Nullable Object handler, Exception ex) {
	ModelAndView result = doResolveException(request, response, handler, ex);
}
- AbstractHandlerMethodExceptionResolver#doResolveException
protected final ModelAndView doResolveException(
		HttpServletRequest request, HttpServletResponse response, @Nullable Object handler, Exception ex) {
	return doResolveHandlerMethodException(request, response, handlerMethod, ex);
}
- ExceptionHandlerExceptionResolver#doResolveHandlerMethodException
找到了处理异常的控制器方法后,后面的过程和普通控制器方法的执行过程一样。
protected ModelAndView doResolveHandlerMethodException(HttpServletRequest request,
		HttpServletResponse response, @Nullable HandlerMethod handlerMethod, Exception exception) {
	ServletInvocableHandlerMethod exceptionHandlerMethod = getExceptionHandlerMethod(handlerMethod, exception);
	exceptionHandlerMethod.invokeAndHandle(webRequest, mavContainer, arguments);
}
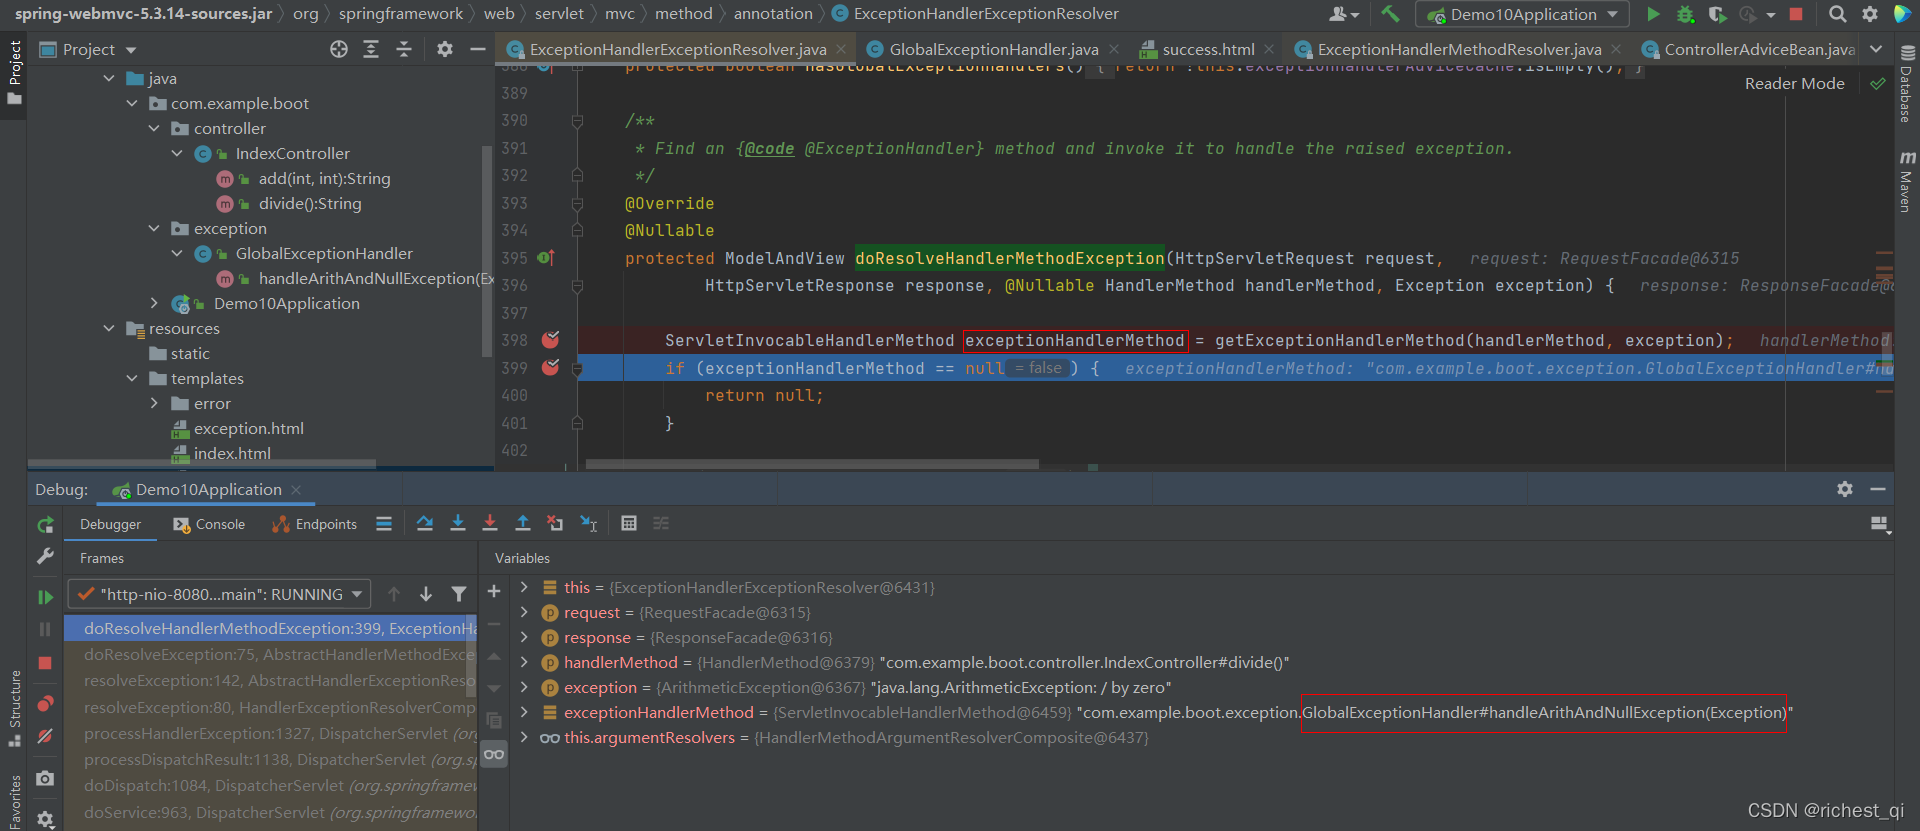
但,处理异常的控制器方法是怎么找到的呢?一步步来。
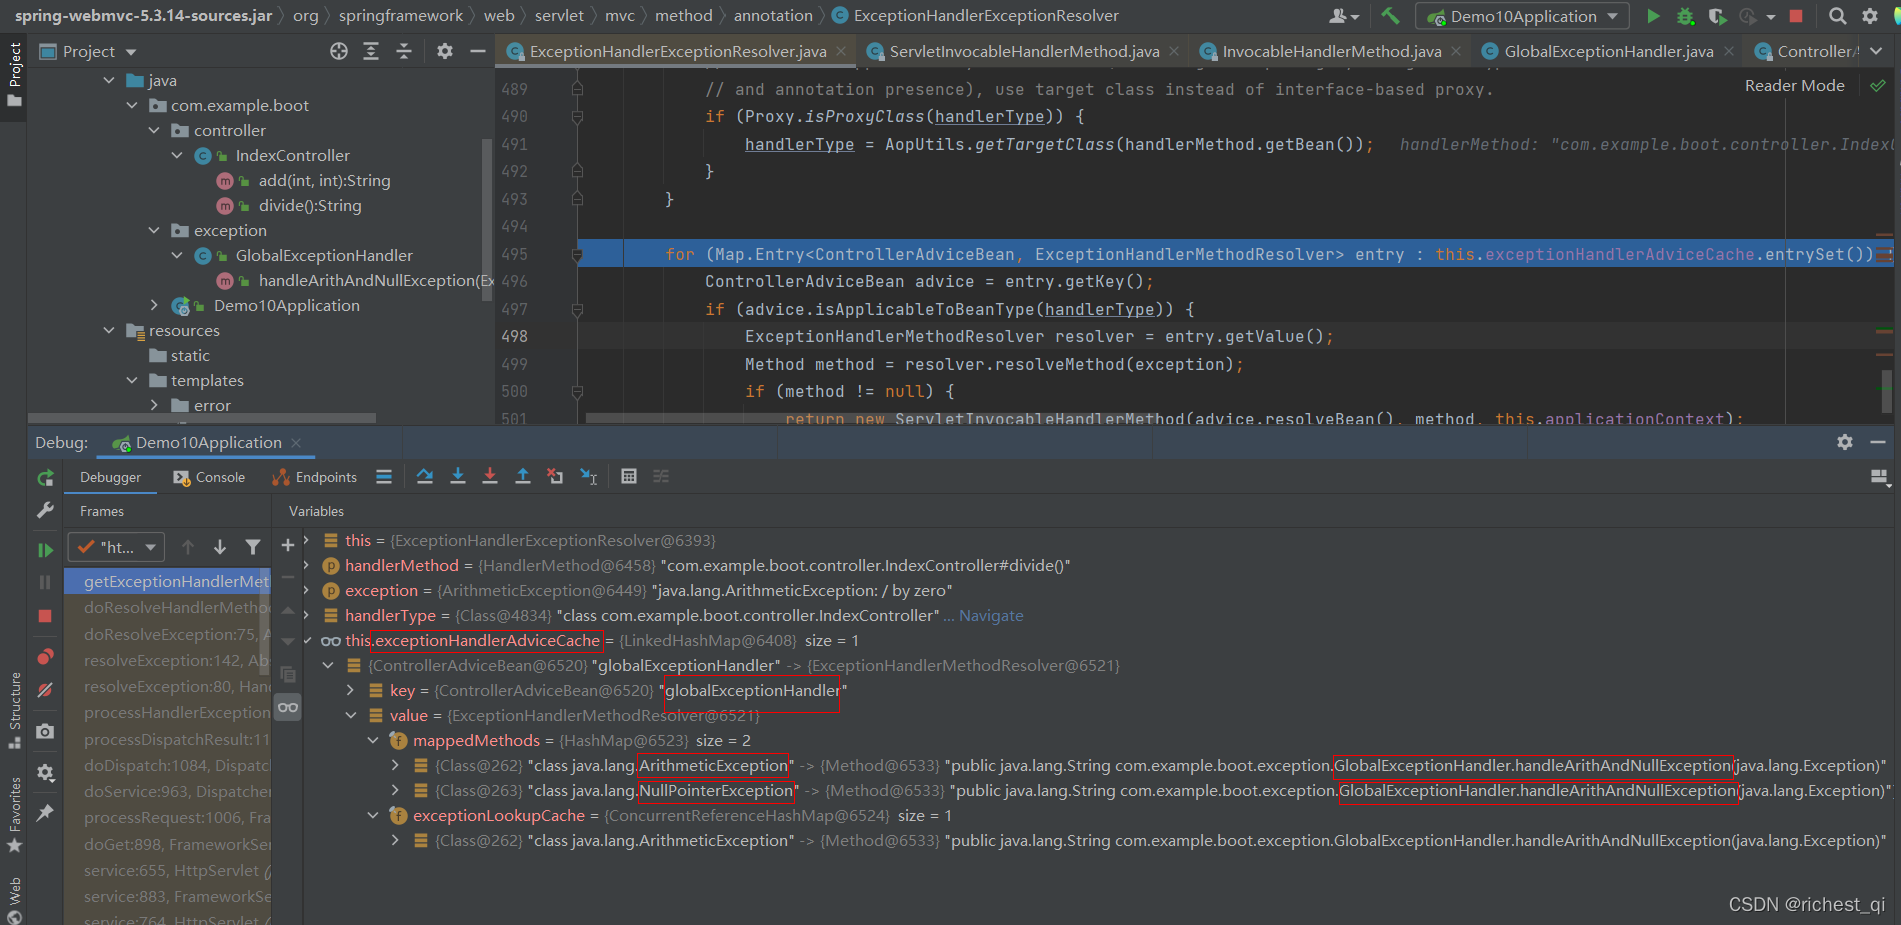
a)ExceptionHandlerExceptionResolver#getExceptionHandlerMethod
protected ServletInvocableHandlerMethod getExceptionHandlerMethod(
		@Nullable HandlerMethod handlerMethod, Exception exception) {
	for (Map.Entry<ControllerAdviceBean, ExceptionHandlerMethodResolver> entry : this.exceptionHandlerAdviceCache.entrySet()) {
		ControllerAdviceBean advice = entry.getKey();
		if (advice.isApplicableToBeanType(handlerType)) {
			ExceptionHandlerMethodResolver resolver = entry.getValue();
			Method method = resolver.resolveMethod(exception);
		}
	}
}
b)ExceptionHandlerMethodResolver#resolveMethod
public Method resolveMethod(Exception exception) {
	return resolveMethodByThrowable(exception);
}
c)ExceptionHandlerMethodResolver#resolveMethodByThrowable
public Method resolveMethodByThrowable(Throwable exception) {
	Method method = resolveMethodByExceptionType(exception.getClass());
	return method;
}
d)ExceptionHandlerMethodResolver#resolveMethodByExceptionType
public Method resolveMethodByExceptionType(Class<? extends Throwable> exceptionType) {
	Method method = this.exceptionLookupCache.get(exceptionType);
	if (method == null) {
		method = getMappedMethod(exceptionType);
		this.exceptionLookupCache.put(exceptionType, method);
	}
	return (method != NO_MATCHING_EXCEPTION_HANDLER_METHOD ? method : null);
}
e)ExceptionHandlerMethodResolver#getMappedMethod
private Method getMappedMethod(Class<? extends Throwable> exceptionType) {
	List<Class<? extends Throwable>> matches = new ArrayList<>();
	for (Class<? extends Throwable> mappedException : this.mappedMethods.keySet()) {
		if (mappedException.isAssignableFrom(exceptionType)) {
			matches.add(mappedException);
		}
	}
	if (!matches.isEmpty()) {
		if (matches.size() > 1) {
			matches.sort(new ExceptionDepthComparator(exceptionType));
		}
		return this.mappedMethods.get(matches.get(0));
	}
	else {
		return NO_MATCHING_EXCEPTION_HANDLER_METHOD;
	}
}
以上步骤,重点关注ExceptionHandlerExceptionResolver的exceptionHandlerAdviceCache属性、ExceptionHandlerMethodResolver的mappedMethods属性。这两个属性的值,在应用启动时就已经确定了。
启动应用调试一下就清楚了,以下是部分有关源码。
//ExceptionHandlerExceptionResolver#initExceptionHandlerAdviceCache
private void initExceptionHandlerAdviceCache() {
	List<ControllerAdviceBean> adviceBeans = ControllerAdviceBean.findAnnotatedBeans(getApplicationContext());
	for (ControllerAdviceBean adviceBean : adviceBeans) {
		Class<?> beanType = adviceBean.getBeanType();
		ExceptionHandlerMethodResolver resolver = new ExceptionHandlerMethodResolver(beanType);
		if (resolver.hasExceptionMappings()) {
			this.exceptionHandlerAdviceCache.put(adviceBean, resolver);
		}
	}
}

//ExceptionHandlerMethodResolver#ExceptionHandlerMethodResolver
public ExceptionHandlerMethodResolver(Class<?> handlerType) {
	for (Method method : MethodIntrospector.selectMethods(handlerType, EXCEPTION_HANDLER_METHODS)) {
		for (Class<? extends Throwable> exceptionType : detectExceptionMappings(method)) {
			addExceptionMapping(exceptionType, method);
		}
	}
}

private void addExceptionMapping(Class<? extends Throwable> exceptionType, Method method) {
	Method oldMethod = this.mappedMethods.put(exceptionType, method);
	if (oldMethod != null && !oldMethod.equals(method)) {
		throw new IllegalStateException("Ambiguous @ExceptionHandler method mapped for [" +
				exceptionType + "]: {" + oldMethod + ", " + method + "}");
	}
}

- ServletInvocableHandlerMethod#invokeAndHandle
public void invokeAndHandle(ServletWebRequest webRequest, ModelAndViewContainer mavContainer,
		Object... providedArgs) throws Exception {
Object returnValue = invokeForRequest(webRequest, mavContainer, providedArgs);
this.returnValueHandlers.handleReturnValue(
		returnValue, getReturnValueType(returnValue), mavContainer, webRequest);
}
@ResponseStatus和自定义异常
在com.example.boot.exception下定义自定义异常:UserTooManyException,如下。
一旦UserTooManyException被抛出且捕获,将返回状态码403(HttpStatus.FORBIDDEN),异常原因是”用户数量太多“。
package com.example.boot.exception;

import org.springframework.http.HttpStatus;
import org.springframework.web.bind.annotation.ResponseStatus;

@ResponseStatus(value = HttpStatus.FORBIDDEN,reason = "用户数量大多")
public class UserTooManyException extends RuntimeException{
    public UserTooManyException(){

    }

    public UserTooManyException(String message){
        super(message);
    }
}
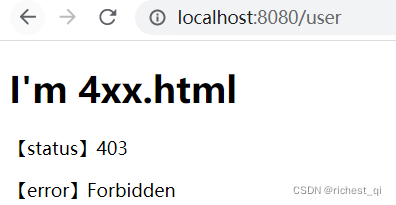
resources.templates.error下新建错误视图文件:4xx.html,如下。
<!DOCTYPE html>
<html lang="en" xmlns:th="http://www.thymeleaf.org">
<head>
  <meta charset="UTF-8">
  <title>4xx</title>
</head>
<body>
<h1>I'm 4xx.html</h1>
<p>【status】<span th:text="${status}"></span></p>
<p>【error】<span th:text="${error}"></span></p>
</body>
</html>
com.example.boot.controller.IndexController中添加一个新接口:/user,访问该接口时将抛出自定义异常UserTooManyException,如下。
@GetMapping("/user")
public String user(){
    String[] users = {"zhangsan","lisi","wangwu","zhaoliu"};
    if(users.length>3){
        throw new UserTooManyException();
    }
    return "success";
}
重启应用,访问接口/user。
通过调试源码来理解是怎么处理自定义异常的。
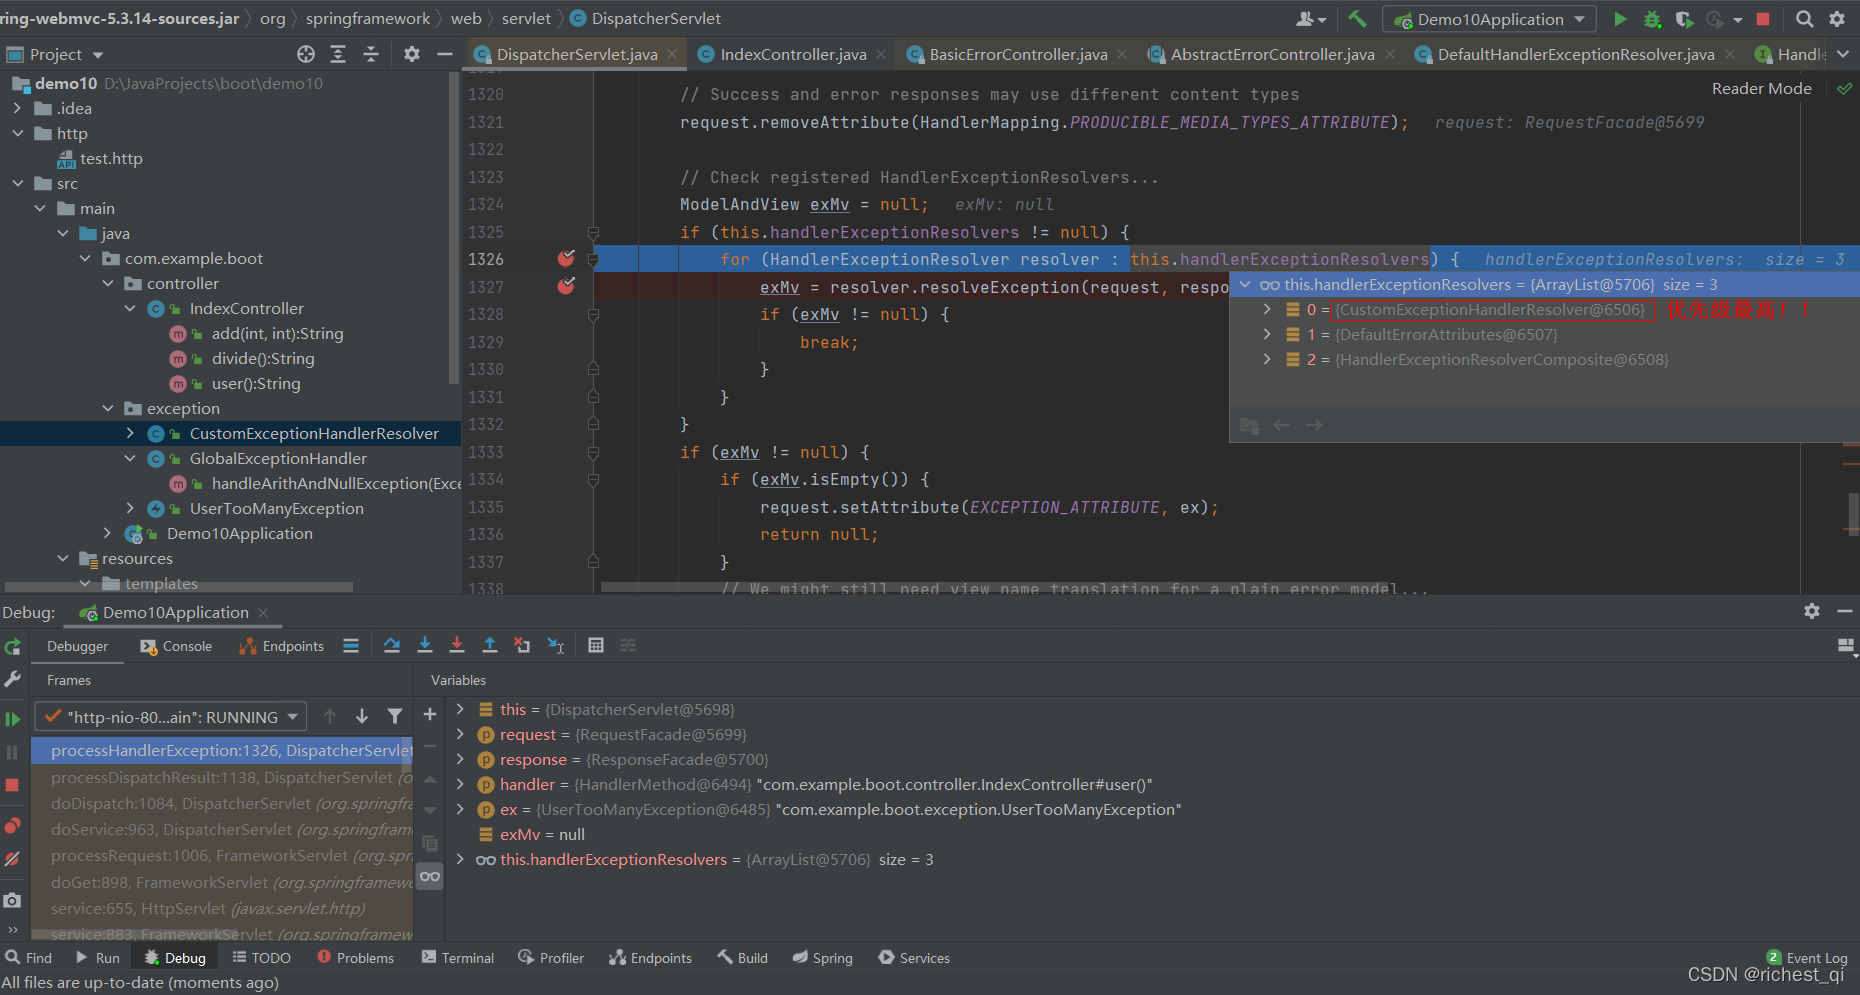
- DispatcherServlet#doDispatch,同上。
- DispatcherServlet#processDispatchResult,同上。
- DispatcherServlet#processHandlerException,同上。
- HandlerExceptionResolverComposite#resolveException,同上。
遍历找到能处理该控制器异常的解析器,找到了ResponseStatusExceptionResolver。 - AbstractHandlerExceptionResolver#resolveException,同上。
- ResponseStatusExceptionResolver#doResolveException
发现@ResponseStatus注解,将获取@ResponseStatus中的信息。
protected ModelAndView doResolveException(
		HttpServletRequest request, HttpServletResponse response, @Nullable Object handler, Exception ex) {
		ResponseStatus status = AnnotatedElementUtils.findMergedAnnotation(ex.getClass(), ResponseStatus.class);
	}
		if (status != null) {
			return resolveResponseStatus(status, request, response, handler, ex);
		}
}
- ResponseStatusExceptionResolver#resolveResponseStatus
protected ModelAndView resolveResponseStatus(ResponseStatus responseStatus, HttpServletRequest request,
		HttpServletResponse response, @Nullable Object handler, Exception ex) throws Exception {

	int statusCode = responseStatus.code().value();
	String reason = responseStatus.reason();
	return applyStatusAndReason(statusCode, reason, response);
}
- ResponseStatusExceptionResolver#applyStatusAndReason
protected ModelAndView applyStatusAndReason(int statusCode, @Nullable String reason, HttpServletResponse response)
		throws IOException {
	String resolvedReason = (this.messageSource != null ?
			this.messageSource.getMessage(reason, null, reason, LocaleContextHolder.getLocale()) :
			reason);
	response.sendError(statusCode, resolvedReason);
	return new ModelAndView();
}
获取@ResponseStatus注解的信息后,调用response.sendError(statusCode, resolvedReason),底层将发送/error请求。
自定义HandlerExceptionResolver
自定义异常解析器(HandlerExceptionResolver),实现HandlerExceptionResolver接口即可。
在com.example.boot.exception下新建CustomHandlerExceptionResolver,如下:
package com.example.boot.exception;

import org.springframework.core.Ordered;
import org.springframework.core.annotation.Order;
import org.springframework.stereotype.Component;
import org.springframework.web.servlet.HandlerExceptionResolver;
import org.springframework.web.servlet.ModelAndView;

import javax.servlet.http.HttpServletRequest;
import javax.servlet.http.HttpServletResponse;
import java.io.IOException;

@Order(value = Ordered.HIGHEST_PRECEDENCE)
@Component
public class CustomExceptionHandlerResolver implements HandlerExceptionResolver {
    @Override
    public ModelAndView resolveException(HttpServletRequest request, HttpServletResponse response, Object handler, Exception ex) {
        try {
            response.sendError(555,"其他异常");
        } catch (IOException e) {
            e.printStackTrace();
        }
        return new ModelAndView();
    }
}
@Component,将自定义的异常解析器CustomHandlerExceptionResolver放入容器。
@Order(value = Ordered.HIGHEST_PRECEDENCE),将自定义的异常解析器CustomHandlerExceptionResolver优先级置为最高,所以它将优先处理异常。
启动应用,访问接口:/user,响应如下:
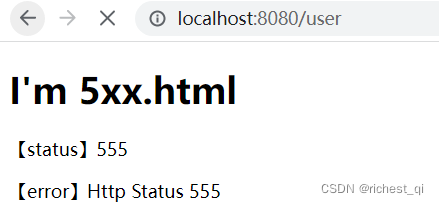


 553
553

 被折叠的 条评论
为什么被折叠?
被折叠的 条评论
为什么被折叠?
 到【灌水乐园】发言


