


1. 描述
- 是一个单行文本编辑器
- 允许用户输入和编辑单行纯文本
- 自带一组编辑功能(撤销、重做、剪切、粘贴、拖放)
2. 继承
QWidget
3. 功能作用
3.1 控件的创建
QLineEdit(parent: QWidget=None)
QLineEdit(str, parent: QWidget=None)
3.2 文本设置和获取
3.2.1 API
| API | 功能 | 备注 | ||||||
|---|---|---|---|---|---|---|---|---|
|
|
|
| ||||||
|
|
|
| ||||||
|
|
|
| ||||||
|
|
|
| ||||||
3.2.2 应用场景
通过代码来控制输入文本内容
3.2.3 案例
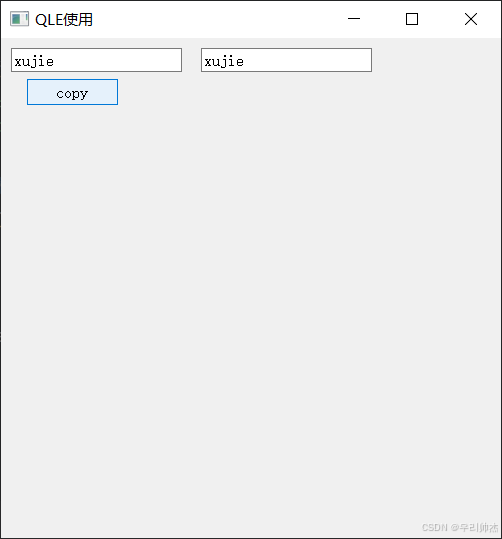
创建一个窗口,添加两个文本框和一个按钮
要求:点击按钮后,将文本框A中的内容复制到文本框B中
from PyQt5.Qt import *

import sys

if __name__ == '__main__':
    app = QApplication(sys.argv)
    w = QWidget()
    w.setWindowTitle('QLE使用')
    w.resize(500,500)

    # 创建文本框和一个按钮
    qle1 = QLineEdit(w)
    qle1.move(10, 10)
    qle2 = QLineEdit(w)
    qle2.move(200, 10)
    btn = QPushButton(w)
    btn.move(25, 40)


    # 文本框1设置文本内容
    qle1.setText('xujie')
    btn.setText('copy')

    # 点击按钮,将文本框1的内容复制给文本框2
    btn.clicked.connect(lambda x: qle2.setText(qle1.text()))


    w.show()
    sys.exit(app.exec_())
3.3 输出模式
3.3.1 API
| API | 功能 | 备注 | ||||||
|---|---|---|---|---|---|---|---|---|
|
|
|
②QLineEdit.NormalEcho=1:正常输出 ③QLineEdit.Password=2:密文形式 ④QLineEdit.PasswordEchoOnEdit=3:编辑时明文,结束后密文 | ||||||
|
|
|
| ||||||
3.3.2 应用场景
设置输出模式,来适应不同的应用场景
3.3.3 案例
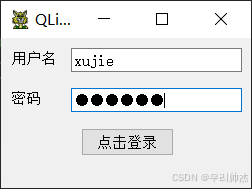
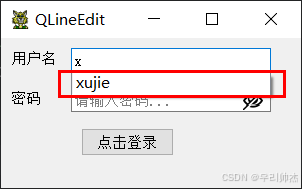
模拟用户登录案例
创建一个窗口,添加两个文本框和一个按钮
要求
- 一个用作账号
- 另一个用作密码
- 点击登录后,获取账号和密码信息
- 进行比对账号密码信息
- 正确账号:xujie
- 正确密码:123456
- 如果账号错误,则清空账号和密码
- 如果仅密码错误,则仅清空密码框
from PyQt5.Qt import *

import sys

class MyWindow(QWidget):
    def __init__(self):
        super().__init__()
        self.initUI()

    def initUI(self):
        """控件调用方法"""
        # 用户名输入框
        self.label1 = QLabel(self)
        self.edit_1 = QLineEdit(self)
        self.label1.setText('用户名')
        self.label1.move(10, 13)
        self.edit_1.move(70, 10)

        # 密码输入框
        self.label2 = QLabel(self)
        self.edit_2 = QLineEdit(self)
        self.label2.setText('密码')
        self.label2.move(10, 53)
        self.edit_2.move(70, 50)
        self.edit_2.setEchoMode(QLineEdit.Password)

        # 按钮控件
        self.button = QPushButton(self)
        self.button.setText('点击登录')
        self.button.move(80, 90)

        # 动作信号
        self.button.clicked.connect(self.get_command)

    def get_command(self):
        """按钮点击槽函数"""
        name = self.edit_1.text()
        passwd = self.edit_2.text()
        rel_name = 'xujie'
        rel_passwd = '123456'
        if name == rel_name and str(passwd) == str(rel_passwd):
            print('登录成功!!!')
        elif name != rel_name:
            self.edit_1.clear()
            self.edit_2.clear()
        elif str(passwd) != str(rel_passwd):
            self.edit_2.clear()

if __name__ == '__main__':
    app = QApplication(sys.argv)
    window = MyWindow()
    window.setWindowTitle('QLineEdit')
    window.setWindowIcon(QIcon('cats1.ico'))
    window.resize(250, 150)
    window.show()
    sys.exit(app.exec_())
3.4 占位提示字符串
3.4.1 API
| API | 功能 | 备注 | ||||||
|---|---|---|---|---|---|---|---|---|
|
|
|
| ||||||
|
|
|
| ||||||
3.4.2 应用场景
- 在用户输入文本内容之前,给用户提示语句
- 文本框内容:空:显示提示文本;不空:隐藏提示文本
3.4.3 案例
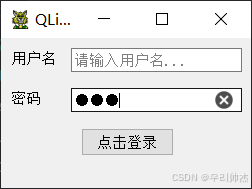
完善3.3案例,增加占位提示文本
from PyQt5.Qt import *

import sys

class MyWindow(QWidget):
    def __init__(self):
        super().__init__()
        self.initUI()

    def initUI(self):
        """控件调用方法"""
        # 用户名输入框
        self.label1 = QLabel(self)
        self.edit_1 = QLineEdit(self)
        self.label1.setText('用户名')
        self.label1.move(10, 13)
        self.edit_1.move(70, 10)
        self.edit_1.setPlaceholderText('请输入用户名...')

        # 密码输入框
        self.label2 = QLabel(self)
        self.edit_2 = QLineEdit(self)
        self.label2.setText('密码')
        self.label2.move(10, 53)
        self.edit_2.move(70, 50)
        self.edit_2.setEchoMode(QLineEdit.Password)
        self.edit_2.setPlaceholderText('请输入密码...')

        # 按钮控件
        self.button = QPushButton(self)
        self.button.setText('点击登录')
        self.button.move(80, 90)

        # 动作信号
        self.button.clicked.connect(self.get_command)

    def get_command(self):
        """按钮点击槽函数"""
        name = self.edit_1.text()
        passwd = self.edit_2.text()
        rel_name = 'xujie'
        rel_passwd = '123456'
        if name == rel_name and str(passwd) == str(rel_passwd):
            print('登录成功!!!')
        elif name != rel_name:
            self.edit_1.clear()
            self.edit_2.clear()
        elif str(passwd) != str(rel_passwd):
            self.edit_2.clear()

if __name__ == '__main__':
    app = QApplication(sys.argv)
    window = MyWindow()
    window.setWindowTitle('QLineEdit')
    window.setWindowIcon(QIcon('cats1.ico'))
    window.resize(250, 150)
    window.show()
    sys.exit(app.exec_())

3.5 清空按钮提示
3.5.1 API
| API | 功能 | 备注 | ||||||
|---|---|---|---|---|---|---|---|---|
|
|
|
| ||||||
|
|
|
| ||||||
3.5.2 应用场景
用作快速清空文本框内容
3.5.3 案例
完善3.3.3案例,为密码文本框加上清空按钮
from PyQt5.Qt import *

import sys

class MyWindow(QWidget):
    def __init__(self):
        super().__init__()
        self.initUI()

    def initUI(self):
        """控件调用方法"""
        # 用户名输入框
        self.label1 = QLabel(self)
        self.edit_1 = QLineEdit(self)
        self.label1.setText('用户名')
        self.label1.move(10, 13)
        self.edit_1.move(70, 10)
        self.edit_1.setPlaceholderText('请输入用户名...')

        # 密码输入框
        self.label2 = QLabel(self)
        self.edit_2 = QLineEdit(self)
        self.label2.setText('密码')
        self.label2.move(10, 53)
        self.edit_2.move(70, 50)
        self.edit_2.setEchoMode(QLineEdit.Password)
        self.edit_2.setPlaceholderText('请输入密码...')
        self.edit_2.setClearButtonEnabled(True)

        # 按钮控件
        self.button = QPushButton(self)
        self.button.setText('点击登录')
        self.button.move(80, 90)

        # 动作信号
        self.button.clicked.connect(self.get_command)

    def get_command(self):
        """按钮点击槽函数"""
        name = self.edit_1.text()
        passwd = self.edit_2.text()
        rel_name = 'xujie'
        rel_passwd = '123456'
        if name == rel_name and str(passwd) == str(rel_passwd):
            print('登录成功!!!')
        elif name != rel_name:
            self.edit_1.clear()
            self.edit_2.clear()
        elif str(passwd) != str(rel_passwd):
            self.edit_2.clear()

if __name__ == '__main__':
    app = QApplication(sys.argv)
    window = MyWindow()
    window.setWindowTitle('QLineEdit')
    window.setWindowIcon(QIcon('cats1.ico'))
    window.resize(250, 150)
    window.show()
    sys.exit(app.exec_())
3.6 添加操作行为
3.6.1 API
| API | 功能 | 备注 | ||||||
|---|---|---|---|---|---|---|---|---|
|
|
|
| ||||||
|
|
|
| ||||||
3.6.2 应用场景
为文本框添加附加行为操作
3.6.3 案例
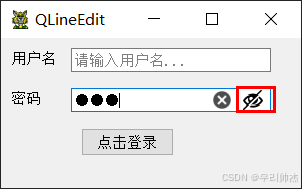
完善3.5.3案例,为密码文本框添加明文和密文切换按钮
from PyQt5.Qt import *

import sys

class MyWindow(QWidget):
    def __init__(self):
        super().__init__()
        self.initUI()

    def initUI(self):
        """控件调用方法"""
        # 用户名输入框
        self.label1 = QLabel(self)
        self.edit_1 = QLineEdit(self)
        self.label1.setText('用户名')
        self.label1.move(10, 13)
        self.edit_1.move(70, 10)
        self.edit_1.resize(200, 24)
        self.edit_1.setPlaceholderText('请输入用户名...')

        # 密码输入框
        self.label2 = QLabel(self)
        self.edit_2 = QLineEdit(self)
        self.label2.setText('密码')
        self.label2.move(10, 53)
        self.edit_2.move(70, 50)
        self.edit_2.resize(200, 24)
        self.edit_2.setEchoMode(QLineEdit.Password)
        self.edit_2.setPlaceholderText('请输入密码...')
        self.edit_2.setClearButtonEnabled(True)

        # 添加密码框明文密文切换按钮,自定义操作
        action = QAction(self.edit_2)
        action.setIcon(QIcon('close_eye.png'))
        def change():
            """改变明文和密文方法"""
            if self.edit_2.echoMode() == QLineEdit.Normal:
                self.edit_2.setEchoMode(QLineEdit.Password)
                action.setIcon(QIcon('close_eye.png'))
            else:
                self.edit_2.setEchoMode(QLineEdit.Normal)
                action.setIcon(QIcon('open_eye.png'))
        action.triggered.connect(change)
        self.edit_2.addAction(action, QLineEdit.TrailingPosition)

        # 按钮控件
        self.button = QPushButton(self)
        self.button.setText('点击登录')
        self.button.move(80, 90)

        # 动作信号
        self.button.clicked.connect(self.get_command)

    def get_command(self):
        """按钮点击槽函数"""
        name = self.edit_1.text()
        passwd = self.edit_2.text()
        rel_name = 'xujie'
        rel_passwd = '123456'
        if name == rel_name and str(passwd) == str(rel_passwd):
            print('登录成功!!!')
        elif name != rel_name:
            self.edit_1.clear()
            self.edit_2.clear()
        elif str(passwd) != str(rel_passwd):
            self.edit_2.clear()


if __name__ == '__main__':
    app = QApplication(sys.argv)
    window = MyWindow()
    window.setWindowTitle('QLineEdit')
    window.setWindowIcon(QIcon('cats1.ico'))
    window.resize(300, 150)
    window.show()
    sys.exit(app.exec_())
3.7 文本自动补全
3.7.1 API
| API | 功能 | 备注 | ||||||
|---|---|---|---|---|---|---|---|---|
|
|
|
| ||||||
|
|
|
| ||||||
3.7.2 应用场景
根据用户已经输入的字符串,快速联想补全
3.7.3 案例
完善3.6.3案例,为账户设置文本框,设置补全候选项
from PyQt5.Qt import *

import sys

class MyWindow(QWidget):
    def __init__(self):
        super().__init__()
        self.initUI()

    def initUI(self):
        """控件调用方法"""
        # 用户名输入框
        self.label1 = QLabel(self)
        self.edit_1 = QLineEdit(self)
        self.label1.setText('用户名')
        self.label1.move(10, 13)
        self.edit_1.move(70, 10)
        self.edit_1.resize(200, 24)
        self.edit_1.setPlaceholderText('请输入用户名...')

        completer = QCompleter(['xujie', 'linfeng', '123456'], self.edit_1)
        self.edit_1.setCompleter(completer)

        # 密码输入框
        self.label2 = QLabel(self)
        self.edit_2 = QLineEdit(self)
        self.label2.setText('密码')
        self.label2.move(10, 53)
        self.edit_2.move(70, 50)
        self.edit_2.resize(200, 24)
        self.edit_2.setEchoMode(QLineEdit.Password)
        self.edit_2.setPlaceholderText('请输入密码...')
        self.edit_2.setClearButtonEnabled(True)

        # 添加密码框明文密文切换按钮,自定义操作
        action = QAction(self.edit_2)
        action.setIcon(QIcon('close_eye.png'))
        def change():
            """改变明文和密文方法"""
            if self.edit_2.echoMode() == QLineEdit.Normal:
                self.edit_2.setEchoMode(QLineEdit.Password)
                action.setIcon(QIcon('close_eye.png'))
            else:
                self.edit_2.setEchoMode(QLineEdit.Normal)
                action.setIcon(QIcon('open_eye.png'))
        action.triggered.connect(change)
        self.edit_2.addAction(action, QLineEdit.TrailingPosition)

        # 按钮控件
        self.button = QPushButton(self)
        self.button.setText('点击登录')
        self.button.move(80, 90)

        # 动作信号
        self.button.clicked.connect(self.get_command)

    def get_command(self):
        """按钮点击槽函数"""
        name = self.edit_1.text()
        passwd = self.edit_2.text()
        rel_name = 'xujie'
        rel_passwd = '123456'
        if name == rel_name and str(passwd) == str(rel_passwd):
            print('登录成功!!!')
        elif name != rel_name:
            self.edit_1.clear()
            self.edit_2.clear()
        elif str(passwd) != str(rel_passwd):
            self.edit_2.clear()


if __name__ == '__main__':
    app = QApplication(sys.argv)
    window = MyWindow()
    window.setWindowTitle('QLineEdit')
    window.setWindowIcon(QIcon('cats1.ico'))
    window.resize(300, 150)
    window.show()
    sys.exit(app.exec_())
3.8 输入限制
3.8.1 API
| API | 功能 | 备注 | ||||||
|---|---|---|---|---|---|---|---|---|
|
|
|
| ||||||
|
|
|
| ||||||
|
|
|
| ||||||
|
|
|
| ||||||
|
|
|
| ||||||
|
|
|
| ||||||
|
|
|
| ||||||
3.8.2 应用场景
限制用户在文本框中输入内容
3.8.3 案例1
完善3.7.3案例,添加内容长度限制
from PyQt5.Qt import *

import sys

class MyWindow(QWidget):
    def __init__(self):
        super().__init__()
        self.initUI()

    def initUI(self):
        """控件调用方法"""
        # 用户名输入框
        self.label1 = QLabel(self)
        self.edit_1 = QLineEdit(self)
        self.label1.setText('用户名')
        self.label1.move(10, 13)
        self.edit_1.move(70, 10)
        self.edit_1.resize(200, 24)
        self.edit_1.setPlaceholderText('请输入用户名...')

        completer = QCompleter(['xujie', 'linfeng', '123456'], self.edit_1)
        self.edit_1.setCompleter(completer)
        # 设置最大长度
        self.edit_1.setMaxLength(10)


        # 密码输入框
        self.label2 = QLabel(self)
        self.edit_2 = QLineEdit(self)
        self.label2.setText('密码')
        self.label2.move(10, 53)
        self.edit_2.move(70, 50)
        self.edit_2.resize(200, 24)
        self.edit_2.setEchoMode(QLineEdit.Password)
        self.edit_2.setPlaceholderText('请输入密码...')
        self.edit_2.setClearButtonEnabled(True)

        # 添加密码框明文密文切换按钮,自定义操作
        action = QAction(self.edit_2)
        action.setIcon(QIcon('close_eye.png'))
        def change():
            """改变明文和密文方法"""
            if self.edit_2.echoMode() == QLineEdit.Normal:
                self.edit_2.setEchoMode(QLineEdit.Password)
                action.setIcon(QIcon('close_eye.png'))
            else:
                self.edit_2.setEchoMode(QLineEdit.Normal)
                action.setIcon(QIcon('open_eye.png'))
        action.triggered.connect(change)
        self.edit_2.addAction(action, QLineEdit.TrailingPosition)

        # 按钮控件
        self.button = QPushButton(self)
        self.button.setText('点击登录')
        self.button.move(80, 90)

        # 动作信号
        self.button.clicked.connect(self.get_command)

    def get_command(self):
        """按钮点击槽函数"""
        name = self.edit_1.text()
        passwd = self.edit_2.text()
        rel_name = 'xujie'
        rel_passwd = '123456'
        if name == rel_name and str(passwd) == str(rel_passwd):
            print('登录成功!!!')
        elif name != rel_name:
            self.edit_1.clear()
            self.edit_2.clear()
        elif str(passwd) != str(rel_passwd):
            self.edit_2.clear()


if __name__ == '__main__':
    app = QApplication(sys.argv)
    window = MyWindow()
    window.setWindowTitle('QLineEdit')
    window.setWindowIcon(QIcon('cats1.ico'))
    window.resize(300, 150)
    window.show()
    sys.exit(app.exec_())
3.9 补充
3.9.1 QValidator
3.9.1.1 描述
3.9.1.1.1 验证器
用于验证用户输入数据的合法性
3.9.1.1.2 如果一个输入框设置了验证器
- 用户在文本框中输入内容时
- 首先会将内容传递给验证器进行验证
| API | 返回值 | 功能 | ||||||
|---|---|---|---|---|---|---|---|---|
|
|
|
| ||||||
|
|
| |||||||
|
|
| |||||||
- 是一个抽象类,使用前需要进行子类化操作
- 自定义子类
- 系统提供子类
| API | 功能 | 备注 |
|---|---|---|
|
|
|
|
|
|
|
|
|
|
|
|
3.9.1.2 基本使用
3.9.1.2.1 第一步
子类化此类
3.9.1.2.2 第二步:实现
| API | 返回值 | 功能 |
|---|---|---|
|
|
|
|
|
|
| |
|
|
|
| API | 返回值 | 功能 |
|---|---|---|
|
|
|
|
3.9.1.3 案例2
创建两个文本框
要求:
- 第一个文本框中添加限制,输入一个整形数字,如果数字范围在18-180之间,则输出该数字;
- 如果小于18或者为其他字符或为空,则输出为18;
- 如果大于180,则输出180;
- 切换到另一个输入框后,程序不报错,并按上三个要求自动填入数据在第一个文本框中
from PyQt5.Qt import *

import sys


class AgeVadidator(QValidator):
    """验证器类"""

    def validate(self, a0, a1):
        # 判断字符串是否以数字组成
        try:
            if 18 <= int(a0) <= 180:
                return QValidator.Acceptable, a0, a1
            elif 1 <= int(a0) <= 17:
                return QValidator.Intermediate, a0, a1
            else:
                return QValidator.Invalid, a0, a1
        except:
            if len(a0) == 0:
                return QValidator.Intermediate, a0, a1
            return QValidator.Invalid, a0, a1


    def fixup(self, a0):
        print(a0)
        try:
            if int(a0) <18:
                return '18'
            else:
                return '180'
        except:
            return '18'

class MyAgeValidator(QIntValidator):
    """数字验证器类"""
    def fixup(self, input):
        try:
            if int(input) < 18:
                return '18'
        except:
            return '18'

class Window(QWidget):
    def __init__(self):
        super().__init__()
        self.setWindowTitle('验证器的使用')
        self.resize(500, 500)
        self.initUI()

    def initUI(self):
        self.le = QLineEdit(self)
        self.le.move(100, 10)

        self.le2 = QLineEdit(self)
        self.le2.move(100, 50)

        # 创建验证器
        # 方式一:自定义验证器子类
        # vadidator = AgeVadidator()
        # 方式二
        vadidator = MyAgeValidator(18, 180)
        self.le.setValidator(vadidator)


if __name__ == '__main__':
    app = QApplication(sys.argv)
    window = Window()

    window.show()
    sys.exit(app.exec_())
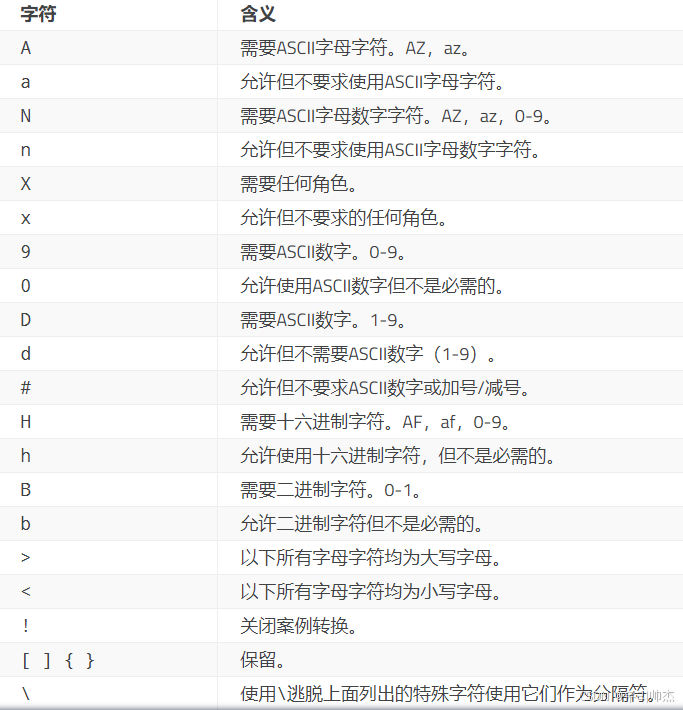
3.9.2 掩码
3.9.2.1 描述
- 掩码可以指定固定位置的固定数据类型,达到一个格式上的限制
- 掩码由一串掩码字符和分隔符组成
- 可选的分号;和空白占位字符
3.9.2.2 举例
- 座机号码:四位区号-七位电话
- IP地址:XXX.XXX.XXX.XXX
3.9.2.3 掩码字符的含义
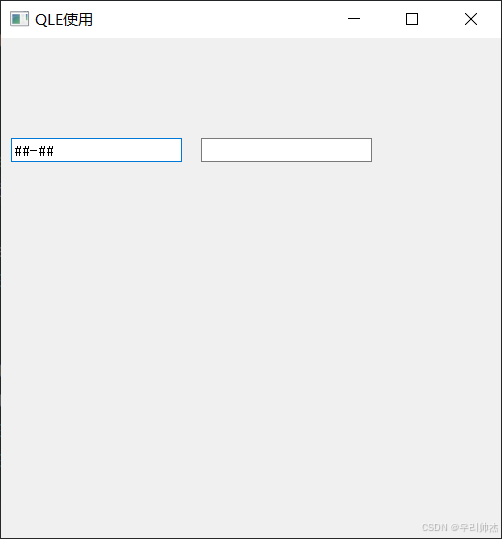
3.9.2.4 案例3
要求:
- 设置掩码总共5位字符,左边2(必须是大写字符) - 右边2(必须是数字)
- 使用#作为占位字符
from PyQt5.Qt import *

import sys

if __name__ == '__main__':
    app = QApplication(sys.argv)
    w = QWidget()
    w.setWindowTitle('QLE使用')
    w.resize(500,500)

    # 创建文本框
    qle = QLineEdit(w)
    qle2 = QLineEdit(w)
    qle.move(10, 100)
    qle2.move(200,100)

    # 设置掩码
    qle.setInputMask('>AA-99;#')

    w.show()
    sys.exit(app.exec_())
3.10 是否被编辑
3.10.1 API
| API | 功能 | 备注 |
|---|---|---|
|
|
|
|
|
|
|
|
3.10.2 应用场景
标识文本是否被修改
3.11 光标控制
3.11.1 API
| API | 功能 | 备注 |
|---|---|---|
|
|
|
mark=False:不带选中效果 |
|
|
|
mark=False:不带选中效果 |
|
|
|
mark=False:不带选中效果 |
|
|
|
mark=False:不带选中效果 |
|
|
|
mark=False:不带选中效果 |
|
|
|
mark=False:不带选中效果 |
|
|
|
|
|
|
|
|
|
|
|
|
3.11.2 应用场景
控制光标,以及文本选择操作
3.11.3 案例
from PyQt5.Qt import *

import sys

if __name__ == '__main__':
    app = QApplication(sys.argv)
    w = QWidget()
    w.setWindowTitle('光标使用')
    w.resize(500,500)

    # 创建文本框
    qle = QLineEdit(w)
    qle.move(10, 100)

    # 创建按钮
    btn = QPushButton(w)
    btn.setText('点我')
    btn.move(50, 130)

    def cursor_move():
        # qle.cursorBackward(True, 2)
        # qle.cursorWordBackward(True)
        qle.home(True)
        qle.setFocus()

    btn.clicked.connect(cursor_move)


    w.show()
    sys.exit(app.exec_())
3.12 文本边距设置
3.12.1 API
| API | 功能 | 备注 |
|---|---|---|
|
|
|
|
|
|
|
|
3.12.2 应用场景
设置文本内容边距
3.12.3 演示
from PyQt5.Qt import *

import sys

if __name__ == '__main__':
    app = QApplication(sys.argv)
    w = QWidget()
    w.setWindowTitle('光标使用')
    w.resize(500,500)

    # 创建文本框
    qle = QLineEdit(w)
    qle.move(10, 50)
    qle.resize(300, 300)
    qle.setContentsMargins(100, 100, 0, 100)
    qle.setStyleSheet('background-color:cyan;')
    # qle.setTextMargins(100, 0, 0, 0)

    # 创建按钮
    btn = QPushButton(w)
    btn.setText('点我')
    btn.move(10, 10)

    w.show()
    sys.exit(app.exec_())
3.13 对齐方式
3.13.1 API
| API | 功能 | 备注 |
|---|---|---|
|
|
|
|
|
|
|
|
3.13.2 Qt.Alignment参数
| 方式 | 参数 | 解释 |
|---|---|---|
|
|
|
|
|
|
| |
|
|
| |
|
|
| |
|
|
|
|
|
|
| |
|
|
| |
|
|
| |
|
|
|
|
3.13.3 应用场景
设置用户内容文本对齐方式
3.14 常用编辑功能
3.14.1 API
| API | 功能 | 备注 |
|---|---|---|
|
|
|
|
|
|
|
|
|
|
|
|
|
|
|
|
|
|
|
|
|
|
|
|
|
|
|
|
|
|
|
|
|
|
|
|
3.14.2 应用场景
编辑用户输入文本
3.15 文本选中
| API | 功能 |
|---|---|
|
|
|
|
|
|
|
|
|
|
|
|
|
|
|
|
|
|
|
|
|
|
|
|
4. 信号
| API | 功能 | 备注 |
|---|---|---|
|
|
|
|
|
|
|
|
|
|
|
|
|
|
|
|
|
|
|
|
|
|
|
|


 291
291

 被折叠的 条评论
为什么被折叠?
被折叠的 条评论
为什么被折叠?
 到【灌水乐园】发言


