


 本文详细介绍如何使用IDEA创建并配置Spring Boot项目,包括解决常见的依赖问题及手动导入jar包的方法。此外还介绍了基本的项目结构和启动流程。
1用idea创建一个maven项目
建好的项目没有src文件夹,自己建,注意java文件夹和resour的颜色


配置maven的pom.xml,引入springboot 的包
奇怪的是开始都是红字报错,然后idea右下角弹出框框 点击enable…,过一会就不报错了,可能去网上下载jar包了,但是我本地仓库有这些包啊。。。
<?xml version="1.0" encoding="UTF-8"?>

<!-- $Id: pom.xml 642118 2008-03-28 08:04:16Z reinhard $ -->
<project xmlns="http://maven.apache.org/POM/4.0.0" xmlns:xsi="http://www.w3.org/2001/XMLSchema-instance" xsi:schemaLocation="http://maven.apache.org/POM/4.0.0 http://maven.apache.org/maven-v4_0_0.xsd">

  <modelVersion>4.0.0</modelVersion>
  <packaging>war</packaging>

  <name>allformm</name>
  <groupId>org.example</groupId>
  <artifactId>allformm</artifactId>
  <version>1.0-SNAPSHOT</version>

  <build>
    <plugins>
      <plugin>
        <groupId>org.mortbay.jetty</groupId>
        <artifactId>maven-jetty-plugin</artifactId>
        <version>6.1.7</version>
        <configuration>
          <connectors>
            <connector implementation="org.mortbay.jetty.nio.SelectChannelConnector">
              <port>8888</port>
              <maxIdleTime>30000</maxIdleTime>
            </connector>
          </connectors>
          <webAppSourceDirectory>${project.build.directory}/${pom.artifactId}-${pom.version}</webAppSourceDirectory>
          <contextPath>/</contextPath>
        </configuration>
      </plugin>
    </plugins>
  </build>
  <parent>
    <groupId>org.springframework.boot</groupId>
    <artifactId>spring-boot-starter-parent</artifactId>
    <version>1.5.9.RELEASE</version>

    <!-- lookup parent from repository -->
  </parent>
  <dependencies>
    <!--dependency>
      <groupId>org.example</groupId>
      <artifactId>[the artifact id of the block to be mounted]</artifactId>
      <version>1.0-SNAPSHOT</version>
    </dependency-->
    <dependency>
      <groupId>org.springframework.boot</groupId>
      <artifactId>spring-boot-starter-test</artifactId>

    </dependency>
  </dependencies>

</project>
这样弄完后,@controller 需要的依赖如下,又报错了,这回怎么下载都没用了,
org.springframework.boot
spring-boot-starter-web
结局方法:
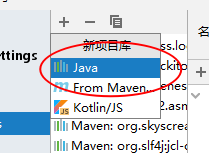
因为我的本地maven仓库里有 spring-boot-starter-web这个包,所以就干脆不用maven下载,直接手动导入
手动导入方法
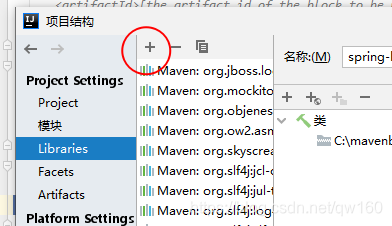
右键项目–模块设置(moudle setting)–点击加号–点击java–选择想加的jar包–选择jardictionary
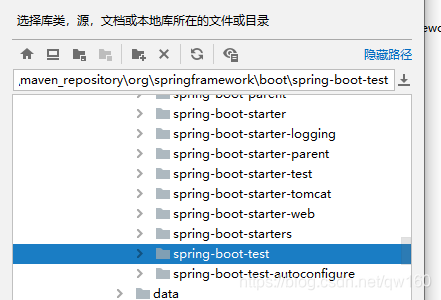

手动导入结束后点击红线 import就行了
上面是弄jar包的部分,以下是写spring boot
项目机构

控制器 hellocontroller,接收浏览器发出的hello请求
package com.allformm.contorller;

import org.springframework.stereotype.Controller;
import org.springframework.web.bind.annotation.RequestMapping;
import org.springframework.web.bind.annotation.ResponseBody;

@Controller
public class helloconcoller {
    @ResponseBody
    @RequestMapping("/hello")
    public String hello(){
        return "hello world";
    }

}
helloworldmian 主程序(),
@SpringBootApplication//说明这是一i个springboot应用
package com.allformm;

import org.springframework.boot.SpringApplication;
import org.springframework.boot.autoconfigure.SpringBootApplication;

@SpringBootApplication//说明这是一i个springboot应用

public class helloworldmain {
    public static void main(String[] args) {
        SpringApplication.run(helloworldmain.class, args);
    }
}
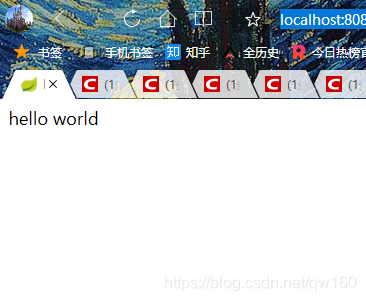
运行
不需要配置tomcar服务,直接点击运行主程序

在浏览器访问
http://localhost:8080/hello


 361
361

 被折叠的 条评论
为什么被折叠?
被折叠的 条评论
为什么被折叠?
 到【灌水乐园】发言


