


 本文介绍如何在高德地图API中使用图标进行点标记,并实现基于不同策略的驾车路线规划,包括最快捷、最经济及最短距离模式。
<!doctype html>
<html>
<head>
    <meta charset="utf-8">
    <meta http-equiv="X-UA-Compatible" content="IE=edge">
    <meta name="viewport" content="initial-scale=1.0, user-scalable=no, width=device-width">
    <link rel="stylesheet" href="https://a.amap.com/jsapi_demos/static/demo-center/css/demo-center.css" />
    <title>图标点标记</title>
    <style>
        * {
            margin: 0;
            padding: 0;
        }
        html,body,#container{
            height:100%;
            width:100%;
        }
    </style>
</head>
<body>
    <div id="container"></div>
    <script src="https://webapi.amap.com/maps?v=1.4.15&key=您的key&plugin=AMap.Driving"></script>

    <script>
    var map = new AMap.Map('container', {
        zoom: 12,
        center: [116.4,39.92],
        resizeEnable: true
    });

    var startIcon = new AMap.Icon({
        // 图标尺寸
        size: new AMap.Size(25, 25),
        // 图标的取图地址
        image: 'tu.png',
        // 图标所用图片大小
        imageSize: new AMap.Size(25, 25),
    });
    /*
    * 驾车策略
    * AMap.DrivingPolicy.LEAST_TIME           最快捷模式
    * AMap.DrivingPolicy.LEAST_FEE            最经济模式
    * AMap.DrivingPolicy.LEAST_DISTANCE       最短距离模式
    * AMap.DrivingPolicy.REAL_TRAFFIC         考虑实时路况
    */
    var drivingOption = {
        policy: AMap.DrivingPolicy.LEAST_TIME, // 其它policy参数请参考 https://lbs.amap.com/api/javascript-api/reference/route-search#m_DrivingPolicy
        ferry: 1, // 是否可以使用轮渡
        map: map,
        hideMarkers: false, // 设置隐藏路径规划的起始点图标
        autoFitView: true
    }

    // 构造路线导航类
    var driving = new AMap.Driving(drivingOption)
    // 根据起终点经纬度规划驾车导航路线
    driving.search(new AMap.LngLat(116.421002, 39.93123), new AMap.LngLat(116.402123, 39.91122), function(status, result) {
      if (status === 'complete') {
        console.log('绘制驾车路线完成')
      } else {
        console.log('获取驾车数据失败:' + result)
      }
    });

    var capitals = [{
        center: [116.42,39.93123],
    }, {
        center: [116.41,39.92132],
    }, {
        center: [116.40,39.91122],
    }];

    var facilities = [];
    for (var i = 0; i < capitals.length; i++) {
        var marker = new AMap.Marker({
            position: new AMap.LngLat(capitals[i].center[0], capitals[i].center[1]),
            offset: new AMap.Pixel(-10, -10),
            icon: startIcon,
        });
        facilities.push(marker);
    }
    map.add(facilities);
    </script>
</body>
</html>
效果图:
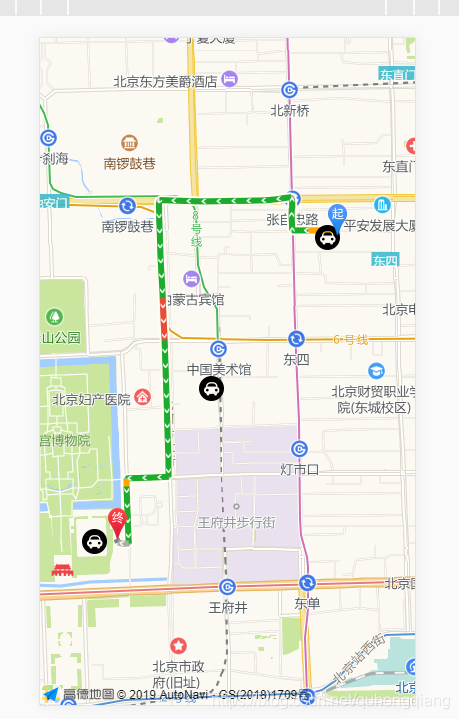
以防自己以后能用到 先写出来。


 2580
2580

 被折叠的 条评论
为什么被折叠?
被折叠的 条评论
为什么被折叠?
 到【灌水乐园】发言


