


目录
一、I2C通信协议简述
I2C(Inter - Integrated Circuit)通信协议是一种简单、双向二线制同步串行总线,用于连接微控制器及其外围设备。
(一)物理层
引脚:I2C总线只使用两条双向信号线,一条是串行数据线(SDA),另一条是串行时钟线(SCL)。SDA用于数据的传输,SCL用于同步通信双方的数据传输速率。
连接方式:多个I2C设备可以连接到同一组SDA和SCL线上。每个设备都有一个唯一的7位或10位地址,这样在总线上可以通过地址来识别不同的设备。例如,在一个简单的嵌入式系统中,一个微控制器可以通过I2C总线连接温度传感器、EEPROM(电可擦除可编程只读存储器)等多个设备。
(二)协议层
起始条件和停止条件
起始条件(START):当SCL为高电平时,SDA从高电平变为低电平,表示一个起始条件,它用于通知总线上的设备通信开始。
停止条件(STOP):当SCL为高电平时,SDA从低电平变为高电平,表示一个停止条件,用于结束一次通信过程。
数据传输格式
字节传输:I2C总线上每次传输的数据以字节(8位)为单位。在传输每个字节时,先传输最高位(MSB),后传输最低位(LSB)。
应答信号(ACK)/非应答信号(NACK)**:在每发送完一个字节后,接收方需要发送一个应答信号。接收方在第9个时钟脉冲期间将SDA拉低,表示应答(ACK);如果接收方不拉低SDA(保持高电平),则表示非应答(NACK)。例如,当主设备向从设备读取数据,而从设备已经没有更多的数据发送时,从设备会发送NACK。
通信模式
主从模式:I2C通信通常采用主从模式。主设备控制着总线的时钟信号,并且发起通信,它产生起始条件和停止条件,还负责生成SCL时钟信号来同步数据传输。从设备则根据主设备的请求做出响应,例如接收或发送数据。例如,微控制器作为主设备,它可以向I2C接口的EEPROM从设备写入数据或者读取数据。
(三)传输速度
I2C协议支持不同的传输速度,标准模式下传输速率可达100 kbps,快速模式下可达400 kbps,高速模式下可达3.4 Mbps。传输速度的选择可以根据具体的应用场景和连接设备的要求来确定。例如,对于一些对速度要求不高的传感器数据采集应用,标准模式可能就足够了;而对于需要快速存储大量数据的应用,可能就需要使用高速模式与EEPROM等设备进行通信。
二、AHT20温度采集
(一)CUBE配置
首先新建一个CUBEMX工程并找到我们的STM32F103C8T6最小系统开发板,选中后进入配置页面。
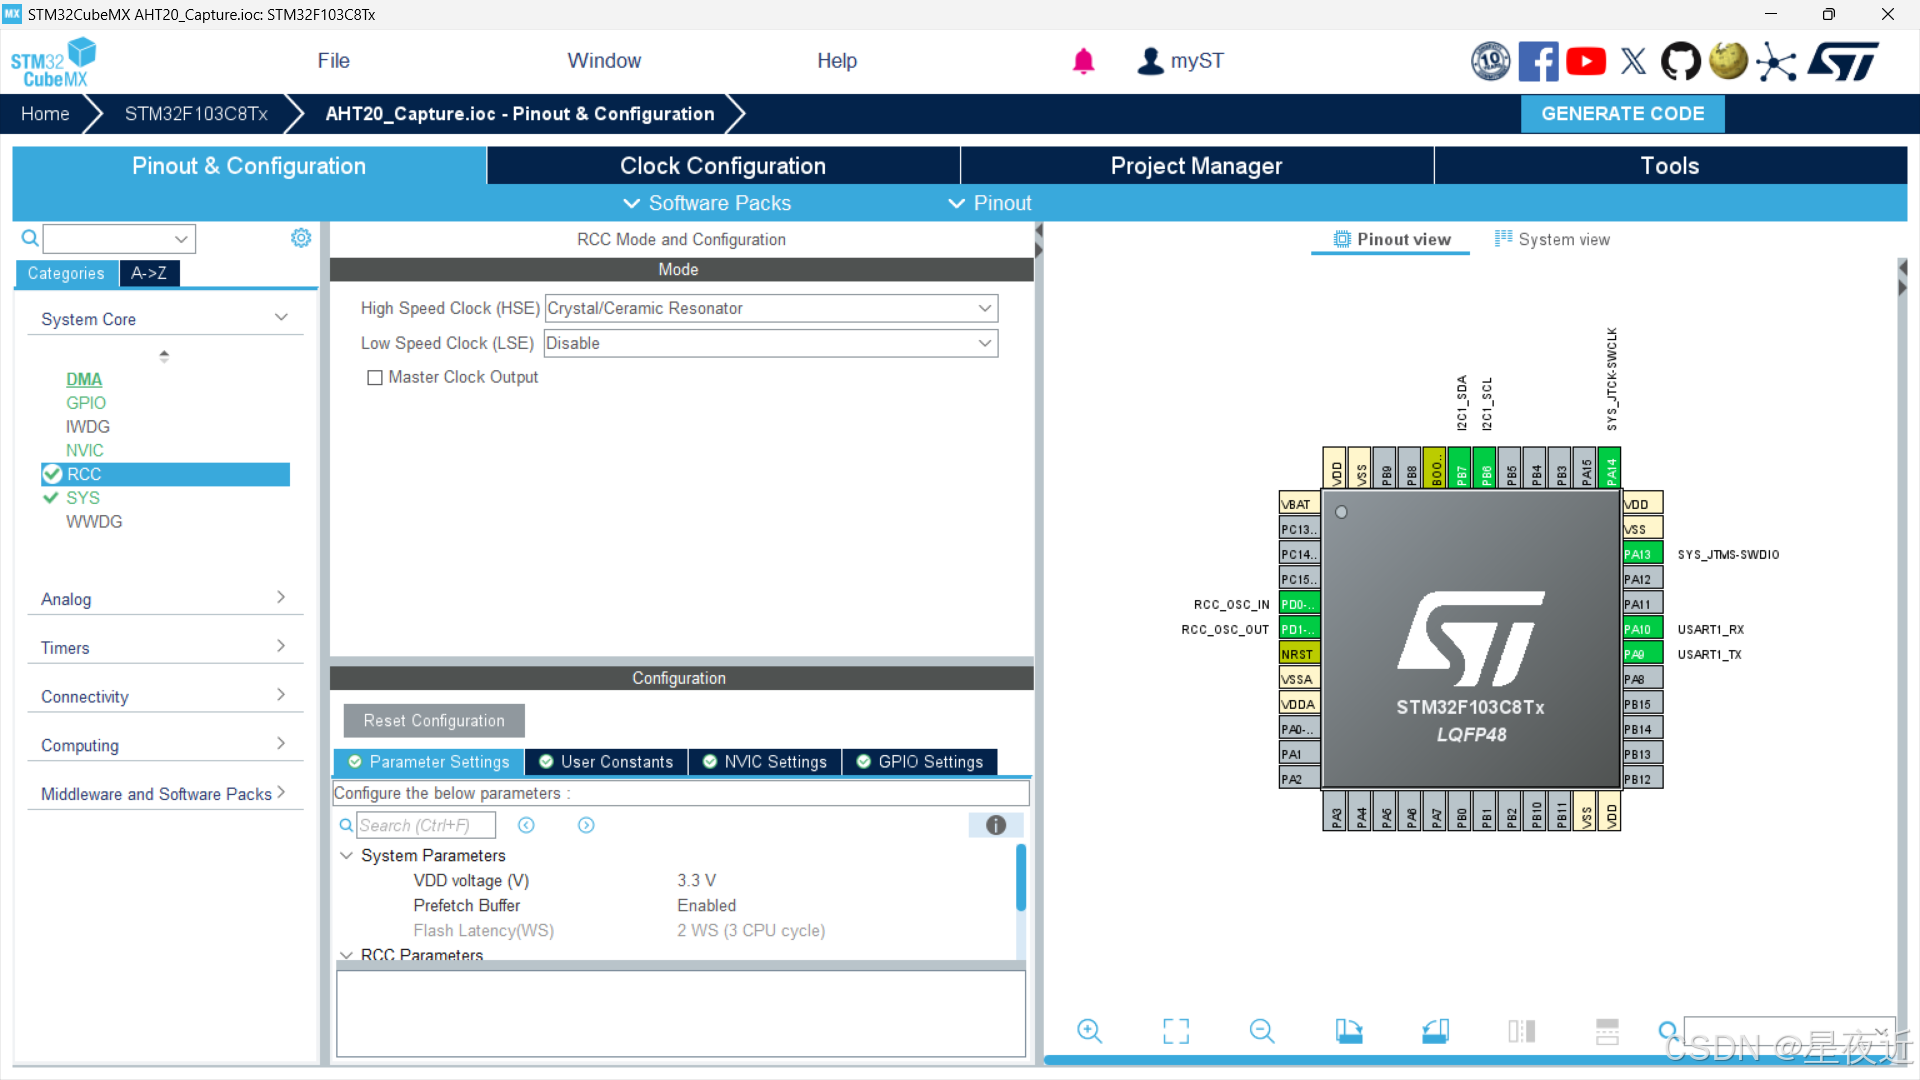
首先配置我们的RCC为高速外部晶振
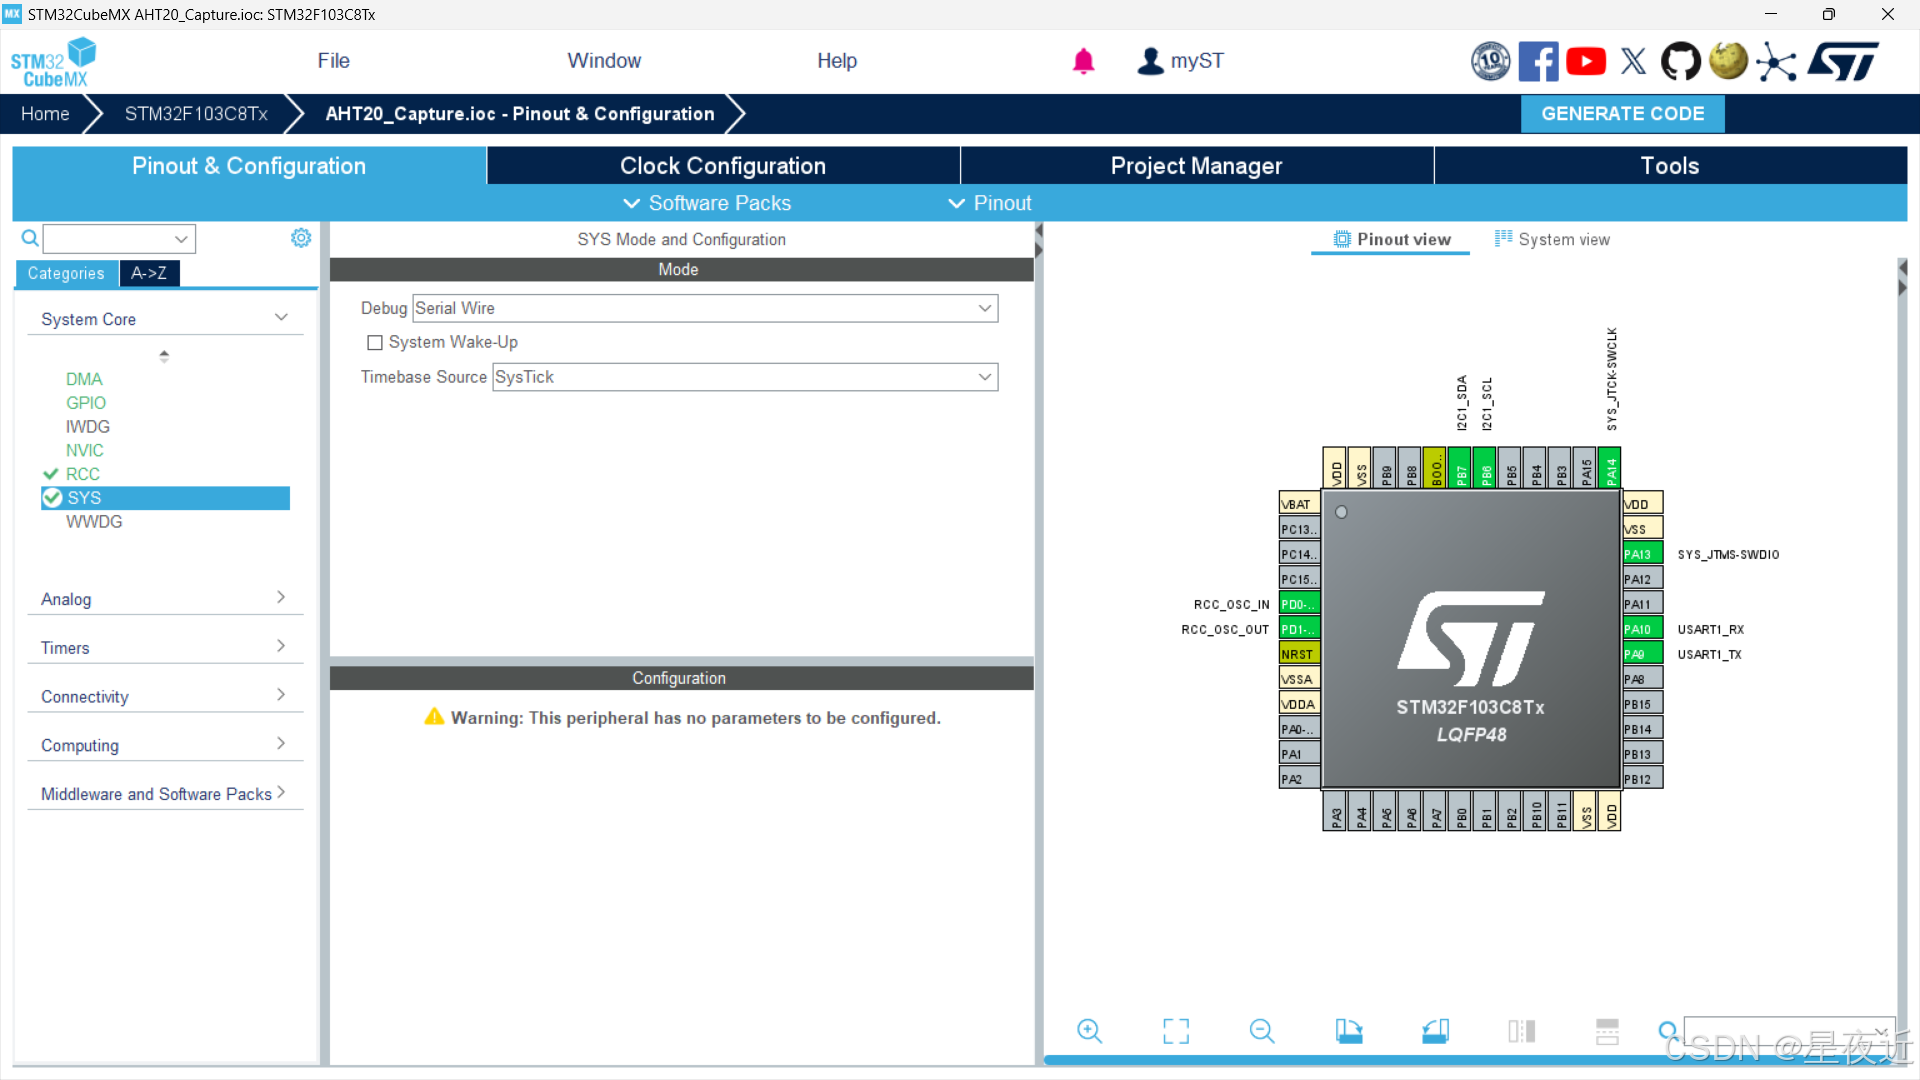
然后配置我们的SYS为serial wire,具体选项根据自己的烧录器进行选择,因为我是用STLink烧录所以选择这个,如果采用的JLINK烧录的话就选用JTAG,然后根据自己烧录器的引脚来选择4 Pin或者5 Pin。
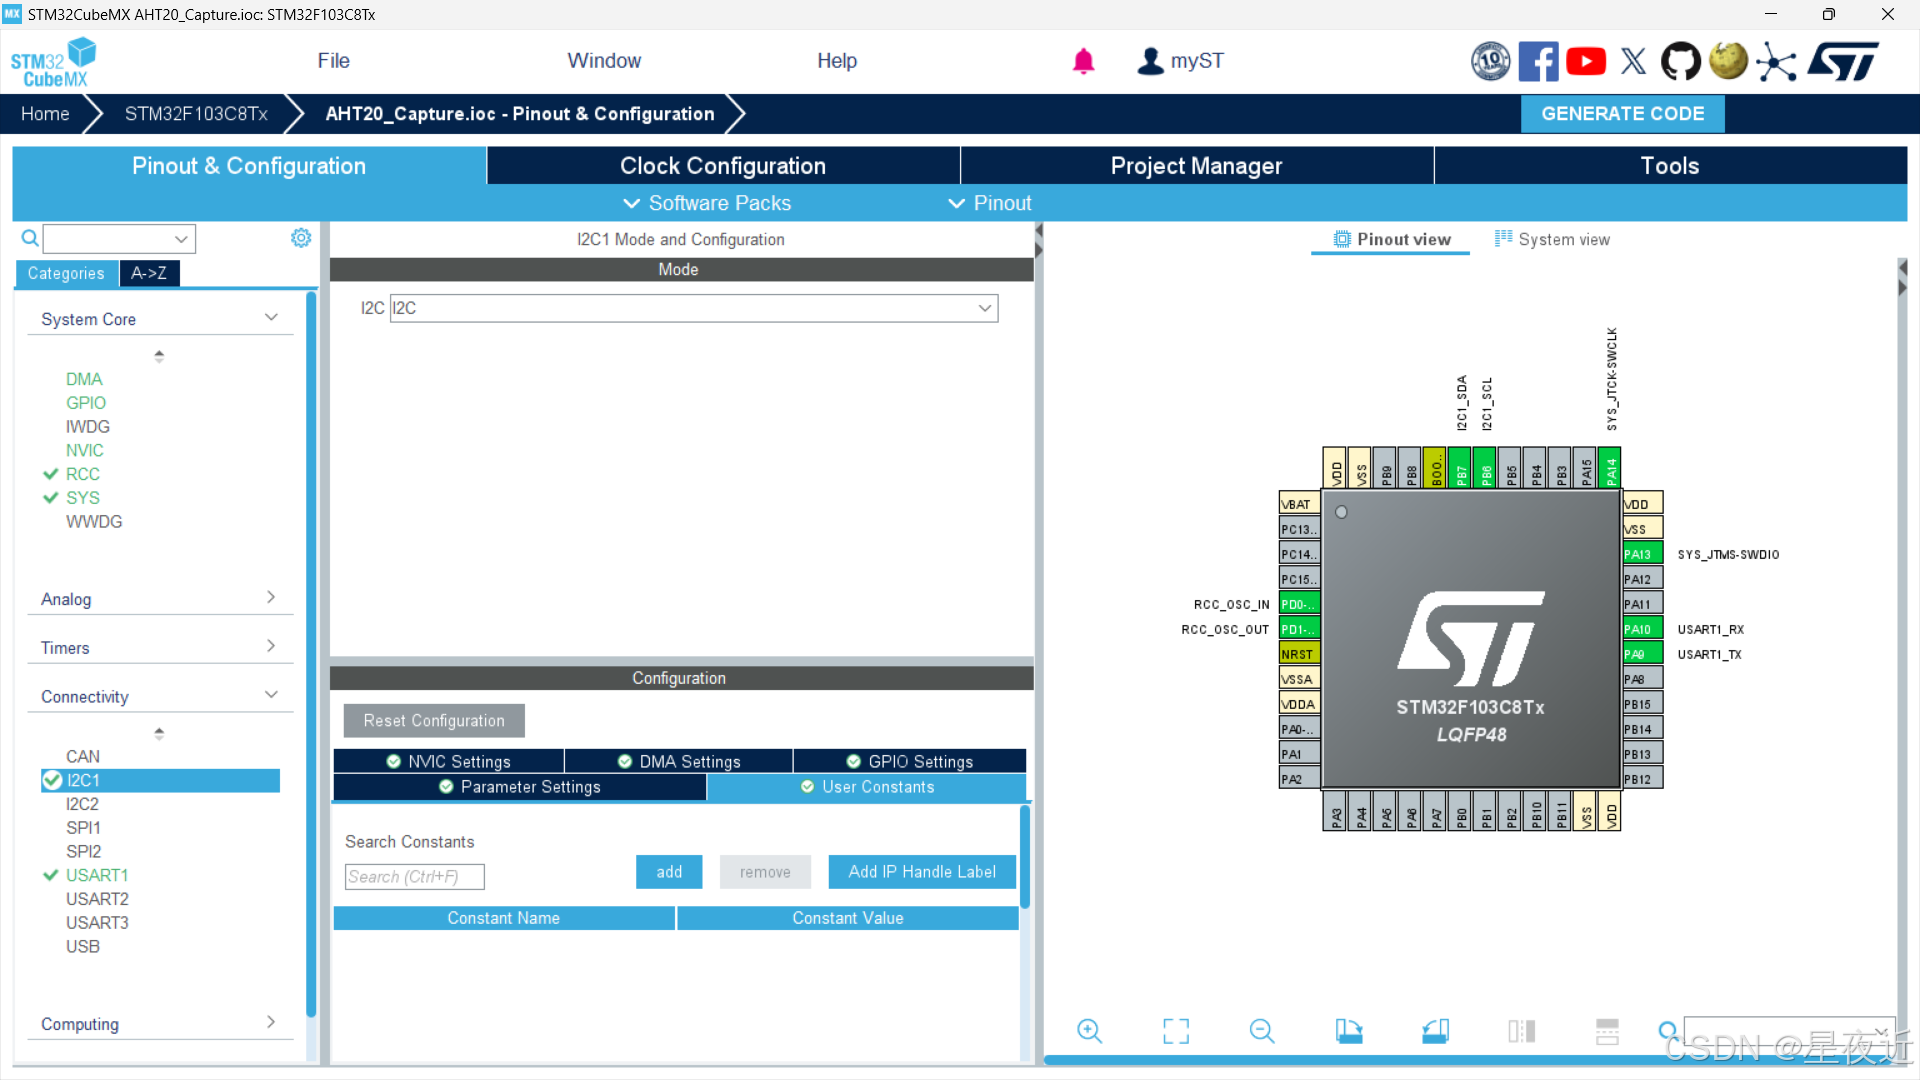
 接下来配置我们的I2C,选择I2C1作为我们的AHT20数据采集的串口,只需打开就行,其他的就按照默认配置来就行。
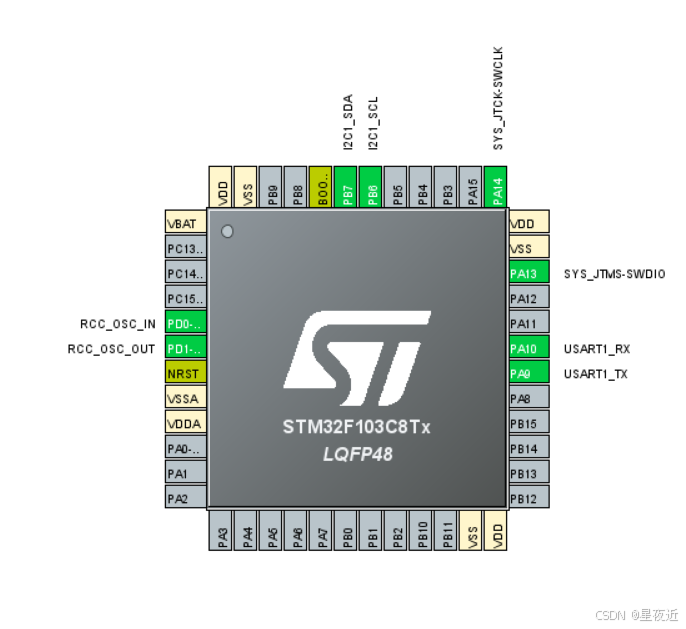
因为我们要使用串口来答应我们的采集到的数据,所以我们还需要配置串口。选择USART1来作为我们输出数据的串口。

配置完后查看我们右边芯片的引脚,可以观测到配置的引脚变绿。
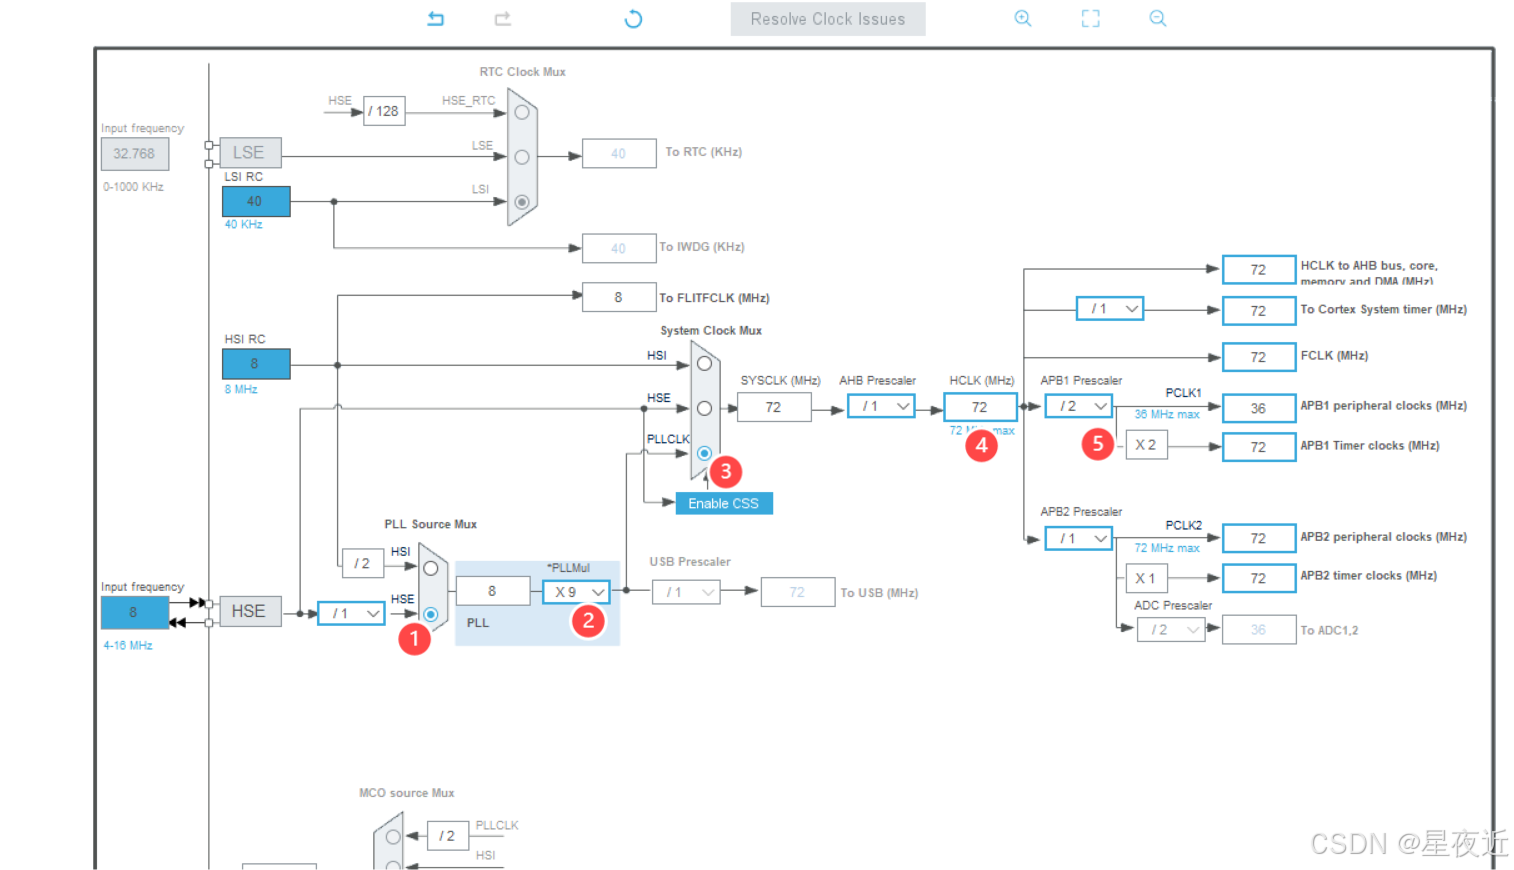
 接下来配置我们的系统时钟树,按照下图配置就行。
接下来配置我们的项目,按照下图红框中的标注进行配置就行。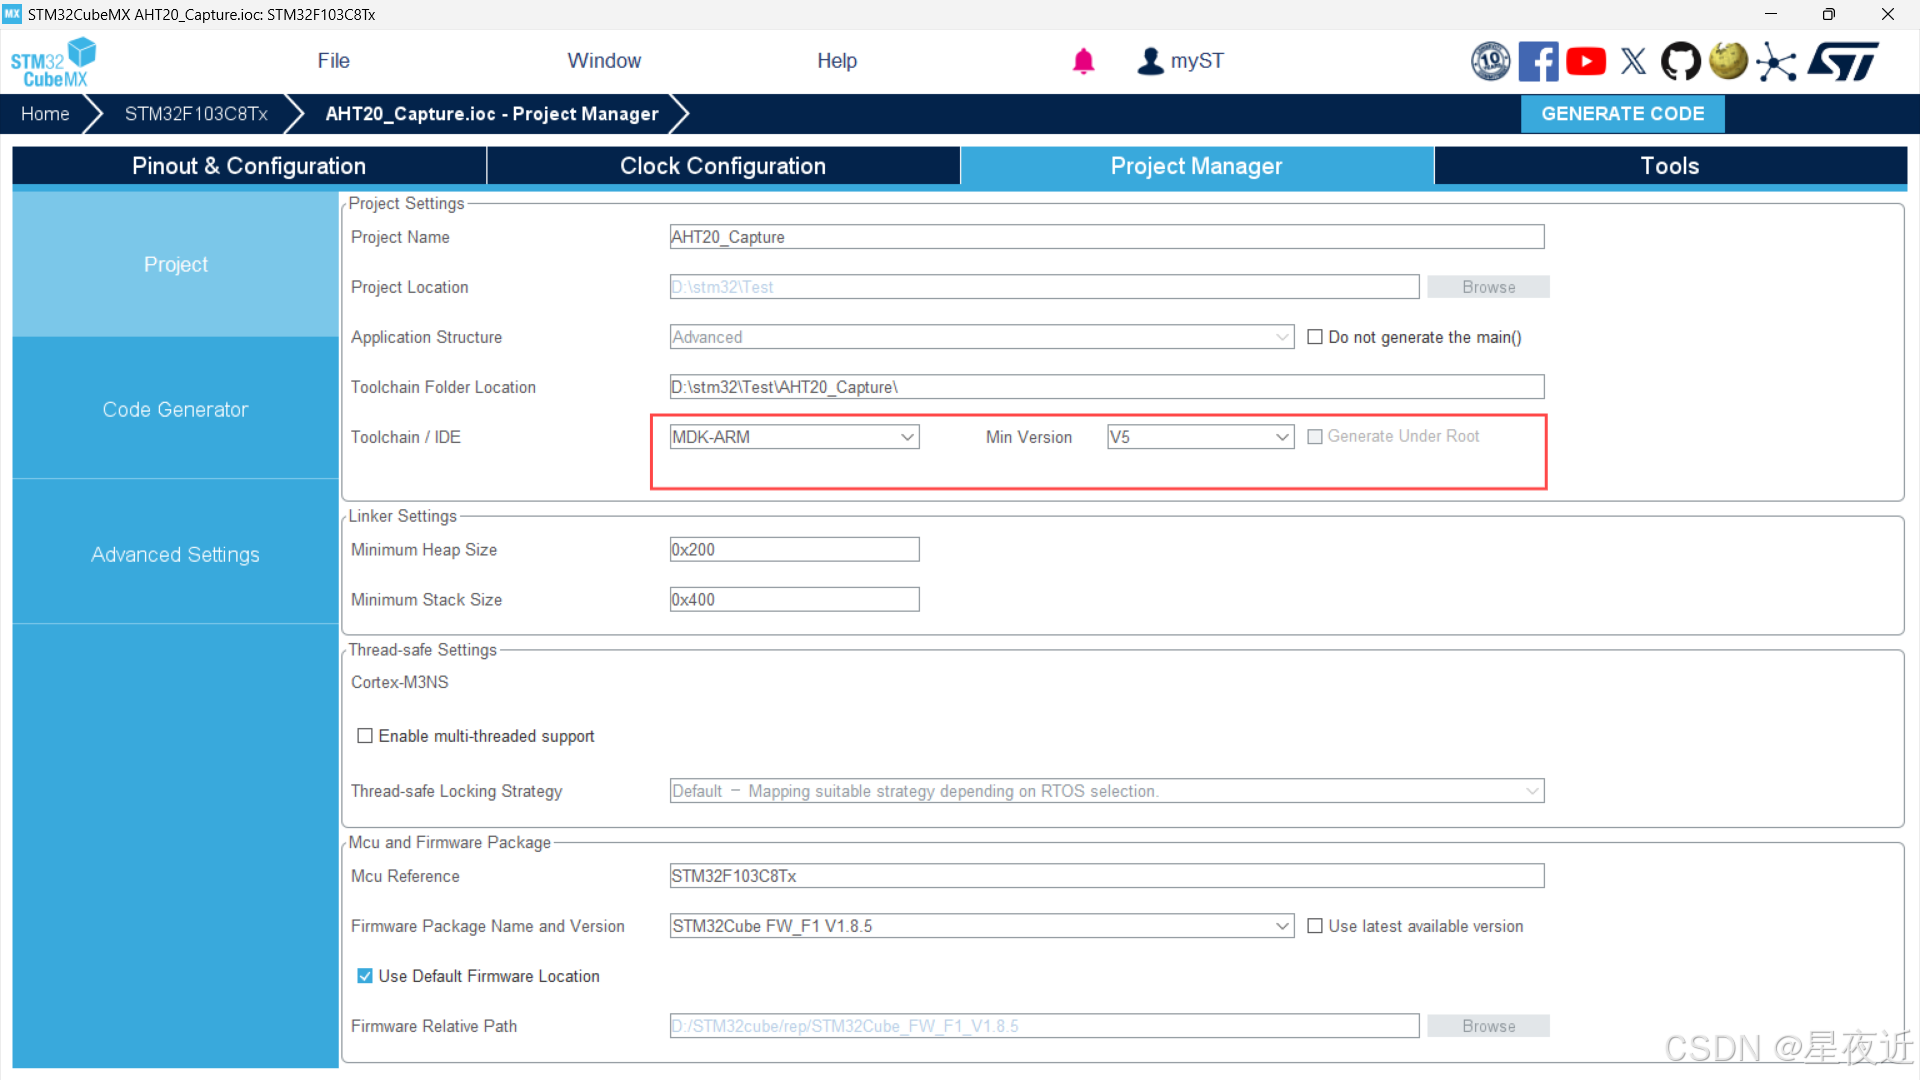
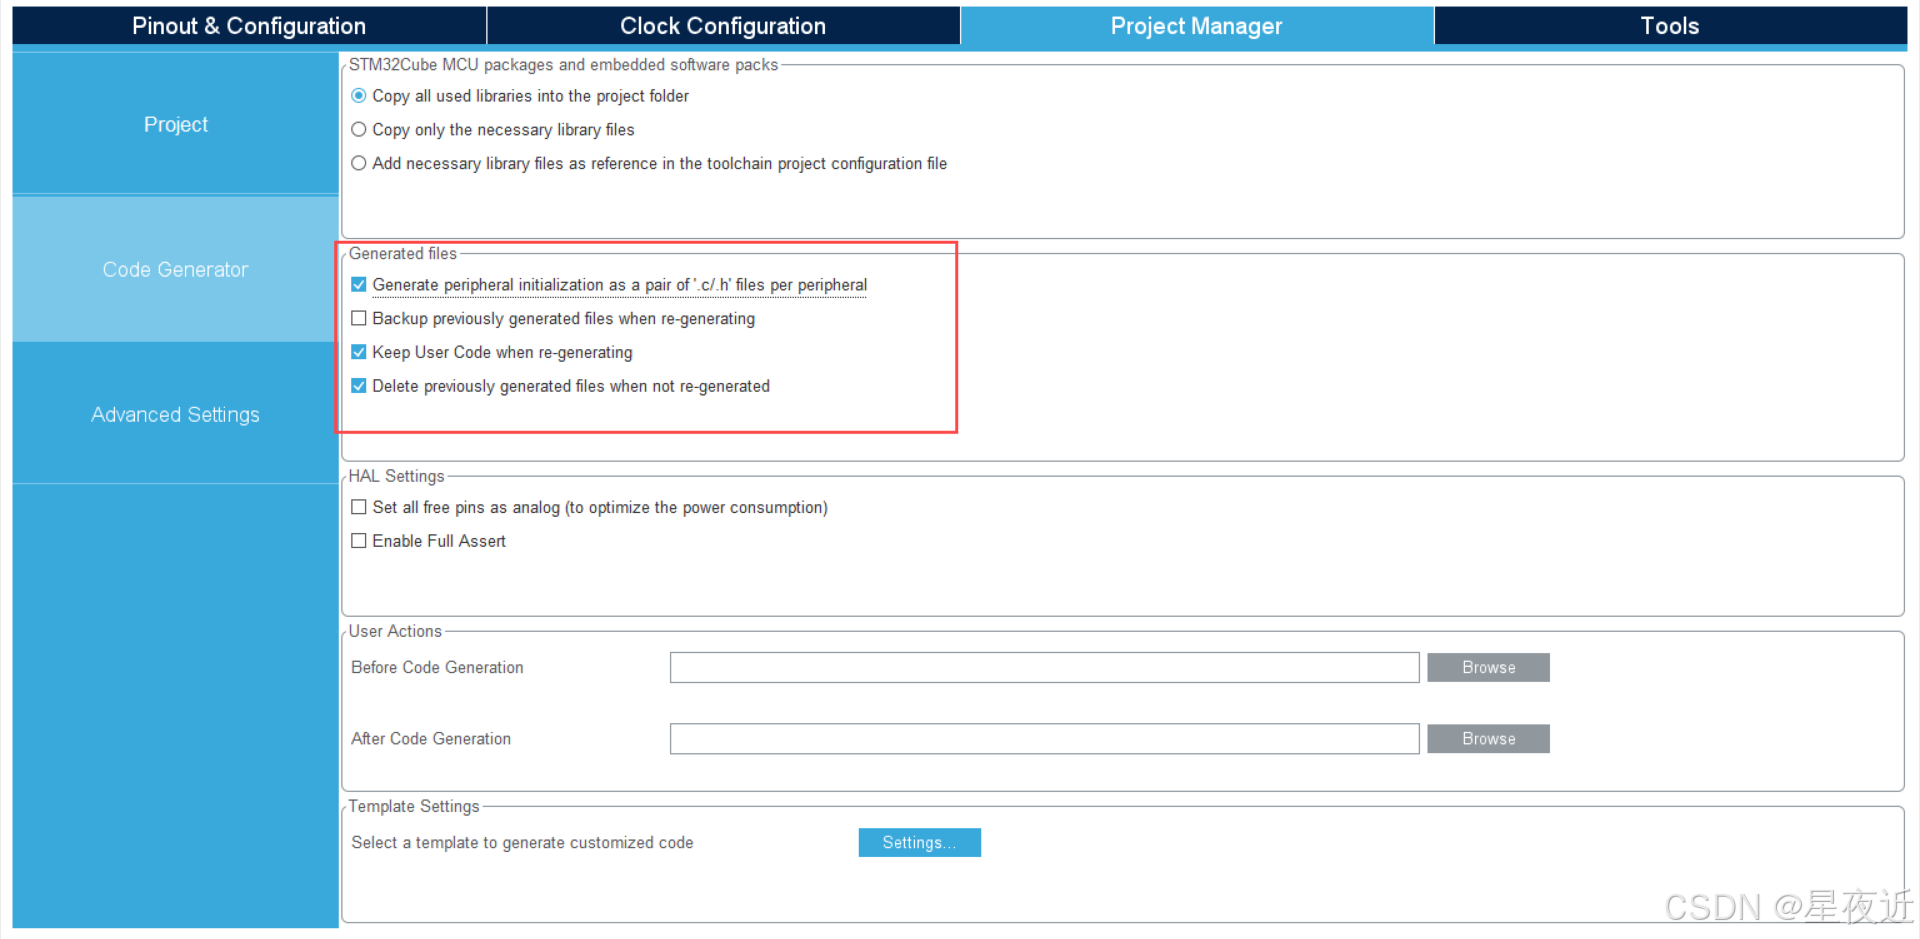
点击右上方的GENERATE CODE就能生成我们的Keil代码了。
(二)代码编写
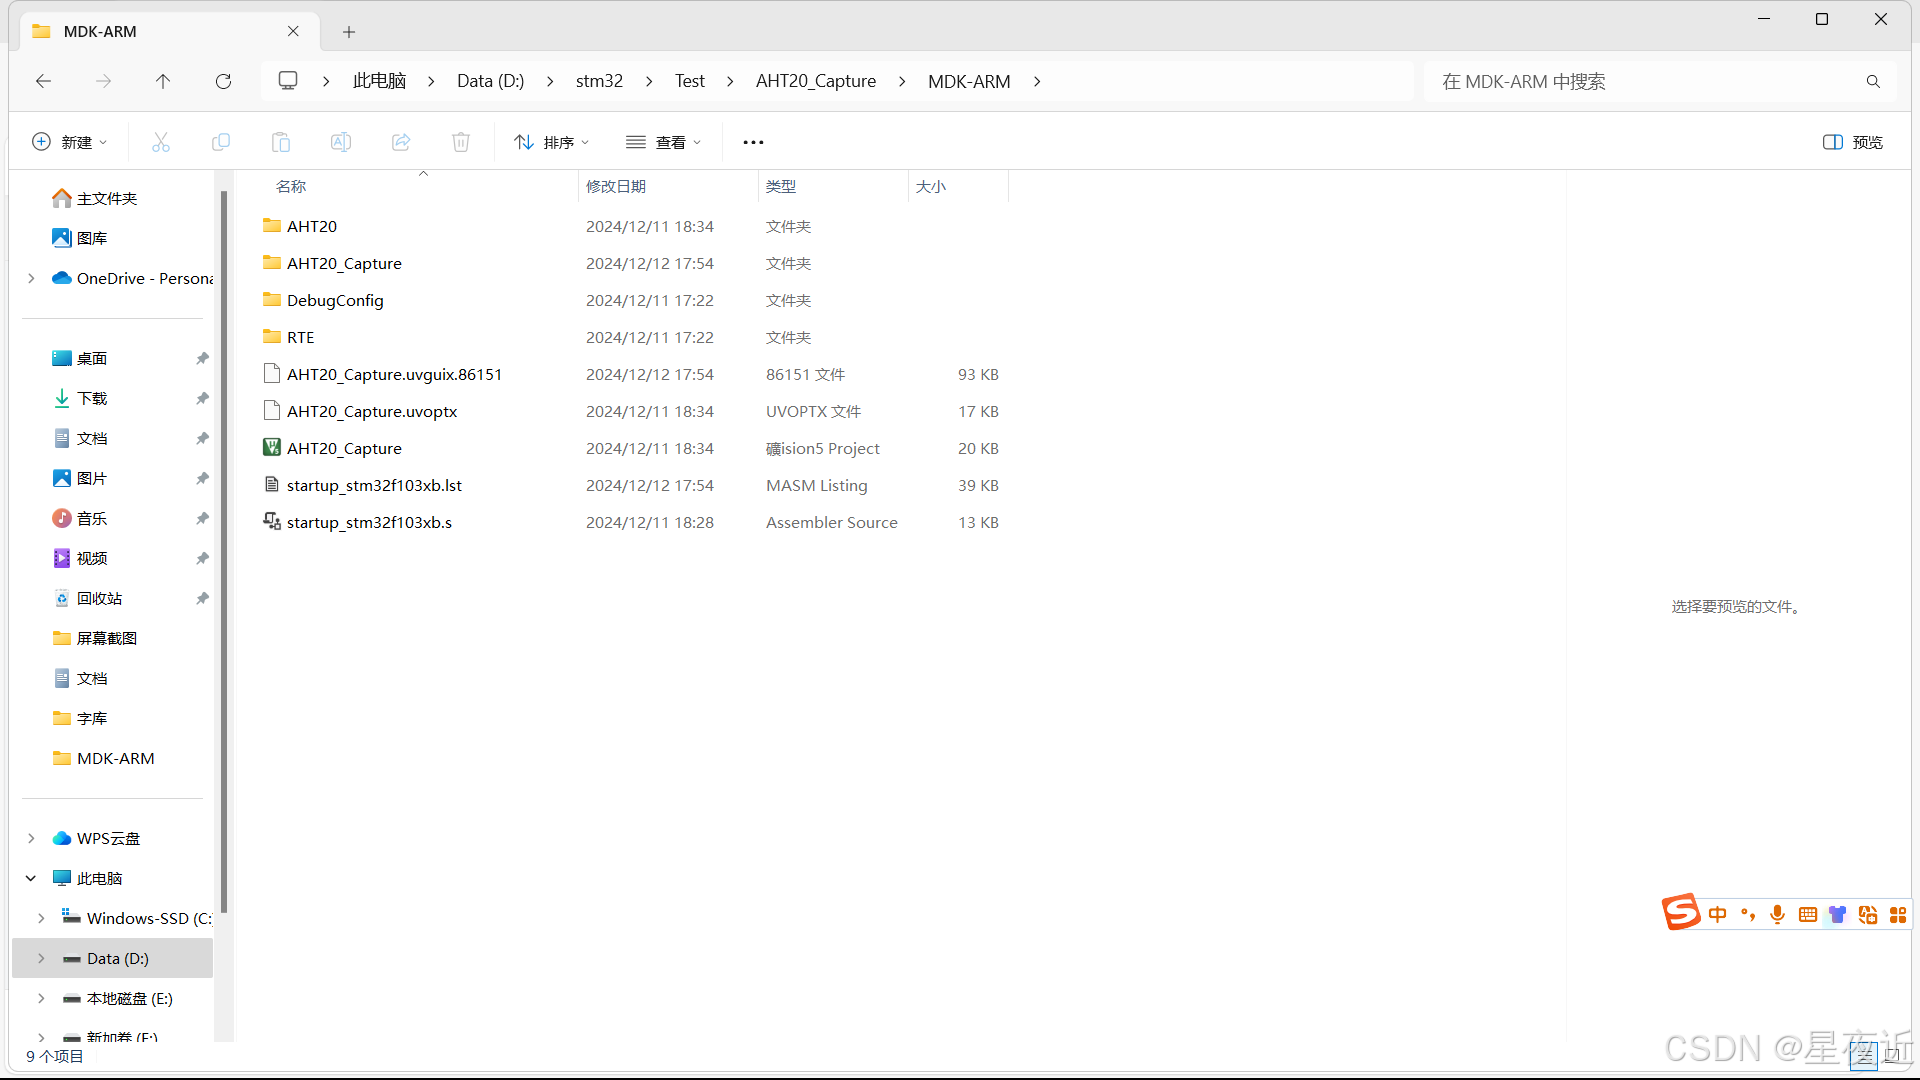
在生成代码后先不着急打开我们的代码,打开我们的工程文件夹,创建一个aht20文件夹来写入我们待会儿的采集程序。类似下图
然后打开工程开始添加我们的AHT20采集程序。
aht20.c
#include "aht20.h"
#define AHT20_ADDRESS 0x70 // 从机地址
//AHT20 的驱动程序
void AHT20_Init () //AHT20初始化函数 记住要在"aht20.h"中声明
{
uint8_t readBuffer;//用于接收状态信息
HAL_Delay(40);
HAL_I2C_Master_Receive(&hi2c1, AHT20_ADDRESS, &readBuffer, 1, HAL_MAX_DELAY);//I2C读取函数,读数据函数 readBuffer此时获得了一个字节的状态字。
if((readBuffer & 0x08) == 0x00) //判断第三位是否为0 发送0xBE命令初始化
{
uint8_t sendBuffer [3] = {0xBE , 0x08 , 0x00};
HAL_I2C_Master_Transmit(&hi2c1, AHT20_ADDRESS, sendBuffer, 3, HAL_MAX_DELAY);//I2C发送函数
}
}
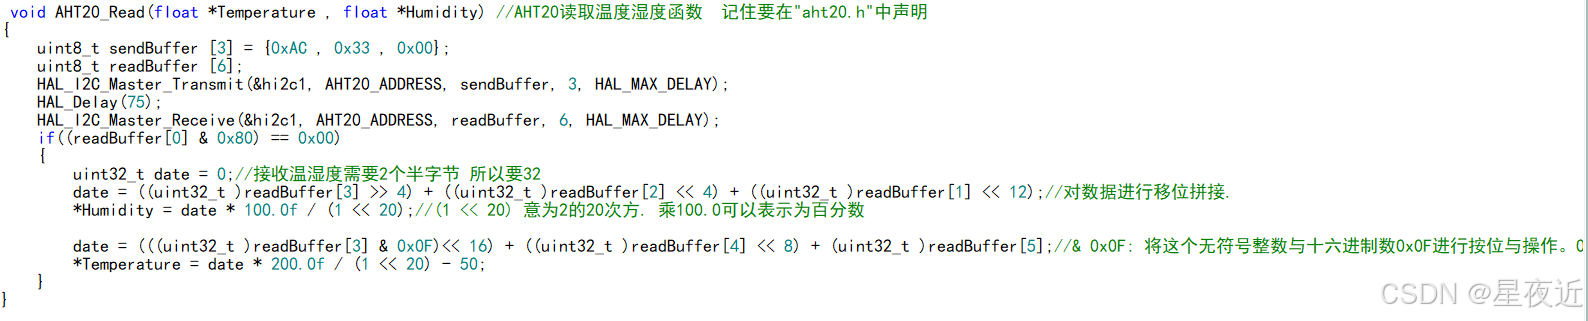
void AHT20_Read(float *Temperature , float *Humidity) //AHT20读取温度湿度函数 记住要在"aht20.h"中声明
{
uint8_t sendBuffer [3] = {0xAC , 0x33 , 0x00};
uint8_t readBuffer [6];
HAL_I2C_Master_Transmit(&hi2c1, AHT20_ADDRESS, sendBuffer, 3, HAL_MAX_DELAY);
HAL_Delay(75);
HAL_I2C_Master_Receive(&hi2c1, AHT20_ADDRESS, readBuffer, 6, HAL_MAX_DELAY);
if((readBuffer[0] & 0x80) == 0x00)
{
uint32_t date = 0;//接收温湿度需要2个半字节 所以要32
date = ((uint32_t )readBuffer[3] >> 4) + ((uint32_t )readBuffer[2] << 4) + ((uint32_t )readBuffer[1] << 12);//对数据进行移位拼接.
*Humidity = date * 100.0f / (1 << 20);//(1 << 20) 意为2的20次方. 乘100.0可以表示为百分数
date = (((uint32_t )readBuffer[3] & 0x0F)<< 16) + ((uint32_t )readBuffer[4] << 8) + (uint32_t )readBuffer[5];//& 0x0F: 将这个无符号整数与十六进制数0x0F进行按位与操作。0x0F的二进制表示为00001111,这个操作会保留readBuffer[3]的低四位,即将高四位清零。
*Temperature = date * 200.0f / (1 << 20) - 50;
}
}
aht20.h
/*
 * aht20.h
 *
 *  Created on: Apr 25, 2024
 *      Author: lenovo
 */

#ifndef INC_AHT20_H_
#define INC_AHT20_H_

#include "i2c.h"
 void AHT20_Init (void);

 void AHT20_Read(float *Temperature , float *Humidity);
#endif /* INC_AHT20_H_ */
有了采集函数过后,我们就可以开始着手实现功能了。其实我们要实现的就是AHT20采集温湿度,然后发给STM32,32接收到数据后,通过串口将数据发送给上位机,然后上位机通过串口助手显示出来。
那么首先,我们需要定义一个数据变量用来存储我们采集到的温度和湿度,同时,因为方便串口的打印,我们定义一个字符串数组来进行数据的输出。这部分功能在我们主函数的main内完成。
  float temperature , humidity ;    //定义温湿度变量
  char message [50];                //后续串口打印数据
变量定义好后,我们就要开始实现接下来的功能了。功能部分将在main内的while循环中实现。
首先,是对温湿度的采集的实现,这部分在我们的aht20.c中已经编写了,我们只需要在while循环中调用这个函数就行了。
其第一个参数表示为我们定义的温度变量,第二个为我们定义的湿度的变量。调用这个函数后,我们采集到的数据就被保存在这两个变量内了。为了将采集到的数据打印到串口,我们使用sprintf将我们需要输出的文字和数据拼接为一个字符串,具体操作如下。
sprintf(message ,"温度: %f℃ , 湿度: %f.\r\n",temperature , humidity);//拼接
其中message就是我们刚才定义的串口输出字符数组,引号内的两个%f依次填入我们后面的temperature和humidity。
拼接完字符串后,我们要给串口发送的数据也明了了,只需要调用串口发送函数发送数据就行了。至此,我们的所有功能都已经完成,接下来给出完整的主函数代码。
/* USER CODE BEGIN Header */
/**
  ******************************************************************************
  * @file           : main.c
  * @brief          : Main program body
  ******************************************************************************
  * @attention
  *
  * Copyright (c) 2024 STMicroelectronics.
  * All rights reserved.
  *
  * This software is licensed under terms that can be found in the LICENSE file
  * in the root directory of this software component.
  * If no LICENSE file comes with this software, it is provided AS-IS.
  *
  ******************************************************************************
  */
/* USER CODE END Header */
/* Includes ------------------------------------------------------------------*/
#include "main.h"
#include "i2c.h"
#include "usart.h"
#include "gpio.h"

/* Private includes ----------------------------------------------------------*/
/* USER CODE BEGIN Includes */
#include "i2c.h"
#include <stdio.h>
#include "string.h"
#include "aht20.h"
/* USER CODE END Includes */

/* Private typedef -----------------------------------------------------------*/
/* USER CODE BEGIN PTD */

/* USER CODE END PTD */

/* Private define ------------------------------------------------------------*/
/* USER CODE BEGIN PD */

/* USER CODE END PD */

/* Private macro -------------------------------------------------------------*/
/* USER CODE BEGIN PM */

/* USER CODE END PM */

/* Private variables ---------------------------------------------------------*/

/* USER CODE BEGIN PV */

/* USER CODE END PV */

/* Private function prototypes -----------------------------------------------*/
void SystemClock_Config(void);
/* USER CODE BEGIN PFP */

/* USER CODE END PFP */

/* Private user code ---------------------------------------------------------*/
/* USER CODE BEGIN 0 */

/* USER CODE END 0 */

/**
  * @brief  The application entry point.
  * @retval int
  */
int main(void)
{
  /* USER CODE BEGIN 1 */

  /* USER CODE END 1 */

  /* MCU Configuration--------------------------------------------------------*/

  /* Reset of all peripherals, Initializes the Flash interface and the Systick. */
  HAL_Init();

  /* USER CODE BEGIN Init */

  /* USER CODE END Init */

  /* Configure the system clock */
  SystemClock_Config();

  /* USER CODE BEGIN SysInit */

  /* USER CODE END SysInit */

  /* Initialize all configured peripherals */
  MX_GPIO_Init();
  MX_I2C1_Init();
  MX_USART1_UART_Init();
  /* USER CODE BEGIN 2 */
  AHT20_Init ();//初始化AHT20

  float temperature , humidity ;    //定义温湿度变量
  char message [50];                //后续串口打印数据
  /* USER CODE END 2 */

  /* Infinite loop */
  /* USER CODE BEGIN WHILE */
  while (1)
  {
	  AHT20_Read( &temperature , &humidity); //读取AHT20
	  sprintf(message ,"温度: %f℃ , 湿度: %f.\r\n",temperature , humidity);//拼接
	  HAL_UART_Transmit(&huart1, (uint8_t*)message,strlen(message) , HAL_MAX_DELAY);//串口发送函数
	  HAL_Delay(1000);
    /* USER CODE END WHILE */

    /* USER CODE BEGIN 3 */
  }
  /* USER CODE END 3 */
}

/**
  * @brief System Clock Configuration
  * @retval None
  */
void SystemClock_Config(void)
{
  RCC_OscInitTypeDef RCC_OscInitStruct = {0};
  RCC_ClkInitTypeDef RCC_ClkInitStruct = {0};

  /** Initializes the RCC Oscillators according to the specified parameters
  * in the RCC_OscInitTypeDef structure.
  */
  RCC_OscInitStruct.OscillatorType = RCC_OSCILLATORTYPE_HSI;
  RCC_OscInitStruct.HSIState = RCC_HSI_ON;
  RCC_OscInitStruct.HSICalibrationValue = RCC_HSICALIBRATION_DEFAULT;
  RCC_OscInitStruct.PLL.PLLState = RCC_PLL_NONE;
  if (HAL_RCC_OscConfig(&RCC_OscInitStruct) != HAL_OK)
  {
    Error_Handler();
  }

  /** Initializes the CPU, AHB and APB buses clocks
  */
  RCC_ClkInitStruct.ClockType = RCC_CLOCKTYPE_HCLK|RCC_CLOCKTYPE_SYSCLK
                              |RCC_CLOCKTYPE_PCLK1|RCC_CLOCKTYPE_PCLK2;
  RCC_ClkInitStruct.SYSCLKSource = RCC_SYSCLKSOURCE_HSI;
  RCC_ClkInitStruct.AHBCLKDivider = RCC_SYSCLK_DIV1;
  RCC_ClkInitStruct.APB1CLKDivider = RCC_HCLK_DIV1;
  RCC_ClkInitStruct.APB2CLKDivider = RCC_HCLK_DIV1;

  if (HAL_RCC_ClockConfig(&RCC_ClkInitStruct, FLASH_LATENCY_0) != HAL_OK)
  {
    Error_Handler();
  }
}

/* USER CODE BEGIN 4 */

/* USER CODE END 4 */

/**
  * @brief  This function is executed in case of error occurrence.
  * @retval None
  */
void Error_Handler(void)
{
  /* USER CODE BEGIN Error_Handler_Debug */
  /* User can add his own implementation to report the HAL error return state */
  __disable_irq();
  while (1)
  {
  }
  /* USER CODE END Error_Handler_Debug */
}

#ifdef  USE_FULL_ASSERT
/**
  * @brief  Reports the name of the source file and the source line number
  *         where the assert_param error has occurred.
  * @param  file: pointer to the source file name
  * @param  line: assert_param error line source number
  * @retval None
  */
void assert_failed(uint8_t *file, uint32_t line)
{
  /* USER CODE BEGIN 6 */
  /* User can add his own implementation to report the file name and line number,
     ex: printf("Wrong parameters value: file %s on line %d\r\n", file, line) */
  /* USER CODE END 6 */
}
#endif /* USE_FULL_ASSERT */
(三)结果展示
将代码进行编译烧录后,我们就可以连接我们的TTL和板子了。将我们TTL的RX连接PA9,将TC连接PA10。VCC与GND分别与板子上相连就行了,然后在我们的串口助手打开串口就能观测AHT20采集到的数据了。
三、OLED显示
经过上一步的配置过后,我们就可以尝试在OLED屏上面显示了。而对于OLED的显示,我采用了u8g2库来完成这项功能。这个库的移植步骤具体步骤请详见
稍后我会将我自己移植的库和本次工程代码放在末尾。
(一)CUBE配置
RCC、SYS和I2C1的配置和上述相同,这里不多加赘述。我们这次不需要打开串口通信,所以不需要打开USART,因为本次需要AHT20与OLED屏共同工作,而这两个都使用了I2C协议,所以我们这次还要打开I2C2,具体操作与I2C1一致,将其通道打开就行。
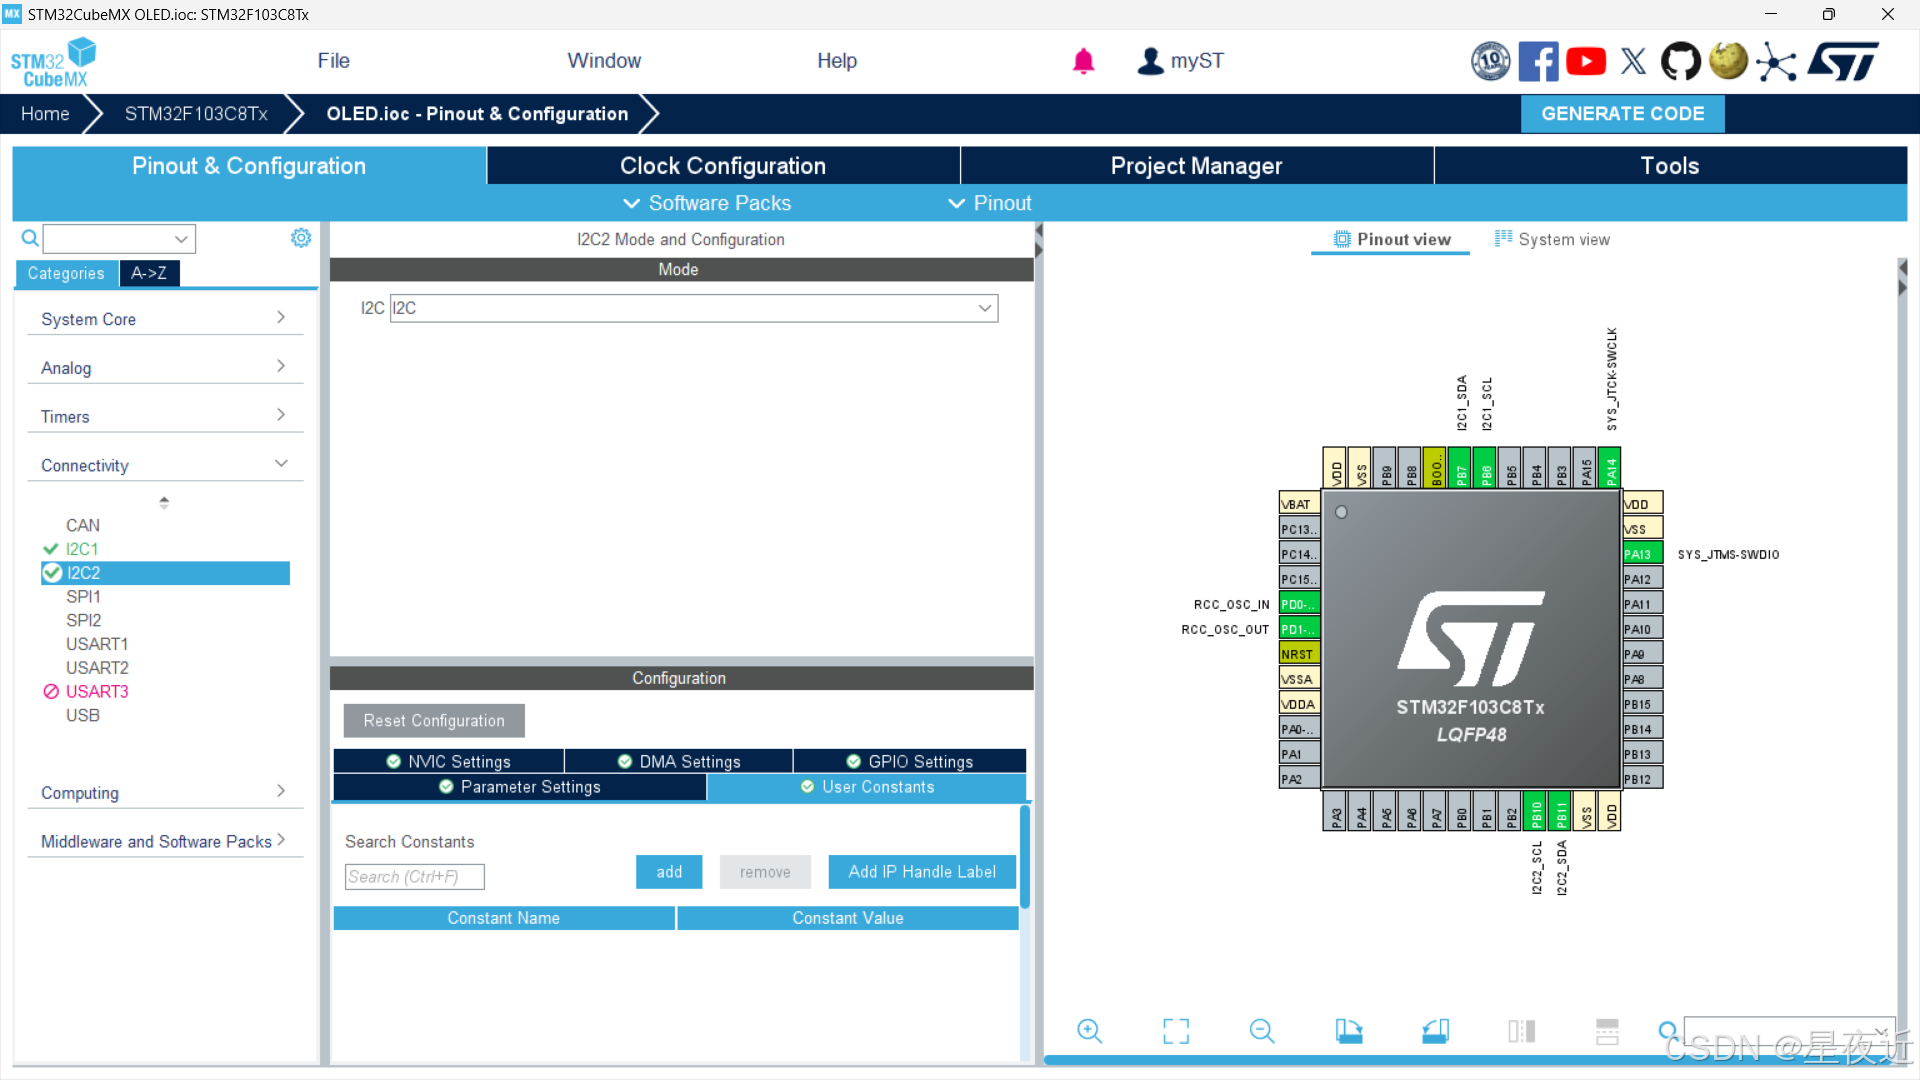
然后我们看右边的芯片,发现打开的通道已经点亮。
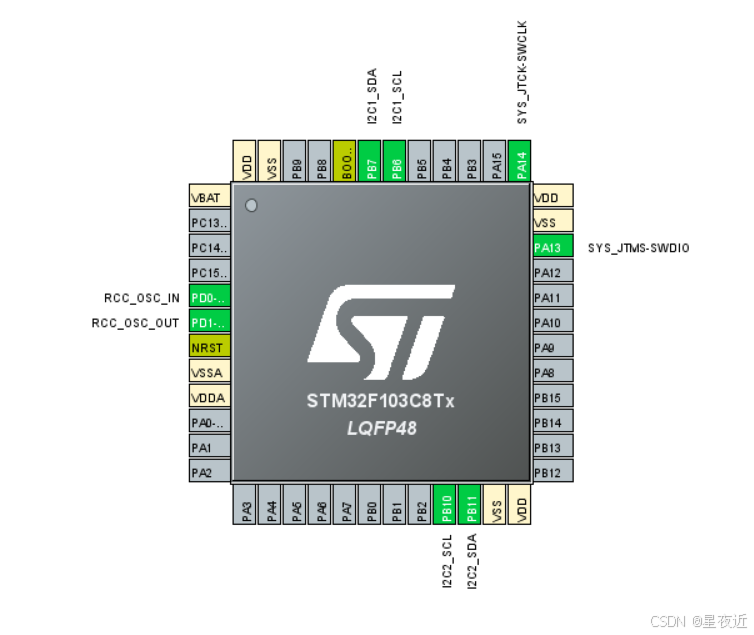
让各位配置完看这个的原因是为了检查是否成功配置,以及找到接线时对应的接口。
接下来就是配置系统时钟树,和上述的步骤一致,后面的项目配置也是一样的,这里就不再重复了。
(二)功能实现
首先是按照我们先前的链接成功移植u8g2库,然后我们可以尝试使用u8g2库显示一下我们的网名昵称。
(1)显示汉字和数字
对于u8g2库而言,他其实是将我们写入的数据放入缓存区,然后在执行的时候将缓存区的数据发出。 其打印字符的顺序首先是调用u8g2_SetFont设置我们的字体格式,也就是建立我们的字体集,因为u8g2对中文的支持度十分友好,为中文设置了字体集,这也是使用u8g2的一个主要原因。
在调用了中文字体集后,我们就可以开始调用u8g2_DrawXBMP显示中文了,这个操作我们将使用取字模,在优快云能搜到很多的取字模软件,因为我使用的是PCtoLCD2002,所以我这里讲述的操作步骤可能不适于其他的取字模软件,稍后我也会将PCtoLCD2002放在工程压缩包内。这里演示一下具体步骤。
首先是设置我们字模生成的格式,按照下图顺序配置。
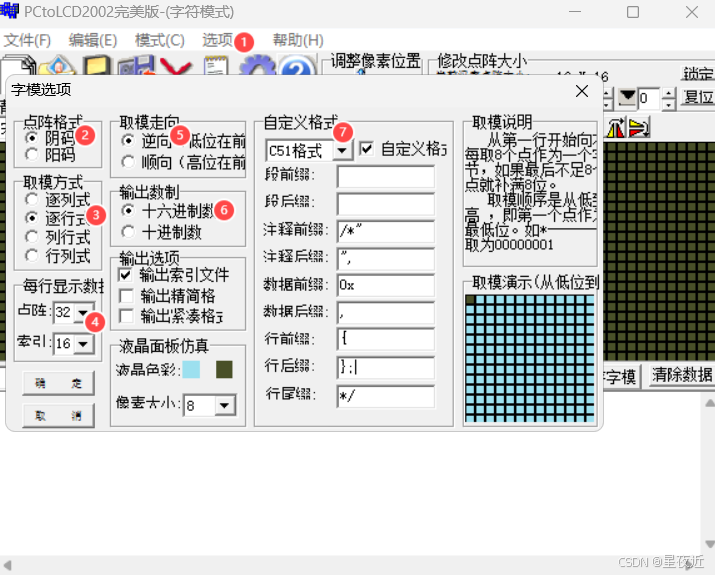
在自定义格式中,我们的行后缀默认的一般是英文逗号,我们将其改为英文分号,这会减少我们后面很多工作量。然后点击确定保存我们的配置,接下来就可以生成字模了。
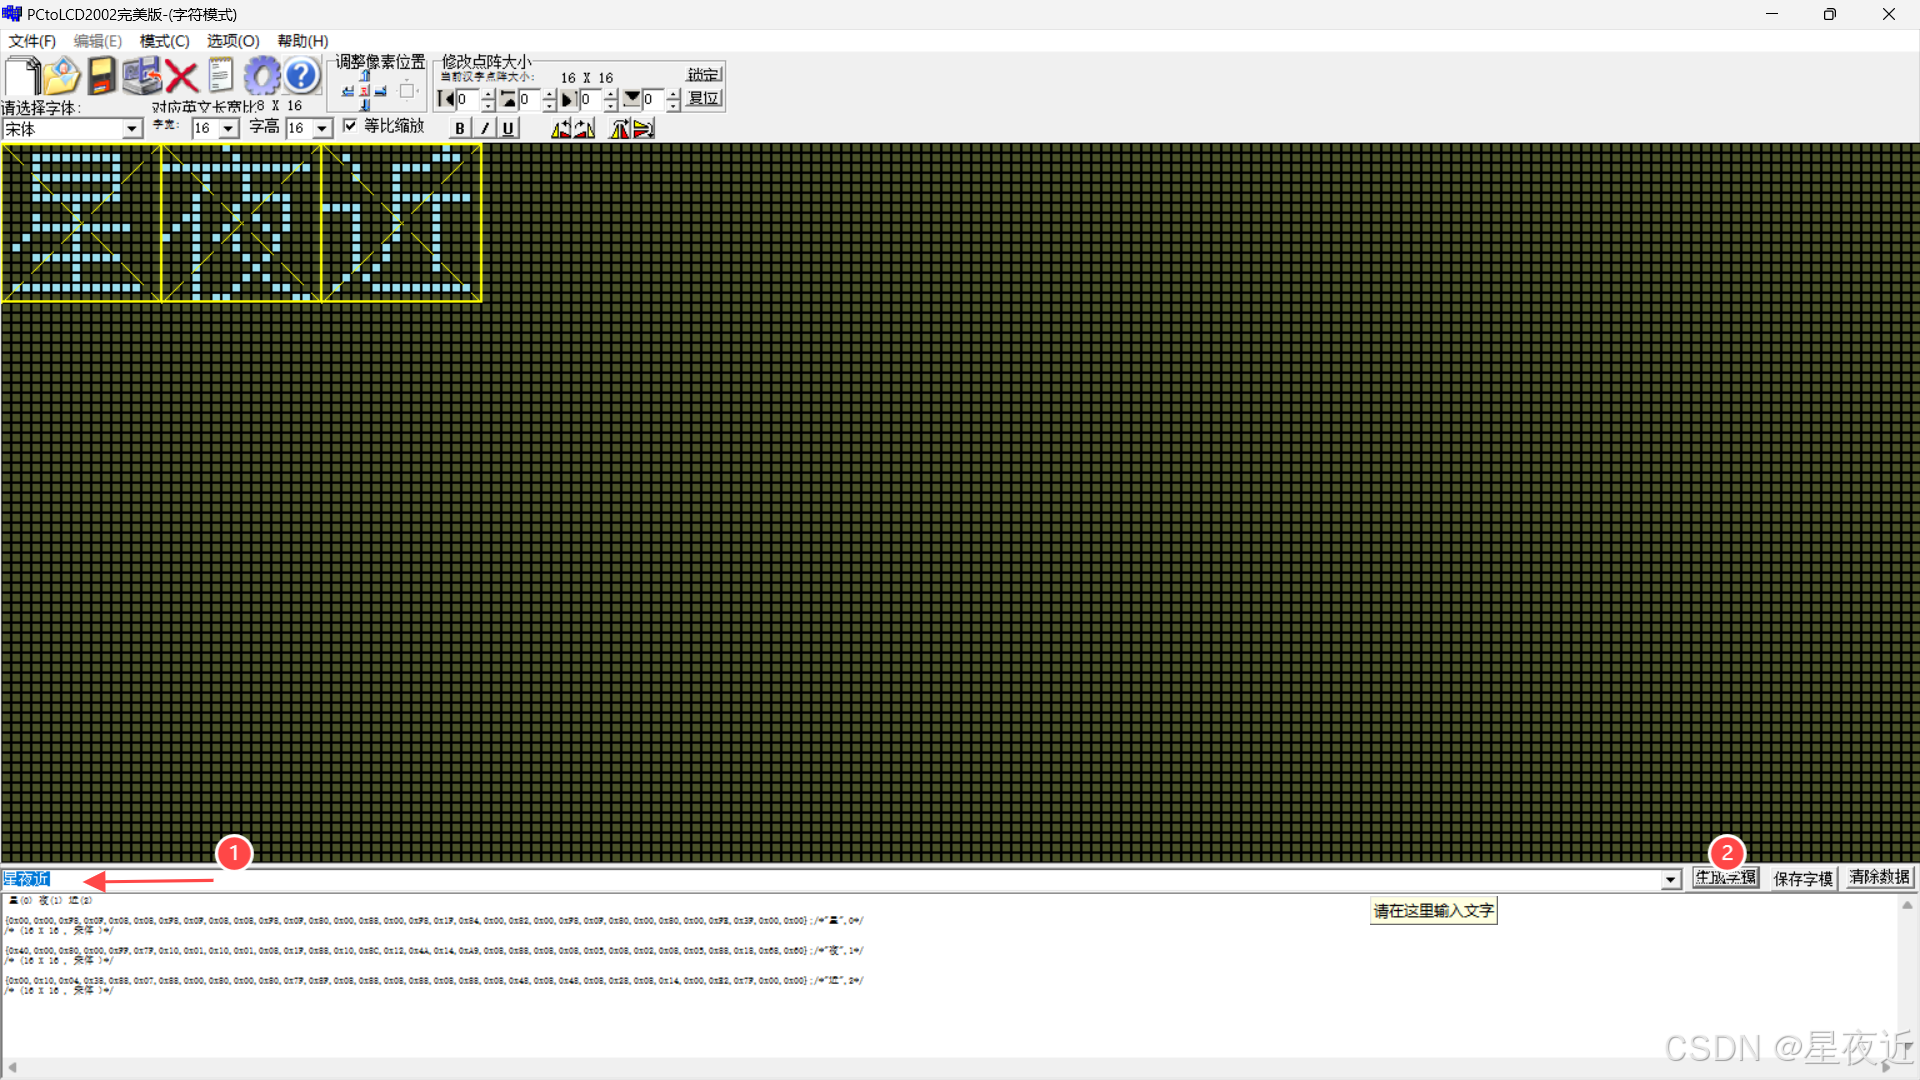 生成字模后,我们可以选择将字模保存起来,方便我们后续的使用。 接下来我们就可以着手编写显示中文和数字的代码了。
/* USER CODE BEGIN Header */
/**
  ******************************************************************************
  * @file           : main.c
  * @brief          : Main program body
  ******************************************************************************
  * @attention
  *
  * Copyright (c) 2024 STMicroelectronics.
  * All rights reserved.
  *
  * This software is licensed under terms that can be found in the LICENSE file
  * in the root directory of this software component.
  * If no LICENSE file comes with this software, it is provided AS-IS.
  *
  ******************************************************************************
  */
/* USER CODE END Header */
/* Includes ------------------------------------------------------------------*/
#include "main.h"
#include "i2c.h"
#include "tim.h"
#include "gpio.h"
#include "u8g2.h"
#include "stm32_u8g2.h"
#include "OLED_Front.h"
#include <stdio.h>
#include "string.h"
/* Private includes ----------------------------------------------------------*/
/* USER CODE BEGIN Includes */

/* USER CODE END Includes */

/* Private typedef -----------------------------------------------------------*/
/* USER CODE BEGIN PTD */

/* USER CODE END PTD */

/* Private define ------------------------------------------------------------*/
/* USER CODE BEGIN PD */

/* USER CODE END PD */

/* Private macro -------------------------------------------------------------*/
/* USER CODE BEGIN PM */

/* USER CODE END PM */

/* Private variables ---------------------------------------------------------*/

/* USER CODE BEGIN PV */

/* USER CODE END PV */

/* Private function prototypes -----------------------------------------------*/
void SystemClock_Config(void);
/* USER CODE BEGIN PFP */

/* USER CODE END PFP */

/* Private user code ---------------------------------------------------------*/
/* USER CODE BEGIN 0 */


/* USER CODE END 0 */

/**
  * @brief  The application entry point.
  * @retval int
  */
int main(void)
{

  /* USER CODE BEGIN 1 */

  /* USER CODE END 1 */

  /* MCU Configuration--------------------------------------------------------*/

  /* Reset of all peripherals, Initializes the Flash interface and the Systick. */
  HAL_Init();

  /* USER CODE BEGIN Init */

  /* USER CODE END Init */

  /* Configure the system clock */
  SystemClock_Config();

  /* USER CODE BEGIN SysInit */

  /* USER CODE END SysInit */

  /* Initialize all configured peripherals */
  MX_GPIO_Init();
  MX_I2C2_Init();
  MX_TIM1_Init();
  MX_I2C1_Init();

  u8g2_t u8g2;
  u8g2_Init(&u8g2);      //初始化


  /* Infinite loop */
  /* USER CODE BEGIN WHILE */
  while (1)
  {
    /* USER CODE END WHILE */
      //显示汉字和数字
    u8g2_SetFont(&u8g2,u8g2_font_ncenB12_tf);//设置字体格式
    //(参数顺序依次是,结构体、x、y、字宽、字高、储存要显示的字点阵的数组)
    u8g2_DrawXBMP(&u8g2,32,0,16,16,xing);
    u8g2_DrawXBMP(&u8g2,48,0,16,16,ye);
    u8g2_DrawXBMP(&u8g2,64,0,16,16,jin);
    u8g2_SetFont(&u8g2,u8g2_font_ncenB10_tf);
    u8g2_DrawStr(&u8g2,16,50,"632207030128");
    u8g2_SendBuffer(&u8g2);

    /* USER CODE BEGIN 3 */
  }
  /* USER CODE END 3 */
}

/**
  * @brief System Clock Configuration
  * @retval None
  */
void SystemClock_Config(void)
{
  RCC_OscInitTypeDef RCC_OscInitStruct = {0};
  RCC_ClkInitTypeDef RCC_ClkInitStruct = {0};

  /** Initializes the RCC Oscillators according to the specified parameters
  * in the RCC_OscInitTypeDef structure.
  */
  RCC_OscInitStruct.OscillatorType = RCC_OSCILLATORTYPE_HSE;
  RCC_OscInitStruct.HSEState = RCC_HSE_ON;
  RCC_OscInitStruct.HSEPredivValue = RCC_HSE_PREDIV_DIV1;
  RCC_OscInitStruct.HSIState = RCC_HSI_ON;
  RCC_OscInitStruct.PLL.PLLState = RCC_PLL_ON;
  RCC_OscInitStruct.PLL.PLLSource = RCC_PLLSOURCE_HSE;
  RCC_OscInitStruct.PLL.PLLMUL = RCC_PLL_MUL9;
  if (HAL_RCC_OscConfig(&RCC_OscInitStruct) != HAL_OK)
  {
    Error_Handler();
  }

  /** Initializes the CPU, AHB and APB buses clocks
  */
  RCC_ClkInitStruct.ClockType = RCC_CLOCKTYPE_HCLK|RCC_CLOCKTYPE_SYSCLK
                              |RCC_CLOCKTYPE_PCLK1|RCC_CLOCKTYPE_PCLK2;
  RCC_ClkInitStruct.SYSCLKSource = RCC_SYSCLKSOURCE_PLLCLK;
  RCC_ClkInitStruct.AHBCLKDivider = RCC_SYSCLK_DIV1;
  RCC_ClkInitStruct.APB1CLKDivider = RCC_HCLK_DIV2;
  RCC_ClkInitStruct.APB2CLKDivider = RCC_HCLK_DIV1;

  if (HAL_RCC_ClockConfig(&RCC_ClkInitStruct, FLASH_LATENCY_2) != HAL_OK)
  {
    Error_Handler();
  }
}

/* USER CODE BEGIN 4 */

/* USER CODE END 4 */

/**
  * @brief  This function is executed in case of error occurrence.
  * @retval None
  */
void Error_Handler(void)
{
  /* USER CODE BEGIN Error_Handler_Debug */
  /* User can add his own implementation to report the HAL error return state */
  __disable_irq();
  while (1)
  {
  }
  /* USER CODE END Error_Handler_Debug */
}

#ifdef  USE_FULL_ASSERT
/**
  * @brief  Reports the name of the source file and the source line number
  *         where the assert_param error has occurred.
  * @param  file: pointer to the source file name
  * @param  line: assert_param error line source number
  * @retval None
  */
void assert_failed(uint8_t *file, uint32_t line)
{
  /* USER CODE BEGIN 6 */
  /* User can add his own implementation to report the file name and line number,
     ex: printf("Wrong parameters value: file %s on line %d\r\n", file, line) */
  /* USER CODE END 6 */
}
#endif /* USE_FULL_ASSERT */
其中,我们的字模数据保存在我的字库OLED_Front.h函数中,大家也可以自己定义一个字库,或者直接在主函数中声明就可以了。我这里展示一下我这次工程的字库。
OLED_Front.h
#ifndef _OLED_FRONT_H
#define _OLED_FRONT_H


//汉字
static const unsigned char chong[] =
{0x00,0x08,0x00,0x1F,0xFC,0x00,0x80,0x00,0xFF,0x7F,0x80,0x00,0xF8,0x0F,0x88,0x08,0xF8,0x0F,0x88,0x08,0xF8,0x0F,0x80,0x00,0xFC,0x1F,0x80,0x00,0xFF,0x7F,0x00,0x00};/*"重",0*/
/* (16 X 16 , 宋体 )*/

static const unsigned char qing[] =
{0x80,0x00,0x00,0x01,0xFC,0x7F,0x04,0x00,0x04,0x01,0x04,0x01,0x04,0x01,0xF4,0x3F,0x04,0x01,0x84,0x02,0x84,0x02,0x44,0x04,0x42,0x04,0x22,0x08,0x11,0x10,0x08,0x60};/*"庆",1*/
/* (16 X 16 , 宋体 )*/

static const unsigned char jiao[] =
{0x40,0x00,0x80,0x00,0x80,0x00,0xFF,0x7F,0x00,0x00,0x08,0x08,0x08,0x10,0x04,0x24,0x12,0x24,0x20,0x02,0x40,0x01,0x80,0x00,0x40,0x01,0x30,0x02,0x0C,0x0C,0x03,0x70};/*"交",2*/
/* (16 X 16 , 宋体 )*/

static const unsigned char tong[] =
{0x00,0x00,0xE2,0x1F,0x04,0x08,0x84,0x05,0x00,0x02,0xE0,0x3F,0x27,0x22,0x24,0x22,0xE4,0x3F,0x24,0x22,0x24,0x22,0xE4,0x3F,0x24,0x22,0x24,0x2A,0x2A,0x10,0xF1,0x7F};/*"通",3*/
/* (16 X 16 , 宋体 )*/

static const unsigned char da[] =
{0x80,0x00,0x80,0x00,0x80,0x00,0x80,0x00,0x80,0x00,0xFF,0x7F,0x80,0x00,0x80,0x00,0x40,0x01,0x40,0x01,0x20,0x02,0x20,0x02,0x10,0x04,0x08,0x08,0x04,0x10,0x03,0x60};/*"大",4*/
/* (16 X 16 , 宋体 )*/

static const unsigned char xue[] =
{0x44,0x10,0x88,0x10,0x88,0x08,0x00,0x04,0xFE,0x7F,0x02,0x40,0x01,0x20,0xF8,0x07,0x00,0x02,0x80,0x01,0xFF,0x7F,0x80,0x00,0x80,0x00,0x80,0x00,0xA0,0x00,0x40,0x00};/*"学",5*/
/* (16 X 16 , 宋体 )*/
static const unsigned char xing[] =
{0x00,0x00,0xF8,0x0F,0x08,0x08,0xF8,0x0F,0x08,0x08,0xF8,0x0F,0x80,0x00,0x88,0x00,0xF8,0x1F,0x84,0x00,0x82,0x00,0xF8,0x0F,0x80,0x00,0x80,0x00,0xFE,0x3F,0x00,0x00};/*"星",0*/
/* (16 X 16 , 宋体 )*/
static const unsigned char ye[] =
{0x40,0x00,0x80,0x00,0xFF,0x7F,0x10,0x01,0x10,0x01,0x08,0x1F,0x88,0x10,0x8C,0x12,0x4A,0x14,0xA9,0x08,0x88,0x08,0x08,0x05,0x08,0x02,0x08,0x05,0x88,0x18,0x68,0x60};/*"夜",1*/
/* (16 X 16 , 宋体 )*/
static const unsigned char jin[] =
{0x00,0x10,0x04,0x38,0x88,0x07,0x88,0x00,0x80,0x00,0x80,0x7F,0x8F,0x08,0x88,0x08,0x88,0x08,0x88,0x08,0x48,0x08,0x48,0x08,0x28,0x08,0x14,0x00,0xE2,0x7F,0x00,0x00};/*"近",2*/
/* (16 X 16 , 宋体 )*/
static const unsigned char dian[] =
{0x00,0x00,0x00,0x00,0x00,0x00,0x00,0x00,0x00,0x00,0x00,0x00,0x06,0x06,0x00,0x00};/*".",3*/
/* (8 X 16 , 宋体 )*/

static const unsigned char wen[] =
{0x00,0x00,0xC4,0x1F,0x48,0x10,0x48,0x10,0xC1,0x1F,0x42,0x10,0x42,0x10,0xC8,0x1F,0x08,0x00,0xE4,0x3F,0x27,0x25,0x24,0x25,0x24,0x25,0x24,0x25,0xF4,0x7F,0x00,0x00};/*"温",0*/
/* (16 X 16 , 宋体 )*/
static const unsigned char du[] =
{0x80,0x00,0x00,0x01,0xFC,0x7F,0x44,0x04,0x44,0x04,0xFC,0x3F,0x44,0x04,0x44,0x04,0xC4,0x07,0x04,0x00,0xF4,0x0F,0x24,0x08,0x42,0x04,0x82,0x03,0x61,0x0C,0x1C,0x70};/*"度",1*/
/* (16 X 16 , 宋体 )*/
static const unsigned char maohao[] =
{0x00,0x00,0x00,0x00,0x00,0x00,0x00,0x00,0x00,0x00,0x00,0x00,0x00,0x00,0x00,0x00,0x00,0x00,0x0C,0x00,0x0C,0x00,0x00,0x00,0x0C,0x00,0x0C,0x00,0x00,0x00,0x00,0x00};/*":",2*/
/* (16 X 16 , 宋体 )*/
static const unsigned char shi[] =
{0x00,0x00,0xE4,0x1F,0x28,0x10,0x28,0x10,0xE1,0x1F,0x22,0x10,0x22,0x10,0xE8,0x1F,0x88,0x04,0x84,0x04,0x97,0x24,0xA4,0x14,0xC4,0x0C,0x84,0x04,0xF4,0x7F,0x00,0x00};/*"湿",0*/
/* (16 X 16 , 宋体 )*/


#endif
对于u8g2_DrawStr而言,他的三个参数分别是我们字符显示的X轴、Y轴、我们定义的字符。u8g2_SendBuffer就是发出缓存的功能函数。
将上述代码编译烧录过后,得到的结果应该和下图一致。

(2)显示滚动字符
接下来我们尝试给字体加上滚动的功能,所谓的滚动其实就是X轴逐渐变化,以向右滚动为例,向右滚动其实就是我们在调用u8g2_DrawXBMP时,X轴的值逐渐增加。那么我们就需要定义一个逐渐增加的变量,但是我们的屏幕的大小是有限制的,其X轴的总长度为128,所以我们还要考虑在达到最大值之后将X置为0。相信各位已经想到了,我们只需要使用条件语句判断一下就行了,在低于128时我们逐渐增加,在高于128时将变量置0.反映到代码上的形式为
/* USER CODE BEGIN Header */
/**
  ******************************************************************************
  * @file           : main.c
  * @brief          : Main program body
  ******************************************************************************
  * @attention
  *
  * Copyright (c) 2024 STMicroelectronics.
  * All rights reserved.
  *
  * This software is licensed under terms that can be found in the LICENSE file
  * in the root directory of this software component.
  * If no LICENSE file comes with this software, it is provided AS-IS.
  *
  ******************************************************************************
  */
/* USER CODE END Header */
/* Includes ------------------------------------------------------------------*/
#include "main.h"
#include "i2c.h"
#include "tim.h"
#include "gpio.h"
#include "u8g2.h"
#include "stm32_u8g2.h"
#include "OLED_Front.h"
#include <stdio.h>
#include "string.h"
/* Private includes ----------------------------------------------------------*/
/* USER CODE BEGIN Includes */

/* USER CODE END Includes */

/* Private typedef -----------------------------------------------------------*/
/* USER CODE BEGIN PTD */

/* USER CODE END PTD */

/* Private define ------------------------------------------------------------*/
/* USER CODE BEGIN PD */

/* USER CODE END PD */

/* Private macro -------------------------------------------------------------*/
/* USER CODE BEGIN PM */

/* USER CODE END PM */

/* Private variables ---------------------------------------------------------*/

/* USER CODE BEGIN PV */

/* USER CODE END PV */

/* Private function prototypes -----------------------------------------------*/
void SystemClock_Config(void);
/* USER CODE BEGIN PFP */

/* USER CODE END PFP */

/* Private user code ---------------------------------------------------------*/
/* USER CODE BEGIN 0 */


/* USER CODE END 0 */

/**
  * @brief  The application entry point.
  * @retval int
  */
int main(void)
{

  /* USER CODE BEGIN 1 */

  /* USER CODE END 1 */

  /* MCU Configuration--------------------------------------------------------*/

  /* Reset of all peripherals, Initializes the Flash interface and the Systick. */
  HAL_Init();

  /* USER CODE BEGIN Init */

  /* USER CODE END Init */

  /* Configure the system clock */
  SystemClock_Config();

  /* USER CODE BEGIN SysInit */

  /* USER CODE END SysInit */

  /* Initialize all configured peripherals */
  MX_GPIO_Init();
  MX_I2C2_Init();
  MX_TIM1_Init();
  MX_I2C1_Init();
  /* USER CODE BEGIN 2 */

  u8g2_t u8g2;
  u8g2_Init(&u8g2);      //初始化


  //uint16_t x=0;
  /* USER CODE END 2 */
    float temperature=1 , humidity ;


  uint16_t x=0;
  /* Infinite loop */
  /* USER CODE BEGIN WHILE */
  while (1)
  {
    /* USER CODE END WHILE */
//      //显示汉字和数字
//    u8g2_SetFont(&u8g2,u8g2_font_ncenB12_tf);//设置字体格式
//    //(参数顺序依次是,结构体、x、y、字宽、字高、储存要显示的字点阵的数组)
//    u8g2_DrawXBMP(&u8g2,32,0,16,16,xing);
//    u8g2_DrawXBMP(&u8g2,48,0,16,16,ye);
//    u8g2_DrawXBMP(&u8g2,64,0,16,16,jin);
//    u8g2_SetFont(&u8g2,u8g2_font_ncenB10_tf);
//    u8g2_DrawStr(&u8g2,16,50,"632207030128");
//    u8g2_SendBuffer(&u8g2);
      //滚动显示汉字
        if(x<=128)
		{
			x++;//向右滑动,可以提高每次x的增加量来控制滑动速度
		}
		else if(x>128)//置零
		{
			x=0;
		}
    u8g2_SetFont(&u8g2,u8g2_font_ncenB12_tf);//设置字体格式
    //(参数顺序依次是,结构体、x、y、字宽、字高、储存要显示的字点阵的数组)
    u8g2_DrawXBMP(&u8g2,x+16,0,16,16,chong);
    u8g2_DrawXBMP(&u8g2,x+32,0,16,16,qing);
    u8g2_DrawXBMP(&u8g2,x+48,0,16,16,jiao);
    u8g2_DrawXBMP(&u8g2,x+64,0,16,16,tong);
    u8g2_DrawXBMP(&u8g2,x+80,0,16,16,da);
    u8g2_DrawXBMP(&u8g2,x+96,0,16,16,xue);
    u8g2_SetFont(&u8g2,u8g2_font_ncenB10_tf);
    u8g2_SendBuffer(&u8g2);

    /* USER CODE BEGIN 3 */
  }
  /* USER CODE END 3 */
}

/**
  * @brief System Clock Configuration
  * @retval None
  */
void SystemClock_Config(void)
{
  RCC_OscInitTypeDef RCC_OscInitStruct = {0};
  RCC_ClkInitTypeDef RCC_ClkInitStruct = {0};

  /** Initializes the RCC Oscillators according to the specified parameters
  * in the RCC_OscInitTypeDef structure.
  */
  RCC_OscInitStruct.OscillatorType = RCC_OSCILLATORTYPE_HSE;
  RCC_OscInitStruct.HSEState = RCC_HSE_ON;
  RCC_OscInitStruct.HSEPredivValue = RCC_HSE_PREDIV_DIV1;
  RCC_OscInitStruct.HSIState = RCC_HSI_ON;
  RCC_OscInitStruct.PLL.PLLState = RCC_PLL_ON;
  RCC_OscInitStruct.PLL.PLLSource = RCC_PLLSOURCE_HSE;
  RCC_OscInitStruct.PLL.PLLMUL = RCC_PLL_MUL9;
  if (HAL_RCC_OscConfig(&RCC_OscInitStruct) != HAL_OK)
  {
    Error_Handler();
  }

  /** Initializes the CPU, AHB and APB buses clocks
  */
  RCC_ClkInitStruct.ClockType = RCC_CLOCKTYPE_HCLK|RCC_CLOCKTYPE_SYSCLK
                              |RCC_CLOCKTYPE_PCLK1|RCC_CLOCKTYPE_PCLK2;
  RCC_ClkInitStruct.SYSCLKSource = RCC_SYSCLKSOURCE_PLLCLK;
  RCC_ClkInitStruct.AHBCLKDivider = RCC_SYSCLK_DIV1;
  RCC_ClkInitStruct.APB1CLKDivider = RCC_HCLK_DIV2;
  RCC_ClkInitStruct.APB2CLKDivider = RCC_HCLK_DIV1;

  if (HAL_RCC_ClockConfig(&RCC_ClkInitStruct, FLASH_LATENCY_2) != HAL_OK)
  {
    Error_Handler();
  }
}

/* USER CODE BEGIN 4 */

/* USER CODE END 4 */

/**
  * @brief  This function is executed in case of error occurrence.
  * @retval None
  */
void Error_Handler(void)
{
  /* USER CODE BEGIN Error_Handler_Debug */
  /* User can add his own implementation to report the HAL error return state */
  __disable_irq();
  while (1)
  {
  }
  /* USER CODE END Error_Handler_Debug */
}

#ifdef  USE_FULL_ASSERT
/**
  * @brief  Reports the name of the source file and the source line number
  *         where the assert_param error has occurred.
  * @param  file: pointer to the source file name
  * @param  line: assert_param error line source number
  * @retval None
  */
void assert_failed(uint8_t *file, uint32_t line)
{
  /* USER CODE BEGIN 6 */
  /* User can add his own implementation to report the file name and line number,
     ex: printf("Wrong parameters value: file %s on line %d\r\n", file, line) */
  /* USER CODE END 6 */
}
#endif /* USE_FULL_ASSERT */
将上述代码烧录编译后,得到的结果如下。
(3)显示温湿度
首先我们需要将前文提到的AHT20的采集程序添加到我们的工程中,添加完之后,和之前的步骤相同,只是将串口打印改为了由OLED屏输出。需要值得注意的是,u8g2库并不能直接展示变量,所以我们还是需要使用sprintf将变量转义为字符。同时通过u8g2_DrawUTF8输出我们的UTF8编码格式的数据。代码示例如下:
/* USER CODE BEGIN Header */
/**
  ******************************************************************************
  * @file           : main.c
  * @brief          : Main program body
  ******************************************************************************
  * @attention
  *
  * Copyright (c) 2024 STMicroelectronics.
  * All rights reserved.
  *
  * This software is licensed under terms that can be found in the LICENSE file
  * in the root directory of this software component.
  * If no LICENSE file comes with this software, it is provided AS-IS.
  *
  ******************************************************************************
  */
/* USER CODE END Header */
/* Includes ------------------------------------------------------------------*/
#include "main.h"
#include "i2c.h"
#include "tim.h"
#include "gpio.h"
#include "u8g2.h"
#include "stm32_u8g2.h"
#include "OLED_Front.h"
#include "aht20.h"
#include <stdio.h>
#include "string.h"
/* Private includes ----------------------------------------------------------*/
/* USER CODE BEGIN Includes */

/* USER CODE END Includes */

/* Private typedef -----------------------------------------------------------*/
/* USER CODE BEGIN PTD */

/* USER CODE END PTD */

/* Private define ------------------------------------------------------------*/
/* USER CODE BEGIN PD */

/* USER CODE END PD */

/* Private macro -------------------------------------------------------------*/
/* USER CODE BEGIN PM */

/* USER CODE END PM */

/* Private variables ---------------------------------------------------------*/

/* USER CODE BEGIN PV */

/* USER CODE END PV */

/* Private function prototypes -----------------------------------------------*/
void SystemClock_Config(void);
/* USER CODE BEGIN PFP */

/* USER CODE END PFP */

/* Private user code ---------------------------------------------------------*/
/* USER CODE BEGIN 0 */


/* USER CODE END 0 */

/**
  * @brief  The application entry point.
  * @retval int
  */
int main(void)
{

  /* USER CODE BEGIN 1 */

  /* USER CODE END 1 */

  /* MCU Configuration--------------------------------------------------------*/

  /* Reset of all peripherals, Initializes the Flash interface and the Systick. */
  HAL_Init();

  /* USER CODE BEGIN Init */

  /* USER CODE END Init */

  /* Configure the system clock */
  SystemClock_Config();

  /* USER CODE BEGIN SysInit */

  /* USER CODE END SysInit */

  /* Initialize all configured peripherals */
  MX_GPIO_Init();
  MX_I2C2_Init();
  MX_TIM1_Init();
  MX_I2C1_Init();
  /* USER CODE BEGIN 2 */

  u8g2_t u8g2;
  u8g2_Init(&u8g2);      //初始化

  /* USER CODE END 2 */
    float temperature=1 , humidity ;
    char t[5];
    char h[5];

//  uint16_t x=0;
  /* Infinite loop */
  /* USER CODE BEGIN WHILE */
  while (1)
  {
    /* USER CODE END WHILE */
//      //显示汉字和数字
//    u8g2_SetFont(&u8g2,u8g2_font_ncenB12_tf);//设置字体格式
//    //(参数顺序依次是,结构体、x、y、字宽、字高、储存要显示的字点阵的数组)
//    u8g2_DrawXBMP(&u8g2,32,0,16,16,xing);
//    u8g2_DrawXBMP(&u8g2,48,0,16,16,ye);
//    u8g2_DrawXBMP(&u8g2,64,0,16,16,jin);
//    u8g2_SetFont(&u8g2,u8g2_font_ncenB10_tf);
//    u8g2_DrawStr(&u8g2,16,50,"632207030128");
//    u8g2_SendBuffer(&u8g2);
      //滚动显示汉字
//        if(x<=128)
//		{
//			x++;//向右滑动,可以提高每次x的增加量来控制滑动速度
//		}
//		else if(x>128)//置零
//		{
//			x=0;
//		}
//    u8g2_SetFont(&u8g2,u8g2_font_ncenB12_tf);//设置字体格式
//    //(参数顺序依次是,结构体、x、y、字宽、字高、储存要显示的字点阵的数组)
//    u8g2_DrawXBMP(&u8g2,x+16,0,16,16,chong);
//    u8g2_DrawXBMP(&u8g2,x+32,0,16,16,qing);
//    u8g2_DrawXBMP(&u8g2,x+48,0,16,16,jiao);
//    u8g2_DrawXBMP(&u8g2,x+64,0,16,16,tong);
//    u8g2_DrawXBMP(&u8g2,x+80,0,16,16,da);
//    u8g2_DrawXBMP(&u8g2,x+96,0,16,16,xue);
//    u8g2_SetFont(&u8g2,u8g2_font_ncenB10_tf);
//    u8g2_SendBuffer(&u8g2);
        //显示采集到的温度和湿度
    AHT20_Read( &temperature , &humidity); //读取AHT20
	sprintf(t ," %f",temperature);//拼接
    sprintf(h ," %f",humidity);//拼接
    u8g2_SetFont(&u8g2,u8g2_font_ncenB12_tf);//设置字体格式
    //(参数顺序依次是,结构体、x、y、字宽、字高、储存要显示的字点阵的数组)
    u8g2_DrawXBMP(&u8g2,32,0,16,16,wen);
    u8g2_DrawXBMP(&u8g2,48,0,16,16,du);
	u8g2_DrawStr(&u8g2,64,16,":");
    u8g2_SetFont(&u8g2,u8g2_font_ncenB10_tf);
    u8g2_DrawXBMP(&u8g2,32,32,16,16,shi);
    u8g2_DrawXBMP(&u8g2,48,32,16,16,du);
	u8g2_DrawStr(&u8g2,64,48,":");
    u8g2_SetFont(&u8g2,u8g2_font_ncenB10_tf);
    u8g2_DrawUTF8(&u8g2,80,16,t);
	u8g2_DrawUTF8(&u8g2,80,48,h);
    u8g2_SendBuffer(&u8g2);
    /* USER CODE BEGIN 3 */
  }
  /* USER CODE END 3 */
}

/**
  * @brief System Clock Configuration
  * @retval None
  */
void SystemClock_Config(void)
{
  RCC_OscInitTypeDef RCC_OscInitStruct = {0};
  RCC_ClkInitTypeDef RCC_ClkInitStruct = {0};

  /** Initializes the RCC Oscillators according to the specified parameters
  * in the RCC_OscInitTypeDef structure.
  */
  RCC_OscInitStruct.OscillatorType = RCC_OSCILLATORTYPE_HSE;
  RCC_OscInitStruct.HSEState = RCC_HSE_ON;
  RCC_OscInitStruct.HSEPredivValue = RCC_HSE_PREDIV_DIV1;
  RCC_OscInitStruct.HSIState = RCC_HSI_ON;
  RCC_OscInitStruct.PLL.PLLState = RCC_PLL_ON;
  RCC_OscInitStruct.PLL.PLLSource = RCC_PLLSOURCE_HSE;
  RCC_OscInitStruct.PLL.PLLMUL = RCC_PLL_MUL9;
  if (HAL_RCC_OscConfig(&RCC_OscInitStruct) != HAL_OK)
  {
    Error_Handler();
  }

  /** Initializes the CPU, AHB and APB buses clocks
  */
  RCC_ClkInitStruct.ClockType = RCC_CLOCKTYPE_HCLK|RCC_CLOCKTYPE_SYSCLK
                              |RCC_CLOCKTYPE_PCLK1|RCC_CLOCKTYPE_PCLK2;
  RCC_ClkInitStruct.SYSCLKSource = RCC_SYSCLKSOURCE_PLLCLK;
  RCC_ClkInitStruct.AHBCLKDivider = RCC_SYSCLK_DIV1;
  RCC_ClkInitStruct.APB1CLKDivider = RCC_HCLK_DIV2;
  RCC_ClkInitStruct.APB2CLKDivider = RCC_HCLK_DIV1;

  if (HAL_RCC_ClockConfig(&RCC_ClkInitStruct, FLASH_LATENCY_2) != HAL_OK)
  {
    Error_Handler();
  }
}

/* USER CODE BEGIN 4 */

/* USER CODE END 4 */

/**
  * @brief  This function is executed in case of error occurrence.
  * @retval None
  */
void Error_Handler(void)
{
  /* USER CODE BEGIN Error_Handler_Debug */
  /* User can add his own implementation to report the HAL error return state */
  __disable_irq();
  while (1)
  {
  }
  /* USER CODE END Error_Handler_Debug */
}

#ifdef  USE_FULL_ASSERT
/**
  * @brief  Reports the name of the source file and the source line number
  *         where the assert_param error has occurred.
  * @param  file: pointer to the source file name
  * @param  line: assert_param error line source number
  * @retval None
  */
void assert_failed(uint8_t *file, uint32_t line)
{
  /* USER CODE BEGIN 6 */
  /* User can add his own implementation to report the file name and line number,
     ex: printf("Wrong parameters value: file %s on line %d\r\n", file, line) */
  /* USER CODE END 6 */
}
#endif /* USE_FULL_ASSERT */
进行编译烧录后,得到的结果如下。
四、总结
有需要本次工程所需的代码或者软件的伙伴,可以在此链接下下载:
通过网盘分享的文件:AHT20&U8G2.zip
链接: https://pan.baidu.com/s/1iGSu-1RZoLR0Lq0Sq5aSoQ?pwd=aj2d 提取码: aj2d
在 I2C 通信协议部分,其物理层凭借 SDA 和 SCL 双线实现多设备互联,各设备依独特地址区分。协议层起始与停止条件精准界定通信边界,字节传输搭配应答机制保障数据准确交互,主从模式下主设备掌控节奏、从设备响应请求,传输速度依场景灵活可选,为数据传输筑牢根基。 AHT20 温度采集环节,CUBE 配置涵盖多模块精准设置及代码生成,代码编写构建初始化与读取函数,采集流程经变量定义、函数调用、数据拼接与串口发送,最终经烧录测试,成功在串口助手呈现数据,实现稳定温湿度采集与传输,为后续显示提供数据支撑。
OLED 显示方面,CUBE 配置按需调整 I2C 等模块,功能实现借助 u8g2 库达成多样显示效果。汉字与数字显示经字体设置、取模操作与函数调用,精准呈现信息;滚动字符显示借变量控制 X 轴坐标,达动态视觉效果;温湿度显示融合 AHT20 采集程序,经格式转换与特定函数输出于 OLED 屏,直观展示环境参数。


 791
791

 被折叠的 条评论
为什么被折叠?
被折叠的 条评论
为什么被折叠?
 到【灌水乐园】发言


