


主从复制
- 基于语句的复制。在主服务器上执行的 SQL 语句,在从服务器上执行同样的语句。MySQL 默认采用基于语句的复制,效率比较高。
- 基于行的复制。把改变的内容复制过去,而不是把命令在从服务器上执行一遍。
- 混合类型的复制。默认采用基于语句的复制,一旦发现基于语句无法精确复制时, 就会采用基于行的复制。
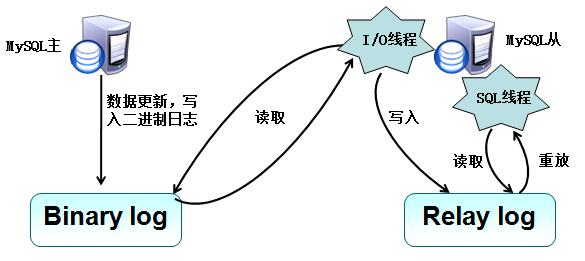
- 在每个事务更新数据完成之前,Master 在二进制日志记录这些改变。写入二进制 日志完成后,Master 通知存储引擎提交事务。
- Slave 将 Master 的 Binary log 复制到其中继日志。首先,Slave 开始一个工作线 程——I/O 线程,I/O 线程在 Master 上打开一个普通的连接,然后开始 Binlog dump process。 Binlog dump process 从 Master 的二进制日志中读取事件,如果已经跟上 Master,它会睡 眠并等待 Master 产生新的事件。I/O 线程将这些事件写入中继日志。
- SQL slave thread(SQL 从线程)处理该过程的最后一步。SQL 线程从中继日志 读取事件,并重放其中的事件而更新 Slave 的数据,使其与 Master 中的数据一致。只要该 线程与 I/O 线程保持一致,中继日志通常会位于 OS 的缓存中,所以中继日志的开销很小。
- 复制过程有一个很重要的限制,即复制在 Slave 上是串行化的,也就是说 Master 上的 并行更新操作不能在 Slave 上并行操作。
实验环境
2台CentOS 7
192.168.14.128 master
192.168.14.129 slave1
提示:写完文章后,目录可以自动生成,如何生成可参考右边的帮助文档
前言
数据库可用性、安全性加固之一
//后面会说读写分离
提示:以下是本篇文章正文内容,下面案例可供参考
一、为什么要数据库主从复制
1、提高数据库可用性,
2、可以在从数据库上进行日志备份,
3、提高数据库更高层面的读写分离技术,
二、配置步骤
①主服务器配置
1、配置ntp服务(保证从服务器和主服务器上时间一致)
#主服务器配置为时间同步服务器
yum -y install ntp //下载安装ntp服务器
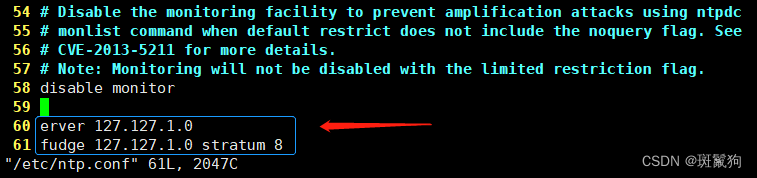
2、修改 "/etc/ntp.conf" 配置文件;
vim /etc/ntp.conf #在最下面添加两行内容、"127.127.1.0" 通用的时间服务器
server 127.127.1.0
fudge 127.127.1.0 stratum 8
systemctl restart ntpd #修改了配置文件、重启下服务
systemctl enable ntpd #可设置开机自启动
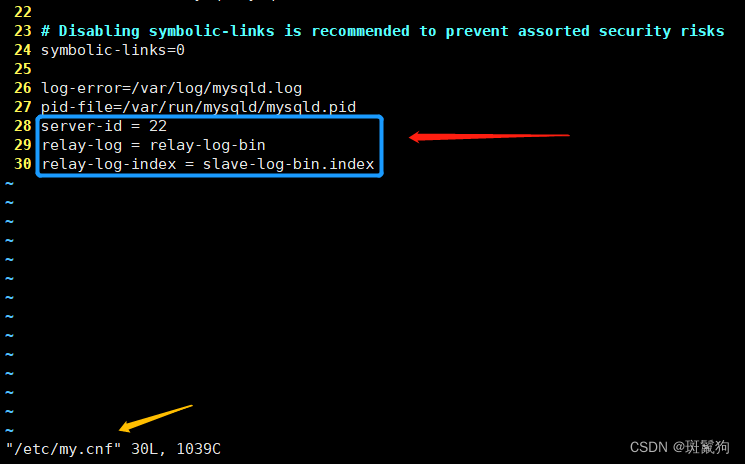
3、修改 "/etc/my.cnf" 配置文件;
vim /etc/my.cnf #添加下面的三行内容
server-id = 11
log_bin = master-bin
log-slave-updates = true
systemctl restart mysqld #凡是修改了配置文件记得重启!
4、为从服务器添加授权;
#进入主服务器MySQL
mysql -uroot -pWoniu@1234 # -u用户名 -p密码
mysql> grant replication slave on *.* to 'myslave'@'192.168.14.%' identified by 'Woniu@1234';
mysql> flush privileges;
Query OK, 0 rows affected (0.01 sec)
# "grant replication slave on" 授予复制从端
# "14网段所有主机myslave用户登录." "identified by 登录密码"
# "flush privileges;" #刷新用户授权
5、#查看 master 状态,找到 position 字段信息,这里是306
mysql> show master status;
+-------------------+----------+--------------+------------------+-------------------+
| File | Position | Binlog_Do_DB | Binlog_Ignore_DB | Executed_Gtid_Set |
+-------------------+----------+--------------+------------------+-------------------+
| master-bin.000003 | 260064 | | | |
+-------------------+----------+--------------+------------------+-------------------+
1 row in set (0.01 sec)

#File 主服务器的二进制日志文件名
#Position 主服务器的文件配置记录
#master-bin.000003 这个是日志文件 //文件名和记录增删改会变动的
6、主从全部配置完成后,最后验证主服务器创建数据库看从服务器是否显示
mysql> create database wangan; #创建个新数据库
7、回从查看。
②从服务器配置
1、下载ntpdate客户端;
#从服务器配置为时间同步客户端
yum -y install ntpdate //下载安装ntpdate
2、启动ntpdate;
systemctl enable ntpdate #可设置开机自启动
systemctl start ntpdate #启动ntpdate客户端
3、连接ntp主服务器(时间同步)
ntpdate 192.168.14.128 // "192.168.14.128"为主服务器IP
============注意关闭防火墙(不关连不上)===============
4、修改配置文件 " /etc/my.cnf "; #添加下面三行内容
vim /etc/my.cnf
5、重启MySQL;
systemctl restart mysqld
6、进入MySQL;
mysql -uroot -pWoniu@1234
7、配置从服务器数据库连接主服务器; //关键连接
mysql>change master to master_host='192.168.14.128',master_user='myslave',master_password='Woniu@1234',master_log_file='master-bin.000003',master_log_pos=260064;# 注意:这里的 master_log_pos=260064 为master服务器上 position 字段信息
#指定的IP为主服务器IP # "myslave" 是主服务器授权从服务器所登录的用户名
#后面的 "master-bin.000003" 是主服务器master 状态。 //输入对才能同步成功
8、启动 slave 后 查看其状态;
mysql> start slave;
mysql> show slave status\G;
*************************** 1. row ***************************
Slave_IO_State: Waiting for master to send event
Master_Host: 192.168.14.128
Master_User: myslave
Master_Port: 3306
Connect_Retry: 60
Master_Log_File: master-bin.000003
Read_Master_Log_Pos: 260064
Relay_Log_File: relay-log-bin.000005
Relay_Log_Pos: 260279
Relay_Master_Log_File: master-bin.000003
Slave_IO_Running: Yes #保证为yes,不然不成功,如果是Connecting主服务器的授权没能成功,注意密码复杂度要求
Slave_SQL_Running: Yes #保证为yes
Replicate_Do_DB:
Replicate_Ignore_DB:
Replicate_Do_Table:
Replicate_Ignore_Table:
Replicate_Wild_Do_Table:
Replicate_Wild_Ignore_Table:
Last_Errno: 0
Last_Error:
Skip_Counter: 0
Exec_Master_Log_Pos: 260064
Relay_Log_Space: 260651
Until_Condition: None
Until_Log_File:
Until_Log_Pos: 0
Master_SSL_Allowed: No
Master_SSL_CA_File:
Master_SSL_CA_Path:
Master_SSL_Cert:
Master_SSL_Cipher:
Master_SSL_Key:
Seconds_Behind_Master: 0
Master_SSL_Verify_Server_Cert: No
Last_IO_Errno: 0
Last_IO_Error:
Last_SQL_Errno: 0
Last_SQL_Error:
Replicate_Ignore_Server_Ids:
Master_Server_Id: 11
Master_UUID: 800e5ef3-407f-11ed-9529-000c292bfea4
Master_Info_File: /var/lib/mysql/master.info
SQL_Delay: 0
SQL_Remaining_Delay: NULL
Slave_SQL_Running_State: Slave has read all relay log; waiting for more updates
Master_Retry_Count: 86400
Master_Bind:
Last_IO_Error_Timestamp:
Last_SQL_Error_Timestamp:
Master_SSL_Crl:
Master_SSL_Crlpath:
Retrieved_Gtid_Set:
Executed_Gtid_Set:
Auto_Position: 0
Replicate_Rewrite_DB:
Channel_Name:
Master_TLS_Version:
1 row in set (0.00 sec)
图片参考;
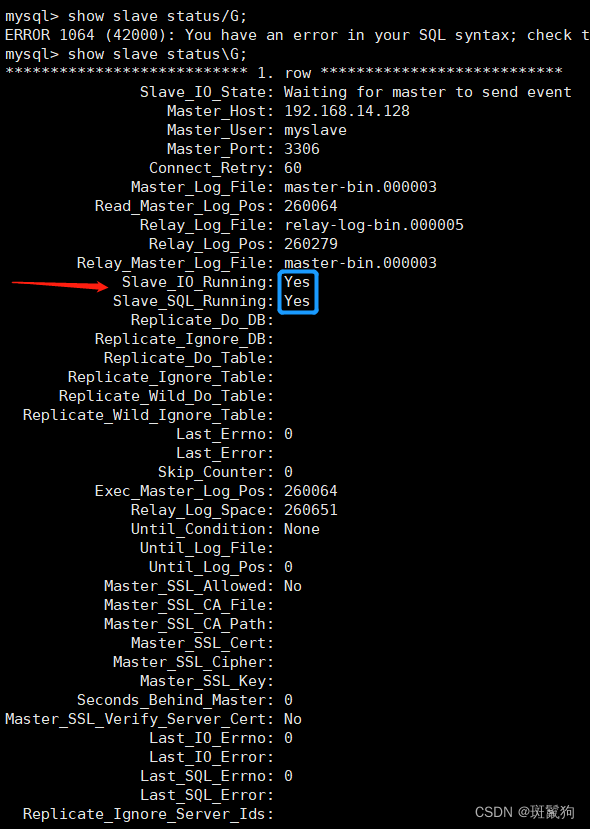
双 "Yes"
MySQL主从复制成功;
9、回主服务器验证
10、最后一步在从服务器查看,服务器是否有 "wangan" 数据库
mysql> show databases;
+--------------------+
| Database |
+--------------------+
| information_schema |
| mysql |
| performance_schema |
| school |
| sys |
| wangan |
+--------------------+
6 rows in set (0.00 sec)
配置总结
主从复制
1、先要同步时间,
2、修改主从配置文件,
3、添加相互授权,同步数据库连接状态。
4、验证。


 1966
1966

 被折叠的 条评论
为什么被折叠?
被折叠的 条评论
为什么被折叠?
 到【灌水乐园】发言


