


目录
2. 在resources目录下创建spring config xml文件,并管理bean对象
2.1.2 实现接口(InitializingBean)初始化方法
2.3.1 创建一个类(Myprocessor)并实现BeanPoscessor接口
2.3.2 创建一个类(StudentService),并实现InitializingBean接口,使用初始化方法
2.3.3 编写spring配置文件(applicationContext.xml),配置后置处理器,并管理StudentService
4.2 MVC三大注解(@Controller、@Service、@Repository)
4.4 生命周期注解(@PostConstruct、@PoreDestory)
4.4.2 @PostConstruct注解(bean初始化)
4.8 @RequiredArgsConstructor 注解
9.使用PropertySource读取properties资源文件
12.1 xml使用ProxyFactoryBean进行增强

1.将bean交给spring容器管理
1.为什么要将bean交给spring容器管理?
在没有spring之前,我们需要某个对象时,是通过手动new创建出来对象的,这样手动创建出来的方式具有强耦合的关系,如果在bean对象中需要依赖另一个bean对象时,当被依赖的对象需要做出改变时,需要依赖对象的一方则也要做出想对应的改变
比如 如果被依赖的一方改了名称,则需要依赖的一方也要更改,则间接违反了开闭原则
现在将bean对象交给spring容器管理,则不需要我们手动创建bean对象,Spring容器负责自动创建和注入这些依赖,这就实现了spring中的思想控制反转
所谓控制反转,就是对象不再主动获取依赖(例如通过
new关键字创建依赖对象),而是由外部容器负责注入依赖给它。当需要对象时,通过容器取获取即可
1. 编写bean对象
1.1 编写UserService接口
public interface UserService {
    /**
     * 添加用户
     */
    void addUser();
}
1.2 编写类对象实现UserService接口
public class UserServiceImpl implements UserService {
    @Override
    public void addUser() {
        System.out.println("添加用户");
    }
}
public class TeacherServiceImpl implements UserService {
    @Override
    public void addUser() {
        System.out.println("创建老师");
    }
}
2. 在resources目录下创建spring config xml文件,并管理bean对象

定义名为beans.xml的xml文件
<?xml version="1.0" encoding="UTF-8"?>
<beans xmlns="http://www.springframework.org/schema/beans"
       xmlns:xsi="http://www.w3.org/2001/XMLSchema-instance"
       xsi:schemaLocation="http://www.springframework.org/schema/beans http://www.springframework.org/schema/beans/spring-beans.xsd">

    <!--装配UserService实现类-->
    <!--id表示这个bean在容器里面的唯一表示-->
    <!--class表示bean的完整类名-->
    <bean id="userService" class="com.xr.springdemo.service.impl.UserServiceImpl"/>

    <bean id="studentService" class="com.xr.springdemo.service.impl.TeacherServiceImpl"/>


</beans>
现在我们创建的bean对象都以及交给spring容器管理了
2.1 通过配置文件初始化容器工厂,并通过工厂来获取bean对象
创建一个main方法
public class Main {
public static void main(String[] args) throws BeansException {
// 根据配置文件初始化一个容器工厂,并关联xml文件
ApplicationContext context = new ClassPathXmlApplicationContext("beans.xml");
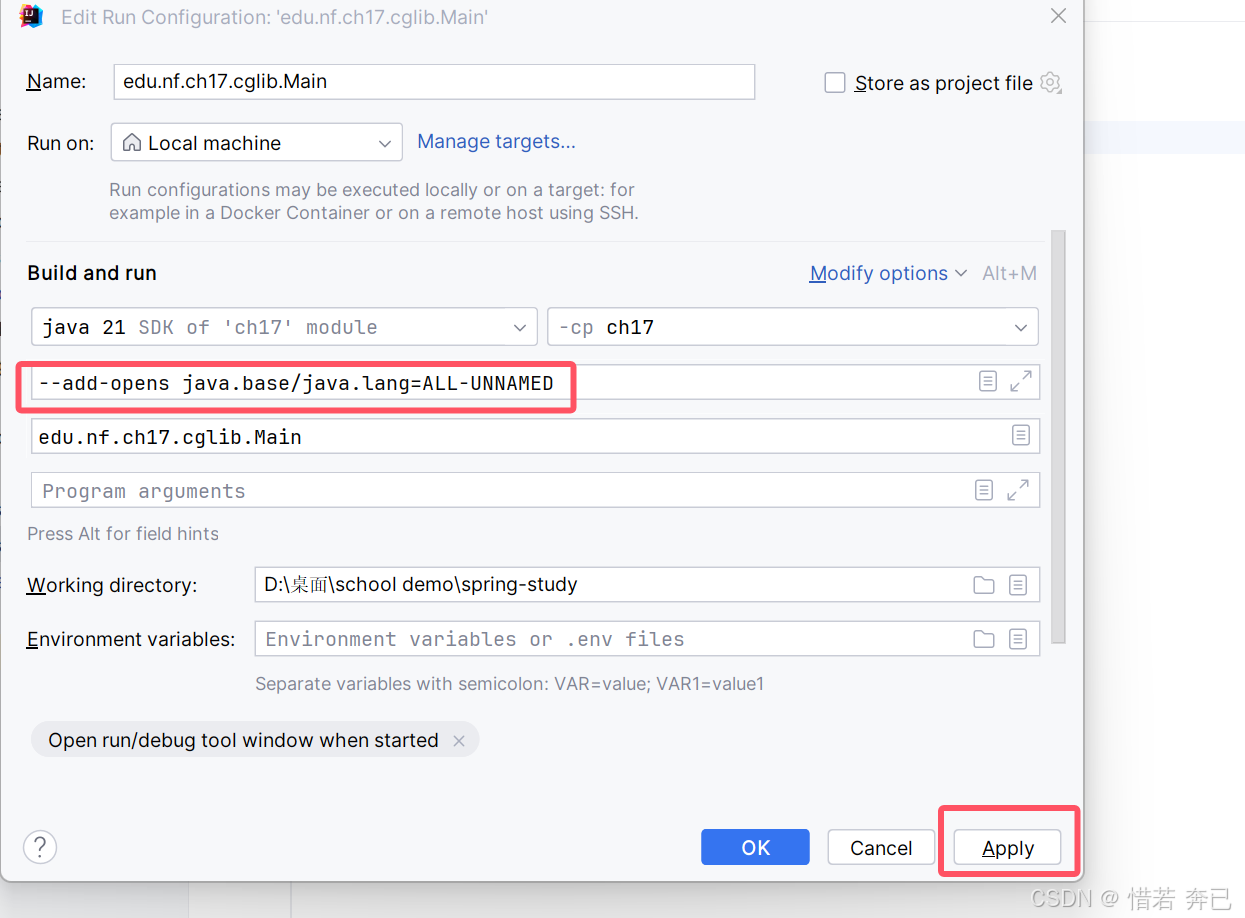
// 从容器中获取bean对象(根据xml文件配置bean中的唯一id来获取)
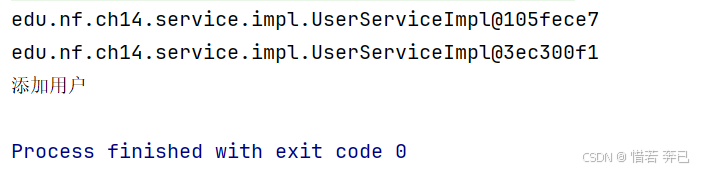
UserService userService = (UserService) context.getBean("userService");
UserService teacherService = (UserService) context.getBean("teacherService");
// 调用
userService.addUser();
teacherService.addUser();
}
}最后执行结果

现在我们获取bean对象的方式并不是通过new的方式,而是通过spring容器获取到的bean对象
3. spring容器管理工厂
spring容器不仅可以管理bean对象,还可以将自定义工厂交给spring容器管理,而定义工厂生产出来的bean对象也会被spring容器管理,所以spring容器非常灵活
3.1 创建自定义静态工厂 (StudentServiceFactory)
/**
 * 自定义工厂来创建特定的对象
 * 这个自定义工厂也将纳入spring容器中
 * spring会调用自定义工厂的方法来创建Bean对象
 * 创建出来的bean也会纳入容器中管理
 */
public class StudentServiceFactory {
    public static UserService create() {
        return new StudentServiceImpl();
    }
}
3.2 将自定义静态工厂交给spring容器管理,而自定义工厂创建出来的bean对象也会被spring容器管理
<?xml version="1.0" encoding="UTF-8"?>
<beans xmlns="http://www.springframework.org/schema/beans"
       xmlns:xsi="http://www.w3.org/2001/XMLSchema-instance"
       xsi:schemaLocation="http://www.springframework.org/schema/beans http://www.springframework.org/schema/beans/spring-beans.xsd">

    <!--装配UserService实现类-->
    <!--id表示这个bean在容器里面的唯一表示-->
    <!--class表示bean的完整类名-->
    <bean id="userService" class="com.xr.springdemo.service.impl.UserServiceImpl"/>
    <bean id="studentService" class="com.xr.springdemo.service.impl.TeacherServiceImpl"/>


    <!--装配自定义工厂,由spring容器来管理这个工厂,factory-method指定自定义静态工厂的方法-->
    <bean id="studentService" class="com.xr.springdemo.factory.StudentServiceFactory" factory-method="create"/>


</beans>
3.3 通过自定义工厂获取Bean对象
public class Main {
    public static void main(String[] args) throws BeansException {

        // 根据配置文件初始化一个容器工厂,并关联xml文件
        ApplicationContext context = new ClassPathXmlApplicationContext("beans.xml");
        // 通过自定义工厂创建的bean对象,并获取
        UserService studentService = (UserService) context.getBean("studentService");
        // 调用方法
        studentService.addUser();
    }
}
最后执行结果

发现spring容器将自定义工厂创建出来的bean对象也管理了起来
3.4 基于spring提供的FactoryBean接口创建工厂,官方推荐
/**
 * 自定义工厂,这个工厂是实现spring提供的FactoryBean接口
 */
public class TeacherServiceFactoryBean implements FactoryBean<UserService> {

    /**
     * getObject方法创建一个对象
     */
    @Override
    public UserService getObject() throws Exception {
        return new TeacherServiceImpl();
    }

    /**
     * getObjectType方法返回创建对象的类型
     */
    @Override
    public Class<?> getObjectType() {
        return TeacherServiceImpl.class;
    }
}
3.5 创建TeacherServiceImpl类并实现UserService
public class TeacherServiceImpl implements UserService {
    @Override
    public void addUser() {
        System.out.println("创建老师");
    }
}
3.6 xml配置工厂
<?xml version="1.0" encoding="UTF-8"?>
<beans xmlns="http://www.springframework.org/schema/beans"
       xmlns:xsi="http://www.w3.org/2001/XMLSchema-instance"
       xsi:schemaLocation="http://www.springframework.org/schema/beans http://www.springframework.org/schema/beans/spring-beans.xsd">

    <!--装配UserService实现类-->
    <!--id表示这个bean在容器里面的唯一表示-->
    <!--class表示bean的完整类名-->
    <bean id="userService" class="com.xr.springdemo.service.impl.UserServiceImpl"/>
    <bean id="studentService" class="com.xr.springdemo.service.impl.TeacherServiceImpl"/>


    <!--装配自定义工厂,由spring容器来管理这个工厂,factory-method指定自定义静态工厂的方法-->
    <bean id="studentService" class="com.xr.springdemo.factory.StudentServiceFactory" factory-method="create"/>

    <!--装配实现Spring提供FactoryBean接口的工厂-->
    <bean id="teacherService" class="com.xr.springdemo.factory.TeacherServiceFactoryBean"/>


</beans>
3.6 获取bean对象并执行
public class Main {
    public static void main(String[] args) throws BeansException {
        // 根据配置文件初始化一个容器工厂
        ApplicationContext context = new ClassPathXmlApplicationContext("beans.xml");
        UserService teacherService = (UserService) context.getBean("teacherService");
        teacherService.addUser();
    }
}
最后执行结果

这种方式是通过spring提供factoryBean接口的方式创建的工厂并交给spring容器进行管理
2.Spring Bean 生命周期
对象构造方法
- Spring 通过反射机制调用 Bean 的构造方法,创建 Bean 的实例。此时,Bean 还没有完成属性的注入。
- 例如:
new UserService(),调用无参构造器。后置处理器的
postProcessBeforeInitialization方法
- 在 Bean 初始化之前,Spring 调用实现了
BeanPostProcessor接口的后置处理器的postProcessBeforeInitialization方法。- 这个方法可以对 Bean 进行预处理,在 Bean 完成初始化前做一些自定义操作。
- 对应配置中的
<bean id="myProcessor" class="com.xr.processor.MyProcessor"/>。InitializingBean 接口的
afterPropertiesSet方法
- 如果 Bean 实现了
InitializingBean接口,Spring 会调用其afterPropertiesSet方法进行初始化操作。- 这个方法是 Spring 内置的初始化回调机制之一,用于在所有的属性被设置后执行一些定制的初始化逻辑。
自定义的
init-method初始化方法
- 如果在 XML 配置中指定了
init-method属性,Spring 会调用指定的初始化方法。在配置中,UserServiceBean 使用了beanInit作为自定义初始化方法。- 这是另一种初始化 Bean 的方式。
后置处理器的
postProcessAfterInitialization方法
- 在 Bean 初始化之后,Spring 调用实现了
BeanPostProcessor接口的后置处理器的postProcessAfterInitialization方法。- 这个方法可以对 Bean 进行后处理操作,在 Bean 初始化完成后做进一步定制化处理。
DisposableBean 接口的
destroy方法
- 如果 Bean 实现了
DisposableBean接口,Spring 在销毁 Bean 时会调用其destroy方法。- 这个方法是 Spring 提供的内置销毁回调,用于 Bean 在被销毁之前执行清理操作。
自定义的
destroy-method销毁方法
- 如果在 XML 配置中指定了
destroy-method属性,Spring 在 Bean 被销毁时会调用这个方法。在配置中,UserServiceBean 使用了beanDestroy作为自定义销毁方法。- 这是另一种销毁 Bean 的方式。
spring Bean先销毁,在着是spring容器销毁
后置处理器(BeanPostProcessor) 是 Spring 框架中一个重要的扩展机制,它允许在 Spring 容器实例化 Bean 之后、初始化方法执行前后对容器中所有 Bean 进行一些自定义的修改或增强。
执行顺序:
bean对象的构造方法--------------------》》》后置处理器
postProcessBeforeInitialization---------------》》》InitializingBean 接口的afterPropertiesSetbean初始化方法---------------------》》》自定义的init-method初始化方法----------------------------------》》》后置处理器的postProcessAfterInitialization方法-----------------------------》》》DisposableBean 接口的destroy销毁方法----------------------》》》自定义的destroy-method销毁方法
初始化方法和销毁方法有两种一个是实现接口,一个是自定义方法,如果两种同时使用,优先执行实现接口的方法,在执行自定义方法
2.1 Spring Bean初始化方法
2.1.1 自定义初始化方法
2.1.1.1 创建UserService类,并编写构造方法和自定义初始化方法
public class UserService {

    /**
     * 构造方法是被JVM在创建类实例的时候自动调用
     * 例如:new UserService();
     * 或者基于反射创建 USerService.class.newInstance();
     */
    public UserService() {
        System.out.println("执行UserService构造方法");
    }


    /**
     * 自定义Bean的初始化方法
     */
    public void beanInit() {
        System.out.println("执行Bean的初始化方法");
    }
}
2.1.1.2 将UserService Bean交给spring容器 管理,编写名为applicationContext.xml配置文件
<?xml version="1.0" encoding="UTF-8"?>
<beans xmlns="http://www.springframework.org/schema/beans"
       xmlns:xsi="http://www.w3.org/2001/XMLSchema-instance"
       xsi:schemaLocation="http://www.springframework.org/schema/beans http://www.springframework.org/schema/beans/spring-beans.xsd">
    <!--bean初始化方法:
        两种方式:
        第一种方式. 在Bean中自定义初始化方法,在配置中使用init-method属性来指定初始化方法-->
    <bean id="userService" class="com.xr.service.UserService" init-method="beanInit"/>

</beans>
在自定义初始化方式,将Bean交给spring 容器管理的时候需要使用init-method属性来指定初始化方法
2.1.1.3 编写Main方法
public class Main {
    public static void main(String[] args) {
        // 创建spring上下文,从而通过它来访问和操作在Spring配置文件(applicationContext.xml)中定义的bean对象
        ApplicationContext context = new ClassPathXmlApplicationContext("applicationContext.xml");

    }
}
执行结果: 
Main方法 中只是获取了spring上下文,没有调用构造方法和自定义初始化方法,执行的结果却调用了先执行了构造方法在执行自定义初始化方法
构造方法: 由jvm创建
初始化方法: 由spring容器创建
所有Bean对象一开始都是交由spring容器进行管理,所以只要spring容器一开始则就会调用所有bean对象的初始化方法,而构造方法确实jvm创建
2.1.2 实现接口(InitializingBean)初始化方法
2.1.2.1 创建StudenttService类,并实现InitializingBean接口
public class StudentService implements InitializingBean {

    public StudentService() {
        System.out.println("执行StudentService的构造方法");
    }

    @Override
    public void afterPropertiesSet() throws Exception {
        System.out.println("实现了initializingBean接口,执行studnetafterPropertiesSet方法");
    }
}
2.1.2.2 将StudentService Bean交给spring容器 管理,在applicationContext.xml配置文件进行配置
<?xml version="1.0" encoding="UTF-8"?>
<beans xmlns="http://www.springframework.org/schema/beans"
       xmlns:xsi="http://www.w3.org/2001/XMLSchema-instance"
       xsi:schemaLocation="http://www.springframework.org/schema/beans http://www.springframework.org/schema/beans/spring-beans.xsd">
    <!--bean初始化方法:
        两种方式:
        第二种方式. 在Bean中实现InitializingBean接口,接口中包含一个afterPropertiesSet方法-->
    <bean id="userService" class="com.xr.service.UserService"/>

</beans>
2.1.2.3 编写Main方法
public class Main {
    public static void main(String[] args) {
        // 创建spring上下文,从而通过它来访问和操作在Spring配置文件(applicationContext.xml)中定义的bean对象
        ApplicationContext context = new ClassPathXmlApplicationContext("applicationContext.xml");

    }
}
2.1.2.4 执行结果

2.2 Spring Bean 销毁方法
有初始化那么就肯定有销毁,那么spring Bean销毁的方式有两种
1. 自定义销毁方式
2. 实现DisposableBean接口的方式
2.2.1 自定义方式销毁
2.2.1.1 创建一个UserService类,并编写一个销毁bean方法
public class UserService implements DisposableBean {
    /**
    * 自定义销毁方法
    */
    public void beanDestroy() {
        System.out.println("准备销毁Bean");
    }
}
2.2.1.2 在spring配置文件中(applicationContext.xml)装配该bean对象,并使用destory-method属性指定销毁方法的名称
<?xml version="1.0" encoding="UTF-8"?>
<beans xmlns="http://www.springframework.org/schema/beans"
       xmlns:xsi="http://www.w3.org/2001/XMLSchema-instance"
       xsi:schemaLocation="http://www.springframework.org/schema/beans http://www.springframework.org/schema/beans/spring-beans.xsd">
    <!--
        bean的第一种销毁方法:
            1. 在Bean方法中自定义销毁方法,在配置中使用destroy-method属性来指定销毁方法
    -->
<bean id="userService" class="com.xr.service.UserService" destroy-method="beanDestroy"/>
</beans>
2.2.1.3 编写Main方法
public class Main {
    public static void main(String[] args) {
        ApplicationContext context = new ClassPathXmlApplicationContext("applicationContext.xml");
        /**
         * 关闭容器,关闭才勾起相关的销毁方法
         * 如果不关闭容器,那么销毁方法是不会执行的
         * 关闭容器之前,bean的销毁方法比关闭容器先执行,bean销毁完成之后容器才会关闭
         */
        ((ClassPathXmlApplicationContext)context).close();
    }
}
2.2.1.4 最后执行结果为

2.2.2 实现DisposableBean接口方式
2.2.2.1 定义StudentService类实现DisposableBean接口,并重写destory方法
public class StudentService implements DisposableBean{

    @Override
    public void destory() thorw Exception() {
        System.out.println("实现类DisposableBean接口,并重写了销毁方法,执行销毁");
    }
}
2.2.2.2 在spring配置文件中(applicationContext.xml)装配该bean对象,无需使用destory-method属性指定销毁方法的名称
<?xml version="1.0" encoding="UTF-8"?>
<beans xmlns="http://www.springframework.org/schema/beans"
       xmlns:xsi="http://www.w3.org/2001/XMLSchema-instance"
       xsi:schemaLocation="http://www.springframework.org/schema/beans http://www.springframework.org/schema/beans/spring-beans.xsd">
    <!--
        bean的第二种销毁方法:
            1. 在Bean中实现DisposableBean接口,接口中包含一个destroy方法
    -->
<bean id="userService" class="com.xr.service.UserService"/>
</beans>
2.2.2.3 编写main方法
public class Main {
    public static void main(String[] args) {
        ApplicationContext context = new ClassPathXmlApplicationContext("applicationContext.xml");
        /**
         * 关闭容器,关闭才勾起相关的销毁方法
         * 如果不关闭容器,那么销毁方法是不会执行的
         * 关闭容器之前,bean的销毁方法比关闭容器先执行,bean销毁完成之后容器才会关闭
         */
        ((ClassPathXmlApplicationContext)context).close();
    }
}
2.2.2.4执行结果为:

如果实现接口的方式和自定义的方式同时使用,优先执行实现接口的方式
2.3 Spring Bean 后置处理器
它是一种允许在 Spring 容器中创建 Bean(Java 对象)之前或之后对 Bean 进行额外处理的接口。Spring 框架利用后置处理器来实现各种功能,比如为 Bean 进行自动注入、代理增强等操作
简要的说:
就是在bean初始化之前和初始化之后可以做一些事情
2.3.1 创建一个类(Myprocessor)并实现BeanPoscessor接口
/**
* Bean的后置处理器(必须实现BeanPostProcessor)
* 后置处理器可以将spring容器装配完Bean之后(包括依赖注入)
* 在执行Bean的初始化方法之前执行(afterPropertiesSet、init-method)前后执行
* 也就是在初始化方法前执行后置处理器的postProcessBeforeInitialization方法
* 在初始化方法后执行后置处理器的postProcessAfterInitialization方法
*/
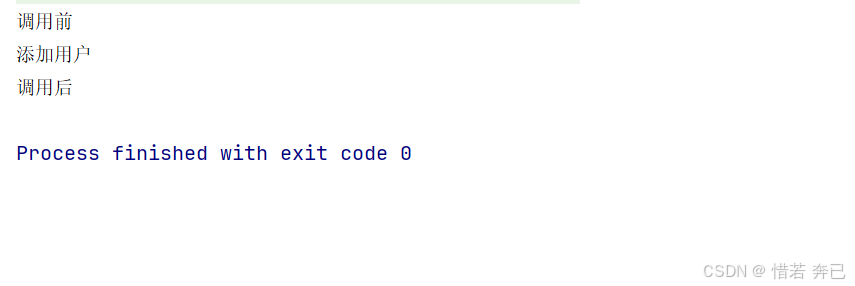
public class MyProcessor implements BeanPostProcessor {
@Override
public Object postProcessBeforeInitialization(Object bean, String beanName) throws BeansException {
System.out.println("执行后置处理器postProcessBeforeInitialization方法,在所有Bean的初始化之前执行,每个bean初始化之前都会执行");
return BeanPostProcessor.super.postProcessBeforeInitialization(bean, beanName);
}
@Override
public Object postProcessAfterInitialization(Object bean, String beanName) throws BeansException {
System.out.println("执行后置处理器postProcessAfterInitialization方法,在所有Bean的初始化之后执行,每个bean初始化之后都会执行");
return BeanPostProcessor.super.postProcessAfterInitialization(bean, beanName);
}
}
2.3.2 创建一个类(StudentService),并实现InitializingBean接口,使用初始化方法
public class StudentService implements InitializingBean {

    public StudentService() {
        System.out.println("执行StudentService的构造方法");
    }

    @Override
    public void afterPropertiesSet() throws Exception {
        System.out.println("bean的初始化,实现了initializingBean接口,执行studnetafterPropertiesSet方法");
    }
}
2.3.3 编写spring配置文件(applicationContext.xml),配置后置处理器,并管理StudentService
<?xml version="1.0" encoding="UTF-8"?>
<beans xmlns="http://www.springframework.org/schema/beans"
       xmlns:xsi="http://www.w3.org/2001/XMLSchema-instance"
       xsi:schemaLocation="http://www.springframework.org/schema/beans http://www.springframework.org/schema/beans/spring-beans.xsd">
    <!--配置bean对象-->
    <bean id="studentService" class="com.xr.service.StudentService" />
    <!--装配后置处理器-->
    <bean id="myProcessor" class="com.xr.processor.MyProcessor"/>

</bean>
2.3.4 最后执行结果

3.Ico(控制反转)
不是什么技术,而是一种设计思想。在Java开发中,Ioc意味着将你设计好的对象交给容器控制,而不是传统的在你的对象内部直接控制。
什么是控制反转:
容器将底层模板反向注入到高层模块的过程,间接实现了依赖倒置原则
一开始我们需要某对象都是使用new关键字获取的,现在我们是通过spring容器获取
3.1 依赖注入bean的两种方式
3.1.1.2 先创建controller,service包,并在controller包下创建UserController,在到service创建userService接口和一个子包impl,最后到impl下创建UserServiceImpl并实现userService接口
当我想使用UserServsice实现类的时候,通常时直接在UserController类中创建出来
如:
UserService userService = new UserServiceImpl();
但是我们现在通过容器取获取,将创建对象的主动权交给容器取做,我们直接获取就ok了
UserService接口
public interface UserService {
    void add ();
}
UserServiceImpl类实现UserService接口
public class UserServiceImpl implements UserService {


    @Override
    public void add() {
        System.out.println("添加用户");
    }
}
3.1.1通过构造的方式注入
通过依赖注入获取bean的第一中方式
UserController类
public class UserController {
    /**
     *  需要依赖的UserService接口
     */
    private UserService userService;


    /**
     * 1. 方式一通过构造器的方式获取bean对象
     * 2.将UserService的实现类注入进来
     */
    public UserController(UserService userService) {
        this.userService = userService;
    }


    // 调用userService接口实现的add方法
    public void add() {
        userService.add();
    }
}
spring配置(applicationContext.xml)文件
<?xml version="1.0" encoding="UTF-8"?>
<beans xmlns="http://www.springframework.org/schema/beans"
       xmlns:xsi="http://www.w3.org/2001/XMLSchema-instance"
       xsi:schemaLocation="http://www.springframework.org/schema/beans http://www.springframework.org/schema/beans/spring-beans.xsd">
    <!--将userService注入到userController中,通过构造方法注入-->

    <!--
        name对应构造方法的参数名称,
        type指定参数的类型,
        index指定参数的下标
        所以name、type、index三者都可以指定参数的方式
        ref同样是引用容器中Bean的id,
        这里我们需要在userController对象中注入的对象是下面的userService

        这些都是constructor-arg标签的属性,都是用来指定依赖的bean对象的,选一即可
    -->

    <!--首先将两个bean对象都交给spring容器管理(userController,userService)-->
    <bean id="userController" class="com.xr.controller.UserController">
        <!--将下面的userService对象注入到userController中-->
        <constructor-arg ref="userService"/>
    </bean>


    <bean id="userService" class="com.xxr.service.impl.userService"/>


</beans>
编写mian方法
public class Main {
    public static void main(String[] args) {
        // 容器将低层模板反向注入到高层模块的过程
        ApplicationContext application = new ClassPathXmlApplicationContext("applicationContext.xml");
        UserController bean = application.getBean(UserController.class);
        bean.add();
    }
}
最后执行结果
发现:
我们在userController中并没有使用new关键字创建出userService对象,而是通过构造器的方式结合spring的xml配置文件配置来获取的bean对象

3.1.2 通过setter方式注入
userController类
/**
 * 通过setter注入
 * 通过构造器注入
 */
public class UserController {

    private UserService userService;

    /**
     * 将UserService的实现类注入进来
     */
    public void setUserService(UserService userService) {
        this.userService = userService;
    }

    public void add() {
        userService.add();
    }
}
spring配置(applicationContext.xml)文件
<?xml version="1.0" encoding="UTF-8"?>
<beans xmlns="http://www.springframework.org/schema/beans"
       xmlns:xsi="http://www.w3.org/2001/XMLSchema-instance"
       xsi:schemaLocation="http://www.springframework.org/schema/beans http://www.springframework.org/schema/beans/spring-beans.xsd">
    <!--将userService注入到userController中,通过构造方法注入-->

    <!--
        name对应构造方法的参数名称,
        type指定参数的类型,
        index指定参数的下标
        所以name、type、index三者都可以指定参数的方式
        ref同样是引用容器中Bean的id
    -->
    <bean id="userController" class="com.xr.controller.UserController">
        <!--name对应的是set注入方法,将set去掉然后将set后面的第一个字母改成小写,
       ref属性值表示引用容器中bean的id,就是你要依赖哪个对象就引用谁的bean-->
        <property name="userService" ref="userService"/>
    </bean>


    <bean id="userService" class="com.xr.service.impl.UserServiceImpl"/>

</beans>
编写main方法
public class Main {
    public static void main(String[] args) {
        // 容器将低层模板反向注入到高层模块的过程
        ApplicationContext application = new ClassPathXmlApplicationContext("applicationContext.xml");
        UserController bean = application.getBean(UserController.class);
        bean.add();
    }
}
执行结果
构造注入和setter方法注入都可以获取想要的依赖,二选一即可

3.2 依赖注入注入值
spring不仅可以注入对象依赖还可以注入属性
3.2.1 通过构造方式注入属性
创建一个UserService类,并定义两个属性(name,age)通过构造方法的方式注入
public class UserService {

    /**
     * 定义两个属性
     */
    private String name;
    private Integer age;

    /**
     * 定义有参构造方法
     */
    public UserService(String name,Integer age)
    {
        this.name = name;
        this.age = age;
    }


    /**
     * 最后输出属性
     */
    public void say() {
        System.out.println("name:"+name+" age:"+age);
    }
}
编写spring配置文件(applicationContext.xml)
<?xml version="1.0" encoding="UTF-8"?>
<beans xmlns="http://www.springframework.org/schema/beans"
       xmlns:xsi="http://www.w3.org/2001/XMLSchema-instance"
       xsi:schemaLocation="http://www.springframework.org/schema/beans http://www.springframework.org/schema/beans/spring-beans.xsd">

    <bean id="userService" class="com.xr.service.UserService">
        <!--name指定的是属性的名称,value是属性的值-->
        <constructor-arg name="name" value="张三"/>
        <constructor-arg name="age" value="18"/>
    </bean>
</beans>
编写mian方法
public class Main {
    public static void main(String[] args) {
        ApplicationContext application = new ClassPathXmlApplicationContext("applicationContext.xml");
        UserService bean = application.getBean(UserService.class);
        // 调用输出方法
        bean.say();
    }
}
最后执行结果

3.2.2 通过setter方式注入属性
编写userService类
package com.xr.service;

import java.util.List;

public class UserService {
    // 定义两个属性
    private String name;
    private Integer age;

    // 定义set方法
    public void setName(String name) {
        this.name = name;
    }

    public void setAge(Integer age) {
        this.age = age;
    }

    // 输出方法
    public void say() {
        System.out.println("name:"+name+" age:"+age);
    }
}
编写spring配置文件(applicationContext.xml)
<?xml version="1.0" encoding="UTF-8"?>
<beans xmlns="http://www.springframework.org/schema/beans"
       xmlns:xsi="http://www.w3.org/2001/XMLSchema-instance"
       xsi:schemaLocation="http://www.springframework.org/schema/beans http://www.springframework.org/schema/beans/spring-beans.xsd">

    <bean id="userService" class="com.xr.service.UserService">
        <property name="name" value="小明"/>
        <property name="age" value="18"/>
    </bean>
</beans>
编写main方法
public class Main {
    public static void main(String[] args) {
        ApplicationContext application = new ClassPathXmlApplicationContext("applicationContext.xml");
        UserService bean = application.getBean(UserService.class);
        // 调用输出方法
        bean.say();
    }
}
最后执行结果
 3.2.3 注入map属性
编写userService类
public class UserService {
    private Map<String, String> addresses;

    //方式一:通过构造方式注入
    public UserService(Map<String,String> addresses) {
        this.addresses = addresses;
    }

    // 方式二:通过set方法注入
    public void setAddresses(Map<String, String> addresses) {
        this.addresses = addresses;
    }


    // 最后输出语句
    public void say() {
        System.out.println(addresses);
    }


    /*两种方式二选一即可*/
}
编写spring配置文件(applicationContext.xml)
<?xml version="1.0" encoding="UTF-8"?>
<beans xmlns="http://www.springframework.org/schema/beans"
       xmlns:xsi="http://www.w3.org/2001/XMLSchema-instance"
       xsi:schemaLocation="http://www.springframework.org/schema/beans http://www.springframework.org/schema/beans/spring-beans.xsd">

    <bean id="userService" class="com.xr.service.UserService">
        <!--两种方式二选一即可-->
        <!--通过构造注入map方法-->
        <constructor-arg>
            <map>
                <entry key="1" value="北京"/>
                <entry key="2" value="上海"/>
            </map>
        </constructor-arg>

        <!--通过set 注入map方法-->
        <property name="addresses">
            <map>
                <entry key="1" value="北京"/>
                <entry key="2" value="上海"/>
            </map>
        </property>
    </bean>
</beans>
编写main方法
public class Main {
    public static void main(String[] args) {
        ApplicationContext application = new ClassPathXmlApplicationContext("applicationContext.xml");
        UserService bean = application.getBean(UserService.class);
        // 调用输出方法
        bean.say();
    }
}
最后执行结果

3.2.4 注入list属性
编写userService类
package com.xr.service;

import java.util.List;

public class UserService {
    // 定义list集合
    private List<String> addresses;

    // 方式一:通过构造方式注入
    public UserService(List<String> addresses) {
        this.addresses= addresses;
    }

    // 方式二: 通过set方式注入
    public void setAddresses(List<String> addresses) {
        this.addresses = addresses;
    }


    public void say() {
        System.out.println(addresses);
    }
}
编写spring配置文件(applicationContext.xml)
<?xml version="1.0" encoding="UTF-8"?>
<beans xmlns="http://www.springframework.org/schema/beans"
       xmlns:xsi="http://www.w3.org/2001/XMLSchema-instance"
       xsi:schemaLocation="http://www.springframework.org/schema/beans http://www.springframework.org/schema/beans/spring-beans.xsd">

    <bean id="userService" class="com.xr.service.UserService">
        <!--二选一即可-->
        <!--方式一:通过构造注入list集合-->
        <constructor-arg name="addresses">
            <list>
                <value>南美</value>
                <value>非洲</value>
            </list>
        </constructor-arg>

        <!--通过set注入list集合-->
        <property name="addresses">
            <list>
                <value>北京</value>
                <value>上海</value>
            </list>
        </property>
    </bean>
</beans>
编写main方法
package com.xr;

import com.xr.service.UserService;
import org.springframework.context.ApplicationContext;
import org.springframework.context.support.ClassPathXmlApplicationContext;

public class Main {
    public static void main(String[] args) {
        ApplicationContext application = new ClassPathXmlApplicationContext("applicationContext.xml");
        UserService bean = application.getBean(UserService.class);
        // 调用输出方法
        bean.say();
    }
}
最后执行结果

4. 注解
上面配置了一大堆的东西是不是非常繁琐,注解就是简化了这些配置来达到快速编写代码,简便了在applicationContext.xml文件配置
首先在applicationContext.xml配置扫描注解的基础配置
1.如果想要使用注解则必须要编写扫描注解配置
<?xml version="1.0" encoding="UTF-8"?>
<beans xmlns="http://www.springframework.org/schema/beans"
       xmlns:xsi="http://www.w3.org/2001/XMLSchema-instance"
       xmlns:context="http://www.springframework.org/schema/context"
       xsi:schemaLocation="http://www.springframework.org/schema/beans http://www.springframework.org/schema/beans/spring-beans.xsd http://www.springframework.org/schema/context https://www.springframework.org/schema/context/spring-context.xsd">

    <!--1.启用注解处理器,这样才可以使用spring提供的注解来配置-->
    <context:annotation-config/>
    <!--2.配置扫描,将带有注解的类交给spring管理
        当撇脂component-scan时,默认就会启用注解处理器,所以可以不用配置注解处理器-->
    <context:component-scan base-package="com.xr.zhujie"/>
</beans>
4.1 @Component注解
@Component是 Spring 框架中的一个通用注解,用于将类标识为 Spring 管理的组件(即 Bean)。
标注在类上面,表示当前类将纳入容器管理,去掉xml中的<bean/>标签的配置
注解中的value属性表示在容器中的唯一标识,想当于xml中<bean/>标签id属性
简化了在xml配置bean的操作
定义一个UserController类,并在该类中标明@Component注解
/**
 * 使用Component标注,表示该类由spring容器管理,想当于xml中<bean/> 标签
 * 注解值表示在spring容器的唯一标识,相当于xml中<bean/>标签的id属性
 */
@Component("userController")
public class UserController {

    public void say(){
        System.out.println("使用了Component注解,将该类交给了spring容器管理");
    }
}
4.2 MVC三大注解(@Controller、@Service、@Repository)
Spring 还提供了三个针对不同层次的特定注解,它们都是
@Component的特殊化形式
@Controller:用于表示控制层组件,处理用户请求和响应。@Service:用于表示服务层组件,承载业务逻辑。@Repository:用于表示持久层组件,负责数据持久化操作。
这三个注解标注在不同层上,和@Component具有相同的效果,额外增加了细化语义效果
创建三个包(controller,service,dao),在这三个包下分别创建3个类(userController,userService,userDao)
userController类(@Controller层)
/**
 * 表示这是控制层
 */
@Controller
public class userController {

    public void say() {
        System.out.println("使用@Controller注解标注类上,可以不使用@Component注解,表示这是控制层,用于接收请求,返回响应");
    }
}
userService类(@Service)
/**
 * 表示这是服务层
 */
@Service
public class userController {

    public void say() {
        System.out.println("使用@Service注解标注类上,可以不使用@Component注解,表示这是服务层,用于处理业务逻辑");
    }
}
userDao类(@Repository )
/**
 * 表示这是持久层
 */
@Repository
public class userController {

    public void say() {
        System.out.println("使用@Repositroy注解标注类上,可以不使用@Component注解,表示这是数据持久层,用于将数据持久化到数据库");
    }
}
4.3 @Scope注解
@Scope是 Spring 框架中用于指定 Bean 作用域的注解。通过使用@Scope,开发者可以控制 Spring 容器如何创建和管理 Bean 的实例,从而满足不同的需求
默认为单例,不写注解值为单例,指定值为prototype就是原型(多例)
创建UserService类
@Scope("prototype")
public class UserService{

    public void say() {
        System.out.println("使用Scope注解,指定注解值为prototype,该类为原型,既多例,不写注解值为单例");
    }
}
4.4 生命周期注解(@PostConstruct、@PoreDestory)
@PostConstruct和@PreDestroy是 Java 标准中的注解,定义在javax.annotation包中。这两个注解用于在 Bean 的生命周期中执行特定的方法:
@PostConstruct:在 Bean 完成依赖注入后、初始化方法执行前调用,用于进行初始化操作。@PreDestroy:在 Bean 销毁之前调用,用于进行资源释放等清理操作。
因为他是外部依赖,所以需要到pom.xml引用javax的依赖
原型创建的Bean时不会执行销毁方法的,因为创建的对象不受容器管理,Scope指定为prototype,就是临时对象
4.4.1 在pom文件中配置javax依赖
        <!--要使用生命周期的注解时需要导入此包-->
        <dependency>
            <groupId>javax.annotation</groupId>
            <artifactId>javax.annotation-api</artifactId>
            <version>1.3.2</version>
        </dependency>
4.4.2 @PostConstruct注解(bean初始化)
@PostConstruct相当上面生命周期中2.1.1和2.1.2的两个案例
创建一个UserController类
@Controller
public void UserController {

    /**
     * 等价于xml中init-method属性
     */
    @PostConstruct
    public void init() {
        System.out.println("bean的初始化,当一启动,构造方法先执行,在执行该方法");
    }
}
编写Main方法
public class Main {
    public static void main(String[] args) {
        ApplicationContext ctx =  new ClassPathXmlApplicationContext("applicationContext.xml");
}
执行结果

4.4.3 @PreDestory注解(bean销毁)
@PreDestory相当上面生命周期中2.2.1和2.2.2的两个案例
@PreDestory注解等价xml中destory-method属性
原型创建的Bean时不会执行销毁方法的,因为创建的对象不受容器管理,Scope指定为prototype,就是临时对象(也就是多例)
在UserController类基础上增加destory()方法
@Controller
public void UserController {

    /**
     * 等价于xml中init-method属性
     */
    @PostConstruct
    public void init() {
        System.out.println("bean的初始化,当一启动,构造方法先执行,在执行该方法");
    }

    /**
     * @PreDestroy等价于destroy-method
     */
    @PreDestroy
    public void destory() {
        System.out.println("bean销毁,当容器销毁之前,执行销毁方法,在销毁容器");
    }
}
编写Main方法
public class Main {
    public static void main(String[] args) {
        ApplicationContext ctx =  new ClassPathXmlApplicationContext("applicationContext.xml");

        // 销毁容器
        ((ClassPathXmlApplicationContext)ctx).close();
}
最后执行结果

4.5 依赖注入注解(@Inject、@Named)
@Inject用于依赖注入,相当于上面的3.1.1构造方法注入bean
@Inject 用于通过构造方法和set方法注入bean
@Named 当接口有多个实现类时,通过@Named可以指定注入的Bean(实现类)
创建controller,service包,在controller包下创建UserController类,在service包下创建userService接口,在到service包下创建子包impl,最后在impl包创建UserServiceImpl类并实现userService接口
UserService接口
public interface UserService {
    // 添加用户
    void add();
}
UserServiceImpl类
@Service
public class UserServiceImpl implments UserService{
    public void add() {
        System.out.println("添加用户");
    }
}
UserController类
该类需要注入UserService的实现类(bean),并调用add方法
@Controller
public class UserController {

    // UserService接口
    private UserService userService;

    /**
     * 构造方法注入
     * 注意:从spring4.3版本开始,如果构造方法注入时,
     * 注入的依赖只有一个实现类时,spring默认就会将这个实现类注入进来
     * 但注解需要写在属性上
     * @param userService
     */
    @Inject
    public UserController(UserService userService) {
        this.userService = userService;
    }

    // 添加用户
    public void add() {
        // 调用注入bean的add方法
        userService.add();
    }

}
不编写构造方法时,并且只有一个实现类时,@Inject注解应该放在属性上
从spring4.3版本开始,如果构造方法注入时,
只有一个实现类时,spring默认就会将这个实现类注入进来
@Controller
public class UserController {

    @Inject
    private UserService userService;

    // 添加用户
    public void add() {
        // 调用注入bean的add方法
        userService.add();
    }

}
编写Main方法
public class Main {

    public static void main(String[] args) {
        ApplicationContext context = new ClassPathXmlApplicationContext("applicationContext.xml");
        UserController controller = (UserController) context.getBean("userController");
        controller.add();
    }
}
最后执行结果

当UserService接口有多个实现类时,使用@Named注解来指定注入的实现类
在impl包下在添加UserService接口的实现类StudentServiceImpl
/*
 * @Service注解值表示在容器中bean标签的id属性,唯一标识
 */
@Service("studentService")
public class StudentServiceImpl implments UserService {

    public void add() {
        System.out.println("添加学生信息");
    }
}
UserController类使用@Named注解来指定注入的实现类
@Controller
public class UserController {

    private UserService userService;


    /**
     * 通过set方法来注入
     * 使用@Inject注解进行注入
     * 当有多个实现类时,可以结合@Named注解来指定想要注入的Bean的id
     * @param userService
     */
    @Inject
    @Named("studentService")
    public void setUserService(UserService userService) {
        this.userService = userService;
    }


    public void add() {
        userService.add();
    }
}
现在UserService接口有了两个实现类(UserServiceImpl,StudentServiceImpl)了,userController类通过@Named注解指定了注入的实现类为StudentServiceImpl,所以最终执行的结果为添加学生信息

4.6@Resource注解
@Resourcce注解同样是依赖注入,他是使用JSR250(java规提案)
提供的@Resource注解实现依赖注入。
* 它有一个name属性,在注入时指定需要注入的bean的id。这个注解
* 可以标注在类的字段上,也可以标注在set方法上实现注入功能,
* 但不支持标注在构造方法上,这是它的局限性。
UserService接口
public interface UserService {
    // 添加用户
    void add();
}
UserServiceImpl类
@Service
public class UserServiceImpl implments UserService{
    public void add() {
        System.out.println("添加用户信息");
    }
}
UserController类
将@Resource注解标注在类的字段上
@Controller
public class UserController {
    // 标注在类的字段上面
    @Resource
    private UserService userService;

    // 调用userService的add方法
    public void add() {
        userService.add();
    }
}
编写Main方法
    public static void main(String[] args) {
        ApplicationContext context = new ClassPathXmlApplicationContext("applicationContext.xml");
        UserController controller = context.getBean(UserController.class);
        controller.addUser();
    }
最后执行结果

将@Ressource注解标注在set方法上
UserController类
@Controller
public class UserController {
    // 需要注入的bean,生成对应的set方法
    private UserService userService;

    /**
     * 将Resource注解标注在set方法上,默认会去掉set将set后面第一个字母改小写
     * 已userService命名
     */
    @Resource
    public void setUserService(UserServive usreService) {
        this.userService = userService;
    }


    public void add() {
        userService.add();
    }
}
执行结果与上面同等
4.7 @Autowired注解、@Qualifier
@Autowired注解于@Resource注解作用一致
@Autowired由spring提供的注入注解
@Autowired注解可以标注在属性、构造方法、set方法上,而@Resource注解不支持标注在构造方法上
@Qualifier注解用于当依赖对象有多个实现类时,指定具体的一个实现类,等价于上面4.5中的@Named注解
如果不想使用@Qualifier注解时可以在实现类上使用@Primary注解来指定注入的优先级
创建UserService接口,并创建UserServiceImpl类,并实现UserService接口,在创建UserController类
UserService接口
public interface UserService {
    pubic void add();
}
UserServiceImpl类
@Service
public class UserServiceImpl implments UserService {
    @Override
    public void add() {
        System.out.println("添加用户信息!");
    }
}
UserController类
将@Autowired注解标注在构造上
@Controller
public class UserController {

    private UserService userService;

    /*
     * 将@Autorired标注在构造方法上
     */
    @Autowired
    public UserController(UserService userService){
        this.userService = userService;
    }

    public void add() {
        userService.add();
    }
}
将@Autowired标注在属性上,无需编写构造方法
@Controller
public Class UserController{

    /*
     * 将注解标注在属性上,注解自动生成构造方法注入bean
     */
    @Autowired
    private UserService userService;

    public void add() {
        userService.add();
    }

}
将@Autowired注解标注在set方法上
@Controller
public Class UserController {
    private UserService userService;

    /**
     * 标注在set方法,name为将set去掉后面第一个字母改成小写(userService)
     */
    @Autowired
    public void setUserService(UserService userService) {
        this.userService = userService;
    }

    public void add() {
        usereService.add();
    }


}
编写Main方法
public Class Main{
    public static void main(String[] args) {
        ApplicationContext contex = new ClassPathXmlApplicationContext("applicationContext.xml");
        UserController userController = (UserController) context.getBean("userController");
        userController.add();
    }
}
最后执行结果

使用@Qualifier注解,当UserService接口在增加一个实现类时,这个时候就需要指定注入哪个实现类了
创建StudentServiceImpl类,并实现了UserService接口
@Service
public class StudentServiceImpl implments UserService {
    @Override
    public void add() {
        System.out.println("添加学生信息");
    }
}
修改UserController类,使用@Qualifier注解指定注入的实现类
在构造方法上使用
@Controller
public class UserController {

    private UserService userService;

    /**
     * 在构造方法中的参数指定注入的实现类为studentService
     * @Qualifier注解不能标注在构造方法上,只能标注在参数中
     */
    @Autowired
    public UserController(@Qualifier("studentService") UserService userService) {
        this.userService = userService;
    }
}
在set方法中使用
@Controller
public class UserController {

    private UserService userService;

    /**
     * 在set方法的参数指定注入的实现类为studentService
     */
    @Autowired
    public setUserController(@Qualifier("studentService") UserService userService) {
        this.userService = userService;
    }

    /*@Qualifier可以在set方法上标注,也可以在方法参数标注,二选一*/
    /*@Autowired
    @Qualifier("studentService")
    public setUserController(UserService userService) {
        this.userService = userService;
    }*/
}
最后执行结果:

如果不想使用@Qualifier注解指定注入的实现类,可以使用@Primary注解设置Bean注入的优先级别
/**
 * @Primary注解可以设置Bean注入优先级别
 * 你要指定哪个实现类需要注入就在哪加
 */
@Service
@Primary
public class StudentServiceImpl implments UserService {
    @Override
    public void add() {
        System.out.println("添加学生信息");
    }
}
执行结果
4.8 @RequiredArgsConstructor 注解
@RequiredArgsConstructor注解也是依赖注入的一种,有lombok提供,使用时需要导入lombok依赖
导入lombox的依赖
        <dependency>
            <groupId>org.projectlombok</groupId>
            <artifactId>lombok</artifactId>
            <version>1.18.32</version>
        </dependency>
修改UserController
/**
 * 使用lombok来生成一个带参的构造方法
 * 注意:赋值的字段必须是final
 */
@Controller
@RequiredArgsConstructor
public class userController {

    // 注入的对象必须使用final关键字修饰
    private final userService userService;

    public void add() {
        userService.add();
    }
}
最后执行结果:
5.作用域代理
作用域:
作用域定义了Bean的生命周期。主要的作用域有:
- Singleton(单例,默认):整个Spring容器中只有一个实例,所有请求共享。
- Prototype(原型):每次请求都会创建一个新的Bean实例。
- Request:每个HTTP请求创建一个实例,请求结束后销毁(Web应用)。
- Session:每个HTTP会话创建一个实例,会话结束后销毁(Web应用)。
- Application:整个Web应用共享一个实例(Web应用)。
- WebSocket:每个WebSocket连接创建一个实例,连接结束后销毁
简单说就是单例(只有一个实例)和多例(有多个实例)
作用域代理:
当单例bean依赖原型bean时,使用作用域代理解决原型bean是单例bean问题,
原型bean是多实例
不使用作用域代理时,原型bean是单例情况
pom.xml导入Lombox依赖
        <dependency>
            <groupId>org.projectlombok</groupId>
            <artifactId>lombok</artifactId>
            <version>1.18.32</version>
        </dependency>
创建UserService接口
public interface UserService {

    void save();
}
创建UserServiceImpl类,并实现UserService接口
/**
 * 1.@Service注解为id,这个是在spring容器中的唯一标识
 * 2.不适用@Scope注解标注时和不写注解值,默认userService为单例
 * 3.@Scope注解指定注解值为prototype时,userService为多例
 */
@Service("userService")
@Scope("prototype")
public class UserServiceImpl implements UserService {

    @Override
    public void save() {
        System.out.println("添加用户");
    }
}
创建UserController类
/**
 * 使用Lombox提供的@RequiredArgsConstructor注解,并使用final修饰符修饰的属性会生成构造方法,并通过将bean依赖注入进来
 */
@Controller
@RequiredArgsConstructor
public class UserController {

    // 需要依赖的bean
    private final UserService userService;

    public void add() {
        System.out.println("业务层实例:" + userService);
        userService.save();
    }
配置ApplicationContext.xml 文件
<?xml version="1.0" encoding="UTF-8"?>
<beans xmlns="http://www.springframework.org/schema/beans"
       xmlns:xsi="http://www.w3.org/2001/XMLSchema-instance"
       xmlns:context="http://www.springframework.org/schema/context"
       xsi:schemaLocation="http://www.springframework.org/schema/beans http://www.springframework.org/schema/beans/spring-beans.xsd http://www.springframework.org/schema/context https://www.springframework.org/schema/context/spring-context.xsd">

    <!--开启扫描,自定开启注解-->
    <context:component-scan base-package="edu.nf.ch12"/>

</beans>
编写Main方法
public static void main(String[] args) {
ApplicationContext context = new ClassPathXmlApplicationContext("applicationContext.xml");
UserController controller = (UserController) context.getBean("userController");
System.out.println("控制层实例:" + controller);
UserController controller1 = (UserController) context.getBean("userController");
System.out.println("控制层实例:" + controller1);
controller.add();
controller1.add();
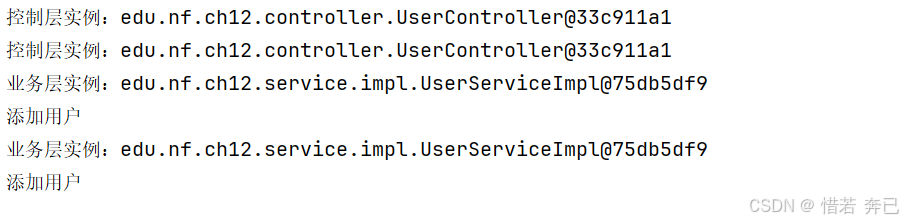
}执行结果:
控制层userController是单例的[地址值一样],单例bean依赖原型bean时(userController依赖UserServiceImpl), 发现业务层(UserServiceImpl)我们指定了这个bean为原型bean(多例),原型bean失效,他们的地址值也是一样的
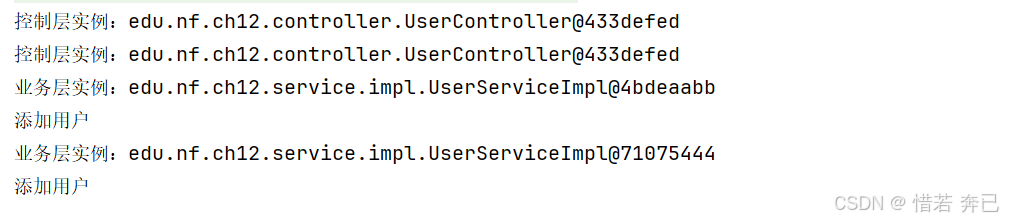
使用作用域代理解决依旧是单例bean问题
修改UserServiceImpl类
/**
 * proxyMode用于启用作用域代理,
 * 作用域代理可以解决当一个单例的Bean依赖一个原型的Bean的时候,
 * 这个Bean依旧是单例的问题
 */
@Service("userService")
@Scope(value = "prototype", proxyMode = ScopedProxyMode.TARGET_CLASS)
public class UserServiceImpl implements UserService {

    @Override
    public void save() {
        System.out.println("添加用户");
    }
}
最终执行结果:
原型bean恢复为多例,UserServiceImpl地址值不同了
6.使用java类代替xml配置两种方式
两种方式:
1.通过配置类进行装配Bean
2.无需配置类装配Bean,通过注解方式,扫描注解
@Configuration注解:标识当前类是一个配置类,同时也纳入容器管理
@Bean注解:用来装配对象呢,等价于xml的<bean/>标签
@ComponentScan注解:指定扫描包下的所有注解
第一种方式:(使用配置类进行装配Bean)
创建3个包(controller,service,dao),在controller包下创建UserController类,在service包下创建UserService接口在创建一个子包impl,并在子包下创建UserServiceImpl类,并实现UserService接口,在dao包下创建UserDao接口,在创建一个子包,并在子包下创建UserDaoImpl并实现UserDao接口
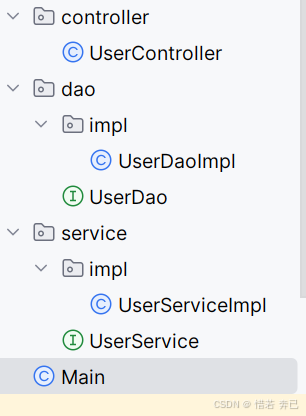
1.整体结构
2.controller类
@RequiredArgsConstructor
public class UserController {

    private final UserService userService;

    public void add() {
        userService.addUser();
    }
}
3.UserService接口
public interface UserService {

    /**
     * 添加用户
     */
    void addUser();
}
4.UserServiceImpl实现类
@RequiredArgsConstructor
public class UserServiceImpl implements UserService {

    private final UserDao userDao;

    @Override
    public void addUser() {
        userDao.save();
    }
}
5.UserDao接口
public interface UserDao {

    /**
     * 保存
     */
    void save();
}
6.UserDaoImpl类
public class UserDaoImpl implements UserDao {

    @Override
    public void save() {
        System.out.println("insert into user_info");
    }
}
7.在创建配置类(AppConfigure),通过配置类将Bean纳入容器
/**
 * 配置类使用@Configuration注解标注。
 * 本质上配置类也属于Bean,同样会纳入Spring容器中管理
 */
@Configuration
public class AppConfigure {

    /**
     * 可以使用@Bean注解来装配对象,等价xml中的<bean/>,
     * 默认方法名就是Bean的id。initMethod属性用于配置
     * bean的初始化方法,destroyMethod配置bean的销毁方法,
     * name属性可以指定Bean在容器中的名称
     *
     * 也可以结合@Scope注解来配置bean的作用域
     * @return
     */
    //@Bean(name="dao", initMethod = "init", destroyMethod = "destroy")
    //@Scope
    @Bean
    public UserDao userDao() {
        return new UserDaoImpl();
    }

    /**
     * 装配UserService并注入UserDao
     * 注入方式有两种:
     * 1. 通过方法参数传递进来
     * 2. 新建对象时直接调用bean的方法,new UserServiceImpl(userDao());
     * @param userDao
     * @return
     */
    @Bean
    public UserService userService(UserDao userDao) {
        //将UserDao注入UserService
        return new UserServiceImpl(userDao);
    }

    @Bean
    public UserController userController(UserService userService) {
        //将UserService注 入到UserController
        return new UserController(userService);
    }

}
8.编写Main进行测试
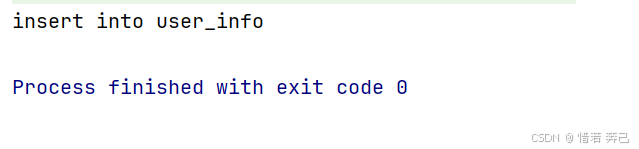
public class Main {
    public static void main(String[] args) {
        //使用注解和配置类时,使用AnnotationConfigApplicationContext子容器
        // 如果使用的是xml形式时,使用的时ClassPathXmlApplicationContext子容器
        ApplicationContext context = new AnnotationConfigApplicationContext(AppConfigure.class);
        UserController controller = (UserController) context.getBean("userController");
        controller.add();
    }
}
9.最后执行结果为
第二种方式:(通过扫描)
第二种方式就相对简单了,在不同层的类上标注上对应的注解 (@Controller,@Service,@Repositroy),标记了这些注解容器会自动将标记过的类纳入容器管理
1.UserController类
@Controller
@RequiredArgsConstructor
public class UserController {

    private final UserService userService;

    public void add() {
        userService.addUser();
    }
}
2.UserServiceImpl类
@Service("userService")
@RequiredArgsConstructor
public class UserServiceImpl implements UserService {

    private final UserDao userDao;

    @Override
    public void addUser() {
        userDao.save();
    }
}
3.UserDaoImpl类
@Repository("userDao")
public class UserDaoImpl implements UserDao {

    @Override
    public void save() {
        System.out.println("insert into user_info");
    }
}
4.编写配置类
/**
 * 先使用@Configuration注解标记这个类为配置类
 * 在使用@ComponentScan开启扫描注解,并指定具体包下的所有注解,这样简化了配置
 */
@Configuration
@ComponentScan(basePackages = "edu.nf.ch13")
public class AppConfigure2 {
}
5.编写Main方法
6.最后执行结果public class Main { public static void main(String[] args) { //使用注解和配置类时,使用AnnotationConfigApplicationContext子容器 ApplicationContext context = new AnnotationConfigApplicationContext(AppConfigure.class); UserController controller = (UserController) context.getBean("userController"); controller.add(); } }
7.Lite模式和Full模式
Lite模式
简单模式,当配置类不使用@Configuration注解时,或者@Configuration注解的proxyBeanMethods属性设置为false,那么就是Lite模式,在Lite模式下,spring不会为配置类创建代理,因此调用@Bean注解的方法时,仅是纯粹的调用
1. 创建一个UserContoller类,和一个UserServiceImpl类,并实现UserService接口,最后创建AppConfigure配置类将UserController和UserServiceImpl两个类纳入Spring容器进行管理
2.UserService接口
/**
 * UserService接口
 */
public interface UserService {
    /**
     * 添加
     */
    void save();
}
3.UserServiceImpl实现类
@Service("userService")
public class UserServiceImpl implements UserService {

    @Override
    public void save() {
        System.out.println("添加用户");
    }
}
4. UserController类
@Controller
@RequiredArgsConstructor
public class UserController {

    private final UserService userService;

    public void addUser() {
        userService.save();
    }
}
5. AppConfigure配置类
/**
 * Lite模式(简单):如果配置类没有使用@Configuration注解,或者proxyBeanMethods属性设置为
 * false,那么就是Lite模式,在Lite模式下,Spring不会为配置类创建代理,因此调用任何带有
 * @Bean注解的方法时,仅仅是纯粹的调用
 */
@Configuration(proxyBeanMethods = false)
public class AppConfigure {

    @Bean
    public UserService userService() {
        return new UserServiceImpl();
    }

    @Bean
    public UserController userController() {
        // 查看userService地址值
        UserService userService = userService();
        System.out.println(userService);
        UserService userService1 = userService();
        System.out.println(userService1);
        return new UserController(userService);
    }
}
6. 编写Mian方法
public class Main {

    public static void main(String[] args) {
        ApplicationContext context = new AnnotationConfigApplicationContext(AppConfigure.class);
        UserController controller = (UserController) context.getBean("userController");
        controller.addUser();
    }
}
7.最后执行结果
发现userService方法执行了两次,地址值不同
Full模式
当配置类使用@Configuration注解时,并且proxyBeanMethods属性设置为true时,容器会为这个配置类创建一个代理对象,代理了配置类之后,当调用@Bean注解注解修饰方法时,如果是单例Bean,spring会先从容器中查找相应的Bean
1. 更改AppConfigure配置类
/**
 * 配置类的Lite模式(非代理模式)和Full模式(代理模式)
 * Full模式(完整):当配置类上使用了@Configuration注解时,并且proxyBeanMethods属性
 * 设置为true时,这就是Full模式。容器会为这个配置类创建一个代理对象。代理了配置类之后
 * 当调用@Bean注解修饰的方法时,如果是单例的bean,spring会先从容器中查找相应的Bean
 */
@Configuration(proxyBeanMethods = true)
public class AppConfigure {

    @Bean
    public UserService userService() {
        return new UserServiceImpl();
    }

    @Bean
    public UserController userController() {
        UserService userService = userService();
        System.out.println(userService);
        UserService userService1 = userService();
        System.out.println(userService1);
        return new UserController(userService);
    }
}
2. 执行结果
1. 地址值相同,为full模式,使用了代理

8.使用@Import注解
@Import注解导入的几种用法:
1.导入其他配置类
2.导入其他Bean
3.选择性导入(按照指定的逻辑来导入相关的类)
1. 导入其他配置类
导入其他类的作用用于,当需要整合其他框架时的配置(如:Mybatis,MvcConfig)就可以使用该导入方法
1.创建Mybatis配置类(MabatisConfigure)
/**
 * mybatis和数据源配置
 */
@Configuration
public class MybatisConfigure {
}
2.创建MVC配置类(MvcConfigure)
/**
 * Mvc配置
 */
@Configuration
public class MvcConfigure {
}
3.创建根配置AppConfigure类,并将其他配置导入根配置中
/**
 * 在根配置中导入其他配置
 *
 */
@Configuration
@Import({MvcConfigure.class, MybatisConfigure.class})
public class AppConfigure {

}
2.导入其他Bean
1.创建一个UserController类
/**
 *
 * 可以被导入容器中
 */
public class UserController {
}
2. 修改配置类
/**
 * 将UserController类交给容器进行管理
 */
@Configuration
@Import(UserController.Class)
pubic class AppConfigure{

}
3. 选择性导入(按照指定的逻辑来导入相关的类)
1.创建自定义注解MyAnno
/**
 * 创建自定义注解,使用该注解标识的类则导入
 */
@Target(ElementType.TYPE)
@Retention(RetentionPolicy.RUNTIME)
public @interface MyAnno {
}
2. 创建TestController类,并用@MyAnno注解进行标注
/**
 * 使用@MyAnno注解进行标注,用于过滤条件的标识
 */
@MyAnno
public class TestController {
}
2. 创建自定义导入选择器
/**
 * 自定义导入选择器
 * 实现ImportSelector接口,重写selectImports方法,返回值将过滤后的类装入String数组中
 */
public class AnnoImportSelector implements ImportSelector {

    @Override
    public String[] selectImports(AnnotationMetadata importingClassMetadata) {
        List<String> list = new ArrayList<>();
        if(TestController.class.isAnnotationPresent(MyAnno.class)) {
            list.add(TestController.class.getName());
        }
        return StringUtils.toStringArray(list);
    }
}
3. 修改根配置类
/**
 * 将自定义导入选择器导入
 */
@Import(AnnoImportSelector.class)
public class AppConfigure {

}
9.使用PropertySource读取properties资源文件
@Value注解:
配置文件属性注入:可以将
.properties或.yml配置文件中的属性值注入到 Bean 的字段中。这样做可以使得应用程序的配置更加灵活,易于管理和维护。提供默认值:可以在配置文件的属性值无法解析时提供一个默认值,增强程序的健壮性。
系统属性注入:可以注入 Java 系统属性,使得应用程序可以读取和使用系统级别的配置。
SpEL表达式支持:支持使用 Spring 表达式语言编写复杂的表达式,实现动态计算和条件逻辑,从而注入计算得出的值。
类型转换:Spring 会自动将字符串形式的配置属性转换为字段的类型,例如将字符串转换为整型或布尔型等。
@propertySource注解:
解析properties资源文件
1. 在resources目录下创建properties文件(datasource.properties)
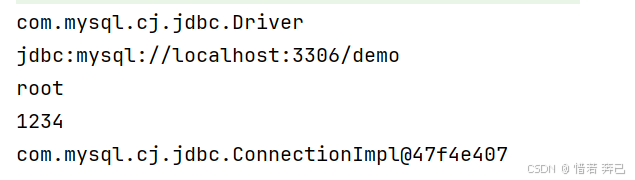
driver = com.mysql.cj.jdbc.Driver
url = jdbc:mysql://localhost:3306/demo
user = root
password = 1234
2. 创建配置类
/**
 * 使用@PropertySource解析properties资源文件
 *  @PropertySource注解值为("classpath: + properties文件名+ .properties")
 */
@Configuration
@PropertySource("classpath:datasource.properties")
public class AppConfigure {
    /**
     * 使用@Value属性注入值类型,结合SPEL表达式
     */
    @Value("${driver}")
    private String driver;
    @Value("${url}")
    private String url;
    @Value("${user}")
    private String username;
    @Value("${password}")
    private String password;

    @Bean
    public Connection conn() {
        try {
            System.out.println(driver);
            System.out.println(url);
            System.out.println(username);
            System.out.println(password);
            return DriverManager.getConnection(url, username, password);
        } catch (SQLException e) {
            throw new RuntimeException(e);
        }
    }
}
3. 编写Main方法
public class Main {

    public static void main(String[] args) {
        ApplicationContext context = new AnnotationConfigApplicationContext(AppConfigure.class);
        Connection connection = context.getBean("conn", Connection.class);
        System.out.println(connection);
    }
}
4. 执行结果
10.JDK 和CGLIB动态代理
JDK动态代理
JDK动态代理:
1. 可以在不修改实际对象的情况下,通过代理对象增强实际对象的功能,如日志记录、权限检查、事务处理等
2. JDK 动态代理只能代理接口方法的调用,不能代理类的方法,他是对接口的代理
1. 创建OrderService接口
public interface OrderService {

    /**
     * 下单
     */
    void placeOrder();
}
2.创建OrderServiceImpl类实现OrderService接口
public class OrderServiceImpl implements OrderService {


    /**
     * 下单
     */
    @Override
    public void placeOrder() {
        System.out.println("执行下单操作");
    }
}
3. 创建jdk代理处理器
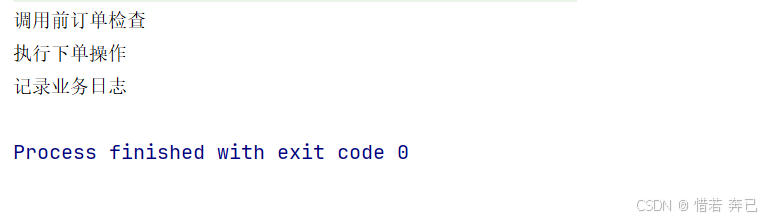
/**
 * 需要实现InvocationHandler接口,并重写invoke方法,在invoke方法实现增强功能
 */
public class OrderInvocationHandler implements InvocationHandler {

    //目标对象
    private Object target;

    // 创建jdk代理生成器时,同时拥有要代理的对象也就是目标对象
    public OrderInvocationHandler(Object target) {
        this.target = target;
    }


    /**
     * proxy:  代理对象
     * method: 目标方法
     * arges:  目标方法的参数
    */
    @Override
    public Object invoke(Object proxy, Method method, Object[] args) throws Throwable {
        System.out.println("调用前订单检查");
        //调用目标对象方法
        Object result = method.invoke(target, args);
        System.out.println("记录业务日志");
        return result;
    }
}
4. 编写Main方法
public class Main {

    public static void main(String[] args) {
        // 创建jdk代理处理器,并绑定目标对象(需要被代理的对象)
        InvocationHandler handler = new OrderInvocationHandler(new OrderServiceImpl());

        // 获取当前线程的上下文类加载器。类加载器负责加载类,这里它将用于加载动态生成的代理类。
        ClassLoader loader = Thread.currentThread().getContextClassLoader();

        // 获取 OrderServiceImpl 实现的所有接口,并把它们存储在数组中。在动态代理中,代理对象需要实现与目标对象相同的接口,这样代理对象才能有目标对象的方法
        Class<?>[] interfaces = OrderServiceImpl.class.getInterfaces();

        // 创建代理对象
        OrderService proxy = (OrderService) Proxy.newProxyInstance(loader, interfaces, handler);

        // 通过动态生成的代理对象调用被代理的方法,实现增强功能
        proxy.placeOrder();
    }
}
5. 最后执行结果
我们在没有修改原代码的情况下增强了功能
CGLIb 动态代理
CGLIB 通过生成目标类的 子类 来创建动态代理,允许拦截和修改类的行为。它特别适用于没有实现接口的类,这与传统的基于 Java 动态代理(
java.lang.reflect.Proxy)不同,后者只能代理实现了接口的类
cglib动态代理:
是针对类进行代理的,只需要指定需要代理的类
原理:
CGLIB代理的工作原理是通过生成被代理对象的子类来实现代理的。它通过继承被代理类,并覆盖被代理类的方法来实现。在子类中,可以添加额外的逻辑,或者对方法进行增强
1. 由于cglib为第三方提供,需要第三方依赖
        <dependency>
            <groupId>cglib</groupId>
            <artifactId>cglib-nodep</artifactId>
            <version>3.3.0</version>
        </dependency>
2. 创建userService类
public class UserService {

    public void add() {
        System.out.println("添加用户");
    }
}
3. 创建cjlib代理处理器
/**
 * cjlib代理处理器 实现 MethodInterceptor 接口,并在intercept方法中实现增强功能
 */
public class UserInterceptor implements MethodInterceptor {


    /**
     * proxy:代理对象本身,即动态生成的子类实例。
     * method : 目标方法(被代理的方法)
     * args : 目标方法的参数
     * methodProxy : 子类代理方法
     */
    @Override
    public Object intercept(Object proxy, Method method, Object[] args, MethodProxy methodProxy) throws Throwable {
        System.out.println("调用前");
        //通过子类代理方法去调用父类的方法
        Object result = methodProxy.invokeSuper(proxy, args);
        System.out.println("调用后");
        return result;
    }
}
4. 编写Main方法
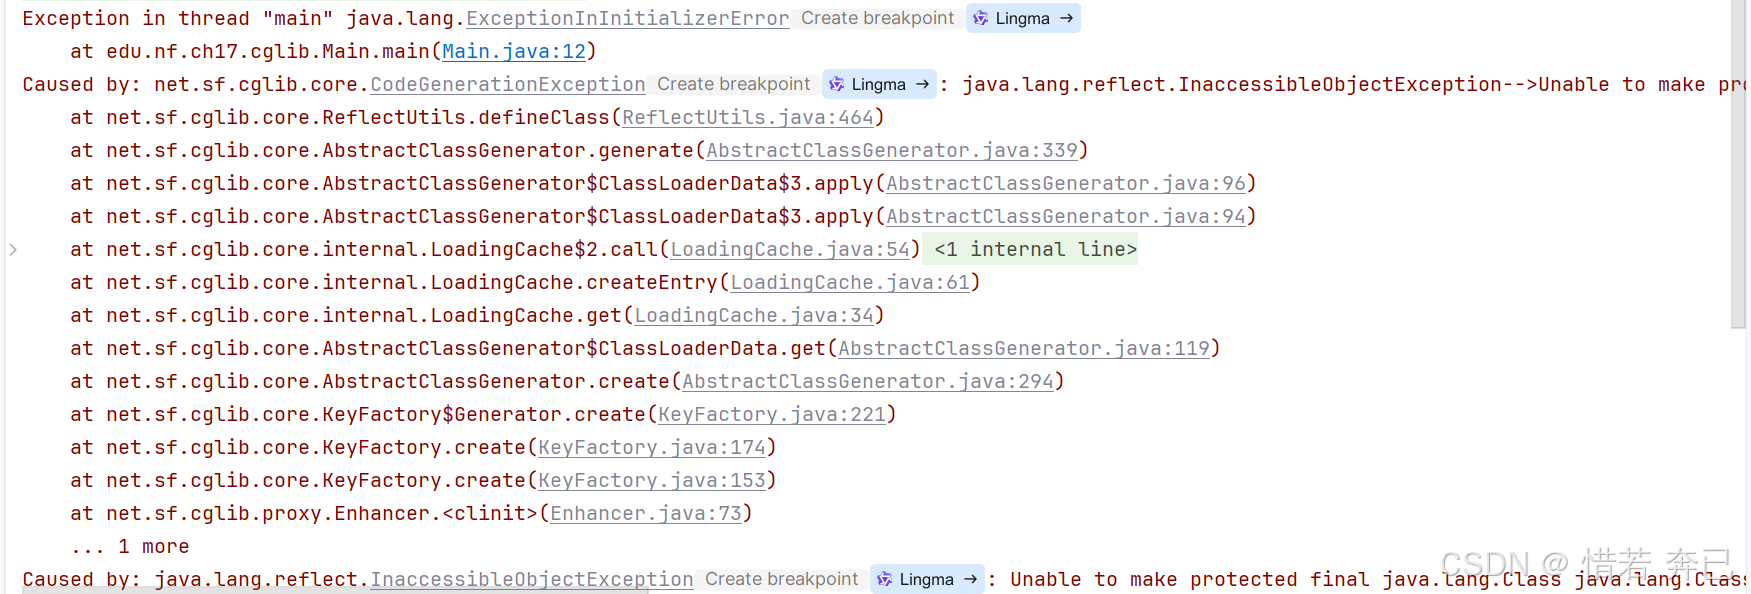
public class Main {

    public static void main(String[] args) {
        // 创建 Enhancer 对象,通过这个对象可以设置cjlib代理处理器和需要被代理的对象
        Enhancer enhancer = new Enhancer();
        // 设置需要代理的对象
        enhancer.setSuperclass(UserService.class);
        // 设置cjlib代理处理器
        enhancer.setCallback(new UserInterceptor());
        // 动态地创建 UserService 的代理子类的一个实例
        UserService proxy = (UserService) enhancer.create();
        // 调用代理对象的方法
        proxy.add();
    }
}
5.执行结果:
6. 报错原因:
这个错误是由于 Java 9 及以后版本中的模块系统引起的。从 Java 9 开始,JVM 的模块系统对反射和类加载器的某些操作施加了更严格的限制,以增强安全性和封装性。具体来说,错误信息表明
java.lang.ClassLoader.defineClass方法无法被访问,因为它所在的模块java.base没有对当前模块开放java.lang包。
7. 解决方案
在运行 Java 应用程序时,可以通过添加
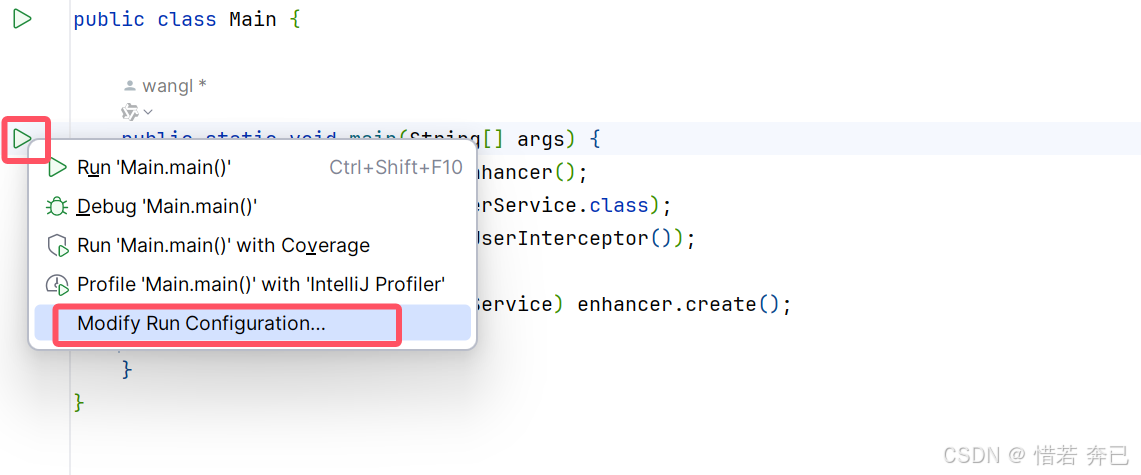
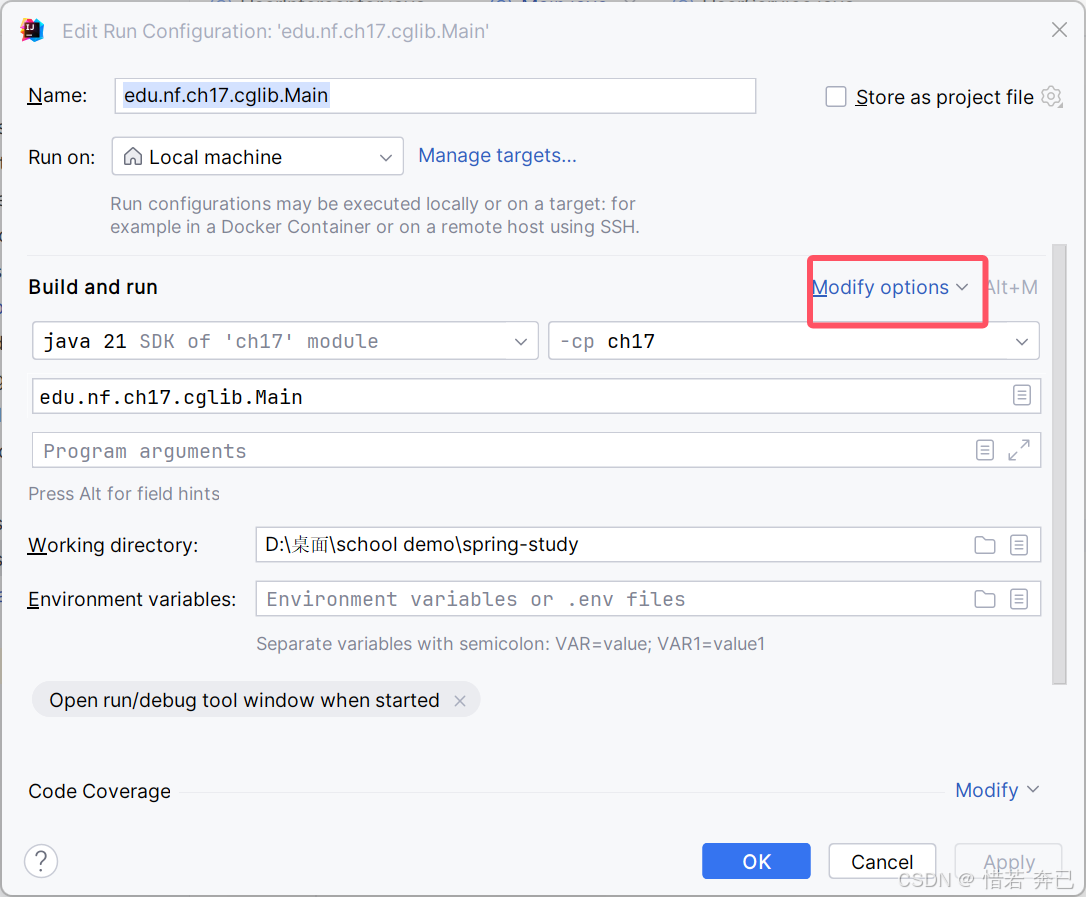
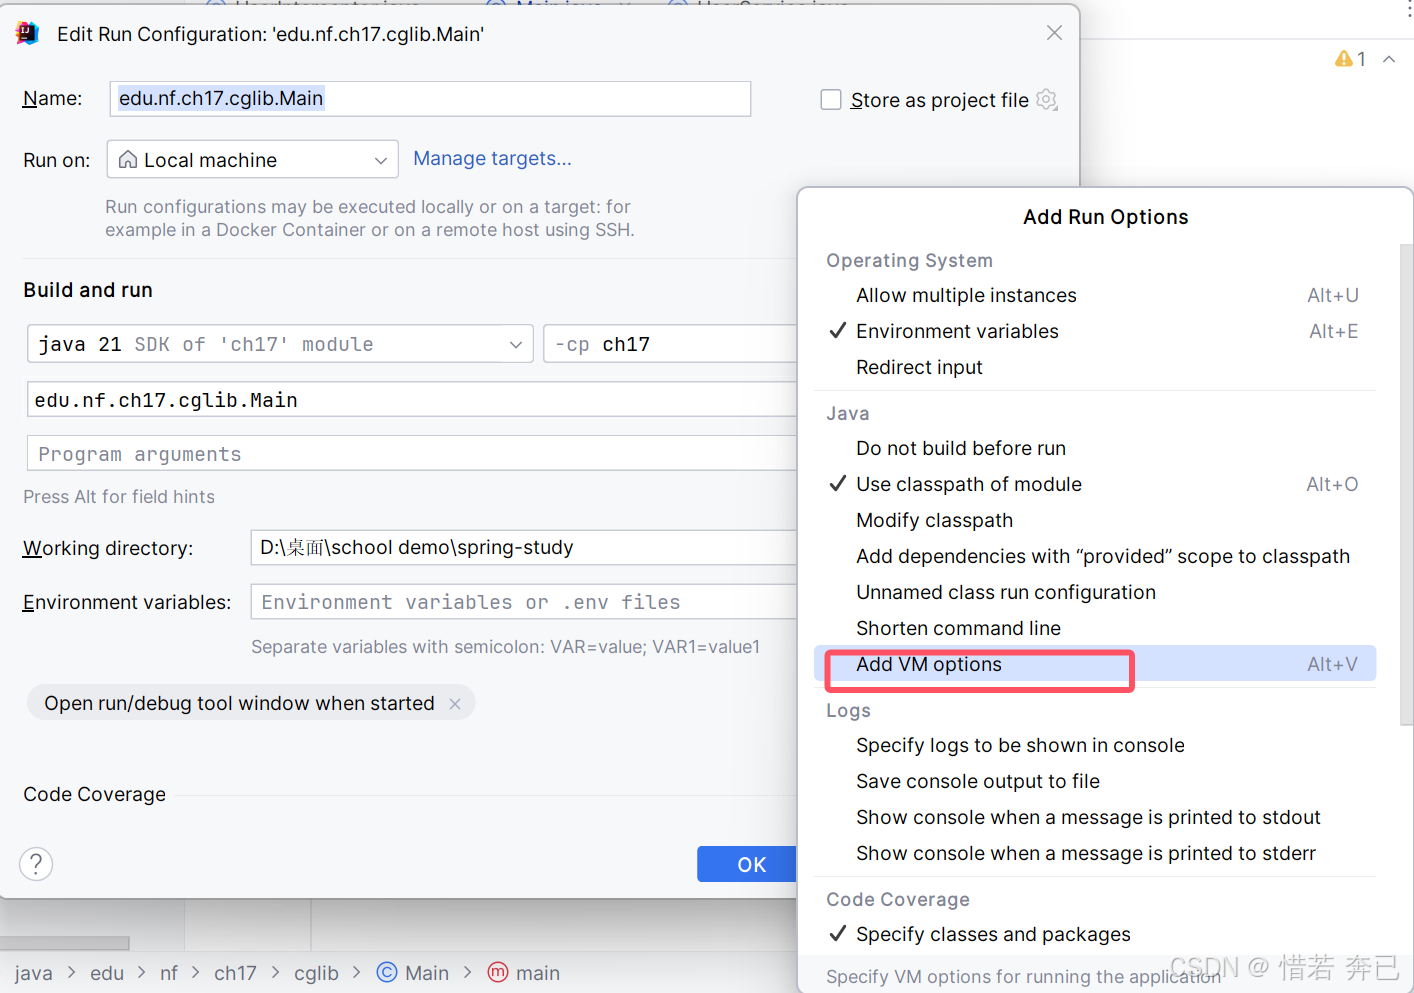
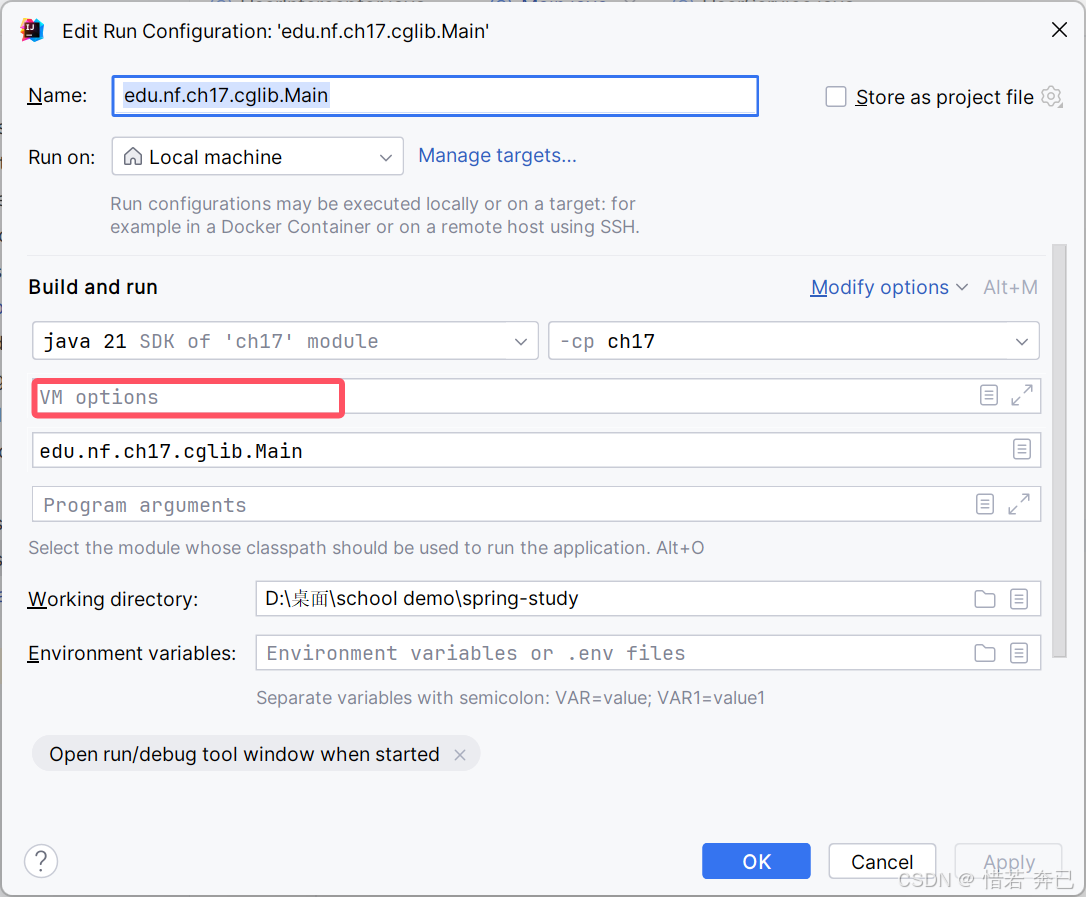
--add-opens参数来解决这个问题。这个参数允许你指定哪个模块的哪个包可以被反射访问。在JVM 启动参数中添加--add-opens java.base/java.lang=ALL-UNNAMED7.1 找到main方法右键Modify Run configuration
7.2 找到Modify options选项
7.3 勾选 add VM options选项
7.8 在VM options 输入框填写命令,在Apply
8. 最后执行结果
11.实现简单的Aop切面
完成功能:
1.动态选择使用代理的方式(jdk代理,cjlib代理),jdk代理是对有接口的实现类进行代理的,cjlib代理是对类进行代理的,实现动态选择代理方式
2. 灵活增强
动态选择代理方式
思路一:
首先两种不同的代理方式(jdk和cjlib)都是完成同一个事情,就是将目标对象进行代理,那么使用接口可以达到此目的,多个实现方式实现接口中的方法来完成不同的代理,假如在增加一个代理方式也可以实现接口来达到代理(做相同的事情,想到接口)
1. 定义接口ProxyHandler(抽象的代理生成器)
public interface ProxyHandler {

    /**
     * 生成代理对象
     * @param targetClass 目标对象的class
     * @return 代理实例
     */
    Object createProxy(Class<?> targetClass);
}
2. 创建CglibProxyHandler类(cjlib代理生成器),用于实现cglib代理
/**
 * cjlib代理生成器针对类
 */
public class CglibProxyHandler  implements ProxyHandler   {

    /**
     * cjlib代理实现
     * targetClass: 目标对象的class
     */
    @Override
    public Object createProxy(Class<?> targetClass) {
        Enhancer enhancer = new Enhancer();

        // 设置父类(目标对象,需要被代理的对象)
        enhancer.setSuperclass(targetClass);

        /**
         * 使用Lambda表达式增强功能
         */
        MethodInterceptor interceptor = (proxy, method, args, methodProxy) -> {
            System.out.println("方法执行前......");

            //调用目标方法
            Object result = methodProxy.invokeSuper(proxy, args);

            System.out.println("方法执行后......");

            // 执行完目标方法肯能有返回值,所以将放回在返回
            return result;
        };

        enhancer.setCallback(interceptor);

        // 返回创建好的代理对象
        return enhancer.create();
    }
}
3. 创建JdkProxyHandler类(jdk代理生成器)
/**
 * jdk代理生成器,针对接口
 */
public class JdkProxyHandler implements ProxyHandler {

    /*
     * 定义接口数组,用于存放被代理类实现的接口
     * 由于被代理的类肯能实现了多个接口,而我们是代理接口的方法,所以需要获取被代理类所有实现的接口
     */
    private Class<?>[] interfaces;

    /**
     * 创建该jdk代理生成器时将被代理类所有实现的接口进行赋值
     */
    public JdkProxyHandler(Class<?>[] interfaces) {
        this.interfaces = interfaces;
    }

    @Override
    public Object createProxy(Class<?> targetClass) {
        try {
            Object instance = targetClass.getConstructor().newInstance();
            ClassLoader loader = targetClass.getClassLoader();
            return Proxy.newProxyInstance(loader, interfaces, (proxy, method, args) -> {
                // 调用方法前增强
                System.out.println("调用目标方法前....");

                //调用目标方法
                Object result = method.invoke(instance, args);

                //调用方法后增强
                System.out.println("调用目标方法后....");

                // 返回调用目标方法的返回值
                return result;
            });
        } catch (Exception e) {
            throw new RuntimeException("Create proxy fail.", e);
        }
    }
}
思路二:
上面已经将二种代理方式实现并完成了,但是如何调用呢?如何确定使用的是哪个代理呢?cjlib代理只需要class参数,而jdk代理需要被代理对象的所实现的所有接口和class参数,由于需要的参数不同,我们可以通过中间类来进行调用,上面设计了jdk代理时,创建了该对象时就获取代理类的所有接口,那么我们通过一个中间类来分别调用不同的代理,通过这个中间类来帮我确认具体使用哪个代理类,一个是需要接口,一个是不需要接口
4. 创建ProxyContext类(代理生成上下文)
/*
 * 代理生成上下文
 * 下面定义了两个构造方法,当我只传递一个class对象的时候,就给我们创建cglib代理
 * 当我们传递class对象和接口数组时,就帮我们创建jdk代理
 * 在定义一个方法,利用接口多态的特性进行代理,完美解决了以上问题
 */
public class ProxyContext {

    /**
     * 代理生成器接口,拥有两个不同的实现(jdk代理,cjlib代理)
     */
    private final ProxyHandler proxyHandler;

    // class对象
    private final Class<?> targetClass;

    /**
     *  创建CGLIB动态代理
     * @param targetClass 目标对象的class
     */
    public ProxyContext(Class<?> targetClass) {
        this.targetClass = targetClass;
        proxyHandler = new CglibProxyHandler();
    }

    /**
     *  创建JDK动态代理
     * @param targetClass 目标对象的class
     * @param interfaces  目标对象实现的接口
     */
    public ProxyContext(Class<?> targetClass, Class<?>[] interfaces) {
        this.targetClass = targetClass;
        proxyHandler = new JdkProxyHandler(interfaces);
    }

    /**
     * 生成代理
     * @return 代理对象
     */
    public Object createProxy() {
        return proxyHandler.createProxy(targetClass);
    }
}
5. 使用cjlib进行代理
5.1 创建TestService类
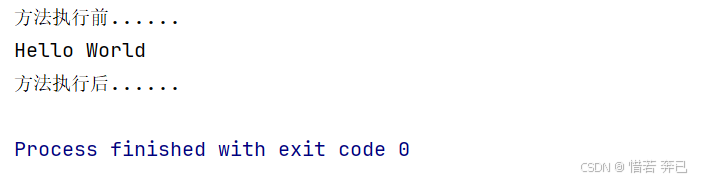
/**
 * 要代理的类
 */
public class TestService {

    /**
     * 被代理的方法
     */
    public void say() {
        System.out.println("Hello World");
    }
}
5.2 编写Main方法
public class Main {

    public static void main(String[] args) {
        // 创建中间类来进行动态代理
        ProxyContext context = new ProxyContext(TestService.class);
        // 创建代理对象
        TestService service = (TestService) context.createProxy();
        // 调用代理对象的方法
        service.say();
    }
}
5.3 执行结果
6. 使用jdk进行代理
6.1 创建UserService接口
public interface UserService {
    void add();
}
6.2 创建UserviceImpl类实现UserService接口
public class UserServiceImpl implements UserService{
    @Override
    public void add() {
        System.out.println("使用jdk代理");
    }
}
6.3 编写Main方法
public class Main {

    public static void main(String[] args) throws Exception {
        // 创建中间类来进行动态代理
        ProxyContext context = new ProxyContext(UserServiceImpl.class,UserServiceImpl.class.getInterfaces());
        // 创建代理对象
        UserService userService = (UserService) context.createProxy();
        // 调用代理对象的方法
        userService.add();
    }
}
6.4 最后执行结果
思路三:
当使用不同代理方式进行方法增强时,发现增强的功能是重复做的,并且增强功能只写在具体代理实现中,那么能否将这些增强方法进行动态增强呢?
1. 首先我们发现不同的代理方式增强功能在每个被代理方法调用之前和调用之后进行增强的,那么将这些增强功能抽离成接口,已达到复用性,在通过实现接口来完成增强的功能
2. 现在增强功能已经动态实现抽离了出来,用户可以自定义增强的逻辑,那么如何将这个增强的功能插入到被代理的方法调用之前和调用之后呢,我们创建一个注解,这个注解值用来标识哪个类的方法需要被增强,注解值传递增强的实现类,通过实现类来获取增强的方法,并插入到被代理的方法调用之前和调用之后
3. 通过反射的方式获取实现的增强方法,在实现代理之前先获取增强方法,通过反射调用增强方法,因为获取增强方法不同的代理模式都需要获取,将这个操作提取出来封装到抽象类中,调用增强功能也是都需要使用的,也提取出来放入抽象类中,接着使用这个抽象类实现抽象的代理生成器,最后不同的代理方式继承这个抽象类,来间接实现接口,并复用父类封装的获取增强功能方法
7. 定义2个增强接口(调用之前和调用之后)
7.1 创建MethodBeforeAdvice类,调用之前增强接口(称之为前置通知)
/**
 * 调用之前增强功能
 */
public interface MethodBeforeAdvice {

    /**
     * 前置通知
     */
    void before();

}
7.2 创建AfterRerurningActive类,调用之后增强接口(称之为后置通知)
/**
 * 调用之后增强功能
 */
public interface AfterReturningAdvice {

    /**
     * 后置通知
     */
    void afterReturning();
}
7.3 创建实现类(oneAspect)实现两个通知接口(MethodBeforeAdive,AftterReturningAdice)
/**
 * 自定义增强功能
 */
public class OneAspect implements MethodBeforeAdvice, AfterReturningAdvice {

    @Override
    public void before() {
        System.out.println("前置通知1...");
    }

    @Override
    public void afterReturning() {
        System.out.println("后置通知1...");
    }
}
7.4 定义接口用于注入实现类增强功能的实现类
@Target(ElementType.TYPE)
@Retention(RetentionPolicy.RUNTIME)
public @interface Aspect {
    /**
     * value用于指定增强的类,肯能有多个实现类实现了增强功能,可以多注入
     * @return
     */
    Class<?>[] value();
}
7.5 创建AdviceInfo类用于保存实现增强功能类的实例,和增强功能
/*
 * 保存切面实例和相关的通知
 */
public class AdviceInfo {
    private Object aspect;
    private Method before;
    private Method afterReturning;

    public Object getAspect() {
        return aspect;
    }

    public void setAspect(Object aspect) {
        this.aspect = aspect;
    }

    public Method getBefore() {
        return before;
    }

    public void setBefore(Method before) {
        this.before = before;
    }

    public Method getAfterReturning() {
        return afterReturning;
    }

    public void setAfterReturning(Method afterReturning) {
        this.afterReturning = afterReturning;
    }
}
7.6 创建抽象类AbstractProxyHandler,并实现ProxyHandler接口,但不实现接口中的具体方法createProxy(),由子类实现,将需要复用的方法提取到该类中(获取增强方法,调用后置方法,调用前置方法)
/**
 * 不同的代理实现都需要获取增强功能,和调用增强功能
 * 使用继承关系,让子类达到复用
 */
public abstract class AbstractProxyHandler implements ProxyHandler {

    /**
     * 存放前置通知
     */
    private final List<AdviceInfo> beforeList = new ArrayList<>();
    /**
     * 存放后置通知
     */
    private final List<AdviceInfo> afterReturningList = new ArrayList<>();

    /**
     * 初始化注解拦截器
     * @param targetClass 目标对象的Class
     */
    protected void initInterceptor(Class<?> targetClass) {

        //先找到目标对象标注的@Advice注解
        if(targetClass.isAnnotationPresent(Aspect.class)) {
            //获取注解中的拦截器(Class对象)【OneAspect.class】,获取实现增强功能的实现类
            Class<?>[] aspectClasses = targetClass.getAnnotation(Aspect.class).value();
            try {
                for (Class<?> aspectClass : aspectClasses) {
                    // 获取增强功能实现类的实例
                    Object aspect = aspectClass.getConstructor().newInstance();

                    // 创建AdviceInfo对象用于保存实现增强功能实现类的实例和增强方法
                    AdviceInfo adviceInfo = new AdviceInfo();
                    //保存切面实例
                    adviceInfo.setAspect(aspect);
                    //收集前置通知
                    if(MethodBeforeAdvice.class.isAssignableFrom(aspectClass)) {
                        adviceInfo.setBefore(aspectClass.getMethod("before"));
                        beforeList.add(adviceInfo);
                    }
                    //收集后置通知
                    if(AfterReturningAdvice.class.isAssignableFrom(aspectClass)) {
                        adviceInfo.setAfterReturning(aspectClass.getMethod("afterReturning"));
                        afterReturningList.add(adviceInfo);
                    }
                }

            } catch (Exception e) {
                throw new RuntimeException("Instance error.", e);
            }
        }
    }

    /**
     * 调用前置增强
     */
    protected void invokeBefore() {
        for (AdviceInfo adviceInfo : beforeList) {
            Method before = adviceInfo.getBefore();
            if(before != null) {
                try {
                    // 调用前置增强功能的方法
                    before.invoke(adviceInfo.getAspect());
                } catch (Exception e) {
                    throw new RuntimeException("Invoke before advice error.", e);
                }
            }
        }
    }

    /**
     * 调用后置增强
     */
    protected void invokeAfter() {
        for (int i = afterReturningList.size()-1; i>=0; i--) {
            AdviceInfo adviceInfo = afterReturningList.get(i);
            Method afterReturning = adviceInfo.getAfterReturning();
            if(afterReturning != null) {
                try {
                    // 调用后置增强功能的方法
                    afterReturning.invoke(adviceInfo.getAspect());
                } catch (Exception e) {
                    throw new RuntimeException("Invoke afterReturning advice error.", e);
                }
            }
        }
    }
}
7.7 修改jdk代理实现的方法
/*
 * 1.JDK代理生成器
 * 2.使用继承抽象类,抽象类中实现了PrxyHandler接口,间接实现了ProxyHandler接口中的createProxy()
 */
public class JdkProxyHandler extends AbstractProxyHandler {

    private Class<?>[] interfaces;

    public JdkProxyHandler(Class<?>[] interfaces) {
        this.interfaces = interfaces;
    }

    @Override
    public Object createProxy(Class<?> targetClass) {
        // 一开始就获取增强功能
        initInterceptor(targetClass);
        try {
            Object instance = targetClass.getConstructor().newInstance();
            ClassLoader loader = targetClass.getClassLoader();
            return Proxy.newProxyInstance(loader, interfaces, (proxy, method, args) -> {
                //调用前置通知
                invokeBefore();
                //调用目标方法
                Object result = method.invoke(instance, args);
                //调用后置通知
                invokeAfter();
                return result;
            });
        } catch (Exception e) {
            throw new RuntimeException("Create proxy fail.", e);
        }
    }
}
7.8 修改cglib代理实现方法
/*
 * 1.使用继承抽象类,抽象类中实现了PrxyHandler接口,间接实现了ProxyHandler接口中的createProxy()
 * 2.CGLIB代理生成器
 */
public class CglibProxyHandler extends AbstractProxyHandler {

    @Override
    public Object createProxy(Class<?> targetClass) {
        // 一开始就获取增强功能
        initInterceptor(targetClass);
        Enhancer enhancer = new Enhancer();
        enhancer.setSuperclass(targetClass);
        MethodInterceptor interceptor = (proxy, method, args, methodProxy) -> {
            //调用前置通知
            invokeBefore();
            //调用目标方法
            Object result = methodProxy.invokeSuper(proxy, args);
            //调用后置通知
            invokeAfter();
            return result;
        };
        enhancer.setCallback(interceptor);
        return enhancer.create();
    }
}
7.9 修改被代理的类,注入自定义增强类
/**
 * 使用@Aspect注解注入实现增强功能的实现类,可以注入多个实现类,如:@Aspect({OneAspect.class,TwoAspect.class})
 */
@Aspect({OneAspect.class})
public class TestService {

    public void say() {
        System.out.println("Hello World");
    }
}
7.1.0 编写Main方法
public class Main {

    public static void main(String[] args) {
        ProxyContext context = new ProxyContext(TestService.class);
        TestService service = (TestService) context.createProxy();
        service.say();
    }
}
7.1.1 执行结果
12. Aop xml配置3种方式
1.aop就是在不修改源代码的情况下增加额外的功能
2.AOP是针对面向对象编程的一种补充,有时使用面向对象不能很好完成一些额外的功能业务时,可以采用AOP来进行补充。切面编程的目的就是为了将业务目标进行而外的增强或者扩展。Spring中的AOP是基于JDK动态代理和CGLIB动态代理实现的。
应用场景
日志操作:
可以在业务方法前后进行日志的记录,不需要每个业务方法中都编写重复的代码
权限管理:
可以在调用目标方法前确定是否有权限
事务管理 :
可以在调用业务方法前开启事务,方法执行完成后提交事务
AOP术语
切面(Aspect):
切面是用于编写切面逻辑的一个类,这个类很类似于JDK动态代理中的回调处理器或者cglib中的方法拦截器,主要就是将需要增强目标对象的功能代码编写在这个类中,而这些功能增强的代码就是切面逻辑。
通知/增强(Advice):
增强就是对目标行为植入额外的逻辑代码,从而增强原有的功能。增强分为五种类型:
1)前置通知(在目标方法调用之前执行)
2)后置通知(在目标方法正确返回之后执行)
3)环绕通知(在目标方法调用前后执行)
4)异常通知(当目标方法抛出异常时执行,并且不会执行后置通知)
5)最终通知(不管目标方法有无异常都会执行)
切入点(Pointcut):
切入点类似一个切入的坐标,目的就是要找到目标对象的哪些方法(多个或单个)进行切入。切入点可以使用表达式进行描述。
连接点(Joinpoint):
目标对象的方法(被切入的方法)【具体需要增强的方法】就称之为连接点,一个切入点可以对应目标对象的的多个连接点。
代理(Proxy):
在运行时动态创建的对象,称之为代理对象,负责调用目标对象的方法,并执行增强功能。
目标(Target):
被代理的对象就是目标对象。
织入(Weaver):
将切面中的增强逻辑应用到目标具体的连接点上并产生代理的过程称之为织入。
因此通常描述为“将通知织入到具体的目标”。
织入的时机可以分为以下几种:
类加载时织入,需要特殊的类加载器(LTW)
编译时织入,需要特殊的编译器(CTW)
运行时织入,通常使用JDK或者CGLIB在程序运行创建代理对象,
spring就是基于运行时织入的。(注意:spring仅仅只是用到了AspectJ的切入点表达式和注解,但并没有使用AspectJ的类加载和编译时织入功能,而是使用JDK和CGLIB在运行时生成代理对象。)
12.1 xml使用ProxyFactoryBean进行增强
1. 定义切面类UserServiceAspect,(通知【增强的功能】)
/**
 * 定义切面,并在切面中声明各种增强(通知)
 * 1.前置通知实现MethodBeforeAdvice接口,
 * 2.后置通知实现AfterReturningAdvice接口,
 * 3.环绕通知实现MethodInterceptor接口,
 * 4.异常通知实现ThrowsAdvice接口,
 * 5.最终通知没有提供接口
 */
public class UserServiceAspect implements MethodBeforeAdvice,
        AfterReturningAdvice, MethodInterceptor, ThrowsAdvice {

    /**
     * 前置通知
     * @param method 目标方法
     * @param args 目标方法的参数
     * @param target 目标对象
     * @throws Throwable 目标方法抛出的异常
     */
    @Override
    public void before(Method method, Object[] args, Object target) throws Throwable {
        System.out.println("前置通知...");
    }

    /**
     * 后置通知
     * @param returnValue 目标方法返回值
     * @param method 目标对象的方法
     * @param args 目标对象方法的参数
     * @param target 目标对象
     * @throws Throwable 目标方法抛出的异常
     */
    @Override
    public void afterReturning(Object returnValue, Method method, Object[] args, Object target) throws Throwable {
        System.out.println("后置通知");
    }

    /**
     * 环绕通知
     * @param invocation 回调处理器
     * @return
     * @throws Throwable
     */
    @Override
    public Object invoke(MethodInvocation invocation) throws Throwable {
        System.out.println("环绕通知前...");
        //通过MethodInvocation调用目标对象方法
        Object returnValue = invocation.proceed();
        System.out.println("环绕通知后...");
        return returnValue;
    }

    /**
     * 异常通知,依据官方文档说明
     * 该方法名必须叫做afterThrowing,
     * 并且必须包含一个Exception的参数,
     * 同时还可以有三个可选参数(method,args,target)
     * 注意:这三个可选参数要么全部声明,要么都不声明
     *
     * @param e 目标方法引发的异常
     */
    public void afterThrowing(Exception e) {
        System.out.println("异常通知...");
    }
}
2. 创建UserService接口
/**
 * 接口使用jdk进行增强(通知)
 */
public interface UserService {

    /**
     * 添加
     */
    void add();
}
3. 创建UserServiceImpl实现类,并实现UserService接口
/**
 * 使用jdk增强功能(通知)
 */
public class UserServiceImpl implements UserService {

    @Override
    public void add() {
        System.out.println("添加用户");
        // 代码异常会执行异常通知(0不能做除数)
       // System.out.println(10/0);
    }
}
4. 创建StuService 类
/**
 * 没有任何接口则会使用cjlib进行增强(通知)
 */
public class StuService {

    public void add() {
        System.out.println("添加学生信息");
    }
}
5. 在resources目录下创建spring配置文件(applicationContext.xml)
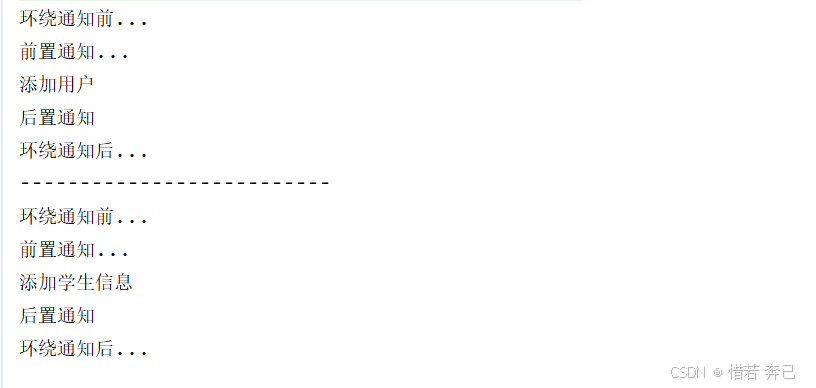
<?xml version="1.0" encoding="UTF-8"?>
<beans xmlns="http://www.springframework.org/schema/beans"
       xmlns:xsi="http://www.w3.org/2001/XMLSchema-instance"
       xsi:schemaLocation="http://www.springframework.org/schema/beans http://www.springframework.org/schema/beans/spring-beans.xsd">

    <!--
       配置aop流程:
            1. 将需要的被增强的Bean纳入spring容器进行管理
            2. 指定配置切面的类(实现了具体增强功能),纳入容器管理
            3. 通过spring框架提供的ProxyFactoryBean来进行将增强功能切入到需要被增强的类中
    -->

    <!-- 装配UserService -->
    <bean id="userService" class="edu.nf.ch18.service.impl.UserServiceImpl"/>

    <!-- 装配StuService-->
    <bean id="stuService" class="edu.nf.ch18.service.StuService"/>

    <!-- 装配切面-->
    <bean id="userServiceAspect" class="edu.nf.ch18.aspect.UserServiceAspect"/>

    <!-- 使用jdk进行代理,装配UserService代理,Spring框架使用自己封装的ProxyFactoryBean来创建代理,
     并将传构建出来的代理对象一并纳入IOC容器中-->
    <bean id="userServiceProxy" class="org.springframework.aop.framework.ProxyFactoryBean">
        <!-- 将接口信息注入到ProxyFactoryBean中,spring就会使用JDK动态代理 -->
            <property name="proxyInterfaces">
            <!-- 目标对象可能会实现多个接口,因此注入的接口是List -->
            <list>
                <value>edu.nf.ch18.service.UserService</value>
            </list>
        </property>

        <!-- 注入目标对象-->
        <property name="target" ref="userService"/>

        <!-- 注入切面-->
        <property name="interceptorNames">
            <!-- 因为可以有多个切面进行增强,因此是List -->
            <list>
                <!-- 注意:这里value是引用切面的id -->
                <value>userServiceAspect</value>
            </list>
        </property>
    </bean>

    <!-- 装配StuService的代理,使用cjlib进行增强 -->
    <bean id="stuServiceProxy" class="org.springframework.aop.framework.ProxyFactoryBean">
         <!-- 没有任何接口则使用CGLIB创建代理 -->
         <!-- 注入目标对象-->
         <property name="target" ref="stuService"/>
         <!-- 注入切面-->
         <property name="interceptorNames">
             <list>
                 <value>userServiceAspect</value>
             </list>
         </property>
    </bean>

</beans>
6. 编写Main方法
使用cglib代理时要配置命令,看上文10的cglib案例
public class Main {

    public static void main(String[] args) {
        ApplicationContext context = new ClassPathXmlApplicationContext("applicationContext.xml");
        // 使用jdk进行动态代理(增强方法)
        UserService service = context.getBean("userServiceProxy", UserService.class);
        service.add();

        System.out.println("--------------------------");

        // 使用cglib进行动态代理(增强方法)
        StuService stuServiceProxy = context.getBean("stuServiceProxy", StuService.class);
        stuServiceProxy.add();
    }
}
7. 执行结果
12.2 xml使用 <aop>标签进行配置
1. 修改xml文件
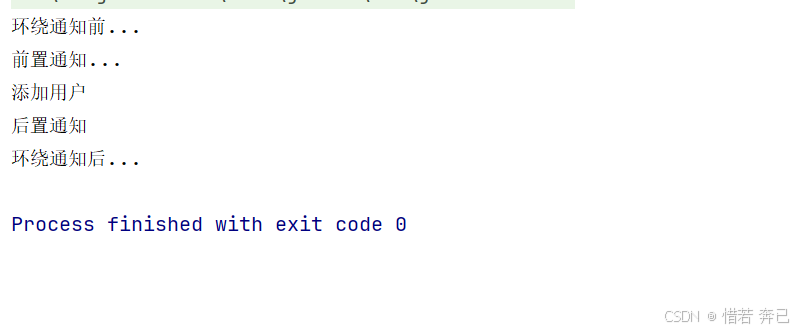
<?xml version="1.0" encoding="UTF-8"?>
<beans xmlns="http://www.springframework.org/schema/beans"
       xmlns:xsi="http://www.w3.org/2001/XMLSchema-instance"
       xmlns:aop="http://www.springframework.org/schema/aop"
       xsi:schemaLocation="http://www.springframework.org/schema/beans
       http://www.springframework.org/schema/beans/spring-beans.xsd http://www.springframework.org/schema/aop https://www.springframework.org/schema/aop/spring-aop.xsd">

    <!-- 装配UserService -->
    <bean id="userService" class="edu.nf.ch19.service.UserService"/>

    <!-- 装配切面-->
    <bean id="serviceAspect" class="edu.nf.ch19.aspect.ServiceAspect"/>

    <!-- aop配置, proxy-target-class属性设置为true表示强制使用CGLIB创建代理 -->
    <aop:config proxy-target-class="true">
        <!-- 配置切入点, id是切入点的唯一标识,expression用于声明切入点表达式
         通过一个切入点表达式可以定位到需要增强的目标方法,这些目标方法就是连接点。
         切入点表达式语法:execution(访问修饰符 包名.类名.方法名(参数类型))。
         *号通配符表示全部,方法参数可以使用".."来表示任意个数和任意类型的参数-->
        <aop:pointcut id="myPointcut" expression="execution(* edu.nf.ch19.service.UserService.*(..))"/>
        <!-- 配置通知器(也就是切面),advice-ref引用切面的id, pointcut-ref引用切入点的id -->
        <aop:advisor advice-ref="serviceAspect" pointcut-ref="myPointcut"/>
    </aop:config>

</beans>
2. 编写main方法
public class Main {

    public static void main(String[] args) {
        ApplicationContext context = new ClassPathXmlApplicationContext("applicationContext.xml");
        UserService service  = (UserService) context.getBean("userService");
        service.add();
    }
}
3. 执行结果
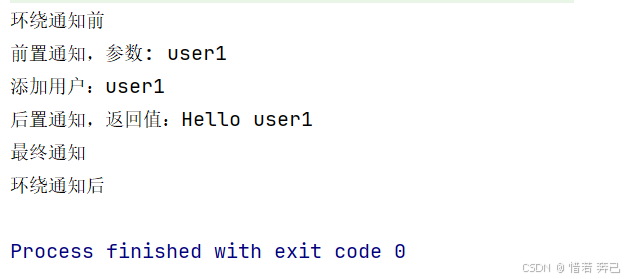
12.3 不实现通知接口,自定义切面,xml指定通知方法
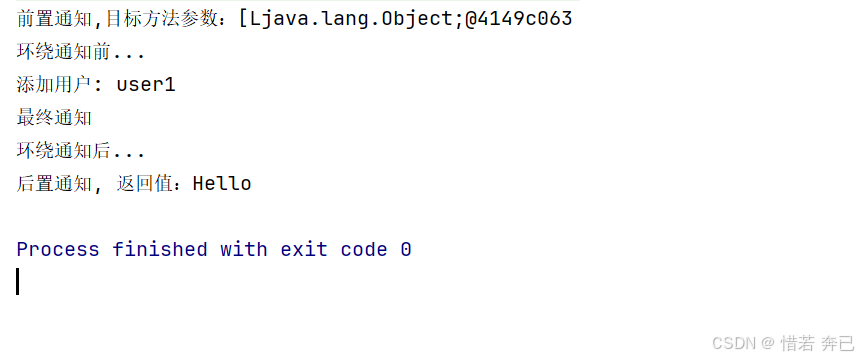
1.修改切面类ServiceAspect,自定义可以自定义最终通知
public class ServiceAspect {

    /**
     * 前置通知
     * @param joinPoint 连接点(封装目标方法的信息)
     */
    public void before(JoinPoint joinPoint) {
        System.out.println("前置通知,目标方法参数:" + joinPoint.getArgs());
    }

    /**
     * 后置通知
     * @param joinPoint 连接点
     * @param returnValue 目标方法的返回值
     */
    public void afterReturning(JoinPoint joinPoint, String returnValue) {
        System.out.println("后置通知, 返回值:" + returnValue);
    }

    /**
     * 环绕通知
     * @param joinPoint 连接点
     */
    public Object around(ProceedingJoinPoint joinPoint) throws Throwable {
        System.out.println("环绕通知前...");
        Object returnVal = joinPoint.proceed();
        System.out.println("环绕通知后...");
        return returnVal;
    }

    /**
     * 异常通知
     * @param joinPoint 连接点
     * @param e 目标方法引发的异常对象
     */
    public void afterThrowing(JoinPoint joinPoint, Exception e) {
        System.out.println("异常通知,异常信息:" + e.getMessage());
    }

    /**
     * 最终通知
     * 不管是否产生异常否会执行的通知
     * @param joinPoint 连接点
     */
    public void after(JoinPoint joinPoint) {
        System.out.println("最终通知");
    }
}
2. 需要增强的UserService类
public class UserService {

    public String add(String name) {
        System.out.println("添加用户: " + name);
        return "Hello";
    }
}
3. 在resources目录下创建spring配置文件(applicationContext.xml)
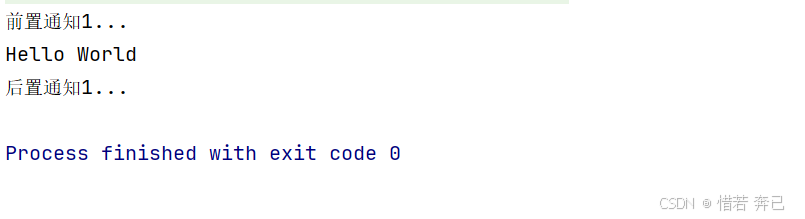
<?xml version="1.0" encoding="UTF-8"?>
<beans xmlns="http://www.springframework.org/schema/beans"
       xmlns:xsi="http://www.w3.org/2001/XMLSchema-instance" xmlns:aop="http://www.springframework.org/schema/aop"
       xsi:schemaLocation="http://www.springframework.org/schema/beans http://www.springframework.org/schema/beans/spring-beans.xsd http://www.springframework.org/schema/aop https://www.springframework.org/schema/aop/spring-aop.xsd">

    <!-- 装配UserService -->
    <bean id="userService" class="edu.nf.ch20.service.UserService"/>
    <!-- 装配切面-->
    <bean id="serviceAspect" class="edu.nf.ch20.aspect.ServiceAspect"/>
    <!-- 配置aop-->
    <aop:config>
        <!-- 配置切入点 -->
        <aop:pointcut id="myPointcut" expression="execution(* edu.nf.ch20.service.*.*(..))"/>
        <!-- 配置切面和通知, ref引用切面的id-->
        <aop:aspect ref="serviceAspect">
            <!-- 配置各种通知(增强), method指定通知的方法名 -->
            <!-- 前置通知-->
            <aop:before method="before" pointcut-ref="myPointcut"/>
            <!-- 后置通知,returnValue对应后置通知返回值参数的名称 -->
            <aop:after-returning method="afterReturning" pointcut-ref="myPointcut" returning="returnValue"/>
            <!-- 环绕通知-->
            <aop:around method="around" pointcut-ref="myPointcut"/>
            <!-- 异常通知, throwing对应异常通知的异常参数名-->
            <aop:after-throwing method="afterThrowing" pointcut-ref="myPointcut" throwing="e"/>
            <!-- 最终通知-->
            <aop:after method="after" pointcut-ref="myPointcut"/>
         </aop:aspect>
    </aop:config>
</beans>
4.编写Main方法
public class Main {

    public static void main(String[] args) {
        ApplicationContext context = new ClassPathXmlApplicationContext("applicationContext.xml");
        UserService userService = (UserService) context.getBean("userService");
        userService.add("user1");
    }
}
5. 执行结果
13. Aop注解结合配置类,省略xml配置
1. 创建需要被增强的类(UserService)
@Service
public class UserService {

    public String add(String name) {
        System.out.println("添加用户:" + name);
        // 需要异常通知时
        //System.out.println(10/0);
        return "Hello " + name;
    }
}
2. 创建切面类(ServiceAspect)
/**
 * 1.使用@Aspect注解标注当前类为一个切面类,
 * 2.再结合@Componemt注解纳入spring容器中管理
 */
@Aspect
@Component
public class ServiceAspect {

    /**
     *3.在切面中声明一个切入点,该方法不做任何事情,就只是使用@Pointcut注解来标识需要被增强的类
     * 其他通知方法注解引用该方法,就知道哪个类需要通知
     */
    @Pointcut("execution(* edu.nf.ch21.service.UserService.*(..))")
    public void pointcut() {}

    /**
     * 前置通知, 引用切入点方法名
     * @param joinPoint 连接点
     */
    @Before("pointcut()")
    public void before(JoinPoint joinPoint) {
        System.out.println("前置通知,参数: " + joinPoint.getArgs()[0]);
    }

    /**
     * 后置通知
     * @param joinPoint 连接点
     * @param returnVal 目标方法返回值
     */
    @AfterReturning(value = "pointcut()", returning = "returnVal")
    public void afterReturning(JoinPoint joinPoint, String returnVal) {
        System.out.println("后置通知,返回值:" + returnVal);
    }

    /**
     * 环绕通知
     * @param joinPoint 连接点
     * @throws Throwable
     */
    @Around("pointcut()")
    public Object around(ProceedingJoinPoint joinPoint) throws Throwable {
        System.out.println("环绕通知前");
        Object result = joinPoint.proceed();
        System.out.println("环绕通知后");
        return result;
    }

    /**
     * 异常通知
     * @param joinPoint 连接点
     * @param e 目标方法产生异常对象
     */
    @AfterThrowing(value = "pointcut()", throwing = "e")
    public void afterThrowing(JoinPoint joinPoint, Exception e) {
        System.out.println("异常通知,异常信息:" + e.getMessage());
    }

    @After("pointcut()")
    public void after(JoinPoint joinPoint) {
        System.out.println("最终通知");
    }
}
3. 创建配置类(AppConfig)
@Configuration
@ComponentScan(basePackages = "edu.nf.ch21")
/**
 * 启用AspectJ注解处理器,
 * proxyTargetClass用于设置是否强制使用CGLIB代理
 */
@EnableAspectJAutoProxy(proxyTargetClass = true)
public class AppConfig {
}
4. 编写Main方法
public class Main {

    public static void main(String[] args) {
        ApplicationContext context = new AnnotationConfigApplicationContext(AppConfig.class);
        UserService serviceProxy = context.getBean(UserService.class);
        serviceProxy.add("user1");
    }
}
5. 执行结果
6. 注意
当存在多个切面时,会形成一个嵌套的调用,但被增强的类的方法只会调用一次,而创建了几个切面,切面方法就会调用几次
14.Aware感知型接口
1. 简单来说通过感知接口我们可以直接获取spring容器中的特定信息和资源,即使当前类获取的时候,并没有纳入spring容器管理,也可以直接获取
1.一个非常大的公司工作,这个公司就像Spring容器,它管理着很多员工,这些员工就像Spring中的bean。现在,公司(Spring容器)有很多资源,比如会议室(
ApplicationContext)、打印机(Environment)、食堂(BeanFactory)等。员工(bean)在工作时可能需要使用这些资源。但是,员工通常不知道这些资源在哪里,或者怎么去使用它们。这时候,
Aware接口就相当于公司给员工的一种特殊权限,让员工能够知道并使用这些资源。具体来说:
BeanNameAware:就像公司告诉你你的工位编号(bean的名字)一样,这个接口让bean知道自己在Spring容器中的名字。
BeanFactoryAware:就像公司给你一个电话簿(BeanFactory),通过这个电话簿,你可以找到公司里的其他员工(其他bean)。
ApplicationContextAware:就像公司给你一个内部网络的账号(ApplicationContext),通过这个账号,你可以访问公司的更多服务,比如邮件系统(消息源)、图书馆(资源加载)等。
EnvironmentAware:就像公司告诉你今天的天气预报(环境信息),这样你可以决定今天是否带伞。
ResourceLoaderAware:就像公司给你一个图书馆的借书证(资源加载器),你可以用它去图书馆借阅书籍(加载资源)。
ApplicationEventPublisherAware:就像公司给你一个广播站的麦克风,你可以通过它发布消息,比如“今天晚上有团队建设活动”。通过这些
Aware接口,bean(员工)就能够更好地利用公司(Spring容器)提供的资源和服务,提高工作效率。
1. 创建(UserService)类实现感知接口
/*
 * Aware接口(感知型接口),当Spring容器发现某个Bean实现
 * 了Aware接口之后,就会为这个Bean注入容器的一些核心对象
 * 例如:当实现BeanNameAware时,容器会将Bean的名称注入到当前的
 * 类中
 */
@Service
public class UserService implements BeanNameAware {

    private String beanName;

    @Override
    public void setBeanName(String name) {
        this.beanName = name;
    }

    public void add() {
        System.out.println("Bean的名称:" + beanName);
    }
}
2. 创建ApplicationContext类容器
/*
 * 实现ApplicationContextAware接口,spring会将
 * 整个ApplicationContext注入到当前类中,方便在其他非容器管理
 * 的环境下可以操作Spring容器
 */
@Component
public class ApplicationContextHolder implements ApplicationContextAware {

    private static ApplicationContext applicationContext;

    /**
     * 注入整个容器本身
     * @param applicationContext
     * @throws BeansException
     */
    @Override
    public void setApplicationContext(ApplicationContext applicationContext) throws BeansException {
        System.out.println(applicationContext);
        ApplicationContextHolder.applicationContext = applicationContext;
    }

    /**
     * 获取容器对象
     * @return
     */
    public static ApplicationContext getApplicationContext() {
        return applicationContext;
    }

    public static Object getBean(String name) {
        return applicationContext.getBean(name);
    }

    public static <T> T getBean(Class<T> clazz) {
        return applicationContext.getBean(clazz);
    }

    public static <T> T getBean(String name, Class<T> clazz) {
        return applicationContext.getBean(name, clazz);
    }
}
3. 创建非容器管理的(StuService)类
/**
 * 该类为纳入spring容器管理,但通过applicationContextHolder类可以获取容器中的特定资源
 */
public class StuService {

    public void addStu() {
        //获取当前创建好的spring容器来获取UserService
        UserService service = ApplicationContextHolder.getBean(UserService.class);
        service.add();
    }
}
4. 创建配置类(AppConfig)
@Configuration
@ComponentScan(basePackages = "edu.nf.ch22")
public class AppConfig {
}
5. 编写main方法
public class Main {

    public static void main(String[] args) {
        ApplicationContext context = new AnnotationConfigApplicationContext(AppConfig.class);
        System.out.println(context);
        // 被spring容器管理的类
        /*UserService service = context.getBean(UserService.class);
        service.add();*/

        // 未被spring容器管理的类
        StuService service = new StuService();
        service.addStu();
    }
}
6. 执行结果

15. 事件监听
当一个事件被发布到 Spring 容器中时,所有注册的监听器都会收到通知,并执行相应的操作。这类似于现实世界中的订阅模式,你订阅了一个事件,当事件发生时,你就会收到通知。
使用场景
用户注册后发送欢迎邮件:当用户注册成功这个事件被发布后,一个监听器会接收到这个事件,然后发送一封欢迎邮件给用户。
日志记录:当某个业务操作完成时,发布一个事件,监听器可以记录这个操作的日志。
缓存更新:当数据库中的数据被更新或删除时,发布一个事件,监听器可以据此来清除或更新缓存。
任务调度:当系统启动或关闭时,发布系统事件,监听器可以执行一些初始化或清理工作。
消息队列:当一个消息被发送到消息队列时,监听器可以接收这个消息并进行处理。
1. 创建事件对象类(MyEvent)
/*
 * 定义事件对象
 */
public class MyEvent {

    private String data;

    public MyEvent() {
    }

    public MyEvent(String data) {
        this.data = data;
    }

    public String getData() {
        return data;
    }

    public void setData(String data) {
        this.data = data;
    }
}
2. 创建事件监听器类(MyEventListener)
@Component
public class MyEventListener {

    /**
     * 1.使用@EventListener注解标注方法为一个时间监听方法、
     * 2.只要MyEvent对象一创建,并发布则就会调用该方法,
     * 当发布事件后,容器会调用监听器的方法来处理事件
     * @param event
     */
    @EventListener
    public void handleEvent(MyEvent event) {
        System.out.println("处理事件信息: " + event.getData());
    }
}
3. 编写main方法
public class Main {

    public static void main(String[] args) {
        ApplicationContext context = new AnnotationConfigApplicationContext("edu.nf.ch23");
        // 创建事件对象
        MyEvent event = new MyEvent("Hello spring");
        //向容器发布事件
        context.publishEvent(event);
    }
}
4. 执行结果
16. 定时任务
定时任务是一种在特定时间或间隔执行任务的机制。在编程和软件开发中,定时任务常用于执行周期性的工作,比如数据备份、报告生成、状态检查、调度作业等
使用场景
定时任务在许多场景中都非常有用,包括但不限于:
- 数据清理:定期删除过期数据或清理日志文件。
- 报告生成:每天自动生成业务报告。
- 定期检查:定时检查系统状态或执行维护任务。
- 调度作业:在特定时间执行批量处理或数据导入/导出作业。
- 提醒和通知:定时发送提醒或通知给用户。
1. 创建任务类(OrderService)
@Service
public class OrderService {

    /**
     * 需要定时执行备份的逻辑
     */
    public void backup() {
        System.out.println("备份订单数据...");
    }

    /**
     * 定时检查订单的有效性
     */
    public void checkOrder() {
        System.out.println("检查订单状态...");
    }
}
2. 创建执行定时任务类(OrderTask)
/*
 * 定时任务
 * cron表达式说明:
 * cron表达式主要由6项字符组成,每个字符中间使用空格隔开。
 * 则6项字符分别代表:秒、分、时、日、月、周几
 * 特殊字符"*" :匹配所有值
 * 特殊字符"?":不关心,无所谓,通常用于匹配在周几中
 * 特殊字符",":与
 * 特殊字符"/":增量值
 * 特殊字符"-":区间
 * 例子:
 * "0 * * * * ?" : 每分钟(当秒为0的时候)
 * "0 0 * * * ?" : 每小时(当秒和分为0的时候)
 * "0/5 * * * * ?":每5秒
 * "0 5/15 * * * ?":增量执行,每小时的5分、20分、35分、50分
 * "0 0 9,13 * * ?" : 每天的9点和13点
 * "0 0 8-10 * * ?":每天的8点、9点、10点
 * "0 0 0 25 12 ?":每年的12月25日0点0分0秒
 * "0 30 10 * * ?":每天10点半
 */
@Component
@RequiredArgsConstructor
public class OrderTask {

    /**
     * 注入OrderService
     */
    private final OrderService orderService;

    /**
     * 定时执行备份
     * 每间隔5秒执行一次
     */
    @Scheduled(cron = "0/5 * * * * ?")
    public void executeBackup() {
        orderService.backup();
    }

    @Scheduled(cron = "0/8 * * * * ?")
    public void executeCheck() {
        orderService.checkOrder();
    }
}
3. 创建配置类(Appconfig)
/**
 * 1.启用定时任务注解处理器
 * 2. 实现SchedulingConfigurer接口,用于配置定时执行任务的线程
 * 3. 执行定时任务默认是单线程执行,如果定时任务过多,执行速度会变慢,所以指定线程数量
 * 分别执行不同的定时任务
 */
@Configuration
@ComponentScan(basePackages = "edu.nf.ch24")
@EnableScheduling
public class AppConfig implements SchedulingConfigurer {

    /**
     * 配置定时任务
     * @param taskRegistrar
     */
    @Override
    public void configureTasks(ScheduledTaskRegistrar taskRegistrar) {
        //通过注册器注册定时任务线程池
        taskRegistrar.setScheduler(taskScheduler());
    }

    /**
     * 装配自定义线程池
     * @return
     */
    @Bean
    public ThreadPoolTaskScheduler taskScheduler() {
        //创建任务线程池
        ThreadPoolTaskScheduler taskScheduler = new ThreadPoolTaskScheduler();
        //设置池的线程大小
        taskScheduler.setPoolSize(2);
        //设置线程名称的前缀
        taskScheduler.setThreadNamePrefix("任务线程-");
        return taskScheduler;
    }
}
4. main方法
public class Main {
    public static void main(String[] args) {
        ApplicationContext context = new AnnotationConfigApplicationContext(AppConfig.class);
        while(true){}
    }
}
5.执行结果(每隔5秒备份订单数据,每隔8秒检查订单状态)
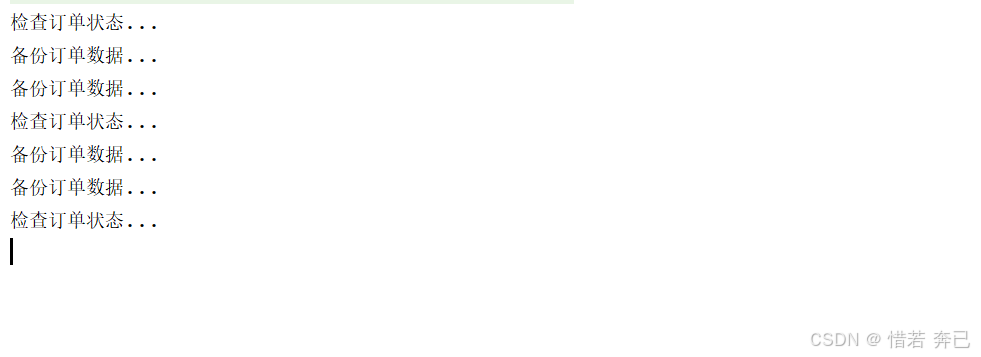
已完结


 被折叠的 条评论
为什么被折叠?
被折叠的 条评论
为什么被折叠?
 到【灌水乐园】发言


