


在红帽8上用源码部署lamp,及源码安装httpd,MySQL,php
1.安装httpd
httpd 和 apr apr-util的包:[Welcome to The Apache Software Foundation!](https://www.apache.org/)
apr1.6.5的软件包网站: https://downloads.apache.org/apr/apr-1.6.5.tar.gz
apr-util-1.6.3的软件包网站:https://downloads.apache.org/apr/apr-util-1.6.3.tar.gz
httpd源码包的网站: https://downloads.apache.org/httpd/httpd-2.4.57.tar.gz
注:在开始之前一定要先配置好yum仓库,和关闭防火墙和selinux
//安装开发工具包
[root@localhost ~]# yum groups mark install 'Development Tools'

//创建apache服务的用户和组
[root@kh3 ~]# groupadd -r apache
[root@kh3 ~]# useradd -r -M -s /sbin/nologin -g apache apache


//安装依赖包
[root@kh3 ~]# yum -y install openssl-devel pcre-devel expat-devel libtool gcc gcc-c++ wget make

//下载和安装apr以及apr-util
[root@kh3 ~]# cd /usr/src/
[root@kh3 src]# wget https://downloads.apache.org/apr/apr-1.6.5.tar.gz https://downloads.apache.org/apr/apr-util-1.6.3.tar.gz

#查看是否安装成功
[root@kh3 src]# ls
apr-1.6.5.tar.gz  apr-util-1.6.3.tar.gz  debug  kernels

#解压两个软件包
[root@kh3 src]# tar xf apr-1.6.5.tar.gz
[root@kh3 src]# tar xf apr-util-1.6.3.tar.gz
#解压成功:
[root@kh3 src]# ls
apr-1.6.5         apr-util-1.6.3         debug
apr-1.6.5.tar.gz  apr-util-1.6.3.tar.gz  kernels

[root@localhost src]# cd apr-1.6.5
[root@localhost apr-1.6.5]# vim configure
    cfgfile="${ofile}T"
    trap "$RM \"$cfgfile\"; exit 1" 1 2 15
    # $RM "$cfgfile"        //将此行加上注释,或者删除此行

[root@localhost apr-1.6.5]# ./configure --prefix=/usr/local/apr
配置过程略...
[root@localhost apr-1.6.5]# make && make install
编译安装过程略...

#安装apr-util
[root@localhost apr-1.6.5]# cd /usr/src/apr-util-1.6.1
[root@localhost apr-util-1.6.1]# ./configure --prefix=/usr/local/apr-util --with-apr=/usr/local/apr
配置过程略...
[root@localhost apr-util-1.6.1]# make && make install
编译安装过程略...

//编译安装httpd
[root@localhost ~]# cd /usr/src
[root@localhost src]# wget https://downloads.apache.org/httpd/httpd-2.4.57.tar.gz
[root@localhost src]# ls
apr-1.6.5         apr-util-1.6.3.tar.gz  kernels
apr-1.6.5.tar.gz  debug
apr-util-1.6.3    httpd-2.4.57.tar.gz

[root@localhost src]# cd httpd-2.4.57/
[root@localhost httpd-2.4.57]# ./configure --prefix=/usr/local/apache \
--sysconfdir=/etc/httpd24 \
--enable-so \
--enable-ssl \
--enable-cgi \
--enable-rewrite \
--with-zlib \
--with-pcre \
--with-apr=/usr/local/apr \
--with-apr-util=/usr/local/apr-util/ \
--enable-modules=most \
--enable-mpms-shared=all \
--with-mpm=prefork

[root@localhost httpd-2.4.57]# make && make install
编译安装过程略...

//安装后配置
[root@localhost ~]# echo 'export PATH=/usr/local/apache/bin:$PATH' > /etc/profile.d/httpd.sh
[root@localhost httpd-2.4.57]# source /etc/profile.d/httpd.sh
[root@localhost httpd-2.4.57]# ln -s /usr/local/apache/include/ /usr/include/httpd
[root@localhost httpd-2.4.57]# echo 'MANPATH /usr/local/apache/man' >> /etc/man.config
[root@localhost ~]# bash

//取消ServerName前面的注释
[root@localhost httpd-2.4.57]# sed -i '/#ServerName/s/#//g' /etc/httpd24/httpd.conf

//启动apache
[root@localhost httpd-2.4.57]# apachectl start
[root@localhost httpd-2.4.57]# ss -antl
State   Recv-Q  Send-Q    Local Address:Port     Peer Address:Port
LISTEN  0       128             0.0.0.0:22            0.0.0.0:*
LISTEN  0       128                   *:80                  *:*
LISTEN  0       128                [::]:22               [::]:*
2.二进制格式mysql安装
要是闲安装麻烦也可直接安装mariadb,它和MySQL是一样的
[root@localhost ~]# yum -y install mariadb mariadb-server
开始二进制安装mysql:
阿里镜像站:centos镜像_centos下载地址_centos安装教程-阿里巴巴开源镜像站 (aliyun.com)
第一步配置好网络yum源安装需要的软件包:
curl -o /etc/yum.repos.d/CentOS-Base.repo https://mirrors.aliyun.com/repo/Centos-vault-8.5.2111.repo
sed -i -e '/mirrors.cloud.aliyuncs.com/d' -e '/mirrors.aliyuncs.com/d' /etc/yum.repos.d/CentOS-Base.repo
[root@localhost ~]# yum -y install wget libncurses*
上传二进制MySQL的软件包自行下载:
#上传二进制MySQL软件包
[root@localhost ~]#  cd /usr/src
[root@localhost src]# ls
debug  kernels  mysql-5.7.39-linux-glibc2.12-x86_64.tar.gz
//创建一个非交互式登录的用户和组
[root@localhost src]# useradd -r -s /sbin/nologin -M mysql
[root@localhost src]# id mysql
uid=994(mysql) gid=991(mysql) groups=991(mysql)

//解压软件至/usr/local/
[root@localhost src]# ls
debug    mysql-5.7.39-linux-glibc2.12-x86_64.tar.gz kernels
[root@localhost src]# tar xf mysql-5.7.39-linux-glibc2.12-x86_64.tar.gz -C /usr/local/
[root@localhost src]# ls /usr/local/
bin  etc  games  include  lib  lib64  libexec  mysql-5.7.39-linux-glibc2.12-x86_64  sbin  share  src
解压成功
#由于名字太长创建一个软连接
[root@localhost src]# cd /usr/local/
[root@localhost local]# ln -s mysql-5.7.39-linux-glibc2.12-x86_64 mysql
[root@localhost local]# ll
total 0
drwxr-xr-x. 2 root root   6 Aug 12  2018 bin
drwxr-xr-x. 2 root root   6 Aug 12  2018 etc
drwxr-xr-x. 2 root root   6 Aug 12  2018 games
drwxr-xr-x. 2 root root   6 Aug 12  2018 include
drwxr-xr-x. 2 root root   6 Aug 12  2018 lib
drwxr-xr-x. 2 root root   6 Aug 12  2018 lib64
drwxr-xr-x. 2 root root   6 Aug 12  2018 libexec
lrwxrwxrwx. 1 root root  35 Sep  4 16:58 mysql -> mysql-5.7.39-linux-glibc2.12-x86_64 #创建成功
drwxr-xr-x. 9 root root 129 Sep  4 16:55 mysql-5.7.39-linux-glibc2.12-x86_64
drwxr-xr-x. 2 root root   6 Aug 12  2018 sbin
drwxr-xr-x. 5 root root  49 Jul 24 11:13 share
drwxr-xr-x. 2 root root   6 Aug 12  2018 src

//修改目录/usr/local/mysql的属主属组
[root@localhost local]# chown -R mysql.mysql /usr/local/mysql
[root@localhost local]# ll /usr/local/mysql -d
lrwxrwxrwx. 1 mysql mysql 35 Sep  4 16:58 /usr/local/mysql -> mysql-5.7.39-linux-glibc2.12-x86_64

//添加环境变量
[root@localhost ~]# cd /usr/local/mysql
[root@localhost mysql]# ls
bin  docs  include  lib  LICENSE  man  README  share  support-files
[root@localhost mysql]# echo 'export PATH=/usr/local/mysql/bin:$PATH' > /etc/profile.d/mysql.sh
[root@localhost mysql]# bash
[root@localhost mysql]# echo $PATH
/usr/local/mysql/bin:/usr/local/sbin:/usr/local/bin:/usr/sbin:/usr/bin:/root/bin
#添加成功!
注释:有bin或者sbin就要,添加环境变量
	 有include这个头文件就要,做软链接
	 有lib这个库文件就要,告诉他在哪里,还要用ldconfig -V来刷新
	 有man帮助文档,就要在/etc/man_db.conf这个文件中添加一行MANPATH

//建立数据存放目录
[root@localhost mysql]# mkdir /opt/data
[root@localhost mysql]# chown -R mysql.mysql /opt/data
[root@localhost mysql]# ll /opt/data/ -d
drwxr-xr-x. 2 mysql mysql 6 Sep  4 17:13 /opt/data/

//初始化数据库
[root@localhost mysql]# /usr/local/mysql/bin/mysqld --initialize --user=mysql --datadir=/opt/data/
2023-09-04T09:21:48.420953Z 0 [Warning] TIMESTAMP with implicit DEFAULT value is deprecated. Please use --explicit_defaults_for_timestamp server option (see documentation for more details).
2023-09-04T09:21:48.579008Z 0 [Warning] InnoDB: New log files created, LSN=45790
2023-09-04T09:21:48.603802Z 0 [Warning] InnoDB: Creating foreign key constraint system tables.
2023-09-04T09:21:48.608264Z 0 [Warning] No existing UUID has been found, so we assume that this is the first time that this server has been started. Generating a new UUID: 7989adfe-4b04-11ee-b0c7-000c29fe7e65.
2023-09-04T09:21:48.608767Z 0 [Warning] Gtid table is not ready to be used. Table 'mysql.gtid_executed' cannot be opened.
2023-09-04T09:21:48.704494Z 0 [Warning] A deprecated TLS version TLSv1 is enabled. Please use TLSv1.2 or higher.
2023-09-04T09:21:48.704528Z 0 [Warning] A deprecated TLS version TLSv1.1 is enabled. Please use TLSv1.2 or higher.
2023-09-04T09:21:48.704920Z 0 [Warning] CA certificate ca.pem is self signed.
2023-09-04T09:21:48.790727Z 1 [Note] A temporary password is generated for root@localhost: tsrpa1tuw0?W
//请注意,这个命令的最后会生成一个临时密码,此处密码是tsrpa1tuw0?W
#保存命令
[root@localhost ~]# echo tsrpa1tuw0?W > password
[root@localhost ~]# cat password
tsrpa1tuw0?W


//生成配置文件
[root@localhost ~]# cat > /etc/my.cnf <<EOF
> [mysqld]
> basedir = /usr/local/mysql
> datadir = /opt/data
> socket = /tmp/mysql.sock
> port = 3306
> pid-file = /opt/data/mysql.pid
> user = mysql
> skip-name-resolve
> sql-mode = STRICT_TRANS_TABLES,NO_ZERO_IN_DATE,NO_ZERO_DATE,ERROR_FOR_DIVISION_BY_ZERO,NO_AUTO_CREATE_USER,NO_ENGINE_SUBSTITUTION
> EOF

[root@localhost ~]# cat /etc/my.cnf
[mysqld]
basedir = /usr/local/mysql
datadir = /opt/data
socket = /tmp/mysql.sock
port = 3306
pid-file = /opt/data/mysql.pid
user = mysql
skip-name-resolve
sql-mode = STRICT_TRANS_TABLES,NO_ZERO_IN_DATE,NO_ZERO_DATE,ERROR_FOR_DIVISION_BY_ZERO,NO_AUTO_CREATE_USER,NO_ENGINE_SUBSTITUTION

basedir = [数据库的位置]
datadir = [存放数据的位置]
socket = [套接字文件的位置]
port = [端口号默认MySQL的端口号是3306]
pid-file = [进程文件的位置]
user = [哪个用户]
skip-name-resolve [跳过名称解析]

//配置服务启动脚本
[root@localhost ~]# cp -a /usr/local/mysql/support-files/mysql.server /etc/init.d/mysqld
[root@localhost ~]# sed -ri 's#^(basedir=).*#\1/usr/local/mysql#g' /etc/init.d/mysqld
[root@localhost ~]# sed -ri 's#^(datadir=).*#\1/opt/data#g' /etc/init.d/mysqld

basedir= [数据库的位置]
datadir= [存放数据的位置]

添加成功!!!
启动mysql
#启动mysql
[root@localhost support-files]# service mysqld start
Starting MySQL.Logging to '/opt/data/localhost.err'.
 SUCCESS!
[root@localhost support-files]# ss -antl
State          Recv-Q         Send-Q                 Local Address:Port                 Peer Address:Port
LISTEN         0              128                          0.0.0.0:22                        0.0.0.0:*
LISTEN         0              80                                 *:3306                            *:*
LISTEN         0              128                             [::]:22                           [::]:*
#看到3306就是启动成功!
CentOS6以前版本的系统控制服务方式,源码安装也需要用这种方法来控制服务
service NAME start      //启动NAME服务
service NAME stop       //停止NAME服务
service NAME status     //查看NAME服务状态
service NAME restart    //重启NAME服务
chkconfig --add NAME    //把NAME脚本纳入管理并设置开机自启
chkconfig NAME on       //设置开机自启
chkconfig NAME off      //设置开机不自动启动
登录MySQL
//修改密码
//使用临时密码登录
[root@localhost ~]# ls
anaconda-ks.cfg  password
[root@localhost ~]# cat password
tsrpa1tuw0?W
[root@localhost ~]# mysql -uroot -ptsrpa1tuw0?W
mysql: [Warning] Using a password on the command line interface can be insecure.
Welcome to the MySQL monitor.  Commands end with ; or \g.
Your MySQL connection id is 2
Server version: 5.7.39

Copyright (c) 2000, 2022, Oracle and/or its affiliates.

Oracle is a registered trademark of Oracle Corporation and/or its
affiliates. Other names may be trademarks of their respective
owners.

Type 'help;' or '\h' for help. Type '\c' to clear the current input statement.

#设置密码
mysql> set password = password('123456');
Query OK, 0 rows affected, 1 warning (0.00 sec)
注释:有bin或者sbin就要,添加环境变量
有include这个头文件就要,做软链接
有lib这个库文件就要,告诉他在哪里,还要用ldconfig -V来刷新
有man帮助文档,就要在/etc/man_db.conf这个文件中添加一行MANPATH
安装注意事项:
[root@localhost ~]# cd /usr/local/mysql
[root@localhost mysql]# ls
bin  docs  include  lib  LICENSE  man  README  share  support-files
[root@localhost mysql]# ln -s /usr/local/mysql/include /usr/include/mysql
[root@localhost mysql]# vim /etc/ld.so.conf.d/mysql.conf
[root@localhost mysql]# cat /etc/ld.so.conf.d/mysql.conf
/user/local/mysql/lib
[root@localhost mysql]# ldconfig -V 	#重新加载

#添加帮助文档:
[root@localhost mysql]# vim /etc/man_db.conf
[root@localhost mysql]# cat /etc/man_db.conf | grep /usr/local/mysql/man
MANDATORY_MANPATH			/usr/local/mysql/man
3.安装php
php网站:PHP: Hypertext Preprocessor
php软件包网站: https://www.php.net/distributions/php-8.2.9.tar.xz
网站:pkgs.org
安装php依赖包:
[root@localhost local]# yum -y install libxml2-devel openssl-devel sqlite-devel bzip2 bzip2-devel libcurl-devel readline-devel libpng-devel libjpeg-turbo-devel freetype-devel libzip-devel

[root@localhost php-8.2.9]# yum -y install http://mirror.centos.org/centos/8-stream/PowerTools/x86_64/os/Packages/oniguruma-devel-6.8.2-2.el8.x86_64.rpm

//下载php
[root@localhost ~]# cd /usr/src/
[root@localhost src]# wget https://www.php.net/distributions/php-8.2.9.tar.xz
[root@localhost src]# ls
apr-1.6.5         apr-util-1.6.3.tar.gz  httpd-2.4.57.tar.gz
apr-1.6.5.tar.gz  debug                  kernels
apr-util-1.6.3    httpd-2.4.57           php-8.2.9.tar.xz

//编译安装php
[root@localhost src]# tar xf php-8.2.9.tar.xz
[root@localhost src]# cd php-8.2.9/
[root@localhost php-8.2.9]# ./configure --prefix=/usr/local/php7  \
--with-config-file-path=/etc \
--enable-fpm \
--disable-debug \
--disable-rpath \
--enable-shared \
--enable-soap \
--with-openssl \
--enable-bcmath \
--with-iconv \
--with-bz2 \
--enable-calendar \
--with-curl \
--enable-exif  \
--enable-ftp \
--enable-gd \
--with-jpeg \
--with-zlib-dir \
--with-freetype \
--with-gettext \
--enable-mbstring \
--enable-pdo \
--with-mysqli=mysqlnd \
--with-pdo-mysql=mysqlnd \
--with-readline \
--enable-shmop \
--enable-simplexml \
--enable-sockets \
--with-zip \
--enable-mysqlnd-compression-support \
--with-pear \
--enable-pcntl \
--enable-posix

[root@localhost php-8.2.9]# make -j $(cat /proc/cpuinfo |grep processor|wc -l)
编译过程略
[root@localhost php-8.2.9]# make install
安装过程略

//安装后配置
[root@localhost php7]# echo 'export PATH=/usr/local/php7/bin:$PATH' > /etc/profile.d/php7.sh
[root@localhost php7]# source /etc/profile.d/php7.sh
[root@localhost php7]# which php
/usr/local/php7/bin/php
#查看php是否安装
[root@localhost php7]# which php
/usr/local/php7/bin/php
[root@localhost php7]# php -v
PHP 8.2.9 (cli) (built: Aug 30 2023 16:34:25) (NTS)
Copyright (c) The PHP Group
Zend Engine v4.2.9, Copyright (c) Zend Technologies
[root@localhost php7]#
//配置php-fpm
[root@localhost sbin]# cd /usr/src/php-8.2.9/
[root@localhost php-8.2.9]# cp php.ini-production /etc/php.ini
[root@localhost php-8.2.9]# cp sapi/fpm/init.d.php-fpm /etc/init.d/php-fpm
[root@localhost php-8.2.9]# chmod +x /etc/rc.d/init.d/php-fpm
[root@localhost php-8.2.9]# cp /usr/local/php7/etc/php-fpm.conf.default /usr/local/php7/etc/php-fpm.conf
[root@localhost php-8.2.9]# cp /usr/local/php7/etc/php-fpm.d/www.conf.default /usr/local/php7/etc/php-fpm.d/www.conf
[root@localhost php-8.2.9]#

//编辑php-fpm的配置文件(/usr/local/php7/etc/php-fpm.conf):
//配置fpm的相关选项为你所需要的值:
[root@localhost ~]# vim /usr/local/php7/etc/php-fpm.conf
.....
.....
pm.max_children = 50    ;最多同时提供50个进程提供50个并发服务
pm.start_servers = 5    ;启动时启动5个进程
pm.min_spare_servers = 2    ;最小空闲进程数
pm.max_spare_servers = 8    ;最大空闲进程数

[root@localhost ~]# tail /usr/local/php7/etc/php-fpm.conf
; file.
; Relative path can also be used. They will be prefixed by:
;  - the global prefix if it's been set (-p argument)
;  - /usr/local/php7 otherwise
include=/usr/local/php7/etc/php-fpm.d/*.conf
pm.max_children = 50
pm.start_servers = 5
pm.min_spare_servers = 2
pm.max_spare_servers = 8

//启动php-fpm
[root@localhost php-8.2.9]# service php-fpm start
//默认情况下,fpm监听在127.0.0.1的9000端口,也可以使用如下命令验证其是否已经监听在相应的套接字
[root@localhost php-8.2.9]# ss -antl
State   Recv-Q  Send-Q   Local Address:Port     Peer Address:Port
LISTEN  0       128          127.0.0.1:9000          0.0.0.0:*
LISTEN  0       128            0.0.0.0:22            0.0.0.0:*
LISTEN  0       80                   *:3306                *:*
LISTEN  0       128                  *:80                  *:*
LISTEN  0       128               [::]:22               [::]:*
[root@localhost php-8.2.9]#

[root@localhost php-8.2.9]# ps -ef|grep php
root      191944       1  0 16:46 ?        00:00:00 php-fpm: master process (/usr/local/php7/etc/php-fpm.conf)
nobody    191945  191944  0 16:46 ?        00:00:00 php-fpm: pool www
nobody    191946  191944  0 16:46 ?        00:00:00 php-fpm: pool www
root      192008   15941  0 16:51 pts/2    00:00:00 grep --color=auto php
3.4 配置apache
3.4.1 启用代理模块
在apache httpd 2.4以后已经专门有一个模块针对FastCGI的实现,此模块为mod_proxy_fcgi.so,它其实是作为mod_proxy.so模块的扩展,因此,这两个模块都要加载,编辑httpd.conf文件,取消以下两行内容的注释:
- LoadModule proxy_module modules/mod_proxy.so
- LoadModule proxy_fcgi_module modules/mod_proxy_fcgi.so
//启用httpd的相关模块
[root@localhost ~]# sed -i '/proxy_module/s/#//g' /etc/httpd24/httpd.conf
[root@localhost ~]# sed -i '/proxy_fcgi_module/s/#//g' /etc/httpd24/httpd.conf
注意:
这里写的/var/www/html/是yum源安装方式生成的网页存放目录,这里必须改成你编译安装指定的网页存放路径,禁止直接复制我这里的路径
这里的idfsoft.com是域名,你必须改成你所使用的域名,禁止直接复制此处的域名
这里的$1表示匹配所有以.php结尾的http请求
//创建虚拟主机目录并生成php测试页面
[root@localhost ~]# mkdir /usr/local/apache/htdocs/xld.com
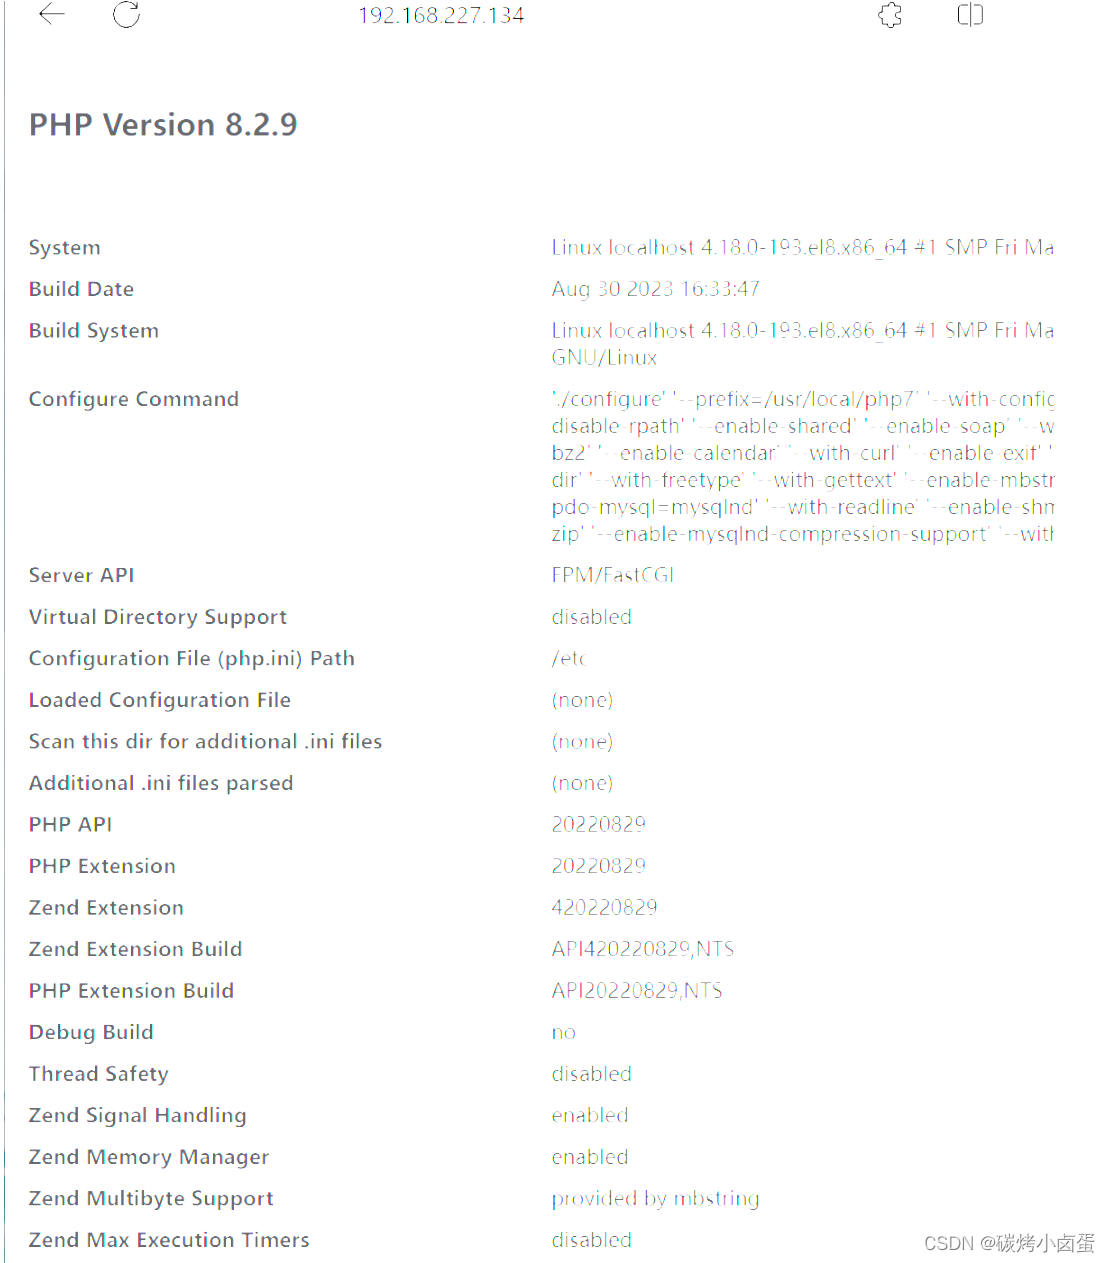
[root@localhost ~]# vim /usr/local/apache/htdocs/xld.com/index.php
[root@localhost ~]# cat /usr/local/apache/htdocs/xld.com/index.php
<?php
phpinfo();
?>
#修改属组
[root@localhost ~]# chown -R apache.apache /usr/local/apache/htdocs/
[root@localhost ~]# ll /usr/local/apache/htdocs/ -d
drwxr-xr-x. 4 apache apache 59 Aug 30 17:17 /usr/local/apache/htdocs/
[root@localhost ~]# vim /etc/httpd24/httpd.conf
//在配置文件的最后加入以下内容
<VirtualHost *:80>
DocumentRoot "/usr/local/apache/htdocs/wangqing.com"
ServerName www.wangqing.com
ProxyRequests Off
ProxyPassMatch ^/(.*\.php)$ fcgi://127.0.0.1:9000/usr/local/apache/htdocs/wangqing.com/$1
<Directory "/usr/local/apache/htdocs/wangqing.com">
Options none
AllowOverride none
Require all granted
</Directory>
</VirtualHost>
[root@localhost ~]# vim /etc/httpd24/httpd.conf
//搜索AddType,添加以下内容
# If the AddEncoding directives above are commented-out, then you
# probably should define those extensions to indicate media types:
#
AddType application/x-compress .Z
AddType application/x-gzip .gz .tgz
AddType application/x-httpd-php .php #添加此行
AddType application/x-httpd-php-source .phps #添加此行
[root@localhost ~]# sed -i '/ DirectoryIndex/s/index.html/index.php index.html/g' /etc/httpd24/httpd.conf
//重启apache服务
[root@localhost ~]# apachectl stop
[root@localhost ~]# apachectl start
[root@localhost ~]# ss -antl
State Recv-Q Send-Q Local Address:Port Peer Address:Port
LISTEN 0 128 *:22 *:*
LISTEN 0 100 127.0.0.1:25 *:*
LISTEN 0 128 127.0.0.1:9000 *:*
LISTEN 0 128 :::80 :::*
LISTEN 0 128 :::22 :::*
LISTEN 0 100 ::1:25 :::*
LISTEN 0 80 :::3306
3.5 验证
1.修改/etc/hosts文件,添加域名与IP的映射
2.在浏览器上使用域名访问,若看到以下界面则表示lamp架构搭建成功,否则请检查你的操作


 被折叠的 条评论
为什么被折叠?
被折叠的 条评论
为什么被折叠?
 到【灌水乐园】发言


