


目录
1.maven私服架构
1.1.maven私服介绍
1.1.1. 私服介绍
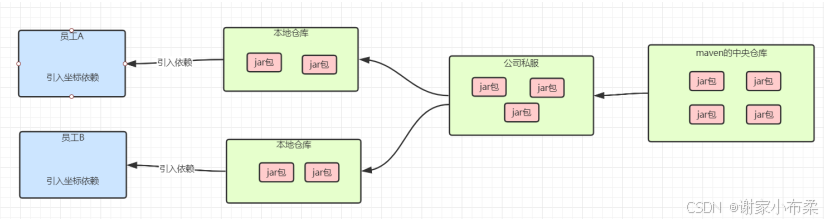
正式开发,不同的项目组开发不同的工程。maven-dao 工程开发完毕,发布到私服maven-service 从私服下载 dao。
公司在自己的局域网内搭建自己的远程仓库服务器,称为私服, 私服服务器即是公司内部的 maven 远程仓库, 每个员工的电脑上安装 maven 软件并且连接私服服务器,员工将自己开发的项目打成 jar 并发布到私服服务器,其它项目组从私服服务器下载所依赖的构件(jar)。
私服还充当一个代理服务器,当私服上没有 jar 包会从互联网中央仓库自动下载。
1.1.2.Nexus介绍
Nexus 是 Maven 仓库管理器, 通过 nexus 可以搭建 maven 仓库,同时 nexus 还提供强大的仓库管理功能,构件搜索功能等。
1.2.maven私服实战
1.2.1.nexus安装
1.解压nexus-2.12.0-01-bundle.zip文件,存放到一个不含中文的目录下。
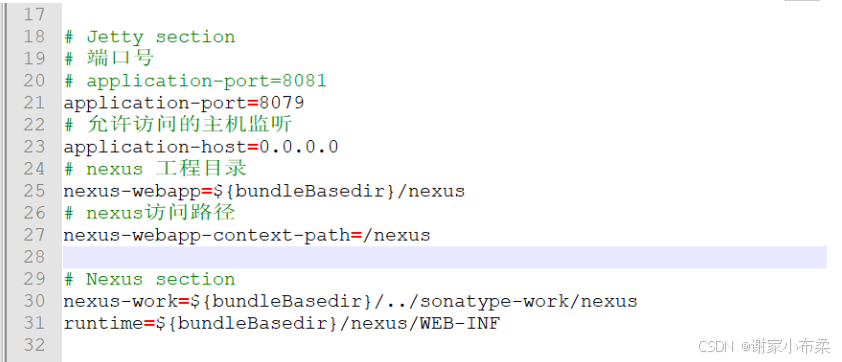
查看conf文件下的nexus.properties配置文件,可以修改对应的配置
2 nexus的安装命令:使用管理员运行cmd命令窗口,切换目录nexus\nexus-2.12.0-01\bin目录下,执行nexus.bat install进行安装。执行nexus.bat start 启动服务 执行nexus.bat stop停止服务。
3 nexus的卸载命令:使用管理员运行cmd命令窗口,切换目录nexus\nexus-2.12.0-01\bin目录下,执行nexus.bat uninstall进行卸载
4 访问图形化界面:打开浏览器,输入http://localhost:端口号/nexus访问
5 点击log in,进行登录。用户名:admin 密码:admin123
1.2.2. nexus仓库类型
nexus提供了不同的仓库类型
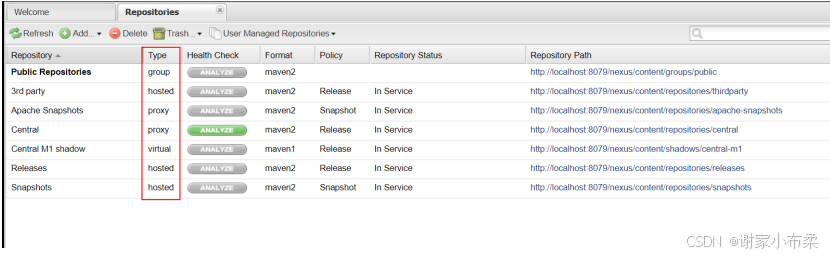
hosted,宿主仓库, 部署自己的 jar 到这个类型的仓库,包括 releases 和 snapshot 两部分, Releases 公司内部发布版本仓库、 Snapshots 公司内部测试版本仓库
proxy,代理仓库, 用于代理远程的公共仓库,如 maven 中央仓库,用户连接私服,私服自动去中央仓库下载 jar 包或者插件。
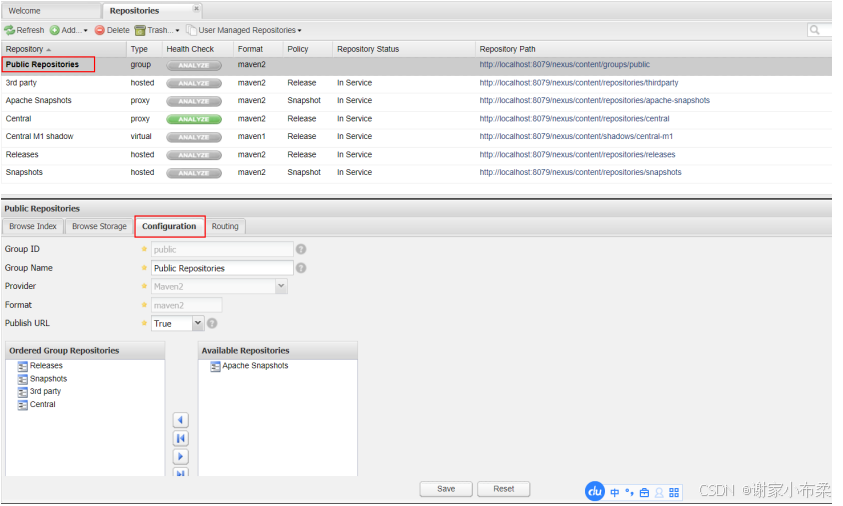
group,仓库组,用来合并多个 hosted/proxy 仓库,通常我们配置自己的 maven 连接仓库组。Group仓库组也是可以自己进行定制的。
4 virtual(虚拟):兼容 Maven1 版本的 jar 或者插件
1.2.3. 将项目发布到私服
需要在客户端即部署要部署的工程电脑上配置 maven 环境,并修改
settings.xml 文件, 配置连接私服的用户和密码 。
此用户名和密码用于私服校验,因为私服需要知道上传的账号和密码是否和私服中的账号和密码一致。
在servers节点下进行配置
<!-- 定义稳定版本的id名称,用户名密码 -->
<server>
      <id>releases</id>
      <username>admin</username>
      <password>admin123</password>
</server>
<!-- 定义开发版本的id名称,用户名密码 -->
<server>
      <id>snapshots</id>
      <username>admin</username>
      <password>admin123</password>
   </server>
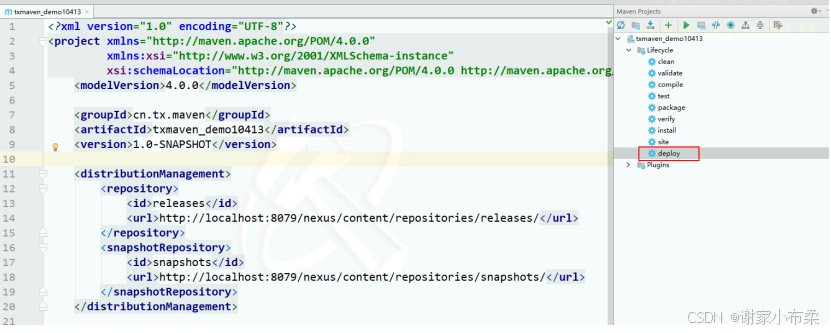
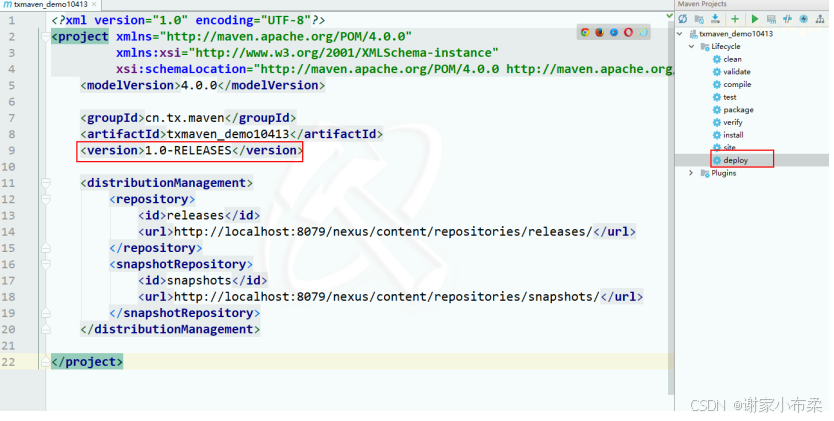
配置项目 pom.xml,配置私服仓库的地址,本公司的自己的 jar 包会上传到私服的宿主仓库,根据工程的版本号决定上传到哪个宿主仓库,如果版本为 release 则上传到私服的 release 仓库,如果版本为snapshot 则上传到私服的 snapshot 仓库。
<distributionManagement>
    <repository>
        <id>releases</id>
        <url>http://localhost:8079/nexus/content/repositories/releases/</url>
    </repository>
    <snapshotRepository>
        <id>snapshots</id>
        <url>http://localhost:8079/nexus/content/repositories/snapshots/</url>
    </snapshotRepository>
</distributionManagement>
注意:这里的 id 标签的值要和 settings.xml配置文件中的id值保持一致。
在该工程中执行deploy命令,发布项目到私服上。
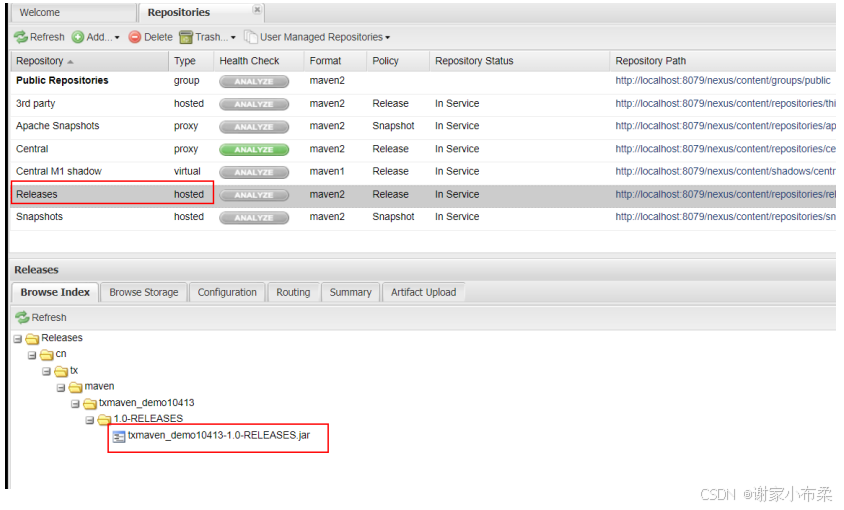
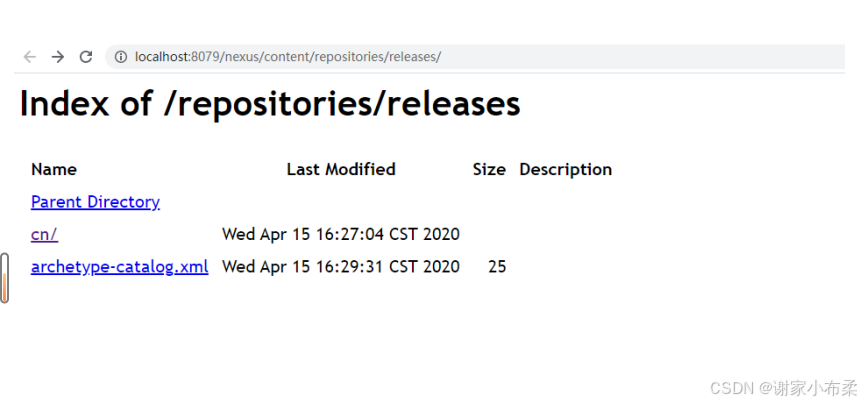
查看私服结果
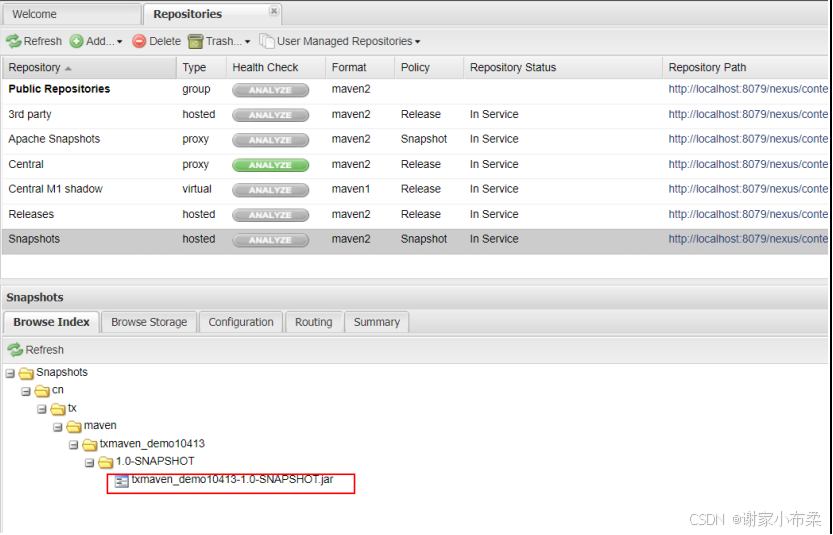

可以发布RELEASES稳定版本的jar包到私服。
查看私服结果
1.2.4. 从私服下载jar包
在settings.xml配置文件配置私服的镜像文件
<mirror>
		<!-- id名称 -->
		<id>nexusmaven</id>
		<!-- 表示拦截所有的请求,都重定向到私服,从私服下载jar包,私服没有再去中央仓库下载 -->
		<mirrorOf>*</mirrorOf>
		<name>nexus maven</name>
		<!-- 私服的组地址 -->
	<url>http://localhost:8079/nexus/content/groups/public/</url>
进行测试
先把自己的某个项目发布到私服中,然后删除掉本地仓库中的jar包,再使用其他项目去依赖该jar包,查看是否从私服中下载。
在其他项目中引入该坐标依赖。
<!--依赖demo1这个项目-->
<dependencies>
    <dependency>
        <groupId>cn.tx.maven</groupId>
        <artifactId>txmaven_demo10413</artifactId>
        <version>1.0-RELEASES</version>
    </dependency>
</dependencies>
还有一种方式,可以配置仓库的方式,可以修改自己项目的pom配置文件,添加仓库的配置。
<repositories>
    <repository>
        <id>nexus</id>
        <name>nexusmaven</name>
        <url>http://localhost:8079/nexus/content/groups/public/</url>
        <releases>
            <enabled>true</enabled>
        </releases>
        <snapshots>
            <enabled>true</enabled>
        </snapshots>
    </repository>
</repositories>
<pluginRepositories>
    <pluginRepository>
        <id>public</id>
        <url>http://localhost:8079/nexus/content/groups/public/</url>
        <name>pluginRepositories</name>
    </pluginRepository>
</pluginRepositories>
上面的方式不是特别的理想,需要在每一个项目的pom文件中都添加相同的配置,比比较麻烦。可以在settings.xml配置文件中添加配置,完成统一的设置。
<!-- 下载jar包配置 -->
	<profile>
		<!--profile的id -->
		<id>dev</id>
		<repositories>
			<repository> <!--仓库id,repositories可以配置多个仓库,保证id不重复 -->
				<id>nexus</id> <!--仓库地址,即nexus仓库组的地址 -->
				<url>http://localhost:8079/nexus/content/groups/public/</url> <!--是否下载releases构件 -->
				<releases>
					<enabled>true</enabled>
				</releases> <!--是否下载snapshots构件 -->
				<snapshots>
					<enabled>true</enabled>
				</snapshots>
			</repository>
		</repositories>
		<pluginRepositories> <!-- 插件仓库,maven的运行依赖插件,也需要从私服下载插件 -->
			<pluginRepository> <!-- 插件仓库的id不允许重复,如果重复后边配置会覆盖前边 -->
				<id>public</id>
				<name>Public Repositories</name>
				<url>http://localhost:8079/nexus/content/groups/public/</url>
			</pluginRepository>
		</pluginRepositories>
	</profile>
激活配置
<activeProfiles>
		<activeProfile>dev</activeProfile>
	</activeProfiles>
进行测试
1.2.5. 第三方jar包发布到私服
把jar包安装到本地仓库
mvn install:install-file -DgroupId=com.alibaba -DartifactId=fastjson -Dversion=1.1.37 -Dfile=fastjson-1.1.37.jar -Dpackaging=jar
把jar包上传到私服
先在settings.xml配置文件中配置用户名密码
<server>
<id>thirdparty</id>
<username>admin</username>
 <password>admin123</password>
</server>
上传到私服
mvn deploy:deploy-file -DgroupId=com.alibaba.fastjson -DartifactId=fastjson -Dversion=1.2.8 -Dpackaging=jar -Dfile=D:\repository\com\alibaba\fastjson\1.2.8\fastjson-1.2.8.jar -Durl=http://localhost:8081/nexus/content/repositories/thirdparty -DrepositoryId=thirdparty


 909
909

 被折叠的 条评论
为什么被折叠?
被折叠的 条评论
为什么被折叠?
 到【灌水乐园】发言


