


 本文详细介绍了如何使用JSONServer创建RESTful API,包括安装、配置、axios的基本操作、拦截器和取消请求,以及axios源码分析。通过实例演示了发送GET、POST、PUT和DELETE请求的方法,以及创建axios实例和设置默认配置。
目录
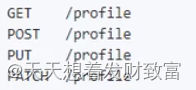
一 JSON Server使用
第一步
npm install -g json-server
第二步:
创建一个db.json文件并复制如下代码
{
  "posts": [
    {
      "id": 1,
      "title": "json-server",
      "author": "typicode"
    }
  ],
  "comments": [
    {
      "id": 1,
      "body": "some comment",
      "postId": 1
    }
  ],
  "profile": {
    "name": "typicode"
  }
}
第三步:
在终端输入(一定要在db.json目录下输入)
json-server --watch db.json
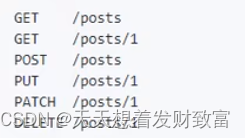
二 介绍
axios是一个基于 promise 的 HTTP 库,可以用在浏览器和 node.js 中。
特性:
- 从浏览器中发送AJAX请求
- 在node.js 中发送http请求
- 支持 Promise API
- 拦截请求和响应
- 转换请求数据和响应数据
- 取消请求
- 自动将结果转换为JSON 数据
- 客户端支持阻挡XSRF攻击
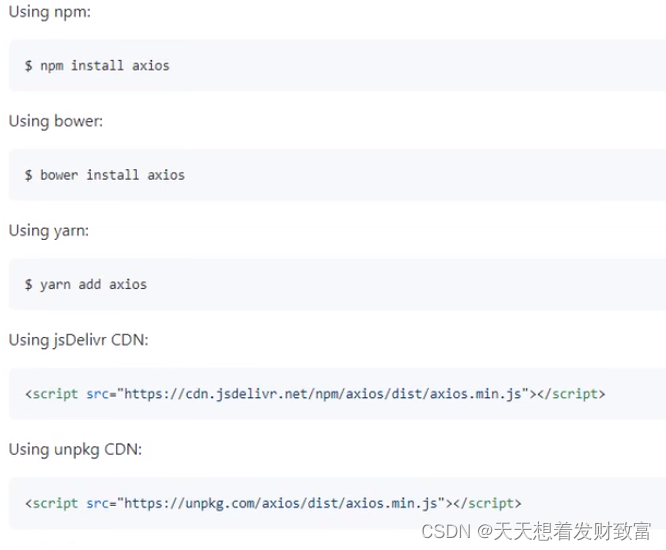
安装
三 基本使用
<!DOCTYPE html>
<html lang="en">
<head>
    <meta charset="UTF-8">
    <meta http-equiv="X-UA-Compatible" content="IE=edge">
    <meta name="viewport" content="width=device-width, initial-scale=1.0">
    <title></title>
    <script src="https://cdn.bootcdn.net/ajax/libs/axios/0.27.2/axios.min.js"></script>
</head>
<body class="container">
    <div class= "container">
        <h2 class=" page-header" >基本使用</h2>
        <button class="btn btn-primary"> 发送GET请求 </button>
        <button cLass="btn btn-warning" > 发送POST请求</button>
        <button cLass="btn btn-success"> 发送PUT请求</button>
        <button cLass="btn btn-danger"> 发送DELETE 请求</button>
    </div>
    <script>
        //获取按钮
        const btn=document.querySelectorAll('button');
        btn[0].onclick=function(){
            //发送AJAX请求
            axios({
                //请求类型
                method:'GET',
               //URL
               url:'http://localhost:3000/posts',
            }).then(response=>{
                console.log(response);
            })
        }
        btn[1].onclick=function(){
            //发送AJAX请求
            axios({
                //请求类型
                method:'POST',
               //URL
               url:'http://localhost:3000/posts',
               data:{
                title:"本天才上线",
                author:"张三"
               }
            }).then(response=>{
                console.log(response);
            })
        }
          btn[2].onclick=function(){
            //发送AJAX请求
            axios({
                //请求类型
                method:'PUT',
               //URL
               url:'http://localhost:3000/posts/2',
             //设置请求体
               data:{
                title:"一只猪",
                author:"李四"
               }
            }).then(response=>{
                console.log(response);
            })
        }
        btn[3].onclick=function(){
            //发送AJAX请求
            axios({
                //请求类型
                method:'delete',
               //URL
               url:'http://localhost:3000/posts/2',
            }).then(response=>{
                console.log(response);
            })
        }
    </script>
</body>
</html> 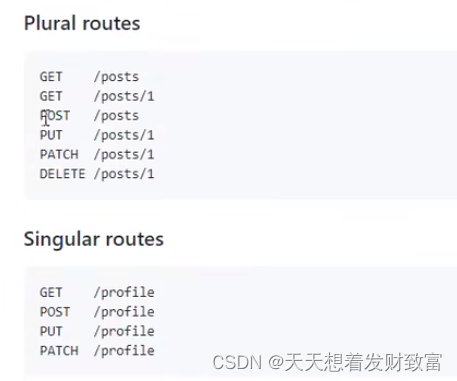
其他方式发送请求
<!DOCTYPE html>
<html lang="en">
<head>
    <meta charset="UTF-8">
    <meta http-equiv="X-UA-Compatible" content="IE=edge">
    <meta name="viewport" content="width=device-width, initial-scale=1.0">
    <title></title>
    <script src="https://cdn.bootcdn.net/ajax/libs/axios/0.27.2/axios.min.js"></script>
</head>
<body class="container">
    <div class= " container">
        <h2 class=" page-header" >基本使用</h2>
        <button class="btn btn-primary"> 发送GET请求 </button>
        <button cLass="btn btn-warning" > 发送POST请求</button>
    </div>
    <script>
          //获取按钮
          const btn=document.querySelectorAll('button');

        btn[0].onclick=function(){
            axios.request({
                method:'GET',
                url:'http://localhost:3000/comments'
            }).then(response=>{
                console.log(response);
            })
        }
        //发送POST请求
        btn[1].onclick=function(){
            axios.post(
                'http://localhost:3000/comments',
                {
                    "body":"喜美cp",
                    "postId":2
                }
            ).then(response=>{
                console.log(response);
            })
        }
        </script>
    </body>
    </html>
创建实例对象
<!DOCTYPE html>
<html lang="en">
<head>
    <meta charset="UTF-8">
    <meta http-equiv="X-UA-Compatible" content="IE=edge">
    <meta name="viewport" content="width=device-width, initial-scale=1.0">
    <script src="https://cdn.bootcdn.net/ajax/libs/axios/0.27.2/axios.min.js"></script>
</head>
<body class="container">
    <div class= "container">
        <h2 class="page-header">基本使用</h2>
        <button class="btn btn-primary"> 发送GET请求 </button>
        <button cLass="btn btn-warning"> 发送POST请求</button>
    </div>
    <script>
        //获取按钮
        const btn=document.querySelectorAll('button');

        //创建实例对象
          const xiaohua=axios.create({
            baseURL:'http://localhost:3000',
            timeout:2000
          })
          const another=axios.create({
            baseURL:'http://b.com',
            timeout:2000
          })
          console.log(xiaohua)
          //这里xioahua与axios对象的功能几近相同
        /*  //用实例对象发送请求第一种方式
          xiaohua({
            url:'/posts'
          }).then(response=>{
            console.log(response)
          })*/
          //第二种方式
          xiaohua.get('/posts').then(response=>{
            console.log(response.data)
          })
     </script>

</body>
</html>
设置默认配置
<!DOCTYPE html>
<html lang="en">
<head>
    <meta charset="UTF-8">
    <meta http-equiv="X-UA-Compatible" content="IE=edge">
    <meta name="viewport" content="width=device-width, initial-scale=1.0">
    <title></title>
    <script src="https://cdn.bootcdn.net/ajax/libs/axios/0.27.2/axios.min.js"></script>
</head>
<body>
    <button class="btn">点击</button>
    <script>
     const btn=document.querySelector('button')
          //默认配置
         axios.defaults.method = 'GET' ;//设置默认的请求类型为GET
          axios.defaults.baseURL = 'http://localhost:3000' ;//设置基础URL
          axios.defaults.params = {id:100};//params 即将与请求一起发送的 URL 参数
          axios.defaults.timeout = 3000;// axios.post(url[, data[, config]])
        btn.onclick=function(){
            axios({
                url:'/posts'
            }).then(response=>{
                console.log(response)
            })
        }
    </script>
</body>
</html>
四 axios拦截器
<!DOCTYPE html>
<html lang="en">
<head>
    <meta charset="UTF-8">
    <meta http-equiv="X-UA-Compatible" content="IE=edge">
    <meta name="viewport" content="width=device-width, initial-scale=1.0">
    <title>拦截器</title>
    <script src="https://cdn.bootcdn.net/ajax/libs/axios/0.27.2/axios.min.js"></script>
</head>
<body>
    <script>
        //设置请求拦截器 config配置对象
        axios.interceptors.request.use(function(config){
            console.log('请求拦截器成功  1号')
            config.params={a:100}
           return config;
          // throw '参数处了问题'
        },function(error){
            console.log('请求拦截器失败  1号')
            return Promise.reject(error);
        })
        axios.interceptors.request.use(function(config){
            console.log('请求拦截器成功  2号')
            config.params={a:100}
           return config;
           //throw '参数处了问题'
        },function(error){
            console.log('请求拦截器失败  2号')
            return Promise.reject(error);
        })
        axios.interceptors.response.use(function(response){
           console.log('响应拦截器成功  1号')
            return response.data;
        },function(error){
            console.log('响应拦截器失败  1号')
            return Promise.reject(error);
        })
        axios.interceptors.response.use(function(response){
           console.log('响应拦截器成功  2号')
            return response;
        },function(error){
            console.log('响应拦截器失败  2号')
            return Promise.reject(error);
        })
        //发送请求
        axios({
            method:'GET',
            url:'http://localhost:3000/posts'
        }).then(response=>{
            console.log('自定义回调处理成功')
            console.log(response)
        }).catch(reason=>{
            console.log('自定义回调失败')
        })
    </script>
</body>
</html>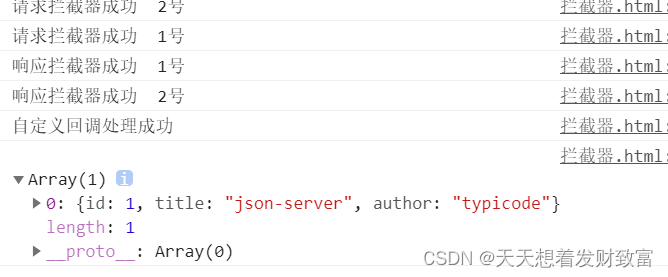
1.请求拦截器:
在真正发送请求前执行的回调函数
可以对请求进行检查或配置进行特定处理
成功的回调函数,传递的默认是config(也必须是)
失败的回调函数,传递的默认是error
2 响应拦截器
在请求得到响应后执行的回调函数
可以对响应数据进行特定处理
成功的回调函数,传递的默认是response
失败的回调函数,传递的默认是error
五 点击取消发送
<!DOCTYPE html>
<html lang="en">
<head>
    <meta charset="UTF-8">
    <meta http-equiv="X-UA-Compatible" content="IE=edge">
    <meta name="viewport" content="width=device-width, initial-scale=1.0">
    <title>点击取消请求</title>
    <script src="https://cdn.bootcdn.net/ajax/libs/axios/0.27.2/axios.min.js"></script>
</head>
<body>
    <button class="btn">点击发送请求</button>
    <button class="btn">点击取消请求</button>
    <script>
          const btns=document.querySelectorAll('button')
          //2.声明全局变量
          let cancel=null;
          btns[0].onclick=function(){
            //检测上一次请求是否完成
             if(cancel!==null){
                //取消上一次请求
                cancel()
             }
            axios({
                method:'GET',
                url:'http://localhost:3000/posts',
                //1.添加配置对象的属性
                cancelToken:new axios.CancelToken(function(c){
                    cancel=c
                })
            }).then(response=>{
                cancel=null
                console.log(response)
            })
          }
           btns[1].onclick=function(){
            cancel();
           }
    </script>

</body>
</html>
六 axios源码分析
(1)axios与Axios关系
1)从语法上来说:axios不是Axios的实例
2)从功能上来说:axios是Axios的实例
3)axios 是Axios.prototype.request函数bind()返回的函数
4)axios 作为对象有Axios原型对象上的所有方法,有Axios对象上所有属性
(2)instance与axios的区别?
相同:
1)都是一个能发任意请求的函数: request(config)
2)都有发特定请求的各种方法: get()/post()/ put()/delete()
3)都有默认配置和拦截器的属性: defaults/interceptors
不同:
1)默认配置很可能不一样
2) instance 没有axios后面添加的一些方法: create()/CancelToken()/all()
(3)请求转换器:对请求头和请求体数据进行特定处理的函数
响应转换器:将响应体json字符串解析为js对象或数组的函数,如
response.data=JSON.parse(response.data)
(4)response整体结构:{data,status,statusText,headers,config,request}
error整体结构:{message,response,request}
(5)如何取消未完成的请求?
1.当配置 了cancelToken对象时,保存cancel函数
1) 创建一个用于将来中断请求的cancelPromise
2) 并定义了一个用于取消请求的cancel函数
3)将cancel函数传递出来
2.调用 cancel()取消请求
1) 执行cacel函数,传入错误信息message
2)内部会让cancelPromise变为成功,且成功的值为-个Cancel对象
3)在cancelPromise的成功回调中中断请求,并让发请求的proimse失败,失败的reason为 Cancel 对象


 1033
1033

 被折叠的 条评论
为什么被折叠?
被折叠的 条评论
为什么被折叠?
 到【灌水乐园】发言


