


5.1 vuex概述
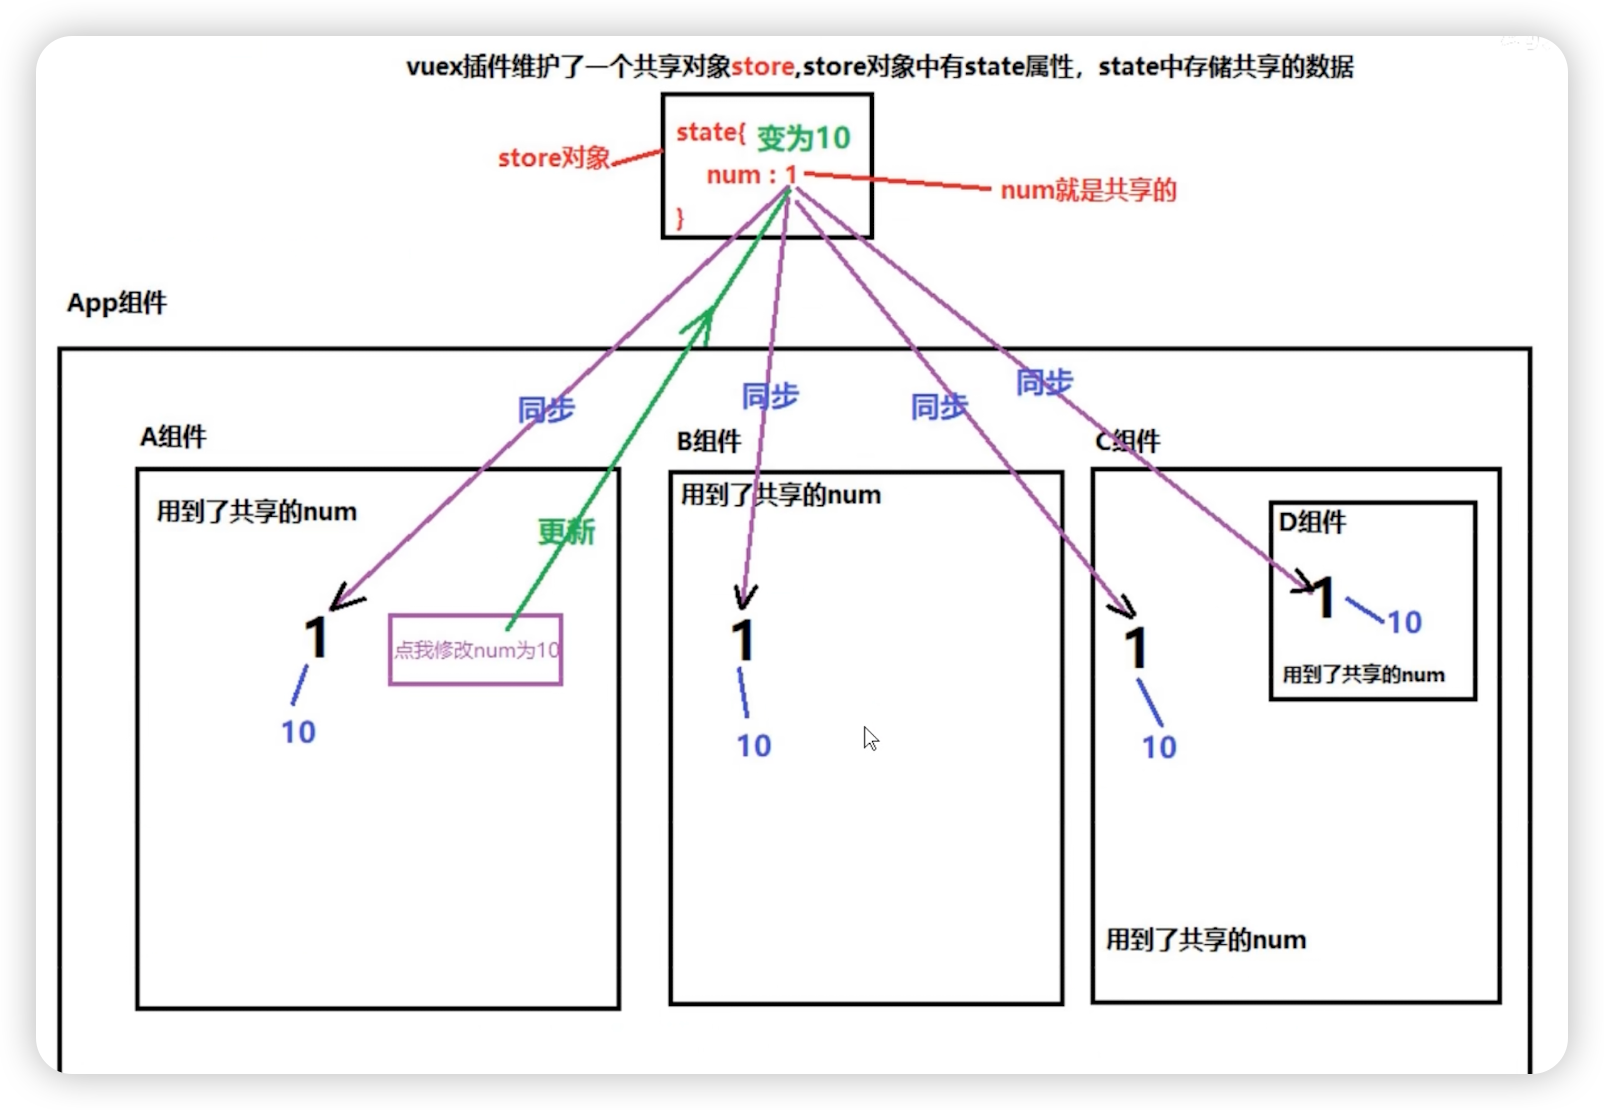
1. vuex是实现数据集中式状态(数据)管理的插件。
数据由vuex统一管理。其它组件都去使用vuex中的数据。只要有其中一个组件去修改了这个共享的数据,其它组件会同步更新。
一定要注意:全局事件总线和vuex插件的区别:
(1) 全局事件总线关注点:组件和组件之间数据如何传递,一个绑定$on,一个触发$emit。数据实际上还是在局部的组件当中,并没有真正的让数据共享。只是数据传来传去。
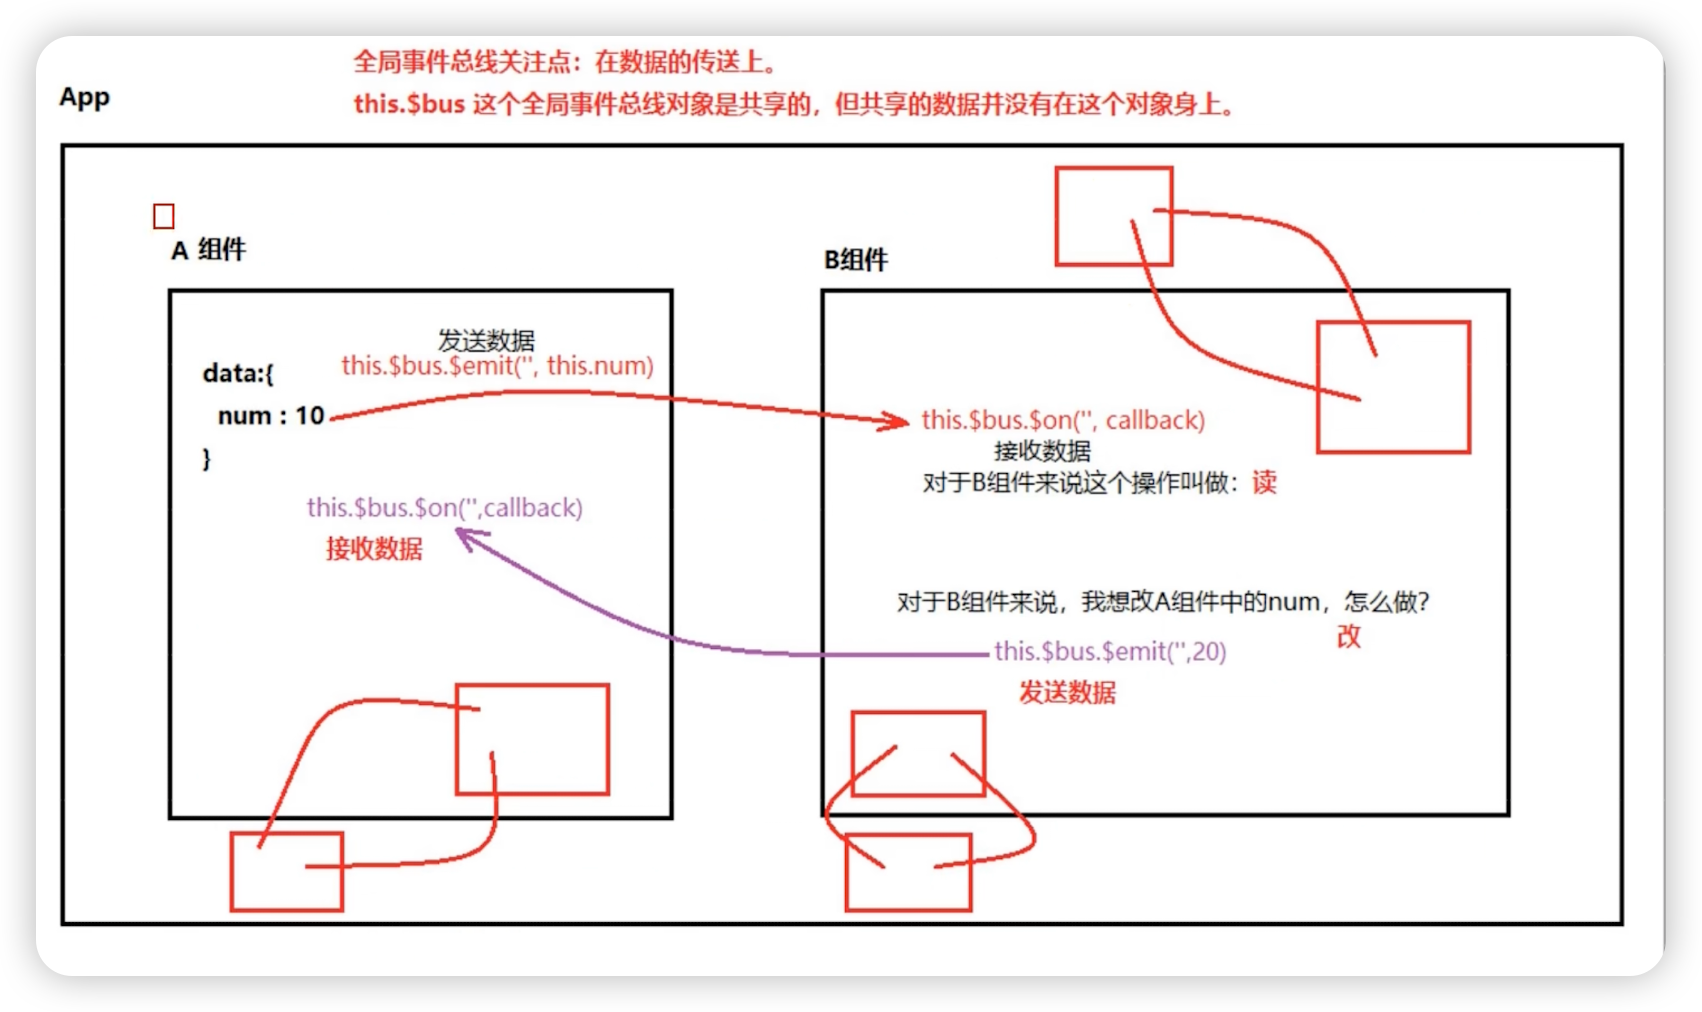
(2) vuex插件的关注点:共享数据本身就在vuex上。其中任何一个组件去操作这个数据,其它组件都会同步更新。是真正意义的数据共享。
2. 使用vuex的场景是:
(1) 多个组件之间依赖于同一状态。来自不同组件的行为需要变更同一状态。
5.2 vuex环境搭建
5.2.1. 安装vuex
(1) vue2安装vuex3版本 npm i vuex@3
如果报错,可能是依赖冲突问题:
npm i vuex@3 --legacy-peer-deps
(2) vue3安装vuex4版本 npm i vuex@4
5.2.2. 创建目录和js文件
(目录和文件名不是必须叫这个)
(1) 目录:vuex或者store
(2) js文件:store.js或index.js
5.2.3. 在store.js文件中创建核心store对象,并暴露
// 引入Vue
import Vue from "vue";
// 引入vuex 插件
import Vuex from "vuex";
// 使用插件
Vue.use(Vuex);
// 创建store对象,它是vuex插件的老大,管理着action,mutations,state
// 创建三个对象
// 执行某个行为的对象
const actions = {};
// 负责更新的对象
const mutations = {};
// 状态对象
const state = {
name:'jack'
};
const store = new Vuex.Store({
// 键,值对名字一样,可以简写
actions,
mutations,
state,
});
// 导出store对象,去main.js中去导入
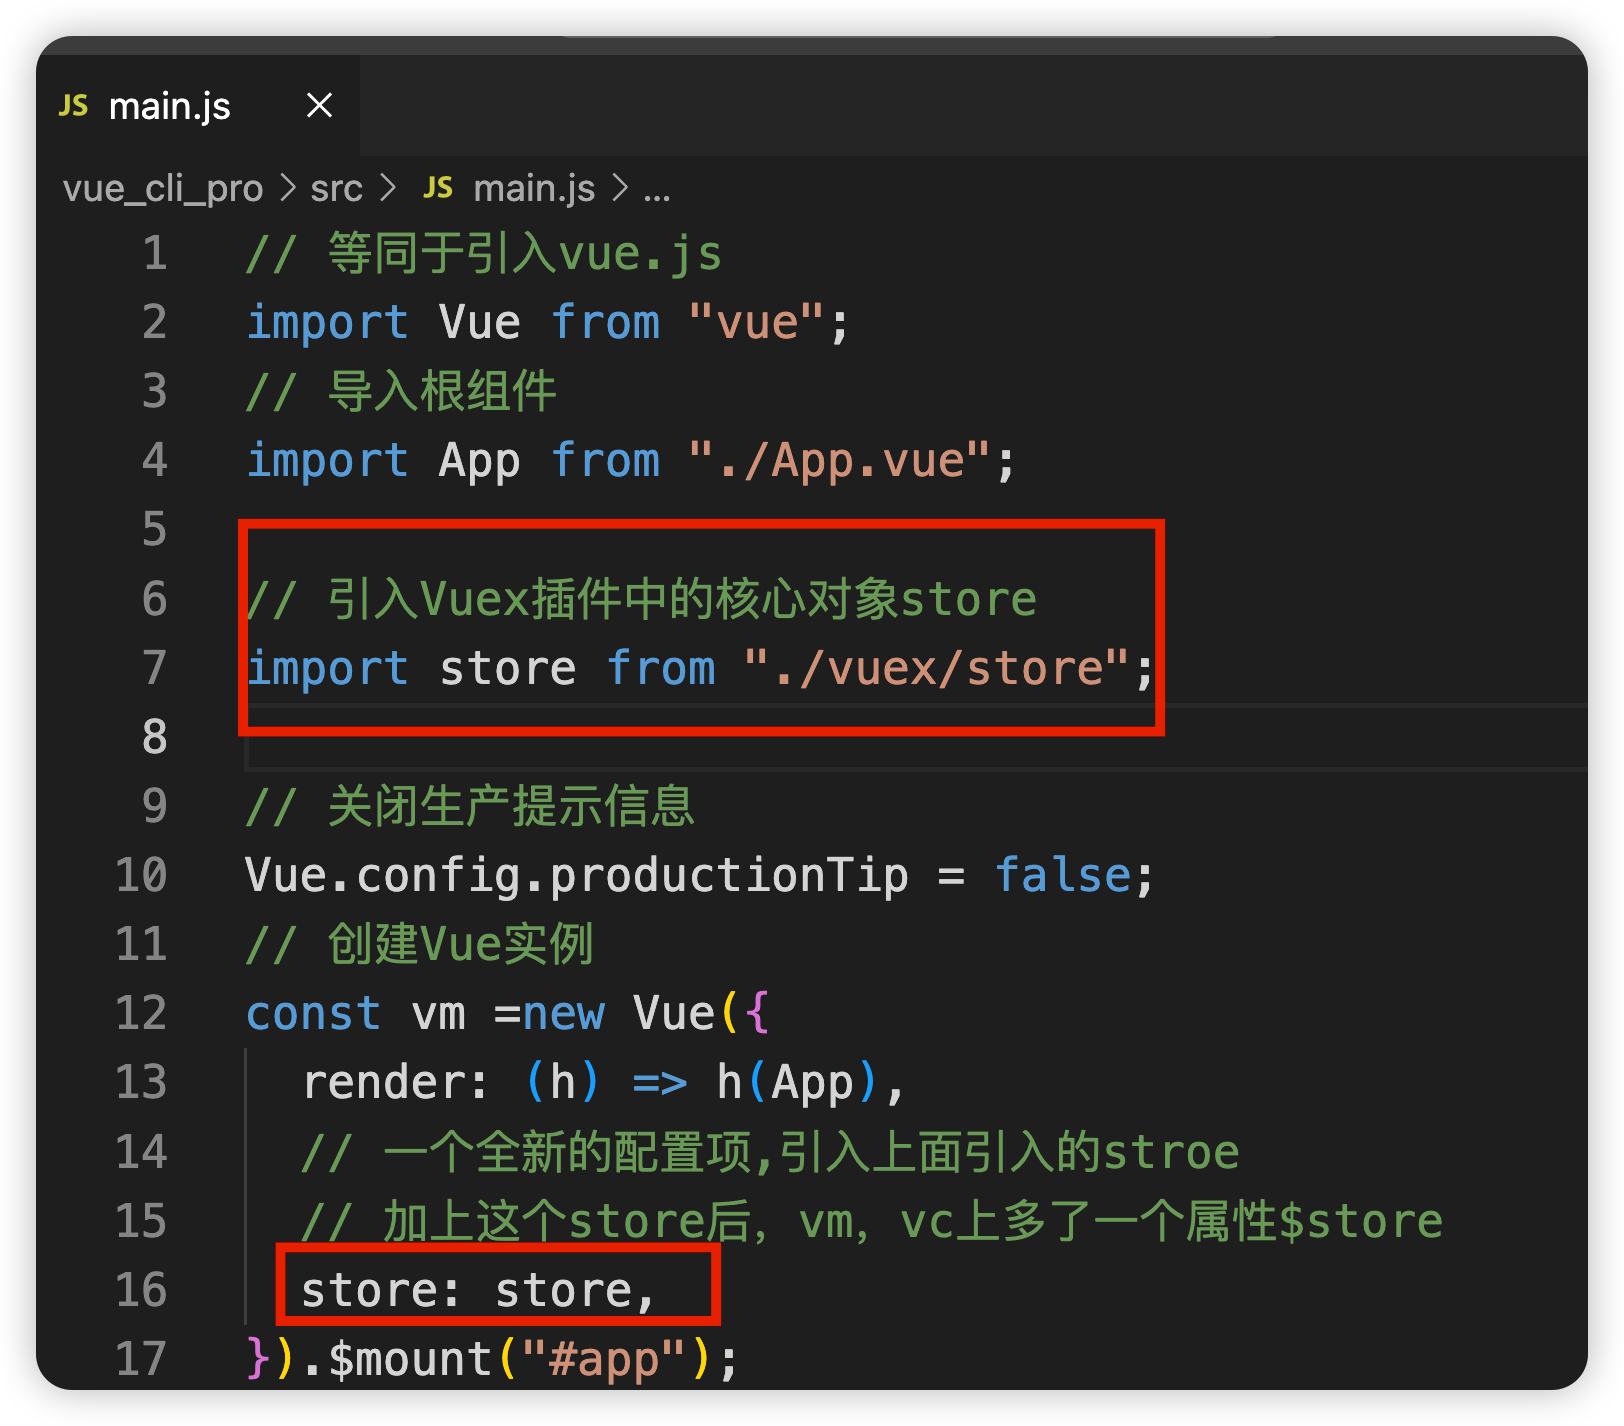
export default store;5.2.4、 在main.js文件中关联store
这一步很重要,完成这一步之后,所有的vm和vc对象上会多一个$store属性
5.3 vuex实现一个最简单的案例
需求:展示vuex中的num数据,并实现点击+1,在vuex中实现逻辑
app.vue
<template>
    <div class="app">
        <h1>app父组件</h1>
        <h2>数据:{{ $store.state.num }}</h2>
        <button @click="add">点我++</button>
    </div>
</template>
<script>
export default {
    name: 'app',
    data() {
        return {
            msg: '我是app组件',
            startNum:0
        }
    },
    methods: {
        add() {
            // dispatch是$store的方法,调用这个方法,
            // 就是让store中的action中的add方法执行,并携带参数
            // 原则是,在现在这个方法里,只触发, 具体操作到vuex中的action中操作
            this.$store.dispatch('addOne',this.startNum)
        }
    }

}
store.js
// 引入Vue
import Vue from "vue";
// 引入vuex 插件
import Vuex from "vuex";
// 使用插件
Vue.use(Vuex);
// 创建store对象,它是vuex插件的老大,管理着action,mutations,state

// 创建三个对象

// 执行某个行为的对象
// 负责处理复杂的业务逻辑,或者发送ajax请求
const actions = {
  // n个action,每一个都是一个回调函数(callback)
  // 回调函数何时触发,等着具体的命令
  // 参数1:context参数:是vuex的上下文对象
  // 参数2:value参数:传过来的数据
  addOne(context, value) {
    // 处理很多的业务逻辑,在初始值上加1
    value += 1;
    // 业务逻辑都处理完后,提交上下文环境
    context.commit("ADD_ONE", value);
    // 这个context参数中还可以分法其他方法
    // context.dispatch("other", value);
  },
  // other(context, value) {
  //   console.log("我是addOne分发处理下一个函数", value);
  // },
};
// 负责更新的state
const mutations = {
  // n个mutations,每一个都是一个回调函数(callback)
  // 参数1:state参数:状态对象
  // 参数2:value参数:上一个环节传递过来的数据
  ADD_ONE(state, value) {
    state.num += value;
  },
};
// 状态对象(数据对象),等同于Vue中的data,并且已经做了响应式处理
const state = {
  num: 1,
};

const store = new Vuex.Store({
  // 键,值对名字一样,可以简写
  actions,
  mutations,
  state,
});
// 导出store对象,去main.js中去导入
export default store;
5.4 vuex工作原理

如果业务逻辑非常简单,也不需要发送AJAX请求的话,可以不调用dispatch方法,直接调用commit方法也是可以的。
this.$store.commit()
5.5 多组件数据共享
需求:实现兄弟组件之间数据的共享
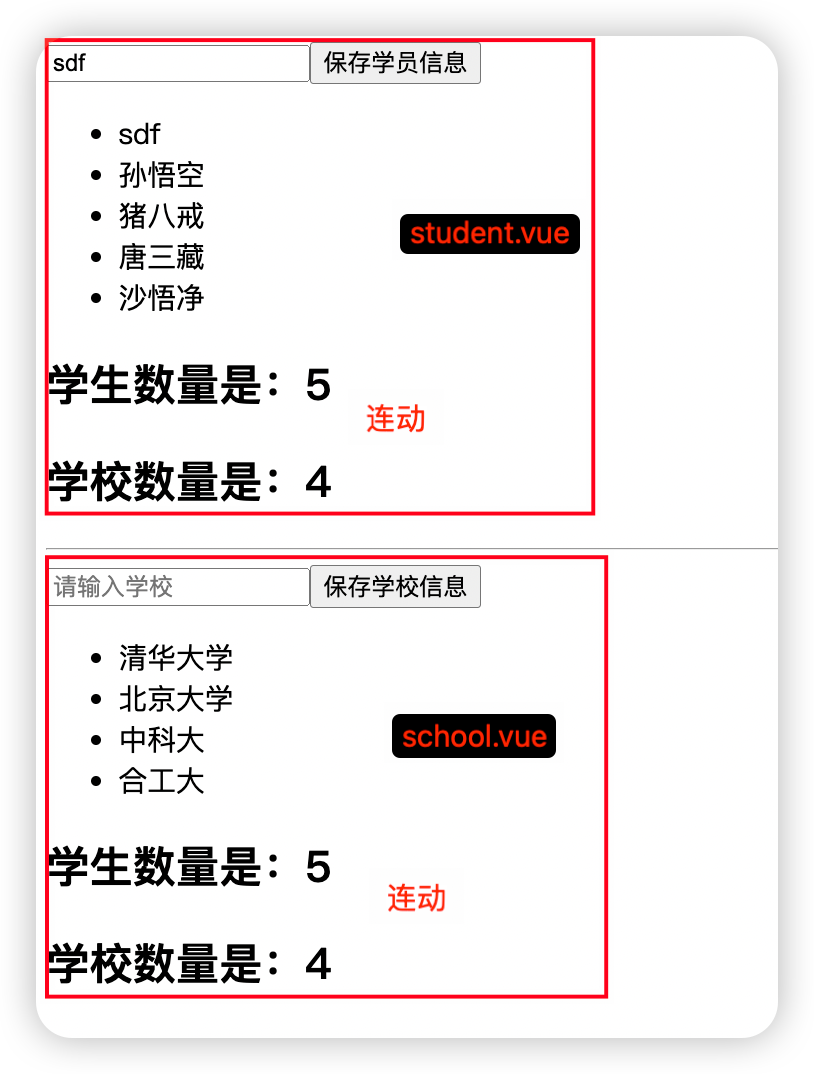
student.vue
<template>
    <div>
        <input type="text" placeholder="请输入姓名" v-model="name">
        <button @click="saveStudent">保存学员信息</button>
        <ul>
            <li v-for="item in $store.state.studentName" :key="item.id">{{ item.name }}</li>
        </ul>
        <h2>学生数量是:{{ $store.state.studentName.length }}</h2>
        <h2>学校数量是:{{ $store.state.schoolName.length }}</h2>
    </div>

</template>

<script>
export default {
    name: 'student',
    data() {
        return {
            name: '',
        }
    },
    methods: {
        saveStudent() {
            // this.studentName.unshift({ id: Date.now(), name: this.name })
            // this.$store.dispatch('saveStudent', { id: Date.now(), name: this.name })
            // 如果逻辑比较简单,可以不走action,直接comint
            this.$store.commit('SAVE_STUDENT',{ id: Date.now(), name: this.name })

        }
    }
}
</script>

<style></style>
school.vue 跟student.vue差不错
store.js
import Vue from "vue";
import Vuex from "vuex";
Vue.use(Vuex);
const actions = {
  // 处理学校信息
  saveSchool(context, value) {
    context.commit("SAVE_SHOLLO", value);
  },
  //   处理学员信息
//   saveStudent(context, value) {
//     context.commit("SAVE_STUDENT", value);
//   },
};
const mutations = {
  SAVE_SHOLLO(state, value) {
    state.schoolName.unshift(value);
  },
  SAVE_STUDENT(state, value) {
    state.studentName.unshift(value);
  },
};
const state = {
  studentName: [
    { id: "001", name: "孙悟空" },
    { id: "002", name: "猪八戒" },
    { id: "003", name: "唐三藏" },
    { id: "004", name: "沙悟净" },
  ],
  schoolName: [
    { id: "001", name: "清华大学" },
    { id: "002", name: "北京大学" },
    { id: "003", name: "中科大" },
    { id: "004", name: "合工大" },
  ],
};
export default new Vuex.Store({
  actions,
  mutations,
  state,
});
5.6 getters配置项
1. 如果想将state中的数据进行加工计算,并且这个计算逻辑复杂,而且要在多个位置使用,建议使用getters配置项。
2. 怎么用?
3、拿取getter数据
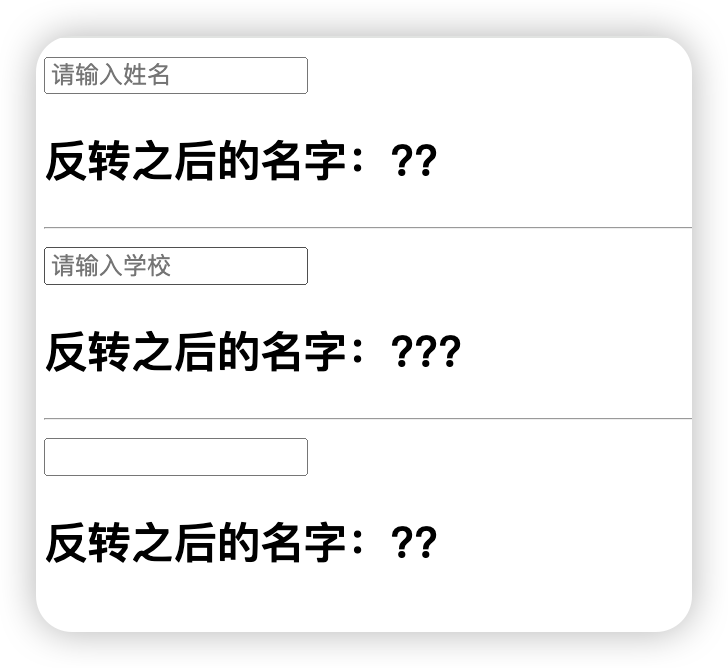
<template>
    <div>
        <input type="text" v-model="$store.state.username"><br>
        <h2>反转之后的名字:{{ $store.getters.reverseName }}</h2>
    </div>
</template>
类似于Vue当中的:data和computed的关系
5.7 mapState和mapGetters的使用(优化计算属性)
1. 组件中在使用state上的数据和getters上的数据时,都有固定的前缀:
{{this.$store.state.name}}
{{this.$store.getters.reverseName}}
使用mapState和mapGetters进行名称映射,可以简化以上的写法。
2. 使用mapState和mapGetters的前提是先引入
import {mapState, mapGetters} from ‘vuex’
3. mapState如何使用,在computed当中使用ES6的语法
(1) 第一种方式:对象形式
① ...mapState({name:’name’})
(2) 第二种方式:数组形式
① ...mapState([‘name’])
(3) 插值语法就可以修改为:{{name}}
4. mapGetters如何使用在computed当中使用ES6的语法
(1) 第一种方式:对象形式
① ...mapGetters({reverseName:’reverseName’})
(2) 第二种方式:数组形式
① ...mapGetters([‘reverseName’])
(3) 插值语法就可以修改为:{{reverseName}}
注意:mapState,mapGetters获取的值,默认是计算属性通过简写方式计算出来的,只能读,不能修改,如果要进行修改,需要computed完整形式,加setter方法
<script>
import { mapGetters, mapState } from 'vuex'
export default {
    name: 'school',
    data() {
        return {
            name: '',
        }
    },
    computed: {
       // 1、mapState
        //1.1 通过计算属性,返回需要的数据==》手写
        //注意:类似这样 固定格式的代码,就可以自动生成
        // schoolName() {
        //     return this.$store.state.schoolName
        // },
        // studentName() {
        //     return this.$store.state.studentName
        // }
        //
        //1.2  vuex帮我们自动生成的,mapState()返回的是一个对象,所以用...打开对象
        //1.2.1 对象形式
        // ...mapState({ schoolName: 'schoolName', studentName: 'studentName' })
        //1.2.2 数组形式 (计算属性的名字跟state中的属性名一致)
        ...mapState(['schoolName', 'studentName']),
        //2、mapGetters 数组形式
        ...mapGetters(['reverseName'])
    },
    methods: {
        saveSchool() {
            // this.schoolName.unshift({ id: Date.now(), name: this.name })
            this.$store.dispatch('saveSchool', { id: Date.now(), name: this.name })
        }
    }
}
</script>
5.8 mapMutations和mapActions的使用(优化methods)
student.vue
import {mapMutations, mapActions} from ‘vuex’
···
  methods: {
        // saveStudent() {
        //     // this.studentName.unshift({ id: Date.now(), name: this.name })
        //     // this.$store.dispatch('saveStudent', { id: Date.now(), name: this.name })
        //     // 如果逻辑比较简单,可以不走action,直接comint
        //     this.$store.commit('SAVE_STUDENT', this.name)
        // }

        // 对象写法  需要传递的参数,在模版中传递
        // ...mapMutations({ saveStudent: 'SAVE_STUDENT' })
        // 数组写法  ==  SAVE_STUDENT:'SAVE_STUDENT' ,如果这么写,绑定的函数名要换成SAVE_STUDENT
        ...mapMutations(['SAVE_STUDENT'])

    }
school.vue
import {mapMutations, mapActions} from ‘vuex’
····
    //2、 打印mapState()
    // 2.1 打印mapState()
 mounted() {
     // vuex会根据我们传入的参数,自动生成计算属性代码
     const xx = mapState({ schoolName: 'schoolName', studentName: 'studentName' })
     console.log(xx);
 },
methods: {
        // 2.2 手动的调用方法,去触发actions
        // saveSchool() {
        //     this.$store.dispatch('saveSchool', this.name)
        // },
        // 2.3 mapActions()根据传入的参数,会自动生成代码,触发actions,需要传递的参数,在模版中传递
        ...mapActions({ saveSchool: 'saveSchool' })
    }
store.js
import Vue from "vue";
import Vuex from "vuex";
Vue.use(Vuex);
const actions = {
// 处理学校信息
saveSchool(context, value) {
context.commit("SAVE_SHOLLO", { id: Date.now(), name: value });
},
// 处理学员信息
// saveStudent(context, value) {
// context.commit("SAVE_STUDENT", value);
// },
};
const mutations = {
SAVE_SHOLLO(state, value) {
state.schoolName.unshift(value);
},
SAVE_STUDENT(state,value) {
state.studentName.unshift({ id: Date.now(), name: value });
},
};
const state = {
username: "",
studentName: [
{ id: "001", name: "孙悟空" },
{ id: "002", name: "猪八戒" },
{ id: "003", name: "唐三藏" },
{ id: "004", name: "沙悟净" },
],
schoolName: [
{ id: "001", name: "清华大学" },
{ id: "002", name: "北京大学" },
{ id: "003", name: "中科大" },
{ id: "004", name: "合工大" },
],
};
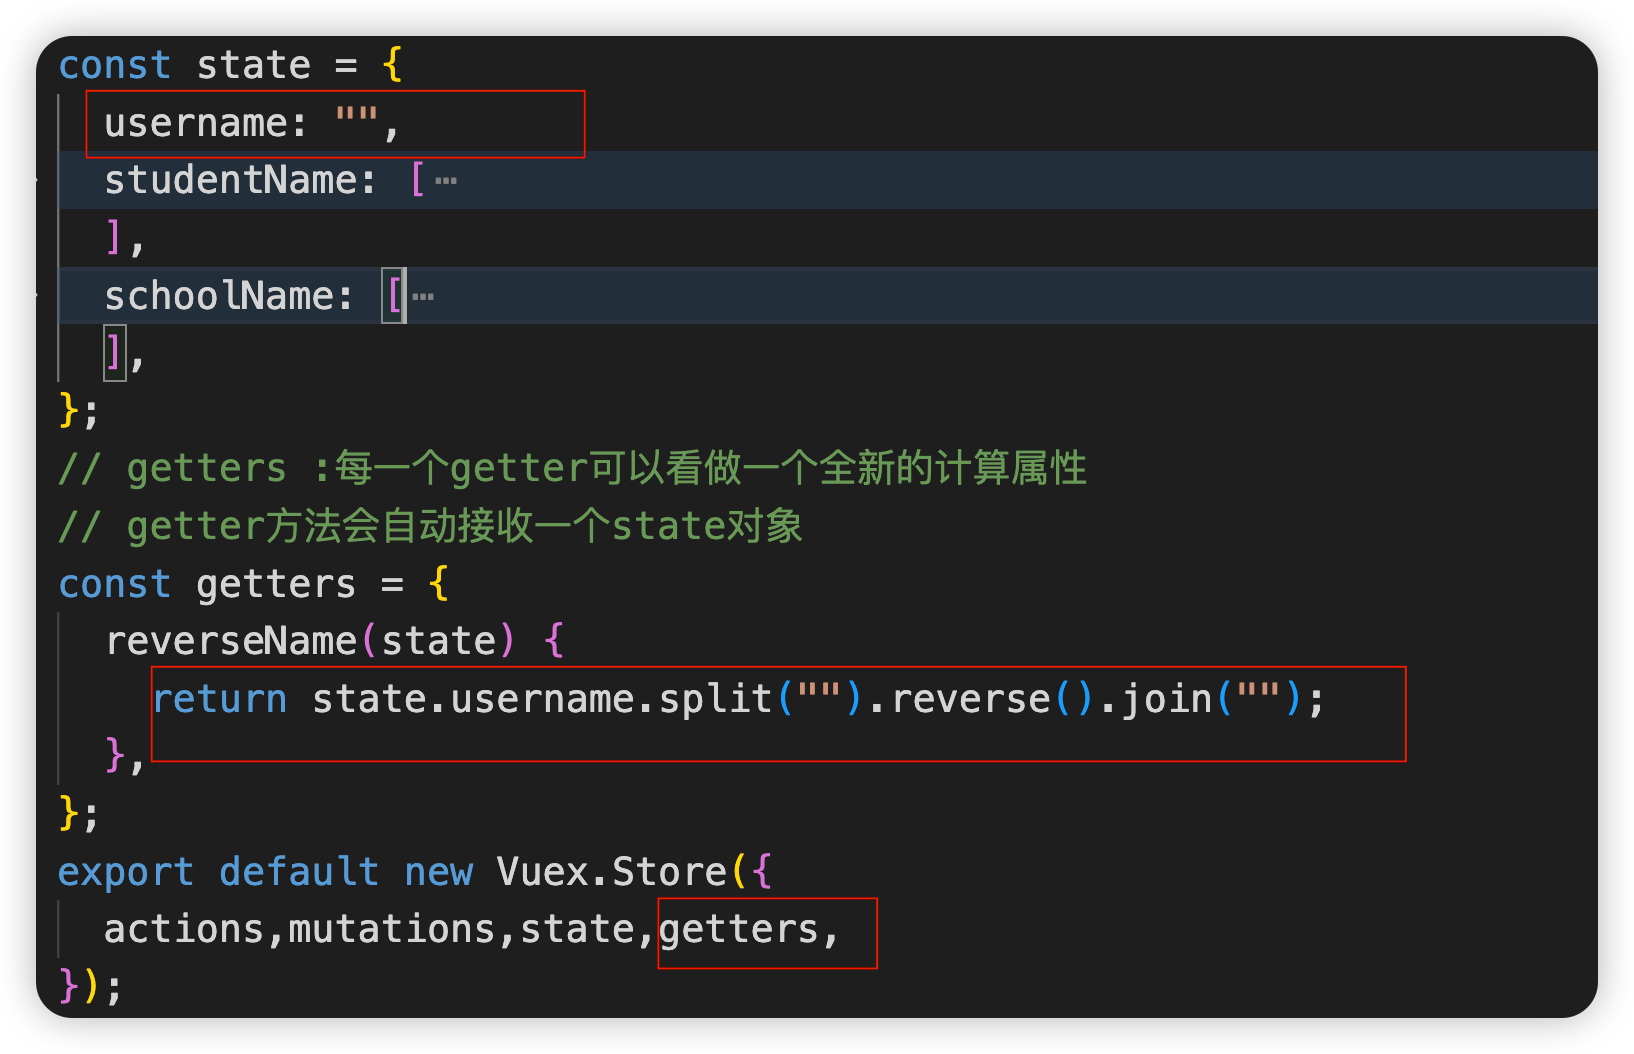
// getters :每一个getter可以看做一个全新的计算属性
// getter方法会自动接收一个state对象
const getters = {
reverseName(state) {
return state.username.split("").reverse().join("");
},
};
export default new Vuex.Store({
actions,
mutations,
state,
getters,
});5.9 vuex的模块化开发
5.9.1 未使用mapXxxx的模块化开发
1、未使用模块化完成
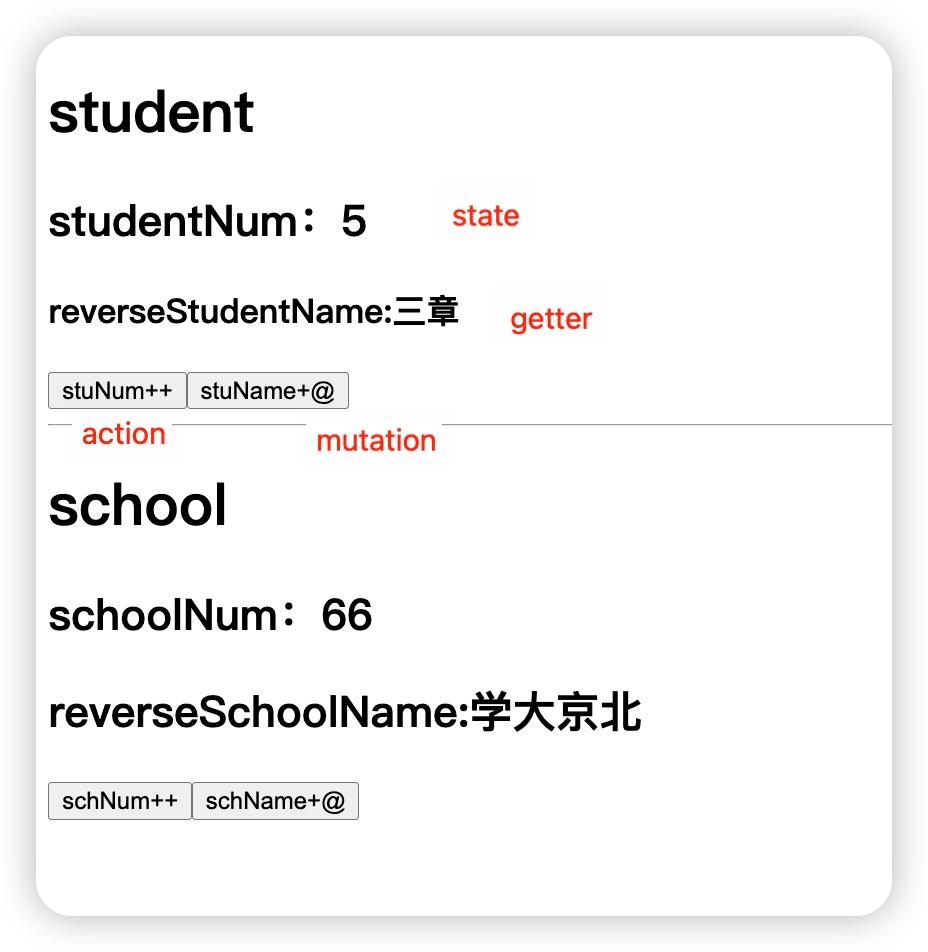
student.vue
<template>
    <div>
        <h1>student</h1>
        <h2>studentNum:{{ $store.state.studentNum }}</h2>
        <h3>reverseStudentName:{{ $store.getters.reverseStudentName }}</h3>
        <button @click="stuNumFun">stuNum++</button>
        <button @click="stuNameFun">stuName+@</button>
    </div>

</template>

<script>
export default {
    name: 'student',
    methods: {
        stuNumFun() {
            this.$store.dispatch('stuNumFun')
        },
        stuNameFun() {
            this.$store.commit('STU_NAME_FUN')
        }
    }
}
</script>

<style></style>
school.vue
<template>
    <div>
        <h1>school</h1>
        <h2>schoolNum:{{ $store.state.schoolNum }}</h2>
        <h2>reverseSchoolName:{{ $store.getters.reverseSchoolName }}</h2>
        <button @click="schNumFun">schNum++</button>
        <button @click="schNameFun">schName+@</button>
    </div>

</template>

<script>
export default {
    name: 'school',
    methods: {
        schNumFun() {
            this.$store.dispatch('schNumFun')
        },
        schNameFun() {
            // 直接commit
            this.$store.commit('SCH_NAME_FUN')
        }
    }
}
</script>

<style></style>
store.js
import Vue from "vue";
import Vuex from "vuex";
Vue.use(Vuex);

const actions = {
  // 学校actions
  schNumFun(context) {
    context.commit("SCH_NUM_FUN");
  },
  // 学生actions
  stuNumFun(context) {
    context.commit("STU_NUM_FUN");
  },
};
const mutations = {
  // 学校mutations
  SCH_NUM_FUN(state) {
    state.schoolNum += 1;
  },
  SCH_NAME_FUN(state) {
    state.schoolName += "@";
  },
  // 学生mutations
  STU_NUM_FUN(state) {
    state.studentNum += 2;
  },
  STU_NAME_FUN(state) {
    state.studentName += "!";
  },
};
const getters = {
  // 学校名反转
  reverseSchoolName(state) {
    return state.schoolName.split("").reverse().join("");
  },
  // 学生名反转
  reverseStudentName(state) {
    return state.studentName.split("").reverse().join("");
  },
};
const state = {
  // 学校数据
  schoolNum: 66,
  schoolName: "北京大学",
  // 学生数据
  studentNum: 5,
  studentName: "章三",
};

export default new Vuex.Store({
  state,
  actions,
  mutations,
  getters,
});
2、模块化实现
将原来写的store.js拆分成若干js
student.js
// student 模块
export default {
  // 开启命名空间
  namespaced: true,
  actions: {
     // 学生actions
  stuNumFun(context) {
    context.commit("STU_NUM_FUN");
  },
  },
  mutations: {
    // 学生mutations
    STU_NUM_FUN(state) {
      state.studentNum += 2;
    },
    STU_NAME_FUN(state) {
      state.studentName += "!";
    },
  },
  getters: {
    // 学生名反转
    reverseStudentName(state) {
      return state.studentName.split("").reverse().join("");
    },
  },
  state: {
    // 学生数据
    studentNum: 5,
    studentName: "章三",
  },
};
school.js
// school 模块
export default {
  // 开启命名空间
  namespaced: true,
  actions: {
      // 学校actions
  schNumFun(context) {
    context.commit("SCH_NUM_FUN");
  },
  },
  mutations: {
    // 学校mutations
    SCH_NUM_FUN(state) {
      state.schoolNum += 1;
    },
    SCH_NAME_FUN(state) {
      state.schoolName += "@";
    },
  },
  getters: {
    // 学校名反转
    reverseSchoolName(state) {
      return state.schoolName.split("").reverse().join("");
    },
  },
  state: {
    // 学校数据
    schoolNum: 66,
    schoolName: "北京大学",
  },
};
store.js
将若干js文件,引入到store.js
import Vue from "vue";
import Vuex from "vuex";
Vue.use(Vuex);

// 导入各vuex模块
import student from "./student";
import school from "./school";

export default new Vuex.Store({
  modules: {
    student,
    school,
  },
});
student.vue
<template>
    <div>
        <h1>student</h1>
        <h2>studentNum:{{ $store.state.student.studentNum }}</h2>
        <h3>reverseStudentName:{{ $store.getters['student/reverseStudentName'] }}</h3>
        <button @click="stuNumFun">stuNum++</button>
        <button @click="stuNameFun">stuName+@</button>
    </div>

</template>

<script>
export default {
    name: 'student',
    mounted() {
        console.log(this.$store);
    },
    methods: {
        stuNumFun() {
            this.$store.dispatch('student/stuNumFun')
        },
        stuNameFun() {
            this.$store.commit('student/STU_NAME_FUN')
        }
    }
}
</script>

<style></style>
school.vue
<template>
    <div>
        <h1>school</h1>
        <h2>schoolNum:{{ $store.state.school.schoolNum }}</h2>
        <h2>reverseSchoolName:{{ $store.getters['school/reverseSchoolName'] }}</h2>
        <button @click="schNumFun">schNum++</button>
        <button @click="schNameFun">schName+@</button>
    </div>

</template>

<script>
export default {
    name: 'school',
    methods: {
        schNumFun() {
            this.$store.dispatch('school/schNumFun')
        },
        schNameFun() {
            // 直接commit
            this.$store.commit('school/SCH_NAME_FUN')
        }
    }
}
</script>

<style></style>
5.9.2 使用mapXxxx的模块化开发
store.js 分为如果个js模块,再将各模块分别导入,写法一致,不一样的是数据的拿取于触发
student.vue
<template>
    <div>
        <h1>student</h1>
        <h2>studentNum:{{ studentNum }}</h2>
        <h3>reverseStudentName:{{ reverseStudentName }}</h3>
        <button @click="stuNumFun">stuNum++</button>
        <button @click="stuNameFun">stuName+@</button>
    </div>

</template>

<script>
import { mapState, mapGetters, mapActions, mapMutations } from 'vuex'
export default {
    name: 'student',
    mounted() {
        console.log(this.$store);
    },
    computed: {
        // map模块化获取数据
        ...mapState('student', ['studentNum']),
        ...mapGetters('student', ['reverseStudentName'])
    },
    methods: {
        // 对象形式
        ...mapActions('student', { stuNumFun: 'stuNumFun' }),
        // stuNumFun() {
        //     this.$store.dispatch('student/stuNumFun')
        // },
        ...mapMutations('student', { stuNameFun: 'STU_NAME_FUN' })
        // stuNameFun() {
        //     this.$store.commit('student/STU_NAME_FUN')
        // }
    }
}
</script>

<style></style>
school.vue
<template>
    <div>
        <h1>school</h1>
        <h2>schoolNum:{{ schoolNum }}</h2>
        <h2>reverseSchoolName:{{ reverseSchoolName }}</h2>
        <button @click="schNumFun">schNum++</button>
        <button @click="SCH_NAME_FUN">schName+@</button>
    </div>

</template>

<script>
import { mapState, mapGetters, mapActions, mapMutations } from 'vuex'
export default {
    name: 'school',
    computed: {
        ...mapState('school', ['schoolNum']),
        ...mapGetters('school', ['reverseSchoolName'])
    },
    methods: {
        // 数组形式
        ...mapActions('school', ['schNumFun']),
        // schNumFun() {
        //     this.$store.dispatch('school/schNumFun')
        // },
        ...mapMutations('school', ['SCH_NAME_FUN'])
        // schNameFun() {
        //     // 直接commit
        //     this.$store.commit('school/SCH_NAME_FUN')
        // }
    }
}
</script>

<style></style>
5.9.3 action中发送ajax
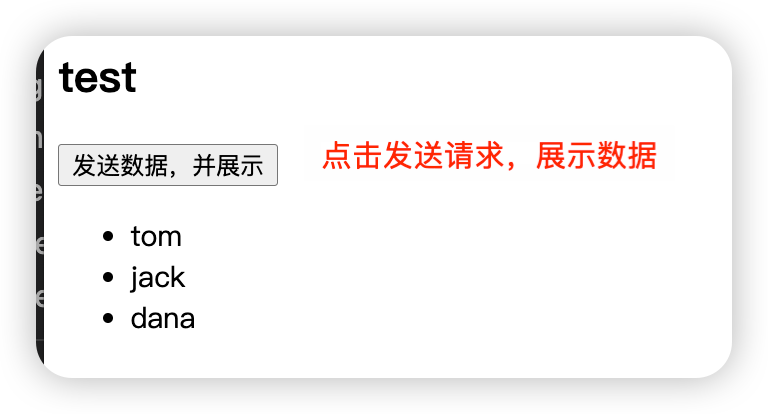
test.vue
<template>
    <div>
        <h2>test</h2>
        <button @click="getUserInfo">发送数据,并展示</button>
        <ul>
            <li v-for="(item, index) in list" :key="index">{{ item.name }}</li>
        </ul>
    </div>
</template>

<script>
import { mapState, mapActions } from 'vuex';
export default {
    name: 'test',
    methods: {
        ...mapActions('test', ['getUserInfo'])
    },
    computed: {
        ...mapState('test', ['list'])
    }

}
</script>
store.js
import Vue from "vue";
import Vuex from "vuex";
Vue.use(Vuex);

// 导入各vuex模块
import student from "./student";
import school from "./school";
import test from "./test";

export default new Vuex.Store({
  modules: {
    student,
    school,
    test,
  },
});
test.js
import axios from "axios";
export default {
  namespaced: true,
  actions: {
    // 请求数据
    async getUserInfo(context) {
      try {
        let res = await axios.get("api/user");
        context.commit("GET_USER_INFO", res.data);
        // console.log(res.data);
      } catch (error) {
        console.log(error.message);
      }
    },
  },
  getters: {},
  mutations: {
    // 更新state数据
    GET_USER_INFO(state, value) {
      state.list = value;
    },
  },
  state: {
    list: [],
  },
};


 1007
1007

 被折叠的 条评论
为什么被折叠?
被折叠的 条评论
为什么被折叠?
 到【灌水乐园】发言


