


 本文讲述了在SpringCloud环境中,遇到的@RequestBody注解失效问题的分析与解决,以及如何通过编程扫描获取所有API接口。同时讨论了Nginx配置中处理跨域问题和ActiveMQ中点对点与消息订阅冲突的配置调整。
1.@RequestBody注解失效问题
出现背景:springcloud+openfeign+openapi3
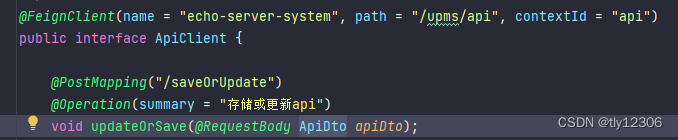
出现情况 :图一
图二
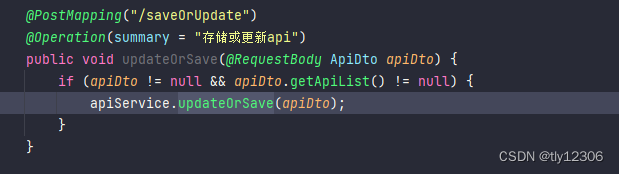
图二被调用方法接收不到feign接口传过来的数据
问题原因:@RequestBody依赖问题,正确依赖如下图,图四的依赖属于openapi3
图三
![]()
图四
![]()
2. 获取所有api接口
import com.zmztech.echo.api.system.domain.Api;
import com.zmztech.echo.api.system.domain.ApiDto;
import com.zmztech.echo.api.system.feign.ApiClient;
import io.swagger.v3.oas.annotations.Operation;
import io.swagger.v3.oas.annotations.tags.Tag;
import org.apache.commons.lang3.StringUtils;
import org.springframework.beans.factory.annotation.Autowired;
import org.springframework.beans.factory.annotation.Qualifier;
import org.springframework.beans.factory.annotation.Value;
import org.springframework.boot.CommandLineRunner;
import org.springframework.stereotype.Component;
import org.springframework.web.bind.annotation.RequestMethod;
import org.springframework.web.method.HandlerMethod;
import org.springframework.web.servlet.mvc.method.RequestMappingInfo;
import org.springframework.web.servlet.mvc.method.annotation.RequestMappingHandlerMapping;

import java.lang.annotation.Annotation;
import java.lang.reflect.Method;
import java.util.ArrayList;
import java.util.Map;
import java.util.Set;

/**
 * @author Tian liyuan
 * 扫描获取所有api接口
 */
@Component
public class ApiRunner implements CommandLineRunner {

    @Autowired
    @Qualifier("requestMappingHandlerMapping")
    private RequestMappingHandlerMapping handlerMapping;

    @Value("${spring.application.name}")
    private String applicationName;

    @Autowired
    private ApiClient apiClient;

    @Override
    public void run(String... args) {
        Map<RequestMappingInfo, HandlerMethod> map = handlerMapping.getHandlerMethods();
        ArrayList<Api> list = new ArrayList<>();
        for (Map.Entry<RequestMappingInfo, HandlerMethod> entry : map.entrySet()) {
            RequestMappingInfo requestMappingInfo = entry.getKey();
            HandlerMethod handlerMethod = entry.getValue();
            Method method = handlerMethod.getMethod();
            Set<RequestMethod> requestMethodSet = requestMappingInfo.getMethodsCondition().getMethods();
            Set<String> patterns = entry.getKey().getPathPatternsCondition().getPatternValues();
            String remark = null;
            String tagName = null;
            Class<?> myApiClass = handlerMethod.getBeanType();
            Annotation[] annotations = myApiClass.getAnnotations();
            for (Annotation annotation : annotations) {
                if (annotation instanceof Tag) {
                    Tag tagAnnotation = (Tag) annotation;
                    tagName = tagAnnotation.name();
                }
            }
            Operation annotation = method.getAnnotation(Operation.class);
            if (annotation != null && StringUtils.isNotBlank(annotation.summary())) {
                remark = tagName + "-" + annotation.summary();
            }
            if (!requestMethodSet.isEmpty()) {
                for (RequestMethod requestMethod : requestMethodSet) {
                    for (String pattern : patterns) {
                        Api api = new Api();
                        api.setHandlerMethod(handlerMethod.toString());
                        api.setRequestMethod(requestMethod.name());
                        api.setOnline(true);
                        api.setCheckType(1);
                        api.setPattern("/" + applicationName + pattern);
                        api.setApplicationName(applicationName);
                        api.setRemark(remark);
                        list.add(api);
                    }
                }
            } else {
                for (String pattern : patterns) {
                    Api api = new Api();
                    api.setRequestMethod("*");
                    api.setHandlerMethod(handlerMethod.toString());
                    api.setOnline(true);
                    api.setCheckType(1);
                    api.setPattern(pattern);
                    api.setApplicationName(applicationName);
                    api.setRemark(remark);
                    list.add(api);
                }
            }
        }
        ApiDto apiDto = new ApiDto();
        apiDto.setApiList(list);
        apiDto.setApplicationName(applicationName);
        apiClient.updateOrSave(apiDto);
    }

}
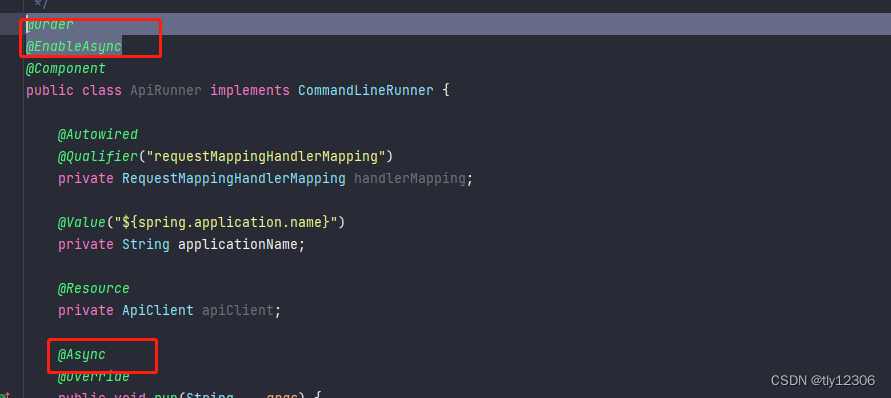
出现问题:启动报错,什么json解析出错,其实就是服务跟方法启动先后顺序问题
解决方案:异步调用

3.nginx配置问题
问题描述:nginx代理配置完之后,页面是出来的,但是接口都是不通的,出现了跨域问题
原因:后端接口代理未配置
server {
        listen       80;
        server_name  localhost;

        #charset koi8-r;

        #access_log  logs/host.access.log  main;

        location / {
            root   D:/java/nginx-1.24.0/dist; 静态资源地址
            index  index.html index.htm;
        }

  # 接口网关
    location ^~/api/ {
        proxy_pass   http://127.0.0.1:7002/;
        proxy_set_header   X-Real-IP        $remote_addr;
        proxy_set_header   X-Forwarded-For  $remote_addr;
    }
}
4.activemq 点对点 和 消息订阅发布配置冲突问题
首先 yaml中关于activemq配置如下
server:
  port: 1111
spring:
  main:
    allow-circular-references: true
  application:
    name: test
  jms:
    pub-sub-domain: true topic相关配置之后 消息发布 消费者主动接收但是会造成queue点对点不能主动接收问题
  activemq:
    queue-name: queue.log
    topic: topic.log
    broker-url: tcp://124.70.134.128:61616
    in-memory: false
解决方法如下activemq配置类中加入下列代码
    @Bean
    public JmsListenerContainerFactory<?> queueListenerFactory(ConnectionFactory connectionFactory) {
        DefaultJmsListenerContainerFactory factory = new DefaultJmsListenerContainerFactory();
        factory.setPubSubDomain(false);
        factory.setConnectionFactory(connectionFactory);
        return factory;
    }
使用时如下
  @JmsListener(destination = "${spring.activemq.queue-name:queue.log}", containerFactory = "queueListenerFactory")
    public void receiveQueue(Map message) {
        System.out.println("接收到点对点队列消息:" + message);
    }


 2431
2431

 被折叠的 条评论
为什么被折叠?
被折叠的 条评论
为什么被折叠?
 到【灌水乐园】发言


