


学习SpringAOP呢,我们需要先知道我们学SpringAOP是为了什么?他能做什么?
下面我就慢慢讲解一些我知道的东西。
在开始之前,我们要知道,SpringAOP其实是一种编程思想,我爬了一张网上的图:

图源:Spring AOP——Spring 中面向切面编程 - SharpCJ - 博客园
这怎么理解呢?我举个例子:
这就好比一个人正准备开一扇门然后进入,正常顺序如下:
拿出钥匙 => 开锁 => 进入
那么,在这个过程中,AOP在哪呢?
我们可以将上面的这个过程看成一个事务,这时候的AOP会把这个过程分成几个部分,大致如下:
先获取钥匙[AOP前置增强]
↓
[拿出钥匙 => 开锁 => 进入] = 出错(比如没有钥匙) => 去找钥匙[AOP异常增强]
↓ ↓
放好钥匙[AOP后置增强] ↓
↓ ↓
检查门是否关好[AOP最终增强] ← ← ←
看这个流程 你们或许应该知道了,AOP的原理,其实就是在你的事务执行前,后,抛出异常时,执行完成后添加上了一些条件,或者解决方式,比如我们平常处理多表修改时要添加事务,且事务需要四个性质:
1、原子性(Atomicity)
原子性是指事务包含的所有操作要么全部成功,要么全部失败回滚,因此事务的操作如果成功就必须要完全应用到数据库,如果操作失败则不能对数据库有任何影响。
2、一致性(Consistency)
一致性是指事务必须使数据库从一个一致性状态变换到另一个一致性状态,也就是说一个事务执行之前和执行之后都必须处于一致性状态。举例来说,假设用户A和用户B两者的钱加起来一共是1000,那么不管A和B之间如何转账、转几次账,事务结束后两个用户的钱相加起来应该还得是1000,这就是事务的一致性。
3、隔离性(Isolation)
隔离性是当多个用户并发访问数据库时,比如同时操作同一张表时,数据库为每一个用户开启的事务,不能被其他事务的操作所干扰,多个并发事务之间要相互隔离。关于事务的隔离性数据库提供了多种隔离级别,稍后会介绍到。
4、持久性(Durability)
持久性是指一个事务一旦被提交了,那么对数据库中的数据的改变就是永久性的,即便是在数据库系统遇到故障的情况下也不会丢失提交事务的操作。例如我们在使用JDBC操作数据库时,在提交事务方法后,提示用户事务操作完成,当我们程序执行完成直到看到提示后,就可以认定事务已经正确提交,即使这时候数据库出现了问题,也必须要将我们的事务完全执行完成。否则的话就会造成我们虽然看到提示事务处理完毕,但是数据库因为故障而没有执行事务的重大错误。这是不允许的。
此时,AOP就可以派上用场:如前置增强负责开启事务,后置增强负责返回信息,异常增强负责在代码报错时,提供解决办法,最终增强则负责执行完事务后关闭事务连接。
一、学习SpringAOP的目的。
首先,我们学习SpringIOC和SpringAOP的最主要的目的就是:解耦。
其次:
①IOC/DI实现的是类与类之间的解耦。
②AOP实现的是方法与方法之间的解耦。
③AOP是面向切面编程,OOP是面向对象编程,AOP是OOP的补充延续。
④OOP: 考虑的对象与对象之间的关系, 层次: 对象层面
⑤AOP: 考虑的方法与方法之间的关系, 层次: 方法层面
二、Spring的实现技术。
SpringAOP的底层实现技术是:动态代理
①jdk自带Proxy,要求核心方法所在类(目标类)必须实现接口。
②cglib框架实现的,目标类不需要实现接口。
③AOP的思想:采用代理思想,在不改变原来目标代码的前提下,实现功能增强!
④IOC 工厂制造对象,AOP 代码增强对象,在工厂制造对象过程中,使用代理进行对象的方法增强(BeanPostProcessor )。
主要应用场景:
①事物管理,②记录日志, ③检测性能 ,④权限控制 ,⑤缓存
三、SpringAOP的简单实现。
(一)使用AOP的Aspect框架
AOP术语概念:
①Joinpoint(连接点):所谓连接点是指那些被拦截到的点,在Spring中,这些点指的是方法,因为Spring只支持方法类型的连接点.
②Pointcut(切入点):所谓的切入点是指我们要对哪些Joinpoint进行拦截的定义
③Advice(通知/增强):所谓通知是指拦截到Joinpoint之后所要做的事情就是通知,通知分为前置通知,后置通知,异常通知,最终通知,环绕通知(切面要完成的事情)
④ Introduction(引介):引介是一种特殊的通知,在不修改类代码的前提下,Introduction可以在运行期为类动态的添加一些方法或Field
⑤Target:代理的目标对象
⑥Weaving:是指把增强应用到目标对象来创建的代理对象的过程,Spring采用动态代理织入,而AspectJ采用编译期织入和类装载期织入
⑦Proxy(代理):一个类被AOP织入增强后,就产生一个结果代理类
⑧ Aspect(切面):是切入点和通知(引介)的结合
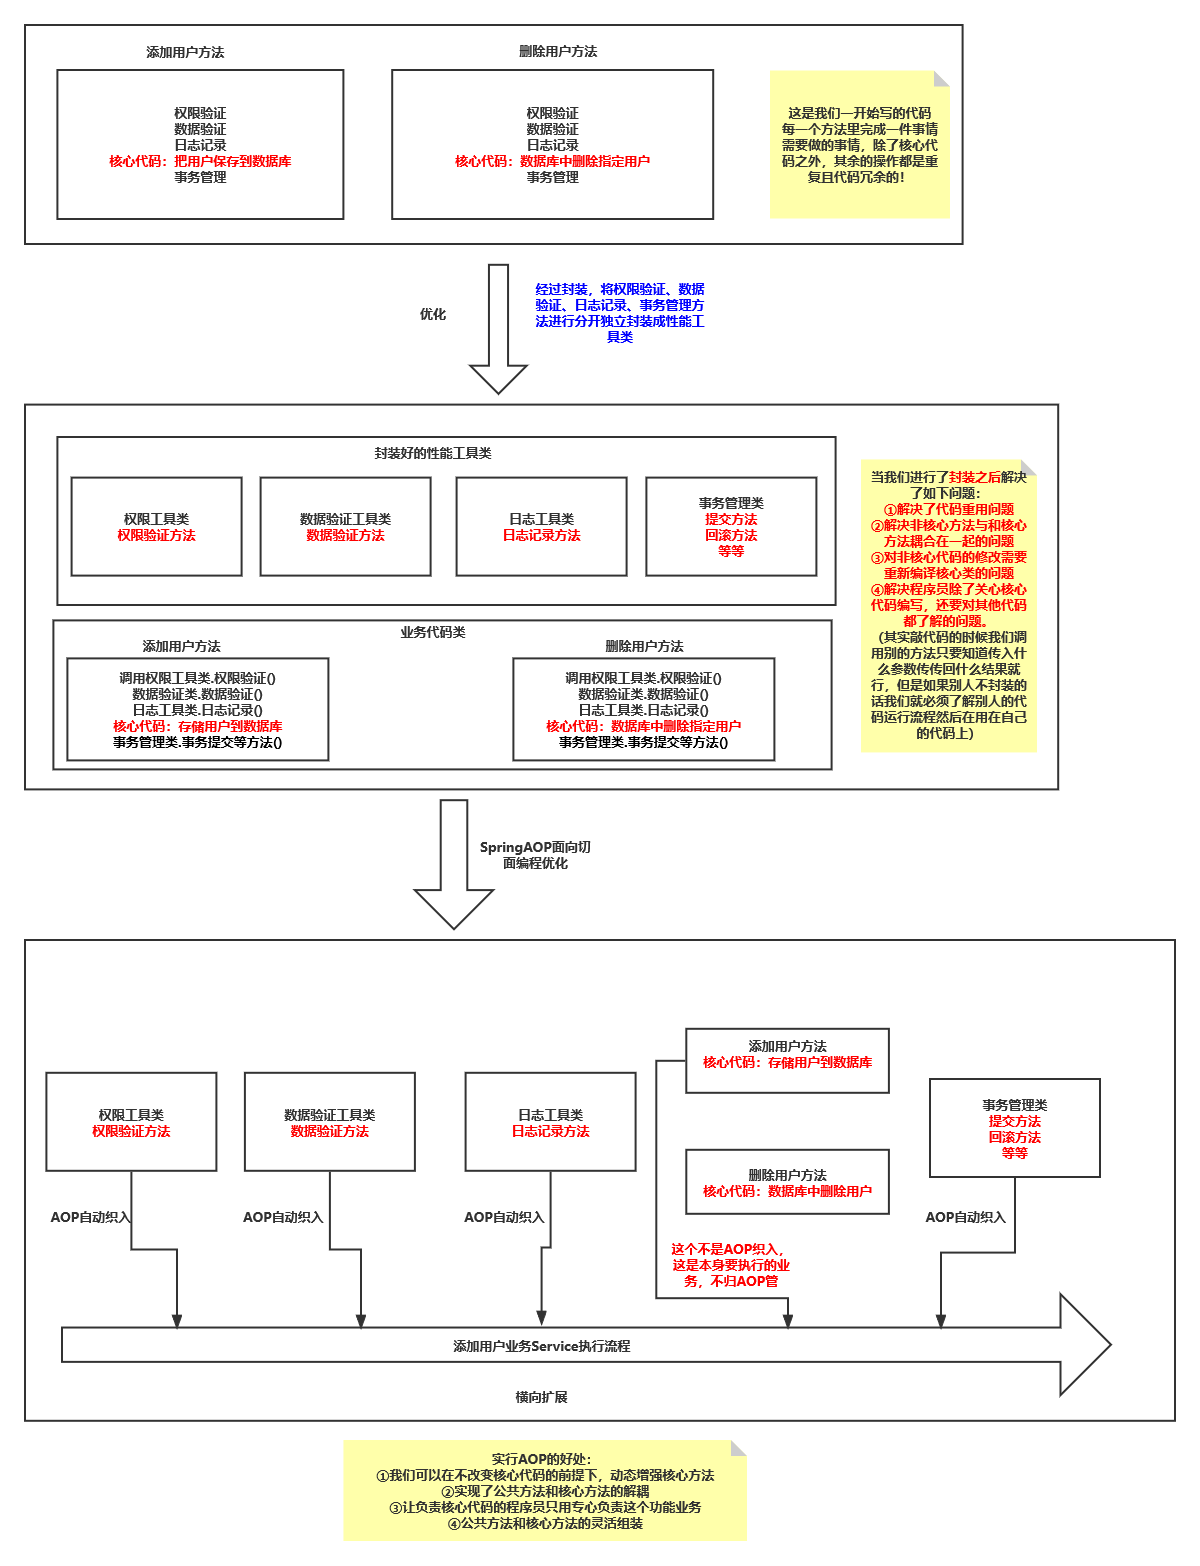
看不懂AOP?那就理一下,来咱们上图理解一下AOP!
其实第一个框就是我们以前敲的不封装工具类的业务代码,
第二个框就是我们封装了工具类之后的代码
然后第三个框就是我们的AOP织入执行的原理
二、AOP在代码上怎么实现?
老样子,咱们写个简单地例子:
(一)导入依赖:
父工程(root):
<dependencyManagement>
        <dependencies>
            <dependency>
                <groupId>org.springframework</groupId>
                <artifactId>spring-framework-bom</artifactId>
                <version>4.3.10.RELEASE</version>
                <type>pom</type>
                <scope>import</scope>
            </dependency>
        </dependencies>
    </dependencyManagement>
    <build>
        <!-- 插件 -->
        <plugins>
            <plugin>
                <groupId>org.apache.maven.plugins</groupId>
                <artifactId>maven-compiler-plugin</artifactId>
                <configuration>
                    <source>1.8</source>
                    <target>1.8</target>
                    <encoding>UTF-8</encoding>
                </configuration>
            </plugin>
            <plugin>
                <groupId>org.apache.maven.plugins</groupId>
                <artifactId>maven-surefire-plugin</artifactId>
                <configuration>
                    <testFailureIgnore>true</testFailureIgnore>
                </configuration>
            </plugin>
        </plugins>
        <!--设置maven拷贝那些目录下的文件-->
        <resources>
            <resource>
                <directory>src/main/java</directory>
                <includes>
                    <include>**/*.xml</include>
                    <include>**/*.properties</include>
                </includes>
            </resource>
            <resource>
                <directory>src/main/resources</directory>
                <includes>
                    <include>**/*.xml</include>
                    <include>**/*.properties</include>
                </includes>
            </resource>
        </resources>
    </build>
子工程(module):
<dependencies>
        <!--spring的依赖-->
        <dependency>
            <groupId>org.springframework</groupId>
            <artifactId>spring-core</artifactId>
            <version>4.3.10.RELEASE</version>
            <exclusions>
                <exclusion>
                    <groupId>commons-logging</groupId>
                    <artifactId>commons-logging</artifactId>
                </exclusion>
            </exclusions>
        </dependency>
        <dependency>
            <groupId>org.springframework</groupId>
            <artifactId>spring-context</artifactId>
        </dependency>

        <dependency>
            <groupId>junit</groupId>
            <artifactId>junit</artifactId>
            <version>4.12</version>
        </dependency>

        <dependency>
            <groupId>org.slf4j</groupId>
            <artifactId>slf4j-log4j12</artifactId>
            <version>1.7.21</version>
        </dependency>
        <dependency>
            <groupId>org.slf4j</groupId>
            <artifactId>jcl-over-slf4j</artifactId>
            <version>1.7.21</version>
        </dependency>

        <dependency>
            <groupId>org.projectlombok</groupId>
            <artifactId>lombok</artifactId>
            <version>1.18.20</version>
        </dependency>

        <!--spring-test-->
        <dependency>
            <groupId>org.springframework</groupId>
            <artifactId>spring-test</artifactId>
        </dependency>

        <!--aop相关的-->
        <dependency>
            <groupId>org.springframework</groupId>
            <artifactId>spring-aop</artifactId>
        </dependency>
        <dependency>
            <groupId>org.springframework</groupId>
            <artifactId>spring-aspects</artifactId>
        </dependency>
        <dependency>
            <groupId>org.aspectj</groupId>
            <artifactId>aspectjweaver</artifactId>
            <version>1.9.6</version>
        </dependency>
    </dependencies>
(二)写实体类,这里方便测试所以我就只写Service层和AOP全局事务类
①Service层:
IUserService接口:
public interface IUserService {

    /**
     * 添加的方法
     */
    public void insert();

    /**
     * 删除的方法
     */
    public void delete();
}
UserServiceImpl实现类:
为了等等方便我测试我提前写好一个不会抛出异常的insert()方法,和一个等等抛出异常的delete()方法
public class UserServiceImpl implements IUserService {
    @Override
    public void insert() {
        System.out.println("添加成功");
    }

    @Override
    public int delete(int id) throws SQLException {
        System.out.println("删除成功");
        if(true){
            throw new SQLException("测试一下");
        }
        System.out.println("");
        return id;
    }
}
②advice全局事务管理层:
LoggingAdvice类(配置):写上前置增强的方法 before,后置增强方法after......(名字随意,但是写配置文件applicationContext的时候就要用对应的名字)
public class LoggingAdvice {

    //前置增强:

    public void before(JoinPoint joinPoint) {
        Object target = joinPoint.getTarget(); //得到目标对象
        //目标对象所在类的全限定名 String target.getClass().getName()
        // String target.getClass().getSimpleName()  得到类名
        String className = target.getClass().getName();
        //得到目标方法签名
        //joinPoint.getSignature().getName()  得到方法名
        String methodName = joinPoint.getSignature().getName();

        //得到目标方法执行传递参数
        Object[] args = joinPoint.getArgs();

         System.out.println("========前置增强:执行"+className+"的"+methodName+"方法,传递参数:"+ Arrays.asList(args));
//        log.info("========前置增强:执行"+className+"的"+methodName+"方法,传递参数:"+ Arrays.asList(args));
    }

    //后置增强: 前提条件, 目标方法正常执行
    // Object rs 接收目标方法执行完成的返回值结果,但是如果增强的方法没有返回值(void)那就会无法进行增强哦!
    public void afterReturning(JoinPoint joinPoint,Object rs){
        String className = joinPoint.getTarget().getClass().getName();
        String methodName = joinPoint.getSignature().getName();
        System.out.println("========后置增强:执行完成"+className+"的"+methodName+"方法,目标方法的返回值:"+rs);
    }

    //异常增强   只能对RuntimeException异常进行增强,如果目标方法抛出的异常RuntimeException以及子类该增强方法才执行
    //如果抛出不是RuntimeException异常,该方法也不执行
//    @AfterThrowing(value = "servicePointcut()",throwing = "ex")
    public void afterThrowing(JoinPoint joinPoint,Exception ex){
        String className = joinPoint.getTarget().getClass().getName();
        String methodName = joinPoint.getSignature().getName();
        System.out.println("========异常增强:执行"+className+"的"+methodName+"方法,出错了....");
    }

    //最终增强  不管目标方法是否是正常执行, 最终增强都会执行
    public void after(JoinPoint joinPoint){
        String className = joinPoint.getTarget().getClass().getName();
        String methodName = joinPoint.getSignature().getName();
        System.out.println("========最终增强:执行"+className+"的"+methodName+"方法");
    }

    //环绕增强: 一个顶上面四个,但是项目效率会降低
    public Object around(ProceedingJoinPoint jp) throws Throwable{
        System.out.println(jp.getSignature().getName()+"方法开始执行"); //前置增强
        try {
            //执行目标方法
            Object rs = jp.proceed();  //去执行目标方法
            System.out.println(jp.getSignature().getName()+"方法正常执行完"); //后置增强
            return rs;
            //return null;
        } catch (Exception e) {
            System.out.println("调用"+jp.getTarget()+"的"+jp.getSignature().getName()
                    +"方法发生异常"+e);  //异常增强
            throw e;
        }finally{
            System.out.println("执行完了"); //最终增强
        }
    }
}
(三)配置applicationContext.xml文件:先把UserServiceImpl和LoggingAdvice交给Spring管理,然后再配置aop相关配置。
在配置之前先讲语法:
Ø execution(修饰符? 返回值类型 方法名(参数) 异常?)
Ø execution(* *(..)) 匹配所有spring**管理对象所有方法,** 第一个***任意返回值** ,第二个***任意方法,** .. 任意参数
Ø execution(* org.suke.spring..*.*(..) ):**匹配org.suke.spring包及其子包所有类的所有方法**
Ø execution(* org.suke.spring.*.*(..)) 匹配org.suke.spring**包中所有对象所有方法**
Ø execution(* org.suke.spring.UserService.s*(..)) 匹配org.suke.spring**包UserService中s开头方法**
Ø execute( public * addUser(entity.User)) 匹配addUser**方法,返回值任意,参数为entity包User对象**
Ø execute( public void *(entity.User)) 匹配返回值为void,**参数为entity包User的所有方法**
Ø execute( public void addUser(..)) 匹配返回值为void,**参数任意的addUser方法**
<!--配置aop相关配置-->
<aop:config>
<!--配置切入点
id: 切入点唯一标志符, 方便使用
expression: 切入点表达式 语法: execution(修饰符? 返回值 方法名(参数) 异常?)
-->
<aop:pointcut id="mypointcut" expression="execution(* com.fs.service..*.*(..))"/>
<aop:pointcut id="mypointcut1" expression="execution(* com.fs.service.impl.UserServiceImpl.insert(..))"/>
<!--织入: 把增强类loggingAdvice的方法与切入点匹配到的方法进行织入-->
<aop:aspect ref="loggingAdvice">
<!--前置增强 aop:before
后置增强aop:after-returning
最终增强aop:after
异常增强aop:after-throwing
method: 增强类的方法名,也就是你想要在这个切入点触发的方法名
-->
<aop:before method="before" pointcut-ref="mypointcut1"/>
<!-- 最终增强 aop:after -->
<aop:after method="after" pointcut-ref="mypointcut1"/>
<!-- <aop:after-returning method="afterReturning" pointcut-ref="mypointcut1"/>-->
</aop:aspect>
</aop:config>
<?xml version="1.0" encoding="UTF-8"?>
<beans xmlns="http://www.springframework.org/schema/beans"
       xmlns:xsi="http://www.w3.org/2001/XMLSchema-instance"
       xmlns:aop="http://www.springframework.org/schema/aop"
       xsi:schemaLocation="http://www.springframework.org/schema/beans
       http://www.springframework.org/schema/beans/spring-beans.xsd
       http://www.springframework.org/schema/aop
       http://www.springframework.org/schema/aop/spring-aop.xsd">

    <!--把UserServiceImpl 以及LoggingAdvice这两个类交给spring管理-->
    <bean id="userService" class="com.fs.service.impl.UserServiceImpl"/>

    <bean id="loggingAdvice" class="com.fs.advice.LoggingAdvice"/>

    <!--配置aop相关配置-->
    <aop:config>
        <!--配置切入点
           id: 切入点唯一标志符, 方便使用
           expression: 切入点表达式 语法: execution(修饰符? 返回值 方法名(参数) 异常?)
        -->
        <aop:pointcut id="mypointcut" expression="execution(* com.fs.service..*.*(..))"/>
        <aop:pointcut id="mypointcut1" expression="execution(* com.fs.service.impl.UserServiceImpl.insert(..))"/>
        <!--织入: 把增强类loggingAdvice的方法与切入点匹配到的方法进行织入-->
        <aop:aspect ref="loggingAdvice">
            <!--前置增强 aop:before

                  后置增强aop:after-returning

                  最终增强aop:after

                  异常增强aop:after-throwing

                  method: 增强类的方法名,也就是你想要在这个切入点触发的方法名
            -->
            <aop:before method="before" pointcut-ref="mypointcut"/>
            <!-- 最终增强 -->
            <aop:after method="after" pointcut-ref="mypointcut"/>
            <!-- 后置增强 -->
            <aop:after-returning method="afterReturning" pointcut-ref="mypointcut1"/>
            <!-- 异常增强 -->
            <aop:after-throwing method="afterThrowing" pointcut-ref="mypointcut1"/>
        </aop:aspect>

    </aop:config>
</beans>
(四)写个测试类进行测试:
@RunWith(SpringJUnit4ClassRunner.class)
@ContextConfiguration("classpath:applicationContext.xml")
public class UserServiceImplTest {
@Autowired
private IUserService userService;
@Test
public void insert() {
userService.insert();
}
@Test
public void delete() throws SQLException {
userService.delete(1);
}
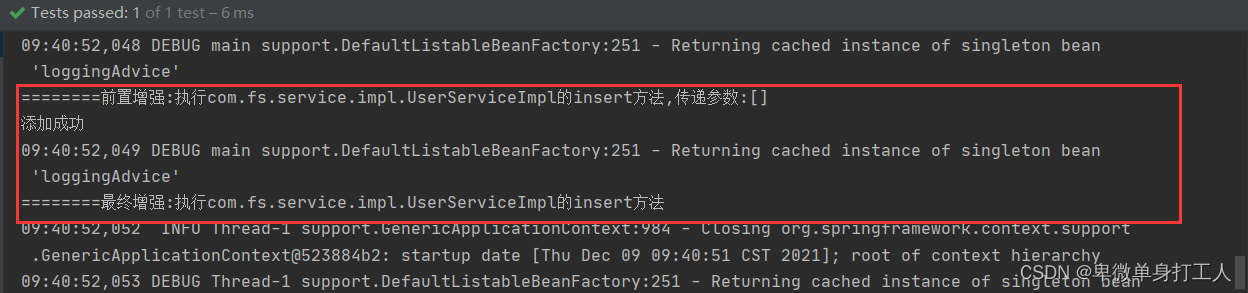
}然后我们看运行结果:
①insert:
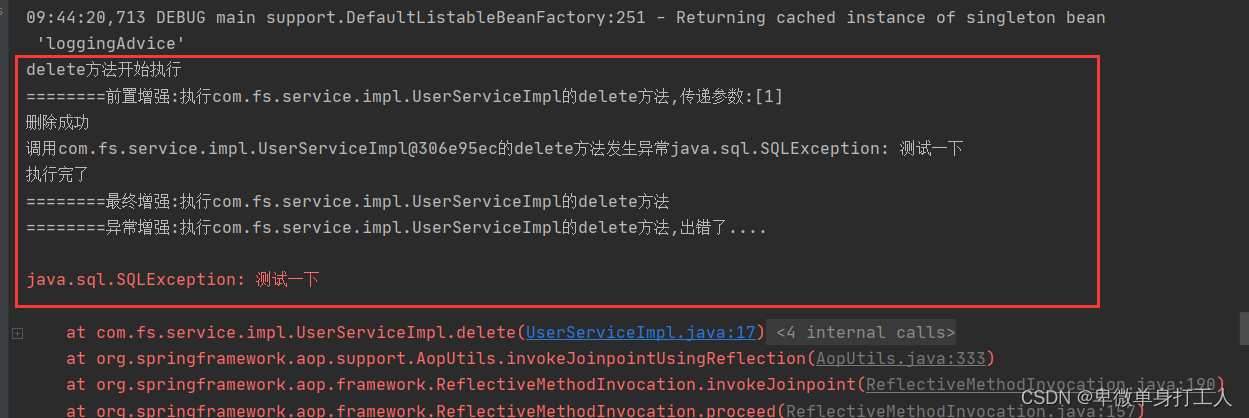
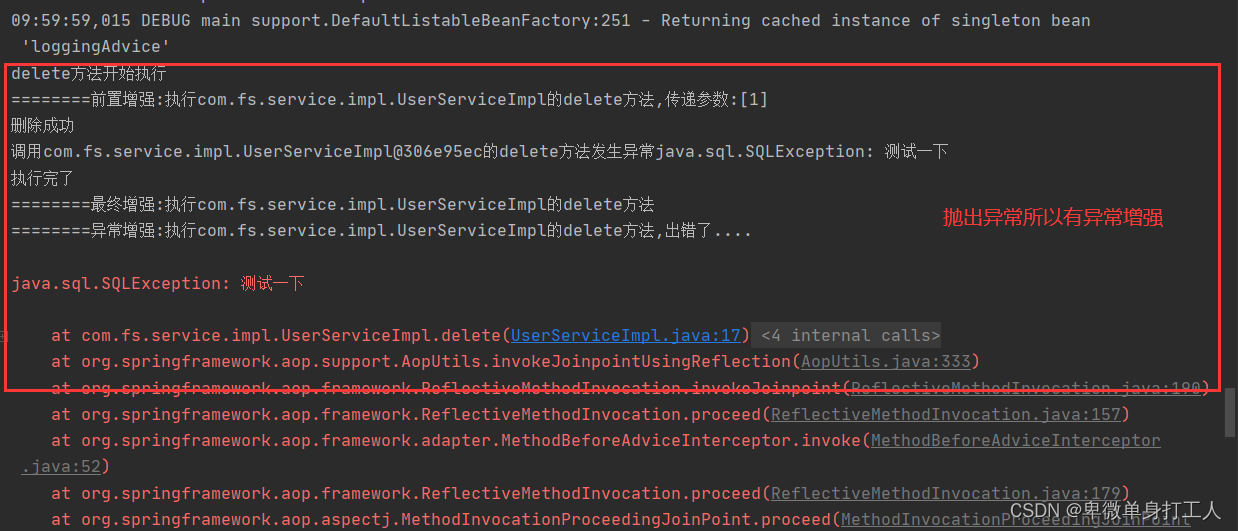
②delete方法:
三、使用注解的方式实现上面的例子(偷懒啦~~!)
(一)我们在原有的LoggingAdvice实体类中做了修改加上了注解:
@Aspect是增强类的声明注解
@Log只是日志,可以加可以不加
/**
 * 注解实现方式
 */
@Aspect
@Log
public class LoggingAdvice {

    //定义一个切入点的方法,增强中value输入这个包及其后代包中的方法执行时会执行相应的增强,其实就是偷懒一下不想写这个也行,不想写的话就像相面被注释掉的那个@Before("execution(* com.fs.service..*.*(..))"),每个都要这么写,写了这个就可以偷点懒
    @Pointcut("execution(* com.fs.service..*.*(..))")
    public void servicePointcut(){};

    //前置增强:
    //@Before("execution(* com.fs.service..*.*(..))")
    @Before("servicePointcut()")
    public void before(JoinPoint joinPoint) {
        Object target = joinPoint.getTarget(); //得到目标对象
        //目标对象所在类的全限定名 String target.getClass().getName()
        // String target.getClass().getSimpleName()  得到类名
        String className = target.getClass().getName();
        //得到目标方法签名
        //joinPoint.getSignature().getName()  得到方法名
        String methodName = joinPoint.getSignature().getName();

        //得到目标方法执行传递参数
        Object[] args = joinPoint.getArgs();

         System.out.println("========前置增强:执行"+className+"的"+methodName+"方法,传递参数:"+ Arrays.asList(args));
//        log.info("========前置增强:执行"+className+"的"+methodName+"方法,传递参数:"+ Arrays.asList(args));
    }

    //后置增强: 前提条件, 目标方法正常执行
    // Object rs 接收目标方法执行完成的返回值结果
    @AfterReturning(value="servicePointcut()",returning = "rs")
    public void afterReturning(JoinPoint joinPoint,Object rs){
        String className = joinPoint.getTarget().getClass().getName();
        String methodName = joinPoint.getSignature().getName();
        System.out.println("========后置增强:执行完成"+className+"的"+methodName+"方法,目标方法的返回值:"+rs);
    }

    //异常增强   只能对RuntimeException异常进行增强,如果目标方法抛出的异常RuntimeException以及子类该增强方法才执行
    //如果抛出不是RuntimeException异常,该方法也不执行
    @AfterThrowing(value = "servicePointcut()",throwing = "ex")
    public void afterThrowing(JoinPoint joinPoint,Exception ex){
        String className = joinPoint.getTarget().getClass().getName();
        String methodName = joinPoint.getSignature().getName();
        System.out.println("========异常增强:执行"+className+"的"+methodName+"方法,出错了....");
    }

    //最终增强  不管目标方法是否是正常执行, 最终增强都会执行
    @After("servicePointcut()")
    public void after(JoinPoint joinPoint){
        String className = joinPoint.getTarget().getClass().getName();
        String methodName = joinPoint.getSignature().getName();
        System.out.println("========最终增强:执行"+className+"的"+methodName+"方法");
    }

    //环绕增强: 一个顶上面四个,但是项目效率会降低
    @Around("servicePointcut()")
    public Object around(ProceedingJoinPoint jp) throws Throwable{
        System.out.println(jp.getSignature().getName()+"方法开始执行"); //前置增强
        try {
            //执行目标方法
            Object rs = jp.proceed();  //去执行目标方法
            System.out.println(jp.getSignature().getName()+"方法正常执行完"); //后置增强
            return rs;
            //return null;
        } catch (Exception e) {
            System.out.println("调用"+jp.getTarget()+"的"+jp.getSignature().getName()
                    +"方法发生异常"+e);  //异常增强
            throw e;
        }finally{
            System.out.println("执行完了"); //最终增强
        }
    }
}
(二)在applicationContext.xml配置文件中把之前的开启aop注解扫描:
<!--开启aspect注解扫描-->
<aop:aspectj-autoproxy/>
<?xml version="1.0" encoding="UTF-8"?>
<beans xmlns="http://www.springframework.org/schema/beans"
xmlns:xsi="http://www.w3.org/2001/XMLSchema-instance"
xmlns:aop="http://www.springframework.org/schema/aop"
xsi:schemaLocation="http://www.springframework.org/schema/beans
http://www.springframework.org/schema/beans/spring-beans.xsd
http://www.springframework.org/schema/aop
http://www.springframework.org/schema/aop/spring-aop.xsd">
<!--把UserServiceImpl 以及LoggingAdvice这两个类交给spring管理-->
<bean id="userService" class="com.fs.service.impl.UserServiceImpl"/>
<bean id="loggingAdvice" class="com.fs.advice.LoggingAdvice"/>
<!--开启aspect注解扫描-->
<aop:aspectj-autoproxy/>
<!-- <!–配置aop相关配置–>-->
<!-- <aop:config>-->
<!-- <!–配置切入点-->
<!-- id: 切入点唯一标志符, 方便使用-->
<!-- expression: 切入点表达式 语法: execution(修饰符? 返回值 方法名(参数) 异常?)-->
<!-- –>-->
<!-- <aop:pointcut id="mypointcut" expression="execution(* com.fs.service..*.*(..))"/>-->
<!-- <aop:pointcut id="mypointcut1" expression="execution(* com.fs.service.impl.UserServiceImpl.insert(..))"/>-->
<!-- <!–织入: 把增强类loggingAdvice的方法与切入点匹配到的方法进行织入–>-->
<!-- <aop:aspect ref="loggingAdvice">-->
<!-- <!–前置增强 aop:before-->
<!-- 后置增强aop:after-returning-->
<!-- 最终增强aop:after-->
<!-- 异常增强aop:after-throwing-->
<!-- method: 增强类的方法名,也就是你想要在这个切入点触发的方法名-->
<!-- –>-->
<!-- <aop:before method="before" pointcut-ref="mypointcut"/>-->
<!-- <!– 最终增强 –>-->
<!-- <aop:after method="after" pointcut-ref="mypointcut"/>-->
<!-- <!– 后置增强 –>-->
<!-- <aop:after-returning method="afterReturning" pointcut-ref="mypointcut1"/>-->
<!-- <!– 异常增强 –>-->
<!-- <aop:after-throwing method="afterThrowing" pointcut-ref="mypointcut1"/>-->
<!-- </aop:aspect>-->
<!-- </aop:config>-->
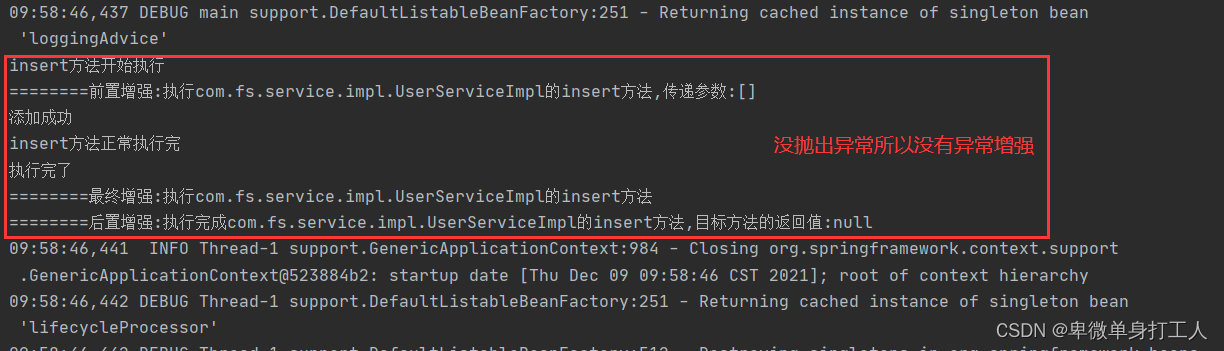
</beans>(三)其他的都不用改动,然后看运行结果:
①insert方法:
②delete方法:
然后,到这里普通实现和注解实现AOP就结束了!
最后提问,那么SpringAOP有啥用?
举个例子你们就晓得了,比如:
①前置增强是在你的这个delete方法进行之前运行的,那我们可以用于事务的开启等操作
②后置增强是在你的这个delete方法进行之后运行的,那么们可以用于存储数据到Session等操作
③最终增强是在你的这个delete方法进行之后结束这个进程之前运行的,那么们可以用于关闭事务关闭数据库连接等操作
④最终增强是在你的这个delete方法抛出异常时执行的,那么们可以用于数据库事务的回滚或采用别的处理方式等操作
那么到这里SpringAOP的大致浅显的使用和了解就到这里了!谢谢!


 被折叠的 条评论
为什么被折叠?
被折叠的 条评论
为什么被折叠?
 到【灌水乐园】发言


