


一、事件绑定
1.methods
事件绑定就是在Vue的methods中写一些方法以便于事件调用。
格式如下:
new Vue({
el:"#app",
data:{},
methods:{name(){}
}//与data平级
})
在这里面是学过的所有方式的写法都行:fn(){}/fn:function(){}等
2.事件
v-on:事件类型和@事件类型都是其写法。
其值就是methods中的方法。
<div v-on:click="fn"></div>
<div @click="fn"></div>
事件修饰符:
- .stop 阻止冒泡,阻止从当前元素经过的所有冒泡行为
.prevent 阻止默认事件
.capture 添加事件侦听器时让事件在捕获阶段触发
.self 其他元素的事件触发时 事件链经过它,无论是捕获还是冒泡阶段都不会触发它的事件,只有它自己是精准对象才会触发事件, 虽然它自己不会被别人影响,但是它自己的事件触发的时候还是会生成事件链经过其他元素,并不阻止继续冒泡到其他元素
.once 事件只触发一次,触发完之后,事件就解绑
多修饰符一起使用:连点
注意:
var vm=new Vue({
el,
data:{msg:"111"},
method:{
fn1:function(){},
fn2:()=>{}
}
})
在vue中,msg、fn1是vm的对象,即this的对象,注意不是data/method的对象
而fn2:()=>{}不是,它是window的对象(箭头函数根本不看他)
二、样式绑定
1.class绑定
绑定类名。
分为数组绑定、变量绑定、对象绑定
1.对象绑定:
<div id="app">
			<div @click="handleClick"  :class="{activated:isActivated}">hello</div>
		</div>
		<script>
			new Vue({
				el:"#app",
				data:{
					isActivated:false
				},
				methods:{
					handleClick:function(){
						this.isActivated=!this.isActivated
					},
				}
			})
		</script>
2.数组绑定:
<div id="app">
			<div @click="handleClick"  :class="[activated]">hello</div>
		</div>
		<script>
			new Vue({
				el:"#app",
				data:{
					activated:""//类名为空
				},
				methods:{
					handleClick:function(){
						this.activated=!this.activated==="activated"?"":"activated"
					},
				}
			})
		</script>
3.变量绑定:
<div id="app">
			<div :class="activated">hello</div>
		</div>
		<script>
			new Vue({
				el:"#app",
				data:{
					activated:"RJY"
				}
			})
		</script>
标签中class和:class可以共存。
2.style绑定
绑定样式。
分为数组绑定、变量绑定、对象绑定
1.对象绑定
<div id="app">
			<div @click="handleClick"  :style="styleObj">hello</div>
		</div>
		<script>
			new Vue({
				el:"#app",
				data:{
					styleObj:{
						color:"blue"
					}
				},
				methods:{
					handleClick:function(){
						this.styleObj.color=this.styleObj.color==="blue"?"red":"blue";
					},
				}
			})
		</script>
2.数组绑定
<div id="app">
			<div @click="handleClick"  :style="[styleObj,{fontsize:'20px'}]">hello</div>
		</div>
		<script>
			new Vue({
				el:"#app",
				data:{
					styleObj:{
						color:"blue"//由这里看得出来,其实它也是一个对象
					}
				},
				methods:{
					handleClick:function(){
						this.styleObj.color=this.styleObj.color==="blue"?"red":"blue";
					},
				}
			})
		</script>
3.变量绑定
<div id="app">
			<div @click="handleClick"  :style="{color:styleObj,fontsize:'20px'}">hello</div>
		</div>
		<script>
			new Vue({
				el:"#app",
				data:{
					styleObj:"blue"//由这里看得出来,其实它也是一个对象
				},
				methods:{
					handleClick:function(){
						this.styleObj=this.styleObj==="blue"?"red":"blue";
					},
				}
			})
		</script>
三、条件渲染
v-if=""
里面是布尔值,可以写任何表达式
常常用于开关思想(不用常切换的,常切换的用display:none)。
例如:
<div id="app">
<button type="button" @click="change">点我</button>
<div @click="handleClick" :style="styleObj">hello!</div>
<div :style={color:color} v-if="flag">RJY</div>
</div>
<script>
new Vue({
el:"#app",
data:{
styleObj:{
color:"blue"
},
color:"oranged",
flag:true
},
methods:{
handleClick:function(){
this.styleObj.color=this.styleObj.color==="blue"?"red":"blue";
},
change(){
this.flag=!this.flag
}
}
})
</script>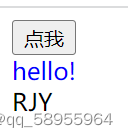 点击后:
点击后: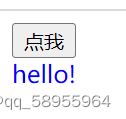
四、循环渲染
v-for=""
例子:
//这里引入了一个自己建立的新浪数据库
<style>
			#rjy{
				position: relative;
			}

		</style>
		<div id='rjy'>
			<div  v-for="el in obj.statuses" :style="bigbox">
				<div>
					<img class="touxiang" :src="el.user.profile_image_url">
				</div>
				<div class="name">{{el.user.screen_name}}</div>
				<div class="txt">{{el.text}}</div>
				<div class="time">{{el.created_at}}</div>
			</div>
		</div>
		<script>
			console.log(sinadata)
			new Vue({
				el: '#rjy',
				data: {
					obj:sinadata,
					touxiangbox:{
						borderRadius: "50%",
						marginLeft: "80px"
					},
					namebox:{
						position: "absolute",
						color: "skyblue",
						marginLeft: "55px"
					},
					txtbox:{
						position: "absolute",
						marginTop: "20px"
					},
					timebox:{
						position: "absolute",
						marginTop: "40px",
						marginLeft: "20px",
						fontSize: "10px",
						color: "orangered"
					},
					bigbox:{
						marginTop:"15px"
					}
				}
			})
</script> 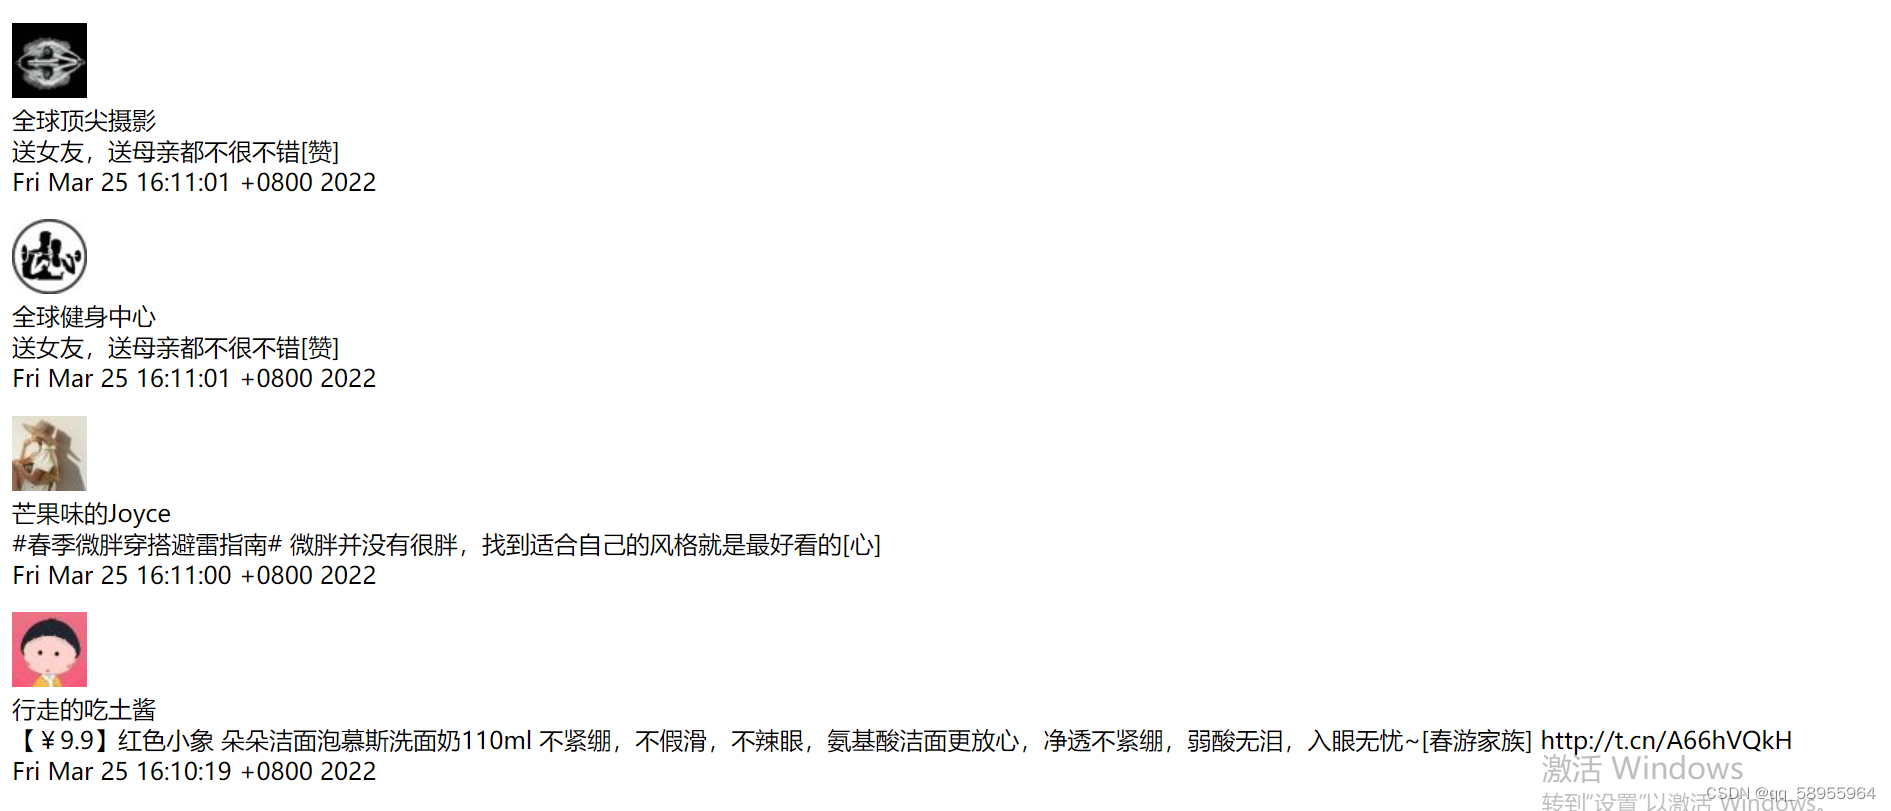
注意:v-for不允许放在根节点上。


 被折叠的 条评论
为什么被折叠?
被折叠的 条评论
为什么被折叠?
 到【灌水乐园】发言


