


1.验证码流程
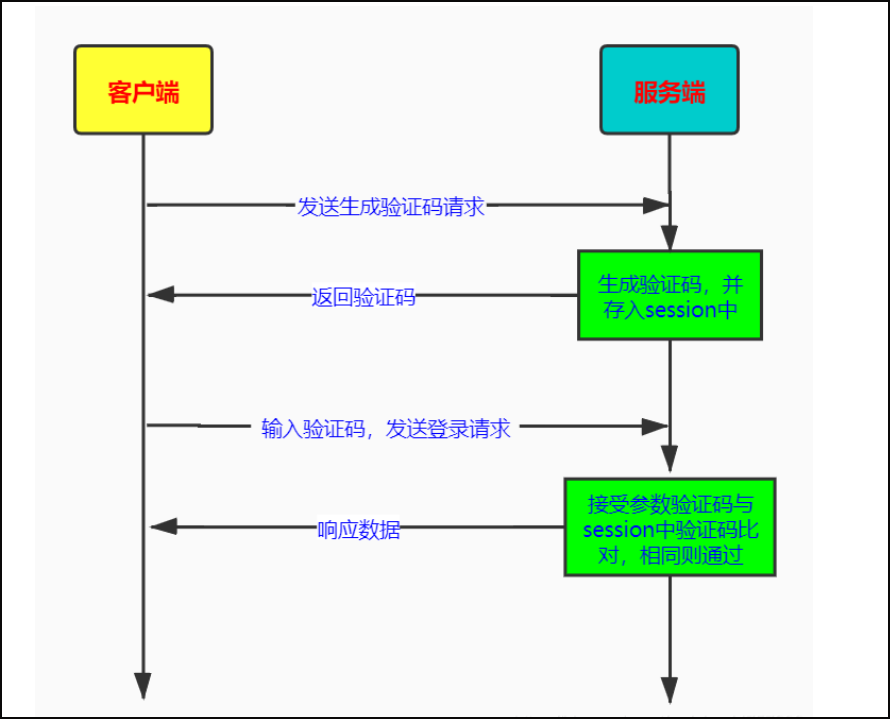
验证码流程图解析:
- 客户端打开登陆页的时候就要发送一个生成图片验证码的请求
- 服务端接受请求,就要随机生成验证码图片,将图片验证码响应给前端页面,并且要将生成的验证码保存到session中,以便登录验证校验
- 客户端收到验证码图片后,填入表单信息后,发送登录请求
- 服务端在接受到前端传来的验证码参数,要先与session中的比对,如果相同,则响应正确,如果不匹配,则返回相应错误信息,如验证码不匹配
2.验证码生成
package com.bruce.controller;

import org.springframework.web.bind.annotation.RequestMapping;
import org.springframework.web.bind.annotation.RestController;

import javax.imageio.ImageIO;
import javax.servlet.http.HttpServletRequest;
import javax.servlet.http.HttpServletResponse;
import java.awt.*;
import java.awt.image.BufferedImage;
import java.util.Random;

@RestController
public class CheckCodeController {

    @RequestMapping("/getCode")
    public void getCode(HttpServletRequest request, HttpServletResponse response) {
        //生成对应宽高的初始图片
        int width = 130;
        int height = 45;
        BufferedImage img = new BufferedImage(width, height, BufferedImage.TYPE_INT_BGR);

        //美化图片
        Graphics g = img.getGraphics();
        g.setColor(Color.white);      //设置画笔颜色-验证码背景色
        g.fillRect(0, 0, width, height);//填充背景
        Random ran = new Random();
        //产生4个随机验证码,12Ey
        String checkCode = getCheckCode();
        //将验证码放入HttpSession中
        request.getSession().setAttribute("checkCode_session", checkCode);
        System.out.println("系统生成的验证码是:" + checkCode);
        Color color = new Color(ran.nextInt(256), ran.nextInt(256), ran.nextInt(256));//随机生成颜色
        g.setColor(color);
        //设置字体的小大
        g.setFont(new Font("微软雅黑", Font.BOLD, 40));
        //向图片上写入验证码
        g.drawString(checkCode, 15, 33);

        //画干扰线
        for (int i = 0; i < 6; i++) {
            // 设置随机颜色
            Color color1 = new Color(ran.nextInt(256),
                    ran.nextInt(256), ran.nextInt(256));//随机生成颜色
            g.setColor(color1);
            // 随机画线
            g.drawLine(ran.nextInt(width), ran.nextInt(height),
                    ran.nextInt(width), ran.nextInt(height));
        }
        //添加噪点
        for (int i = 0; i < 30; i++) {
            int x1 = ran.nextInt(width);
            int y1 = ran.nextInt(height);
            Color color2 = new Color(ran.nextInt(256), ran.nextInt(256), ran.nextInt(256));//随机生成颜色
            g.setColor(color2);
            g.fillRect(x1, y1, 2, 2);
        }
        //将图片输出页面展示
        try {
            ImageIO.write(img, "png", response.getOutputStream());
        } catch (Exception e) {
            e.printStackTrace();
        }
    }

    //生成随机验证码方法
    private String getCheckCode() {
        String base = "123456789abcdefghijklmnopqrstuvwxyzABCDEFGHJKLMNPQRSTUVWXYZ";
        int size = base.length();
        Random r = new Random();
        StringBuffer sb = new StringBuffer();
        for (int i = 1; i <= 4; i++) {
            //产生0到size-1的随机值
            int index = r.nextInt(size);
            //在base字符串中获取下标为index的字符
            char c = base.charAt(index);
            //将c放入到StringBuffer中去
            sb.append(c);
        }
        return sb.toString();
    }
}
3.前端验部分的代码
<%@ page contentType="text/html;charset=UTF-8" language="java" isELIgnored="false" %>
<%@ taglib prefix="security" uri="http://www.springframework.org/security/tags" %>
<html>
<head>
    <title>Title</title>
    <script type="text/javascript">

        //图片点击事件
        function changeCheckCode(img) {
            img.src="/getCode?"+new Date().getTime();
            //拼接时间,是为了可以一直刷新验证码,也可以用其他随机数
        }

    </script>
</head>
<body>
<h1>登录管理</h1>

<form action="/login" method="post">
    账号:<input type="text" name="username"><br>
    密码:<input type="password" name="password"><br>
    验证码:<input type="text" name="checkCode"/>
    <img src="/getCode"  style="width: 130px;height: 40px" onclick="changeCheckCode(this)" ><br>
    <input type="submit" value="登录">
    <security:csrfInput/>
</form>

<span style="color: red">${msg}</span>

<img src="/img/a1.png">


</body>
</html>
springsecurity还需要配置验证码的请求权限:
<?xml version="1.0" encoding="UTF-8"?>
<beans xmlns="http://www.springframework.org/schema/beans"
       xmlns:context="http://www.springframework.org/schema/context"
       xmlns:p="http://www.springframework.org/schema/p"
       xmlns:aop="http://www.springframework.org/schema/aop"
       xmlns:tx="http://www.springframework.org/schema/tx"
       xmlns:security="http://www.springframework.org/schema/security"
       xmlns:xsi="http://www.w3.org/2001/XMLSchema-instance"
       xsi:schemaLocation="http://www.springframework.org/schema/beans
       http://www.springframework.org/schema/beans/spring-beans-4.2.xsd
    http://www.springframework.org/schema/context http://www.springframework.org/schema/context/spring-context-4.2.xsd
    http://www.springframework.org/schema/aop http://www.springframework.org/schema/aop/spring-aop-4.2.xsd
    http://www.springframework.org/schema/tx http://www.springframework.org/schema/tx/spring-tx-4.2.xsd
    http://www.springframework.org/schema/util http://www.springframework.org/schema/util/spring-util-4.2.xsd
    http://www.springframework.org/schema/security http://www.springframework.org/schema/security/spring-security-4.2.xsd">


    <!--直接释放无需经过SpringSecurity过滤器的静态资源-->
    <security:http pattern="/css/**" security="none"/>
    <security:http pattern="/js/**" security="none"/>
    <security:http pattern="/img/**" security="none"/>
    <security:http pattern="/plugins/**" security="none"/>
    <security:http pattern="/favicon.ico" security="none"/>

    <!--设置可以用spring的el表达式配置Spring Security并自动生成对应配置组件(过滤器)-->
    <security:http auto-config="true" use-expressions="true">

        <security:custom-filter ref="checkCodeFilter" before="FORM_LOGIN_FILTER"></security:custom-filter>

        <!--指定login.jsp页面可以被匿名访问-->
        <security:intercept-url pattern="/login.jsp" access="permitAll()"/>
        <security:intercept-url pattern="/failer.jsp" access="permitAll()"/>
        <security:intercept-url pattern="/getCode" access="permitAll()"/>

        <!--使用spring的el表达式来指定项目所有资源访问都必须有ROLE_USER或ROLE_ADMIN角色-->
        <security:intercept-url pattern="/**" access="hasAnyRole('ROLE_USER','ROLE_ADMIN')"/>

        <!--指定自定义的认证页面-->
        <security:form-login login-page="/login.jsp"
                             login-processing-url="/login"
                             default-target-url="/index.jsp"
                             authentication-failure-handler-ref="myFailureHandler" authentication-success-handler-ref="mySuccessHandler"/>

        <!--指定退出登录后跳转的页面-->
        <security:logout logout-url="/logout"
                         logout-success-url="/login.jsp"/>

        <!--禁用csrf防护机制-->
        <!--<security:csrf disabled="false"></security:csrf>-->

    </security:http>

    <bean id="passwordEncoder" class="org.springframework.security.crypto.bcrypt.BCryptPasswordEncoder"/>

    <!--设置Spring Security认证用户信息的来源-->
    <security:authentication-manager>
        <security:authentication-provider user-service-ref="userServiceImpl">
<!--            <security:user-service>-->
<!--                <security:user name="user" password="{noop}user" authorities="ROLE_USER"/>-->
<!--                <security:user name="admin" password="{noop}admin" authorities="ROLE_ADMIN"/>-->
<!--            </security:user-service>-->
            <security:password-encoder ref="passwordEncoder"/>
        </security:authentication-provider>
    </security:authentication-manager>

</beans>
4.验证码校验
首先写一个验证码校验的过滤器:
package com.bruce.filter;

import com.alibaba.druid.util.StringUtils;
import org.springframework.security.core.AuthenticationException;
import org.springframework.security.web.authentication.session.SessionAuthenticationException;
import org.springframework.stereotype.Component;
import org.springframework.web.bind.ServletRequestBindingException;
import org.springframework.web.filter.OncePerRequestFilter;
import javax.annotation.Resource;
import javax.servlet.FilterChain;
import javax.servlet.ServletException;
import javax.servlet.http.HttpServletRequest;
import javax.servlet.http.HttpServletResponse;
import javax.servlet.http.HttpSession;
import java.io.IOException;
import java.util.Objects;

@Component
public class CheckCodeFilter extends OncePerRequestFilter {

    @Resource
    private MyFailureHandler myFailureHandler;

    @Override
    protected void doFilterInternal(HttpServletRequest request, HttpServletResponse response, FilterChain filterChain)
            throws ServletException, IOException {
        if(StringUtils.equals("/login",request.getRequestURI()) && StringUtils.equalsIgnoreCase(request.getMethod(),"post")){
            try{
                //验证谜底与用户输入是否匹配
                validate(request);
            }catch(AuthenticationException e){
                //产生异常交给myFailureHandler处理
                myFailureHandler.onAuthenticationFailure(request,response,e);
                return; //产生异常就不执行后面的过滤器链
            }
        }
        filterChain.doFilter(request,response);
    }

    //校验规则
    private void validate(HttpServletRequest request) throws ServletRequestBindingException {
        HttpSession session = request.getSession();
        String checkCode = request.getParameter("checkCode");
        if(StringUtils.isEmpty(checkCode)){
            throw new SessionAuthenticationException("验证码不能为空");
        }
        // 获取session池中的验证码谜底,session中不存在的情况
        String checkCode_session = (String) session.getAttribute("checkCode_session");
        if(Objects.isNull(checkCode_session)) {
            throw new SessionAuthenticationException("验证码不存在");
        }
        // 请求验证码校验
        if(!StringUtils.equalsIgnoreCase(checkCode_session, checkCode)) {
            throw new SessionAuthenticationException("验证码不匹配");
        }
    }
}
在自定义的登录失败类中处理验证码验证异常:
package com.bruce.filter;

import com.bruce.utils.ResultCode;
import com.bruce.utils.ResultCommon;
import com.google.gson.Gson;
import org.springframework.beans.factory.annotation.Value;
import org.springframework.security.core.AuthenticationException;
import org.springframework.security.web.authentication.SimpleUrlAuthenticationFailureHandler;
import org.springframework.security.web.authentication.session.SessionAuthenticationException;
import org.springframework.stereotype.Component;

import javax.servlet.ServletException;
import javax.servlet.http.HttpServletRequest;
import javax.servlet.http.HttpServletResponse;
import java.io.IOException;

@Component
public class MyFailureHandler extends SimpleUrlAuthenticationFailureHandler {

    private String loginType="json";

    @Override
    public void onAuthenticationFailure(HttpServletRequest request, HttpServletResponse response, AuthenticationException exception) throws IOException, ServletException {

        String errorMsg = "用户名或者密码输入错误!";//返回的错误信息,默认是登录的错误

        if(exception instanceof SessionAuthenticationException){ //如果异常属于验证码session的异常,则获取异常的信息
            errorMsg = exception.getMessage();
        }
        if (loginType.equalsIgnoreCase("json")) {
            //将返回的对象转换成json数据
            request.setAttribute("msg",errorMsg);
            request.getRequestDispatcher("/login.jsp").forward(request,response);
        }else {
            //重新跳转到登录页面
            super.onAuthenticationFailure(request, response, exception);
        }
    }
}
至此,基于SpringSecurity的图片验证码登录功能已完全实现~~


 197
197

 被折叠的 条评论
为什么被折叠?
被折叠的 条评论
为什么被折叠?
 到【灌水乐园】发言


