


 本文详细介绍了如何使用Spring Security进行权限管理和自动登录配置,包括设置登录注销路由、自定义403页面、登录页面与处理URL,以及前端表单中自动登录功能的实现。
原理截图:(引用尚硅谷视频中的流程图)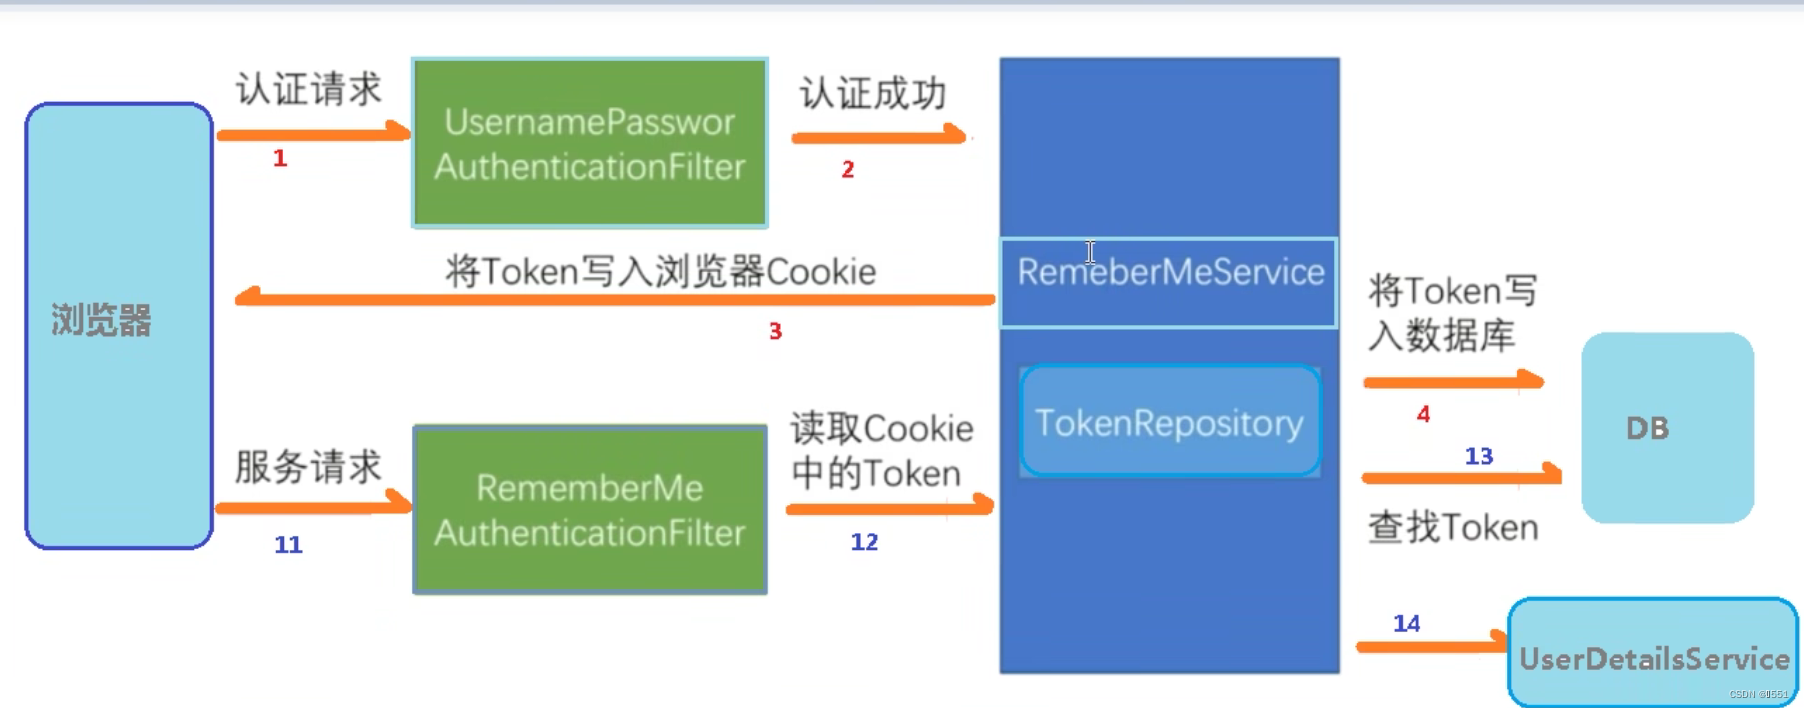
1修改配置类
//实现自动登入
@Autowired
private DataSource dataSource;
@Bean
public PersistentTokenRepository persistentTokenRepository(){
    JdbcTokenRepositoryImpl jdbcTokenRepository=new JdbcTokenRepositoryImpl();
    jdbcTokenRepository.setDataSource(dataSource);
    jdbcTokenRepository.setCreateTableOnStartup(true);
    return jdbcTokenRepository;
}
@Override
protected void configure(HttpSecurity http) throws Exception {
    http.logout().logoutUrl("logout").// 设置触发链接
            logoutSuccessUrl("/test/add").permitAll();//设置退出登入自动跳转
    http.exceptionHandling().accessDeniedPage("/unauth.html");//自定义403页面
    http.formLogin()
            .loginPage("/login.html")//自定义跳转登录页面
            .loginProcessingUrl("/user/login")//登录访问路径
            .defaultSuccessUrl("/test/index").permitAll()//登录成功之后,跳转路径
            .and().authorizeHttpRequests()//自定义哪些请求需要保护
                    .antMatchers("/","/test/add","/user/login").permitAll()//自定义哪些请求不需要保护
                    //配置用户权限
                    //.antMatchers("/test/index").hasAuthority("admins")//当前登录用户只有admin是权限才访问这个路径(只针对单个权限)
                    //.antMatchers("/test/index").hasAnyAuthority("admins","manager")//当前登录用户只有admin是权限才访问这个路径(针多个权限)
                    //.antMatchers("/test/index").hasRole("sale")//源码中将变成ROLE_sale所以在权限列表时应添加ROLE_前缀(与第一个差不多单权限)
                    //.antMatchers("/test/index").hasAnyRole("sale","admins")//与上一致但是是多用户权限
            .anyRequest().authenticated()
            .and().rememberMe().tokenRepository(persistentTokenRepository())
            .tokenValiditySeconds(60)//设置有效时长,单位秒
            .userDetailsService(userDetailsService)
            .and().csrf().disable();//关闭csrf防护
}
2 添加前端自动登入键注意name必须为remember-me
<body> <form action="/user/login"method="post"> 用户名:<input type="text" name="username"/> <br/> 密码:<input type="text" name="password"/> <br/> <input type="checkbox" name="remember-me"/>自动登入 <br/> <input type="submit" value="login"/> </form> </body>
实现截图:


 306
306

 被折叠的 条评论
为什么被折叠?
被折叠的 条评论
为什么被折叠?
 到【灌水乐园】发言


