


基本概念:
1、前言:
web:网页
静态web(html、css):提供给所有人看的数据,始终不会发生变化
动态web(Servlet/JSP、ASP、PHP):提供给所有人看的数据,会发生变化。每个人在不同的时间,不同的地点看到的信息各不相同。
在Java中,动态web资源开发的技术统称为JavaWeb。
2、web应用程序:
web应用程序:可以提供浏览器访问的程序
a.html、b.html……多个web资源,这些web资源可以被外界访问,对外界提供服务
你们能访问到的任何一个页面或者资源,都存在于这个世界的某一个角落的计算机上
这个统一的web资源会被放在同一个文件夹下,web应用程序通过Tomcat服务器访问
一个web应用由多部分组成(静态web、动态web):html、css、js、jsp、servlet、Java程序、jar包、配置文件(Properties)
web应用程序编写完毕后,若想提供给外界访问,需要一个服务器来统一管理
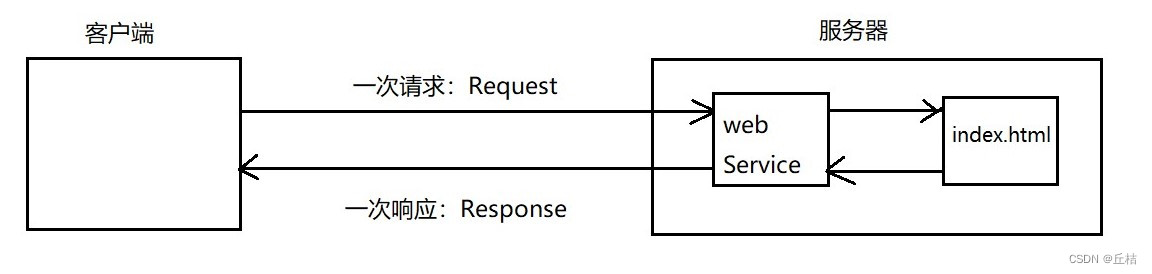
3、静态web:
*.htm、*.html 这些都是网页的后缀,如果服务器上一直存在这些东西,我们就可以直接通过网络进行读取。
静态web存在的缺点:
①web页面无法动态更新,所有用户看到的都是同一个页面
②它无法和数据库交互
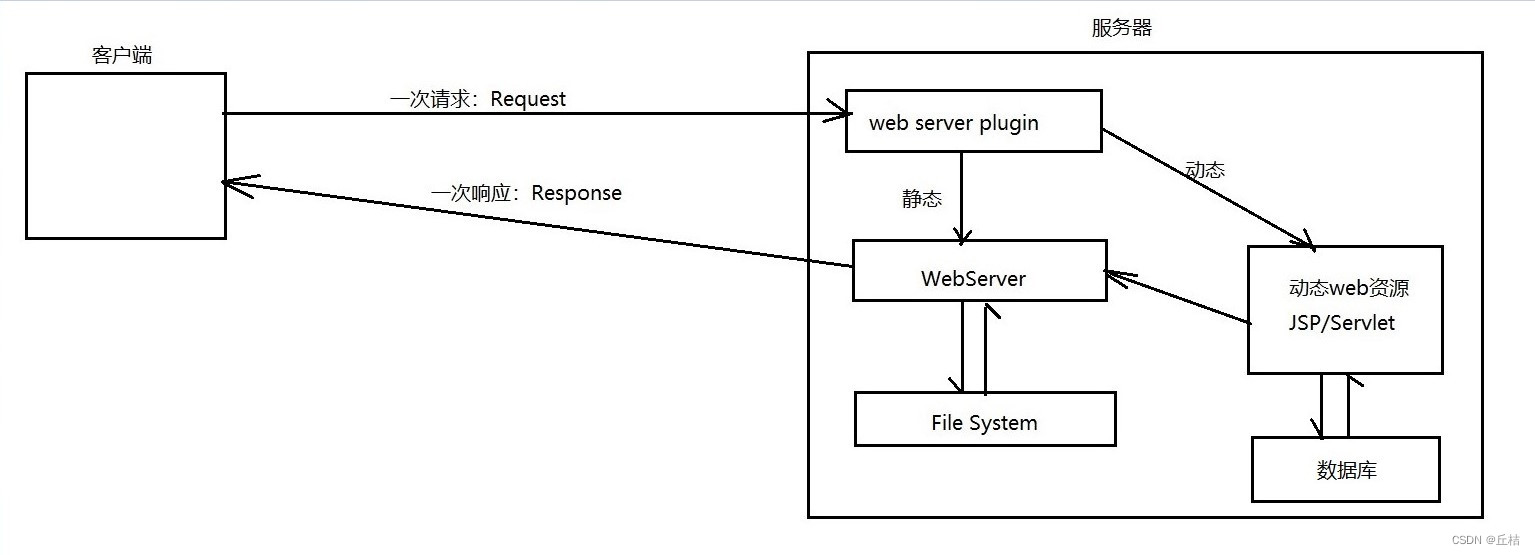
4、动态web:
页面会动态展示:web页面展示的效果因人而异
 缺点:假如服务器的动态web资源出现了问题,我们需要重新编写我们的后台程序,重新发布(停机维护)
优点:
①web页面可以动态更新,不同用户看到的页面不同
②它可以与数据库交互(数据库持久化)
web服务器:
1、技术讲解
ASP(微软):
①国内最早流行的就是ASP
②在HTML中嵌入了VB脚本:ASP+COM
③在ASP开发中,基本一个页面都有几千行的业务代码,页面极其混乱,维护成本高
PHP:
①PHP开发速度很快,功能很强大,跨平台,代码很简单
②局限:无法承载大访问量的情况
JSP/Servlet:
①SUN公司主推的B/S架构
②基于Java语言的(所有的大公司,或者一些开源的组件,都是用Java写的)
③可以承载高并发、高可用、高性能问题带来的影响
④语法像ASP,方便ASP转JSP
2、web服务器
服务器是一种被动的操作,用来处理用户的一些请求和给用户一些响应信息
IIS(微软):Windows中自带的,可以运行ASP
Tomcat(Apache):
①技术先进、性能稳定、免费,比较流行
②是一个免费的、开放源代码的、轻量级的web应用服务器,适合初学者
③运行JSP和Servlet
Http:
1、什么是Http?
Http(超文本传输协议)是一个简单的请求-响应协议,它运行在TCP之上。默认端口80。
文本:html、字符串……
超文本:图片、音乐、视频、定位、地图……
2、两个时代:
①HTTP/1.0:客户端与服务器连接后,只能获得一个web资源。然后断开连接
②HTTP/1.1:客户端与web服务器连接后,可以获得多个web资源。
3、Http请求
客户端 -------发请求-------> 服务器
Request URL:https://www.baidu.com/ 请求地址
Request Method:GET 请求方法
Status Code:200 OK 状态码
Remote Address:39.156.66.14:443 远程地址
Accept:text/html
Accept-Encoding:gzip, deflate, br
Accept-Language:zh-CN,zh;q=0.9 语言
Connection:keep-alive
4、Http响应
服务器 -------响应--------->客户端
Cache-Control:private 缓存控制
Connection:Keep-Alive 连接
Content-Encoding:gzip 编码
Content-Type:text/html 类型
Http请求协议包和Http响应协议包:Http请求协议包和Http响应协议包_丘桔的博客-优快云博客
Servlet:
1、什么是Servlet?
Servlet是Sun公司开发动态web的一门技术。
Sun在这些API中,提供了一个接口叫做Servlet,如果你想开发一个Servlet程序,只需要完成2个小步骤:①编写一个类,实现Servlet接口 ②把开发好的Java类部署到web服务器中
实现了Servlet接口的Java程序叫做Servlet
2、HelloServlet
步骤:
①创建一个普通的Maven项目,并删掉src目录。以后我们学习就在这个项目里面创建Moudel。这个空工程就是Maven主工程。
②修改web.xml的头文件为最新的
<?xml version="1.0" encoding="UTF-8"?>
<web-app xmlns="http://xmlns.jcp.org/xml/ns/javaee"
         xmlns:xsi="http://www.w3.org/2001/XMLSchema-instance"
         xsi:schemaLocation="http://xmlns.jcp.org/xml/ns/javaee http://xmlns.jcp.org/xml/ns/javaee/web-app_4_0.xsd"
         version="4.0">

</web-app>
③将Maven结构搭建完整(在main下,创建java和resources包)
④编写一个普通类
⑤普通类实现Servlet接口(Sun公司给了Servlet接口一个默认的实现类:HttpServlet。我们可以直接继承HttpServlet)

我们写的类,只需要继承HttpServlet即可
public class HelloServlet extends HttpServlet {
    //由于get或者post只是请求实现的不同方式,可以相互调用,因为业务逻辑都一样
    @Override
    protected void doGet(HttpServletRequest req, HttpServletResponse resp) throws ServletException, IOException {
        PrintWriter writer = resp.getWriter();  //响应流
        writer.print("Hello Servlet");
    }

    @Override
    protected void doPost(HttpServletRequest req, HttpServletResponse resp) throws ServletException, IOException {
        doGet(req, resp);
    }
}
⑥编写Servlet映射
为什么需要映射?我们写的是Java程序,但是要通过浏览器访问,而浏览器需要连接web服务器,所以我们要在web服务器中注册我们写的Servlet,还需要给它一个浏览器能够访问的路径
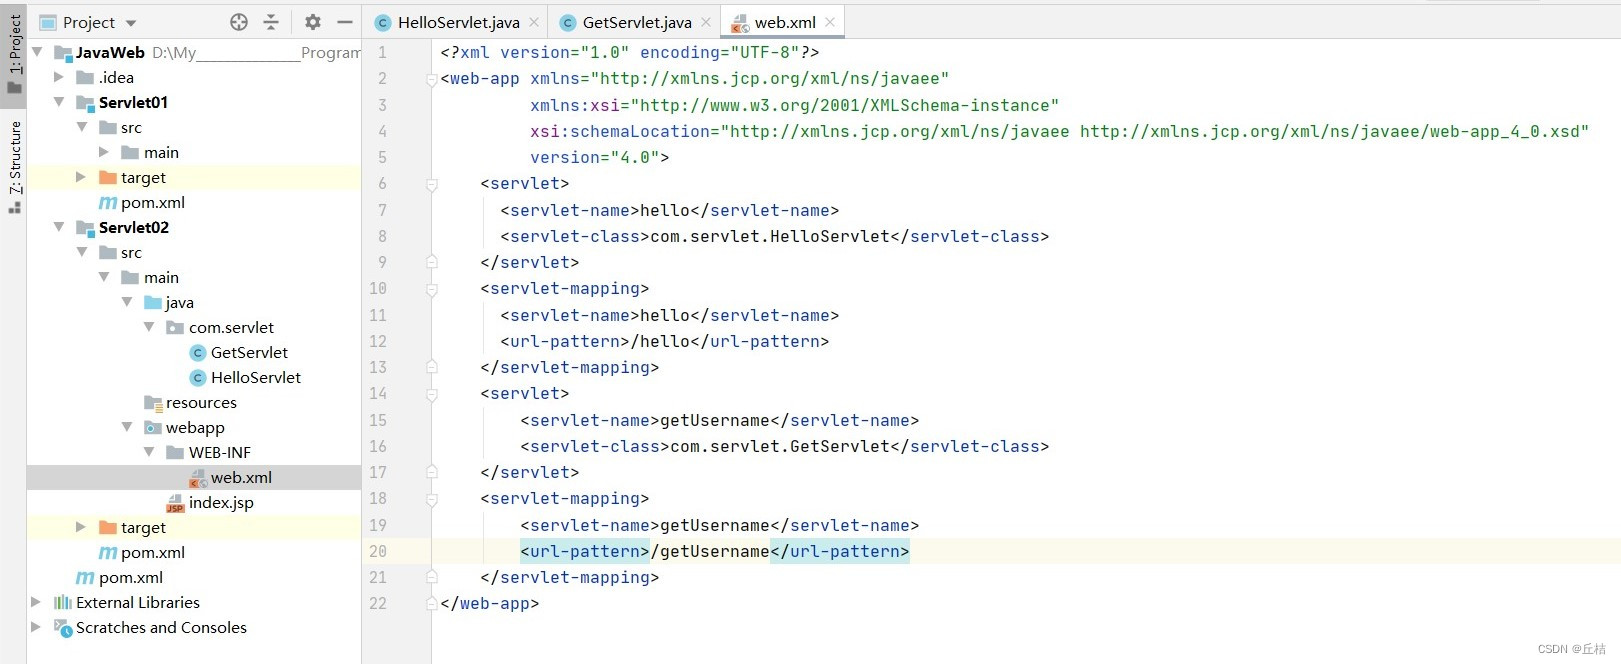
<!--注册Servlet-->
    <servlet>
        <servlet-name>hello</servlet-name>
        <servlet-class>com.servlet.HelloServlet</servlet-class>
    </servlet>
    <!--Servlet的请求路径-->
    <servlet-mapping>
        <servlet-name>hello</servlet-name>
        <url-pattern>/hello</url-pattern>
    </servlet-mapping>
⑦配置Tomcat
⑧启动测试
关于Maven中父子项目的理解:
父项目中会有:
<modules>
    <module>HelloServlet</module>
</modules>
子项目中会有:
<parent>
    <artifactId>JavaWeb</artifactId>
    <groupId>org.example</groupId>
    <version>1.0-SNAPSHOT</version>
</parent>
父项目中的jar包,子项目可以直接使用
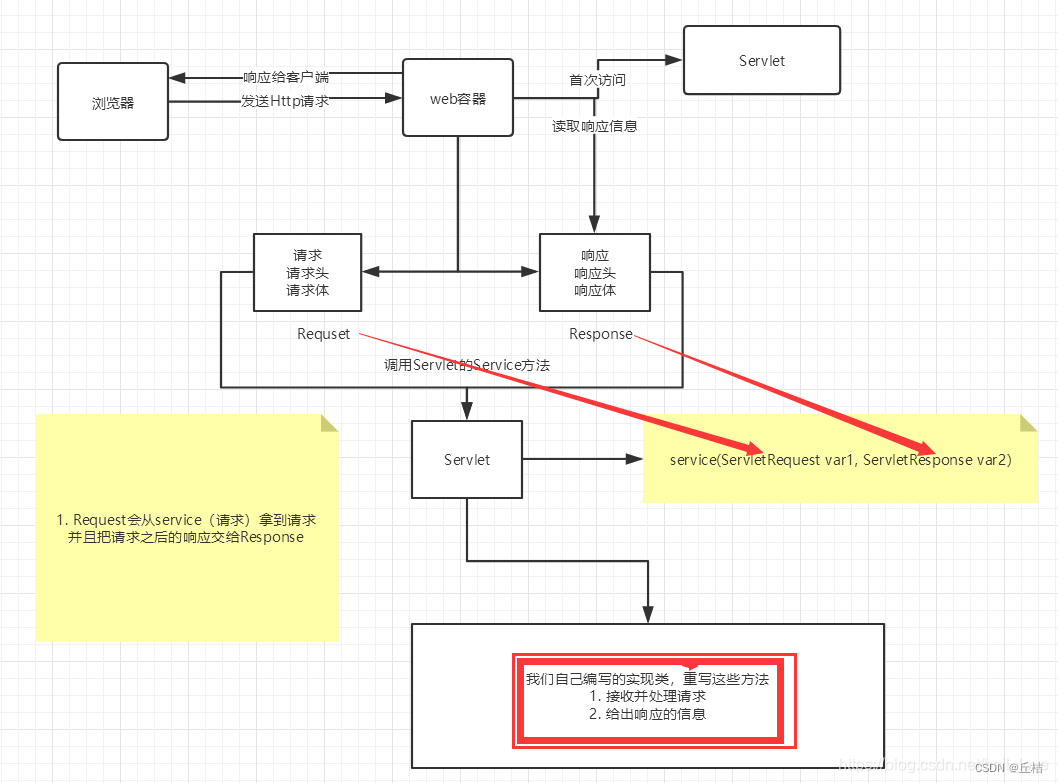
3、Servlet原理:
servlet是由web服务器调用
4、Mapping问题
它可以映射单个、多个、通用、默认(/*)、指定前缀或者后缀的路径。
注意:*号前面不能加项目映射的路径
优先级问题:指定了固定的映射路径优先级最高,如果找不到就会走默认的处理请求(/*)
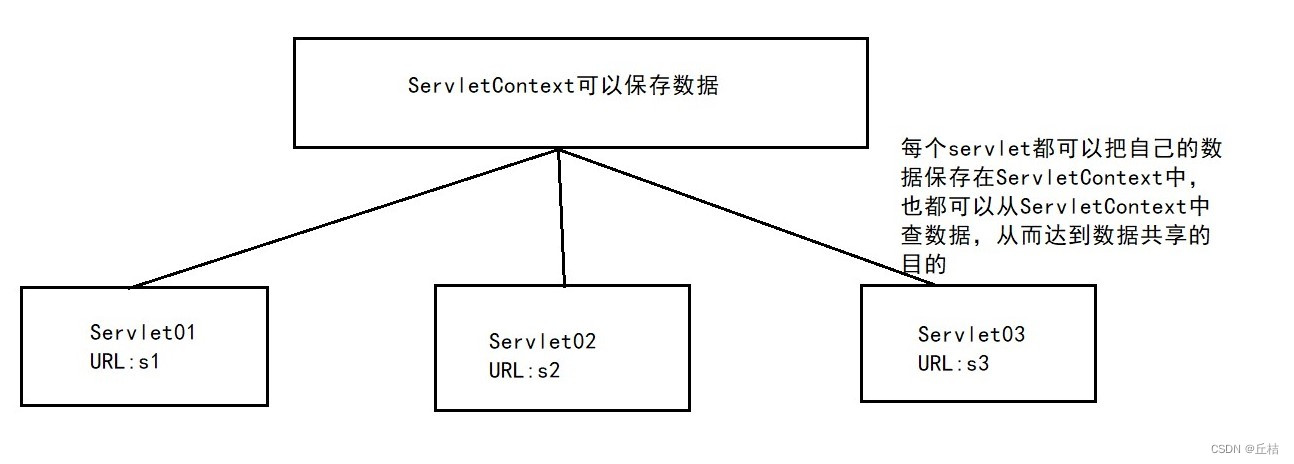
5、ServletContext对象
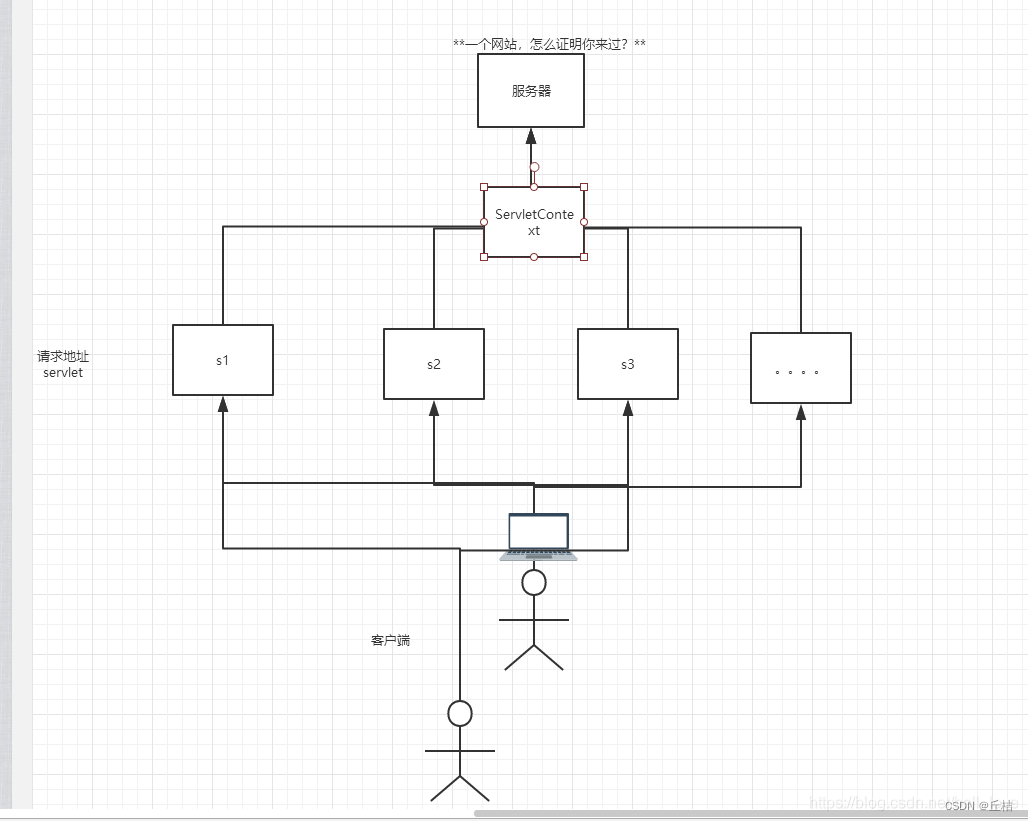
web容器在启动的时候,它会为每个web程序都创建一个对应的ServletContext对象,它代表了当前的web应用。
作用:
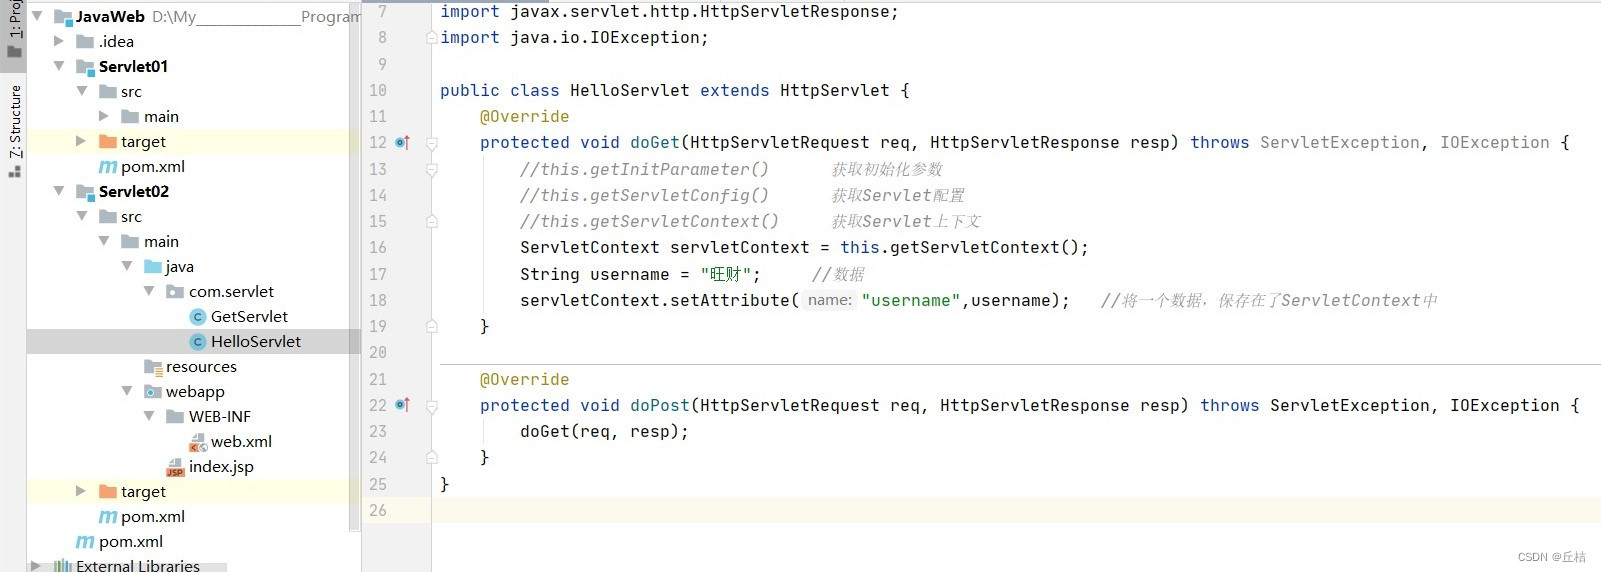
①共享数据:我在这个Servlet中保存的数据,可以在另一个servlet中拿到
在HelloServlet中保存的数据
 可以在GetServlet中拿到
 别忘了在web.xml中配置servlet
 注意:要先访问hello页面,再去访问getUsername页面。因为访问hello页面的时候,servlet会去执行HelloServlet,然后在HelloServlet中,把数据保存到ServletContext中。再去访问getUsername页面的时候,GetServlet类才能够拿到之前保存在ServletContext中的数据。
②获取初始化参数:
第一步,在web.xml中配置初始化参数
<!--配置一些web应用初始化参数-->
    <context-param>
        <param-name>good</param-name>
        <param-value>牛逼</param-value>
    </context-param>
第二步,在HttpServlet的实现类中,拿参数
ServletContext servletContext = this.getServletContext();
String good = servletContext.getInitParameter("good");
③请求转发
public class ServletDemo04 extends HttpServlet {
    @Override
    protected void doGet(HttpServletRequest req, HttpServletResponse resp) throws ServletException, IOException {
        ServletContext servletContext = this.getServletContext();
        RequestDispatcher requestDispatcher = servletContext.getRequestDispatcher("/demo03"); //设置转发的路径为 /demo03
        requestDispatcher.forward(req,resp);    //调用forward方法,实现请求转发
    }
}
④读取资源文件
在java和resources目录下新建properties,都会被打包到class路径下,我们称这个路径为classpath
思路:需要一个文件流
username=zhangsan
password=123456
public class ServletDemo05 extends HttpServlet {
@Override
protected void doGet(HttpServletRequest req, HttpServletResponse resp) throws ServletException, IOException {
InputStream inputStream = this.getServletContext().getResourceAsStream("/WEB-INF/classes/user.properties");
Properties properties = new Properties();
properties.load(inputStream);
String username = properties.getProperty("username");
String password = properties.getProperty("password");
resp.getWriter().print(username+" "+password);
inputStream.close();
}
}
6、HttpServletResponse
web服务器接收到客户端的http请求,针对这个请求,分别创建一个代表请求的HttpServletRequest对象,一个代表响应的HttpServletResponse对象。
如果要获取客户端请求过来的参数:找HttpServletRequest
如果要给客户端响应一些东西:找HttpServletResponse
1、常用方法或属性:
负责向浏览器发送数据的方法:
①getOutputStream()
②getWriter()
负责向浏览器发送响应头的方法:
①setCharacterEncoding(String var1)
②setContentLength(int var1)
③setContentLengthLong(long var1)
④setContentType(String var1)
⑤setDateHeader(String var1, long var2)
⑥addDateHeader(String var1, long var2)
⑦setHeader(String var1, String var2)
⑧addHeader(String var1, String var2)
⑨setIntHeader(String var1, int var2)
⑩addIntHeader(String var1, int var2)
响应状态码:
①public static final int SC_OK = 200;
②public static final int SC_MULTIPLE_CHOICES = 300;
③public static final int SC_UNAUTHORIZED = 401;
④public static final int SC_INTERNAL_SERVER_ERROR = 500;
2、常见应用
1)向浏览器输出消息
2)下载文件
①要获取下载文件的路径
②下载的文件名是啥
③想办法让浏览器能够支持(Content-Disposition)下载我们需要的东西
④获取下载文件的输入流
⑤创建缓冲区
⑥获取OutputStream对象
⑦将FileOutputStream流写入到缓冲区
⑧使用OutputStream将缓冲区中的数据输出到客户端
import java.net.URLEncoder;        //注意:是导这个包
public class FileServlet extends HttpServlet {
    @Override
    protected void doGet(HttpServletRequest req, HttpServletResponse resp) throws ServletException, IOException {
        //①要获取下载文件的路径
        String realPath = "D:\\My_______________Program\\Java\\my_java\\JavaWeb\\Response\\src\\main\\resources\\旺财.jpg";
        //②下载的文件名是啥
        String fireName = realPath.substring(realPath.lastIndexOf("//") + 1);
        //③想办法让浏览器能够支持下载我们需要的东西,中文文件名用 URLEncoder.encode(fireName,"UTF-8") 编码,否则可能乱码
        resp.setHeader("Content-Disposition","attachment;firename=" + URLEncoder.encode(fireName,"UTF-8"));
        //④获取下载文件的输入流
        FileInputStream in = new FileInputStream(realPath);
        //⑤创建缓冲区
        int length = 0;
        byte[] buffer = new byte[1024];
        //⑥获取OutputStream对象
        ServletOutputStream out = resp.getOutputStream();
        //⑦将FileOutputStream流写入到缓冲区
        while ((length = in.read(buffer)) != -1){
            out.write(buffer,0,length);
        }
        in.close();
        out.close();

    }

    @Override
    protected void doPost(HttpServletRequest req, HttpServletResponse resp) throws ServletException, IOException {
        doGet(req, resp);
    }
}
3、验证码功能
验证码怎么来的?
①前端实现
②后端实现:需要用到Java的图片类,产生一个图片
public class ImageServlet extends HttpServlet {
    @Override
    protected void doGet(HttpServletRequest req, HttpServletResponse resp) throws ServletException, IOException {
        //如何让浏览器3秒自动刷新一次
        resp.setHeader("refresh","3");
        //在内存中,创建一个图片
        BufferedImage image = new BufferedImage(80, 20, BufferedImage.TYPE_INT_RGB);
        //得到图片
        Graphics2D graphics = (Graphics2D) image.getGraphics(); //笔
        //设置图片的背景颜色
        graphics.setColor(Color.gray);
        graphics.fillRect(0,0,80,20);
        //给图片写数据
        graphics.setColor(Color.BLUE);
        graphics.setFont(new Font(null,Font.BOLD,20));
        graphics.drawString(makeNum(),0,20);
        //告诉浏览器,这个请求用图片的方式打开
        resp.setContentType("image/jpg");
        //网站存在缓存,不让浏览器缓存
        resp.setDateHeader("expires",-1);
        resp.setHeader("Cache-Control", "no-cache");
        resp.setHeader("Pragma","no-cache");
        //把图片写给浏览器
        ImageIO.write(image,"jpg",resp.getOutputStream());
    }

    //生成随机数
    private String makeNum(){
        Random random = new Random();
        String str_num = "";
        //生成一个4位的随机数
        for(int i = 0; i < 4; i++){
            str_num += random.nextInt(10);
        }
        return str_num;
    }
}
4、实现重定向
一个web资源收到客户端请求后,它会通知客户端去访问另外一个web资源,这个过程叫重定向。
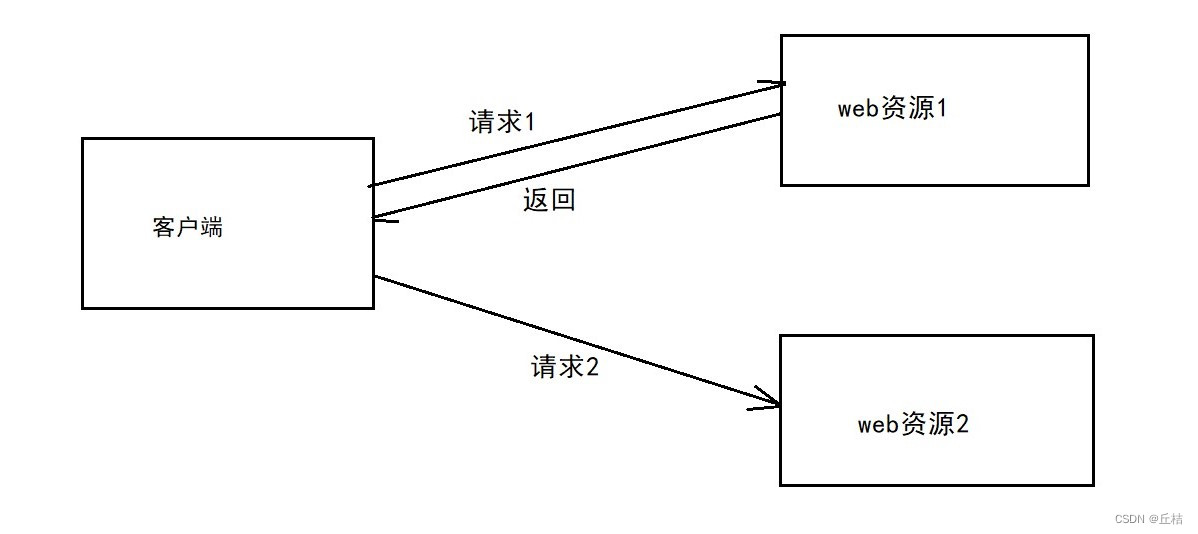 常见场景:用户登录
public class RedirectServlet extends HttpServlet {

    @Override
    protected void doGet(HttpServletRequest req, HttpServletResponse resp) throws ServletException, IOException {
        //重定向到 /img 页面
        resp.sendRedirect( "/Response_war/img");
        /*
            重定向原理:
            resp.setHeader("Location", "/Response_war/img");
            resp.setStatus(302);
        */
    }
}
测试:
<form action="${pageContext.request.contextPath}/login" method="get">
    用户名:
    <input type="text" name="username"> <br>
    密码:
    <input type="password" name="password"><br>
    <input type="submit">
</form>
public class RequestTest extends HttpServlet {
    @Override
    protected void doGet(HttpServletRequest req, HttpServletResponse resp) throws ServletException, IOException {
        //处理请求
        String username = req.getParameter("username");
        String password = req.getParameter("password");
        System.out.println(username + " " + password);
        //重定向的时候,一定要注意路径问题,否则404
        resp.sendRedirect("/Response_war/success.jsp");
    }

    @Override
    protected void doPost(HttpServletRequest req, HttpServletResponse resp) throws ServletException, IOException {
        doGet(req, resp);
    }
}
7、HttpServletRequest
HttpServletRequest代表客户端的请求,用户通过Http协议访问服务器,Http请求中的所有信息,会被封装到HttpServletRequest对象中。
获取前端传递的参数和请求转发:
public class LoginServlet extends HttpServlet {
    @Override
    protected void doGet(HttpServletRequest req, HttpServletResponse resp) throws ServletException, IOException {
        doPost(req, resp);
    }

    @Override
    protected void doPost(HttpServletRequest req, HttpServletResponse resp) throws ServletException, IOException {
        String username = req.getParameter("username");
        String password = req.getParameter("password");
        String[] hobbies = req.getParameterValues("hobbies");
        System.out.println(username);
        System.out.println(password);
        System.out.println(Arrays.toString(hobbies));
        //请求转发
        //注意:这里的 / 代表当前的web应用
        req.getRequestDispatcher("/success.jsp").forward(req,resp);
        //设置编码
        resp.setCharacterEncoding("utf-8");
    }
}
Cookie和Session:
1、会话
会话:用户打开一个浏览器,点击了很多超链接,访问多个web资源,再关闭浏览器,这个过程可以称为一次会话。
有状态会话:一个同学来过教室,下次再来教室的时候,我们会知道这个同学曾经来过,这个称为有状态会话。
2、保存会话的2种技术
cookie:客户端技术(请求、响应)
session:服务端技术。利用这个技术,可以保存用户的会话信息。我们可以把信息或者数据放在session中。
常见场景:网站第一次登录之后,你之后都不需要再登录,就可以直接进去了。
3、Cookie
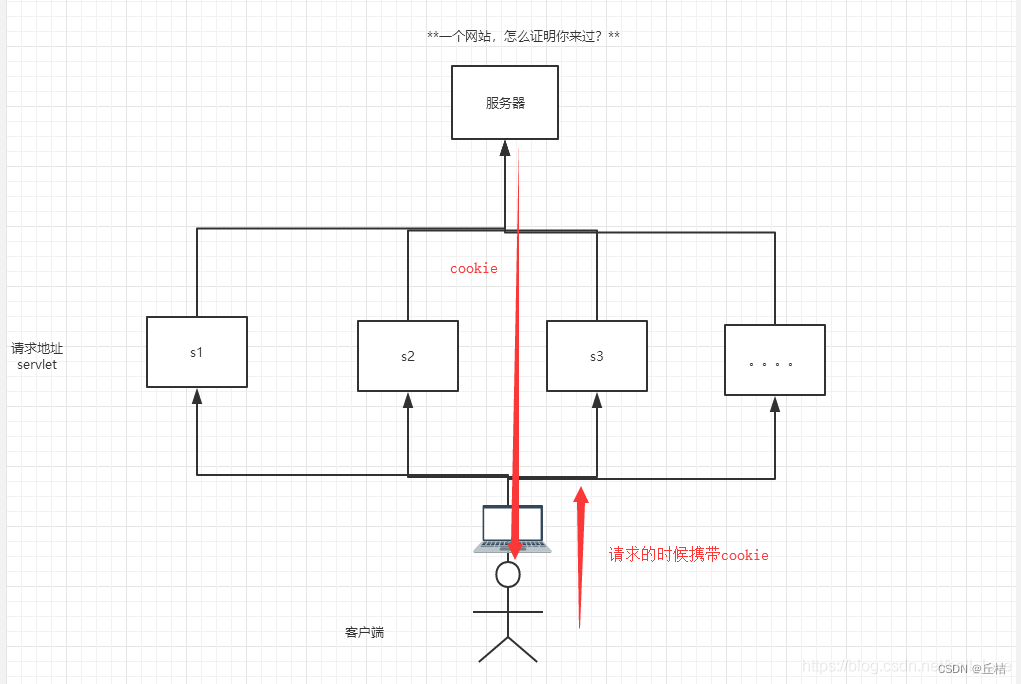
①从请求中拿到cookie信息
②服务器响应给客户端cookie
//返回上一次访问网站的时间
public class Cookie01 extends HttpServlet {
    @Override
    protected void doGet(HttpServletRequest req, HttpServletResponse resp) throws ServletException, IOException {
        //解决中文乱码问题
        req.setCharacterEncoding("utf-8");
        resp.setCharacterEncoding("utf-8");

        PrintWriter out = resp.getWriter();

        //Cookie:服务端从客户端获取
        Cookie[] cookies = req.getCookies();  //这里返回数组,说明Cookie可能存在多个
        if(cookies == null){
            //如果cookies不存在,就代表是第一次访问网站
            out.write("这是你第一次访问本站");
        }else{
            //如果如果cookies存在,就遍历cookies,
            //并找到里面名字为LastLoginTime的cookie,转化为日期类型,就可以得到上一次访问的时间
            for(int i = 0; i < cookies.length; i++){
                Cookie cookie = cookies[i];
                //获取cookie的名字
                if(cookie.getName().equals("LastLoginTime")){
                    //获取cookie中的值
                    long lastLonginTime = Long.parseLong(cookie.getValue());
                    Date date = new Date(lastLonginTime);
                    out.write(date.toLocaleString());
                }
            }
        }
        //服务器给客户端响应一个cookie
        Cookie cookie = new Cookie("LastLoginTime", System.currentTimeMillis()+"");
        cookie.setMaxAge(24*60*60);     //有效期为1天
        resp.addCookie(cookie);
    }
}
cookie:一般会保存在本地的用户目录下 appdata
细节:
①一个Cookie只能保存一个信息
②一个web站点可以给浏览器发送多个cookie(浏览器上限大概为300个cookie,每个站点最多存放20个cookie)
③Cookie大小有限制(4kb)
删除Cookie:
①不设置有效期,关闭浏览器,自动失效
②设置有效期时间为0
 @Override
    protected void doGet(HttpServletRequest req, HttpServletResponse resp) throws ServletException, IOException {
        //创建一个cookie,名字必须要和要删除的cookie名字一样
        Cookie cookie = new Cookie("LastLoginTime",System.currentTimeMillis()+"");
        cookie.setMaxAge(0);
        resp.addCookie(cookie);
    }
编码解码:
URLEncoder.encode("旺财","utf-8");    //编码
URLDecoder.decode(cookie.getValue,"uft-8"); //解码4、Session(重点)
 什么是Session?
①服务器会给每一个用户(浏览器)创建一个Session对象
②一个Session独占一个浏览器,只要浏览器没有关闭,这个Session就会一直存在
③用户登录之后,整个网站它都可以访问(保存用户的信息,保存购物车信息……)
Session和Cookie的区别:
①Cookie是把用户的数据写给用户的浏览器,浏览器保存(可以保存多个)。Session是把用户的数据写给用户独占的Session中,服务器保存(保存重要的信息,减少服务器资源的浪费)
②Session对象由服务器创建
Session的使用场景:
①保存用户的登录信息
②保存购物车信息
③在整网站中,经常会使用的数据,我们将它保存在Session中
使用Session:
public class Session01 extends HttpServlet {
    @Override
    protected void doGet(HttpServletRequest req, HttpServletResponse resp) throws ServletException, IOException {
        //解决乱码问题
        req.setCharacterEncoding("utf-8");
        resp.setCharacterEncoding("utf-8");
        resp.setContentType("text/html;charset=utf-8");

        PrintWriter writer = resp.getWriter();

        //得到Session
        HttpSession session = req.getSession();
        //在Session中存信息
        session.setAttribute("person",new Person("旺财",3));
        //获取Session的id
        String sessionId = session.getId();
        writer.write("Session的id为:" + sessionId + "\n");
        //判断Session是不是新创建的
        boolean isNew = session.isNew();
        writer.write("Session是不是新创建的:" + isNew);
        //Session创建的时候,做了什么事情?
        //Cookie cookie = new Cookie("JSESSIONID", sessionId);
        //resp.addCookie(cookie);
    }
}
public class Session02 extends HttpServlet {
@Override
protected void doGet(HttpServletRequest req, HttpServletResponse resp) throws ServletException, IOException {
//解决乱码问题
req.setCharacterEncoding("utf-8");
resp.setCharacterEncoding("utf-8");
resp.setContentType("text/html;charset=utf-8");
PrintWriter writer = resp.getWriter();
//得到Session
HttpSession session = req.getSession();
Object person = session.getAttribute("person");
writer.write(person.toString());
}
}
public class Session03 extends HttpServlet {
    @Override
    protected void doGet(HttpServletRequest req, HttpServletResponse resp) throws ServletException, IOException {
        HttpSession session = req.getSession();
        session.removeAttribute("person");
        session.invalidate();   //手动注销session,注销之后,会产生一个新的session
    }
}
在web.xml中设置session的失效时间:
    <!--设置Session的默认失效时间-->
    <session-config>
        <!--1分钟后session自动失效。注意:单位是分钟-->
        <session-timeout>1</session-timeout>
    </session-config>
JSP:
1、什么是JSP?
Java Server Pages:java服务端页面,也和Servlet一样,用于动态web技术
最大特点:
1)写JSP就像在写HTML
2)区别:
①HTML只给用户提供静态的数据 ②JSP页面中可以嵌入Java代码,为用户提供动态数据
2、JSP原理
浏览器向服务器发送请求,不管访问什么资源,其实都是在访问Servlet
JSP本质上就是一个Servlet
源码:
①判断请求
②内置一些对象
final javax.servlet.jsp.PageContext pageContext;  //页面上下文
javax.servlet.http.HttpSession session = null;    //session
final javax.servlet.ServletContext application;   //applicationContext
final javax.servlet.ServletConfig config;         //config
javax.servlet.jsp.JspWriter out = null;           //out
final java.lang.Object page = this;               //page:当前
HttpServletRequest request                        //请求
HttpServletResponse response                      //响应
③输出页面前增加的代码
response.setContentType("text/html");       //设置响应的页面类型
pageContext = _jspxFactory.getPageContext(this, request, response,
       null, true, 8192, true);
_jspx_page_context = pageContext;
application = pageContext.getServletContext();
config = pageContext.getServletConfig();
session = pageContext.getSession();
out = pageContext.getOut();
_jspx_out = out;
④以上这些对象,我们可以在JSP页面中直接使用

在JSP页面中:
①如果是Java代码,就会原封不动地输出
②如果是HTML代码,就会被转换为
out.write("<html>\r\n");3、JSP基础语法
任何语言都有自己的语法,java中有,jsp作为java技术的一种应用,它拥有一些自己扩充的语法(了解、知道即可),java中所有的语法,jsp都支持。
| 语法 | 作用 |
| <%-- --%> | 注释 |
| <%=变量或者表达式%> | 将程序输出到客户端 |
| <% %> | 中间可以直接写放到方法里面的java代码 |
| <%! %> | 中间可以直接写放到类里面的java代码 |
<%!
static{
System.out.println("这是静态代码块");
}
public void wangCai(){
System.out.println("这是我自己定义的方法");
}
%>
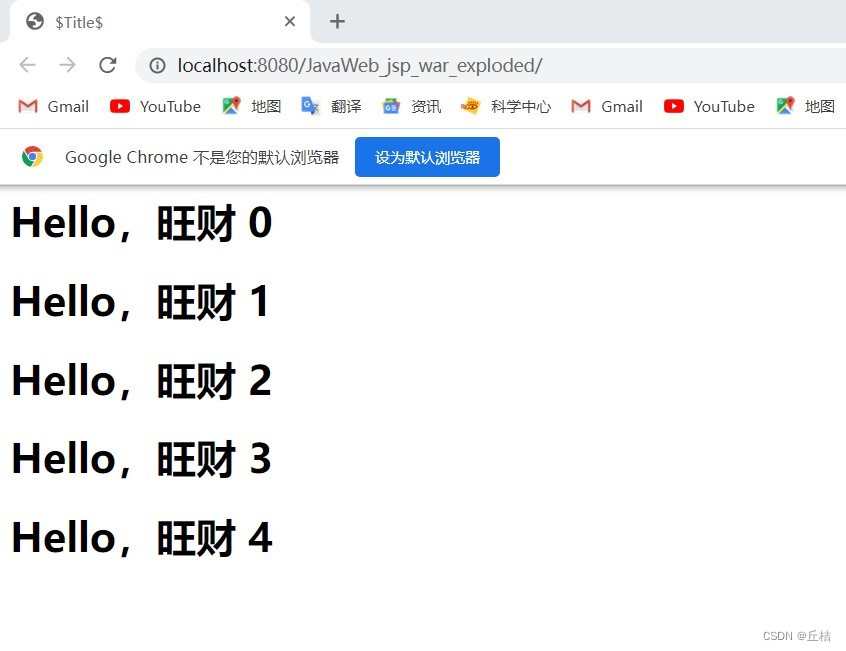
<%
for(int i = 0; i < 5; i++){
%>
<h1>Hello,旺财 <%=i%> </h1>
<%
}
%>
<%
wangCai();
%>浏览器显示结果:
控制台显示结果:
 至于为啥“这是我自己定义的方法”会输出2遍,我也不知道。
细节:HTML的注释会在客户端显示,但是JSP的注释不会。
4、JSP指令
定制错误页面:
①在jsp页面中定制
<%--定制错误页面--%>
<%@ page errorPage="error/500.jsp" %>
②在web.xml中定制
<error-page>
    <error-code>500</error-code>
    <location>/error/500.jsp</location>
</error-page>
包含页面:
① @include 会将几个页面合成一个页面
<%@include file="common/header.jsp"%>
<h1>网页主体</h1>
<%@include file="common/footer.jsp"%>
② jsp:include:拼接页面,本质还是3个页面
 <jsp:include page="/common/header.jsp"/>
 <h1>网页主体</h1>
 <jsp:include page="/common/footer.jsp"/>
5、九大内置对象
①PageContext:存东西
②Request:存东西
③Response
④Session:存东西
⑤Application(ServletContext):存东西
⑥config(ServletConfig)
⑦out
⑧page(不用了解)
⑨exception
pageContext.setAttribute("name1","旺财1");    //保存的数据只在一个页面中有效
request.setAttribute("name2","旺财2");        //保存的数据只在一次请求中有效,包括请求转发
session.setAttribute("name3","旺财3");        //保存的数据在一次会话中有效(从打开浏览器到关闭浏览器)
application.setAttribute("name4","旺财4");    //保存的数据在服务器中有效(从打开服务器到关闭服务器)
pageContext.setAttribute("name","旺财",PageContext.SESSION_SCOPE);
//等价于:
session.setAttribute("name","旺财");应用场景:
①request:客户端向服务端发送请求,产生的数据,用户看完就没用了。比如:新闻。
②session:客户端向服务器发送请求,产生的数据,用户用完一会还有用。比如:购物车。
③application:客户端向服务端发送请求,产生的数据,一个用户用完了,其他用户还可能使用。比如:统计人数,聊天数据。
6、JSP标签、JSTL标签、EL表达式
<!--jstl表达式-->
<dependency>
    <groupId>javax.servlet.jsp.jstl</groupId>
    <artifactId>jstl-api</artifactId>
    <version>1.2</version>
</dependency>
<!--standard标签库-->
<dependency>
    <groupId>taglibs</groupId>
    <artifactId>standard</artifactId>
    <version>1.1.2</version>
</dependency>
1)EL表达式
①获取数据
②执行运算
③获取web开发的常用对象
2)JSP标签
<jsp:include page=""></jsp:include>
<jsp:forward page="/jsptag2.jsp">
    <jsp:param name="name" value="旺财"/>
    <jsp:param name="age" value="3"/>
</jsp:forward>
3)JSTL表达式
使用JSTL标签库就是为了弥补HTML标签的不足,JSTL自定义了许多标签,可以供我们使用,标签的功能和Java代码一样。
JSTL标签库使用步骤:引入对应的taglib --->使用其中的方法 --->在Tomcat中也需要引入jstl的包
①核心标签(掌握部分即可)
<%--引入jstl核心标签库--%>
<%@ taglib prefix="c" uri="http://java.sun.com/jsp/jstl/core"%>
<!--提交到当前页-->
<form action="coreif.jsp" method="get">
<input type="text" name="username" value="${param.username}">
<input type="submit" value="登录"/>
</form>
<!--判断如果提交的用户名是管理员,则登录成功-->
<c:if test="${param.username=='admin'}" var="isAdmin">
<c:out value="欢迎管理员"/>
</c:if>
<c:out value="${isAdmin}"/> <!--定义一个变量为score,值为85-->
<c:set var="score" value="85"></c:set>
<c:choose>
<c:when test="${score>=90}">你成绩牛逼</c:when>
<c:when test="${score>=70}">你成绩一般</c:when>
<c:when test="${score<70}">你成绩……唉~</c:when>
</c:choose> <%
ArrayList<String> people = new ArrayList<>();
people.add("张三");
people.add("李四");
people.add("王五");
people.add("赵六");
request.setAttribute("list",people);
%>
<!--var:每一次要遍历的变量 items:要遍历的对象
begin:起始下标 end:结束下标 step:步长
-->
<c:forEach var="people" items="${list}" begin="1" end="3" step="2">
<c:out value="${people}"/><br>
</c:forEach>②格式化标签
③SQL标签
④XML标签
JavaBean
JavaBean:实体类,一般用来和数据库的字段做映射
JavaBean有特定的写法:
①必须有一个无参构造 ②属性必须私有化 ③必须有对应的set/get方法
MVC三层架构
MVC:Model View Controller 模型视图控制器
1、早些年
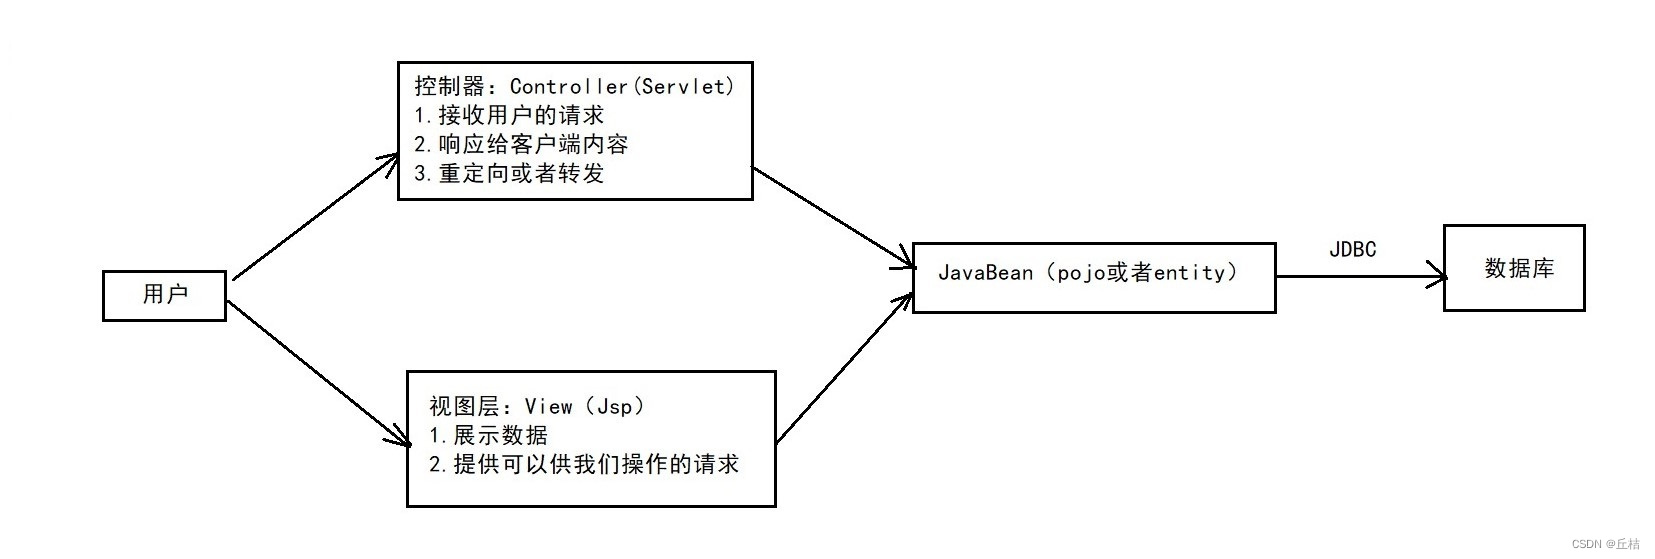
用户直接访问控制层,控制层就可以直接操作数据库
弊端:程序十分臃肿,不利于维护
Servlet代码中:处理请求、响应;视图跳转;处理JDBC;处理业务代码;处理逻辑代码
2、现在(MVC三层架构)
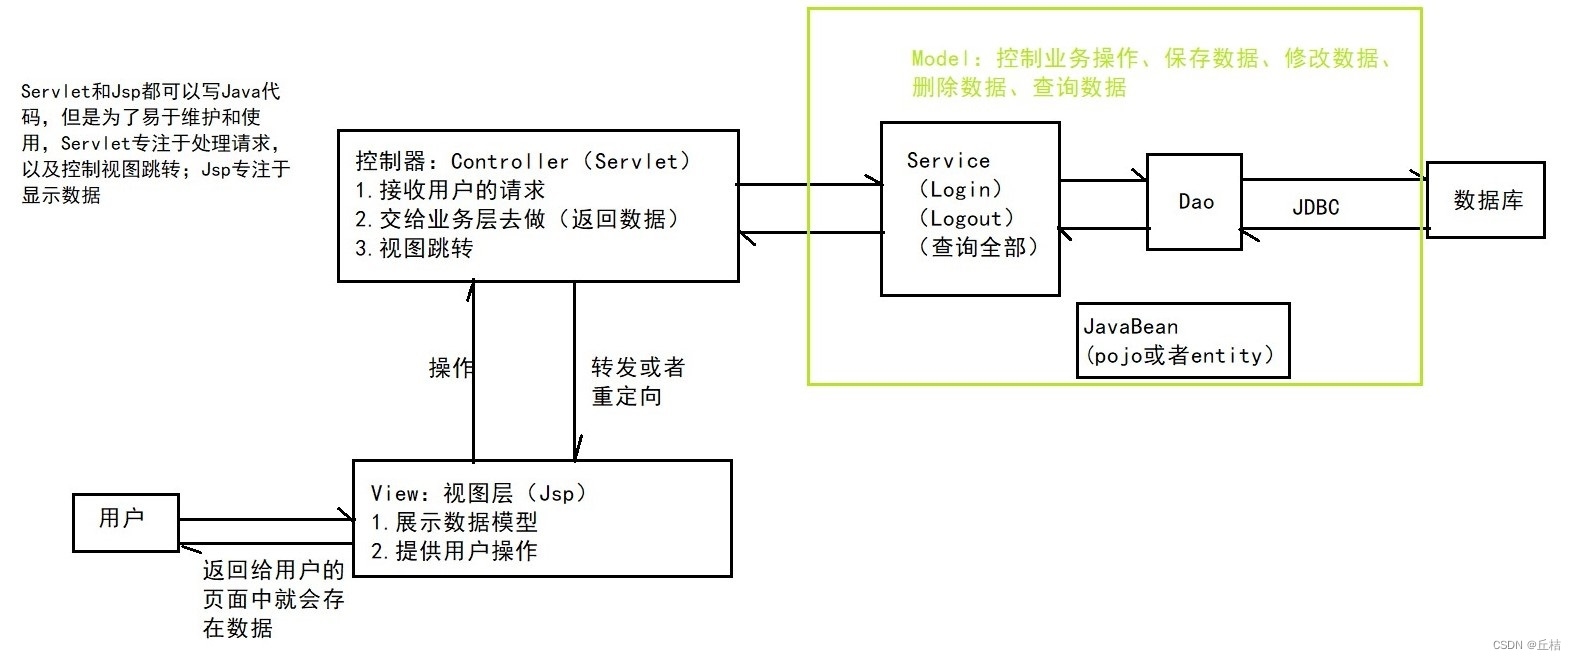
Model:
①业务处理:业务逻辑(Service)
②数据持久层:CRUD(Dao)
View:
①展示数据
②提供链接发起Servlet请求(a、form、img……)
Controller(Servlet):
①接收用户的请求(req):请求参数、Session信息
②交给业务层处理对应的代码
③控制视图的跳转
登录 ---> 接收用户的登录请求 ---> 处理用户的请求(获取用户登录的参数:username、password)--->交给业务层处理登录业务(判断用户名和密码是否正确)---> Dao层查询用户名和密码是否正确 --> 数据库
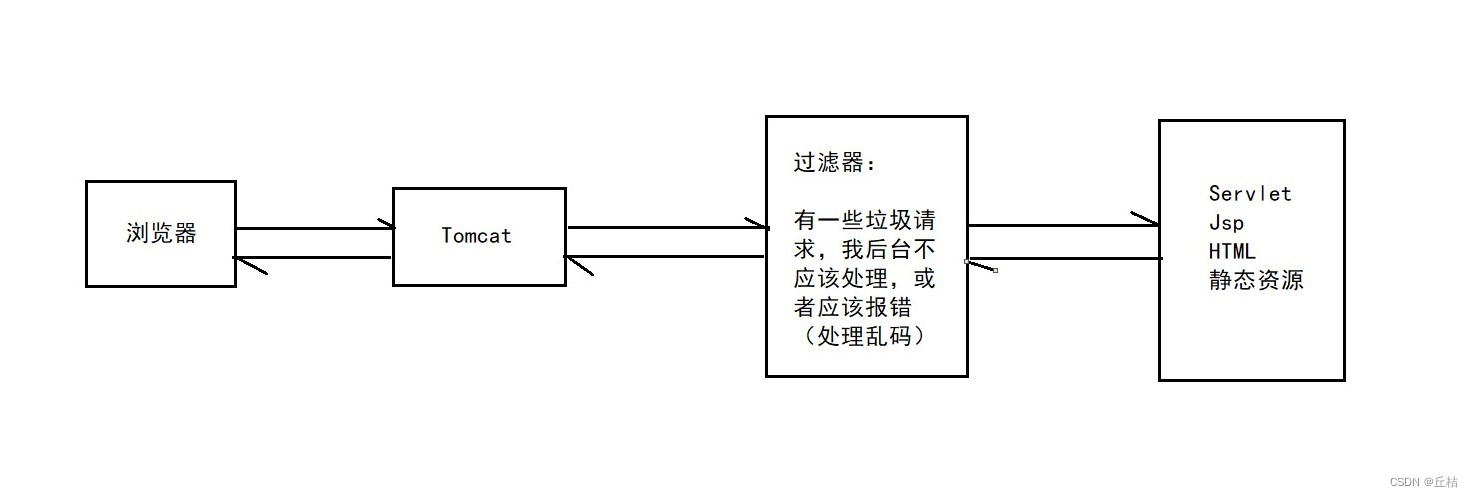
Filter
Filter:过滤器,用来过滤网站的数据(处理中文乱码、登录验证……)
Filter开发步骤:
①导包
②实现Filter接口,重写init()、doFilter()、destory()方法
import javax.servlet.*;

public class CharacterEncodingFiler implements Filter {
    //初始化:Tomcat启动就已经初始化了,随时等待过滤对象出现
    public void init(FilterConfig filterConfig) throws ServletException {
        System.out.println("CharacterEncodingFilter初始化了");
    }
    //过滤
    /*
        1.过滤中的所有代码,在过滤特定请求的时候,都会执行
        2.必须要让过滤器继续同行
     */
    public void doFilter(ServletRequest request, ServletResponse response, FilterChain chain) throws IOException, ServletException {
        request.setCharacterEncoding("utf-8");
        response.setCharacterEncoding("utf-8");
        response.setContentType("text/html;charset=UTF-8");

        System.out.println("CharacterEncodingFilter执行前……");
        chain.doFilter(request,response);   //让我们的请求继续走,如果不写,程序到这里就被拦截停止了
        System.out.println("CharacterEncoding执行后……");
    }
    //销毁:Tomcat关闭的时候,过滤器会销毁
    public void destroy() {
        System.out.println("CharacterEncodingFilter销毁了");
    }
}
③在web.xml中配置过滤器
    <filter>
        <filter-name>CharacterEncodingFitler</filter-name>
        <filter-class>com.Filter.CharacterEncodingFiler</filter-class>
    </filter>
    <filter-mapping>
        <filter-name>CharacterEncodingFitler</filter-name>
        <!--只要是/servlet的任何请求,都会经过这个过滤器-->
        <url-pattern>/servlet/*</url-pattern>
    </filter-mapping>
监听器
步骤:
①实现监听器的接口,并重写里面的方法
//统计网站在线人数:统计session个数
public class OnlineCountListener implements HttpSessionListener {
    //创建Session监听:一旦创建Session就会触发一次这个事件
    public void sessionCreated(HttpSessionEvent se) {
        ServletContext servletContext = se.getSession().getServletContext();
        Integer onlineCount = (Integer) servletContext.getAttribute("onlineCount");
        if(onlineCount == null){
            onlineCount = 1;
        }else {
            onlineCount++;
        }
        servletContext.setAttribute("onlineCount",onlineCount);
    }
    //销毁Session监听:一旦销毁Session就会触发一次这个事件
    public void sessionDestroyed(HttpSessionEvent se) {
        ServletContext servletContext = se.getSession().getServletContext();
        Integer onlineCount = (Integer) servletContext.getAttribute("onlineCount");
        if(onlineCount == null){
            onlineCount = 0;
        }else {
            onlineCount--;
        }
        servletContext.setAttribute("onlineCount",onlineCount);
    }
}
②在web.xml中配置监听器
    <!--注册监听器-->
    <listener>
        <listener-class>com.listener.OnlineCountListener</listener-class>
    </listener>
过滤器、监听器的常见应用
监听器:GUI编程中经常使用
过滤器:用户登录之后,才能进入主页;用户注销之后,就不能进入主页了。
步骤:
1、用户登录之后,向Session中放入用户的数据
2、进入主页的时候,要判断用户是否已经登录。要求:在过滤器中实现
import javax.servlet.*;
public class SysFilter implements Filter {
    public void init(FilterConfig filterConfig) throws ServletException {

    }

    public void doFilter(ServletRequest request, ServletResponse response, FilterChain chain) throws IOException, ServletException {
       HttpServletRequest req = (HttpServletRequest)request;
       HttpServletResponse resp = (HttpServletResponse)response;
       Object user_session = req.getSession().getAttribute("USER_SESSION");
       if(user_session == null){
           resp.sendRedirect("/error.jsp");
       }
       chain.doFilter(req,resp);
    }

    public void destroy() {

    }
}


 592
592

 被折叠的 条评论
为什么被折叠?
被折叠的 条评论
为什么被折叠?
 到【灌水乐园】发言


