


 本文档介绍如何使用vue3、socket.io-client和nodejs创建一个聊天室应用。首先,概述了Socket.IO的基本概念,然后分别讲解前端vue的准备工作和后端nodejs的设置。在服务器端,通过创建连接、监听广播和发送消息来实现功能。客户端代码中,展示了如何在HTML应用中引入CommonJS和express框架,并实现连接监听和广播信息。总结指出,虽然WebSocket原生实现复杂,但借助第三方库可以简化流程,强调了阅读官方文档的重要性。
效果
 Introduction | Socket.IO官网文档
Introduction | Socket.IO![]() https://socket.io/docs/v4/
https://socket.io/docs/v4/
准备
前端vue
1. 利用脚手架(vue_cli)快速完成项目的搭建
2. 启动成功
3. npm i socket.io-client 安装聊天室需要的依赖
后端nodejs
1. 全局安装express框架
2. express 项目名
3. 启动成功
4. npm i socket.io 安装后端聊天室需要的依赖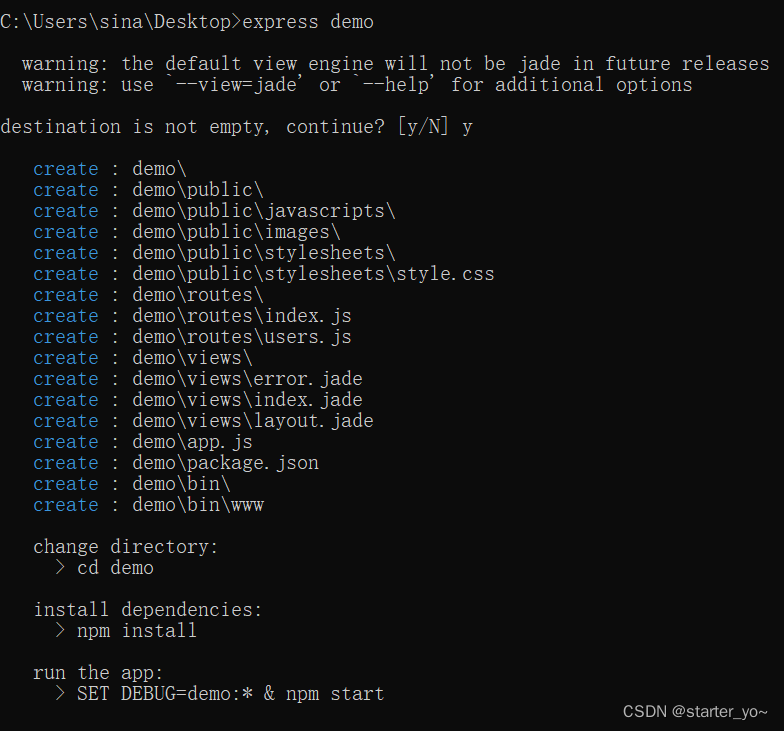
服务器代码
- 创建并连接
- 监听-收服务器的广播
- 发送-当前用户发送消息
- App.vue 如下:
const express = require("express");
const {
  createServer
} = require("http");
const {
  Server
} = require("socket.io");

const app = express();
const httpServer = createServer(app);
const io = new Server(httpServer, {
  cors: true,
});

let count = 0;
io.on("connection", (socket) => {
  count++;
  socket.data.username = '用户' + count;
  socket.emit("welcome", {
    time: new Date().toLocaleTimeString(),
    msg: socket.data.username + '进入聊天室'
  });
  socket.on('send', response => {
    console.log(response.data);
    socket.broadcast.emit('broadcast', {
      time: new Date().toLocaleTimeString(),
      msg: response.data,
      username: socket.data.username
    });
  })
  setTimeout(() => socket.disconnect(true), 500000);
});
httpServer.listen(3001, () => {
  console.log('监听http://127.0.0.1:3001');
});

module.exports = app;
客户端代码
- 一个带HTML应用+CommonJS方式引入+express框架
- 创建连接监听
- 广播-将某个用户的信息广播出去
- app.js如下:
<template>
  <h1>欢迎使用即时通信</h1>
  <div style="position: relative;width: 400px;height: 400px;">
    <div
      style="width: 100%;height: 80%;overflow:scroll;border:1px solid black;border-radius: 5px 5px 0 0;"
      id="p"
    ></div>
    <div
      style="position: absolute;bottom:0;width: 100%;height: 20%;border:1px solid black;border-radius: 0 0 5px 5px;"
    >
      <textarea
        placeholder="回车发送"
        @keyup.enter="send"
        style="width: 100%;height: 100%;padding: 0;border:0;outline: none;"
        v-model="msg"
      ></textarea>
    </div>
  </div>
</template>

<script lang="ts" setup name="App">
import { ref } from "vue";
const msg = ref("");
import io from "socket.io-client";
const socket = io("http://localhost:3001");

socket.on("connect", function() {
  console.log("连接到服务器");
});
socket.on("welcome", result => {
  let newDiv = document.createElement("div");
  newDiv.innerHTML = result.time + " " + result.msg;
  document.getElementById("p").appendChild(newDiv);
});
socket.on("broadcast", result => {
  createDialog(2, result.msg, result.username);
});
socket.on("disconnect", function() {
  console.log("连接断开");
});
const createDialog = (type, data, username) => {
  let container = document.createElement("div");
  let newDiv = document.createElement("div");
  let head = document.createElement("div");
  let one = document.createElement("div");

  one.style.borderTop = "8px solid transparent";
  if (type === 1) {
    one.style.borderLeft = "8px solid #29b8db";
  } else {
    one.style.borderLeft = "8px solid transparent";
  }

  if (type === 1) {
    one.style.borderRight = "8px solid transparent";
  } else {
    one.style.borderRight = "8px solid #d2dde5";
  }

  one.style.borderBottom = "8px solid transparent";
  one.style.width = "0px";
  one.style.height = "0px";

  newDiv.innerHTML = data;
  newDiv.style.padding = "5px";
  if (type === 1) {
    newDiv.style.backgroundColor = "#29b8db";
  } else {
    newDiv.style.backgroundColor = "#d2dde5";
  }
  newDiv.style.borderRadius = "5px";

  if (type === 1) {
    head.innerHTML = "我";
  } else {
    head.innerHTML = username;
  }

  container.style.display = "flex";
  container.style.margin = "5px";
  container.style.alignItems = "center";
  if (type === 1) {
    container.style.justifyContent = "flex-end";
    console.log("wo");
  } else {
    container.style.justifyContent = "flex-start";
  }

  if (type === 1) {
    container.appendChild(newDiv);
    container.appendChild(one);
    container.appendChild(head);
  } else {
    container.appendChild(head);
    container.appendChild(one);
    container.appendChild(newDiv);
  }

  document.getElementById("p").appendChild(container);
};
const send = () => {
  createDialog(1, msg.value);
  socket.emit("send", { data: msg.value });
  msg.value = "";
};
</script>

<style lang="scss">
#app {
  font-family: Avenir, Helvetica, Arial, sans-serif;
  -webkit-font-smoothing: antialiased;
  -moz-osx-font-smoothing: grayscale;
  text-align: center;
  color: #2c3e50;
  margin-top: 60px;
}
</style>
总结
- 正常的http请求是只能客户端发起而聊天就需要服务器的主动推送,原生是通过websocket实现的,这里引入了第三方的库进行,之间引入包,创建实例,调用对应的接口即可
- 看官网文档很重要,虽然是英文的,但是还是得自己看,因为没有现成的参考


 被折叠的 条评论
为什么被折叠?
被折叠的 条评论
为什么被折叠?
 到【灌水乐园】发言


