


文章目录
- 概要
- 整体架构流程
- 技术细节
- 小结
概要
提示:仅供学习,不得用做商业交易,如有侵权请及时联系
逆向:某美世界无感滑块验证-单图片底图还原
URL:aHR0cHM6Ly9pZC53YW5tZWkuY29tL2xvZ2luIw==
接口:aHR0cHM6Ly9jYXB0Y2hhcy53YW5tZWkuY29tL2FpY2FwdGNoYS9maXJzdFRlc3Q=

整体架构流程
提示:过无感-获取滑块图片-还原滑块底图-轨迹-加密-验证滑块
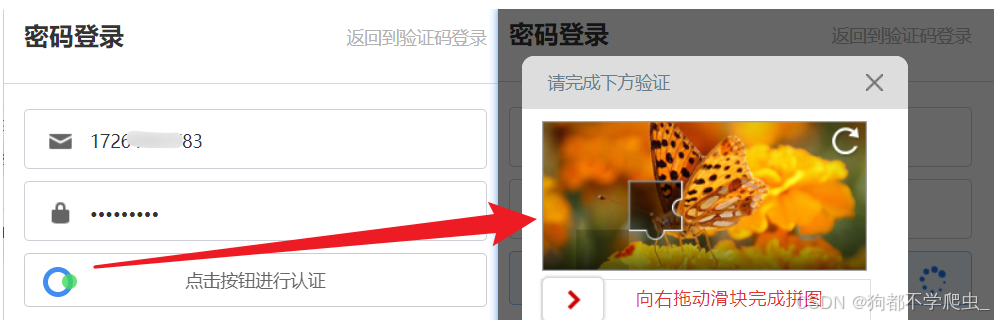
一、点击按钮进行认证-无感:
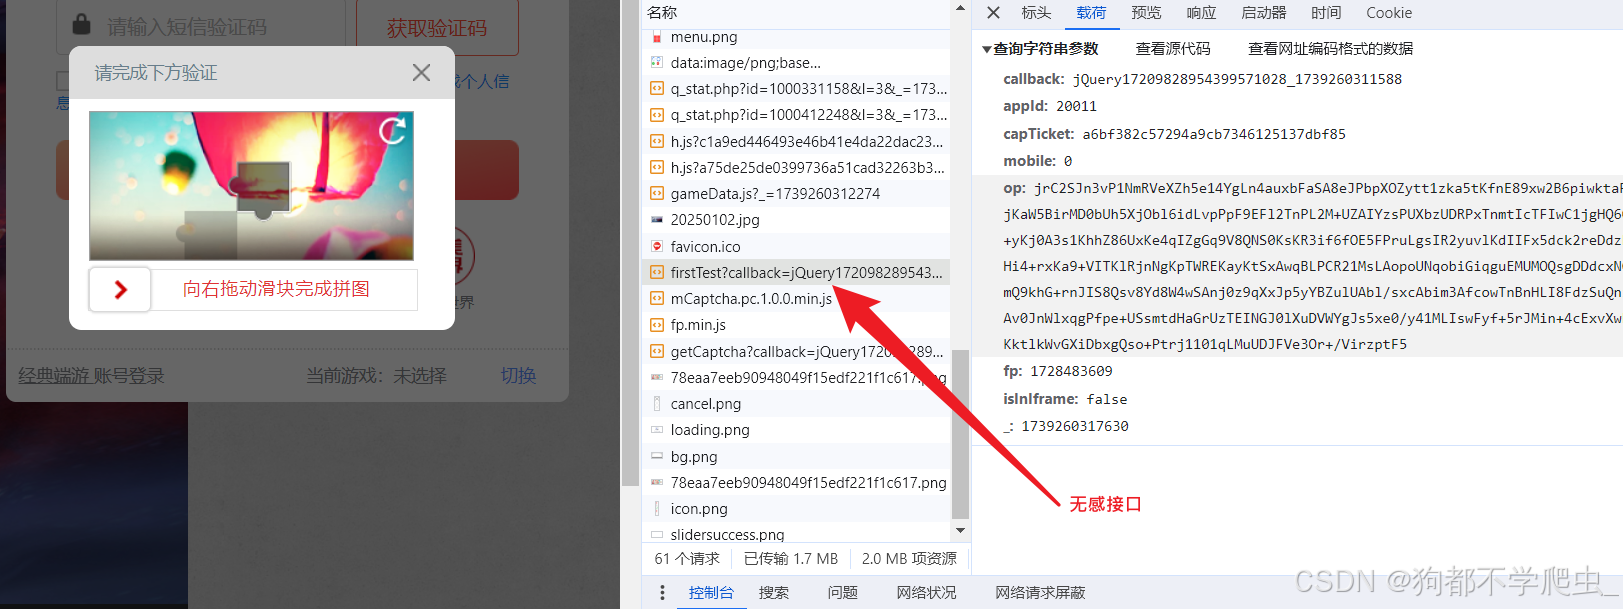
参数分析:
- capTicket、appId:访问首页返回的值
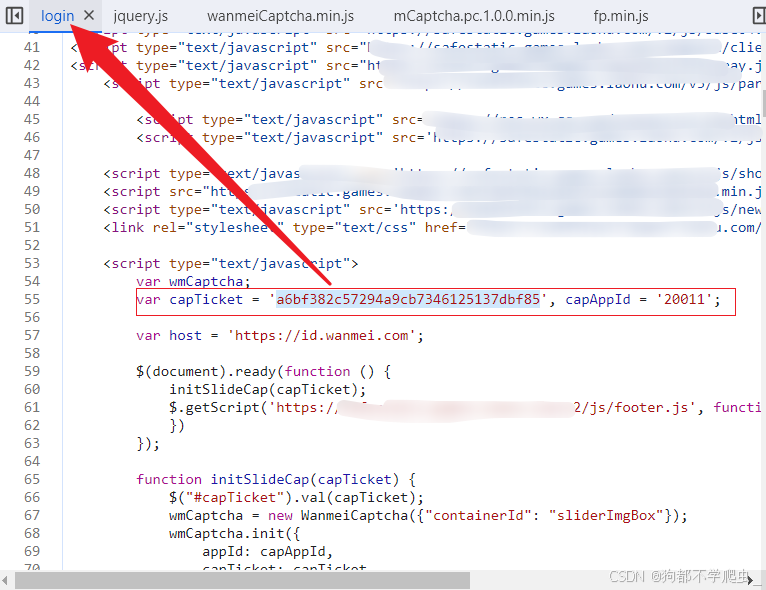
	url = 'https://xxx/login'
    response = requests.get(url, headers=headers).content.decode()
    capTicket = re.findall("var capTicket = '(.*?)',", response)[0]
    capAppId = re.findall(", capAppId = '(.*?)';", response)[0]
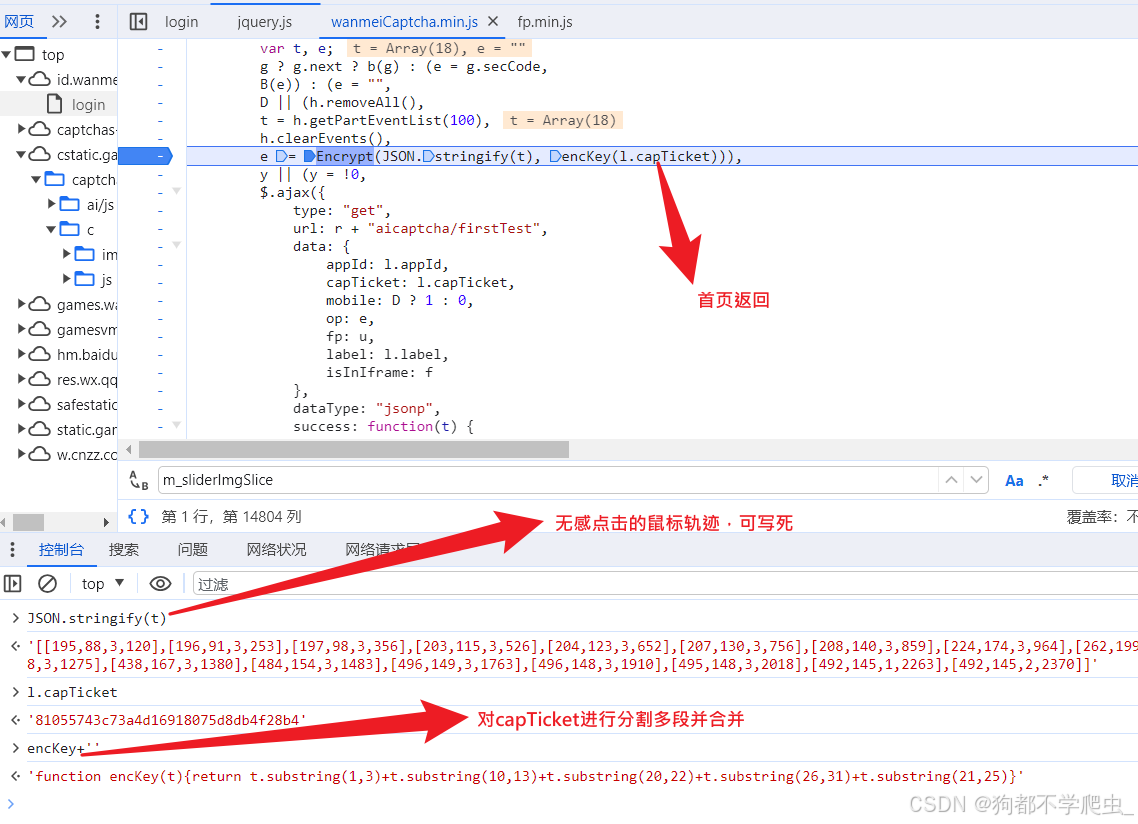
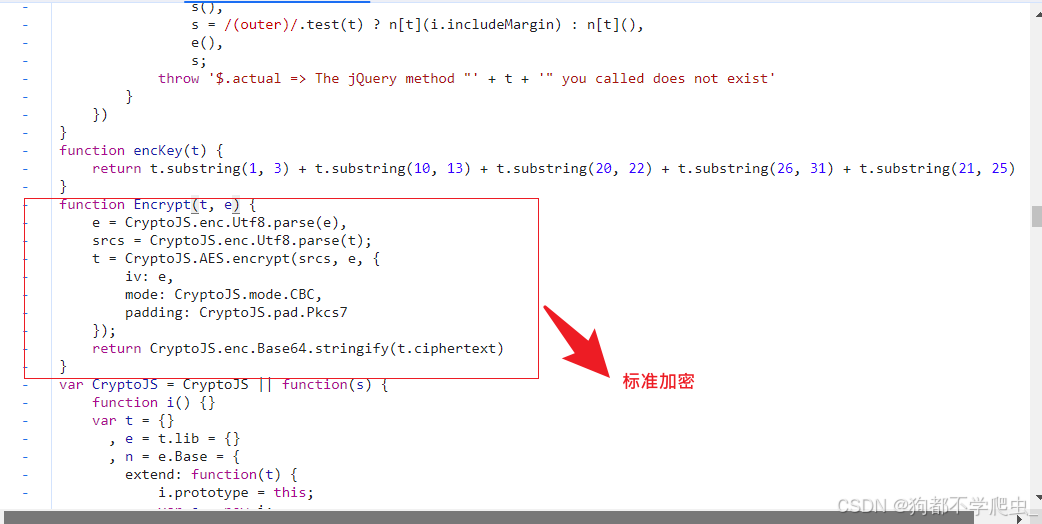
2.op:参数为标准AES加密,key、iv为capTicke分段拼接合并而成
	import requests,base64
	from Crypto.Cipher import AES
	key = iv = capTicket[1:3] + capTicket[10:13] + capTicket[20:22] + capTicket[26:31] + capTicket[21:25]
	# Aes加密  Utf
	def aesEncrypt(text,key=None,iv=None):
	    cipher = AES.new(key.encode('utf-8'), AES.MODE_CBC, iv.encode('utf-8'))
	    pad = 16 - len(text) % 16
	    text = text + pad * chr(pad)
	    encrypted_text = cipher.encrypt(text.encode('utf-8'))
	    return base64.b64encode(encrypted_text).decode('utf-8')
3、_:13为时间戳 f"{int(round(1000*time.time()))}"
二、获取滑块背景图片接口:
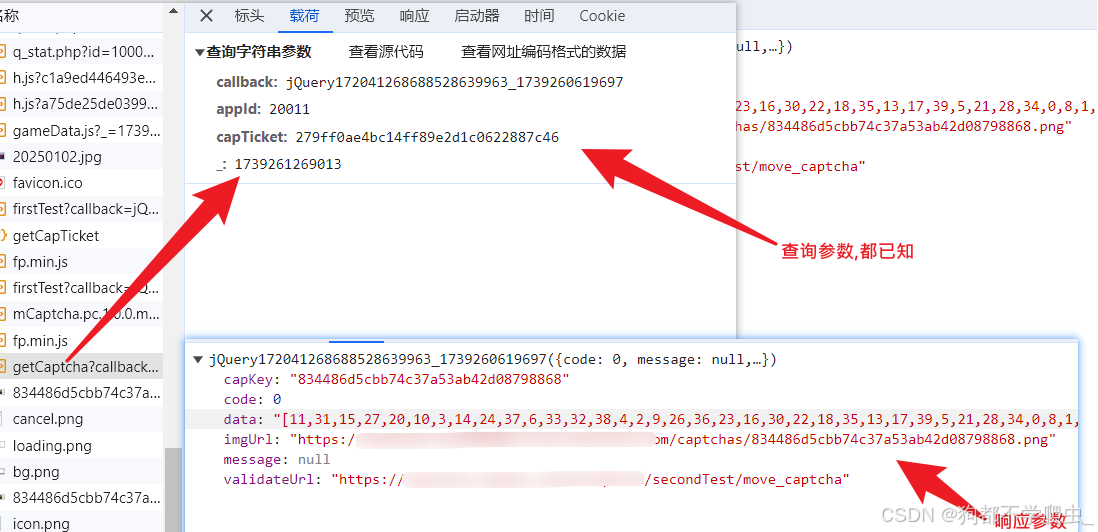
分析一下响应参数:
capKey:验证滑块接口需要的表单数据和作为AES加密的key,iv
data:滑块底图的还原顺序
imgUrl:滑块背景图片和按钮图片(组合一起的)
validateUrl:滑块的验证接口
三、需要解决的问题:
1、将滑块背景图片和按钮图片拆分。
2、还原底图。
3、获取滑块滑动距离。

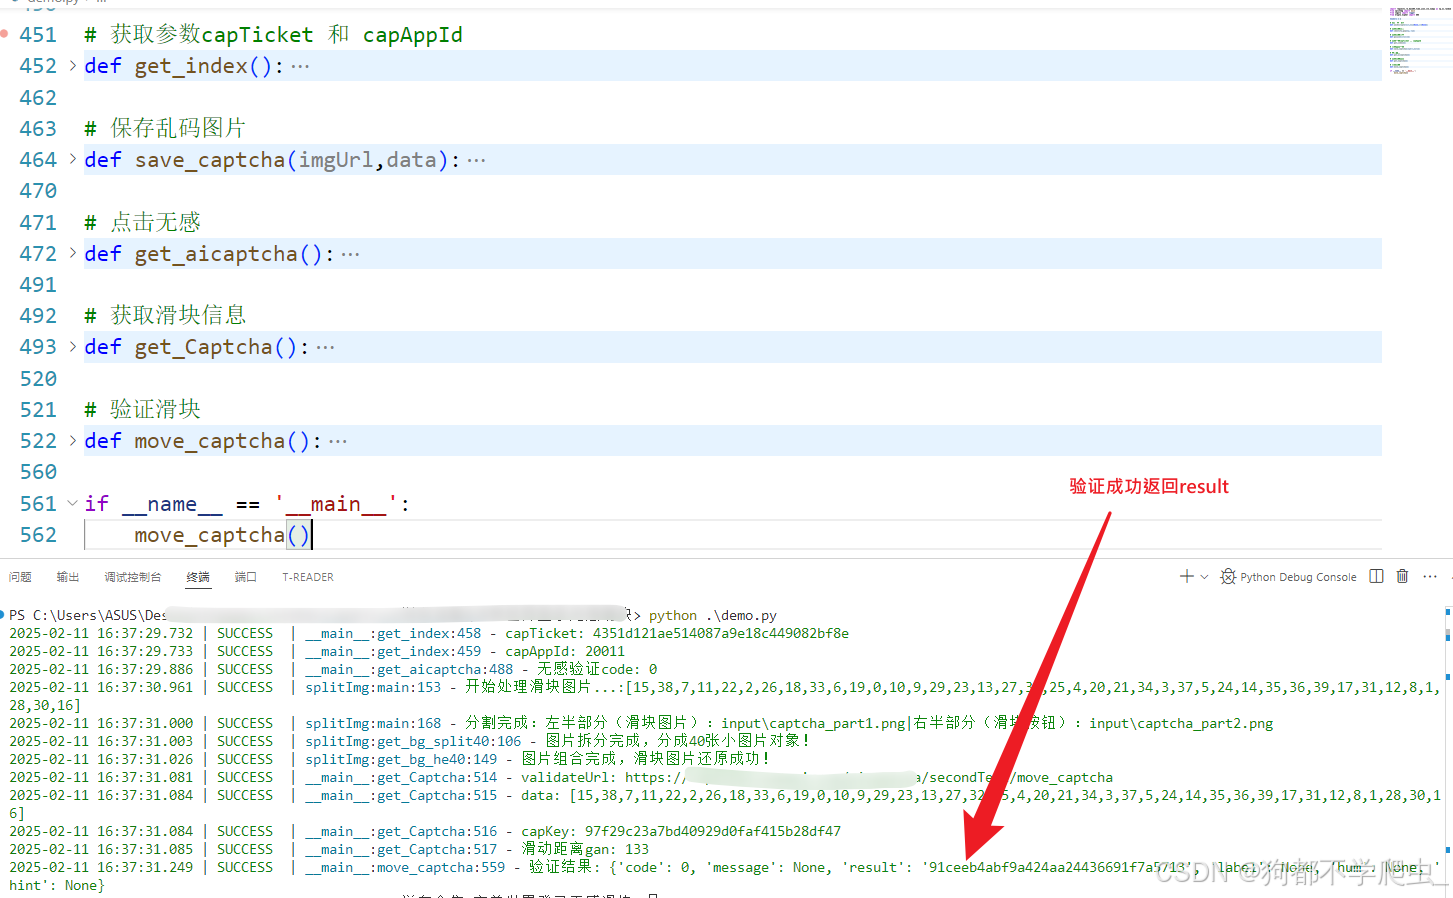
首先我们需要将图片拆分下来,观察保存下来的图片分析,宽为310,高160,再看浏览器中还原后的滑块背景图片宽为260,所以我们需要将拿到的图片进行垂直拆分,并且左边的图片宽为260.
然后我们观察data参数,对照图片发现整个背景图片分成了2行20列,也就是图片被分成了40个小图片,所以我们需要将图片拆分成40个小图,最后通过data底图还原顺序将图片还原。
这里废话不多说,直接放代码吧!!!
from PIL import Image
import os,json
import math
from loguru import logger

# 分割滑块图片和按钮图片
def split_image(image_path, output_dir='output', overlap=0, vertical=True):
    """
    智能图片分割器(支持重叠区域和方向选择)

    参数:
    image_path: str - 原始图片路径
    output_dir: str - 输出目录(默认'output')
    overlap: int - 分割重叠像素数(默认0)
    vertical: bool - 分割方向(True为垂直,False为水平)

    返回:
    tuple - 左右/上下分割后的文件路径
    """
    try:
        # 创建输出目录
        os.makedirs(output_dir,  exist_ok=True)

        with Image.open(image_path)  as img:
            # 获取图片元数据
            width, height = img.size
            format = img.format
            mode = img.mode

            # 计算分割线(考虑重叠区域)
            if vertical:
                split_pos = 260  # 这里的260是根据验证码图片的高度来设置的,可以根据实际情况调整
                box1 = (0, 0, split_pos + overlap, height)
                box2 = (split_pos - overlap, 0, width, height)
            else:
                split_pos = math.ceil(height  / 2)
                box1 = (0, 0, width, split_pos + overlap)
                box2 = (0, split_pos - overlap, width, height)

            # 执行裁剪操作
            part1 = img.crop(box1)
            part2 = img.crop(box2)

            # 生成输出文件名
            base_name = os.path.splitext(os.path.basename(image_path))[0]
            ext = f".{format.lower()}"  if format else '.png'

            part1_path = os.path.join(output_dir,  f"{base_name}_part1{ext}")
            part2_path = os.path.join(output_dir,  f"{base_name}_part2{ext}")

            # 保持原始格式保存
            save_kwargs = {'format': format} if format else {}
            part1.save(part1_path,  **save_kwargs)
            part2.save(part2_path,  **save_kwargs)

            return (part1_path, part2_path)

    except Exception as e:
        logger.error(f"处理失败:{str(e)}")
        raise

# 分割成40张小图片
def get_bg_split40(yuan_img_path,yuan_img):
    # 原始图片的路径
    original_image_path = os.path.join(yuan_img_path,yuan_img)  # 替换为你的图片路径
    # 保存拆分后图片的目录
    output_directory = ''

    # 确保输出目录存在
    # os.makedirs(output_directory, exist_ok=True)

    # 打开原始图片
    original_image = Image.open(original_image_path)

    # 图片的宽度和高度
    width, height = original_image.size

    # 每个小图片的宽度和高度(假设图片被均匀拆分)
    tile_width = width // 20
    tile_height = height // 2


    dict_imgs = {}
    number = 0
    # 遍历每一行和每一列,拆分图片并保存
    for row in range(2):
        for col in range(20):
            # 计算裁剪区域的左上角和右下角坐标
            left = col * tile_width
            upper = row * tile_height
            right = (col + 1) * tile_width
            lower = (row + 1) * tile_height

            # 裁剪图片
            tile_image = original_image.crop((left, upper, right, lower))

            # 构造保存拆分后图片的文件名
            tile_filename = f'tile_{number}.png'
            # tile_path = os.path.join(output_directory, tile_filename)
            number += 1

            # 保存拆分后的图片
            # tile_image.save(tile_path)
            dict_imgs[tile_filename] = tile_image

    logger.success("图片拆分完成,分成40张小图片对象!")
    return dict_imgs

# 还原滑块图片
def get_bg_he40(arrImg,imgs_split):
    # 小图片所在的目录
    tiles_directory = 'input'  # 替换为你的小图片目录路径
    # 输出组合后的大图片的路径
    output_image_path = 'captcha_yuan.png'

    # 获取小图片的文件名列表(假设文件名是按顺序命名的,如tile_0_0.png, tile_0_1.png, ...)
    tile_filenames = [f'tile_{row}.png' for row in json.loads(arrImg)]

    # 打开第一张小图片以获取其尺寸(假设所有小图片尺寸相同)
    # tile_image = Image.open(os.path.join(tiles_directory, tile_filenames[0]))
    tile_image = imgs_split[tile_filenames[0]]
    tile_width, tile_height = tile_image.size

    # 计算大图片的宽度和高度
    big_image_width = tile_width * 20
    big_image_height = tile_height * 2  # 因为有两行,每行20张,所以高度是两倍的小图片高度

    # 创建一个新的空白大图片
    big_image = Image.new('RGB', (big_image_width, big_image_height))

    # 遍历所有小图片,并将它们粘贴到大图片上
    for idx, filename in enumerate(tile_filenames):
        row = idx // 20  # 计算小图片应该粘贴在哪一行(0或1)
        col = idx % 20   # 计算小图片应该粘贴在哪一列(0-19)

        # 打开小图片
        tile = imgs_split[filename]

        # 计算粘贴位置(左上角坐标)
        left = col * tile_width
        upper = row * tile_height  # 因为有两行,所以行高要乘以2,并且第一行从0开始,第二行从tile_height*2开始

        # 将小图片粘贴到大图片上
        big_image.paste(tile, (left, upper))

    # 保存组合后的大图片
    big_image.save(output_image_path)

    logger.success("图片组合完成,滑块图片还原成功!")

# 执行程序
def main(arrImg):
    logger.success(f"开始处理滑块图片...:{arrImg}")

    # 原始图片所在的目录
    yuan_img_path = 'input'
    # 原始图片的名称
    yuan_img = 'captcha_part1.png'

    # 先将滑块和滑块按钮拆分
    left, right = split_image(
        "./captcha.jpg",
        output_dir=yuan_img_path,
        overlap=0,
        # 垂直分割
        vertical=True
    )
    logger.success(f"分割完成:左半部分(滑块图片):{left}|右半部分(滑块按钮):{right}")

    # 再还原滑块图片  imgs_split 分割成40张小图片
    imgs_split = get_bg_split40(yuan_img_path,yuan_img)
    # 过个还原数组还原滑块图片
    get_bg_he40(arrImg,imgs_split)
还原成功

接下来就是获取滑块的滑动距离:你们可以使用ddddocr,这里贴一下我自己的opencv识别
import cv2,numpy as np
# 获取滑块距离
def identify_gap(bg, tp):
    """
    bg: 背景图片
    tp: 缺口图片
    out: 输出图片
    """
    # 读取背景图片和缺口图片
    bg_img = cv2.imdecode(np.frombuffer(bg, np.uint8), cv2.IMREAD_GRAYSCALE)
    tp_img = cv2.imdecode(np.frombuffer(tp, np.uint8), cv2.IMREAD_GRAYSCALE)  # 缺口图片
    yy = []
    xx = []
    for y in range(tp_img.shape[0]):
        for x in range(tp_img.shape[1]):
            r = tp_img[y, x]
            if r < 200:
                yy.append(y)
                xx.append(x)
    tp_img = tp_img[min(yy):max(yy), min(xx):max(xx)]
    # 识别图片边缘
    bg_edge = cv2.Canny(bg_img, 100, 200)
    tp_edge = cv2.Canny(tp_img, 100, 200)
    # 转换图片格式
    bg_pic = cv2.cvtColor(bg_edge, cv2.COLOR_GRAY2RGB)
    tp_pic = cv2.cvtColor(tp_edge, cv2.COLOR_GRAY2RGB)
    # 缺口匹配
    res = cv2.matchTemplate(bg_pic, tp_pic, cv2.TM_CCOEFF_NORMED)
    min_val, max_val, min_loc, max_loc = cv2.minMaxLoc(res)  # 寻找最优匹配
    # # 绘制方框
    th, tw = tp_pic.shape[:2]
    tl = max_loc  # 左上角点的坐标
    br = (tl[0] + tw, tl[1] + th)  # 右下角点的坐标
    cv2.rectangle(bg_img, tl, br, (0, 0, 255), 2)  # 绘制矩形
    cv2.imwrite('distinguish.jpg', bg_img)  # 保存在本地
    # 返回缺口的X坐标
    return max_loc[0]
四、验证滑块接口:
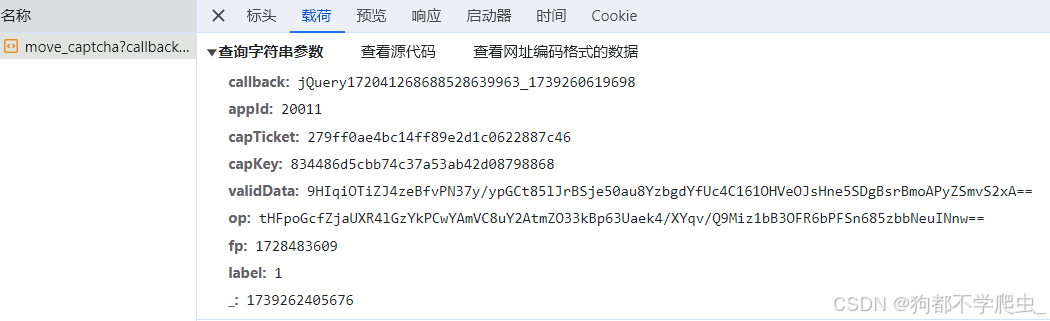
1、capTicket、appId:访问首页返回的值
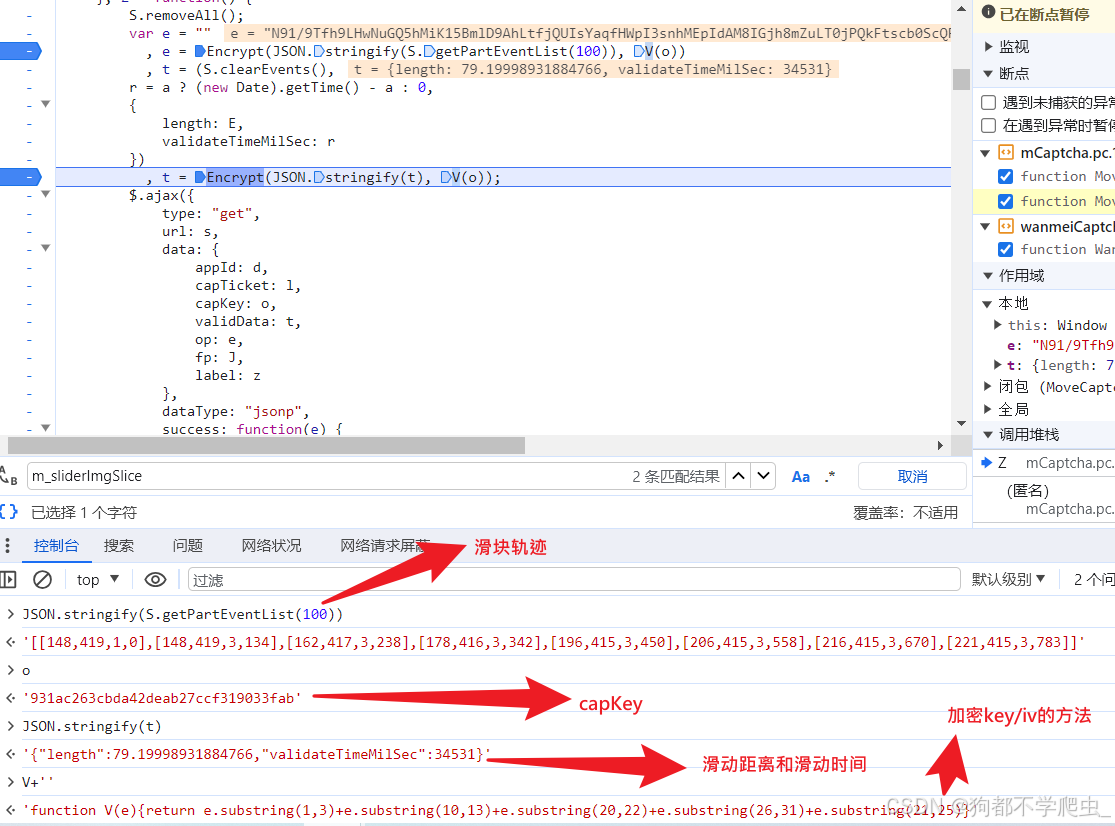
2、op:参数为标准AES加密,对滑块轨迹进行加密,key、iv为capKey分段拼接合并而成
3、validData:validate = { "length":gan + 5, "validateTimeMilSec":random.randint(1100, 3100), }gen:滑动距离
4、_:13位时间戳
注意重点,length的值加5,轨迹的话随便模拟一下就得
五、验证python实现:
技术细节
提示:主要还是还原底图
小结
提示:学习交流+v看主页


 被折叠的 条评论
为什么被折叠?
被折叠的 条评论
为什么被折叠?
 到【灌水乐园】发言


