


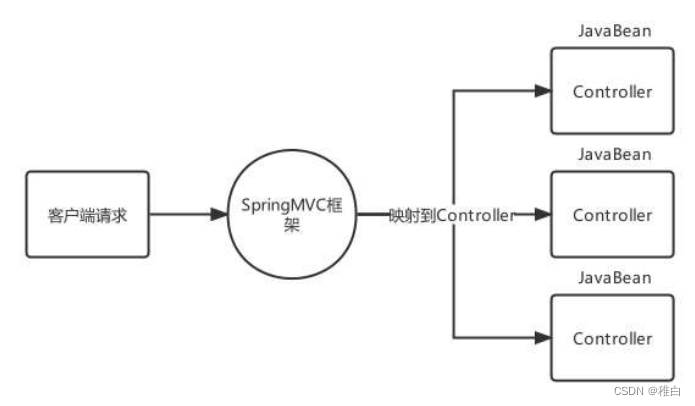
SpringMVC简介
SpringMVC概述
SpringMVC快速入门

1.导入坐标
        <dependency>
            <groupId>org.springframework</groupId>
            <artifactId>spring-webmvc</artifactId>
            <version>5.3.7</version>
        </dependency>
        <dependency>
            <groupId>javax.servlet</groupId>
            <artifactId>javax.servlet-api</artifactId>
            <version>3.1.0</version>
        </dependency>
2.配置SpringMVC的前端控制器ServletDispatcher
新建web.xml文件
    <!--配置DispatcherServlet-->
    <servlet>
        <servlet-name>DispatcherServlet</servlet-name>
        <servlet-class>org.springframework.web.servlet.DispatcherServlet</servlet-class>
        <init-param>
            <param-name>contextConfigLocation</param-name>
            <param-value>classpath:spring-mvc.xml</param-value>
        </init-param>
        <load-on-startup>2</load-on-startup>
    </servlet>
    <servlet-mapping>
        <servlet-name>DispatcherServlet</servlet-name>
        <url-pattern>/</url-pattern>
    </servlet-mapping>
3.编写controller
@Controller
public class QuickController {

    @RequestMapping("/show")
    public String show(){
        System.out.println("show running...");
        return "/index.jsp";
    }

}
4.创建springMVC的核心配置文件 spring-mvc.xml,并配置组件扫描web层
<?xml version="1.0" encoding="UTF-8"?>
 <beans xmlns="http://www.springframework.org/schema/beans"
 xmlns:xsi="http://www.w3.org/2001/xmlSchema-instance"
 xmlns:mvc="http://www.springframework.org/schema/mvc"
 xmlns:context="http://www.springframework.org/schema/context"
 xsi:schemaLocation="
 http://www.springframework.org/schema/beans
http://www.springframework.org/schema/beans/spring-beans.xsd
 http://www.springframework.org/schema/context
http://www.springframework.org/schema/context/spring-context.xsd
 http://www.springframework.org/schema/mvc
http://www.springframework.org/schema/mvc/spring-mvc.xsd">
 <!-- 组件扫描web层 -->
 <context:component-scan base-package="com.itheima.controller"/>
 </beans>
本来不想用xml方式,想用注解开发,于是配置了SpringConfig类,结果报错
javax.servlet.ServletException: Servlet[DispatcherServlet]的Servlet.init()引发异常
org.springframework.context.ApplicationContextException: Fatal initialization error in servlet with name 'DispatcherServlet': custom WebApplicationContext class[com.itheima.config.SpringConfig] is not of type ConfigurableWebApplicationContext
百度之后发现需要继承AbstractAnnotationConfigDispatcherServletInitializer类,结果继承之后还是出现一样的错误。改用xml方式就没事,不知道为什么。。。
@Configuration
@ComponentScan("com.itheima")
public class SpringConfig extends AbstractAnnotationConfigDispatcherServletInitializer {
    @Override
    protected Class<?>[] getRootConfigClasses() {
        return null;
    }

    @Override
    protected Class<?>[] getServletConfigClasses() {
        return new Class[]{SpringConfig.class};
    }

    @Override
    protected String[] getServletMappings() {
        return new String[]{"/"};
    }


}
Controller中访问容器中的Bean
<!-- 组件扫描非web层 -->
<context:component-scan base-package="com.itheima">
 <!--排除com.itheima包下使用@Controller注解的类-->
 <context:exclude-filter type="annotation"
expression="org.springframework.stereotype.Controller"/>
</context:component-scan>
<!--配置ContextLoaderListener-->
<context-param>
 <param-name>contextConfigLocation</param-name>
 <param-value>classpath:applictionContext.xml</param-value>
</context-param>
<listener>
 <listener-class>org.springframework.web.context.ContextLoaderListener</listener-class>
</listener>
public interface UserService {
 public void show();}
@Service("userService")
public class UserServiceImpl implements UserService {
 @Override
 public void show() {
 System.out.println("UserServiceImpl show running ... ...");
 }}
@Controller
public class UserController {
 @Autowired
 private UserService userService;
 @RequestMapping("/show")
 public String show(){
 System.out.println("show 执行....");
 //调用userService的show方法
 userService.show();
 //视图跳转到index.jsp
 return "/index.jsp";
 }
}
测试结果

注:
Spring容器和Spring MVC容器是两个不同的容器
-
Spring容器(也称为应用程序上下文):Spring容器负责管理和实例化应用程序中的所有Bean。它负责加载和管理应用程序的业务类、数据访问类、服务类等。Spring容器可以使用XML配置文件、注解或Java配置类进行配置。
-
Spring MVC容器:Spring MVC容器是基于Spring的Web框架,用于构建Web应用程序。它包含了与Web相关的组件,如控制器、视图解析器、处理器映射器等。Spring MVC容器使用自己的配置文件或注解来配置,并管理Web请求处理流程。
这两个容器在使用上有一定的联系:
- Spring容器可以加载所有的Bean(包括服务类、数据访问类)和配置文件,提供应用程序级别的依赖注入和管理功能。
- Spring MVC容器可以加载Web相关的组件,如控制器、视图解析器,以及处理Web请求和响应的流程。
通常情况下,Spring容器是Spring MVC容器的父容器。Spring容器负责应用程序中的通用Bean管理,而Spring MVC容器则负责处理Web请求和与Web相关的组件。这种层次结构的设计可以使应用程序更好地组织和管理不同层次的组件,并提供灵活和可扩展的架构。
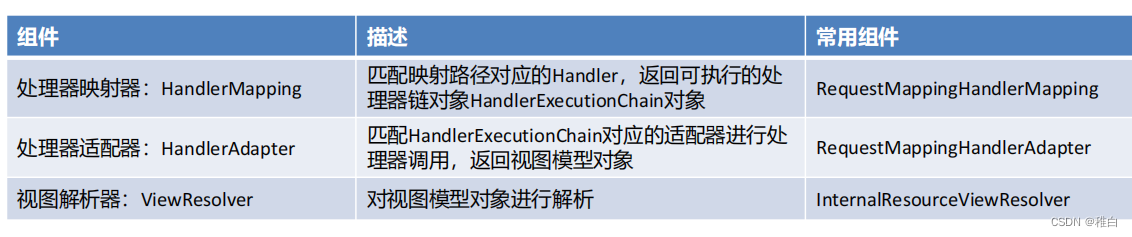
SpringMVC关键组件浅析


SpringMVC的请求处理
请求映射路径的配置
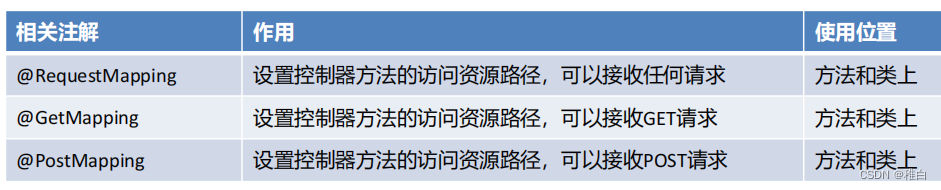
@RequestMapping注解,主要使用在控制器的方法上,用于标识客户端访问资源路径
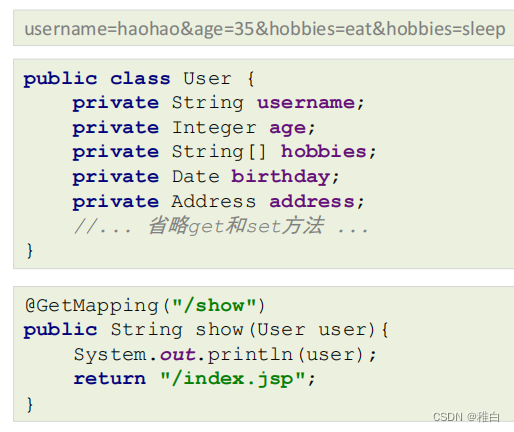
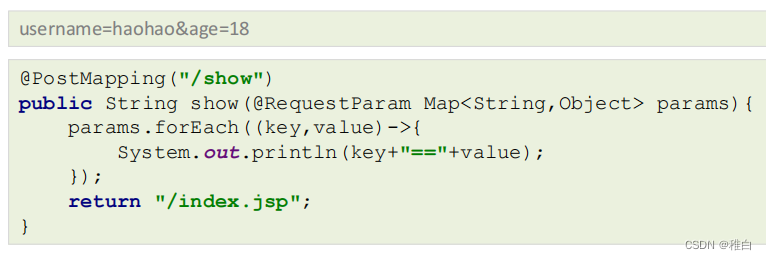
请求数据的接收
注解方式接收参数
@GetMapping("/show")
public String show(@RequestParam(name = "username",required = true) String name, int age){
 System.out.println(name+"=="+age);
 return "/index.jsp";
}
3.接收数组或集合数据,客户端传递多个同名参数时,可以用数组接收。也可以使用单列集合接收,但是需要使用@RequestParam告知框架传递的参数是要同名设置的,不是对象属性设置的
@GetMapping("/show")
public String show(@RequestParam List<String> hobbies){
 for (String hobby : hobbies) {
 System.out.println(hobby);}
 return "/index.jsp";}

配置RequestMappingHandlerAdapter,指定消息转换器,就不用手动转换json格式字符串了

Restful风格
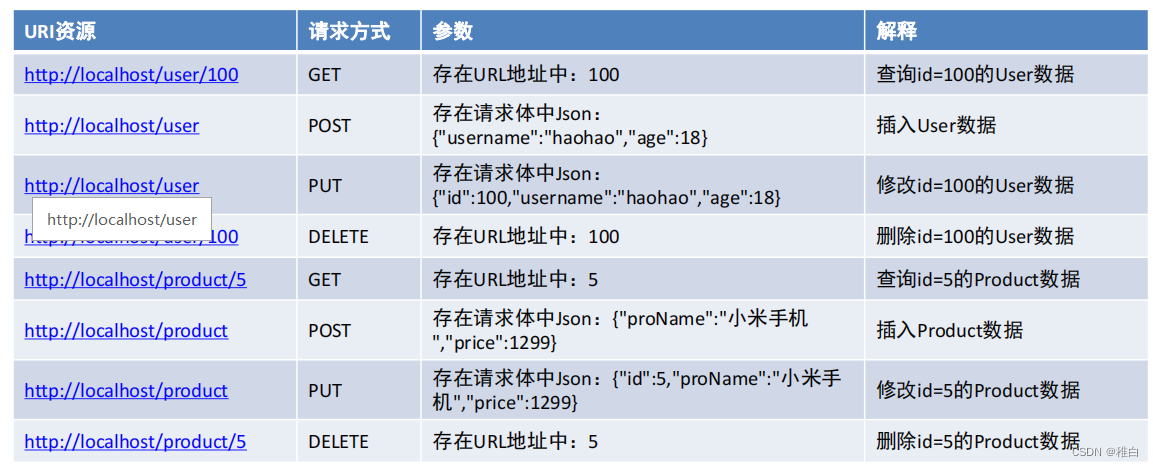
3.用HTTP响应状态码表示结果,国内常用的响应包括三部分:状态码、状态信息、响应数据
{
 "code":200,
 "message":"成功",
 "data":{
 "username":"haohao",
 "age":18
 }
}
{
 "code":300,
 "message":"执行错误",
 "data":"",
}
文件上传
<form action="" enctype="multipart/form-data">
 <input type="file" name="myFile">
</form>
<!--配置文件上传解析器,注意:id的名字是固定写法-->
<bean id="multipartResolver"
class="org.springframework.web.multipart.commons.CommonsMultipartResolver">
 <property name="defaultEncoding" value="UTF-8"/><!--文件的编码格式 默认是ISO8859-1-->
 <property name="maxUploadSizePerFile" value="1048576"/><!--上传的每个文件限制的大小 单位字节-->
 <property name="maxUploadSize" value="3145728"/><!--上传文件的总大小-->
 <property name="maxInMemorySize" value="1048576"/><!--上传文件的缓存大小-->
</bean>
<dependency>
 <groupId>commons-fileupload</groupId>
 <artifactId>commons-fileupload</artifactId>
 <version>1.4</version>
</dependency>
<dependency>
 <groupId>commons-io</groupId>
 <artifactId>commons-io</artifactId>
 <version>2.7</version>
</dependency>
文件保存
    @PostMapping("/param2")
    public String param2(@RequestBody MultipartFile myFile) throws IOException {

        //将上传的文件进行保存
        // 1.获取当前上传文件的输入流
        InputStream inputStream = myFile.getInputStream();
        // 2.获得当前上传文件位置的输出流
        OutputStream outputStream = new FileOutputStream("E:\\"+myFile.getOriginalFilename());
        // 3.执行文件拷贝
        IOUtils.copy(inputStream, outputStream);

        // 4.关闭资源
        inputStream.close();
        outputStream.close();

        return "/index.jsp";
    }
获取http请求头信息
    @GetMapping("/param3")
    public String param3(@RequestHeader("Accept-Encoding") String requestHeader){
        System.out.println("requestHeader = " + requestHeader);
        return "/index.jsp";
    }
@GetMapping("/headersMap")
public String headersMap(@RequestHeader Map<String,String> map){
 map.forEach((k,v)->{
 System.out.println(k+":"+v);
 });
 return "/index.jsp";
}
@GetMapping("/cookies")
public String cookies(@CookieValue(value = "JSESSIONID",defaultValue = "") String jsessionid){
 System.out.println(jsessionid);
 return "/index.jsp";
}
@GetMapping("/request1")
public String request1(HttpServletRequest request){
 //存储数据
 request.setAttribute("username","haohao");
 return "forward:/request2";
}
@GetMapping("/request2")
public String request2(@RequestAttribute("username") String username){
 System.out.println(username);
 return "/index.jsp";
}
参数注解的区别
@PathVariable用于从URL路径中提取参数值,适用于RESTful风格的URL。
@GetMapping("/users/{id}")
public ResponseEntity<User> getUser(@PathVariable("id") int id) {
    // 根据id获取用户信息
}
@RequestParam用于从查询参数中获取参数值,适用于传递较少的参数或需要可选参数。- 如有一个URL为/users?id=123
@GetMapping("/users")
public ResponseEntity<User> getUser(@RequestParam("id") int id) {
    // 根据id获取用户信息
}
@RequestBody用于接收请求体中的数据,适用于接收复杂的数据类型。- POST方式便为接收请求体中的数据
@PostMapping("/users")
public ResponseEntity<User> createUser(@RequestBody User user) {
    // 创建用户
}
Javaweb常用对象获取
@GetMapping("/javawebObject")
public String javawebObject(HttpServletRequest request, HttpServletResponse response,
HttpSession session){
 System.out.println(request);
 System.out.println(response);
 System.out.println(session);
 return "/index.jsp";
}
请求静态资源
<servlet-mapping>
 <servlet-name>default</servlet-name>
 <url-pattern>/img/*</url-pattern>
</servlet-mapping>
<servlet-mapping>
 <servlet-name>default</servlet-name>
 <url-pattern>*.html</url-pattern>
</servlet-mapping>
<!-- mapping是映射资源路径,location是对应资源所在的位置 -->
<mvc:resources mapping="/img/*" location="/img/"/>
<mvc:resources mapping="/css/*" location="/css/"/>
<mvc:resources mapping="/css/*" location="/js/"/>
<mvc:resources mapping="/html/*" location="/html/"/>
<mvc:default-servlet-handler/>
注解驱动 <mvc:annotation-driven> 标签
<!--mvc注解驱动-->
<mvc:annotation-driven/>
SpringMVC的响应处理
传统同步业务数据响应

区别:
- 转发是服务器内部实现的,浏览器对转发是无感知的,URL保持不变,共享原始请求信息。而重定向是浏览器发起的新的请求,URL会变化,并且不会共享原始请求的信息。
- 转发的处理是服务器端完成的,而重定向的处理是浏览器端完成的。
- 转发相对于重定向更加高效,因为它避免了浏览器的额外请求和重定向的性能消耗。但重定向更加灵活,可以处理跨域和跨服务器的请求等情况。
- 转发适用于服务器内部资源的调用和请求处理链的处理。重定向适用于跳转和处理不同的请求。
响应模型数据,响应模型数据本质也是转发,在转发时可以准备模型数据
    @RequestMapping("/res3")
    public ModelAndView res3(ModelAndView modelAndView){
        //ModelAndView封装模型数据和视图名
        //
        User user = new User();
        user.setUsername("qianqian");
        user.setAge("18");
        modelAndView.addObject("user",user);
        //
        modelAndView.setViewName("/index.jsp");

        return modelAndView;
    }
    //直接回写字符串
    @RequestMapping("/res4")
    @ResponseBody//告诉springMVC,返回的字符串不是视图名,而是以响应体方式响应的数据
    public String res4(){
        return "hello world";
    }
前后端分离异步业务数据响应
@GetMapping("/response5")
@ResponseBody
public User response5() throws JsonProcessingException {
 //创建JavaBean
 User user = new User();
 user.setUsername("haohao");
 user.setAge(18);
 //直接返回User对象
 return user;
}
注:@RestController注解结合了@Controller和@ResponseBody
SpringMVC的拦截器

实现了HandlerInterceptor接口,且被Spring管理的Bean都是拦截器。HandlerInterceptor接口方法的作用及其参数、返回值详解如下:

拦截器快速入门
编写MyInterceptor01实现HandlerInterceptor接口:
public class MyInterceptor1 implements HandlerInterceptor {
    @Override
    public boolean preHandle(HttpServletRequest request, HttpServletResponse response, Object handler) throws Exception {
        System.out.println("MyInterceptor1...preHandle");
        return true;
    }

    @Override
    public void postHandle(HttpServletRequest request, HttpServletResponse response, Object handler, ModelAndView modelAndView) throws Exception {
        System.out.println("MyInterceptor1.postHandle");
        //HandlerInterceptor.super.postHandle(request, response, handler, modelAndView);
    }

    @Override
    public void afterCompletion(HttpServletRequest request, HttpServletResponse response, Object handler, Exception ex) throws Exception {
        System.out.println("MyInterceptor1.afterCompletion");
        //HandlerInterceptor.super.afterCompletion(request, response, handler, ex);
    }
}
在spring-mvc.xml中配置Interceptor
    <mvc:interceptors>
        <mvc:interceptor>
            <mvc:mapping path="/**"/>
            <bean class="com.itheima.interceptor.MyInterceptor1"></bean>
        </mvc:interceptor>
    </mvc:interceptors>
拦截器执行顺序
当每个拦截器都是放行状态时,三个方法的执行顺序如下:
Interceptor1,2,3之间,先配置的拦截器先执行

当Interceptor1和Interceptor2处于放行,Interceptor3处于不放行时,三个方法的执行顺序如下:

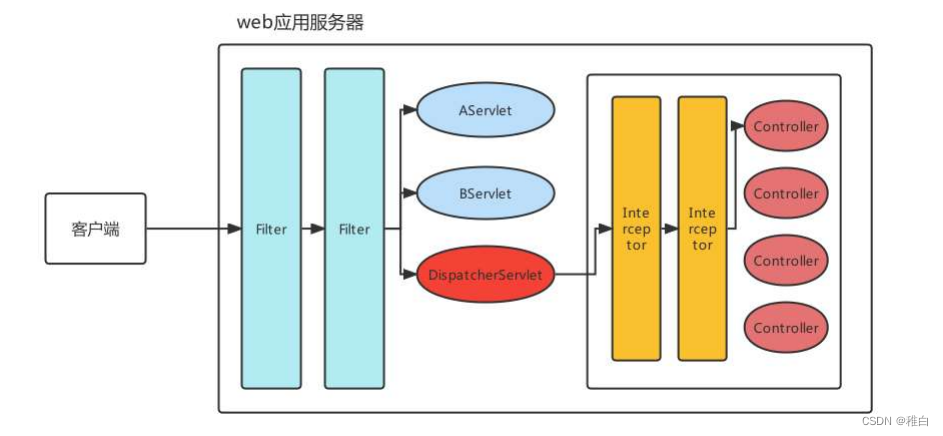
拦截器执行原理

SpringMVC的全注解开发
spring-mvc.xml 中组件转化为注解形式
@Configuration(proxyBeanMethods = false)
public class DelegatingWebMvcConfiguration extends WebMvcConfigurationSupport {
 private final WebMvcConfigurerComposite configurers = new WebMvcConfigurerComposite();
 //从容器中注入WebMvcConfigurer类型的Bean
 @Autowired(required = false)
 public void setConfigurers(List<WebMvcConfigurer> configurers) {
 if (!CollectionUtils.isEmpty(configurers)) {
 this.configurers.addWebMvcConfigurers(configurers);
 }}
 //省略其他代码}
@Component
public class MyWebMvcConfigurer implements WebMvcConfigurer {

    @Override
    public void addInterceptors(InterceptorRegistry registry) {
        //添加一个拦截器,并配置拦截路径
        registry.addInterceptor(new MyInterceptor1()).addPathPatterns("/**");
    }

    @Override
    public void configureDefaultServletHandling(DefaultServletHandlerConfigurer configurer) {
        //开启默认的servlet处理器
        configurer.enable();
    }
}
DispatcherServlet加载核心配置类
<!--配置springMVC前端控制器-->
<servlet>
 <servlet-name>DispatcherServlet</servlet-name>
 <servlet-class>org.springframework.web.servlet.DispatcherServlet</servlet-class>
 <!--指定springMVC配置文件位置-->
 <init-param>
 <param-name>contextConfigLocation</param-name>
 <param-value>classpath:spring-mvc.xml</param-value>
 </init-param>
 <!--服务器启动就创建-->
 <load-on-startup>2</load-on-startup>
</servlet>
<servlet-mapping>
 <servlet-name>DispatcherServlet</servlet-name>
 <url-pattern>/</url-pattern>
</servlet-mapping>
在使用SpringMVCConfig核心配置类提替代的spring-mvc.xml之后,参照Spring的 ContextLoaderListener加载核心配置类的做法,定义了一个AnnotationConfigWebApplicationContext,通过代码注册核心配置类
public class MyAnnotationConfigWebApplicationContext extends
AnnotationConfigWebApplicationContext {
 public MyAnnotationConfigWebApplicationContext(){
 //注册核心配置类
 super.register(SpringMVCConfig.class);
 }
}
<!--指定springMVC的applicationContext全限定名 -->
<init-param>
 <param-name>contextClass</param-name>
 <param-value>com.itheima.config.MyAnnotationConfigWebApplicationContext</param-value>
</init-param>
消除web.xml
<!--配置springMVC前端控制器-->
<servlet>
 <servlet-name>DispatcherServlet</servlet-name>
 <servlet-class>org.springframework.web.servlet.DispatcherServlet</servlet-class>
 <!--指定springMVC的applicationContext全限定名 -->
 <init-param>
 <param-name>contextClass</param-name>
 <param-value>com.itheima.config.MyAnnotationConfigWebApplicationContext</param-value>
 </init-param>
 <!--服务器启动就创建-->
 <load-on-startup>2</load-on-startup>
</servlet>
<servlet-mapping>
 <servlet-name>DispatcherServlet</servlet-name>
 <url-pattern>/</url-pattern>
</servlet-mapping>
public class MyAnnotationConfigDispatcherServletInitializer extends
AbstractAnnotationConfigDispatcherServletInitializer {
 //返回的带有@Configuration注解的类用来配置ContextLoaderListener
 protected Class<?>[] getRootConfigClasses() {
 System.out.println("加载核心配置类创建ContextLoaderListener");
 return new Class[]{ApplicationContextConfig.class};
 }
 //返回的带有@Configuration注解的类用来配置DispatcherServlet
 protected Class<?>[] getServletConfigClasses() {
 System.out.println("加载核心配置类创建DispatcherServlet");
 return new Class[]{SpringMVCConfig.class};
 }
 //将一个或多个路径映射到DispatcherServlet上
 protected String[] getServletMappings() {
 return new String[]{"/"};
 }
}
SpringMVC的组件原理剖析
前端控制器初始化
前端控制器执行主流程

SpringMVC的异常处理机制
SpringMVC 异常的处理流程

SpringMVC 的异常处理方式
@Bean
public SimpleMappingExceptionResolver simpleMappingExceptionResolver(){
 //创建SimpleMappingExceptionResolver
 SimpleMappingExceptionResolver resolver = new SimpleMappingExceptionResolver();
 //设置默认错误展示视图
 resolver.setDefaultErrorView("/error.html");
 //定义Properties设置特殊异常对应的映射视图
 Properties properties = new Properties();
 properties.setProperty("java.lang.RuntimeException","/error.html");
 properties.setProperty("java.io.FileNotFoundException","/io.html");
 resolver.setExceptionMappings(properties);
 return resolver;
}
@Component
public class MyHandlerExceptionResolver implements HandlerExceptionResolver {
 @Override
 //参数Object是当前目标方法处理器对象HandlerMethod
 public ModelAndView resolveException(HttpServletRequest httpServletRequest,
HttpServletResponse httpServletResponse, Object o, Exception e) {
 ModelAndView modelAndView = new ModelAndView();
 modelAndView.setViewName("/error.html");
 return modelAndView;
 }
}
@ControllerAdvice
public class GlobalExceptionHandler {
 @ExceptionHandler(RuntimeException.class)
 public ModelAndView runtimeHandleException(RuntimeException e){
 System.out.println("全局异常处理器执行...."+e);
 ModelAndView modelAndView = new ModelAndView("/error.html");
 return modelAndView;
 }
 @ExceptionHandler(IOException.class)
 @ResponseBody
 public ResultInfo ioHandleException(IOException e){
 //模拟一个ResultInfo
 ResultInfo resultInfo = new ResultInfo(0,"IOException",null);
 return resultInfo;
 }
}
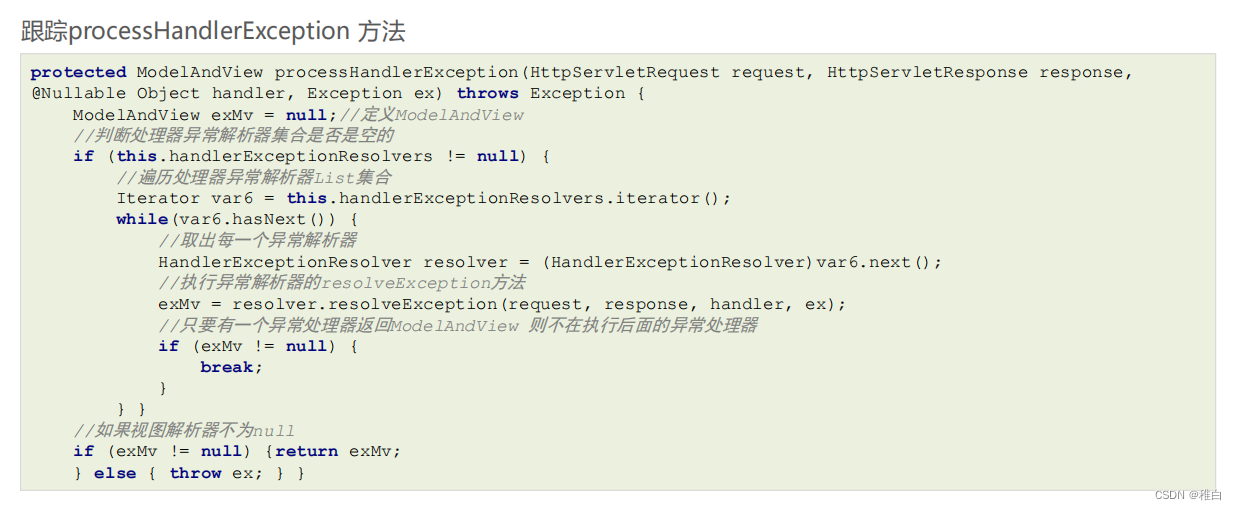
异常处理机制原理剖析


SpringMVC 常用的异常解析器


 35万+
35万+

 被折叠的 条评论
为什么被折叠?
被折叠的 条评论
为什么被折叠?
 到【灌水乐园】发言


