


vue+ts
vue3简介
简单效果
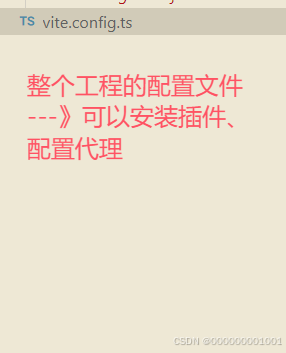
创建vue3工程
执行:
npm create vue@latest
初始化:

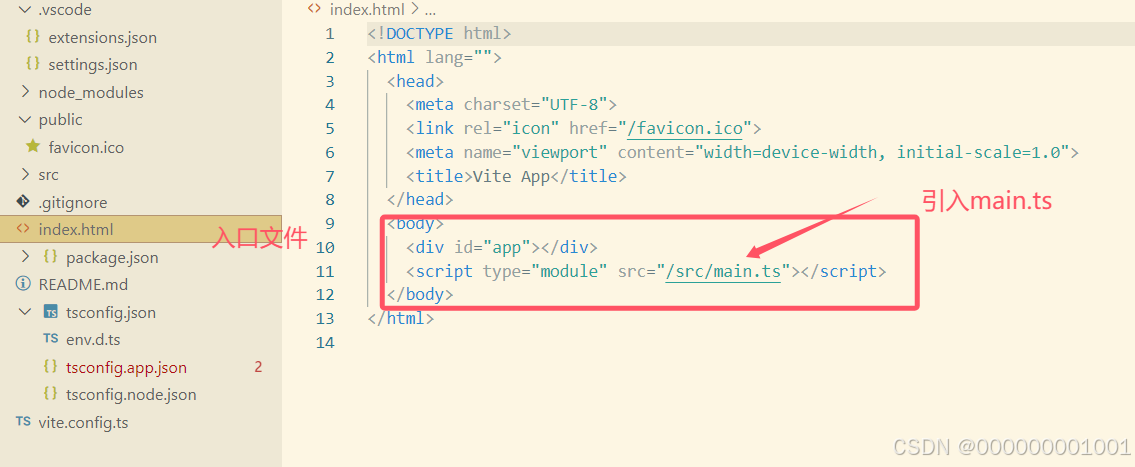
目录介绍:
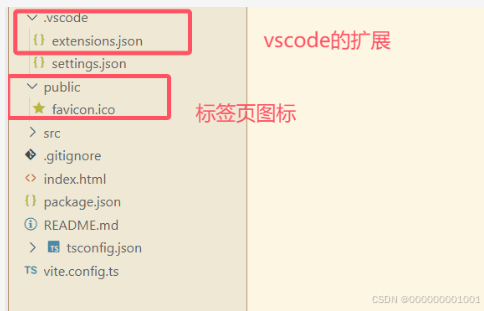
其中 env.d.ts的作用是 让ts认识它不认识的东西,如(txt,jpg)
注意:
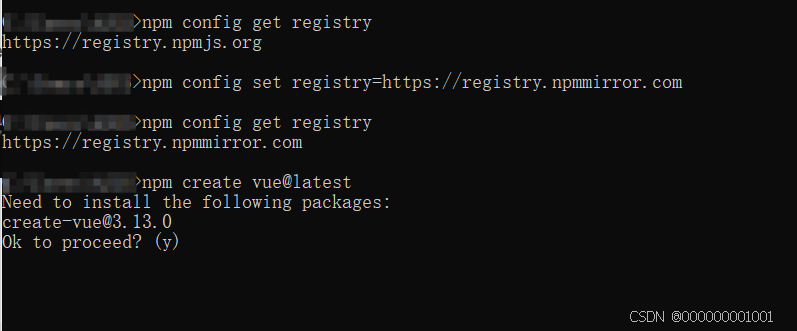
1、vue3 运行npm create vue@latest 和 npm init vue@latest 执行速度慢的问题

解决:
1、查看npm代理
npm config get registry
2、更换npm镜像
npm config set registry=https://registry.npmmirror.com
3、查看npm代理
npm config get registry
修改后:
2、项目中没有node_modules:
安装所有依赖 npm i
编写App组件
插件安装:
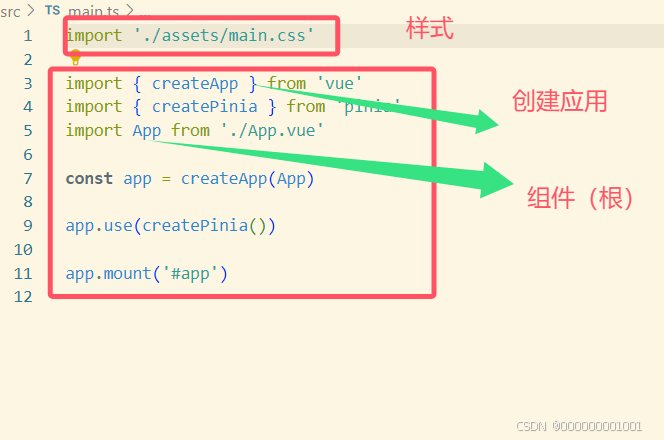
/src/main.ts文件解释:
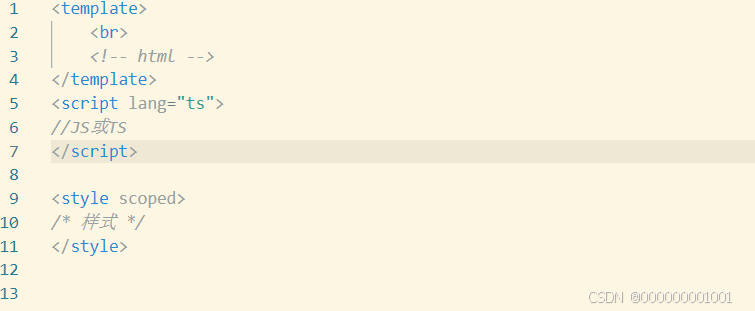
根组件 App.vue结构:
效果:

App.vue代码:
<template>
    <br>
    helloword
    <!-- html -->
</template>
<script lang="ts">
//JS或TS
export default {
    name: 'App', //组件名
    }
</script>

<style scoped>
/* 样式 */
</style>
API
Setup
  setup(){
        //setup函数中的this是undeinfined
        //data

        let name = 'zs'//此时的name不是响应式的
        let age = 18//此时的age不是响应式的
        let tel= '13888888888'//此时的tel不是响应式的
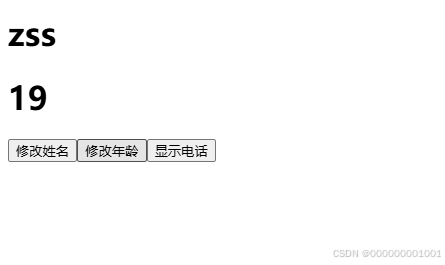
1、返回对象
<template>
    <div>
        <h1>{{name}}</h1>
        <h1>{{age}}</h1>
        <button @click="changeName">修改姓名</button>
        <button @click="changeAge">修改年龄</button>
        <button @click="showTel">显示电话</button>

    </div>
</template>
<script lang="ts">

export default {
    name: 'Person',
    // data() {
    //     return {
    //         // 数据
    //         name: '张三',
    //         age : 18,
    //         tel: '13888888888',
    //     }
    // },
    // methods: {
    //     // 方法
    //     changeName(){
    //         this.name = '李四';

    //     },
    //     changeAge(){
    //         this.age+=1;
    //     },
    //     showTel(){
    //         alert(this.tel)
    //     },

    // },
    // computed: {
    //     // 计算属性
    // },
    // mounted() {
    //     // 页面加载完成后执行
    // },
    setup(){
        //setup函数中的this是undeinfined
        //data

        let name = 'zs'//此时的name不是响应式的
        let age = 18//此时的age不是响应式的
        let tel= '13888888888'//此时的tel不是响应式的


        function changeName() {
            name='zss'
        }
        function changeAge() {
            age +=1
        }
        function showTel() {
            alert(tel)
        }
        // 将数据、方法交出去,模板中才可以使用
         return {name,age,changeName,changeAge,showTel}


    }
}
</script>
效果图:

2、返回函数
export default {
    name: 'Person',
    setup(){
        //setup函数中的this是undeinfined
        //data

        let name = 'zs'//此时的name不是响应式的
        let age = 18//此时的age不是响应式的
        let tel= '13888888888'//此时的tel不是响应式的


        function changeName() {
            name='zss'
        }
        function changeAge() {
            age +=1
        }
        function showTel() {
            alert(tel)
        }

        return function () {
            return "haha"
        }//简写 return ()=> 'haha'

    }
效果图:

面试题:
问:Vue3中的setup和正常写的data、methods有什么关系?
答:
3、语法糖
- 3.1
 效果:
效果:
- 3.2
安装插件:npm i vite-plugin-vue-setup-extend -D
修改vite.config 文件==》引入,并引用插件
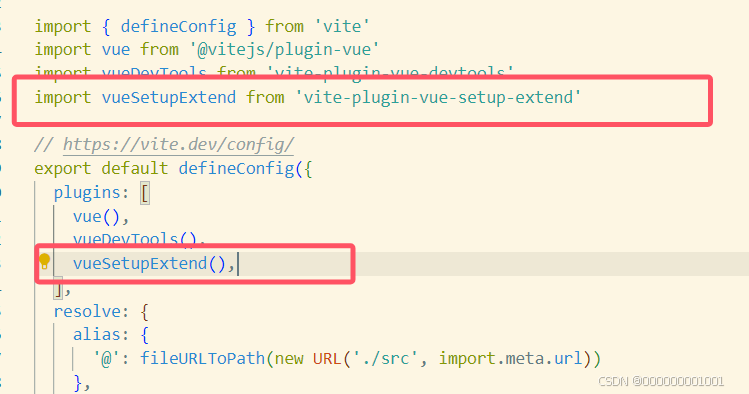
支持这么写:
<script lang="ts" setup name="Person111">
   let a =666
</script>
ref 创建基本类型的响应式数据
- 作用:定义响应式变量
- 语法:let xxx = ref(初始值)
- 返回值:一个RefImpl的实例对象,简称 ref 对象或 ref
,ref的对象value属性是响应式的 - 注意点:
JS 中操作数据需要xxx.value ,但模板中不需要.value直接使用即可
对于let xxx = ref(‘zs’)来说,name不是响应式的,name.value是响应式的
响应式
<template>
    <div>
        <h1>{{name}}</h1>
        <h1>{{age}}</h1>
        <button @click="changeName">修改姓名</button>
        <button @click="changeAge">修改年龄</button>
        <button @click="showTel">显示电话</button>

    </div>
</template>


<script lang="ts" setup name="Person">
		import { ref } from "vue"

        //ref 响应式
        let name = ref('zs')//此时的name不是响应式的
        let age = ref(18)//此时的age不是响应式的
        let tel= '13888888888'//此时的tel不是响应式的


        function changeName() {
            name.value='zss'
        }
        function changeAge() {
            age.value +=1
        }
        function showTel() {
            alert(tel)
        }

</script>
效果:
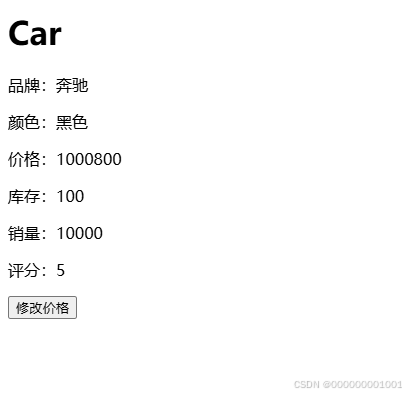
reactive 创建_对象类型的响应式数据
<template>
    <div>
        <h1>Car</h1>
        <p>品牌:{{car.brand}}</p>
        <p>颜色:{{car.color}}</p>
        <p>价格:{{car.price}}</p>
        <p>库存:{{car.stock}}</p>
        <p>销量:{{car.sales}}</p>
        <p>评分:{{car.score}}</p>
        <button @click="changePrice">修改价格</button>
    </div>
</template>

<script lang="ts">
</script>
<script lang="ts" setup name="Car">
	import { reactive } from 'vue';
	//data
    let car =reactive( {
        brand: '奔驰',
        color: '黑色',
        price: 1000000,
        stock: 100,
        sales: 10000,
        score: 5,
    })

    function changePrice() {
        car.price += 200;
    }
</script>
效果:
产生的对象:

ref vs reactive
- 宏观角度
1、ref 用来定义:基本类型数据、对象类型数据
2、reactive 用来定义:对象类型数据
- 区别
1、ref 创建的变量必须使用 .value (可以使用volar插件自动添加 .value)
2、reactive 重新分配一个新对象,会失去响应式(可以用Object.assign 去整体替换)
- 使用原则
1、若需要一个基本类型的响应式数据,必须使用ref
2、若需要一个响应式对象,层级不深,ref 和 reactive 都可
3、若需要一个响应式对象,层级较深,推荐使用 reactive
toRefs and toRef
- 作用:将一个响应式对象中的每一个属性,转换成ref对象
- 备注:toRefs 和 toRef 功能一致,但 toRefs 可以批量转换
- 语法:
<template>
    <div>
        <h1>Person2</h1>
        <p>姓名:{{Person2.name}}</p>
        <p>年龄:{{Person2.age}}</p>
        <p>电话:{{Person2.tel}}</p>
        <button @click="changeName">修改姓名</button>
        <button @click="changeAge">修改年龄</button>
        </div>
</template>
<script>

</script>

<script lang="ts" setup name="Person2">

import { toRefs,reactive,toRef} from 'vue';
//数据
let Person2 = reactive({
    name: 'zs',
    age: 18,
    tel: '13888888888',
});


let {name,age,tel} = toRefs(Person2);
let n1 = toRef(Person2,'name');
console.log(n1.value);
//方法


function changeName() {
    name.value += '~';

}

function changeAge() {
    age.value += 1;
}
</script>
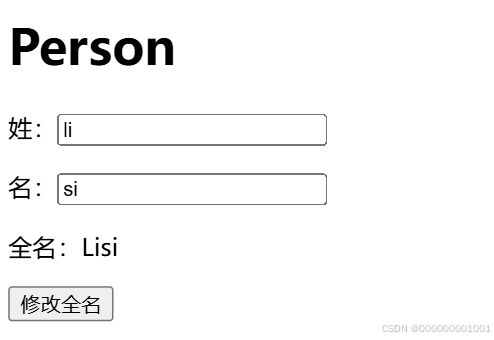
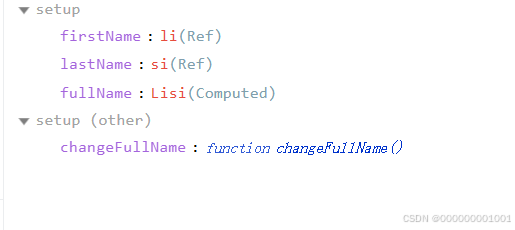
计算属性
<template>
    <div>
        <h1>Person</h1>
        <p>姓:<input type="text" v-model="firstName"/></p>
        <p>名:<input type="text" v-model="lastName"/></p>
        <p>全名:{{fullName}}</p>
        <button @click="changeFullName">修改全名</button>
        </div>
</template>

<script lang="ts" setup name="compute">
import { ref,computed } from 'vue';
let firstName = ref('张');
let lastName = ref('三');
//定义的fullName 是一个计算属性,只可读,不可修改
/*let fullName =computed(()=>{
    return firstName.value.slice(0,1).toUpperCase()+firstName.value.slice(1) + lastName.value;
})
*/

//定义的fullName 是一个计算属性,可读可修改
let fullName =computed({
    get(){
        return firstName.value.slice(0,1).toUpperCase()+firstName.value.slice(1) + lastName.value;
    },
    set(value){
        let names = value.split('-');
        firstName.value = names[0];
        lastName.value = names[1];}})
function changeFullName() {
    console.log(fullName.value);
    fullName.value = 'li-si';
}
</script>
<style scoped>

</style>
watch
- 作用:监视数据的变化(和Vue2中的watch作用一致)
- 特点:vue3中的watch只能监视以下四种数据:
1、ref 定义的数据
2、reative定义的数据
3、函数返回一个值
4、一个包含上述内容的数组
在vue3中使用watch通常遇到以下几种情况:
情况一:监视ref 定义的【基本类型】数据:直接写数据名即可,监视的是其value值的改变
<template>
    <div>
        <h2>当前求和为:{{ sum }}</h2>
        <button @click="changeSum">+1</button>
    </div>
</template>
<script lang="ts" setup name="Watch">
import { ref,computed ,watch} from 'vue';
        let sum = ref(0)
        //方法
        function changeSum() {
            sum.value += 1;
        }
        //watch
        //watch(谁?回调函数)
       const stopWatch= watch(sum,(newValue,oldValue)=>{
            console.log('sum的值发生了变化',newValue,oldValue);
            //解除监视
            if(newValue>=10){
                stopWatch()
            }

        })

</script>
<style scoped>

</style>
情况二:监视ref定义的【基本类型】数据:直接写数据名,监视的是对象的【地址值】,若想监视对象内部的数据,要手动开启深度监视
注意
1、若修改的是ref定义的对象中的属性,newValue和oldValue 都是新值,因为它们都是同一个对象
2、若修改整个ref定义的对象,newValue是新值,oldValue 是旧值,因为不是一个对象了。
<template>
 <div>
  <h1>Person</h1>
  <h2>姓名:{{Person.name}}</h2>
  <h2>年龄:{{Person.age}}</h2>
  <h2>tel:{{Person.tel}}</h2>
  <button @click="changeName">修改姓名</button>
  <button @click="changeAge">修改年龄</button>
  <button @click="changePerson">修改Person</button>
 </div>
</template>
<script lang="ts" setup name="Watch">
import { ref,computed ,watch} from 'vue';
  let Person = ref({
    name: 'zs',
    age: 18,
    tel: '13888888888',
  });

  function changeName() {
    Person.value.name += '~';
  }
  function changeAge() {
    Person.value.age += 1;
  }
  function changePerson() {
    Person.value = {
      name: 'ls',
      age: 20,
      tel: '13888888888',
    };
  }
  //watch
  //watch(谁?回调函数)
  //watch第一个参数:被监视的数据
  //watch第二个参数:回调函数
  //watch第三个参数:配置项 (immediate:立即监视  deep:深度监视  等等)
  watch(Person,(newValue,oldValue)=>{
    console.log('Person的值发生了变化',newValue,oldValue);
  },{
    immediate:true,//立即监视
    deep:true,//深度监视
  })
</script>
<style scoped>

</style>
情况三:监视reactive 定义的对象类型、数据、且默认开启了深度监视
<template>
 <div>
  <h1>Person</h1>
  <h2>姓名:{{Person.name}}</h2>
  <h2>年龄:{{Person.age}}</h2>
  <h2>tel:{{Person.tel}}</h2>
  <button @click="changeName">修改姓名</button>
  <button @click="changeAge">修改年龄</button>
  <button @click="changePerson">修改Person</button>
 </div>
</template>
<script lang="ts" setup name="Watch">
import { reactive,computed ,watch, toRef} from 'vue';
  let Person = reactive({
    name: 'zs',
    age: 18,
    tel: '13888888888',
  });

  function changeName() {
    Person.name += '~';
  }
  function changeAge() {
    Person.age += 1;
  }
  function changePerson() {
   Object.assign(Person,{
    name: 'ls',
    age: 20,
    tel: '13888888888',
   })
  }

  watch(Person,(newValue,oldValue)=>{
    console.log('Person的值发生了变化',newValue,oldValue);
  },{
    immediate:true,//立即监视
    deep:true,//深度监视
  })
</script>
<style scoped>

</style>
情况四:监视ref 或reactive 定义的对象类型,数据中的某个属性,注意点如下:
- 若该属性不是 对象类型 ,需要写成函数形式
- 若该属性值依然是 对象类型 ,可直接编,也可以写成函数,不过建议写成函数
总结:监视的要是对象里的属性,那么最好写函数式。注意点:若是对象监视的是地址值,需要关注对象内部,需要开启深度监视。
<template>
  <div>
  <h1>Person</h1>
  <h2>姓名:{{person.name}}</h2>
  <h2>年龄:{{person.age}}</h2>
  <h2>汽车:{{person.car.c1}}--{{person.car.c2}}</h2>
  <button @click="changeName">修改姓名</button>
  <button @click="changeAge">修改年龄</button>
  <button @click="changeCar1">修改汽车1</button>
  <button @click="changeCar2">修改汽车2</button>
  <button @click="changeCar">修改整个汽车</button>


 </div>
</template>


<script lang="ts" setup name="Watch">

  import { reactive,computed ,watch, toRef} from 'vue';
  let person = reactive({
    name: 'zs',
    age: 18,
    car:{
      c1:'奔驰',
      c2:'40W'
    }
    });
    function changeName(){
      person.name += '~';
    }
    function changeAge(){
      person.age += 1;
    }
    function changeCar1(){
      person.car.c1 = '奥迪';
    }
    function changeCar2(){
      person.car.c2 = '大众';
    }
    function changeCar(){
      person.car = {
        c1:'雅迪',
        c2:'艾玛'
      }
    }
    watch(()=>{return person.name},(newValue,oldValue)=>{
      console.log('person的name发生了变化',newValue,oldValue);
    })
    watch(()=>person.age,(newValue,oldValue)=>{
      console.log('person的age发生了变化',newValue,oldValue);
    })
    watch(()=>person.car,(newValue,oldValue)=>{
      console.log('person的car发生了变化',newValue,oldValue);
    })

</script>
<style scoped>

</style>
情况五:一个包含上述内容的数组
<template>
  <div>
  <h1>Person</h1>
  <h2>姓名:{{person.name}}</h2>
  <h2>年龄:{{person.age}}</h2>
  <h2>汽车:{{person.car.c1}}--{{person.car.c2}}</h2>
  <button @click="changeName">修改姓名</button>
  <button @click="changeAge">修改年龄</button>
  <button @click="changeCar1">修改汽车1</button>
  <button @click="changeCar2">修改汽车2</button>
  <button @click="changeCar">修改整个汽车</button>


 </div>
</template>


<script lang="ts" setup name="Watch">

  import { reactive,computed ,watch, toRef} from 'vue';
  let person = reactive({
    name: 'zs',
    age: 18,
    car:{
      c1:'奔驰',
      c2:'40W'
    }
    });
    function changeName(){
      person.name += '~';
    }
    function changeAge(){
      person.age += 1;
    }
    function changeCar1(){
      person.car.c1 = '奥迪';
    }
    function changeCar2(){
      person.car.c2 = '大众';
    }
    function changeCar(){
      person.car = {
        c1:'雅迪',
        c2:'艾玛'
      }
    }
    watch([()=>person.name,()=>person.car.c1],(newValue,oldValue)=>{
      console.log('p发生了变化',newValue,oldValue);
    },{deep:true})

</script>
<style scoped>

</style>
watchEffect
- 官网:立即执行一个函数,同时响应式地追踪其依赖,并在依赖更改时重新执行该函数
- watch vs watchEffect
- 都能监听响应式数据的变化,不同的是监听数据变化的方式不同
- watch:要明确指出监视的数据
- watchEffect:不用明确指出监视的数据(函数中用到哪些属性,那就监视哪些属性)。
<template>
    <h2>当前水位{{ height }}·C</h2>
    <h2>当前水温{{ temp }}cm</h2>
    <button @click="addHeight">addHeight+10</button>
    <button @click="addTemp">addTemp+10</button>

</template>

<script lang="ts" name="WatchEffect" setup>
import { ref,watch,watchEffect }   from 'vue'

let height = ref(0)
let temp = ref(10)

const addHeight = () => {
    height.value+=10;
}
const addTemp = () => {
    temp.value+=10
}

// watch([temp,height],(value)=>{
//     let [newtemp,newheight] = value;
//     if(newtemp>30||newheight>100){
//         console.log('给服务器发请求');
//     }

// })

//watchEffect会立即执行一次,然后当依赖项发生变化时,再次执行

watchEffect(()=>{

    if(temp.value>30||height.value>100){
        console.log('给服务器发请求');
    }
})
</script>

<style scoped>
</style>
标签的ref属性
作用:用于注册模版使用
- 用在普通DOM标签上,获取的是DOM节点
- 用在组件标签上,获取的是组件实例对象
App.vue 部分代码
<template>
    <h2 ref="title3">你好</h2>
    <button @click="showTitle">show标题</button>
    <RefTest ref="ren"/>


</template>

<script lang="ts" setup name="app">
 import { ref } from 'vue'; //引入ref
    let title3 = ref(); //定义ref
    let ren = ref(); //定义ref
    function showTitle() {
        console.log(ren.value); //使用ref
    }

</script>
RefTest.vue
<template>
    <div>
        <h1 >中国</h1>
        <h2 id="title2">北京</h2>
        <h3 ref="title3">故宫</h3>
        <button @click="showLog">点击我输出h1这个元素</button>

    </div>
</template>
<script lang="ts" setup name="RefTest">
import { ref,defineExpose} from 'vue'
//创建一个title3,用于存储ref标记的内容
let title3 = ref(null)
let a = ref(0)
let b = ref(1)
let c = ref(2)

function showLog() {
    // console.log(document.getElementById('title2'));
    console.log(title3.value);
}

defineExpose({
    a,
    b,
    c
})
</script>
<style scoped></style>

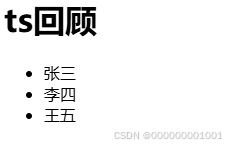
回顾TS
Review.vue
<template>
  <div>
    <h1>ts回顾</h1>
    <ul>
      <li v-for="item in personList" :key="item.id">{{item.name}}</li>
    </ul>
  </div>
</template>
<script></script>

<script lang="ts" setup name="ER">

import {type PersonInter,type Persons} from '@/types'

// let person:PersonInter ={id:1,name:'张三',age:60}


// let personList:Array<PersonInter> = [
//   {id:1,name:'张三',age:60},
//   {id:2,name:'李四',age:50},
//   {id:3,name:'王五',age:40},

// ]

let personList:Persons = [
  {id:1,name:'张三',age:60},
  {id:2,name:'李四',age:50},
  {id:3,name:'王五',age:40},

]
</script>

<style scoped>

</style>
index.ts
//定义一个接口,用于限制person对象的具体属性

export interface PersonInter{
    id:string
    name:string
    age:number
}


//一个自定义类型
// type Persons = Array<PersonInter>  //法一
export type Persons = PersonInter[]  //法二

//暴露有三种形式
效果
props
组件关系: 父传子,子展示

一、传
Props.vue
<template>
  <h2>  {{ a }}</h2>
</template>
<script lang="ts" setup name="Person">
import {defineProps} from 'vue'
defineProps(['a'])
</script>
App.vue 部分代码
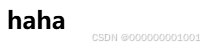
<template>
    <h2 ref="title3">你好</h2>
    <button @click="showTitle">show标题</button>
    <Props a="haha"/>
    <ReviewTs/>

</template>
<script lang="ts">

//JS或TS
import Props from './components/Props.vue';

<script lang="ts" setup name="app">
 import { ref,reactive } from 'vue'; //引入ref

</script>
<style scoped>
/* 样式 */
</style>
效果:
二、存
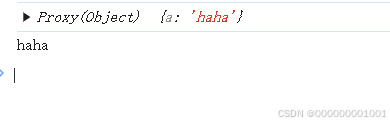
Props.vue
<template>
  <h2>  {{ a }}</h2>
</template>
<script lang="ts" setup name="Person">
import {defineProps} from 'vue'

//接收a
// defineProps(['a'])
// console.log(a)  打印不了a 的值

//接收a ,同时将props保存起来
let x = defineProps(['a'])
console.log(x)
console.log(x.a)  //打印a 的值


</script>
console效果:
三、
这里是引用
<h2 a="1+1" :b="1+1" ref="123"></h2>
a = “1+1” 字符串 ==》a = “1+1”
:b=“1+1” 是表达式 ==》 b = 2
ref是特例,不用+冒号
Props.vue
<template>
  <h2>  {{ a }}</h2>
  <h2>{{ list }}</h2>
  <ul>
    <li v-for="item in list" :key="item.id">{{ item.name }}=={{ item.age }}</li>
  </ul>
</template>
<script lang="ts" setup name="Person">
import {defineProps,withDefaults} from 'vue'
import {type Persons} from '@/types'

//接收a
// defineProps(['a'])
// console.log(a)  打印不了a 的值

//接收a ,同时将props保存起来
// let x = defineProps(['a'])
// console.log(x)
// console.log(x.a)  //打印a 的值


//接收a,list
// let y = defineProps(['a','list'])


// 只接受list 会出问题
// defineProps(['list'])
//循环:<li v-for="p in list" :key="p.id">{{p.name}}</li>


//接收list + 限制类型
//defineProps<{list:Persons}>()


//接收list + 限制类型 + 限制必要性 + 指定默认值
withDefaults(defineProps<{list?:Persons}>(),{
    list:()=>[{
        id:'1',
        name:'张三',
        age:18
    }]
}) //父不传,儿来个默认值


</script>
生命周期(组件的一生)理解
组件的生命周期:
- 创建 created
- 挂载 mouted
- 更新 update
- 销毁
vue2
创建 (创建前 beforeCreate,创建完毕created)
挂载 (挂载前 beforeMount 、挂载完毕mounted)
更新 (更新前 beforeUpdate,更新完毕updated)
销毁 (销毁前 beforeDestroy,销毁完毕destroyed)
4个阶段 8个钩子
vue3
创建 (setup console.log("创建"))
挂载 (引入onBeforeMount,onMounted
挂载前 onBeforeMount()=>{ console.log("挂载前")} 、
挂载完毕 onMounted()=>{ console.log("挂载完毕")})
更新 (引入onBeforeUpdate,onUpdated
更新前 onBeforeUpdate()=>{ console.log("更新前")},
更新完毕 onUpdated()=>{ console.log("更新完毕")})
卸载(引入onBeforeUnmount,onUnmount
卸载前 onBeforeUnmount()=>{ console.log("卸载前")} ,
卸载完毕 onUnmount()=>{ console.log("卸载完毕")})
子先挂载完毕,父后挂载完毕


 1508
1508

 被折叠的 条评论
为什么被折叠?
被折叠的 条评论
为什么被折叠?
 到【灌水乐园】发言


