


04-VUE动画与组件
过滤器
本质,过滤器是一个特殊的函数
作用,可以对模板上的数据进行再处理,在数据挂载前处理。比如:
13331153360
133****3360
1   2
男  女
过滤器作用在变量的后面,
使用 | 作为符合
作用将 | 前边的变量作为 | 后边的函数的值进行处理。
过滤器函数必须有返回值
过滤器只可以在插值表达式和v-bind上使用
<body>
    <div id="app">
        {{ phone|setPhone }} setPhone(phone)
    </div>
</body>
<script>
    Vue.filter("setPhone",function(string){
        return string.slice(0,3)+"****"+string.slice(-4)
    });
    var vue = new Vue({
        el: "#app",
        data: {
            phone: "13331153360"
        }
    });
</script>
过滤器的划分
全局过滤器
Vue.filter("setPhone",function(string){
    console.log("hhh")
    return string.slice(0,3)+"****"+string.slice(-4)
});
局部作用域
var vue = new Vue({
    el: "#APP",
    data: {
        phone: "15210698741",
        gender: 1
    },
    filters:{
        gen(value){
            if(value === 1){
                return "男"
            }else{
                return "女"
            }
        }
    }
});
过滤器参数
1991-06-18
1991/06/18
1991.01.18
比如时间过滤器
<!DOCTYPE html>
<html lang="en">
<head>
    <meta charset="UTF-8">
    <meta http-equiv="X-UA-Compatible" content="IE=edge">
    <meta name="viewport" content="width=device-width, initial-scale=1.0">
    <title>Document</title>
    <script src="./vue.js"></script>
</head>
<body>
    <div id="app">
        {{ timer|setTime("-----") }}
    </div>
</body>
<script>
    Vue.filter("setPhone",function(string){
        console.log("hhh")
        return string.slice(0,3)+"****"+string.slice(-4)
    });
    Vue.filter("setTime",function(string,d="-"){
        var split_list = string.split(" ")
        return split_list.join(d)
    });
    var vue = new Vue({
        el: "#app",
        data: {
            timer: "1991 06 18"
        }
    });
</script>
</html>
过渡动画
CSS过渡动画
<!DOCTYPE html>
<html lang="en">
<head>
    <meta charset="UTF-8">
    <meta http-equiv="X-UA-Compatible" content="IE=edge">
    <meta name="viewport" content="width=device-width, initial-scale=1.0">
    <title>Document</title>
    <script src="./vue.js"></script>
    <style>
        *{
            padding: 0;
            margin: 0;
            box-sizing: border-box;
        }
        .box{
            width: 200px;
            height: 200px;
            background-color: blueviolet;
            transition: all 10s linear 1s;
        }
        .box:hover{
            width: 800px;
            background-color: green;
        }
    </style>
</head>
<body>
    <div id="app">
        <div class="box">

        </div>
    </div>

</body>
<script>
    var vue = new Vue({
        el: "#app",
        data: {

        }
    });
</script>
</html>
VUE过渡动画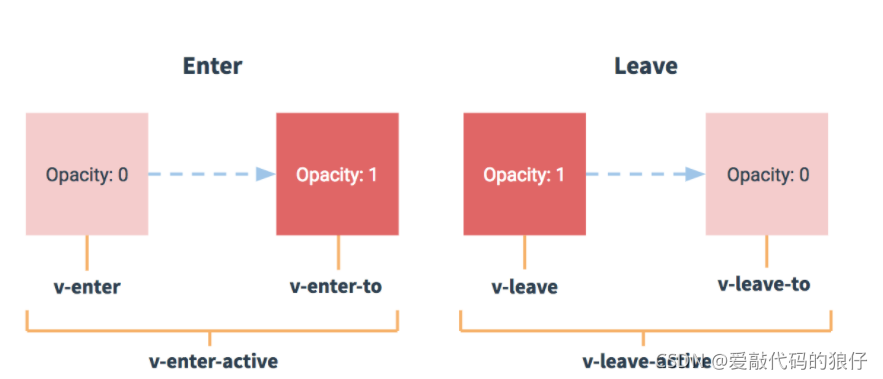
1、将需要过渡的内容放到<transition>标签当中
<body>
    <div id="app">
        <button @click="isShow = !isShow">toggle</button>
        <transition>
            <div class="box" v-if="isShow">

            </div>
        </transition>
    </div>
</body>
2、使用6个定义好的类型来描述过渡动画
-
v-enter:定义进入过渡的开始状态。在元素被插入之前生效,在元素被插入之后的下一帧移除。 -
v-enter-active:定义进入过渡生效时的状态。在整个进入过渡的阶段中应用,在元素被插入之前生效,在过渡/动画完成之后移除。这个类可以被用来定义进入过渡的过程时间,延迟和曲线函数。 -
v-enter-to:2.1.8 版及以上定义进入过渡的结束状态。在元素被插入之后下一帧生效 (与此同时v-enter被移除),在过渡/动画完成之后移除。 -
v-leave:定义离开过渡的开始状态。在离开过渡被触发时立刻生效,下一帧被移除。 -
v-leave-active:定义离开过渡生效时的状态。在整个离开过渡的阶段中应用,在离开过渡被触发时立刻生效,在过渡/动画完成之后移除。这个类可以被用来定义离开过渡的过程时间,延迟和曲线函数。 -
v-leave-to:2.1.8 版及以上定义离开过渡的结束状态。在离开过渡被触发之后下一帧生效 (与此同时v-leave被删除),在过渡/动画完成之后移除。
<style>
    *{
        padding: 0;
        margin: 0;
        box-sizing: border-box;
    }
    .box{
        width: 200px;
        height: 200px;
        background-color: blueviolet;
    }
    .v-enter{
        opacity: 0;
    }
    .v-enter-active{
        transition: all 10s;
    }
    .v-enter-to{
        opacity: 1;
    }
    .v-leave{
        opacity: 1;
    }
    .v-leave-active{
        transition: all 10s;
    }
    .v-leave-to{
        opacity: 0;
    }
</style>
单页面多种过渡效果需要借助name属性,设置name属性后,将name数组作为css样式名称的开始就可以了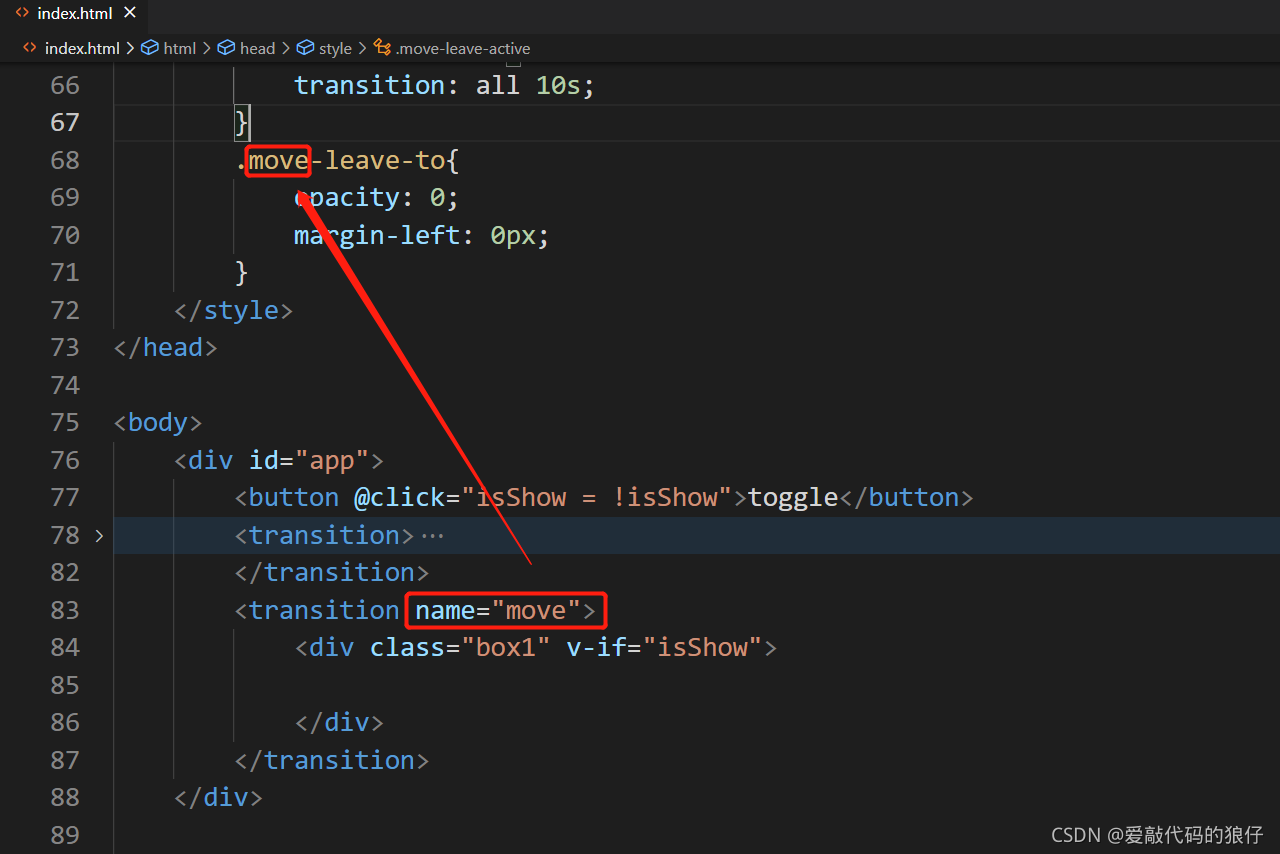
合并代码为
所有代码
<!DOCTYPE html>
<html lang="en">
<head>
<meta charset="UTF-8">
<meta http-equiv="X-UA-Compatible" content="IE=edge">
<meta name="viewport" content="width=device-width, initial-scale=1.0">
<title>Document</title>
<script src="./vue.js"></script>
<style>
*{
padding: 0;
margin: 0;
box-sizing: border-box;
}
.box{
width: 200px;
height: 200px;
background-color: blueviolet;
margin-left: -200px;
}
.v-enter{
opacity: 0;
margin-left: -200px;
}
.v-enter-active{
transition: all 10s;
}
.v-enter-to{
opacity: 1;
margin-left: 500px;
}
.v-leave{
opacity: 1;
margin-left: 500px;
}
.v-leave-active{
transition: all 10s;
}
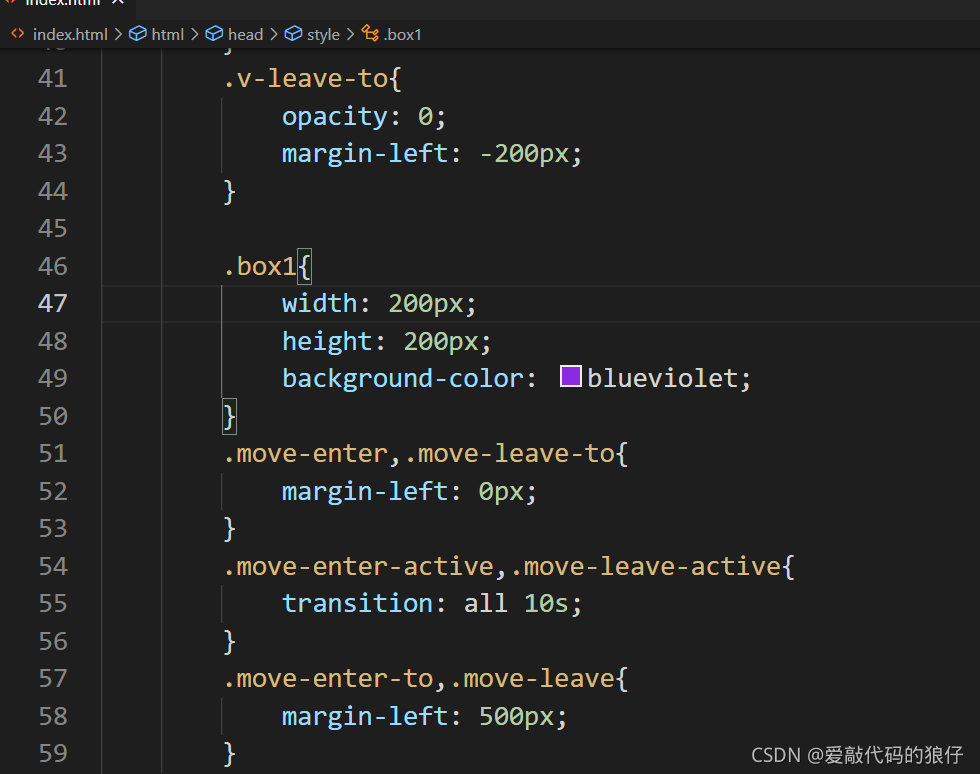
.v-leave-to{
opacity: 0;
margin-left: -200px;
}
.box1{
width: 200px;
height: 200px;
background-color: blueviolet;
}
.move-enter,.move-leave-to{
margin-left: 0px;
}
.move-enter-active,.move-leave-active{
transition: all 10s;
}
.move-enter-to,.move-leave{
margin-left: 500px;
}
</style>
</head>
<body>
<div id="app">
<button @click="isShow = !isShow">toggle</button>
<transition>
<div class="box" v-if="isShow">
</div>
</transition>
<transition name="move">
<div class="box1" v-if="isShow">
</div>
</transition>
</div>
</body>
<script>
var vue = new Vue({
el: "#app",
data: {
isShow: true
}
});
</script>
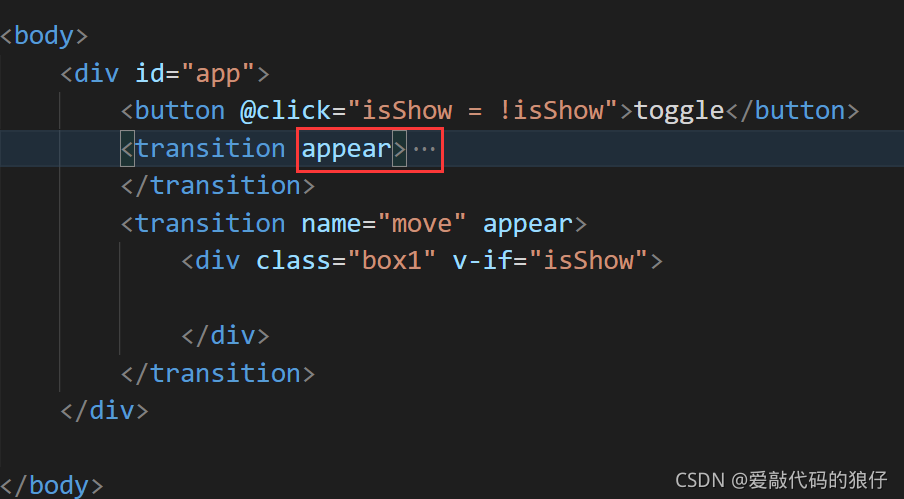
</html>在transition标签上添加appear属性,新增初始化动画
如果使用过渡动画的是多个元素,需要使用transition-group标签
<!DOCTYPE html>
<html lang="en">
<head>
    <meta charset="UTF-8">
    <meta http-equiv="X-UA-Compatible" content="IE=edge">
    <meta name="viewport" content="width=device-width, initial-scale=1.0">
    <title>Document</title>
    <script src="./vue.js"></script>
    <style>
        *{
            padding: 0;
            margin: 0;
            box-sizing: border-box;
        }

        .item{
            width: 300px;
            height: 100px;
            background-color: blueviolet;
            text-align: center;
            line-height: 100px;
        }
        .v-enter{
            opacity: 0;
            margin-left: -200px;
        }
        .v-enter-active{
            transition: all 3s;
        }
        .v-enter-to{
            opacity: 1;
            margin-left: 500px;
        }
        .v-leave{
            opacity: 1;
            margin-left: 500px;
        }
        .v-leave-active{
            transition: all 3s;
        }
        .v-leave-to{
            opacity: 0;
            margin-left: -200px;
        }
    </style>
</head>
<body>
    <div id="app">
        <ul>
        <transition-group appear>
            <li class="item" v-show="isShow" v-for="(i,index) in foods_list" :key="i" @click="del(index)">
                {{ i }}
            </li>
        </transition-group>
        </ul>
        <transition name="move" appear>
            <div class="box1" v-if="isShow">

            </div>
        </transition>
    </div>
</body>
<script>
    var vue = new Vue({
        el: "#app",
        data: {
            isShow: true,
            foods_list: [
                "红烧肉",
                "锅包肉",
                "咕咾肉",
                "回锅肉",
                "粉蒸肉"
            ]
        },
        methods: {
            del(index){
                this.foods_list.splice(index,1)
            }
        }
    })
</script>
</html>
结合三方库的transtion
animate
-
enter-class -
enter-active-class -
enter-to-class(2.1.8+) -
leave-class -
leave-active-class -
leave-to-class(2.1.8+)
<!DOCTYPE html>
<html lang="en">
<head>
    <meta charset="UTF-8">
    <meta http-equiv="X-UA-Compatible" content="IE=edge">
    <meta name="viewport" content="width=device-width, initial-scale=1.0">
    <title>Document</title>
    <script src="./vue.js"></script>
    <style>
        *{
            padding: 0;
            margin: 0;
            box-sizing: border-box;
        }

        .box{
            width: 300px;
            height: 300px;
            background-color: blueviolet;
            text-align: center;
            line-height: 100px;
        }
    </style>
    <link href="https://cdn.jsdelivr.net/npm/animate.css@3.5.1" rel="stylesheet" type="text/css">
    <!-- <link href="./animate.min@4.1.1.css" rel="stylesheet" type="text/css"> -->
</head>

<body>
    <div id="app">
        <button @click="isShow = !isShow">切换</button>
        <transition
            enter-active-class="animated tada"
            leave-active-class="animated bounceOutRight"
        >
            <div class="box" v-if="isShow">

            </div>
        </transition>
    </div>

</body>
<script>
    var vue = new Vue({
        el: "#app",
        data: {
            isShow: true
        },
        methods: {

        }
    });
</script>
</html>
批量的使用三方的过渡动画也是通过<transition-group>标签,属性同上
-
enter-class -
enter-active-class -
enter-to-class(2.1.8+) -
leave-class -
leave-active-class -
leave-to-class(2.1.8+)
组件
组件对应一种模块化开发的思想,就是页面当中常用功能的封装。
组件构成:
视图(html部分)
样式 (css部分)
行为 (js部分)
全局组件
<!DOCTYPE html>
<html lang="en">
<head>
    <meta charset="UTF-8">
    <meta http-equiv="X-UA-Compatible" content="IE=edge">
    <meta name="viewport" content="width=device-width, initial-scale=1.0">
    <title>Document</title>
    <script src="./vue.js"></script>
</head>
<body>
    <div id="app">
        <hhh></hhh>
        <hhh></hhh>
        <hhh></hhh>
        <hhh></hhh>
        <hhh></hhh>
        <hhh></hhh>
    </div>
</body>
<script>
    Vue.component(
        'hhh',{
            template: `
                <h1 @click="say_hello">{{ message }}</h1>
            `,
            data(){
                return {
                    message: "hello world"
                }
            },
            methods:{
                say_hello(){
                    console.log("hello world")
                }
            }
        }
    )
    var vue = new Vue({
        el: "#app",
        data: {
        }
    });
</script>
</html>
1、组件是一个完整的功能体
一个组件的 data 选项必须是一个函数,因此每个实例可以维护一份被返回对象的独立的拷贝,如果 Vue 没有这条规则,在同一页面多次调用一个组件,修改的数据会是同一个数据,形成混淆。
因为对象是一个引用类型的数据结构,在多次调用的时候,实际上修改的内部元素是同一块内存上的同一个数据,而函数每次调用会生成独立的内存空间,所以为了保持组件多次调用,每次的独立性,组件的data属性选用函数,但是这个函数必须返回一个对象。
局部组件
1、组件标签 <template>,本身不显示,可以作为组件的html部分
2、组件当中必须有一个根标签
3、组件支持嵌套
4、报错的等级: info warning error danger
<!DOCTYPE html>
<html lang="en">
<head>
<meta charset="UTF-8">
<meta http-equiv="X-UA-Compatible" content="IE=edge">
<meta name="viewport" content="width=device-width, initial-scale=1.0">
<title>Document</title>
<script src="./vue.js"></script>
</head>
<body>
<div id="app">
<tom></tom>
</div>
<template id="title">
<asdfasf>
<h2>这是一个标题</h2>
<hhh></hhh>
</asdfasf>
</template>
</body>
<script>
Vue.component(
'hhh',{
template: `
<h1 @click="say_hello">{{ message }}</h1>
`,
data(){
return {
message: "hello world"
}
},
methods:{
say_hello(){
console.log("hello world")
}
}
}
)
var vue = new Vue({
el: "#app",
data: {
},
components: {
'tom': {
template: "#title",
data(){
return {
}
},
methods: {
}
}
}
});
</script>
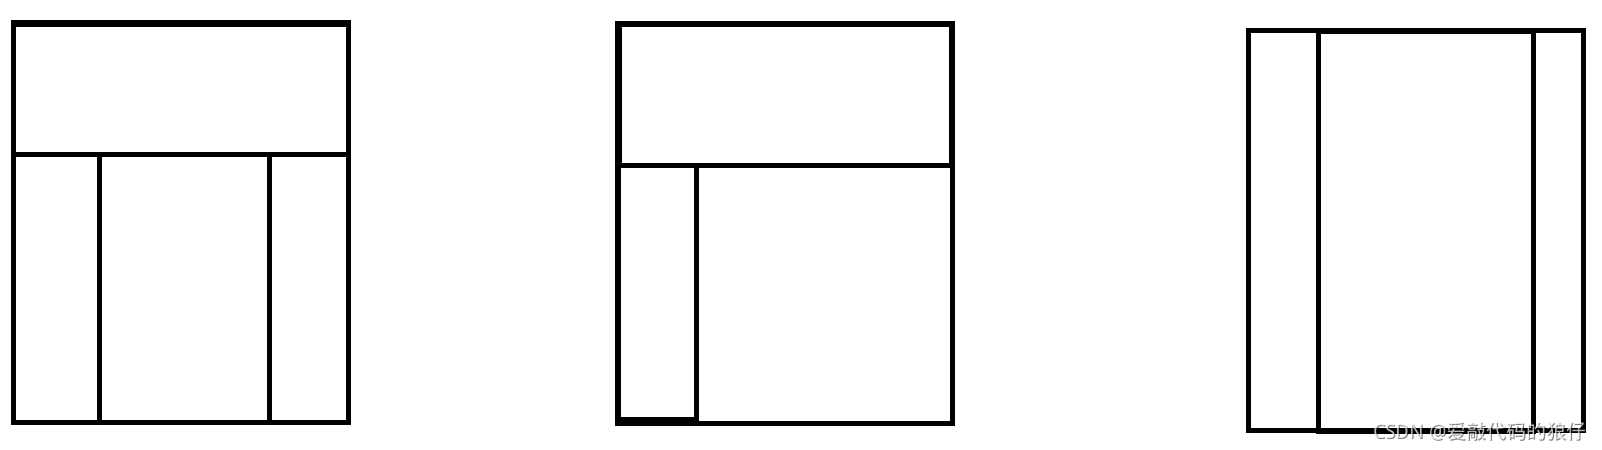
</html>案例

<!DOCTYPE html>
<html lang="en">

<head>
    <meta charset="UTF-8">
    <meta http-equiv="X-UA-Compatible" content="IE=edge">
    <meta name="viewport" content="width=device-width, initial-scale=1.0">
    <title>Document</title>
    <script src="./vue.js"></script>
    <style>
        *{
            margin: 0;
            padding: 0;
        }
        .top{
            width: 100%;
            height: 54px;
            background-color: #22B14C;
        }
        .contioner{
            width: 100%;
            background-color: #EFE4B0;
        }
        .contioner>div{
            float: left;
        }
        .left{
            width: 300px;
            height: calc(100vh - 54px);
            background-color: #FF7F27;
        }
        .right{
            width: calc(100% - 300px);

            height: calc(100vh - 54px);
        }
        .content{
            background-color: #B97A57;
            height: 500px;
            width: 1000px;
            margin: 60px 100px;
        }
    </style>
</head>

<body>
    <div id="app">
        <div class="top">
            <hea></hea>
        </div>
        <div class="contioner">
            <div class="left">
                <lef></lef>
            </div>
            <div class="right">
                <div class="content">
                    <con></con>
                </div>
            </div>
        </div>
    </div>
    <template id="header">
        <div>
            header
        </div>
    </template>
    <template id="left">
        <div>
            left
        </div>
    </template>
    <template id="content">
        <div>
            content
        </div>
    </template>
</body>

<script>
    var vue = new Vue({
        el: "#app",
        data: {

        },
        components: {
            hea:{
                template: "#header"
            },
            lef: {
                template: "#left"
            },
            con: {
                template: "#content"
            }
        }
    });
</script>
</html>
脚手架
项目共性功能的封装,叫做框架。
框架也叫做脚手架,是灵活的使用在同类型项目开发过程当中的辅助功能。
vue cli(command line interface),是vue官方提供的一个基于webpack的一个脚手架工具
vue cli可以帮助我们联网下载要基于webpack的开发模板
vue cli脚手架工具基于node平台的,npm
安装vue-cli
npm i @vue/cli -g
npm install @vue/cli --global
创建项目
首先要选择需要创建项目的目录
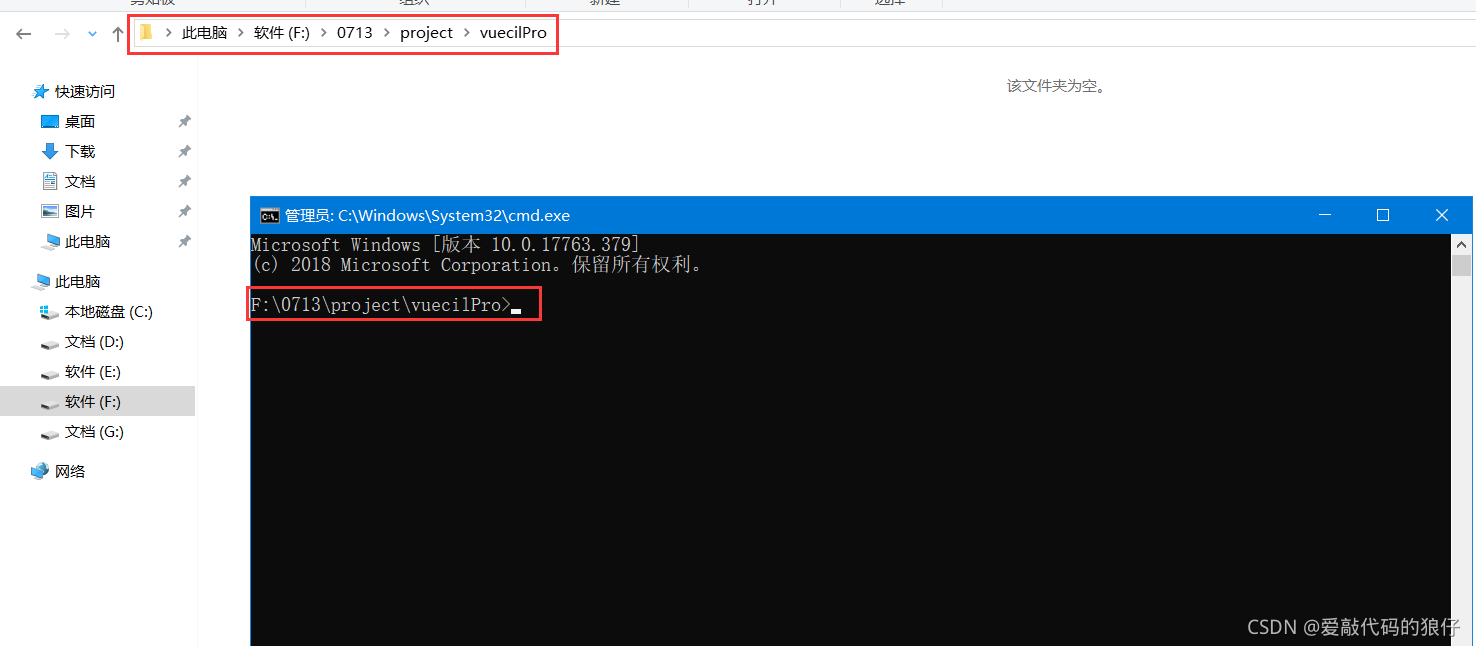
vue-cli可以使用命令行进行项目创建,但是命令行在哪里执行,就在那里创建。
vue create 项目名称(可以下划线,但是不可以大写)
启动项目
cd到项目目录下
npm run serve
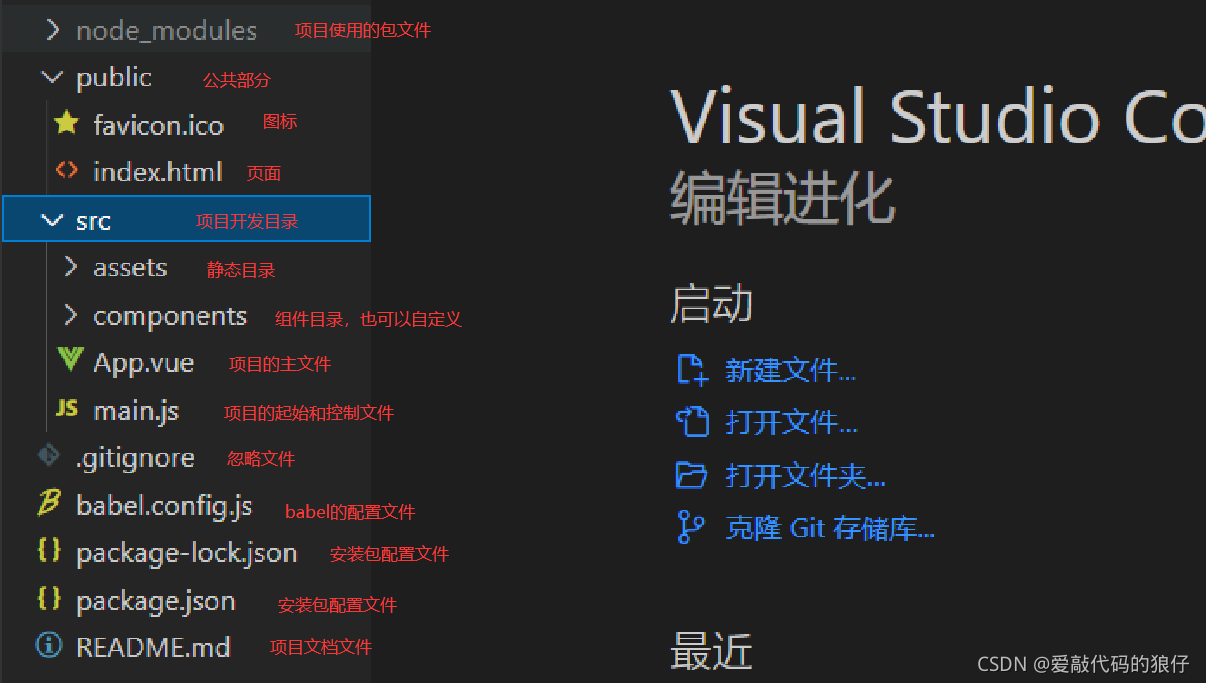
项目结构
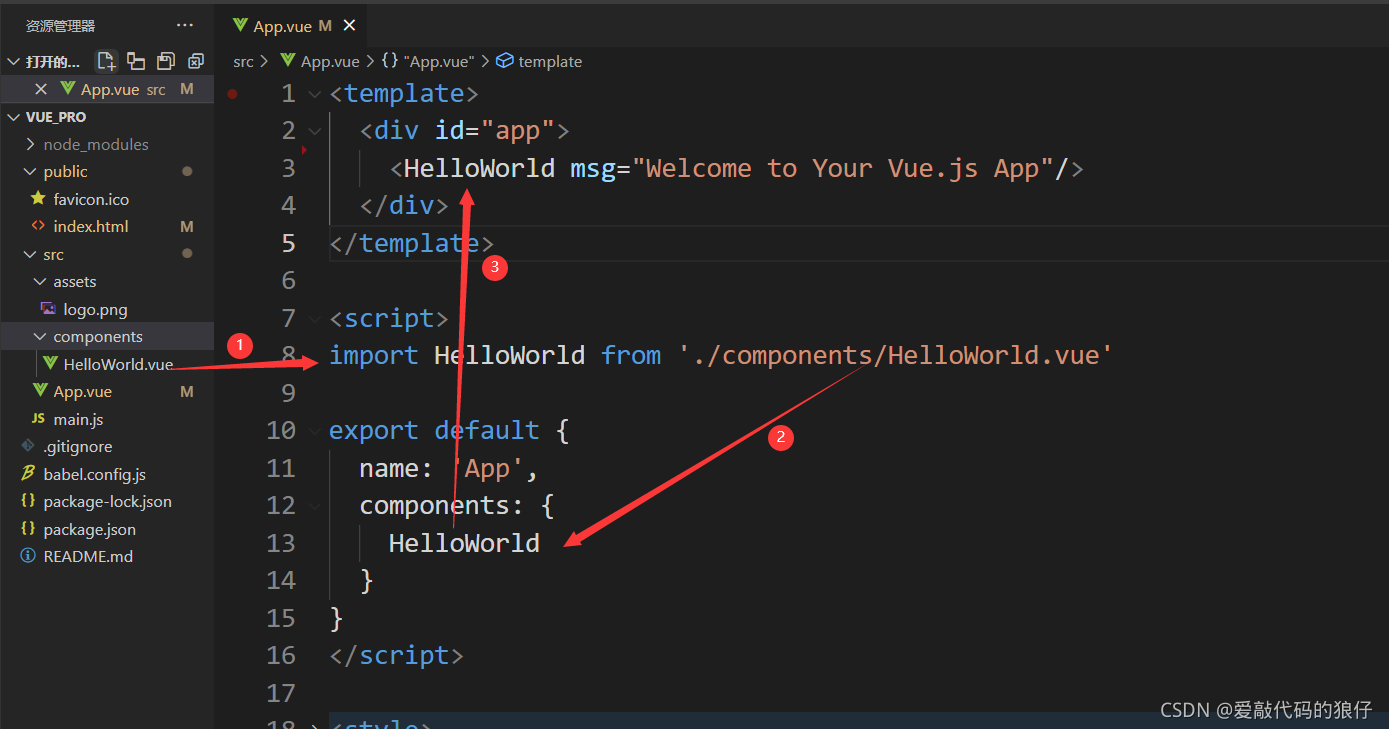
工作流程


 被折叠的 条评论
为什么被折叠?
被折叠的 条评论
为什么被折叠?
 到【灌水乐园】发言


