


 本文详细介绍了在鸿蒙系统中如何创建和使用ServiceAbility,包括Service的生命周期、连接管理、远程调用等方面。首先,创建ServiceAbility并实现关键方法,接着创建ConnectionHelper用于处理连接回调,然后创建RemoteProxy作为远程调用的代理。启动Service后,通过ConnectionHelper和RemoteProxy实现Service间的通信。文章还强调了Service的单例特性以及在主线程中避免阻塞的操作。最后,提供了连接Service的代码示例以及注意事项,确保主机端和远程端的正确连接。
一、基本概念
基于Service模板的Ability(以下简称“Service”)主要用于后台运行任务(如执行音乐播放、文件下载等),但不提供用户交互界面。Service可由其他应用或Ability启动,即使用户切换到其他应用,Service仍将在后台继续运行。
Service是单实例的。在一个设备上,相同的Service只会存在一个实例。如果多个Ability共用这个实例,只有当与Service绑定的所有Ability都退出后,Service才能够退出。由于Service是在主线程里执行的,因此,如果在Service里面的操作时间过长,开发者必须在Service里创建新的线程来处理,防止造成主线程阻塞,应用程序无响应。更多内容可以参考官方文档
二、使用
1.创建Service
新建ServiceAbility 继承Ability
public class ServiceAbility extends Ability {
    private static final HiLogLabel LABEL_LOG = new HiLogLabel(3, 0xD001100, "Demo");

    @Override
    public void onStart(Intent intent) {
        HiLog.info(LABEL_LOG, "ServiceAbility::onStart");
        super.onStart(intent);
    }

    @Override
    public void onBackground() {
        super.onBackground();
        HiLog.info(LABEL_LOG, "ServiceAbility::onBackground");
    }

    @Override
    public void onStop() {
        super.onStop();
        HiLog.info(LABEL_LOG, "ServiceAbility::onStop");
    }

    @Override
    public void onCommand(Intent intent, boolean restart, int startId) {
    }

    @Override
    public IRemoteObject onConnect(Intent intent) {
        HiLog.info(LABEL_LOG,"ServiceAbility::onConnect");
        return new GameRemoteObject("GameRemoteObject").asObject();
    }

    @Override
    public void onDisconnect(Intent intent) {
    }


    /**
     * 用于接受跨端信息
     *
     */
    private static class GameRemoteObject extends RemoteObject implements IRemoteBroker{

        public GameRemoteObject(String descriptor) {
            super(descriptor);
        }

        @Override
        public IRemoteObject asObject() {
            return this;
        }

        public boolean onRemoteRequest(int code, MessageParcel data, MessageParcel reply, MessageOption option){
            //接受跨端信息
            String message =data.readString();

            //通过 ConnectionHelper 将消息回调给 PageAbility
            ConnectionHelper.getInstance().sendMessage(message);

            //回传结果给消息发送者
            reply.writeInt(Constants.ERR_OK);
            return true;
        }
    }

}
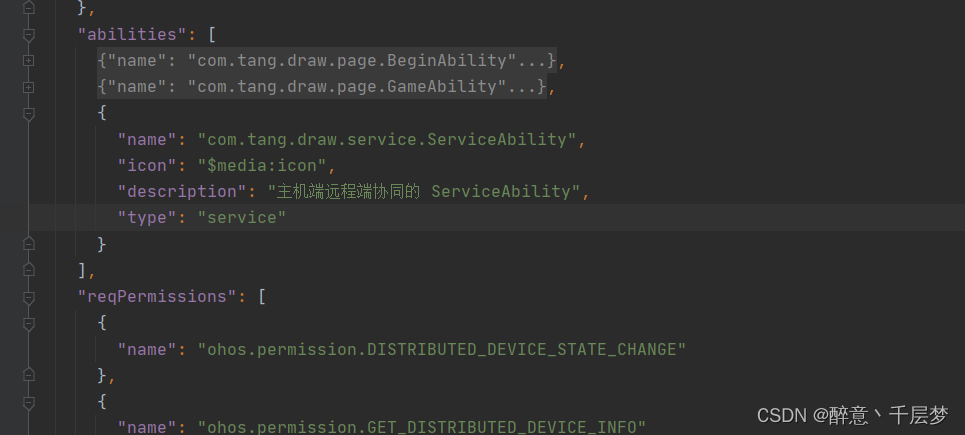
同时在config.json文件中需要注册
2.创建ConnectionHelper
public class ConnectionHelper {
/**
* 私有构造方法,避免单例被额外实例化
*/
private ConnectionHelper(){}
/**
* 静态内部类,持有唯一的 ConnectionHelper 实例
*/
private static class ConnectionHelperHolder{
private static final ConnectionHelper INSTANCE =new ConnectionHelper();
}

* @return ConnectionHelper 实例
*/
public static ConnectionHelper getInstance(){
return ConnectionHelperHolder.INSTANCE;
}
/**
* 通信回调
*/
private IConnectionCallback mConnectionCallback;
/**
* 设置通信回调
*
* @param connectionCallback 通信回调
*/
public void setCallback(IConnectionCallback connectionCallback){
this.mConnectionCallback=connectionCallback;
}
/**
* 发消息
*
* @param message 消息
*/
public void sendMessage(String message){
if(mConnectionCallback!=null){
mConnectionCallback.onCallback(message);
}
}
public interface IConnectionCallback {
/**
* 通信回调
*
* @param message 消息
*/
void onCallback(String message);
}
}
3.创建RemoteProxy
public class RemoteProxy implements IRemoteBroker {

    private static final HiLogLabel LABEL_LOG = new HiLogLabel(0,0x01008,"RemoteProxy");

    private final IRemoteObject remote;

    /**
     * 构造方法
     *
     * @param remote IRemoteObject实例
     */
    public RemoteProxy(IRemoteObject remote) {
        this.remote = remote;
    }

    @Override
    public IRemoteObject asObject() {
        return remote;
    }


    public void sendMessage(String message){
        //把消息封装到MessageParcel
        MessageParcel data= MessageParcel.obtain();
        data.writeString(message);

        MessageParcel reply =MessageParcel.obtain();
        MessageOption option =new MessageOption(MessageOption.TF_SYNC);
        try {
            //通过RemoteObject实例发送消息
            remote.sendRequest(IRemoteObject.MIN_TRANSACTION_ID,data,reply,option);

            //获取消息传递结果
            int ec=reply.readInt();
            if(ec!= Constants.ERR_OK){
                throw new RemoteException();
            }
        } catch (RemoteException e) {
            HiLog.error(LABEL_LOG,"RemoteException: %{public}s",e.getMessage());
        }
    }
}
4.启动service
这里不需要启动setvice,直接连接即可
启动本地设备Service的代码示例如下:
Intent intent = new Intent();
Operation operation = new Intent.OperationBuilder()
        .withDeviceId("")
        .withBundleName("com.domainname.hiworld.himusic")
        .withAbilityName("com.domainname.hiworld.himusic.ServiceAbility")
        .build();
intent.setOperation(operation);
startAbility(intent);
启动远程设备Service的代码示例如下:
Intent intent = new Intent();
Operation operation = new Intent.OperationBuilder()
        .withDeviceId("deviceId")
        .withBundleName("com.domainname.hiworld.himusic")
        .withAbilityName("com.domainname.hiworld.himusic.ServiceAbility")
        .withFlags(Intent.FLAG_ABILITYSLICE_MULTI_DEVICE) // 设置支持分布式调度系统多设备启动的标识
        .build();
intent.setOperation(operation);
startAbility(intent);
5.连接Service
定义相关变量
private Text countdownText;
private static RemoteProxy mRemoteProxy=null;
private final IAbilityConnection connection=new IAbilityConnection() {
@Override
public void onAbilityConnectDone(ElementName elementName, IRemoteObject iRemoteObject, int i) {
//连接成功,实例化代理
mRemoteProxy=new RemoteProxy(iRemoteObject);
getUITaskDispatcher().asyncDispatch(()->{
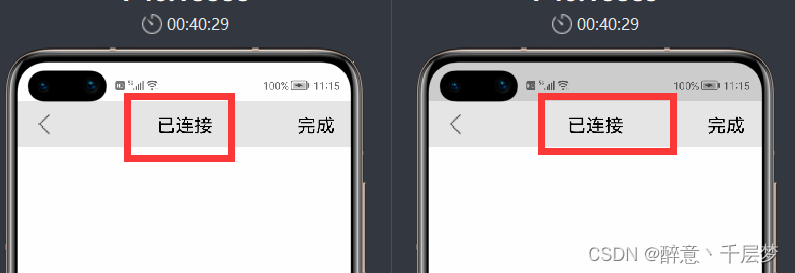
countdownText.setText("已连接");
});
}
@Override
public void onAbilityDisconnectDone(ElementName elementName, int i) {
}
};
连接函数
private void connectService(String deviceId){
        Intent intent=new Intent();
        Operation operation=new Intent.OperationBuilder()
                .withDeviceId(deviceId)
                .withBundleName(getBundleName())
                .withAbilityName(ServiceAbility.class.getName())
                .withFlags(Intent.FLAG_ABILITYSLICE_MULTI_DEVICE)
                .build();
        intent.setOperation(operation);

        connectAbility(intent,connection);
    }
发送消息函数
private void sendMessage(String message){
        if(mRemoteProxy==null){
            ToastUtils.show(getContext(),"无跨端连接代理");
        }
        else{
            mRemoteProxy.sendMessage(message);
        }
    }
消息处理函数
private void handleMessage(String message){
        //对接收到的消息进行处理
    }
最终效果,当正常连接后会出现已连接字样
三、注意
为了可以正确使得主机端和远程端连接成功,主机端主动连接远程端,远程端主动连接主机端。在onStart函数里面应该去获取主机端和远程端的设备ID
isMainDevice=intent.getBooleanParam(Constants.PARAM_KEY_IS_MAIN_DEVICE,true);
mRemoteDeviceId=intent.getStringParam(Constants.PARAM_KEY_REMOTE_DEVICE_ID);
mMainDeviceId=intent.getStringParam(Constants.PARAM_KEY_MAIN_DEVICE_ID);
同时判断当前页面是以主机还是远程端的形式创建,并在onActive函数根据是否为主机去使用不同的连接参数
if(isMainDevice){
    connectService(mRemoteDeviceId);
}
else {
    connectService(mMainDeviceId);
}


 被折叠的 条评论
为什么被折叠?
被折叠的 条评论
为什么被折叠?
 到【灌水乐园】发言


