


0 前言
本文基于ubuntu18.04中基于Docker搭建tensorflow-gpu开发环境这篇文章中构建好的tensorflow-gpu环境进行开发。如果觉得有用,测试demo可以找我要,希望能帮助到大家。
1 给容器安装ssh服务器
# 0 更新一下
root@1dcc1e5f8ae7:/environments# apt-get update
# 1 安装
root@1dcc1e5f8ae7:/environments# apt-get install openssh-server
Reading package lists... Done
Building dependency tree
Reading state information... Done
The following additional packages will be installed:
...
After this operation, 23.5 MB of additional disk space will be used.
Do you want to continue? [Y/n] y
...
# 2 设置登录密码
root@1dcc1e5f8ae7:/environments# passwd
Enter new UNIX password:
Retype new UNIX password:
passwd: password updated successfully
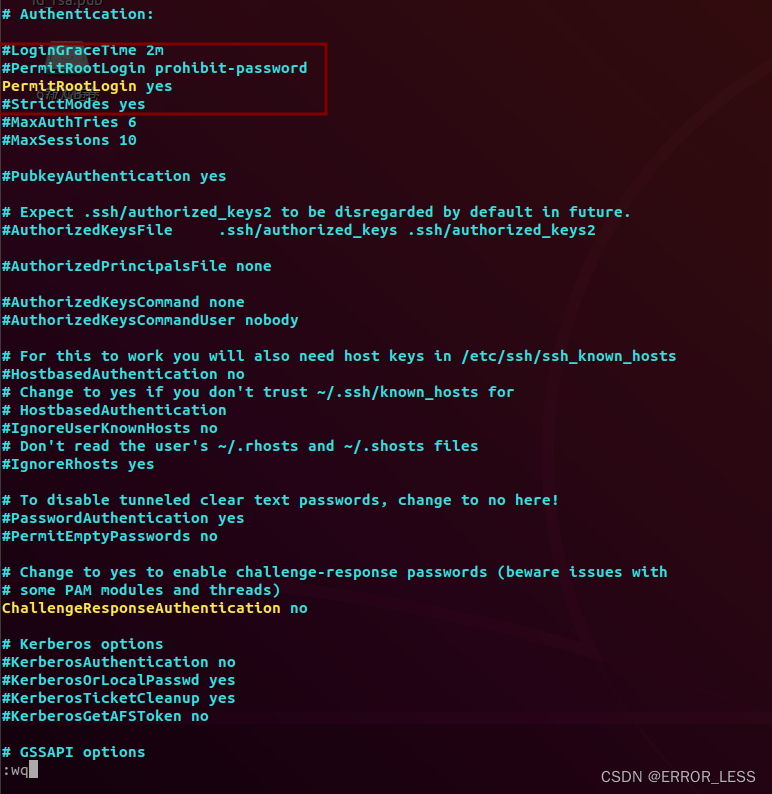
# 3 修改配置文件,使得可以通过root和密码登录
root@1dcc1e5f8ae7:/environments# vim /etc/ssh/sshd_config
添加一行:
4 重启ssh服务:
root@1dcc1e5f8ae7:/environments# /etc/init.d/ssh restart
	 * Restarting OpenBSD Secure Shell server sshd
5 宿主机上连接:
# 先查看一下本机IP
hqc@master:~$ ifconfig
	...
	wlx08beac268018: flags=4163<UP,BROADCAST,RUNNING,MULTICAST>  mtu 1500
	        inet 172.27.244.11  netmask 255.255.192.0  broadcast 172.27.255.255
	        inet6 fe80::11f8:59bd:5ae2:ce02  prefixlen 64  scopeid 0x20<link>
	        inet6 2001:da8:205:6013:e1bb:aef0:c52c:3b8e  prefixlen 64  scopeid 0x0<global>
	        inet6 2001:da8:205:6013:40bd:a37:efb5:3596  prefixlen 64  scopeid 0x0<global>
	        inet6 2001:da8:205:6013:244c:3947:e7d1:a1d3  prefixlen 64  scopeid 0x0<global>
	        ether 08:be:ac:26:80:18  txqueuelen 1000  (以太网)
	        RX packets 6446135  bytes 8182642704 (8.1 GB)
	        RX errors 0  dropped 0  overruns 0  frame 0
	        TX packets 3932659  bytes 699464602 (699.4 MB)
	        TX errors 0  dropped 0 overruns 0  carrier 0  collisions 0

# ssh连接
hqc@master:~$ ssh root@172.27.244.11 -p 1234
The authenticity of host '[172.27.244.11]:1234 ([172.27.244.11]:1234)' can't be established.
ECDSA key fingerprint is SHA256:WrG2VjNr01vqazRfZMPz+GtVb/NkiQeNRhc+QggHv74.
Are you sure you want to continue connecting (yes/no)? yes
Warning: Permanently added '[172.27.244.11]:1234' (ECDSA) to the list of known hosts.
root@172.27.244.11's password:
Welcome to Ubuntu 18.04.5 LTS (GNU/Linux 5.4.0-91-generic x86_64)

 * Documentation:  https://help.ubuntu.com
 * Management:     https://landscape.canonical.com
 * Support:        https://ubuntu.com/advantage
This system has been minimized by removing packages and content that are
not required on a system that users do not log into.

To restore this content, you can run the 'unminimize' command.

The programs included with the Ubuntu system are free software;
the exact distribution terms for each program are described in the
individual files in /usr/share/doc/*/copyright.

Ubuntu comes with ABSOLUTELY NO WARRANTY, to the extent permitted by
applicable law.

root@1dcc1e5f8ae7:~#
# 成功连上!
注意:此处1234端口是之前宿主机映射到容器的端口,详细见我上篇文章。
6 将添加ssh功能的容器打包成一个镜像,在这篇文章的基础上。
# 打包成镜像
root@master:/home/hqc# docker commit 1dcc1e5f8ae7 tf-gpu2.4.0:ssh
	sha256:ee12ce946e629787667dde955f4f3c6b4ffe6f35084f1613ff6f90b336ed0c02
# 保存到指定文件夹
root@master:/home/hqc# docker save -o ./docker_learning/tf-gpu2.4.0-ssh.tar tf-gpu2.4.0:ssh
# 重新载入测试
root@master:/home/hqc# docker load -i ./docker_learning/tf-gpu2.4.0-ssh.tar
	Loaded image: tf-gpu2.4.0:ssh
# 查看
root@master:/home/hqc# docker images
	REPOSITORY                                             TAG                               IMAGE ID       CREATED              SIZE
	tf-gpu2.4.0                                            ssh                               ee12ce946e62   About a minute ago   9.78GB
	tf-gpu2.4.0                                            latest                            141cba844acc   2 hours ago          9.76GB
2 查看每个Docker容器的ip信息
# 原始没有ifconfig命令
root@1dcc1e5f8ae7:~# ifconfig
	-bash: ifconfig: command not found
# 安装net-tools支持
root@1dcc1e5f8ae7:~# apt-get install net-tools
	Reading package lists... Done
	Building dependency tree
	Reading state information... Done
	The following NEW packages will be installed:
	  net-tools
	0 upgraded, 1 newly installed, 0 to remove and 46 not upgraded.
	...
	# 查看
root@1dcc1e5f8ae7:~# ifconfig
	eth0: flags=4163<UP,BROADCAST,RUNNING,MULTICAST>  mtu 1500
	        inet 172.17.0.2  netmask 255.255.0.0  broadcast 172.17.255.255
	        ether 02:42:ac:11:00:02  txqueuelen 0  (Ethernet)
	        RX packets 4219  bytes 6031745 (6.0 MB)
	        RX errors 0  dropped 0  overruns 0  frame 0
	        TX packets 1888  bytes 184211 (184.2 KB)
	        TX errors 0  dropped 0 overruns 0  carrier 0  collisions 0

	lo: flags=73<UP,LOOPBACK,RUNNING>  mtu 65536
	        inet 127.0.0.1  netmask 255.0.0.0
	        loop  txqueuelen 1000  (Local Loopback)
	        RX packets 0  bytes 0 (0.0 B)
	        RX errors 0  dropped 0  overruns 0  frame 0
	        TX packets 0  bytes 0 (0.0 B)
	        TX errors 0  dropped 0 overruns 0  carrier 0  collisions 0
3 宿主机端口和docker容器端口映射
3.0 端口映射相关知识基础
参考链接
TCP/IP协议中的服务端口,端口号的范围从0到65535(2^16)。其中:
	1. 0~1023为系统服务的端口。其中:
		1. 1~255为一些知名端口号,如http服务的端口号是80
		2. 256~1023由Unix系统占用,以提供一些特定的Unix服务
	2. `1024~65535`可供我们调用
由此,我们映射选用1024~65535之间的端口。
3.1 端口映射的方式
为什么要进行端口映射?
docker容器在启动的时候,如果不指定端口映射参数,在容器外部是无法通过网络来访问容器内的网络应用和服务的。
两种指令参数
-p(小写):指定要映射的端口,一个指定端口上只可以绑定一个容器-P(大写):将容器内部开放的网络端口随机映射到宿主机的一个端口上
三种端口对应关系
ip:hostport:containerport#指定宿主机ip、指定宿主机port、指定容器portip::containerport#指定宿主机ip、未指定宿主机port(随机)、指定容器porthostport:containerport#未指定宿主机ip、指定宿主机port、指定容器port
五种映射关系
-
将容器暴露的所有端口,都随机映射到宿主机上(不推荐使用)
docker run -P -it ubuntu /bin/bash
注意,其中p为大写 -
将容器指定端口随机映射到宿主机一个端口上
docker run -P 80 -it ubuntu /bin/bash
将容器的80端口随机映射到宿主机的一个端口上。 -
将容器指定端口指定映射到宿主机的一个端口上
docker run -p 8000:80 -it ubuntu /bin/bash
将容器的80端口映射到宿主机的8000端口上。 -
将容器指定端口映射到宿主机指定IP的随机端口上
docker run -P 192.168.0.100::80 -it ubuntu /bin/bash
将容器80端口映射到宿主机192.168.0.100的一个随机端口上。 -
将容器ip和端口,指定映射到宿主机上
docker run -p 192.168.0.100:8000:80 -it ubuntu /bin/bash
将容器80端口映射到宿主机192.168.0.100的8000端口上。
3.2 端口映射实践
3.2.1 配置验证node01
把这个容器作为Parameter Server,命名为node01_ps
# 交互式运行,自定义名称为node01_ps,设置可识别宿主机的所有gpu,指定端口进行映射
root@master:/home/hqc# docker run -it --name node01_ps --gpus all -p 4081:22 tf-gpu2.4.0:ssh
# 验证
# 当时制作镜像时把python安装在构建的虚拟环境中,因此直接运行找不到命令
root@5c3d79305214:/# python
	bash: python: command not found
# 进入虚拟环境
root@5c3d79305214:/# ls
	NGC-DL-CONTAINER-LICENSE  bin  boot  dev  environments  etc  home  lib  lib64  media  mnt  opt  proc  requirement  root  run  sbin  srv  sys  tmp  usr  var
root@5c3d79305214:/# cd environments/
root@5c3d79305214:/environments# ls
	tf2_py3
root@5c3d79305214:/environments# source tf2_py3/bin/activate
(tf2_py3) root@5c3d79305214:/environments# python
	Python 3.6.9 (default, Mar 15 2022, 13:55:28)
	[GCC 8.4.0] on linux
	Type "help", "copyright", "credits" or "license" for more information.
	>>> import tensorflow as tf
	2022-06-09 08:15:45.490123: I tensorflow/stream_executor/platform/default/dso_loader.cc:49] Successfully opened dynamic library libcudart.so.11.0
	...
# 退出容器
(tf2_py3) root@5c3d79305214:/environments# exit
# 须重新启动该容器,才能进入
root@master:/home/hqc# docker start node01_ps
	node01_ps
# 进入
root@master:/home/hqc# docker attach node01_ps
root@5c3d79305214:/#
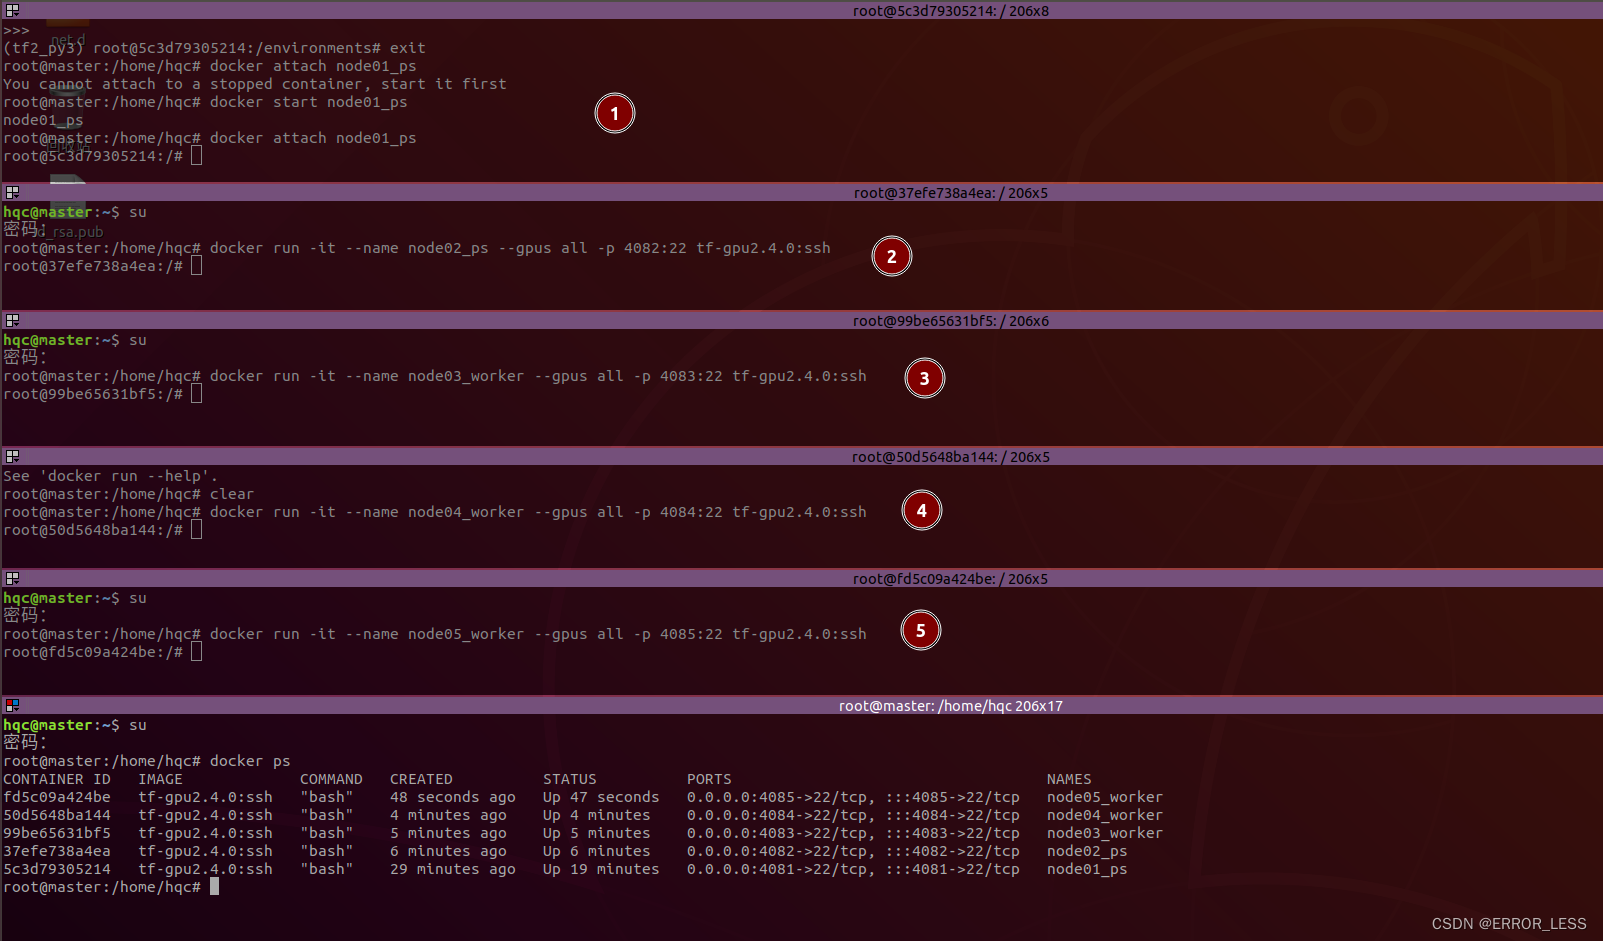
3.2.2 配置剩下所需的节点
拟配置2*ps+3*worker分布式集群,剩下的节点操作与node01相似
| 名称 | 节点 | 容器内IP |
|---|---|---|
| node01 | ps | 172.17.0.2 |
| node02 | ps | 172.17.0.3 |
| node03 | worker | 172.17.0.4 |
| node04 | worker | 172.17.0.5 |
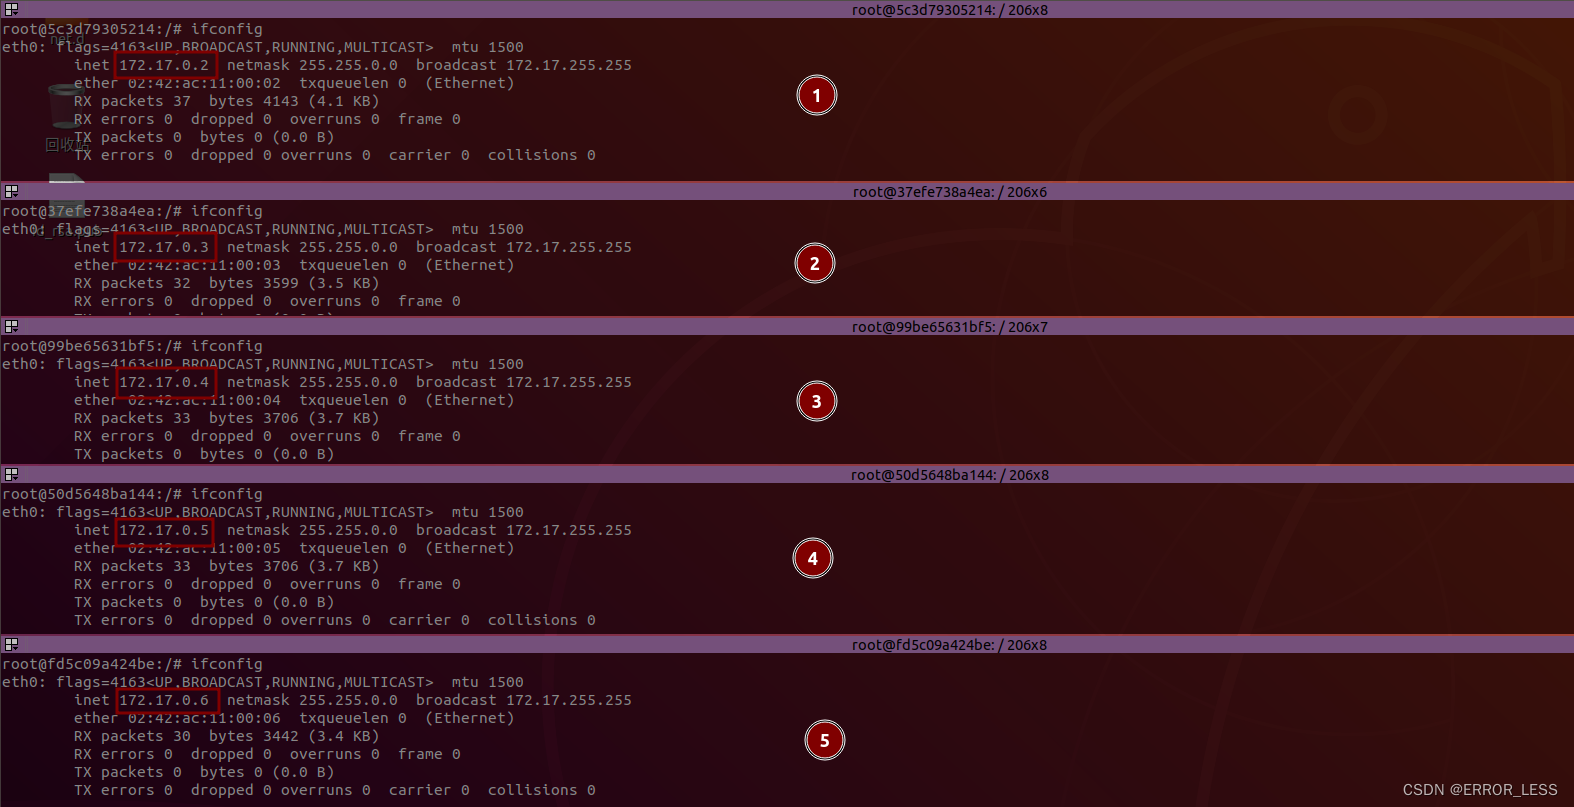
| node05 | worker | 172.17.0.6 |
如图所示:
各个节点中查看本地IP:ifconfig
4 检查容器之间及容器与宿主机之间的通信
4.0 docker容器网络原理
bridge模式:是dokcer网络的默认设置。安装完docker,系统会自动添加一个供docker使用的网桥docker0,我们创建一个新的容器时,容器通过DHCP获取一个与docker0同网段的IP地址。并默认连接到docker0网桥,以此实现容器与宿主机的网络互通。
4.1 容器之间相互ping测试
节点中没有预先安装ping工具,因此各自安装一下:
root@5c3d79305214:/# ping 172.17.0.3
	bash: ping: command not found
root@5c3d79305214:/# apt-get install inetutils-ping
	Reading package lists... Done
	Building dependency tree
	Reading state information... Done
	The following additional packages will be installed:
	  netbase
	The following NEW packages will be installed:
	  inetutils-ping netbase
	0 upgraded, 2 newly installed, 0 to remove and 46 not upgraded.
	Need to get 72.6 kB of archives.
	After this operation, 389 kB of additional disk space will be used.
	Do you want to continue? [Y/n] y
	...
# ping node02
root@5c3d79305214:/# ping 172.17.0.3
	PING 172.17.0.3 (172.17.0.3): 56 data bytes
	64 bytes from 172.17.0.3: icmp_seq=0 ttl=64 time=0.085 ms
	64 bytes from 172.17.0.3: icmp_seq=1 ttl=64 time=0.108 ms
	64 bytes from 172.17.0.3: icmp_seq=2 ttl=64 time=0.097 ms
	...
# 可以ping通
4.2 容器与宿主机之间
容器ping宿主机
# ping宿主机的docker0网卡下的地址
root@5c3d79305214:/# ping 172.17.0.1
	PING 172.17.0.1 (172.17.0.1): 56 data bytes
	64 bytes from 172.17.0.1: icmp_seq=0 ttl=64 time=0.095 ms
	64 bytes from 172.17.0.1: icmp_seq=1 ttl=64 time=0.064 ms
	64 bytes from 172.17.0.1: icmp_seq=2 ttl=64 time=0.048 ms
	...

# ping宿主机的外设网卡下的地址也能通
root@5c3d79305214:/# ping 172.27.244.11
	PING 172.27.244.11 (172.27.244.11): 56 data bytes
	64 bytes from 172.27.244.11: icmp_seq=0 ttl=64 time=0.047 ms
	64 bytes from 172.27.244.11: icmp_seq=1 ttl=64 time=0.097 ms
	64 bytes from 172.27.244.11: icmp_seq=2 ttl=64 time=0.037 ms
	...
宿主机ping容器
root@master:/home/hqc# ping 172.17.0.2
	PING 172.17.0.2 (172.17.0.2) 56(84) bytes of data.
	64 bytes from 172.17.0.2: icmp_seq=1 ttl=64 time=0.068 ms
	64 bytes from 172.17.0.2: icmp_seq=2 ttl=64 time=0.062 ms
	64 bytes from 172.17.0.2: icmp_seq=3 ttl=64 time=0.063 ms
	...
4.3 宿主机和容器ping外网
宿主机ok的这没问题。
root@master:/home/hqc# ping www.baidu.com
	PING www.a.shifen.com (182.61.200.6) 56(84) bytes of data.
	64 bytes from 182.61.200.6 (182.61.200.6): icmp_seq=1 ttl=52 time=6.65 ms
	64 bytes from 182.61.200.6 (182.61.200.6): icmp_seq=2 ttl=52 time=5.72 ms
	64 bytes from 182.61.200.6 (182.61.200.6): icmp_seq=3 ttl=52 time=6.22 ms
	...
容器也能正常ping外网!
root@fd5c09a424be:/# ping www.baidu.com
	PING www.a.shifen.com (182.61.200.7): 56 data bytes
	64 bytes from 182.61.200.7: icmp_seq=0 ttl=51 time=7.013 ms
	64 bytes from 182.61.200.7: icmp_seq=1 ttl=51 time=6.455 ms
	64 bytes from 182.61.200.7: icmp_seq=2 ttl=51 time=6.718 ms
	...
5 docker容器和宿主机进行文件共享
5.1 方法一:重新基于该镜像运行一个容器,并指定挂载卷
5.2 方法二:停止并保存当前容器为镜像,再进行方法一
适用于容器已经在运行的情况,里边含有新安装的东西或新创建的文件,不能丢失。
目前就属于这种情况,今天累了,明天再弄~🐶其实挺简单的
开始实践…
第一步:打包该容器为镜像
root@master:/home/hqc# docker commit 5c3d79305214 tf-gpu:ssh
	sha256:6bc4a0a13201d82f4082781ec2f9fc6dbfb88972909199b67a58cb7ac1943727
root@master:/home/hqc# docker images
	REPOSITORY                                             TAG                               IMAGE ID       CREATED          SIZE
	tf-gpu                                                 ssh                               6bc4a0a13201   14 seconds ago   9.78GB
	...
重新运行该镜像为容器,同时挂载卷共享文件夹
第二步:挂载
# 宿主机中创建一个专门用来共享的文件夹
root@master:/home/hqc# mkdir container_share
# 加入-v参数进行指定共享卷
root@master:/home/hqc# docker run -it --name node01_ps -v /home/hqc/container_share:/share --gpus all -p 4081:22 tf-gpu:ssh
# 直接会进入运行起来的容器
root@53275d4a111e:/# ls
	NGC-DL-CONTAINER-LICENSE  bin  boot  dev  environments  etc  home  lib  lib64  media  mnt  opt  proc  requirement  root  run  sbin  share  srv  sys  tmp  usr  var
第三步:验证
# 宿主机中查看需要共享的文件夹内容
root@master:/home/hqc/python_learning/tensorflow/distributed tensorflow# ls
	 1ps_2workers_on_one_machine   distributed_keras_with_catsdogs   keras_distributed_single_machine_multi_GPU.py   ParameterServerStrategy
	 choose_gpu_manually.py        distributed_keras_with_mnist     'official docs test'                             tf1_single_machine_single_GPU.py
root@master:/home/hqc/python_learning/tensorflow/distributed tensorflow# cd ..
# 将该文件夹的所有文件拷贝到共享文件夹,-r参数表示进行递归拷贝
root@master:/home/hqc/python_learning/tensorflow# cp -r distributed\ tensorflow/ /home/hqc/container_share/
然后
# 进入容器中的share文件夹
root@53275d4a111e:/# cd share/
# 查看,该文件夹已经共享进来了
root@53275d4a111e:/share# ls
	'distributed tensorflow'
# 查看文件夹中的内容
root@53275d4a111e:/share# cd distributed\ tensorflow/
root@53275d4a111e:/share/distributed tensorflow# ls
	 1ps_2workers_on_one_machine   choose_gpu_manually.py            distributed_keras_with_mnist                   'official docs test'
	 ParameterServerStrategy       distributed_keras_with_catsdogs   keras_distributed_single_machine_multi_GPU.py   tf1_single_machine_single_GPU.py
# 和宿主机中的一致
6 分布式tensorflow训练
6.1 双机分布式demo准备
遇到文件同步的问题:
由于demo中的IP需要和运行的平台一致,所以在宿主机中(用vim编辑器)对代码进行修改。但是查看容器内代码,发现并未同步修改。重启该容器还是未发生改变,因此直接在该容器(node01_ps)中修改,却发现其他容器内的代码同步改变了。
搜寻原因,发现大多数是vim编辑器和文件权限的问题,参考这篇文章。
宿主机中查看Inode:
root@master:/home/hqc/python_learning/tensorflow/distributed tensorflow/distributed_keras_with_mnist# stat keras_multi_machine_worker0.py
	  文件:keras_multi_machine_worker0.py
	  大小:4247      	块:16         IO 块:4096   普通文件
	设备:10308h/66312d	Inode:2100158     硬链接:1
	权限:(0664/-rw-rw-r--)  Uid:( 1000/     hqc)   Gid:( 1000/     hqc)
	最近访问:2022-06-10 11:24:55.740828743 +0800
	最近更改:2022-06-10 11:22:03.651412936 +0800
	最近改动:2022-06-10 11:22:03.651412936 +0800
	创建时间:-
5个容器中查看该文件的Inode:
root@0c6a6d9284ee:/share/distributed tensorflow/distributed_keras_with_mnist# stat keras_multi_machine_worker0.py
	  File: keras_multi_machine_worker0.py
	  Size: 4247      	Blocks: 16         IO Block: 4096   regular file
	Device: 10308h/66312d	Inode: 2902732     Links: 1
	Access: (0644/-rw-r--r--)  Uid: (    0/    root)   Gid: (    0/    root)
	Access: 2022-06-10 03:32:14.346492348 +0000
	Modify: 2022-06-10 03:32:14.346492348 +0000
	Change: 2022-06-10 03:32:14.346492348 +0000
	 Birth: -
发现5个容器均为Inode: 2902732与宿主机中不同Inode:2100158,所以宿主机和容器中的文件只是名称相同的不同文件。
aaa~突然发现当时在宿主机中修改的文件是之前的源文件,不是在共享文件夹中修改,自然也不会同步,我傻了。
在共享文件夹中查看该文件的Inode,发现:
root@master:/home/hqc/container_share/distributed tensorflow/distributed_keras_with_mnist# stat keras_multi_machine_worker0.py
	  文件:keras_multi_machine_worker0.py
	  大小:4247      	块:16         IO 块:4096   普通文件
	设备:10308h/66312d	Inode:2902732     硬链接:1
	权限:(0644/-rw-r--r--)  Uid:(    0/    root)   Gid:(    0/    root)
	最近访问:2022-06-10 11:32:14.346492348 +0800
	最近更改:2022-06-10 11:32:14.346492348 +0800
	最近改动:2022-06-10 11:32:14.346492348 +0800
	创建时间:-
和容器中是一致的。
小结一下:
会造成不同步的原因是vim编辑器的保存机制会更改Inode,因此目前的解决办法是重启一下容器即可,会重新链接上。
6.2 运行起来
第一步:进入之前构建好的虚拟环境
root@53275d4a111e:/share/distributed tensorflow/distributed_keras_with_mnist# source /environments/tf2_py3/bin/activate
(tf2_py3) root@53275d4a111e:/share/distributed tensorflow/distributed_keras_with_mnist#
第二步:两台node同时运行
# node01_ps
(tf2_py3) root@53275d4a111e:/share/distributed tensorflow/distributed_keras_with_mnist# python keras_multi_machine_worker0.py
2022-06-10 07:27:09.529574: I tensorflow/stream_executor/platform/default/dso_loader.cc:49] Successfully opened dynamic library libcudart.so.11.0
...
WARNING:tensorflow:From keras_multi_machine_worker0.py:25: _CollectiveAllReduceStrategyExperimental.__init__ (from tensorflow.python.distribute.collective_all_reduce_strategy) is deprecated and will be removed in a future version.
Instructions for updating:
use distribute.MultiWorkerMirroredStrategy instead
# 此处提醒全归约算法将会在未来的版本淘汰
2022-06-10 07:27:10.293130: I tensorflow/core/platform/cpu_feature_guard.cc:142] This TensorFlow binary is optimized with oneAPI Deep Neural Network Library (oneDNN) to use the following CPU instructions in performance-critical operations: AVX512F
To enable them in other operations, rebuild TensorFlow with the appropriate compiler flags.
# 此处表示会用到的CPU
...
2022-06-10 07:27:10.294027: I tensorflow/core/common_runtime/gpu/gpu_device.cc:1862] Adding visible gpu devices: 0
# 此处加入可见GPU设备
...
2022-06-10 07:27:10.564670: I tensorflow/core/common_runtime/gpu/gpu_device.cc:1406] Created TensorFlow device (/job:localhost/replica:0/task:0/device:GPU:0 with 10261 MB memory) -> physical GPU (device: 0, name: NVIDIA GeForce GTX 1080 Ti, pci bus id: 0000:01:00.0, compute capability: 6.1)
...
2022-06-10 07:27:10.565876: I tensorflow/core/common_runtime/gpu/gpu_device.cc:1720] Found device 0 with properties:
pciBusID: 0000:01:00.0 name: NVIDIA GeForce GTX 1080 Ti computeCapability: 6.1
coreClock: 1.582GHz coreCount: 28 deviceMemorySize: 10.92GiB deviceMemoryBandwidth: 451.17GiB/s
# 此处展现GPU的型号/容量/计算能力等信息
...
2022-06-10 07:27:10.570794: I tensorflow/core/distributed_runtime/rpc/grpc_channel.cc:301] Initialize GrpcChannelCache for job worker -> {0 -> 172.17.0.2:12345, 1 -> 172.17.0.3:23456}
# 初始化grpc通信通道,展现两节点集群ip
2022-06-10 07:27:10.571100: I tensorflow/core/distributed_runtime/rpc/grpc_server_lib.cc:411] Started server with target: grpc://172.17.0.2:12345
# 开启服务,等待其他节点开始后会同步进行训练
# ------------------------------下面开始训练----------------------------------- #
Downloading data from https://storage.googleapis.com/tensorflow/tf-keras-datasets/mnist.npz
11493376/11490434 [==============================] - 6s 1us/step
# 官网下载数据集
Creating a new model
# 创建一个新的模型
2022-06-10 07:27:42.683371: I tensorflow/core/profiler/lib/profiler_session.cc:136] Profiler session initializing.
2022-06-10 07:27:42.683393: I tensorflow/core/profiler/lib/profiler_session.cc:155] Profiler session started.
2022-06-10 07:27:42.683411: I tensorflow/core/profiler/internal/gpu/cupti_tracer.cc:1365] Profiler found 1 GPUs
# 分析器开始起作用:初始化-开始-找到一个GPU
2022-06-10 07:27:42.686275: I tensorflow/stream_executor/platform/default/dso_loader.cc:49] Successfully opened dynamic library libcupti.so.11.0
2022-06-10 07:27:42.785211: I tensorflow/core/profiler/lib/profiler_session.cc:172] Profiler session tear down.
# 拆除分析器(为啥呢?)
...
2022-06-10 07:27:42.995396: W tensorflow/core/grappler/optimizers/data/auto_shard.cc:656] In AUTO-mode, and switching to DATA-based sharding, instead of FILE-based sharding as we cannot find appropriate reader dataset op(s) to shard. Error: Found an unshardable source dataset: name: "TensorSliceDataset/_2"
op: "TensorSliceDataset"
input: "Placeholder/_0"
input: "Placeholder/_1"
attr {
key: "Toutput_types"
value {
list {
type: DT_FLOAT
type: DT_FLOAT
}
}
}
attr {
key: "output_shapes"
value {
list {
shape {
dim {
size: 784
}
}
shape {
}
}
}
}
# 此段为警告:说是数据集不可分。但不用管,因为官方也会报这个警告
2022-06-10 07:27:43.095352: I tensorflow/compiler/mlir/mlir_graph_optimization_pass.cc:116] None of the MLIR optimization passes are enabled (registered 2)
2022-06-10 07:27:43.096280: I tensorflow/core/platform/profile_utils/cpu_utils.cc:112] CPU Frequency: 3600000000 Hz
Epoch 1/2
...
1/1562 [..............................] - ETA: 10:41 - loss: 2.3345 - sparse_categorical_accuracy:
13/1562 [..............................] - ETA: 6s - loss: 2.0165 - sparse_categorical_accuracy: 0.4
26/1562 [..............................] - ETA: 6s - loss: 1.7602 - sparse_categorical_accuracy: 0.5
...
1552/1562 [============================>.] - ETA: 0s - loss: 0.3745 - sparse_categorical_accuracy: 0.8
# 训练完一轮
# 第二轮和第一轮一样
Epoch 2/2
...
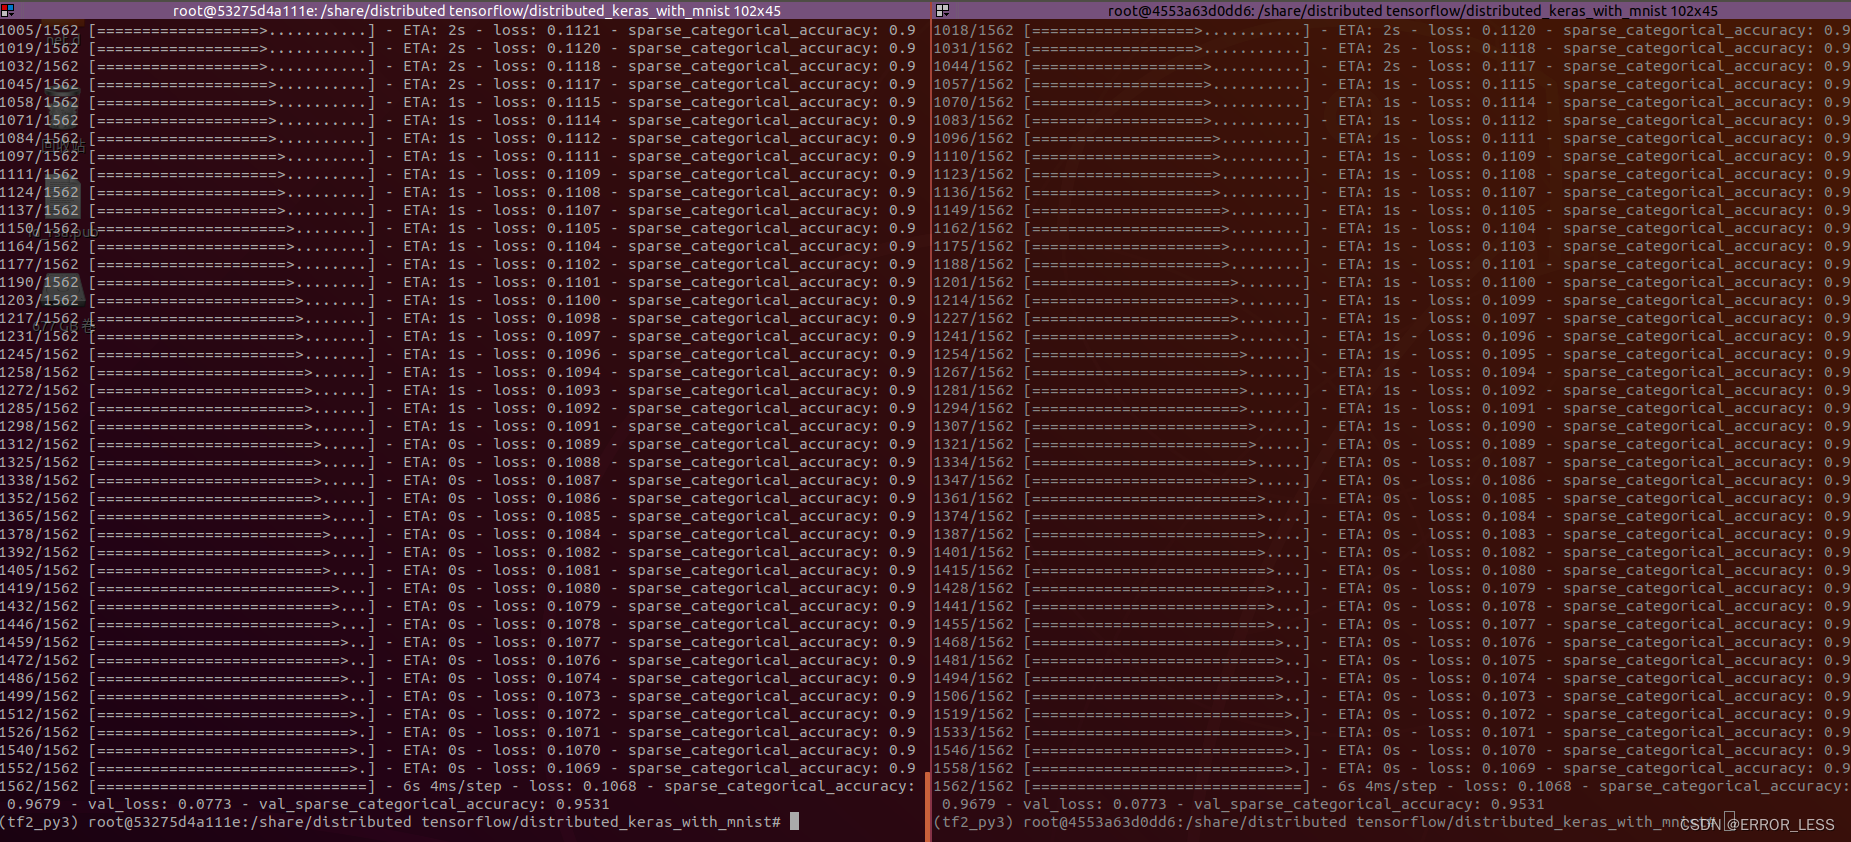
1562/1562 [==============================] - 6s 4ms/step - loss: 0.1068 - sparse_categorical_accuracy: 0.9679 - val_loss: 0.0773 - val_sparse_categorical_accuracy: 0.9531
如图:
6.3 与单机训练对比
单机训练效果如下:
Epoch 2/2
   1/1562 [..............................] - ETA: 2s - loss: 0.1390 - sparse_categorical_accuracy: 1.0
   66/1562 [>.............................] - ETA: 1s - loss: 0.1605 - sparse_categorical_accuracy: 0.9
   133/1562 [=>............................] - ETA: 1s - loss: 0.1454 - sparse_categorical_accuracy: 0.9
   198/1562 [==>...........................] - ETA: 1s - loss: 0.1353 - sparse_categorical_accuracy: 0.9
   264/1562 [====>.........................] - ETA: 0s - loss: 0.1295 - sparse_categorical_accuracy: 0.9
   330/1562 [=====>........................] - ETA: 0s - loss: 0.1268 - sparse_categorical_accuracy: 0.9
   ...
   1512/1562 [============================>.] - ETA: 0s - loss: 0.1117 - sparse_categorical_accuracy: 0.9
   1562/1562 [==============================] - 1s 790us/step - loss: 0.1113 - sparse_categorical_accuracy: 0.9658 - val_loss: 0.0334 - val_sparse_categorical_accuracy: 0.9844
平均下来,两种方式每步的时间对比
双机分布式训练: 4ms/step
单机训练: 790us/step
6.4 结果分析
为什么分布式反而比单机训练更慢呢?
原因是:数据量太小,每步本身就花不了,单机不存在通信问题,而双机分布式训练两台机器之间需要通信,因此所花的时间较长。
那要如何展现分布式训练的优势呢?
解决思路:用一个比较复杂的网络模型进行训练,要求每轮训练所花的时间要远大于机器之间需要的时间,这样通信时延就可以忽略不计了。


 被折叠的 条评论
为什么被折叠?
被折叠的 条评论
为什么被折叠?
 到【灌水乐园】发言


