


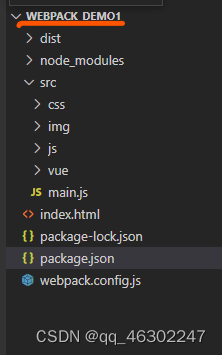
注意:以下全部是手动配置webpack,没用vue-cli(脚手架)
// webpack.config.js

const path = require('path')
const webpack = require('webpack')
const HtmlWebpackPlugin = require('html-webpack-plugin')
const UglifyjsWebpackPlugin = require('uglifyjs-webpack-plugin')

module.exports = {
    // 打包入口文件
    entry: "./src/main.js",
    output: {
        //__dirname表示webpack.config.js所在目录,即 webpack_demo1; 将'dist'拼接到webpack_demo1后面,即webpack_demo1/dist
        path: path.resolve(__dirname,'dist'),
        // 打包出口文件为:webpack_demo1/dist/bundle.js
        filename: 'bundle.js',
        // publicPath: '/', //默认情况下,Vue CLI 会假设你的应用是被部署在一个域名的根路径上,例如 https://www.my-app.com/。如果应用被部署在一个子路径上,你就需要用这个选项指定这个子路径。例如,如果你的应用被部署在 https://www.my-app.com/my-app/,则设置 publicPath 为 /my-app/。
    },
    module: {
        rules: [
          {
            test: /\.css$/,
            use: [ 'style-loader', 'css-loader' ]
          },
          {
            test: /\.less$/,
            use: [{
                loader: "style-loader" // creates style nodes from JS strings
            }, {
                loader: "css-loader" // translates CSS into CommonJS
            }, {
                loader: "less-loader" // compiles Less to CSS
            }]
          },
          {
            test: /\.(png|jpg|gif)$/,
            use: [
              {
                loader: 'url-loader',
                options: {
                  limit: 8192, //图片小于8192时,将该图片的url转为base64;图片大于8192时,需要安装file-loader
                  name: 'img/[name].[hash:8].[ext]' //当图片大于8192时,自动会在dist下新建一个img文件夹,将原图复制一份到dist/img下,并按照我们的配置重新命名: '原图片名.8位hash值.文件扩展名';打包后的项目中展示的就是dist/img下的图片
                }
              }
            ]
          },
          {
            test: /\.js$/,
            exclude: /(node_modules|bower_components)/, // 排除路径中有node_modules或bower_components的js文件
            use: {
              loader: 'babel-loader', //es6 转 es5
              options: {
                presets: ['es2015']
              }
            }
          },
          {
            test: /\.vue$/,
            use: ['vue-loader']
          }
        ]
    },
    resolve: {
        extensions: ['.vue','.css','.less','.js'], //配置导入文件时,可省略的扩展名
        alias: {
            // 当执行import Vue from 'vue'时,会自动到node-modules中找vue/dist/vue.esm.js,它可以编译编译template;如果不指定vue$,默认是vue.runtime.js
            'vue$': 'vue/dist/vue.esm.js'
        }
    },
    plugins: [
        new webpack.BannerPlugin('最终版权归tm所有'),

        //在dist下自动生成新的index.html,并且在index.html中引入相关资源
        new HtmlWebpackPlugin({
            // 注意:index.html 必须和 webpack.config.js 在同一目录下
            template: 'index.html' //以index.html为模板,在打包时,在dist文件夹下生成index.html
        }),
        new UglifyjsWebpackPlugin(), //丑化打包后的js(压缩js)
    ],
    //基于node.js搭建一个本地服务器
    devServer: {
        //为哪个文件夹提供本地服务,默认是根文件夹,我们这里要填写 './dist'
        contentBase: './dist',
        port: '8080',//端口号
        inline: true //页面实时刷新
        // 配置跨域,请参考我的  ‘什么是跨域(CORS),如何解决跨域;配置devServer’ 该博客
    }
}
// package.json

{
  "name": "index.js",
  "version": "1.0.0",
  "description": "",
  "main": "index.js",
  "scripts": {
    "test": "echo \"Error: no test specified\" && exit 1",
    "build": "webpack",  // npm run build 时自动执行本项目的webpack,而不是全局的webpack(webpack用于项目打包,从入口文件打包到出口文件)
    "dev": "webpack-dev-server --open"  // 执行npm run dev时,启动本地服务(即:在webpack.config.js中配置的devServer),--open启动时自动打开浏览器
  },
  "author": "",
  "devDependencies": {
    "babel-core": "^6.26.3",
    "babel-loader": "^7.1.5",
    "babel-preset-es2015": "^6.24.1",
    "css-loader": "^2.0.2",
    "file-loader": "^3.0.1",
    "less-loader": "^4.1.0",
    "style-loader": "^0.23.1",
    "uglifyjs-webpack-plugin": "^1.1.1",
    "url-loader": "^1.1.2",
    "vue-loader": "^13.0.0",
    "vue-template-compiler": "^2.5.21",
    "webpack": "^3.6.0",
    "webpack-dev-server": "^2.9.3",
    "webpack-merge": "^4.1.5"
  },
  "dependencies": {
    "html-webpack-plugin": "^3.2.0",
    "less": "^3.9.0",
    "vue": "^2.5.21"
  }
}
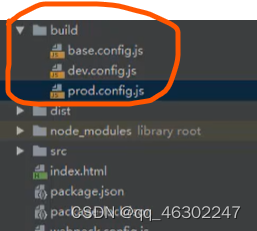
webpack.config.js的抽离(vue-cli的写法):
新建build文件夹进行抽离(具体过程参考codewhy的webpack视频第90集)
// package.json

  "scripts": {
    "test": "echo \"Error: no test specified\" && exit 1",
    "build": "webpack --config  ./build/prod.config.js",  //npm run build 时,执行与package.json同目录的./build/prod.config.js
    "dev": "webpack-dev-server --open --config ./build/dev.config.js "  // 执行npm run dev时,执行与package.json同目录的build/dev.config.js
  },
使用vue-cli3的vue.config.js配置webpack
vue.config.js配置参考:https://cli.vuejs.org/zh/config/
 注意:vue.config.js要和package.json在同一个目录下


 被折叠的 条评论
为什么被折叠?
被折叠的 条评论
为什么被折叠?
 到【灌水乐园】发言


