


Spring
一、Spring简介
1、Spring简介
Spring是一个开源框架,为简化企业级开发而生。它以**IOC(控制反转)和ACP(面向切面)**为思想内核,提供了控制层SpringMVC、数据层SpringjData、服务层事务管理等众多技术,并开源整合众多第三方框架。
Spring将很多复杂的代码变得优雅简洁,有效的降低代码的耦合度,极大的方便项目的后期维护、升级和扩展。
Spring官网地址:https://spring.io/
2、Spring体系结构
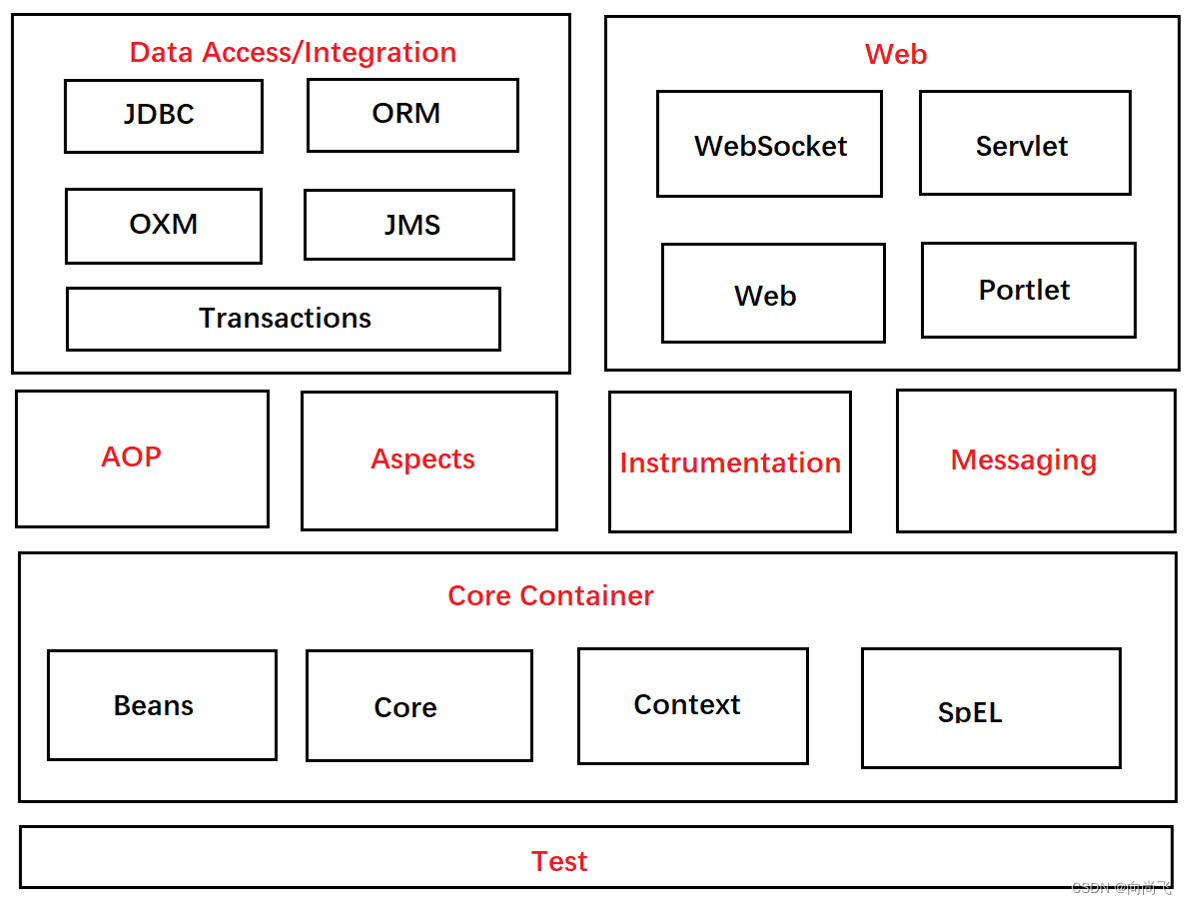
Spring框架根据不同的功能被划分成了多个模块,这些模块可以满足一切企业级应用开发的需求,在开发过程中可以根据需求有选择性地使用所需要的模块。
- Core Container:Spring核心模块,任何功能的使用都离不开该模块,是其他模块建立的基础。
- Data Access/Integration:该模块提供了数据持久化的相应功能。
- Web:该模块提供了web开发的相应功能。
- AOP:提供了面向切面编程实现
- Aspects:提供与AspectJ框架的集成,该框架是面向切面编程框架。
- Instrumentation:提供了类工具的支持和类加载器的实现,可以在特定的应用服务器中使用。
- Messaging:为Spring框架集成一些基础的报文传送应用
- Test:提供与测试框架的集成
二、IOC(控制反转)
1、IOC思想
IOC(Inversion of Control)程序将创建对象的权力交给框架。
之前在开发过程中,对象的实例的创建是由调用者管理的,这样的写法有两个缺点:
- 浪费资源:当调用方法时即会创建一个对象,如果不断调用方法则会创建大量的对象。
- 代码耦合度高:假设随着开发,我们创建了一个更加完善的实现类了,如果想使用新的实现类,则必须修改源码。
而IOC思想是将创建对象的权力交给框架,框架会帮助我们创建对象,分配对象的使用,控制权由程序代码转移到了框架中,控制权发生了反转,这就是Spring的IOC思想。而IOC思想可以完美的解决以上两个问题。对象进行统一管理
2、自定义IOC
创建一个集合容器,先将对象创建出来放到容器中,需要使用对象时,只需要从容器中获取对象即可,而不需要重新创建,此时容器就是对象的管理者。
- 创建实体类
public class Student {
    private int id;
    private String name;
    private String address;

    public Student() {
    }

    public Student(int id, String name, String address) {
        this.id = id;
        this.name = name;
        this.address = address;
    }

    public int getId() {
        return id;
    }

    public void setId(int id) {
        this.id = id;
    }

    public String getName() {
        return name;
    }

    public void setName(String name) {
        this.name = name;
    }

    public String getAddress() {
        return address;
    }

    public void setAddress(String address) {
        this.address = address;
    }

    @Override
    public String toString() {
        return "pojo.Student{" +
                "id=" + id +
                ", name='" + name + '\'' +
                ", address='" + address + '\'' +
                '}';
    }
}
- 创建Dao类,有一个接口里面写了查询方法,两个实现类用来测试不修改源代码就使用更新类
//接口
public interface StudentDao {
    //通过id查询
    Student findById(int id);
}


//实现类1
public class StudentDaoImp implements StudentDao{
    @Override
    public Student findById(int id) {
        return new Student(1,"dianfei","重庆");
    }
}


//实现类2
public class StudentDaoImp2 implements StudentDao {
    @Override
    public Student findById(int id) {
        System.out.println("新方法.....");
        return new Student(1, "dianfei", "重庆");
    }
- 创建配置文件bean.properties,该文件定义管理的对象
StudentDao=dao.StudentDaoImp2
StudentService=service.StudentService
- 创建容器管理类,该类在类加载时读取配置文件,将配置文件中配置的对象全部创建并放入容器中。
public class Container {
    //创建存放对象集合
    static Map<String,Object> map = new HashMap<>();

    static {
        //读取配置文件
        InputStream is = Container.class.getClassLoader().getResourceAsStream("bean.properties");
        Properties properties = new Properties();
        try {
            properties.load(is);
        } catch (IOException e) {
            e.printStackTrace();
        }

        //遍历配置文件
        Enumeration<Object> keys = properties.keys();
        while (keys.hasMoreElements()) {
            String key = keys.nextElement().toString();
            String value = properties.getProperty(key);
            //创建对象
            try {
                Object o = Class.forName(value).newInstance();
                map.put(key,o);
            } catch (Exception e) {
                e.printStackTrace();
            }
        }
    }

    //获取对象的方法
    public static Object getBean(String key){
        return  map.get(key);
    }
}
- 创建StudentService,调用Dao层方法,并输出返回对象的hash值查看是否是同一个对象
public class StudentService {
    public Student findStudentById(int id){
        StudentDao studentDao = (StudentDao) Container.getBean("StudentDao");
        System.out.println(studentDao.hashCode());
        return studentDao.findById(id);
    }
}
- 测试StudentService
public static void main(String[] args) {
    //获取studentService对象
    StudentService studentService = (StudentService) Container.getBean("StudentService");
    //多次调用方法查看是否是同一个对象
    System.out.println(studentService.findStudentById(1));
    System.out.println(studentService.findStudentById(1));
    System.out.println(studentService.findStudentById(1));
}
3、Spring实现IOC
- 创建maven工厂,引入依赖
<dependencies>
    <!-- spring核心模块 -->
    <dependency>
        <groupId>org.springframework</groupId>
        <artifactId>spring-context</artifactId>
        <version>5.3.10</version>
    </dependency>

    <!-- junit -->
    <dependency>
        <groupId>junit</groupId>
        <artifactId>junit</artifactId>
        <version>4.12</version>
        <scope>test</scope>
    </dependency>
</dependencies>
- 编写xml配置文件,配置文件中需要Spring帮助创建的对象
<?xml version="1.0" encoding="UTF-8" ?>
<beans xmlns="http://www.springframework.org/schema/beans"
       xmlns:xsi="http://www.w3.org/2001/XMLSchema-instance"
       xsi:schemaLocation="http://www.springframework.org/schema/beans
        http://www.springframework.org/schema/beans/spring-beans.xsd">
	<!-- id:定义的名字 class:需要创建的类 -->
    <bean id="studentDao" class="dao.StudentDaoImp"></bean>

    </beans>
- 测试从Spring容器中获取对象
@Test
public void testGetBean(){
    //创建spring容器
    ApplicationContext ac = new ClassPathXmlApplicationContext("bean.xml");
    //从容器中获取对象
    StudentDao studentDao1 = (StudentDao) ac.getBean("studentDao");
    StudentDao studentDao2 = (StudentDao) ac.getBean("studentDao");
    System.out.println(studentDao1.hashCode());
    System.out.println(studentDao2.hashCode());
    System.out.println(studentDao1.findById(1));
    System.out.println(studentDao2.findById(1));
}
4、SpringIOC容器类型
容器接口
- BeanFatory:BeanFactory是Spring容器中的顶层接口,它可以对Bean对象进行管理
- ApplicationContext:是BeanFactory的子接口。它除了继承BeanFactory的所有功能外,还添加了对国际化,资源访问、事件传播等方面的良好支持。
- ApplicationContext有三个常用实现类
容器实现类
-
ClassPathXMLApplicationContext:该类可以从项目中读取配置文件(使用资源相对路径)
ApplicationContext ac = new ClassPathXmlApplicationContext("bean.xml"); -
FileSystemXmlApplicationContext:该类从磁盘中读取配置文件(使用绝对路径)
ApplicationContext ac = new FileSystemXmlApplicationContext("D:/java/Projects/ssm/mybatis/spring_ioc1/src/main/resources/bean.xml"); -
AnnotationConfigApplicationContext:使用该类不读取配置文件,而是会读取注解
5、SpringIOC对象的创建方式
使用构造方法
使用工厂类的方法
使用静态工厂类
三、Spring依赖注入
依赖注入(Dependency Injection,简称DI),它是Spring控制反转思想的具体实现。
控制反转就是创建对象,依赖注入是为对象的属性赋值。
1、依赖注入方式
我们之前的属性赋值方式,使用setter方法或者构造方法对成员属性进行赋值;同样在Spring框架中,也封装了这两种注入方式setter和构造方法赋值
手动注入
注:注入之前都需要先在类中提供setter方法和构造方法
public class StudentService {
    private StudentDao studentDao = null;
    public Student findStudentById(int id){
        System.out.println(studentDao.hashCode());
        return this.studentDao.findById(id);
    }
    public StudentDao getStudentDao() {
        return studentDao;
    }
    //构造方法
    public StudentService(StudentDao studentDao) {
        this.studentDao = studentDao;
    }
    //setter方法
    public void setStudentDao(StudentDao studentDao) {
        this.studentDao = studentDao;
    }
}
在Spring中依赖注入,setter注入使用property标签,构造方法注入使用constructor-arg标签
<!-- 肯定需要先映射你需要的属性对象 -->
<bean id="studentDao" class="dao.StudentDaoImp"></bean>
<bean id="studentService" class="service.StudentService">
    <!--依赖注入-->
    <!--setter注入:   name:属性名 ref:属性对应的类型id -->
    <!--<property name="studentDao" ref="studentDao"></property>-->

    <!--构造方法注入  -->
    <constructor-arg name="studentDao" ref="studentDao"></constructor-arg>
</bean>
自动注入
- 全局配置:在beans标签中设置default-autowire属性可以定义所有bean对象的自动注入策略。
- 局部配置:在bean标签中设置autowire属性可以定义当前bean对象的自动注入策略。
autowire的取值:
- no:不会进行自动注入
- default:全局配置default相当于no,局部配置default表示使用全局配置
- byName:在Spring容器中查找id与属性名相同的bean,并进行注入,需要提供set方法。
- byType:在Spring容器中查找类型与属性类型相同的bean,并进行注入,需要提供set方法。
- constructor:在Spring容器中查找id与属性名相同的bean,并进行注入。需要提供构造方法。
2、依赖注入类型
![[外链图片转存失败,源站可能有防盗链机制,建议将图片保存下来直接上传(img-RcwZcmuw-1659441665365)(C:\Users\dianfei\AppData\Roaming\Typora\typora-user-images\image-20220729113301281.png)]](https://i-blog.csdnimg.cn/blog_migrate/c0e16735cb171553d0122b8eec3b9a2e.png)
DI支持注入Bean类型、基本数据类型和字符串、Lis集合、Set集合、Map集合、Properties对象类型等。写法如下
- 需要注入属性的类
public class StudentService {
    private StudentDao studentDao;//bean属性
    private int count; //基本数据类型
    private String name; //字符串类型
    private List<String> names; //List类型 基本类型
    private List<Student> lStudents;//List类型 对象类型
    private Set<Student> students; //Set类型 对象类型
    private Map<String,String> mNames; //Map类型 基本类型
    private Map<String,Student> mStudent;//Map类型 对象类型
    private Properties properties; //Properties类型

    //省略了getter、setter、toString
}
- 注入的xml文件
<beans xmlns="http://www.springframework.org/schema/beans"
       xmlns:xsi="http://www.w3.org/2001/XMLSchema-instance"
       xsi:schemaLocation="http://www.springframework.org/schema/beans
        http://www.springframework.org/schema/beans/spring-beans.xsd">
    <bean id="studentDao" class="dao.StudentDaoImp"></bean>

    <bean id="studentService" class="service.StudentService">
        <!-- bean类型注入 -->
        <!-- 方式一 -->
<!--        <property name="studentDao" ref="studentDao"></property>-->
        <!-- 方式二 -->
        <property name="studentDao">
            <ref bean="studentDao"></ref>
        </property>

        <!-- 基本类型和String类型 -->
        <!-- 方式一 -->
        <property name="count" value="10"></property>
        <!-- 方式二 -->
        <property name="name">
            <value>dianfei</value>
        </property>

        <!-- List类型 -->
        <!-- 简单数据类型 -->
        <property name="names">
            <list>
                <value>dianfei1</value>
                <value>dianfei2</value>
            </list>
        </property>
        <!-- 对象数据类型 -->
        <property name="lStudents">
            <list>
                <!-- 对象类型映射和注入属性 -->
                <bean class="pojo.Student">
                    <property name="id" value="1"></property>
                    <property name="name" value="dianfei1"></property>
                    <property name="address" value="重庆"></property>
                </bean>
                <bean class="pojo.Student">
                    <property name="id" value="2"></property>
                    <property name="name" value="dianfei2"></property>
                    <property name="address" value="四川"></property>
                </bean>
            </list>
        </property>

        <!--Set类型和List类型方法一样-->
        <!--set对象类型-->
        <property name="students">
            <set>
                <!-- 对象类型映射和注入属性 -->
                <bean class="pojo.Student">
                    <property name="id" value="1"></property>
                    <property name="name" value="dianfei1"></property>
                    <property name="address" value="重庆"></property>
                </bean>
                <bean class="pojo.Student">
                    <property name="id" value="2"></property>
                    <property name="name" value="dianfei2"></property>
                    <property name="address" value="四川"></property>
                </bean>
            </set>
        </property>

        <!-- Map类型 -->
        <!-- 简单类型 -->
        <property name="mNames">
            <map>
                <entry key="s1" value="dianfei1"></entry>
                <entry key="s2" value="dianfei2"></entry>
            </map>
        </property>
        <!-- 对象类型 -->
        <property name="mStudent">
            <map>
                <!-- 对象定义在外面的s1,s2 -->
                <entry key="dianfei1" value-ref="s1"></entry>
                <entry key="dianfei1" value-ref="s2"></entry>
            </map>
        </property>

        <!-- Properties类型 -->
        <property name="properties">
            <props>
                <prop key="配置1">参数1</prop>
                <prop key="配置2">参数2</prop>
            </props>
        </property>
    </bean>
    <bean id="s1" class="pojo.Student">
        <property name="id" value="1"></property>
        <property name="name" value="dianfei1"></property>
        <property name="address" value="重庆"></property>
    </bean>
    <bean id="s2" class="pojo.Student">
        <property name="id" value="2"></property>
        <property name="name" value="dianfei2"></property>
        <property name="address" value="四川"></property>
    </bean>
</beans>
四、使用注解实现IOC
在使用注解时需要在xml中多添加约束
<beans xmlns="http://www.springframework.org/schema/beans"
       xmlns:context="http://www.springframework.org/schema/context"
       xmlns:xsi="http://www.w3.org/2001/XMLSchema-instance" xmlns:http="http://www.springframework.org/schema/c"
       xsi:schemaLocation="http://www.springframework.org/schema/beans
        http://www.springframework.org/schema/beans/spring-beans.xsd
        http://www.springframework.org/schema/context
        http://www.springframework.org/schema/context/spring-context.xsd">
1、创建对象
@Component
相当于bean标签,创建对象放在Spring容器中,相当于
**注:**需要先在配置文件中配置扫描的包,扫描到该注解才能生效。
<context:component-scan base-package="dao"></context:component-scan>
//如果没有写参数id就是类名首字母小写
@Component("studentDao")
public class StudentDaoImp implements StudentDao{
    @Override
    public Student findById(int id) {
        return new Student(1,"dianfei","重庆");
    }
}
@Repository、@Service、@Controller
这三个注解和@Component的作用一样,使用它们是为了区分该类属于什么层,其实他们底层也是使用了@Component
- @Repository用于Dao层
- @Service用于Service层
- @Controller用于控制层
- @Component一般用于不知道是那一层的,一般用于工具类等
@Scope
指定创建策略的,和在bean标签中的scope属性的一样
@Scope("singleton")//单例创建,对象创建时机是在对象第一次使用时创建
2、注入
@AutoWierd
从容器中查找符合属性类型的对象自动注入到属性中。用于代替bean中的依赖注入配置。
位置:属性上方、Setter方法上方、构造方法上方
注:
- 写在属性上方进行依赖注入时,可以省略setter方法。
@Autowired
private StudentDao studentDao;
- 容器中没有对应类型的对象会报错,(肯定不要先映射对应属性类型)。
- 容器中有多个对象匹配类型时,会找bean id等于属性名的对象。
@Qualifier
在按照类型注入对象的基础上,指定按照bean的id注入;因为它默认是会去找属性名相同的id,但是如果不想默认的就自定义去找那一个beanid;
位置:属性的上方
注:@Qualifier必须和@Autowired一起使用。
@Autowired
@Qualifier("studentDaoImp2")
private StudentDao studentDao;
@Value
注入String类型和基本数据类型的属性值。
位置:属性上方法
-
直接设置固定的属性值
@Value("1")
private int count;
@Value("dianfei")
private String str;
显然开发中肯定不会这样去设置值,设置了有什么意义呢,不如直接下面赋值啊,一般都是把数据放在配置文件中,从配置文件中读取数据。
-
获取配置文件中的属性值:
需要先在xml中配置context:property-placeholder标签
<context:property-placeholder location="db.properties"></context:property-placeholder>
@Value("${jdbc.username}")
private String username;
@Value("${jdbc.password}")
private String password;
3、实现全注解开发
在真实开发中,我们一般还是要保留xml配置文件,很多情况下使用配置文件更加方便。
注:获取容器时需要使用AnnotationConfigApplicationContext对象
ApplicationContext ac = new AnnotationConfigApplicationContext(SpringConfig.class);
@Configuration
纯注解实现IOC需要一个Java类代替xml文件,这个Java类上方需要添加@Configuration 表示该类是一个配置类,作用是代替配置文件
@Configuration
public class SpringConfig {

}
@ComponentScan
指定Spring在初始化容器时扫描的包。代替了context:component-scan标签
位置:类上方。
注:需要扫描多个包的时候使用{}添加多个参数
@Configuration
@ComponentScan(value = {"dao", "service"})
public class SpringConfig {

}
@PropertySource
代替了配置文件中的context:property-placeholder标签,扫描配置文件
@Configuration
@ComponentScan({"dao", "service"})
@PropertySource("classpath:db.properties")
public class SpringConfig {

}
@Bean
将方法的返回值对象放入Spring容器中。如果想将第三方类的对象放入容器,可以使用@Bean
位置:配置类的方法上方
属性:name,给bean对象设置id
注意:@Bean修饰的方法如果有参数,Spring会根据参数类型从容器中查找对象。
五、Spring整合Mybatis
1、搭建环境
我们都知道使用MyBatis时需要写大量创建SqlSessionFactoryBuilder、SqlSessionFactory、SqlSession等对象代码,而Spring的作用时帮助我们创建和管理对象,所以我们可以使用Spring整合Mybatis,简化MyBatis开发。
- 创建Maven项目,引入依赖
<dependencies>
        <!-- mybatis包 -->
        <dependency>
            <groupId>org.mybatis</groupId>
            <artifactId>mybatis</artifactId>
            <version>3.5.7</version>
        </dependency>

        <!-- mysql驱动包 -->
        <dependency>
            <groupId>mysql</groupId>
            <artifactId>mysql-connector-java</artifactId>
            <version>5.1.47</version>
        </dependency>

        <!-- 连接池包 -->
        <dependency>
            <groupId>com.alibaba</groupId>
            <artifactId>druid</artifactId>
            <version>1.2.8</version>
        </dependency>

        <!-- spring -->
        <dependency>
            <groupId>org.springframework</groupId>
            <artifactId>spring-context</artifactId>
            <version>5.3.13</version>
        </dependency>
        <dependency>
            <groupId>org.springframework</groupId>
            <artifactId>spring-tx</artifactId>
            <version>5.3.13</version>
        </dependency>
        <dependency>
            <groupId>org.springframework</groupId>
            <artifactId>spring-jdbc</artifactId>
            <version>5.3.13</version>
        </dependency>

        <!-- spring和mybatis整合包,该包可以让spring创建mybatis对象-->
        <dependency>
            <groupId>org.mybatis</groupId>
            <artifactId>mybatis-spring</artifactId>
            <version>2.0.6</version>
        </dependency>

    </dependencies>
2、配置文件编写
- 需要配置spring配置文件和mybatis配置文件,mybatis配置文件中只需要导入依赖就行
<?xml version="1.0" encoding="UTF-8" ?>
<beans xmlns="http://www.springframework.org/schema/beans"
       xmlns:context="http://www.springframework.org/schema/context"
       xmlns:xsi="http://www.w3.org/2001/XMLSchema-instance"
      xsi:schemaLocation="http://www.springframework.org/schema/beans
        http://www.springframework.org/schema/beans/spring-beans.xsd
        http://www.springfdramework.org/schema/context
        http://www.springframework.org/schema/context/spring-context.xsd">

    <!-- 包扫描 -->
    <context:component-scan base-package="dianfei"></context:component-scan>

    <!-- 读取配置文件 -->
    <context:property-placeholder location="db.properties"></context:property-placeholder>

    <!-- 创建连接池数据源对象 -->
    <bean id="dataSource" class="com.alibaba.druid.pool.DruidDataSource">
        <!-- 注入依赖 获取数据资源-->
        <property name="driverClassName" value="${jdbc.driver}"></property>
        <property name="url" value="${jdbc.url}"></property>
        <property name="username" value="${jdbc.username}"></property>
        <property name="password" value="${jdbc.password}"></property>
    </bean>

    <!-- 创建Spring封装过的SqlSessionFactory -->
    <bean id="sqlSessionFactory" class="org.mybatis.spring.SqlSessionFactoryBean">
        <property name="dataSource" ref="dataSource"></property>
        <!-- 引入MyBatis配置文件 -->
        <property name="configLocation" value="classpath:SqlMapConfig.xml"></property>
    </bean>

    <!-- 创建Spring封装过的SqlSession -->
    <bean id="sqlSession" class="org.mybatis.spring.SqlSessionTemplate">
        <!-- 通过构造方法创建的对象 -->
        <constructor-arg name="sqlSessionFactory" ref="sqlSessionFactory"></constructor-arg>
    </bean>
</beans>
3、整合测试
在每次单元测试时都需要手动创建Spring容器,所以整合测试让Spring自动创建容器
- 引入Junit和Spring整合Junit依赖
<!-- junit 如果Spring5整合junit,则junit版本至少在4.12以上-->
<dependency>
    <groupId>junit</groupId>
    <artifactId>junit</artifactId>
    <version>4.12</version>
    <scope>test</scope>
</dependency>

<!-- spring和test整合包-->
<dependency>
    <groupId>org.springframework</groupId>
    <artifactId>spring-test</artifactId>
    <version>5.3.13</version>
</dependency>
- 测试类编写
// Junit使用Spring的方式运行代码,及自动创建Spring容器
@RunWith(SpringJUnit4ClassRunner.class)

//Spring容器创建时读取的配置文件或配置类
// 配置类的写法:(classes = 配置类.class)
@ContextConfiguration(locations = "classpath:applicationContext.xml")

public class StudentServiceTest {
    @Autowired
    private StudentService studentService;

    @Test
    public void testFindAllStudent(){
        List<Student> allStudent = studentService.findAllStudent();
        allStudent.forEach(System.out::println);
    }
}
4、Spring自动创建代理对象
Spring提供了MapperScannerConfigurer对象,该对象可以自动扫描包创建代理对象,并将代理对象放入容器中,此时不需要使用SqlSession手动创建代理对象。
手动创建代理对象
在之前我们是在配置文件中使用Spring提供的SqlSessionTemplate对象来获取SqlSession,这种需要手动的获取代理对象,而且要在mybatis配置文件中,映射dao层对象。
<!-- 创建Spring封装过的SqlSession -->
<bean id="sqlSession" class="org.mybatis.spring.SqlSessionTemplate">
    <!-- 通过构造方法创建的对象 -->
    <constructor-arg name="sqlSessionFactory" ref="sqlSessionFactory"></constructor-arg>
</bean>
public class StudentService {

    @Autowired
    private SqlSessionTemplate  sqlSession;

    //使用SqlSession获取代理对象,操作数据库
    public List<Student> findAllStudent(){
        StudentDao studentDao = sqlSession.getMapper(StudentDao.class);
        return studentDao.findAll();
    }
}
自动创建代理对象
- 创建MapperScannerConfigurer对象了,就能在Service类直接使用代理对象了;不用向之前一样需要手动创建代理对象。
<!-- 创建Spring封装过的SqlSession -->
<bean id="mapperScanner" class="org.mybatis.spring.mapper.MapperScannerConfigurer">
    <!-- 配置扫描的接口包 -->
    <property name="basePackage" value="dianfei.dao"></property>
</bean>
- Service类直接使用代理对象
public class StudentService {
    @Autowired
    private StudentDao studentDao;

    public List<Student> findAllStudent(){
        return studentDao.findAll();
    }

    public int addStudent(Student student){
        return studentDao.add(student);
    }
}
5、总
整个mybait搭建
- 导入依赖
- mpybatis、mysql、spring(context,tx,jdbc)、spring和mybatis的整合包
- 引入mybatis的xml
- 引入spring的xml
- 配置扫描包
- 配置扫描资源目录(需要先添加properties文件,放了jdbc连接资源配置)
- 需要使用连接池创建数据库资源(这里使用了alibaba的durid,需要多导入一个durid依赖)
- 创建SqlSessionFactory对象(这里是创建spring的封装的)
- 创建SqlSession对象(也是创建的是Spring封装的)
- 创建SqlSessionTemplate需要手动创建代理对象
- 创建MapperScannerConfigurer可以自动创建代理对象(开发时期多用这个)
使用了个整合测试,目录就是为了Spring自动创建Spring容器,使用了@RunWith定义了
使用了Spring自动创建容器@ContextConfiguration指定创建容器加载的配置文件
六、AOP
AOP的全称是Aspect Oriented Programming,即面向切面编程。是实现功能统一维护的一种技术,它将业务逻辑的各个部分进行隔离,使开发人员在编写业务逻辑时可以专心于核心业务,从而提高开发效率。
- 作用:在不修改源码的基础上,对已有方法进行增强。
- 实现原理:动态代理技术
- 优势:减少重复代码、提高开发效率、维护方便
- 应用场景:事务处理、日志管理、权限控制、 异常处理等方面。
1、AOP相关术语
![[外链图片转存失败,源站可能有防盗链机制,建议将图片保存下来直接上传(img-GpePPfIL-1659441665368)(C:\Users\dianfei\AppData\Roaming\Typora\typora-user-images\image-20220730143148050.png)]](https://i-blog.csdnimg.cn/blog_migrate/389ab70ad6ccff025deaf25cef1df99d.png)
| 名称 | 说明 |
|---|---|
| Joinpoint(连接点) | 指能被拦截到的点,在Spring中只有方法能拦截 |
| Pointcut(切点) | 指要对那些连接进行拦截,即被增强的方法 |
| Advice(通知) | 指拦截后要做的事情,即切点被拦截后执行的方法 |
| Aspect(切面) | 切点+通知称为切面 |
| Target(目标) | 被代理的对象 |
| Proxy(代理) | 代理对象 |
| Weaving(织入) | 生成代理对象的过程 |
2、AOP入门实现练习
AspectJ是一个基于Java语言的AOP框架,在Spring框架中建议使用AspectJ实现AOP。
AOP入门案例:dao层的每个方法结束后都可以打印一条日志:
- 引入依赖
<dependencies>
    <!-- spring -->
    <dependency>
        <groupId>org.springframework</groupId>
        <artifactId>spring-context</artifactId>
        <version>5.3.13</version>
    </dependency>

    <!-- AspectJ -->
    <dependency>
        <groupId>org.aspectj</groupId>
        <artifactId>aspectjweaver</artifactId>
        <version>1.8.7</version>
    </dependency>

    <!-- Junit -->
    <dependency>
        <groupId>junit</groupId>
        <artifactId>junit</artifactId>
        <version>4.12</version>
        <scope>test</scope>
    </dependency>
</dependencies>
- 创建dao类
public class UserDao {
    //新增方法
    public void add(){
        System.out.println("添加用户...");
    }
    //查询方法
    public void findAll(){
        System.out.println("查询用户...");
    }
    //删除方法
    public void delete(){
        System.out.println("删除用户...");
    }
}
- 创建测试类,此时测试只能显示添加用户等信息
public class TestUserDao {
    @Test
    public void testAdd(){
        ApplicationContext ac = new ClassPathXmlApplicationContext("bean.xml");
        UserDao userDao = ac.getBean("userDao", UserDao.class);
        userDao.add();
    }

    @Test
    public void testFindAll(){
        ApplicationContext ac = new ClassPathXmlApplicationContext("bean.xml");
        UserDao userDao = ac.getBean("userDao", UserDao.class);
        userDao.findAll();
    }
    @Test
    public void testDelete(){
        ApplicationContext ac = new ClassPathXmlApplicationContext("bean.xml");
        UserDao userDao = ac.getBean("userDao", UserDao.class);
        userDao.delete();
    }
}
-
配置切面,此时测试就能显示日志信息了,没有修改源码进行了方法增强
-
配置切面前需要先编写切入后增强的方法
-
//通知类
public class MyAspectAdvice {
    //后置通知
    public  void myAfterReturning(){
        System.out.println("打印日志...");
    }
}
-
<?xml version="1.0" encoding="UTF-8"?>
<beans xmlns="http://www.springframework.org/schema/beans"
       xmlns:xsi="http://www.w3.org/2001/XMLSchema-instance"
       xmlns:context="http://www.springframework.org/schema/context"
       xmlns:aop="http://www.springframework.org/schema/aop"
       xsi:schemaLocation="http://www.springframework.org/schema/beans
        http://www.springframework.org/schema/beans/spring-beans.xsd
        http://www.springframework.org/schema/context
        http://www.springframework.org/schema/context/spring-context.xsd
        http://www.springframework.org/schema/aop
        http://www.springframework.org/schema/aop/spring-aop.xsd">


    <bean id="userDao" class="dianfei.dao.UserDao"></bean>

    <!-- 通知类对象 -->
    <bean id="myAspectAdvice" class="dianfei.advice.MyAspectAdvice"></bean>

    <!-- 配置AOP-->
    <aop:config>
        <!-- 配置切面 -->
        <aop:aspect ref="myAspectAdvice">
            <!-- 配置切点 -->
            <aop:pointcut id="myPointcut" expression="execution(* dianfei.dao.UserDao.*(..))"/>
            <!-- 配置通知 -->
            <aop:after-returning method="myAfterReturning" pointcut-ref="myPointcut"></aop:after-returning>
        </aop:aspect>
    </aop:config>

</beans>
3、注解配置AOP
Spring可以使用注解代替配置文件配置切面:
- 在xml中开启AOP注解支持
<!-- 开始AOP注解支持 -->
<aop:aspectj-autoproxy ></aop:aspectj-autoproxy>
- 在通知类上方加入注解@Aspect
- 在通知方法上方加入注解@Before、@AfterReturning、@AfterThrowing、@After、@Around
//通知类
@Aspect
@Component
public class MyAspectAdvice {
    @Pointcut("execution(* dianfei.dao.UserDao.*(..))")
    public void pointCut(){}
    //后置通知
    @AfterReturning("pointCut()")
    public  void myAfterReturning(JoinPoint joinPoint){
        System.out.println("切点方法名" + joinPoint.getSignature().getName());
        System.out.println("目标对象" + joinPoint.getTarget());
        System.out.println("打印日志" + joinPoint.getSignature().getName() +"方法被执行了");
    }

    //前置通知
    @Before("pointCut()")
    public void myBefore(){
        System.out.println("前置通知...");
    }

    //异常通知
    @AfterThrowing(value = "pointCut()",throwing = "ex")
    public void myAfterThrowing(Exception ex){
        System.out.println("异常通知...");
        System.err.println(ex.getMessage());
    }

    @After("pointCut()")
    //最终通知
    public void myEnd(){
        System.out.println("最终通知...");
    }

    //环绕通知 需要添加执行方法,才能知道那个前面添加,那个是后面添加
    @Around("pointCut()")
    public Object myAround(ProceedingJoinPoint proceedingJoinPoint) throws Throwable {
        System.out.println("环绕前");
        Object obj = proceedingJoinPoint.proceed();//执行方法
        System.out.println("环绕后");
        return obj;
    }
}
如何为一个类下的所有方法统一配置切点:
在通知类中添加方法配置切点
@Pointcut("execution(* dianfei.dao.UserDao.*(..))")
public void pointCut(){}
在通知方法上使用定义好的切点就行了
//前置通知
@Before("pointCut()")
public void myBefore(){
    System.out.println("前置通知...");
}
//没有建立统一的切点,就需要在每一个通知类上写切点
@Before(“execution(* dianfei.dao.UserDao.*(…))”)
public void myBefore(){
System.out.println(“前置通知…”);
}如何使用配置类代替xml文件进行AOP注解支持
```java
//配置类
@Configuration
//配置扫描包
@ComponentScan(“dianfei”)
//配置AOP注解支持
@EnableAspectJAutoProxy
public class SpringConfig {
}
4、原生Spring实现Spring
除了AspectJ,Spring支持原生方式实现AOP
Spring原生方式实现AOP时是使用接口实现,动态代理的方式,只支持四种通知类型:
2
| 通知类型 | 实现接口 |
|---|---|
| 前置通知 | MethodBeforeAdvice |
| 后置通知 | AfterReturningAdvice |
| 异常通知 | ThrowsAdvice |
| 环绕通知 | MethodInterceptor |
- 引入依赖
<dependencies>
    <!-- spring -->
    <dependency>
        <groupId>org.springframework</groupId>
        <artifactId>spring-context</artifactId>
        <version>5.3.13</version>
    </dependency>

    <!-- AspectJ -->
    <dependency>
        <groupId>org.aspectj</groupId>
        <artifactId>aspectjweaver</artifactId>
        <version>1.8.7</version>
    </dependency>

    <!-- Junit -->
    <dependency>
        <groupId>junit</groupId>
        <artifactId>junit</artifactId>
        <version>4.12</version>
        <scope>test</scope>
    </dependency>

    <!-- springAop -->
    <dependency>
        <groupId>org.springframework</groupId>
        <artifactId>spring-aop</artifactId>
        <version>5.3.13</version>
    </dependency>
</dependencies>
- 编写通知类
//通知类
public class SpringAop implements AfterReturningAdvice, MethodBeforeAdvice, MethodInterceptor, ThrowsAdvice {
    /**
     * 前置通知
     * @param method 目标方法
     * @param args 目标参数
     * @param target 目标对象
     * @throws Throwable
     */
    public void before(Method method, Object[] args, Object target) throws Throwable {
        System.out.println("前置通知");
    }

    /**
     * 后置通知
     * @param returnValue 目标方法返回值
     * @param method 目标方法
     * @param args 目标方法的参数列表
     * @param target 目标对象
     * @throws Throwable
     */
    public void afterReturning(Object returnValue, Method method, Object[] args, Object target) throws Throwable {
        System.out.println("后置通知");
    }

   //环绕通知
    public Object invoke(MethodInvocation invocation) throws Throwable {
        System.out.println("环绕前");
        Object proceed = invocation.proceed();
        System.out.println("环绕后");
        return proceed;
    }

    //异常通知
    public void afterThrowing(Exception ex){
        System.out.println("异常通知");
    }
- 配置动态代理
<!-- 配置扫描包 -->
<context:component-scan base-package="dianfei"></context:component-scan>

<!-- 通知对象 -->
<bean id="springAop" class="dianfei.advice.SpringAop"></bean>

<!-- 配置代理对象-->
<bean id="userDaoProxy" class="org.springframework.aop.framework.ProxyFactoryBean">
    <!-- 配置目标对象 -->
    <property name="target" ref="userDao"></property>

    <!-- 配置通知-->
    <property name="interceptorNames">
        <list>
            <value>springAop</value>
        </list>
    </property>

    <!-- 代理对象的生成方式 true:使用CGLib  false:使用原生JDK生成-->
    <property name="proxyTargetClass" value="true"></property>
</bean>
注:使用时是使用代理对象类userDaoProxy,不是使用userDao
5、SchemaBased实现AOP
SchemaBased(基础模式)配置方式是指使用Spring原生方式定义通知,而使用AspectJ框架配置切面。
<!-- 配置扫描包 -->
<context:component-scan base-package="dianfei"></context:component-scan>

<!-- 通知对象 这个通知类是使用原生方式实现接口-->
<bean id="springAop2" class="dianfei.advice.SpringAop2"></bean>

<!-- 配置切面 -->
<aop:config>
    <!-- 配置切点 -->
    <aop:pointcut id="myPointCut" expression="execution(* dianfei.dao.UserDao.*(..))"/>
    <!-- 配置通知 -->
    <aop:advisor advice-ref="springAop2" pointcut-ref="myPointCut"></aop:advisor>
</aop:config>
七、Spring事务
1、事务简历
事务:不可分割的原子操作。即一系列的操作要么同时成功,要么同时失败。
开发过程中,事务管理一般在service层,service层中可能会操作多次数据库,这些操作是不可分割的。否则当程序报错时,可能会造成数据异常。
如:张三给李四转账时,需要两次操作数据库:张三存款减少,李四存款增加。在这个张三存款减少后,李四存款增加前中间发生了程序异常,就会导致数据错误。
先通过没有事务来实现这个项目:
- 创建maven项目,导入依赖。
<dependencies>
    <!-- jdbc驱动 -->
    <dependency>
        <groupId>mysql</groupId>
        <artifactId>mysql-connector-java</artifactId>
        <version>5.1.47</version>
    </dependency>

    <!-- mybatis -->
    <dependency>
        <groupId>org.mybatis</groupId>
        <artifactId>mybatis</artifactId>
        <version>3.5.7</version>
    </dependency>

    <!-- druid连接池包 -->
    <dependency>
        <groupId>com.alibaba</groupId>
        <artifactId>druid</artifactId>
        <version>1.2.8</version>
    </dependency>

    <!-- spring核心包 -->
    <dependency>
        <groupId>org.springframework</groupId>
        <artifactId>spring-context</artifactId>
        <version>5.3.13</version>
    </dependency>
    <!-- spring事务包 -->
    <dependency>
        <groupId>org.springframework</groupId>
        <artifactId>spring-tx</artifactId>
        <version>5.3.13</version>
    </dependency>
    <!-- spring jdbc连接包-->
    <dependency>
        <groupId>org.springframework</groupId>
        <artifactId>spring-jdbc</artifactId>
        <version>5.3.13</version>
    </dependency>

    <!-- AspectJ -->
    <dependency>
        <groupId>org.aspectj</groupId>
        <artifactId>aspectjweaver</artifactId>
        <version>1.8.7</version>
    </dependency>

    <!--mybatis和spring整合包-->
    <dependency>
        <groupId>org.mybatis</groupId>
        <artifactId>mybatis-spring</artifactId>
        <version>2.0.6</version>
    </dependency>

    <!-- junit -->
    <dependency>
        <groupId>junit</groupId>
        <artifactId>junit</artifactId>
        <version>4.12</version>
        <scope>test</scope>
    </dependency>

    <!-- 整合测试包 -->
    <dependency>
        <groupId>org.springframework</groupId>
        <artifactId>spring-test</artifactId>
        <version>5.3.13</version>
    </dependency>
</dependencies>
-
编写java代码
- dao层,有通过id查询和修改余额
@Repository public interface AccountDao { //通过id查询 @Select("select id,username,balance from account where id = #{id}") Account findById(int id); //修改余额 @Update("update account set balance = #{balance} where id = #{id}") int updateBalance(Account account); }- sevice层,里面有一个转账的方法
@Service public class AccountService { @Autowired private AccountDao accountDao; /** * 转账 * @param idIn 转出id * @param idOut 转入id * @param price 转入金额 */ public void transfer(int idOut,int idIn,double price){ //转出减少余额 Account accountOut = accountDao.findById(idOut); accountOut.setBalance(accountOut.getBalance()-price); accountDao.updateBalance(accountOut); int i = 1/0;//程序异常 //转入增加余额 Account accountIn = accountDao.findById(idIn); accountIn.setBalance(accountIn.getBalance()+price); accountDao.updateBalance(accountIn); } }- 省略pojo实体类
- 测试
@RunWith(SpringJUnit4ClassRunner.class) @ContextConfiguration(locations = "classpath:applicationContext.xml") public class AccountServiceTest { @Autowired private AccountService accountService; @Test public void transferTest(){ accountService.transfer(1,2,500); } } -
配置spring配置参数
<?xml version="1.0" encoding="UTF-8"?>
<beans xmlns="http://www.springframework.org/schema/beans"
       xmlns:xsi="http://www.w3.org/2001/XMLSchema-instance"
       xmlns:context="http://www.springframework.org/schema/context"
       xsi:schemaLocation="http://www.springframework.org/schema/beans
        http://www.springframework.org/schema/beans/spring-beans.xsd
        http://www.springframework.org/schema/context
        http://www.springframework.org/schema/context/spring-context.xsd">

    <!-- 配置包扫描 -->
    <context:component-scan base-package="dianfei"></context:component-scan>

    <!-- 创建数据库资源 -->
    <bean id="dataSource" class="com.alibaba.druid.pool.DruidDataSource">
        <property name="driverClassName" value="com.mysql.jdbc.Driver"></property>
        <property name="url" value="jdbc:mysql://localhost:3306/spring?characterEncoding=UTF-8"></property>
        <property name="username" value="root"></property>
        <property name="password" value="123456"></property>
    </bean>

    <!-- 创建sqlSessionFactory -->
    <bean id="sqlSessionFactory" class="org.mybatis.spring.SqlSessionFactoryBean">
        <property name="dataSource" ref="dataSource"></property>
    </bean>

    <!-- 创建mapper -->
    <bean id="mapperScanner" class="org.mybatis.spring.mapper.MapperScannerConfigurer">
        <property name="basePackage" value="dianfei.dao"></property>
    </bean>

</beans>
2、事务管理方案
因为没有事务会出现异常情况,在service层手动添加事务可以解决问题:
使用SqlSessionTemlate对象在存储修改前进行事务开启,在全部修改完毕后进行事务提交,如果出现异常就事务回滚。
- 第一个问题:这种方法重复代码太多了,我们需要在每个service的方法中都需要写,事务开启、提前、回滚。(所以我们可以想到AOP他是对一个功能进行统一的维护和管理,使用他进行事务管理)
- 第二个问题(重):在Spring管理下不运行手动提交事务和回滚事务。此时我们需要使用Spring的事务管理方案。
Spring提供了两种事务管理方案:
- 编程式事务:通过编程代码实现事务管理(这种使用已经很少了)。
- 声明式事务:基于AOP技术实现事务管理(现在使用这个居多)。
Spring的声明式事务管理在底层采用了AOP技术,其最大的优点在于无须通过编程的方式管理事务,只需要在配置文件中进行相关的规则声明,就可以将事务规则应用到业务逻辑中。
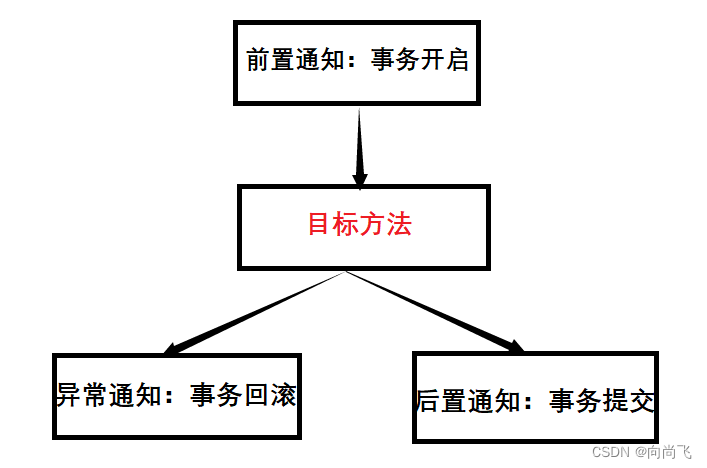
使用AOP技术为service方法添加如下通知:
3、事务管理器
Spring依赖事务管理器进行事务管理,事务管理即一个通知类,我们为该通知类设置切点为service层方法即可完成事务自动管理。由于不同技术操作数据库,进行事务操作的方法不同。如:JDBC提交事务是connection.commit(),MyBatis提交事务是sqlSession.commit(),所以Spring提供了多个事务管理器。
| 事务管理器名称 | 作用 |
|---|---|
| org.springframework.jdbc.datasource.DataSourceTransactionManager | 针对JDBC技术提供的事务管理器。适用于JDBC和MyBatis。 |
| org.springframework.orm.hibernate3.HibernateTransactionManager | 针对于Hibernate框架提供的事务管理器。适用于Hibernate框架。 |
| org.springframework.orm.jpa.JpaTransactionManager | 针对于JPA技术提供的事务管理器。适用于JPA技术。 |
| org.springframework.transaction.jta.JtaTransactionManager | 跨越了多个事务管理源。适用在多个不同的数据源中实现事务控制。 |
- 引入依赖,需要引入spring的事务管理依赖是肯定的,因为spring事务管理底层是AOP所以还需要引入AOP的(这里是使用了AOP的整合包AspectJ)
<!-- spring事务管理 -->
<dependency>
    <groupId>org.springframework</groupId>
    <artifactId>spring-tx</artifactId>
    <version>5.3.13</version>
</dependency>

<!-- AspectJ -->
<dependency>
    <groupId>org.aspectj</groupId>
    <artifactId>aspectjweaver</artifactId>
    <version>1.8.7</version>
</dependency>
- 配置事务,需要多引入tx约束和aop约束
 xmlns:aop="http://www.springframework.org/schema/aop"
	http://www.springframework.org/schema/tx
    http://www.springframework.org/schema/tx/spring-tx.xsd

xmlns:tx="http://www.springframework.org/schema/tx"
    http://www.springframework.org/schema/aop
    http://www.springframework.org/schema/aop/spring-aop.xsd


<!-- 事务管理器对象 -->
<bean id="transactionManager" class="org.springframework.jdbc.datasource.DataSourceTransactionManager">
    <property name="dataSource" ref="dataSource"></property>
</bean>

<!-- 进行事务相关配置 -->
<tx:advice id="txAdvice">
    <tx:attributes>
        <!-- 所有方法都使用默认配置 -->
        <tx:method name="*"/>
    </tx:attributes>
</tx:advice>

<!-- 配置AOP -->
<aop:config>
    <!-- 配置切点 -->
    <aop:pointcut id="servicePointcut" expression="execution(* dianfei.service.*.*(..))"/>
    <!-- 配置通知 -->
    <aop:advisor advice-ref="txAdvice" pointcut-ref="servicePointcut"></aop:advisor>
</aop:config>
4、事物控制的API
Spring进行事务控制的功能是由三个接口提供的,这个三个接口是Spring实现的,在开发中我们很少使用到,因为我们直接使用它封装好的就行了,我们需要了解即可。
PlatFormTransactionManager接口
是Spring提供的事务管理器接口,所有事务管理都实现了该接口。该接口提供了桑事务操作方法:
- TTransactionStatus getTransaction(TransactionDefinition definition):获取事务状态信息。
- void commit(TransactionStatus status):事务提交
- void rollback(TransactionStatus status):事务回滚
TransactionDefinition接口
是事务的定义信息对象,它有如下方法:
- String getName():获取事务对象名称。
- int getsolationLevel():获取事务的隔离级别
- int getPropagationBehavior():获取事务的传播行为。
- int getTimeout():获取事务的超时时间。
- boolean isReadOnly():获取事务是否只读。
TransactionStatus接口
是事务的状态接口,它描述了某一时间点上事务的状态信息。它有如下方法:
- void flush():刷新事务
- boolean hasSavepoint():获取是否存在保存点
- boolean isCompleted():获取事务是否完成
- boolean isNewTransaction():获取是否是新事务
- boolean isRollbackOnly():获取是否回滚
- viod setRollbackOnly():设置事务回滚
5、事务的相关配置
在 tx:advice 中可以进行事务的相关配置:
<tx:advice id="txAdvice">
    <tx:attributes>
        <tx:method name="*"/>
        <tx:method name="find*" read-only="true"></tx:method>
    </tx:attributes>
</tx:advice>
最后事务使用顺序是按照谁更精准使用谁
tx:method 中的属性:
- name:指定配置的方法。* 表示所有方法,find*表示所有以find开头的方法
- read-ontly:是否是只读事务,只读事务不存在数据的修改,数据库将会为只读事务提供一些优化手段,会对性能有一定提升,建议在查询中开启只读事务。
- timeout:指定超时时间,在限定的时间内不能完成所有操作就会抛弃异常。默认永不超时。
- rollback-for:指定某个异常事务回滚,其他事务异常不回滚。默认所有事务异常回滚。
- no-rollback-for:指定某个异常不回滚,其他异常回滚。默认所有异常回滚。
- porpagation:事务的传播行为
- isolation:事务的隔离级别
事务的传播行为
事务传播行为是指多个含有事务的方法相互调用时,事务如何在这些方法中传播。
如果在service层的方法中调用了其他的service方法,假设每次执行service方法都要开启事务,此时就无法保证外层方法和内层方法处于同一个事务当中。
//method1的所有方法在同一个事务中,这是Spring的默认事务传播行为
public void method1(){
    //如果没有Spring的事务传播特性,此时会开启一个新事务,这就无法保证mehtod1()中所有的代码是在同一个事务中
    method2();
    System.out.pringln("method1");
}

public void method2(){
    System.out.pringln("method2");
}
事务的传播特性就是解决这个问题的,Spring帮助我们将外层方法和内层方法放入同一事务中。
| 传播行为 | 介绍 |
|---|---|
| REQUIRED | 默认。支持当前事务,如果当前没有事务,就新建一个事务。这是最常见的选择。(例如method1没有事务,method2有事务就会给method1创建一个事务,如果两个都有事务就会把他们放在同一个事务中) |
| SUPPORTS | 支持当前事务,如果当前没有事务,就以非事务方式执行。(例如method1没有事务,method2有事务,就都不开启事务了) |
| MANDATORY | 支持当前事务,如果当前没有事务,就抛出异常。(例如method1没有事务,method2有事务,抛出异常) |
| REQUIRES_NEW | 新建事务,如果当前存在事务,把当前事务挂起。(例如method1、method2都有事务,就管method2的事务,就不处于同一个事务中) |
| NOT_SUPPORTED | 以非事务方式执行,如果当前存在事务,就把当前事务挂起。(如果method1中有事务就所有事务都不开启了) |
| NEVER | 以非事务方式执行,如果当前存在事务,就抛出异常。(如果method1中有事务就抛出异常) |
| NESTED | 必须在事务状态下执行,如果没有事务则新建事务,如果当前有事务则创建一个嵌套事务。(把method1和method2事务进行分开,在method1事务中嵌套一个method2事务) |
在Spring配置文件中设置事务传播行为
<tx:advice id="txAdvice">
    <tx:attributes>
        <tx:method name="*" propagation="REQUIRED"/>
    </tx:attributes>
</tx:advice>
事务的隔离级别
事务隔离级别反映事务提交并发访问时的处理态度,隔离级别越高,数据出问题的可能性越低,但效率也会越低。
| 隔离级别 | 脏读 | 不可重复读 | 幻读 |
|---|---|---|---|
| READ_UNCOMMITED(读取未提交内容) | Yes | Yes | Yes |
| READ_COMMITED(读取提交内容) | No | Yes | Yes |
| REPEATABLE_READ(重复读) | No | No | Yes |
| SERIALIZABLE(可串行化) | No | No | No |
如果设置为DEFAULT会使用数据库的隔离级别
- SqlServer,Oracle默认的事务隔离级别是READ_COMMITED
- Mysql的默认隔离级别是REPEATABLE_READ
在Spring配置文件中设置隔离级别
<tx:advice id="txAdvice">
    <tx:attributes>
        <tx:method name="*" propagation="REQUIRED" isolation="DEFAULT"/>
        <tx:method name="find*" read-only="true" isolation="READ_UNCOMMITTED"></tx:method>
    </tx:attributes>
</tx:advice>
6、注解配置声明式事务
- 需要使用注解声明事务,首先需要注册事务注解驱动:
<!-- 事务管理器 -->
<bean id="transactionManager" class="org.springframework.jdbc.datasource.DataSourceTransactionManager">
    <property name="dataSource" ref="dataSource"></property>
</bean>

<!-- 注册事务注解驱动 -->
<tx:annotation-driven transaction-manager="transactionManager"></tx:annotation-driven>
- 在需要使用事务支持的方法或类上加@Transaction
- 在类上,是作用于整个类的所有方法。
- 在方法上,作用于这个方法。会优先使用方法自定义的属性,在使用类的。
@Service
//在类上是作用于整个类的所有方法。
@Transactional(propagation = Propagation.REQUIRED,isolation = Isolation.DEFAULT)
public class AccountService {
    @Autowired
    private AccountDao accountDao;

    /**
     * 转账
     * @param idIn 转出id
     * @param idOut 转入id
     * @param price 转入金额
     */
    public void transfer(int idOut,int idIn,double price){
        //转出减少余额
        Account accountOut = accountDao.findById(idOut);
        accountOut.setBalance(accountOut.getBalance()-price);
        accountDao.updateBalance(accountOut);

        int i = 1/0;//程序异常

        //转入增加余额
        Account accountIn = accountDao.findById(idIn);
        accountIn.setBalance(accountIn.getBalance()+price);
        accountDao.updateBalance(accountIn);
    }
    //作用于这个方法,会优先使用方法自定义的属性,在使用类的
    @Transactional(isolation = Isolation.READ_UNCOMMITTED,readOnly = true)
    public Account findById(int id){
        return accountDao.findById(id);
    }
}
使用配置类配置
@Configuration //配置类
@ComponentScan("dianfei") //配置扫描包
@EnableTransactionManagement //注册事务注解驱动
public class SpringConfig {
    //获取数据库资源
    @Bean
    public DruidDataSource getDataSource(){
        DruidDataSource druidDataSource = new DruidDataSource();
        druidDataSource.setDriverClassName("com.mysql.jdbc.Driver");
        druidDataSource.setUrl("jdbc:mysql://localhost:3306/spring?characterEncoding=UTF-8");
        druidDataSource.setUsername("root");
        druidDataSource.setPassword("123456");
        return druidDataSource;
    }

    //创建SqlSessionFactory对象
    @Bean
    public SqlSessionFactoryBean getSqlSessionFactory(DruidDataSource dataSource){
        SqlSessionFactoryBean sqlSessionFactoryBean = new SqlSessionFactoryBean();
        sqlSessionFactoryBean.setDataSource(dataSource);
        return sqlSessionFactoryBean;
    }

    //创建mapper对象
    @Bean
    public MapperScannerConfigurer getMapperScanner(SqlSessionFactoryBean sqlSessionFactory){
        MapperScannerConfigurer mapperScannerConfigurer = new MapperScannerConfigurer();
        mapperScannerConfigurer.setBasePackage("dianfei.dao");
        return mapperScannerConfigurer;
    }

    //创建事务管理器
    @Bean
    public DataSourceTransactionManager getTransactionManager(DataSource dataSource){
        DataSourceTransactionManager dataSourceTransactionManager = new DataSourceTransactionManager();
        dataSourceTransactionManager.setDataSource(dataSource);
        return dataSourceTransactionManager;
    }
}


 42万+
42万+

 被折叠的 条评论
为什么被折叠?
被折叠的 条评论
为什么被折叠?
 到【灌水乐园】发言


